Herunterladen Inhalt Inhalt Diese Seite drucken

Werbung

Verfügbare Sprachen

Verfügbare Sprachen

S O L D E R F E E D S TAT I O N
AL 2500
Instructions manual
Index
English
Español
Deutsch
Page
1
15
29

Werbung

Inhaltsverzeichnis
loading

Inhaltszusammenfassung für jbc Advanced AL 2500

  • Seite 1 Instructions manual Index Page English Español Deutsch S O L D E R F E E D S TAT I O N AL 2500...
  • Seite 3 ENGLISH We appreciate the trust you have placed in JBC in purchasing this station. It is manufactured to the most strictest quality standards in order to give you the best possible service. Before turning on your station, we recommend you read these instructions carefully.
  • Seite 4: Recommendations For Use

    ENGLISH AL 2500 Solder feed station Accessories There are other 3 guide sets, apart from the one - AL 2500 230V Ref. 2500200 supplied with the equipment, for the following solder - AL 2500 120V Ref. 2500100 thread diameters: - AL 2500 100V Ref.
  • Seite 5 ENGLISH AL 2500 SOLDER FEED STATION ACCESSORIES * * * * * Air blower AB 2550 230V Ref. 2550200 AB 2550 120V Ref. 2550100 * * * * * Pedal Ref. 0964551 Solder feed station AL 2500 230V Ref. 2500200 AL 2500 120V Ref.
  • Seite 6 ENGLISH Dragging to adjust the solder thread strength Command to release the pressure of the wheels of the solder dragging mechanism Equipotential connector Solder thread guide tube Pedal connector or external command Stand connector Pressure regulation of the spring tightening control...
  • Seite 7: Operation

    ENGLISH OPERATION For a proper installation, please proceed as follow: Place the solder reel in the stand and set the 2 . Place the control in the position showed in the screws. graphic in order to open the dragging mechanism. .
  • Seite 8 ENGLISH . Place the solder feed handpiece. . Take the solder thread from the solder reel until the guide tube start. ¡Warning! As a safety measure and in order to avoid burns, Place the control in the indicated position in order when the cartridge is manipulated you must switch to close the dragging mechanism.
  • Seite 9 ENGLISH The station is ready to work. PROGRAMMING In order to make a solder joint you only need to The system allow us to modify and adjust the press over the thread dragging button in the following working parameters directly: handle.
  • Seite 10 ENGLISH ERROR MESSAGES SLEEP FUNCTION No cartridge/tool Tool in sleep mode Either no tool is connected with the correct One of the Series Advanced features is that when cartridge or the heating element of the cartridge the tool is placed in the holder, the temperature at is open.
  • Seite 11 ENGLISH...
  • Seite 12 ENGLISH...
  • Seite 13 ENGLISH...
  • Seite 14 ENGLISH SOLDER FEED HANDPIECE Cartridge Thread dragging button Cartridge screw Solder thread guide tube Solder guide tube fixed screw Solder feed handpiece, with a power of 50W, The 2500 handpieces and cartridges comply with has the Advanced range features with a quick the MIL-SPEC-2000 referring to the potential temperature recovery.
  • Seite 15 You must leave a distance between 8-10mm from the tip of the cartridge and the end of the guide JBC reserves the right to make technical changes without prior tube end. Tighten the screw of the guide tube. notification.
  • Seite 17 ESPAÑOL Agradecemos la confianza depositada en JBC al adquirir esta estación. Ha sido fabricada con las más estrictas normas de calidad para prestarle el mejor servicio. Antes de poner en marcha el aparato, recomendamos leer con atención las instrucciones que a continuación se detallan.
  • Seite 18: Recomendaciones De Uso

    ESPAÑOL Alimentador de estaño AL 2500 Accesorios Existen 3 conjuntos guía + tubo, además del que - AL 2500 230V Ref. 2500200 se suministra con el equipo, para los siguientes - AL 2500 120V Ref. 2500100 diámetros de hilo de soldadura: - AL 2500 100V Ref.
  • Seite 19 ESPAÑOL ACCESORIOS DEL ALIMENTADOR DE ESTAÑO AL 2500 * * * * * Air blower AB 2550 230V Ref. 2550200 AB 2550 120V Ref. 2550100 * * * * * Pedal Ref. 0964551 Alimentador de estaño AL 2500 230V Ref. 2500200 AL 2500 120V Ref.
  • Seite 20 ESPAÑOL Embrague para el ajuste de la fuerza de arrastre del hilo Mando para liberar la presión de las ruedas de arrastre sobre el hilo Guías del hilo Conector equipotencial Regulación presión del muelle tensor Conector pedal o comando externo Conector soporte...
  • Seite 21 ESPAÑOL FUNCIONAMIENTO Para su instalación siga los pasos que se indican a continuación: Ponga el soporte para la bobina y apriete las 2 tuercas. . Ponga el mando en la posición señalada en el gráfico para que se abra el mecanismo de arrastre.
  • Seite 22 ESPAÑOL . Coloque el cartucho en el lápiz alimentador. . Pase el hilo de estaño desde la bobina hasta el inicio de los tubos de guía. ¡Atención! Como medida de seguridad y para evitar Ponga el mando en la posición indicada para quemaduras, cuando manipule el cartucho debe que se cierre el mecanismo de arrastre.
  • Seite 23: Regulación Del Embrague

    ESPAÑOL La estación ya está lista para trabajar. PROGRAMACIÓN Para realizar una soldadura sólo debe pulsar El sistema permite modificar y ajustar sobre el botón de aportación de estaño del directamente los siguientes parámetros de mango. trabajo: El programa de la estación le permitirá modificar - La temperatura entre 90 y 400ºC (hasta 450ºC todos los parámetros de trabajo.
  • Seite 24 ESPAÑOL MENSAJES DE ERROR SISTEMA SLEEP No hay cartucho o herramienta (No cartridge/ Herramienta en reposo tool) Una de las cualidades de la serie Advanced, No hay herramienta conectada con cartucho es que cuando una herramienta se coloca en el correcto, o el cartucho está...
  • Seite 25 ESPAÑOL...
  • Seite 26 ESPAÑOL...
  • Seite 27 ESPAÑOL...
  • Seite 28 ESPAÑOL LAPIZ ALIMENTADOR DE ESTAÑO Cartucho Pulsador avance hilo de estaño Tornillo fijación cartucho Tubo guía del hilo de estaño Tornillo fijación del tubo guía estaño El lápiz alimentador, con una potencia de 50W, El lápiz y los cartuchos 2500 cumplen las tiene las prestaciones en cuanto soldadura de especificaciones MIL-SPEC-2000 en cuanto a la gama Advanced, destacando su rápida...
  • Seite 29 Deje una separación de unos 8 a 10mm entre el extremo de la punta del cartucho y el final del tubo guía. Apriete el tornillo de sujección del JBC se reserva el derecho de introducir modificaciones sin tubo guía. previo aviso...
  • Seite 31 DEUTSCH Wir danken Ihnen für das JBC mit dem Kauf dieser Station erwiesene Vertrauen. Bei ihrer Fertigung wurden die strengsten Qualitätsmaßstäbe zugrunde gelegt, so dass Sie optimale Lötergebnisse erwarten dürfen. Vor Inbetriebnahme des Geräts lesen Sie bitte die vorliegende Betriebsanleitung aufmerksam durch.
  • Seite 32: Empfehlungen Für Den Gebrauch

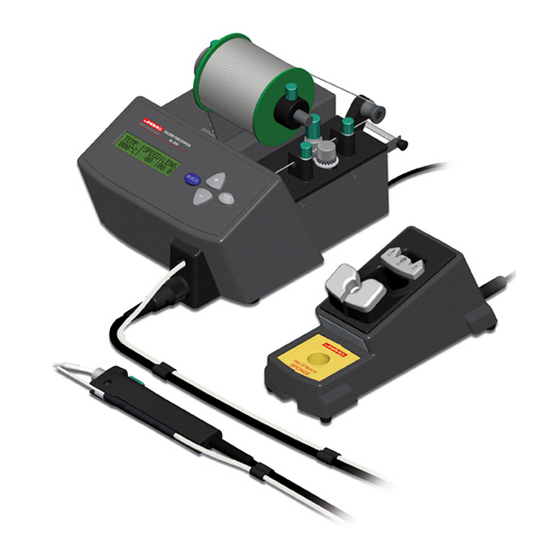
    DEUTSCH Lötstation mit Zinnzuführung AL 2500 Zubehör Neben der zum Lieferumfang des Geräts - AL 2500 230 V Ref. 2500200 gehörenden Zuleitungsgarnitur gibt es 3 - AL 2500 120 V Ref. 2500100 Zuleitungsgarnituren + Schlauch für Lötdraht mit Diese Station ermöglicht es, über die andere Hand den folgenden Durchmessern: zu verfügen, die eigentlich den Löhtdraht hält.
  • Seite 33 DEUTSCH ZUBEHÖR FÜR DIE ZINNZUFÜHRUNG AL 2500 * * * * * Gebläse AB 2550 230 V Ref. 2550200 AB 2550 120 V Ref. 2550100 * * * * * Pedal Ref. 0964551 Lötstation mit Lötdrahtzuführung AL 2500 230 V Ref. 2500200 AL 2500 120 V Ref.
  • Seite 34 DEUTSCH Kupplung für die Einstellung der Vorschubkraft des Drahts Regler zur Entriegelung der Drahtvorschubkraft Führungsschläuche des Equipotentialausgleichsbuchse Zinndrahts Regulierung des Drucks der Spannfeder Anschluss für Pedal oder externe Steuerung Ständeranschluss...
  • Seite 35: Funktionsweise

    DEUTSCH FUNKTIONSWEISE Befolgen Sie bei ihrem Einbau die anschließend genannten Arbeitsschritte: Setzen Sie den Spulenhalter ein und ziehen Sie die 2 Muttern fest. . Bringen Sie den Regler in die auf der Abbildung gezeigte Stellung, damit sich Vorschubmechanismus öffnet. . Lockern Sie die Befestigungsschrauben der Zinndrahtführungen an der Steuereinheit.
  • Seite 36 DEUTSCH . Führen Sie den Zinndraht von der Spule bis . Bauen Sie die Kartusche in das Zuführungs- zum Beginn der Führungsschläuche. Handstück ein. Bringen Sie den Regler in die angegebene Vorsicht! Stellung, damit sich der Vorschubmechanismus Als Vorsichtsmaßnahme und um Verbrennungen zu verriegelt.
  • Seite 37: Abstimmung Der Kupplung

    DEUTSCH Jetzt ist die Station schon einsatzbereit. PROGRAMMIERUNG Um eine Lötung vorzunehmen, müssen Sie nur die Das System erlaubt, direkt die folgenden Taste Zinnzufuhr am Griff betätigen. Arbeitsparameter zu ändern und einzustellen: Das Programm der Station erlaubt Ihnen, alle - die Temperatur zwischen 90 und 400ºC (bis Arbeitsparameter zu ändern.
  • Seite 38 DEUTSCH SLEEP-SYSTEM FEHLERMELDUNGEN Werkzeuge in Standby-Funktion Kein Werkzeug vorhanden oder Werkzeug Eine der Stärken der Advanced-Serie liegt darin, geöffnet (No cartridge/tool) dass die Temperatur automatisch auf die gibt kein korrekter Kartusche Standby-Temperatur abgesenkt wird, wenn ein angeschlossenes Werkzeug oder die Kartusche Werkzeug im Ständer abgestellt wird.
  • Seite 39 DEUTSCH...
  • Seite 40 DEUTSCH...
  • Seite 41 DEUTSCH...
  • Seite 42 DEUTSCH ZINNZUFÜHRUNGS-HANDSTÜCK Kartusche Taste Zinndrahtvorschub Befestigungsschraube Kartusche Befestigungsschraube des Führungsschlauch des Zinndrahts Zinnführungsschlauchs Das Zuführungs-Handstück mit einer Leistung Das Handstück und die Kartuschen 2500 erfüllen von 50 W kann hinsichtlich des Lötens mit den Spezifikationen MIL-SPEC-2000 Leistungen der Advanced-Serie aufwarten, die bezüglich des Spannungsunterschieds zwischen sich durch die schnelle Temperaturerreichung Lötspitze und Erdung, der geringer als 2mV sein...
  • Seite 43 Lassen Sie dabei einen Abstand von etwa 8 bis 10 mm zwischen dem Ende der Kartuschenspitze und dem Ende des Führungsschlauch. Ziehen Sie die JBC behält sich das Recht vor, technische oder konstruktive Befestigungsschraube des Führungsschlauch fest. Änderungen ohne vorherige Ankündigung vorzunehmen...
  • Seite 45 AD 2700 JT 7700 Soldering stations for specialized use with SMD Hot-air flow repair station for desoldering all types components assemblies. of SMD’s particulary QFPs and PLCCs of any size. AM 6800 DD 5700 kit Station for rework and repair of through-hole and Soldering &...
  • Seite 46 ELECTRIC WIRING DIAGRAM...
  • Seite 47 AL 2500 230V 50Hz...
  • Seite 48 AL 2500 120V 60Hz...
  • Seite 49 AL 2500 100V 60Hz...
  • Seite 51: Warranty

    GARANTIE FRANÇAIS JBC garantit cet appareil 2 ans contre tout défaut de fabrication. Cela comprend la réparation, le remplacement des pièces défectueuses et la main d'oeuvre nécessaire. La garantie ne couvre pas l’usure liée à...
  • Seite 52: Garanzia

    GARANTIE DEUTSCH Für das vorliegende Gerät übernimmt JBC eine Garantie von 2 Jahren, für alle Fabrikationsfehler. Diese Garantie schliesst die Reparatur bzw. den Ersatz der defekten Teile sowie die entsprechenden Arbeitskosten ein. Ausgeschlossen dieser Garantieleistung sind durch unsachgemässen Gebrauch hervorgerufene Betriebsstörungen und normale Gebrauchsabnützungen.

Inhaltsverzeichnis