Rollei 5S Anleitung
Inhaltsverzeichnis
Verfügbare Sprachen
Verfügbare Sprachen
Kapitel
Inhaltsverzeichnis

Verwandte Anleitungen für Rollei 5S


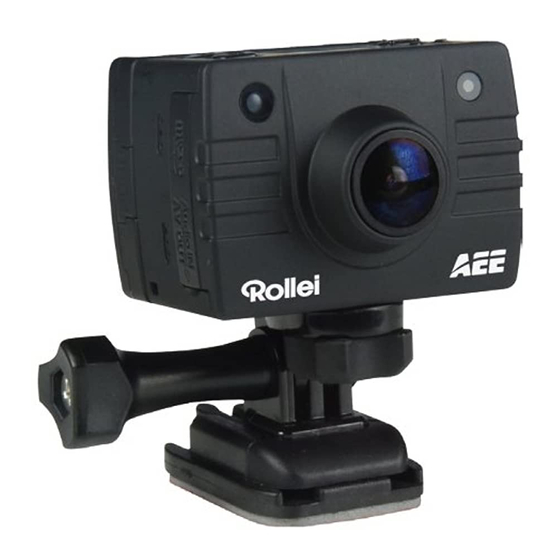
Inhaltszusammenfassung für Rollei 5S
- Seite 23 175° 14-Megapixel 1080i/60 fps F2.8 Dynamische Weitwinkel Glasobjektiv Aufnahmen HD-Aufnahme Zyklische Wasserdichtes Gehäuse und Aufnahme Stativanschluss Digital-Zoom objektivgeschütztes (optional) Design Unabhängige Fernbedienung Synchro Laseranzeige Stopptaste bei mit Clips und Shot Funktion Blendung Laschen Automatische 2 integrierte Mikrofone Aufnahmen in HDMI-Ausgang und externer Daueraufnahme Dunkelheit...
- Seite 24 Inhalt Sicherheitshinweise ......................3 Einleitung ..........................3 Garantie ..........................3 Überblick ..........................3 Schlüsselmerkmale ......................4 Überblick ..........................5 Bedienung und Installation ....................5 Vorbereitung ........................6 Parameter einstellen ......................7 Bedienungshinweise ......................10 Datei speichern und wiedergeben ..................16 Backup-Akku (D23) ......................
-
Seite 25: Sicherheitshinweise
Tondaten / Bildanzeige in Echtzeit / Videoaufnahmen / Bildaufnahmen / Uhrzeitanzeige / Laseranzeige / Funk-Fernbedienung / 10X Digital-Zoom / Externer Mikrofonanschluss / USB 2.0 Datenübertragung / Akku laden im USB-Modus / Zubehör lieferbar. Mehrere Patente zu Technologien sind in der Rollei 5S Videokamera integriert. - Seite 26 • Aufzeichnung von Videoprogrammen in MOV-Format zur Wiedergabe auf PC und Upload zu Video- Websites. • Hohe Farbtreue für klare und natürliche Videobilder. • Funk-Fernbedienung der Rollei 5S Videokamera für Aufnahme, Stopp und Einzelbild. Pairing zur Vermeidung von Störungen der Fernbedienung. • Unterstützt Wiedergabe und Löschen von Dateien auf der Videokamera.
-
Seite 27: Bedienung Und Installation
27. Stativaufnahme Bedienung und Installation 1. Rollei 5S Videokamera installieren Die Rollei 5S Videokamera kann in der Hand gehalten oder auf ein Stativ geschraubt werden. Der Einsatz kann überall erfolgen, auch unter Wasser. Rollei 5S Videokamera installieren (1). Setzen Sie den TFT-Bildschirm auf die Videokamera. -
Seite 28: Vorbereitung
C Betriebssymbol: wird oben rechts angezeigt. Während des Betriebs leuchtet das Symbol ständig. Wird das Symbol ausgeblendet, so ist die Rollei 5S Videokamera ausgeschaltet oder im Stand-by- Modus. D Videoaufnahmedauer: Auf der mittleren Zeile des LCD-Displays wird die Dauer der aktuellen Videoaufnahme angezeigt, beispielsweise 005:20. -
Seite 29: Parameter Einstellen
Wir empfehlen eine micro-SD Karte der Klasse 6 zu nutzen. Vor der Video/Audioaufnahme und Aufnahme von Fotos formatieren Sie die microSD-Karte auf der Rollei 5S Videokamera. Wurde die microSD-Karte in anderen Geräten benutzt, so muss sie auf der Rollei 5S Videokamera neu formatiert werden. - Seite 30 Parameter Videokamera einstellen a. Modus: Wählen Sie (Standardmodus) für Videoaufnahme und für nur Audioaufnahme. b. Auflösung Videoaufnahme: Wählen Sie die gewünschte Auflösung der Videoaufnahme. Einstellung als 1080P, 1080i, 960P, 720P oder 480P-Auflösung ist möglich. Für 1920x1080P 25f 1920x1080I 50f 1280x960P 25f 1280x960P 50f 1280x720P 50f 1280x720P 25f...
- Seite 31 grüne Anzeige ist nun erloschen und die rote Anzeige leuchtet (Betriebsanzeige im LCD-Display), die Videokamera begibt sich in den Audioaufnahmemodus zurück. b. Während der Audioaufnahme reagiert die Videokamera nur auf die Tasten Stopp und Aus. c. Ist die Funktion Laser SYNC Video aktiviert, so wird das Laser-Symbol oben links im Vorschaubild angezeigt, die Videokamera ist im Aufnahmemodus.
-
Seite 32: Bedienungshinweise
System jeweils erneut, wenn eine Taste gedrückt wird. Im Stand-by-Modus startet die Rollei 5S Videokamera wieder, wenn Sie Video, Den Auslöser oder Stopp drücken. Standardgemäß ist dieser Parameter auf AUS eingestellt. f. TV-Ausgang System: Stellen Sie diesen Parameter auf NTSC oder PAL ein. Stellen Sie das Videosystem entsprechend dem angeschlossenen Fernseher ein. - Seite 33 Video/Foto-Anzeige oben auf der Videokamera blinken langsam. Die Aufnahmedauer wird im LCD- Display angezeigt. Während der Videoaufnahme reagiert die Videokamera nur auf Vergrößern (-) und Verkleinern (+). Drücken Sie einmal Stopp, um die Aufnahme zu beenden und zu speichern, die Videoanzeige (grün) vorn erlischt.
- Seite 34 Rollei 5S Videokamera nimmt nun drei, sechs oder zehn Bilder auf, wenn Sie einmal den Auslöser drücken. c. Auto kont. Aufnahme Im Kameraeinstellungsmenü drücken Sie – und wählen Sie Auto kont. Aufnahme. Drücken Sie OK zum Einstellen des Intervalls auf AUS, 0.5,1, 2, 3, 5, 10, 20, 30 oder 60 Sekunden. Drücken Sie > und dann erneut OK , um das Menü...
- Seite 35 Während der Wiedergabe einer Videodatei stehen Ihnen folgende Tasten zur Verfügung: Taste Beschreibung Taste Beschreibung Lautstärke erhöhen. Lautstärke verringern. Taste für langsamen Rücklauf gedrückt Taste für langsamen Vorlauf < halten. > gedrückt halten. Taste für schnellen Rücklauf drücken. Taste für schnellen Vorlauf drücken. Dateiwiedergabe vom Anfang.
-
Seite 36: Fernbedienung
Video- und Fotoaufnahmen genutzt werden kann. Nach dem Drücken einer Taste blinkt die rote Anzeige auf der Fernbedienung einmal. Nachstehende Abbildung zeigt die Funktionstasten der Fernbedienung. Zum Abgleich der Funktionen der Fernbedienung mit jenen der Rollei 5S Videokamera folgen Sie den nachstehenden Schritten zum Pairing, bevor Sie die Fernbedienung benutzen. Aufnahme Auslöser... - Seite 37 Fernbedienung drücken. 13. TFT-Bildschirm ein- und ausschalten a. Ist die Rollei 5S Videokamera eingeschaltet, so halten Sie den Auslöser für 3 Sekunden gedrückt, um den TFT-Bildschirm ein- und auszuschalten. b. Der Auslöser auf der Fernbedienung kann den TFT-Bildschirm nicht ein- und ausschalten.
-
Seite 38: Datei Speichern Und Wiedergeben
Steht der Ein-/Ausschalter auf AUS, können Sie den Akku in der Kamera laden. Die rote Anzeige blinkt langsam. c. Steht der Ein-/Ausschalter auf EIN, können Sie die Aufnahmedateien von der Rollei 5S Videokamera auf einen Computer kopieren. 2. HDMI- oder AV-Kabel anschließen Sie können Aufnahmedateien auf einem Fernseher oder Monitor mit HD-Port über HDMI-Kabel... -
Seite 39: Backup-Akku (D23)
Hinweis: a. Trennen Sie den Backup-Akku nicht während des Betriebs ab. b. Bei längerer Nichtbenutzung der Rollei 5S Videokamera laden Sie den Akku alle 6 Monate, um die Lebenserwartung zu verlängern. c. Ein Ladezyklus dauert ca. 1.5 Stunden mit dem USB-Kabel. -
Seite 40: Lieferumfangfolgende Artikel Befinden
Lieferumfangfolgende Artikel befinden Rollei 5S TFT-Monitor Fernbedienung Wasserdichtes Standard Flache Zubehör flache Gehäuse Akku Halterung Halterung Bedienungs- Halterung microSD-Karte AV-Kabel L-förmige Fahrradhalterung Backup-Akku anleitung Helmhalterung USB-Kabel Tragetasche Halteband CD ROM - 18 -... -
Seite 41: Technische Spezifikationen
Technische Spezifikationen Technische Spezifikationen Rollei 5S Videokamera Option Spezifikationen Option Spezifikationen Blickwinkel 175° 1080P 1920 x 1080P bei 25 fps 14 MP CMOS Sensor Pixel 1080i 1920 x 1080i bei 50 fps (4384 x 3288) 1000 mAh Lithium- 960P 1280 x 960P bei 25 fps... -
Seite 42: Sicherheitshinweise Wasserdichtes Gehäuse
1. Die Rollei 5S Videokamera kann sich während des Betriebs erwärmen, das ist völlig normal. 2. Benutzen Sie die Rollei 5S Videokamera für längere Zeit nicht, so entfernen Sie den Akku und lagern Sie ihn ordnungsgemäß. Laden Sie den Akku alle 6 Monate, um beste Leistung zu garantieren.