Herunterladen Diese Seite drucken

Devon & Devon Etoile Console Montageanleitung

Vorschau ausblenden Andere Handbücher für Etoile Console:

Werbung

Verfügbare Sprachen
  • DE

Verfügbare Sprachen

  • DEUTSCH, seite 16
Etoile Console
ASSEMBLY INSTRUCTIONS
ISTRUZIONI DI MONTAGGIO
MONTAGEANLEITUNGEN
INSTRUCTIONS DE MONTAGE
INSTRUCCIONES DE MONTAJE
ИНСТРУКЦИИ К МОНТАЖУ

Werbung

loading

Inhaltszusammenfassung für Devon & Devon Etoile Console

  • Seite 1 Etoile Console ASSEMBLY INSTRUCTIONS ISTRUZIONI DI MONTAGGIO MONTAGEANLEITUNGEN INSTRUCTIONS DE MONTAGE INSTRUCCIONES DE MONTAJE ИНСТРУКЦИИ К МОНТАЖУ...
  • Seite 2 ISTRUZIONI DI MONTAGGIO Vi ringraziamo per aver scelto un prodotto Devon&Devon. Prima di installarlo vi raccomandiamo di leggere attentamente questo manuale. INDICE Pag.4 - Avvertenze Pag.4 - Prima di iniziare / Attrezzi necessari Pag.5 - Packing list struttura Consolle Etoile Pag.6 - Packing list lavabo Consolle Etoile Pag.7 - Istruzioni di montaggio Pag.15 - Riparazione...
  • Seite 3 AVVERTENZE PACKING LIST STRUTTURA CONSOLLE ETOILE Prima del montaggio verificare l’integrità dei pezzi. In caso di difetti o dubbi rivolgersi al rivenditore. A. Struttura metallica (x1) Il montaggio deve avvenire seguendo attentamente le istruzioni di seguito indicate. B. Mensola in vetro (x1) L’azienda declina ogni responsabilità...
  • Seite 4 PACKING LIST LAVABO CONSOLLE ETOILE ISTRUZIONI DI MONTAGGIO 1) Controllare la perpendicolarità di parete e pavimento. K. Lavabo in ceramica (x1) L. Staffe a “S” (x2) ATTENZIONE: DOPO AVER RIMOSSO I COMPONENTI DALLA STRUTTURA DELL’IMBALLO, APPOGGIARE LA STRUTTURA A TERRA SOPRA UN CARTONE O SU UN ALTRO MATERIALE CHE PERMETTA DI MANTENERE IL PRODOTTO INTEGRO 2) Avvitare le barre filettate (E) alla struttura su cui sono fissati i portasciugamani (A).
  • Seite 5 3) Inserire le gambe (D) della struttura sulle barre filettate (E). 6) Con l’aiuto di una livella verificare che 7) Tracciare i fori di fissaggio delle borchie la struttura sia posizionata correttamente al muro. sia parallelamente che ortogonalmente rispetto al muro. barra filettata dovrà...
  • Seite 6 10) Montare sulla struttura i supporti fissi 11) Montare sulla struttura i supporti 13) Una volta raggiunto il miglior compromesso possibile, posizionare le staffe a “S” (L) (H) per il lavabo più vicini al muro. regolabili (G) più lontani dal muro. sotto al lavabo e tracciare i fori (2 per ciascuna staffa) per il loro fissaggio.
  • Seite 7 15) Posizionare di nuovo il lavabo, inserendo la parte posteriore tra le staffe ed il muro. 17) Rimuovere la mensola, eseguire le forature per i supporti a muro, inserire i tasselli (I) a muro. Montare i supporti e infine montare la mensola. 16) Posizionare la mensola in vetro sugli appoggi presenti sulle gambe e con l’aiuto di una livella tracciare i fori a muro per i supporti (J).
  • Seite 8 18) Applicare il silicone tra il lavabo e il muro. RIPARAZIONI: devono essere effettuate da personale autorizzato per evitare l’invalidazione della garanzia. SMALTIMENTO Questo apparecchio non è un ordinario rifiuto domestico. Deve essere smaltito nei centri di raccolta appropriati. In caso di sostituzione può essere rispedito al distributore.
  • Seite 9 Before assembling it, we recommend that you read this manual carefully. TABLE OF CONTENTS p.18 - Warnings p.18 - Before you begin / Tools needed p.19 - Etoile Console structure packing list p.20 - Etoile Console washbasin packing list p.21 - Assembly instructions p.29 - Repairs p.29 - Disposal...
  • Seite 10 WARNINGS ETOILE CONSOLE STRUCTURE PACKING LIST Make sure that the parts are intact. In case of defect or doubt, contact the retailer. Assembly must be carried out following the instructions indicated below. A. Metal structure (x1) The company accepts no liability for installations that do not comply with current B.
  • Seite 11 ETOILE CONSOLE WASHBASIN PACKING LIST ASSEMBLY INSTRUCTIONS 1) Check that the wall and floor are perpendicular. K. Ceramic basin (x1) L. “S”shaped brackets (x2) CAUTION: AFTER REMOVING THE ITEMS FROM THE PACKING STRUCTURE, PLACE THE STRUCTURE ON THE GROUND EITHER ON A CARDBOARD OR ON ANOTHER MATERIAL SUITABLE TO KEEP THE PRODUCT INTACT.
  • Seite 12 3) Insert the legs (D) of the structure into the threaded rods (E). 6) Using a level, make sure that the 7) Mark the position of the holes to fasten structure is positioned correctly, both the faceplates to the wall. parallel and perpendicular to the wall.
  • Seite 13 10) Assemble the fixed supports for the 11) Assemble the adjustable supports (G) 13) Once you have obtained the best possible compromise, position the “S”-shaped basin (H) closest to the wall on to the furthest from the wall on to the structure. brackets (L) under the basin, and mark the position of the holes (2 for each bracket) to structure.
  • Seite 14 15) Position the basin once again, inserting the back part between the brackets and 17) Remove the shelf, make the holes for the supports in the wall, insert the rawlplugs the wall. (I) into the wall. Assemble the supports and, last of all, the shelf. 16) Position the glass shelf on the supports on the legs and, with the assistance of a level, mark the position of the holes for the supports (J) on the wall.
  • Seite 15 18) Apply silicon between the basin and the wall. REPAIRS: these must be carried out by authorised personnel to avoid invalidating the warranty. DISPOSAL This device is not ordinary household waste. It must be disposed of at the appropriate collection points. In case of replacement, it can be returned to the distributor.
  • Seite 16 
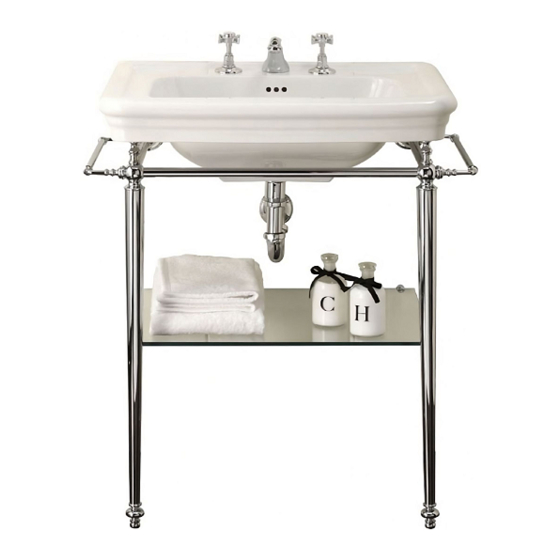
MONTAGEANLEITUNGEN Wir danken Ihnen, dass Sie sich für ein Produkt von Devon&Devon. Vor der Installation empfehlen wir Ihnen, dieses Handbuch sorgfältig zu lesen. INHALT S.32 - Hinweise S.32 - Bevor sie anfangen / Benötigte werkzeuge S.33 - Packliste Struktur der Konsole Etoile S.34 - Packliste Waschbecken der Konsole Etoile S.35 - Montageanleitungen S.43 - Reparaturen...
  • Seite 17 HINWEISE PACKLISTE STRUKTUR DER KONSOLE ETOILE Vor der Montage die Unversehrtheit der Teile prüfen. Im Falle von Fehlern oder Fragen den Händler kontaktieren. A. Metallgestell (x1) Die Montage muss unter genauer Beachtung der nachfolgend aufgeführten Anleitungen B. Glasplatte (x1) erfolgen. Die Firma übernimmt keine Verantwortung für nicht vorschriftsmäßig C.
  • Seite 18 PACKLISTE WASCHBECKEN DER KONSOLE ETOILE MONTAGEANLEITUNGEN 1) Prüfen Sie, ob Wand und Boden rechtwinklig zueinander stehen. K. Keramikwaschbecken (x1) L. “S” förmige Bügel (x2) ACHTUNG: NACH ENTFERNUNG DER KOMPONENTEN VON DER STRUKTUR DER VERPACKUNG DIE STRUKTUR AUF EINEM KARTON ODER AUF EINEM ANDEREN MATERIAL AUF DEN BODEN STELLEN, DAS ES ERMÖGLICHT, DAS PRODUKT UNVERSEHRT ZU ERHALTEN.
  • Seite 19 3) Setzen Sie die Beine (D) des Gestells auf die Gewindestangen (E) auf. 6) Mit Hilfe einer Wasserwaage prüfen, 7) Zeichnen Sie Fixierungslöcher für die ob die Struktur korrekt parallel und Wandbeschläge an. rechtwinklig zur Wand positioniert ist. Die Gewindestange muss etwas über das Bein hinausragen.
  • Seite 20 10) Befestigen Sie die feststehenden 11) Befestigen Sie die regulierbaren 13) Wenn Sie ein gutes Gleichgewicht gefunden haben, positionieren Sie die s-förmigen Halterungen (H) für das Waschbecken am Halterungen Gestell, weiter Bügel (L) unter dem Waschbecken und zeichnen die Löcher (2 pro Bügel) für ihre estell, äher an der Wand.
  • Seite 21 15) Positionieren Sie das Waschbecken erneut und setzen Sie den hinteren Teil 17) Legen Sie die Glasplatte wieder zur Seite, bohren Sie die Löcher in die Wand, führen zwischen Bügel und Wand. Sie die Dübel ein und montieren Sie dann die Glasplatte. 16) Legen Sie die Glasplatte auf die Auflagen an den Beinen und zeichnen Sie mit Hilfe einer Wasserwaage die Wandlöcher für die Halterungen an (J).
  • Seite 22 18) Bringen Sie zwischen Waschbecken und Wand Silikon an. REPARATUREN: müssen von autorisiertem Personal durchgeführt werden, um ein Erlöschen der Garantie zu vermeiden. ENTSORGUNG Dieses Gerät ist kein gewöhnlicher Hausmüll. Es muss bei den entsprechenden Sammelstellen entsorgt werden. Im Falle eines Austauschs kann es an den Händler zurückgeschickt werden.
  • Seite 23 INSTRUCTIONS DE MONTAGE Nous vous remercions d’avoir choisi un produit Devon&Devon. Avant de l'installer, nous vous invitons à lire attentivement ce manuel. INDEX Page 46 - Avertissements Page 46 - Avant de commencer / Outils nécessaires Page 47 - Liste d’emballage de la structure de la console Etoile Page 48 - Liste d’emballage du lavabo console Etoile Page 49 - Instructions de montage Page 57 - Réparations...
  • Seite 24 AVERTISSEMENTS LISTE D’EMBALLAGE DE LA STRUCTURE DE LA CONSOLE ETOILE Avant le montage, vérifier l’intégrité des pièces. En cas de défaut ou de doute, contacter le revendeur. A. Structure métallique (x1) Le montage doit être effectué en suivant scrupuleusement les instructions ci-dessous. B.
  • Seite 25 LISTE D’EMBALLAGE DU LAVABO CONSOLE ETOILE INSTRUCTIONS DE MONTAGE 1) Vérifier la perpendicularité du mur et du sol. K. Lavabo en céramique (x1) L. étriers en “S” (x2) ATTENTION: APRÈS LE DÉBALLAGE DES DIVERS COMPOSANTS DE LA STRUCTURE, POSEZ LA STRUCTURE AU SOL SUR UN CARTON OU UN AUTRE MATÉRIAU POUR NE PAS ABIMER LE PRODUIT.
  • Seite 26 3) Insérer une patte (D) de la structure dans une barre filetée (E). 6) En se servant d'un niveau à bulle, 7) Repérer les trous de fixation des vérifier que la structure est correctement garnitures au mur. positionnée, à la fois parallèlement et orthogonalement par rapport au mur.
  • Seite 27 10) Monter sur la structure les supports 11) Monter sur la structure les supports 13) Une fois obtenu le meilleur équilibre possible, positionner les étriers en « S » (L) fixes (H) du lavabo les plus proches du réglables (G) plus éloignés du mur. sous le lavabo et tracer les trous (2 pour chaque étrier) pour leur fixation.
  • Seite 28 15) Placer de nouveau le lavabo sur la structure en insérant la partie postérieure de 17) Retirer la tablette, faire les trous pour les supports dans le mur et y introduire les celui-ci entre les étriers et le mur. chevilles (I). Monter les supports et enfin la tablette. 16) Placer la tablette en verre sur les appuis des pattes et, à...
  • Seite 29 18) Appliquer le silicone entre le lavabo et le mur. RÉPARATIONS : elles doivent être effectuées par du personnel autorisé afin d’éviter toute invalidation de la garantie. MISE AU REBUT Cet appareil n’est pas un déchet ménager ordinaire. Il doit être éliminé dans des points de collecte appropriés.
  • Seite 30 INSTRUCCIONES DE MONTAJE Les agradecemos por haber elegido un producto Devon&Devon. Antes de instalarlo le recomendamos que lea este manual con atención. ÍNDICE Pág.60 - Advertencias Pág.60 - Antes de comenzar / Utensilios necesarios Pág.61 - Lista de artículos – Estructura lavabo tipo consola Etoile Pág.62 - Lista de artículos –...
  • Seite 31 ADVERTENCIAS LISTA DE ARTÍCULOS – ESTRUCTURA LAVABO TIPO CONSOLA ETOILE No instale el producto sin antes asegurarse de que no presente defectos. Contacte con el revendedor en caso de dudas. Instale el producto respetando escrupulosamente las A. Estructura metálica (x1) siguientes instrucciones.
  • Seite 32 LISTA DE ARTÍCULOS – LAVABO TIPO CONSOLA ETOILE INSTRUCCIONES DE MONTAJE 1) Compruebe la perpendicularidad entre la pared y el pavimento. K. Lavabo de cerámica (x1) L. Pletinas en “S” (x2) ADVERTENCIA: COLOQUE UN CARTÓN U OTRO MATERIAL APTO PARA APOYAR SOBRE EL PAVIMENTO TODOS LOS ARTÍCULOS EXTRAÍDOS DEL EMBALAJE SIN QUE SE DAÑEN.
  • Seite 33 3) Introducir las patas (D) de la estructura sobre las barras roscadas (E). 6) Con ayuda de un nivel, compruebe que 7) Marcar en la pared los agujeros de la estructura esté en la posición correcta, fijación de los tornillos. tanto en paralelo como en ortogonal con respecto a la pared.
  • Seite 34 10) Montar sobre la estructura los soportes 11) Montar sobre la estructura los soportes 13) Una vez alcanzado el mayor equilibrio posible, colocar las pletinas en “S” (L) bajo el fijos para el lavabo (H) más cercanos a la regulables (G) más alejados de la pared. lavabo y marcar los agujeros (2 por cada pletina) para su fijación.
  • Seite 35 15) Colocar de nuevo el lavabo, introduciendo la parte posterior entre las pletinas y la 17) Quitar la repisa, realizar los agujeros para los soportes en la pared e introducir los pared. tacos en la misma. Montar los soportes y por último montar la repisa. 16) Colocar la repisa de cristal sobre los apoyos presentes en las patas y con la ayuda de un nivel marcar en la pared los agujeros para los soportes (J).
  • Seite 36 18) Aplicar la silicona entre el lavabo y la pared. REPARACIONES: deben ser realizadas por personal autorizado para no invalidar la garantía. ELIMINACIÓN Este dispositivo no es un residuo doméstico ordinario. Debe eliminarse en los puntos de recogida adecuados. En caso de sustitución, se puede devolver al distribuidor.
  • Seite 37 ИНСТРУКЦИИ К МОНТАЖУ Благодарим за выбор изделия Devon&Devon. Перед монтажом рекомендуем вам внимательно прочитать данное руководство. ОГЛАВЛЕНИЕ Стр.74 - Предупреждения Стр.74 - Перед началом сборки / Необходимые инструменты Стр.75 - Упаковочный лист на каркас консоли Etoile Стр.76 - Упаковочный лист на раковину консоли Etoile Стр.77 - Инструкции...
  • Seite 38 ПРЕДУПРЕЖДЕНИЯ УПАКОВОЧНЫЙ ЛИСТ НА КАРКАС КОНСОЛИ ETOILE Перед началом монтажа проверьте детали на предмет повреждений. В случае дефектов или сомнений обращайтесь к дилеру. A. Металлическая конструкция (x1) Во время монтажа необходимо строго следовать предоставленным ниже B. Стеклянная полка (x1) инструкциям. Компания не несет ответственность за монтаж, не соответствующий C.
  • Seite 39 УПАКОВОЧНЫЙ ЛИСТ НА РАКОВИНУ КОНСОЛИ ETOILE ИНСТРУКЦИИ К МОНТАЖУ 1) Проверьте перпендикулярность стены относительно пола. K. Керамическая раковина (x1) L. “S” образные кронштейны (x2) ВНИМАНИЕ: ПОСЛЕ ИЗВЛЕЧЕНИЯ КОМПОНЕНТОВ ИЗ УПАКОВКИ ПОЛОЖИТЕ КАРКАС НА ГОРИЗОНТАЛЬНУЮ ПЛОСКОСТЬ ПОВЕРХ КАРТОННОЙ КОРОБКИ ИЛИ ДРУГОГО МАТЕРИАЛА, КОТОРЫЙ СОХРАНИТ ИЗДЕЛИЕ...
  • Seite 40 3) Надеть полые внутри ножки (D) основной конструкции на стержни с резьбой (Е). С помощью уровня проверить 7) Наметить отверстия для крепления правильность расположения металлических накладок к стене. конструкции как параллельно, так и ортогонально стене. Стержень должен немного выступать по отношению к ножке. Закрепить...
  • Seite 41 10) Установить неподвижные опорные 11) Установить регулируемые опорные 13) По достижении оптимальной балансировки, установить “S” образные стойки раковины (Н), располагающиеся стойки (G), располагающиеся на кронштейны (L) под раковиной и наметить отверстия (2 на каждый кронштейн) для ближе к стене. удалении от стены. их...
  • Seite 42 15) Вновь установить раковину в необходимое положение, поместив ее заднюю 17) Убрать полку и просверлить отверстия для стенных опор. Вставить дюбели (I). часть между кронштейнами и стеной. Установить опоры и затем полку. 16) Установить стеклянную полку на опоры, находящиеся на ножках и при помощи уровня...
  • Seite 43 18) Заполнить пространство между раковиной и стеной силиконом. РЕМОНТ: его должен выполнять уполномоченный персонал во избежание аннулирования гарантии. УТИЛИЗАЦИЯ Данный прибор не относится к категории обычных бытовых отходов. Его необходимо сдать на утилизацию в специальный центр сбора отходов. В случае замены его можно вернуть дистрибьютору.
  • Seite 49 Via di Casellina, 61D - 50018 - Scandicci (FI) Italy Tel. +39 055 308350 - email: info@devon-devon.com DEVON-DEVON.COM Printed on December 2022...