Herunterladen Inhalt Inhalt Diese Seite drucken

Werbung

Verfügbare Sprachen
  • DE

Verfügbare Sprachen

  • DEUTSCH, seite 18

Werbung

Inhaltsverzeichnis
loading

Inhaltszusammenfassung für Devon & Devon New Etoile

  • Seite 2: Prima Di Iniziare

    Vi ringraziamo per aver scelto un prodotto Devon&Devon. Vi preghiamo cortesemente di leggere questo manuale prima di installare il prodotto. PRIMA DI INIZIARE Verificare le predisposizioni d’impianto necessarie prima del montaggio. Verificare la presenza di tutti gli articoli al’interno dell’imballo tramite il Packing List riportato alla pagina seguente.
  • Seite 3: Packing List

    PACKING LIST (STRUTTURA) A: Struttura di metallo (x1) B: Gambe (x2) C: Barre filettate (x2) D: Piedini (x2) E: Supporti lavabo (x2) F: Viti e Tasselli di fissaggio a muro (x8)
  • Seite 4 PACKING LIST (LAVABO) G: Lavabo New Etoile in ceramica (x1) H: Staffe a “S” (x2) (Viti e Tasselli non forniti da Devon&Devon)
  • Seite 5: Istruzioni Di Montaggio

    ISTRUZIONI DI MONTAGGIO Dopo avere rimosso i componenti metallici dall’imballo posizionare la struttura (A) su un piano ed accostare l’estremità di sezione maggiore della gamba (B) alla struttura. Inserire la gamba sulla struttura. Inserire la barra filettata (C) in modo che sporga sia dalla parte della struttura sia dall’estremità...
  • Seite 6 Avvitare i supporti (E) sulla barra filettata che sporge dalla parte della gamba con la sezione di dimensione maggiore. Avvitare il piedino (D) dalla Presentare a muro la struttura parte opposta della gamba. così assemblata. Ripetere le stesse operazioni anche per l’altra gamba.
  • Seite 7 Verificare il posizionamento Tracciare i fori di fissaggio delle della struttura tramite una livella borchie a muro, sia per quelle sulla in direzione sia parallela che struttura sia per quelle all’estremità ortogonale a muro. del braccetto fissato alla gamba. Rimuovere la struttura ed eseguire gli 8 fori in base alla tracciatura. Inserire i tasselli in dotazione nei fori (F), posizionare di nuovo la struttura e fissarla con le viti anch’esse incluse nella dotazione (F).
  • Seite 8 Appoggiare il lavabo (G) sui Mantenendo il lavabo in supporti montati sulla struttura, posizione corretta con l’aiuto della sostenendolo nella parte posteriore. livella, tracciare i fori per il fissaggio delle staffe ad “S” di supporto del lavabo. A questo punto è possibile rimuovere il lavabo ed eseguire le forature a muro rispettando le tracciature.
  • Seite 9 Posizionare di nuovo il Applicare il silicone tra il lavabo, inserendo parte lavabo ed il muro. posteriore tra le staffe ed il muro. Al termine la consolle dovrebbe apparire come mostrato.
  • Seite 10: Before You Begin

    Thank you for choosing a Devon&Devon product. Please read this manual before installing the product. BEFORE YOU BEGIN Please check the existing layout of the system required before assembly. Verify the presence of all items inside the package using the Packing List included in the following page.
  • Seite 11 PACKING LIST (STRUCTURE) A: Metal structure (x1) B: Legs (x2) C: Threaded rods (x2) D: Feet (x2) E: Basin supports (x2) F: Screws and rawlplugs to fasten the metal structure to the wall (x8)
  • Seite 12 PACKING LIST (BASIN) G: New Etoile Ceramic basin (x1) H: S-shaped brackets (x2) (screws and rawplugs not provided by Devon&Devon)
  • Seite 13 ASSEMBLY INSTRUCTIONS After removing the metal components from the packaging, place the structure (A) on a surface and put the widest end of the leg (B) near the structure. Insert the leg on the structure. Insert the threaded bar (C) so that it protrudes from both the structure and from the narrowest end of the leg.
  • Seite 14 Tighten the supports (E) on the threaded bar protruding from the widest part of the leg. Tighten the foot (D) from the Lean the structure you have opposite end of the leg. just assembled against the wall. Repeat the above operations for the other leg.
  • Seite 15 Making sure that Mark the position of the holes positioned correctly by using a on the wall to fit the wall fittings for level in both a parallel and both those on the structure and perpendicular position to the wall. those at the end of the arm fastened to the leg.
  • Seite 16 Rest the basin (G) on the Keeping the basin in the correct supports fitted on the structure, position with the aid of the level, holding it at the rear. mark the position of the holes for fastening the basin support S-shaped brackets.
  • Seite 17 Position the basin again, Seal the area between the inserting the rear part between basin and the wall with silicon. the brackets and the wall. Once you have finished the console should look as shown.
  • Seite 18: Bevor Sie Anfangen

    Wir danken Ihnen, dass Sie sich für ein Produkt von Devon&Devon entschieden haben und bitten Sie, diese Anleitung zu lesen, bevor Sie das Produkt installieren. BEVOR SIE ANFANGEN Überprüfen Sie vor der Montage die nötigen Vorrichtungen in IhremBadezimmer. Überprüfen Sie mit Hilfe der Packing List auf der nächsten Seite, ob in der Verpackung alle Artikel vorhanden sind.
  • Seite 19 PACKING LIST (GESTELL) A: Metallstruktur (x1) B: Beine (x2) C: Gewindestangen (x2) D: Füße (x2) E: Waschbeckenstützen (x2) F: Schrauben und dübel für die Wandfixierung der metalstruktur (x8)
  • Seite 20 PACKING LIST (WASCHBECKEN) G: Keramikwaschbecken New Etoile (x1) H: S-förmige Bügel (x2) (Schrauben und Dübel werden nicht mitgeliefert)
  • Seite 21 MONTAGEANLEITUNG Nach Entnahme der Metallteile aus der Verpackung den Träger auf eine ebene Fläche legen und das Bein mit seinem dickeren Ende zum Träger bringen. Das Bein in den Träger stecken. Die Gewindestange so einführen, dass sie aus dem Träger und aus dem dünneren, unteren Ende des Beins hervorsteht.
  • Seite 22 Die Stützen (E) auf die aus dem dickeren Ende des Beins hervorstehende Gewindestange montieren. Den Fuß (D) auf die Die so zusammengebaute gegenüberliegende Seite des Trägerkonstruktion an die Wand Beins schrauben. stellen. Den gleichen Vorgang für das andere Bein wiederholen.
  • Seite 23 Ihre Lage mit der Wasserwaage Die Befestigungslöcher für parallel und im rechten Winkel die Scheiben an der Wand zur Wand prüfen. anzeichnen, sowohl für den Träger als auch für den am Bein befestigten Arm. Die Trägerkonstruktion entfernen und die 8 angezeichneten Löcher bohren.
  • Seite 24 Das Waschbecken auf die am Das Waschbecken mithilfe der Träger montierten Stützen setzen Wasserwaage in die richtige Lage und dabei von hinten festhalten. bringen und die Löcher für die Befestigung der S- Bügel anzeichnen. Nun kann das Waschbecken wieder abgenommen werden, um die vorher angezeichneten Löcher in die Wand zu bohren.
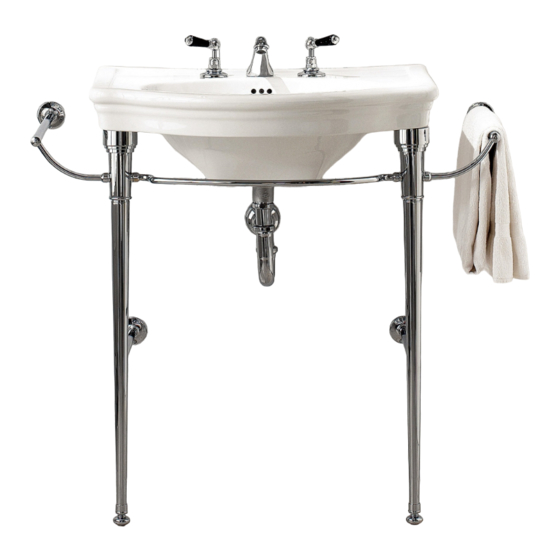
  • Seite 25 Das Waschbecken mit Den Bereich zwischen seiner Rückseite zwischen Waschbecken und Wand mit Bügeln und Wand einsetzen. Silikon abdichten. Zum Schluss soll die Konsole so aussehen, wie in der Abbildung dargestellt.
  • Seite 26: Avant De Commencer

    Nous vous remercions d’avoir choisi un produit Devon&Devon et vous prions de lire ce manuel avant d’installer le produit. AVANT DE COMMENCER Vérifier les dispositions d’installation nécessaires avant le montage. Vérifier la présence de tous les articles à l’intérieur de l’emballage grâce à...
  • Seite 27 LISTE DES ACCESSOIRES (STRUCTURE) A: Structure métallique (x1) B: Pattes (x2) C: Barres filetées (x2) D: Pieds (x2) E: Supports de lavabo (x2) F: Vis et chevilles de fixation au mur (x8)
  • Seite 28 LISTE DES ACCESSOIRES (LAVABO) G: Lavabo New Etoile en céramique (x1) H: Étriers en “S” (x2) (vis et chevilles non fournies par Devon&Devon)
  • Seite 29: Montage

    MONTAGE Après avoir retiré les composants métalliques de l’emballage, placer la structure sur un plan et approcher de la structure l’extrémité de la patte qui a la section la plus grande. Introduire la patte dans la structure. Introduire la barre filetée de façon à ce qu'elle soit en saillie aussi bien du côté...
  • Seite 30 Visser les supports (E) sur la barre filetée qui est en saillie du côté de la patte qui a la section la plus grande. Visser le pied (D) du côté Adosser au mur la structure opposé de la patte. ainsi assemblée. Répéter les mêmes opérations pour l’autre patte.
  • Seite 31 Vérifier le positionnement de Tracer les trous de fixation la structure à l’aide d’un niveau des clous au mur, aussi bien en direction tant parallèle que pour les clous sur la structure perpendiculaire au mur. que pour les clous à l’extrémité du bras fixé...
  • Seite 32 Appuyer le lavabo (G) sur les Tenir le lavabo dans une supports montés sur la structure, position correcte à l'aide d'un en le soutenant dans la partie niveau et tracer les trous pour arrière. fixer les étriers de support en “S”. A ce point, il est possible d'enlever le lavabo et de réaliser les trous en respectant les traçages.
  • Seite 33 Positionner à nouveau le Appliquer le silicone entre lavabo, en introduisant la partie le lavabo et le mur. arrière entre les étriers et le mur. A la fin des opérations, la console devrait apparaître comme le montre la figure ci-contre.
  • Seite 34: Antes De Comenzar

    Les agradecemos por haber elegido un producto Devon&Devon. Les rogamos que lean este manual antes de instalar el producto. ANTES DE COMENZAR Comprobar las predisposiciones para instalación necesarias antes del montaje. Comprobar que todos los artículos se encuentran en el interior del embalaje mediante la lista de contenido (ver página siguiente) y que ninguno de sus componentes presenta defectos visibles.
  • Seite 35 LISTA DE CONTENIDO (ESTRUCTURA) A: Estructura de metal (x1) B: Patas (x2) C: Barras roscadas (x2) D: Pies (x2) E: Soportes del lavabo (x2) F: Tornillos y tacos de fijación a la pared (x8)
  • Seite 36 LISTA DE CONTENIDO (LAVABO) G: Lavabo New Etoile de cerámica (x1) H: Pletinas en “S” (x2) (tornillos y tacos no proporcionados por Devon&Devon)
  • Seite 37: Instrucciones De Montaje

    INSTRUCCIONES DE MONTAJE Después de haber sacado los componentes metálicos de su embalaje, apoye la estructura sobre una superficie de trabajo y junte el extremo de mayor sección de la pata a la estructura. Introduzca pata estructura. Introduzca la barra roscada de modo que sobresalga tanto por la parte de la estructura, como por el extremo de sección inferior de la pata.
  • Seite 38 Enrosque los soportes (E) en la barra roscada que sobresale por la parte de la pata que tiene la sección de tamaño mayor. Enrosque el pie (D) en la Apoye en la pared la estructura parte opuesta de la pata. tal y como está...
  • Seite 39 Controle la posición de la Trace los agujeros de fijación de estructura utilizando un nivel en los tachones, tanto los de la sentido tanto paralelo como estructura, como los del extremo ortogonal en la pared. del bracillo fijado a la pata. Aparte la estructura y haga los 8 agujeros siguiendo el trazado.
  • Seite 40 Apoye el lavabo en los Manteniendo el lavabo en su soportes montados correcta posición ayudándose con estructura, aguantándolo por la un nivel, marque los agujeros para la parte trasera. fijación de las abrazaderas en “S” de soporte del lavabo. A este punto, aparte el lavabo y taladre la pared siguiendo los trazados.
  • Seite 41 Vuelva a colocar el lavabo, Selle con silicona la zona poniendo la parte posterior entre el lavabo y la pared. entre las abrazaderas y la pared. Al final, el lavabo de consola debe presentar el aspecto mostrado en la imagen.
  • Seite 42: Перед Началом Сборки

    Благодарим за выбор изделия Devon&Devon. Перед установкой внимательно прочитайте настоящую инструкцию. ПЕРЕД НАЧАЛОМ СБОРКИ Перед тем, как приступать к сборке, убедиться в наличии всех элементов структуры. Проверить наличие всех деталей внутри упаковки, в соответствии с Упаковочным листом, приведенным на следующей странице. Убедиться, что...
  • Seite 43 УПАКОВОЧНЫЙ ЛИСТ (ОСНОВНАЯ КОНСТРУКЦИЯ) A: Рама металлическая (x1) B: Ножки (x2) C: Шпильки резьбовые (x2) D: Накладки на ножки (x2) E: Крепления для раковины (x2) F: Винты и дюбели в стену (x8)
  • Seite 44: Упаковочный Лист

    УПАКОВОЧНЫЙ ЛИСТ (РАКОВИНА) E: Керамическая раковина New Etoile (x1) F: S-образные кронштейны (х2) (винты и дюбели не поставляются Devon&Devon)
  • Seite 45: Инструкция По Сборке

    ИНСТРУКЦИЯ ПО СБОРКЕ После извлечения металлических комплектующих из упаковки установите структуру на горизонтальную поверхность и приставьте ножку большим диаметром к структуре. Вставьте ножку в структуру. Вставьте резьбовую шпильку таким образом, чтобы она выступала и со стороны структуры, и со стороны меньшего диаметра ножки.
  • Seite 46 Прикрутите крепления (Е) на резьбовую шпильку со стороны большего диаметра. Прикрутите накладку (D) с Собранную таким образом другой стороны ножки. структуру приложите к стене. Повторите те же операции с другой ножкой.
  • Seite 47 Выровняйте положение Отметьте расположение структуры по отношению к стене крепежных отверстий в настенных при помощи уровня, как по накладках, как для накладок на горизонтали, так и по вертикали. самой структуре, так и для накладок, находящихся на фиксирующих перекладинах ножек. Отложите структуру и сделайте 8 отверстий согласно меткам.
  • Seite 48 Установите раковину на Удерживая раковину в структуру, придерживая ее правильной позиции, определенной заднюю часть. при помощи уровня, разметьте отверстия для фиксации S-образных кронштейнов для раковины. Теперь можно убрать раковину и проделать отверстия в стене согласно отметкам. Установить кронштейны для раковины, зафиксировав их при помощи шурупов...
  • Seite 49 Снова установить раковину, Нанести силикон между поместив заднюю часть между раковиной и стеной. кронштейнами и стеной. По окончании работы консоль должна выглядеть, как показано на фотографии.
  • Seite 50 Devon & Devon Viale A.Volta, 46 - 50131 Firenze Tel. 0039 055 5001173 - Fax 0039 055 5000628 www.devon-devon.com email: office@devon-devon.com...

Inhaltsverzeichnis