Herunterladen Inhalt Inhalt Diese Seite drucken

Werbung

Verfügbare Sprachen
  • DE

Verfügbare Sprachen

  • DEUTSCH, seite 26
Consolle
Serenade
ISTRUZIONI PER IL MONTAGGIO
ASSEMBLY INSTRUCTIONS
MONTAGEANLEITUNG
INSTRUCTIONS DE MONTAGE
INSTRUCCIONES DE MONTAJE
ИНСТРУКЦИЯ ПО СБОРКЕ

Werbung

Inhaltsverzeichnis
loading

Inhaltszusammenfassung für Devon & Devon Serenade

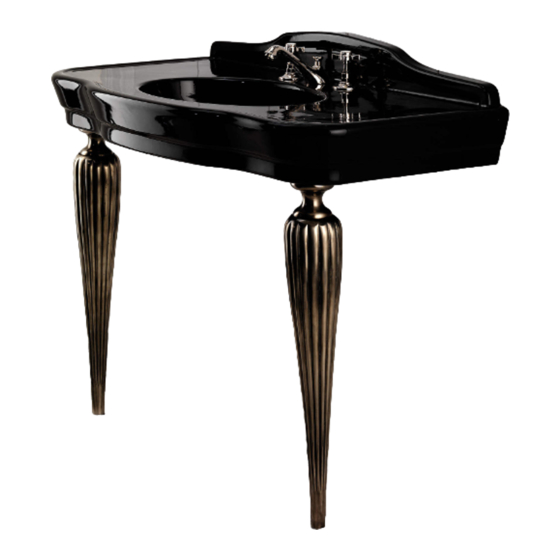
  • Seite 1 Consolle Serenade ISTRUZIONI PER IL MONTAGGIO ASSEMBLY INSTRUCTIONS MONTAGEANLEITUNG INSTRUCTIONS DE MONTAGE INSTRUCCIONES DE MONTAJE ИНСТРУКЦИЯ ПО СБОРКЕ...
  • Seite 2: Prima Di Iniziare

    Vi ringraziamo per aver scelto un prodotto Devon&Devon. Vi preghiamo cortesemente di leggere questo manuale prima di installare il prodotto. PRIMA DI INIZIARE Verificare le predisposizioni d’impianto necessarie prima del montaggio. Verificare la presenza di tutti gli articoli al’interno dell’imballo tramite il Packing List riportato alla pagina seguente.
  • Seite 3: Packing List

    PACKING LIST struttura in metallo A: Gambe metalliche (x2) B: Staffe (x2) C: Viti di fissaggio per staffe/top in ceramica (x4) D: Rondelle per viti fissaggio (x4) E: Tasselli ad espansione (x4) F: Viti a brugola (x2) G: Rondelle per viti a brugola (x2)
  • Seite 4 PACKING LIST lavabo H: Lavabo in ceramica (x1) I: Viti e tasselli di fissaggio a muro per lavabo (x4) J: Rondelle in plastica (x4)
  • Seite 5: Istruzioni Di Montaggio

    ISTRUZIONI DI MONTAGGIO gambe in metallo Dopo avere rimosso il top in ceramica e le gambe con i relativi accessori dai loro imballi, appoggiare il top in ceramica sulla sua faccia superiore, sfruttando ad esempio i componenti del suo imballo di polistirolo. Inserire tasselli Montare le gambe (A) sulle...
  • Seite 6 Posizionare l’insieme gamba/ Fissare le gambe/staffe con le staffa facendo combaciare le viti (C) e le rondelle (D). asole presenti sulla staffa con i tasselli ad espansione. Notate che la parte della staffa più stretta deve andare sul frontale del top. Attenzione: Non stringere eccessivamente le viti.
  • Seite 7 Tracciare i fori a muro per il montaggio dei 4 tasselli di fissaggio (I). Rimuovere la struttura da Posizionare di nuovo la muro eseguire forature, struttura appoggiandola a muro montare i tasselli a muro e e bloccandola con le rondelle avvitare le viti.
  • Seite 8 Sigillare con silicone (di colore appropriato) la zona di contatto tra il top in ceramica e il muro. Al termine la consolle dovrebbe apparire come mostrato.
  • Seite 9 PACKING LIST struttura in ceramica A: Gambe in ceramica (x2) B: Colla da costruzione (x1)
  • Seite 10 PACKING LIST lavabo H: Lavabo in ceramica (x1) I: Viti e tasselli di fissaggio a muro per lavabo (x4) J: Rondelle in plastica (x4)
  • Seite 11 ISTRUZIONI DI MONTAGGIO gambe in ceramica Tracciare i 4 fori di fissaggio a muro del top in ceramica in base allo schema. Forare, inserire i tasselli e le Appoggiare la livella sulle viti di fissaggio (I) a muro. viti che sporgono da muro per verificarne l’allineamento.
  • Seite 12 Montare il top in ceramica Bloccare il top in ceramica (H), inserendo le viti che (H) con le rondelle in plastica sporgono da muro nei 4 fori (J). situati nella parte posteriore del top. Applicare colla Inserire le gambe nella loro costruzione nella parte...
  • Seite 13 Verificare corretto Sigillare con silicone (di allineamento delle gambe, colore appropriato) la zona di eventualmente misurando la contatto tra il top in ceramica e distanza da muro. il muro. Al termine la consolle dovrebbe apparire come mostrato.
  • Seite 14: Before You Begin

    Thank you for choosing a Devon&Devon product. Please read this manual before installing the product. BEFORE YOU BEGIN Please check the existing layout of the system required before assembly. Verify the presence of all items inside the package using the Packing List included in the following page.
  • Seite 15 PACKING LIST metal structure A: Metal legs (x2) B: Brackets (x2) C: Screws to attach brackets and ceramic top (x4) D: Washers for fastening screws (x4) E: Rawlplugs (x4) F: Allen screws (x2) G: Washers for Allen screws (x2)
  • Seite 16 PACKING LIST basin H: Ceramic basin (x1) I: Screws and rawlplugs to fasten basin to wall (x4) J: Plastic washers (x4)
  • Seite 17 ASSEMBLY INSTRUCTIONS metal legs After removing the ceramic top and the legs with their corresponding accessories from the packaging, place the ceramic top on its upper side, using, for example, pieces of its polystyrene packaging. Insert the rawlplugs (E) in the Fit the legs (A) on the brackets holes provided in the ceramic (B), using the Allen screws (F)
  • Seite 18 Position leg/bracket Fasten the legs/brackets with group making sure that the slots the screws (C) and washers (D). on the bracket correspond with the rawl plugs. Please note that the narrowest part of Caution: the bracket must go on the front of the Do not the overtighten the screws.
  • Seite 19 Mark the position of the holes on the wall to fit the 4 rawlplugs (I). Remove the structure from Position the structure against the wall, drill the holes, place the wall again and fasten it using the rawlplugs in the wall and the plastic washers (J).
  • Seite 20 Seal the area of contact between the ceramic top and the wall with silicon (using the same colour as the ceramic basin). Once you have finished, the console should look as shown.
  • Seite 21 PACKING LIST ceramic structure A: Ceramic legs (x2) B: Builders’ glue (x1)
  • Seite 22 PACKING LIST basin H: Ceramic basin (x1) I: Screws and rawlplugs to attach the basin to the wall (x4) J: Plastic washers (x4)
  • Seite 23 ASSEMBLY INSTRUCTIONS ceramic legs Mark the position of the 4 holes to attach the ceramic top to the wall according to the drawing. Drill the holes, insert the Place the level on the screws rawlplugs and the fastening that protrude from the wall to screws (I) to the wall.
  • Seite 24 Position the ceramic top (H) Fasten the ceramic top (H) inserting screws that with the ceramic washers (J). protrude from the wall in the 4 holes located in the back part of the top. Apply the builders’ glue (B) Insert the legs in their housing on to the upper part of each (at the front side corners) under ceramic leg (A).
  • Seite 25 Verify that the legs are Seal the area of contact correctly aligned, if necessary between the ceramic top and measuring the distance from the the wall with silicon (using the wall. same colour as the ceramic basin). Once you have finished, the console should look as shown.
  • Seite 26: Bevor Sie Anfangen

    Wir danken Ihnen, dass Sie sich für ein Produkt von Devon&Devon entschieden haben und bitten Sie, diese Anleitung zu lesen, bevor Sie das Produkt installieren. BEVOR SIE ANFANGEN Überprüfen Sie vor der Montage die nötigen Vorrichtungen in IhremBadezimmer. Überprüfen Sie mit Hilfe der Packing List auf der nächsten Seite, ob in der Verpackung alle Artikel vorhanden sind.
  • Seite 27 PACKING LIST gestell A: Metallbeine (x2) B: Bügel (x2) C: Fixierungsschrauben für Bügel/Keramikwaschbecken (x4) D: Beilagscheiben für Fixierungsschrauben (x4) E: Expansionsdübel (x4) F: Inbusschrauben (x2) G: Beilagscheiben für Inbusschrauben (x2)
  • Seite 28 PACKING LIST waschbecken H: Keramikwaschbecken (x1) I: Schrauben und Dübel für Wandfixierung des Waschbeckens (x4) J: Plastikbeilagscheiben (x4)
  • Seite 29 MONTAGEANLEITUNG metallbeine Entfernen aller Verpackungsteile vom Keramikwaschbecken, von den Metallbeinen und vom jeweiligen Zubehör. Nun das Keramikwaschbecken mit der Oberseite nach unten hinlegen. Als Unterlage empfiehlt es sich, beispielsweise Styroporteile der Verpackung zu verwenden. Die Expansionsdübel (E) in die Die Beine (A) an die Bügel dafür vorgesehenen Öffnungen (B) mit Hilfe der Inbusschrauben Keramikwaschbecken...
  • Seite 30 Die Konstruktion Bein/Bügel Die Beine mit den Schrauben so positionieren, dass die Ösen (C) und den Beilagscheiben (D) im Bügel auf die Expansionsdübel fixieren. passen. Bitte beachten: die engere Seite des Bügels sollte auf die Achtung: Vorderseite des Keramikwaschbeckens Schrauben nicht zu fest anziehen. angebracht werden.
  • Seite 31 An der Wand Löcher markieren für die Anbringung der 4 Fixierungsdübel (I). Struktur entfernen, Löcher Struktur ausführen gemäß Wand positionieren und mit Markierungen, Wanddübel Plastikbeilagscheiben anbringen Schrauben blockieren (J). festziehen.
  • Seite 32 Mit Silikon die Kontaktzone zwischen Keramikwaschbecken und Wand versiegeln. Zum Schluß sollte die Consolle der Abbildung entsprechen.
  • Seite 33 PACKING LIST keramikgestell A: Keramikbeine (x2) B: Montagekleber (x1)
  • Seite 34 PACKING LIST waschbecken H: Keramikwaschbecken (x1) I: Schrauben und Dübel für Wandfixierung des Waschbeckens (x4) J: Plastikbeilagscheiben (x4)
  • Seite 35 MONTAGEANLEITUNG keramikgestell Die 4 Löcher für die Wandfixierung des Keramikwaschbeckens gemäß dem Schema markieren. Löcher ausführen, Dübel Die Wasserwaage auf die Schrauben für chrauben legen deren Wandfixierung einführen. nordnung nachprüfen.
  • Seite 36 Das Keramikwaschbecken Das Keramikwaschbecken Rückseite positionieren, dass Keramikbeilagscheiben Schrauben in der Wand durch blockieren. die rückwärtigen Öffnungen eingeführt werden können. Montagekleber (B) auf die Die Beine wie in der obere Seite des jeweiligen Beins Abbildung an die jeweilige (A) auftragen. Position vorderen seitlichen...
  • Seite 37 Die korrekte Anordnung der Mit Silikon (in der passenden Beine nachprüfen, eventuell Farbe) die Kontaktzone zwischen durch Messung des Abstandes Wand und Keramikwaschbecken zur Wand. versiegeln. Zum Schluß sollte die Consolle der Abbildung entsprechen.
  • Seite 38: Avant De Commencer

    Nous vous remercions d’avoir choisi un produit Devon&Devon et vous prions de lire ce manuel avant d’installer le produit. AVANT DE COMMENCER Vérifier les dispositions d’installation nécessaires avant le montage. Vérifier la présence de tous les articles à l’intérieur de l’emballage grâce à...
  • Seite 39: Liste Des Accessoires

    LISTE DES ACCESSOIRES structure métallique A: Pattes métalliques (x2) B: Étriers (x2) C: Vis pour fixer l’étrier et le top en céramique (x4) D: Rondelles pour vis de fixation (x4) E: Vis tamponnées (x4) F: Boulons (x2) G: Rondelles pour boulons (x2)
  • Seite 40 LISTE DES ACCESSOIRES lavabo H: Lavabo en céramique (x1) I: Vis et chevilles pour fixer le lavabo au mur (x4) J: Rondelles en plastique (x4)
  • Seite 41 MONTAGE pattes métalliques Après avoir retiré de l’emballage le top en céramique et les pattes ainsi que leurs accessoires respectifs, poser le top en céramique sur un plan de travail, la partie supérieure vers le sol, en employant - par exemple - les éléments de l’emballage en polystyrène. Insérer les vis tamponnées (E) Monter les pattes (A) sur dans les trous prévus du top en...
  • Seite 42 Placer l’ensemble patte/étrier Fixer les pattes/étriers avec en faisant correspondre les les vis (C) et les rondelles (D). fentes présentes sur l’étrier avec les espaceurs. Attention: Attention: que la partie la plus étroite de l’étrier ne pas serrer lesvis à fond. doit aller sur la partie frontale du top.
  • Seite 43 Repérer les trous sur le mur pour le montage des 4 chevilles de fixation (I). Retirer la structure, percer Placer à nouveau la structure contre le mur et puis la bloquer là où les trous ont été tracés, monter les chevilles pour la avec les rondelles en plastique fixation au mur et visser.
  • Seite 44 Sceller à l’aide de silicone la zone de contact entre le top en céramique et le mur. A la fin, la console doit apparaitre comme dans l’illustration cicontre.
  • Seite 45 LISTE DES ACCESSOIRES structure en céramique A: Pattes en céramique (x2) B: Tube de colle pour le montage (x1)
  • Seite 46 LISTE DES ACCESSOIRES lavabo H: Lavabo en céramique (x1) I: Vis et chevilles pour fixer le lavabo au mur (x4) J: Rondelles en plastique (x4)
  • Seite 47 MONTAGE pattes en céramique Tracer au mur les 4 trous de fixation pour le top en céramique sur la base du schéma ci-dessous. Percer les trous puis y insérer Placer un niveau sur les vis les chevilles et les vis (I) pour la qui dépassent du mur pour en fixation au mur.
  • Seite 48 Monter le top en céramique Bloquer le top en céramique (H) en insérant les vis qui (H) avec les rondelles en sortent du mur dans les 4 trous céramique (J). situés dans la partie supérieure de celui-ci. Appliquer la colle (B) sur la Insérer les pattes à...
  • Seite 49 Vérifier l’alignement correct Sceller à l’aide de silicone pattes mesurant (d’une couleur appropriée) la éventuellement leur distance au zone de contact entre le top en mur. céramique et le mur. À la fin, la console doit apparaître comme sur l’illustration ci-contre.
  • Seite 50: Antes De Comenzar

    Les agradecemos por haber elegido un producto Devon&Devon. Les rogamos que lean este manual antes de instalar el producto. ANTES DE COMENZAR Comprobar las predisposiciones para instalación necesarias antes del montaje. Comprobar que todos los artículos se encuentran en el interior del embalaje mediante la lista de contenido (ver página siguiente) y que ninguno de sus componentes presenta defectos visibles.
  • Seite 51 LISTA DE CONTENIDO estructura de metal A: Patas metálicas (x2) B: Pletinas (x2) C: Tornillos de fijación para pletinas/el lavabo de cerámica (x4) D: Arandelas para tornillos de fijación (x4) E: Tacos de expansión (x4) F: Tornillos Allen (x2) G: Arandelas para tornillos Allen (x2)
  • Seite 52 LISTA DE CONTENIDO lavabo H: Lavabo de cerámica (x1) I: Tornillos y tacos de fijación a la pared para el lavabo (x4) J: Arandelas de plástico (x4)
  • Seite 53: Instrucciones De Montaje

    INSTRUCCIONES DE MONTAjE ( patas de metal Después de haber sacado de sus embalajes el lavabo de cerámica y las patas con sus respectivos accesorios, apoye el lavabo de cerámica por el lado superior, aprovechando - por ejemplo- los componentes de su embalaje de poliestireno. Introduzca los tacos de Monte las patas (A) sobre las expansión (E) en los agujeros...
  • Seite 54 Coloque el conjunto pata/ Fije las patas/pletinas con los pletina de manera que coincidan tornillos (C) y las arandelas (D). las ranuras de la pletina con los tacos de expansión. Nótese que la parte más estrecha de Precaución: la pletina debe quedar hacia la parte no apriete demasiado los tornillos.
  • Seite 55 Marque en la pared los agujeros para el montaje de los 4 tacos de fijación (I). Aparte pared Vuelva a colocar la estructura, apoyándola en la pared y estructura, realice erforaciones, monte los tacos bloqueándola con las arandelas en la pared y enrosque los de plástico (J).
  • Seite 56 Selle con silicona la zona de contacto entre el lavabo de cerámica y la pared. Al final, el lavabo de consola debe presentar el aspecto mostrado en la imagen.
  • Seite 57 LISTA DE CONTENIDO estructura en cerámica A: Patas de cerámica (x2) B: Cola de construcción (x1)
  • Seite 58 LISTA DE CONTENIDO lavabo H: Lavabo de cerámica (x1) I: Tornillos y tacos de fijación a la pared para lavabo (x4) J: Arandelas de plástico (x4)
  • Seite 59 INSTRUCCIONES DE MONTAjE ( patas de cerámica Marcar los 4 agujeros de fijación a la pared del lavabo de cerámica según el siguiente esquema. Apoyar el nivel sobre los Perforar, introducir los tacos y los tornillos de fijación (I) a la tornillos que sobresalen de pared.
  • Seite 60 Monte el lavabo de cerámica Bloquee lavabo (H) introduciendo los tornillos cerámica (H) utilizando las que sobresalen de la pared en arandelas de cerámica (J). los 4 agujeros situados en la parte trasera del lavabo. Aplique cola Introducir las patas en el construcción (B) en la parte lugar designado bajo el lavabo superior de cada pata de...
  • Seite 61 Comprobar correcta Sellar con silicona (del color alineación patas, apropiado) la zona de contacto eventualmente midiendo entre el lavabo de cerámica y la distancia desde la pared. pared. Al final la consola debe presentar el aspecto mostrado en la imagen.
  • Seite 62: Перед Началом Сборки

    Благодарим за выбор изделия Devon&Devon. Перед установкой внимательно прочитайте настоящую инструкцию. ПЕРЕД НАЧАЛОМ СБОРКИ Перед тем, как приступать к сборке, убедиться в наличии всех элементов структуры. Проверить наличие всех деталей вну три упаковки, в соответствии с Упак овоч ным ли стом, п риведенн ым н а следу...
  • Seite 63 УПАКОВОЧНЫЙ ЛИСТ (МЕТАЛЛИЧЕСКАЯ КОНСТРУКЦИЯ) A: Ножки металлические (x2) B: Уголки (x2) C: Винты для крепления уголков на керамических топах (х 4) D: Шайбы для винтов крепежных (x4) E: Дюбели (х4) F: Винты под ключ–шестигранник (х2) G: Шайбы для винтов под ключ–шестигранник (х2)
  • Seite 64 УПАКОВОЧНЫЙ ЛИСТ РАКОВИНА H: Раковина керамическая (x1) I: Сантехшпильки с дюбелями для крепления раковины к стене (x4) J: Гайки–шайбы пластмассовые (х 4)
  • Seite 65 ИНСТРУКЦИЯ ПО СБОРКЕ (МЕТАЛЛИЧЕСКИЕ НОЖКИ) Освободив керамический топ и ножки со всеми принадлежностями от упаковки, положите керамический топ верхом вниз, предварительно подложив под него, например, полистироловую упаковку. Вставьте дюбели (Е) в Прикрепите ножки (A) к имеющиеся отверстия в уголкам (B) с помощью винтов керамическом...
  • Seite 66 Установите ножку с Привинтите уголки с привинченным уголком на топ, помощью винтов (C) с шайбами соединив отверстия на уголке (D). с дюбелями в топе. Следует учесть, что более узкая *Осторожно! полоса уголка должна располагаться Не перетяните винты! вдоль передней линии топа. Собранную...
  • Seite 67 Наметьте в стене отверстия для установки 4 крепёжных дюбелей (I). Отставьте в сторону консоль, Вновь приставьте консоль к просверлите в стене отверстия, стене и закрепите её с помощью вставьте в них дюбели и пластмассовых гаек–шайб (J). ввинтите сантехшпильки.
  • Seite 68 Заделайте силиконовым герметиком соответствующего цвета стык между керамическим топом и стеной. По завершении установки консоль будет выглядеть следующим образом.
  • Seite 69 УПАКОВОЧНЫЙ ЛИСТ (КЕРАМИЧЕСКАЯ КОНСТРУКЦИЯ) A: Ножки керамические (x2) B: Тюбик клея строительного (x1)
  • Seite 70 УПАКОВОЧНЫЙ ЛИСТ РАКОВИНА H: Раковина керамическая (x1) I: Сантехшпильки с дюбелями для крепления раковины к стене(x4) J: Гайки–шайбы пластмассовые (х 4)
  • Seite 71 ИНСТРУКЦИЯ ПО СБОРКЕ (КЕРАМИЧЕСКИЕ НОЖКИ) Наметьте в стене отверстия для установки 4 крепёжных дюбелей (I). Просверлите в стене Уровнем проверьте отверстия, вставьте дюбели и параллельность расположения ввинтите в них сантехшпильки шпилек относительно пола. (I).
  • Seite 72 Установите керамический топ Закрепите керамический топ (Н), надев его на выступающие (Н) с помощью пластмассовых концы сантехшпилек через гаек–шайб (J). 4 отверстия, имеющиеся на задней стенке топа. Нанесите строительный клей Вставьте ножки в (В) на верхний торец каждой соответствующие гнезда керамической...
  • Seite 73 Проверьте ровность Заделайте силиконовым расположения ножек, измерив герметиком соответствующего расстояние от стены. цвета стык между керамическим топом и стеной. По завершении установки консоль будет выглядеть следующим образом.
  • Seite 74 Devon & Devon Via Arno, 26 - 50019 - Sesto Fiorentino (FI) Tel. 0039 055 308350 - Fax 0039 055 375549 www.devon-devon.com email: office@devon-devon.com...

Inhaltsverzeichnis