Devon & Devon Colette Montageanleitung
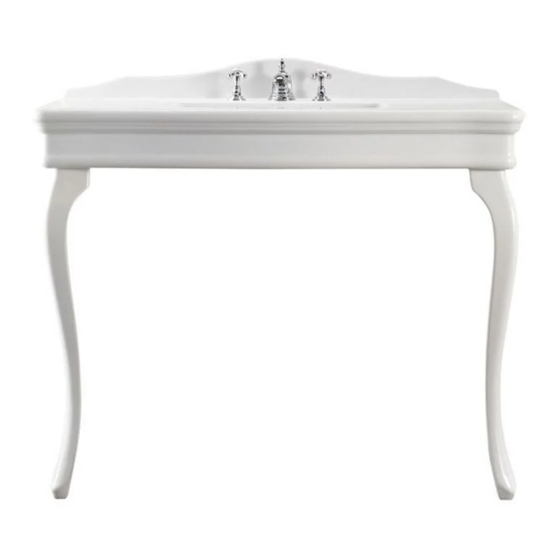
Consolle

Verwandte Anleitungen für Devon & Devon Colette


Inhaltszusammenfassung für Devon & Devon Colette
- Seite 1 Consolle Colette ISTRUZIONI PER IL MONTAGGIO ASSEMBLY INSTRUCTIONS MONTAGEANLEITUNG INSTRUCTIONS DE MONTAGE INSTRUCCIONES DE MONTAJE ИНСТРУКЦИЯ ПО СБОРКЕ...
-
Seite 26: Bevor Sie Anfangen
Wir danken Ihnen, dass Sie sich für ein Produkt von Devon&Devon entschieden haben und bitten Sie, diese Anleitung zu lesen, bevor Sie das Produkt installieren. BEVOR SIE ANFANGEN Überprüfen Sie vor der Montage die nötigen Vorrichtungen in IhremBadezimmer. Überprüfen Sie mit Hilfe der Packing List auf der nächsten Seite, ob in der Verpackung alle Artikel vorhanden sind. - Seite 27 PACKING LIST (GESTELL) A: Metallbeine (x2) B: Bügel (x2) C: Schrauben zur Fixierung der Bügel/Keramiktop (x4) D: Inbusschrauben (x4) E: Plättchenx (x4) F: Expansionsdübel (x4)
- Seite 28 PACKING LIST (WASCHBECKEN) G: Lavabo in ceramica (x1) H: Schrauben und Dübel zur Fixierung des Waschbeckens an der Wand (x4) I: Plastikplättchen (x4) J: Blockiermuttern (x4)
- Seite 29 MONTAGEANLEITUNG (METALLBEINE) Nach der Entnahme der Keramikabdeckplatte und der Beine mit Zubehör aus ihrer Verpackung die Keramikabdeckplatte auf ihre Oberseite ablegen dazu beispielsweise Verpackungsteile aus Polystyrol verwenden. Die Expansionsdübel (F) in die an der Keramikabdeckplatte vorhandenen Löcher einsetzen.
- Seite 30 Die Beine (A) mit den 4 Bügeln Inbusschrauben (D) auf die Bügel zusammengebauten Beine (B) montieren. 2 Inbusschrauben für positionieren, dass die am Bügel jedes Bein-/Bügelpaar verwenden. vorhandenen Langlöcher mit den Expansionsdübeln (F) übereinstimmen. Zu beachten: Die Beine sind untereinander austauschbar (können beide rechts oder links montiert werden).
- Seite 31 Die Löcher für die 4 Befestigungsdübel (H) an der Wand anzeichnen. Die Trägerkonstruktion wieder von der Wand entfernen, alle Bohrungen ausführen und die Wanddübel einsetzen. Die Trägerkonstruktion wieder an die Wand stellen und mit den Kunststoff-Unterlegscheiben (J) sichern.
- Seite 32 Konsole Kontaktbereich Befestigungsmuttern (I) endgültig zwischen Keramikabdeckplatte an der Wand befestigen. und Wand mit Silikon (mit passender Farbe) abdichten. Zum Schluss muss die Konsole so aussehen, wie dargestellt.
- Seite 33 PACKING LIST (KERAMIKGESTELL) A: Keramikbeine (x2) B: Baukleber...
- Seite 34 PACKING LIST (WASCHBECKEN) C: Keramikwaschbecken (x1) D: Schrauben und Dübel zur Fixierung des Waschbeckens an der Wand (x4) E: Plastikplättchen (x4) F: Blockiermuttern (x4)
- Seite 35 MONTAGEANLEITUNG (KERAMIKBEINE) Die 4 Wandbefestigungslöcher für die Keramikabdeckplatte nach dem Plan anzeichnen. Bohren und die Dübel sowie die Wandbefestigungsschrauben (D) einsetzen. Die Wasserwaage auf die aus der Wand hervorstehenden Schrauben setzen, um deren Nivellierung zu prüfen.
- Seite 36 Die Keramikabdeckplatte (C) durch Einschrauben der aus der Wand hervorstehenden Schrauben in die 4 Löcher an der Rückseite der Abdeckplatte befestigen. Die Keramikabdeckplatte (C) mit den Kunststoffunterlegscheiben (F) sichern. Konsole Geeigneten Klebstoff (B) auf Befestigungsmuttern (E) endgültig die Oberseite jedes Keramikbeins an der Wand befestigen.
- Seite 37 Die Beine in ihre Aufnahme Prüfen, Beine unterhalb der Keramikabdeckplatte einwandfrei ausgerichtet sind, einführen (seitlich am vorderen dazu eventuell den Abstand Ende), wie dargestellt. von der Wand messen. Den Kontaktbereich zwischen Zum Schluss muss die Keramikabdeckplatte und Wand Konsole aussehen, mit Silikon (mit passender Farbe) dargestellt.
- Seite 74 Devon & Devon Viale A.Volta, 46 - 50131 Firenze Tel. 0039 055 5001173 - Fax 0039 055 5000628 www.devon-devon.com email: office@devon-devon.com...