Herunterladen Inhalt Inhalt Diese Seite drucken
Inhaltsverzeichnis

Werbung

Verfügbare Sprachen
  • DE

Verfügbare Sprachen

  • DEUTSCH, seite 1
SolarFlow
User Manual
support-eu@zendure.com

Werbung

Inhaltsverzeichnis
loading

Inhaltszusammenfassung für Zendure SmartFlow

  • Seite 1 SolarFlow User Manual support-eu@zendure.com...
  • Seite 3: Inhaltsverzeichnis

    Verantwortung für die sichere Benutzung und Bedienung dieses Produktes. Machen Sie sich mit relevanten Richtlinien in Ihrer Region vertraut. Sie zeichnen allein dafür verantwortlich, sich mit allen relevanten Richtlinien und der konformen Verwendung von Zendure-Produkten vertraut zu machen. Bewahren Sie diese Anleitung zum künftigen Nachschlagen auf.
  • Seite 4 Smart PV Hub 1200 Name Controller Modell ZDSPVH1200 Gewicht ≈ 4,7 kg Abmessungen(L x B x H) 363 × 246 × 64 mm Drahtlostyp Bluetooth, 2,4-GHz- WLAN, IP-Stufe IP65 Garantie 10 Jahre PV-Eingang Empfohlene Eingangsleistung Jeweils 210 bis 550 W Maximale Eingangsgleichspannung 60 V MPPT-Spannungsbereich...
  • Seite 5: Sicherheitsanweisungen

    Übereinstimmung mit dem Abschnitt Anleitung zur Entsorgung dieser Anleitung entsorgt werden. 11. Stellen Sie im Betrieb eine angemessene Belüftung sicher. Eine unzureichende Belüftung kann dauerhafte Geräteschäden verursachen. 12. Stellen Sie nichts auf SmartFlow. Installieren Sie es an Orten, an denen es niemand berühren kann.
  • Seite 6: Fcc-Erklärung

    Mindestabstand von 20 cm zwischen dem Sender und Ihrem Körper installiert und betrieben werden. 3.3 EG-KONFORMITÄTSERKLÄRUNG ZENDURE TECHNOLOGY CO., LIMITED erklärt, dass das SolarFlow-Produkt (Smart PV Hub und Zusatzakku AB1000) die Richtlinien 2014/53/EU (RED), 2011/65/EU (RoHS), 2015/863/EU (RoHS) erfüllt.
  • Seite 7: Konformitätserklärung

    Nach der SolarFlow-Installation dauert es etwa 5 Minuten, bis es eine Verbindung zum Stromnetz herstellen kann. Die Daten werden innerhalb von 20 Minuten mit der Zendure-App synchronisiert. Bitte bestätigen Sie vor Einstellung der Ausgabe an den Mikro- Inverter die Nennleistung Ihres Mikro-Inverters. Die Ausgabe an den Mikro-Inverter darf nicht größer sein als die Nennleistung Ihres Mikro-...
  • Seite 8: Erste Schritte

    5. Erste Schritte 5.1 Lieferumfang 1 x Smart PV Hub 4 x Solarmodulkabel, 1 x Akkukabel, 2 x Mikro-Inverter- 1,5 m Kabel, 0,6 m 6 x Montageschraube, 2 x flache 1 x Antenne Bedienungsanleitung M4,7 x 39 mm Unterlegscheibe 1. Solarmodulkabel: Zum Anschließen der Solarmodule. 2.
  • Seite 9 Verbindung auf. Sie können in der Zendure-App direkt eine Verbindung zum IoT herstellen. Tipps: • Nachdem das Gerät an die Zendure-App gebunden wurde, blinkt bei erneutem Einschalten von SolarFlow die IoT-Anzeige langsam, bis das Gerät mit der Zendure-App kommunizieren kann.
  • Seite 10 Überspannungshinweis Sie die detaillierten / Überstromhinweis / Smart PV Hub- Fehlerinformationen in Kurzschlusshinweis / Anzeige blinkt rot der Zendure-App und Fehlerhinweis wenden Sie sich an den Kundendienst AB1000-Anzeige Nachdem sich Smart PV AB1000-Verbindung blinkt 2 s grün und Hub einschaltet leuchtet dann grün...
  • Seite 11: Installation

    Tipps: • Wählen Sie ein Bluetooth oder WLAN in der Zendure-App; WLAN wird empfohlen. 5.3 Installation • Wenn Sie Ihr Solarsystem sofort verifizieren und bereitstellen möchten, schließen Sie die Installation bei sonnigem Wetter ab. • Die Installation sollte von mindestens zwei Personen ausgeführt werden.
  • Seite 12 Wenn Sie das Balkon-Solarsystem installiert haben, müssen Sie es anhand der folgenden Schritte trennen: Trennen Sie die Kabel von Mikro-Inverter und heimischem Stromnetz. Trennen Sie nur die Kabel des ersten Solarmoduls und des Mikro- Inverters. Tipps: Die Installation des Solarmoduls muss nur bewegt werden, wenn Sie den Position ändern möchten.
  • Seite 13: Smart Pv Hub Installieren

    5.3.4 Smart PV Hub installieren Tipps: • Installieren Sie den Smart PV Hub an einer Stelle, die keinem direkten Sonnenlicht ausgesetzt ist. • Die Länge der Solarmodulkabel beträgt 3 Meter. Messen Sie also vor Bestätigung des Installationsortes des Smart PV Hub den Abstand vom MC4-Anschluss des Solarmoduls bis zum MC4-Anschluss des Smart PV Hub.
  • Seite 14: Ab1000 Stapeln

    Standort markieren: Wählen Sie eine Position neben dem Smart PV Hub. Die eine Person hält den Mikro-Inverter mit beiden Händen an der Wand, die andere Person markiert die Positionen der beiden Schraubenlöcher des Mikro-Inverters mit einem Marker. Bohren: Bohren Sie zwei Montagelöcher mit einem Durchmesser von 8 mm an den zwei markierten Positionen.
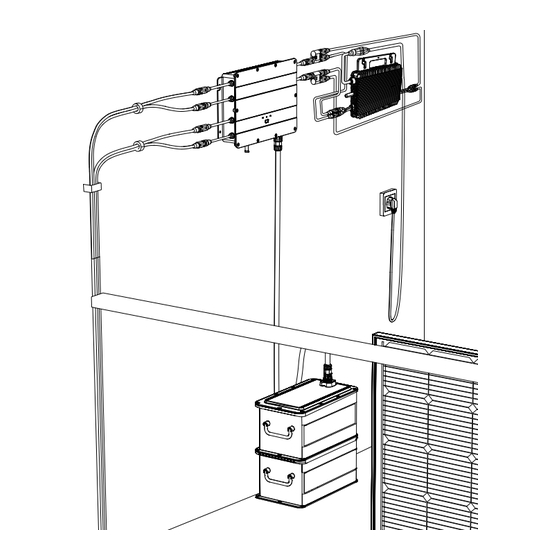
  • Seite 15: Mit Kabeln Anschließen

    5.3.7 Mit Kabeln anschließen Tipps: Stellen Sie vor Anschließen des Kabels sicher, dass das Produkt ausgeschaltet ist (halten Sie die IoT-Taste 6 Sekunden gedrückt). Kabelverbindung für 1-in-1-Mikro-Inverter Heimische Steckdose Home Socket Der Pfeil am Akkukabel The arrow on the battery befindet sich vorne.
  • Seite 16: Zendure-App Herunterladen

    AB1000 und dem heimischen Stromnetz sowie die Überwachung der Stromerzeugung. Die Leistung an den Mikro-Inverter kann in einem Bereich von 100 bis 1200 W eingestellt werden. Lesen Sie die Bedienungsanleitung der Zendure-App und greifen Sie hier auf den Download-Link zu: https://zendure.com/pages/download-center. Datenschutzerklärung...
  • Seite 17 Tipps: • Es dauert einige Zeit, bis das System eine Verbindung zum Stromnetz hergestellt hat, und die Synchronisierung der Daten mit der Zendure- App dauert etwa 20 Minuten, weshalb Sie nach der Installation bitte 20 Minuten warten, bevor Sie die App-Einstellungen aufrufen.
  • Seite 18: Solarflow Trennen

    5.3.9 SolarFlow trennen Tipps: Schalten Sie SolarFlow vor der Trennung aus (halten Sie die IoT- Taste zum Ausschalten 6 Sekunden gedrückt) Schalten Sie AB1000 und Smart PV Hub aus (halten Sie die IoT-Taste 6 Sekunden lang gedrückt). Ziehen Sie zur Trennung von der häuslichen Stromversorgung die Kabel von Mikro-Inverter und Schuko-Steckdose.
  • Seite 19: Year Warranty

    Garantieverlängerung müssen Sie Ihr Produkt in der Zendure-App registrieren, und es könnten zusätzliche Kosten oder andere Bedingungen anfallen. Die obige Tabelle zeigt die Garantiedauer für von Zendure oder seinen Handelspartnern gekaufte Produkte. Die Garantiedauer der über Zendures Crowdfunding-Kampagnen (Kickstarter, Indiegogo usw.) bestellten Produkte kann unterschiedlich ausfallen. Weitere Informationen entnehmen Sie bitte der Dokumentation Ihres Produktes.
  • Seite 20 Produktes zur Reparatur, die Reparatur vor Ort oder den Austausch. Schritt 4 Versenden Sie den/die Artikel an Zendure. Vermerken Sie die RMA-Nummer auf dem Versandetikett auf der Außenseite der Verpackung. Schreiben Sie die RMA-Nummer nicht auf die grüne Kartonschachtel.
  • Seite 21 Users take full responsibility for the safe usage and operation of this product. Familiarize yourself with relevant regulations in your area. You are solely responsible for being aware of all relevant regulations and using Zendure products in a way that is compliant. Keep this manual for future reference. CONTENTS 1.
  • Seite 22 Smart PV Hub 1200 Name Controller Model ZDSPVH1200 Weight ≈ 4.7 kg Dimensions(L*W*H) 363×246×64 mm Wireless Type Bluetooth, 2.4GHz Wi-Fi, IP Level IP65 Warranty 10 Years PV Input Recommended Input Power 210-550W each Maximum Input DC Voltage MPPT Voltage Range 16-48V MPPT Full Power Voltage Range 31-48V...
  • Seite 23: Safety Instruction

    Name Add-on Battery AB1000 Model ZDAB1000 Weight ≈ 11.5kg Dimensions 350×200×186.5mm Capacity 960Wh/48V Type LiFePO4 Output Power 1,200W Max Input Power 800W Max Max Extend Number of Battery Max Extend Capacity 3,840Wh IP Level IP65 Color Gray Charging Temperature 0-45℃ Discharging Temperature -20-45℃...
  • Seite 24: Fcc Statement

    20cm between the radiator & your body. 3.3 EC DECLARATION OF CONFORMITY ZENDURE TECHNOLOGY CO., LIMITED declares that the SolarFlow product (Smart PV Hub and Add on battery AB1000) complies with directive 2014/53/EU (RED) , 2011/65/EU(RoHS) , 2015/863/EU(RoHS) .
  • Seite 25: Important Tips

    Please check the accessories before installation, some accessories € need to be purchased separately. After the installation, please first download the Zendure App to check electricity produced and set the power to the Mroinverter. After SolarFlow installation, it will take about 5 minutes before it can be connected to the grid, and the data will be synchronized to the Zendure App within 20 minutes.
  • Seite 26: Getting Started

    5. Getting Started 5.1 What’s in The Box 1* Smart PV Hub 4* Solar Cable 3m 1* Battery Cable 2* Microinverter 1.5m Cable 0.6m 6* Mounting Screws 2* Flat 1* Aerial User Manual M4.7*39mm Washeret 1. Solar Cable: Used for solar panels connection. 2.
  • Seite 27 IoT connection. Users can directly connect to IoT on Zendure App. Tips: • After the device is bound to Zendure Apps, when SolarFlow is turned on again, the IoT indicator light flashes slowly until it can communicate with the Zendure App.
  • Seite 28 Press and hold the IoT Smart PV Hub & AB1000 Hardware Reset button 10 seconds Download the Zendure Smart PV Hub & AB1000 OTA App to OTA Tips: • Choose one of bluetooth or Wi-Fi on Zendure App, Wi-Fi is preferred .
  • Seite 29: Installation

    F. Connect the Microinverter to home grid G. Connect the solar panels to the Smart PV Hub H. Scan the QR code and download the Zendure app. Follow the instructions of the app to set up device.After 20 minutes, you will get the SolarFlow power storage system's data on your Zendure app.
  • Seite 30 If you have installed the balcony solar system, you need to disconnect it according to the following steps: Unplug the cables of the Microinverter and the home grid. Only unplug the cables of the first solar panel and the Microinverter. Tips: The installation of the solar panel does not need to be moved unless you want to change the location.
  • Seite 31: Install Smart Pv Hub

    5.3.4 Install Smart PV Hub Tips: • Please install the Smart PV Hub in a place out of direct sunlight. • The length of our solar cables are 3 meter, so before confirming the location of the Smart PV Hub's installation, please measure the distance from MC4 connector of solar panel to MC4 connector of Smart PV Hub.
  • Seite 32: Stack Ab1000

    Mark Location, Find a position next to Smart PV Hub, one person fixes the Microinverter on the wall with his hands, and the other person marks the positions of the two screw holes of the Microinverter with a marker. Drilling,drill two diameter 8mm mounting holes at the two marked positions.
  • Seite 33: Connect With Cables

    5.3.7 Connect with Cables Tips: Before connecting cable, please make sure that the product is turned off(press and hold IoT button for 6 seconds). Cable Connection For 1-in-1 Microinverter Home Socket Home Socket The arrow on the battery The arrow on the battery cable is in the front.
  • Seite 34: Download The Zendure App

    1 second). 5.3.8 Download the Zendure app The Zendure App gives users the ability to allocate the power to AB1000 and home grid and monitor power generation,the power to Microinverter can be set in a range of 100-1200W.
  • Seite 35 Tips: • It takes a period of time for the system to grid connection, and it takes about 20 minutes to synchronize data to Zendure App, so after the installation, please wait 20 minutes before going to the APP settings.
  • Seite 36: Disconnection Of Solarflow

    5.3.9 Disconnection of SolarFlow Tips: Before disconnecting, please turn off SolarFlow (Press and hold the IoT button 6 seconds to turn off ) First turn off the AB1000 and Smart PV Hub(Press and hold the IoT button 6 seconds ) Disconnection of home grid,un plug the cables of Mroinverter and home shuko.
  • Seite 37: Year Warranty

    * A Warranty Extension is offered for some of our products. To receive a warranty extension, you’ll need to register your product in the Zendure app, and there may be additional costs or other conditions involved. The table above indicates the warranty periods for products purchased from Zendure or its retail partners.
  • Seite 38 Step 4 Ship the item(s) to Zendure with your RMA number included on the shipping label on the outside of the packaging. Do not write the RMA number on the green carton box. Read the Zendure App user guide and access the download link here: https://eu.zendure.com/pages/download-center...
  • Seite 39 Zorg dat u op de hoogte bent van de relevante regelgevingen in uw regio. U bent als enige verantwoordelijk om op de hoogte te zijn van alle relevante regelgevingen en ze na te leven bij het gebruik van de Zendure- producten.
  • Seite 40 Smart PV Hub Naam 1200-controller Model ZDSPVH1200 Gewicht ≈ 4,7 kg Afmetingen (L*B*H) 363×246×64 mm Draadloos type Bluetooth, 2.4GHz Wi-Fi, IP-niveau IP65 Garantie 10 jaar PV-ingang Aanbevolen ingangsvermogen Elke 210-550 W Maximale DC-ingangsspanning MPPT-spanningsbereik 16-48V MPPT-spanningsbereik volledige vermogen 31-48V Min DC-ingangsspanning Max.
  • Seite 41: Gebruik

    Naam Extra batterij AB1000 Model ZDAB1000 Gewicht ≈ 11,5kg Afmetingen 350×200×186,5mm Capaciteit 960 Wh/48 V Type LiFePO4 Uitgangsvermogen Max. 1.200W Ingangsvermogen Max. 800W Max. aantal uitbreiding batterij Max.uitgebreide capaciteit 3.840 Wh IP-niveau IP65 Kleur Grijs Laadtemperatuur 0-45℃ Ontlaadtemperatuur -20-45℃ Garantie 10 jaar Smart PV Hub-controller omvat geen batterijdoos en de batterij moet niet afzonderlijk worden aangeschaft.
  • Seite 42: Fcc-Verklaring

    Dit apparaat moet worden geïnstalleerd en gebruikt met een minimumafstand van 20 cm tussen de zender en uw lichaam 3.3 EG-VERKLARING VAN CONFORMITEIT ZENDURE TECHNOLOGY CO., LIMITED verklaart dat het SolarFlow-product (Smart PV Hub en extra batterij AB1000) voldoet aan richtlijn 2014/53/EU (RED), 2011/65/EU (RoHS), 2015/863/EU (RoHS).
  • Seite 43: Belangrijke Tips

    Controleer de accessoires vóór de installatie. Sommige accessoires moeten afzonderlijk worden aangeschaft. € Download na de installatie eerst de Zendure-app om de geproduceerde elektriciteit te controleren en stel het vermogen in op de micro-omvormer. Na de SolarFlow-installatie zal het ongeveer 5 minuten duren voordat deze kan worden verbonden met het raster.
  • Seite 44: Aan De Slag

    5. Aan de slag 5.1 Wat zit er in de doos? 1* Smart PV Hub 4* zonnekabel 3 m 1* batterijkabel 2* micro- 1,5 m omvormerkabel 0,6m 6* montageschroeven 1* antenne 2* platte Gebruikershandleiding M4.7*39mm sluitring 1. Zonnekabel: Wordt gebruikt voor het aansluiten van de zonnepanelen. 2.
  • Seite 45 IoT-verbinding. Gebruikers kunnen direct verbinding maken met IoT op de Zendure-app. Tips: • Nadat het apparaat is verbonden op Zendure-apps en wanneer SolarFlow opnieuw wordt ingeschakeld, knippert de IoT-indicator langzaam tot het kan communiceren met de Zendure-app. • Als u de account opnieuw wilt verbinden en de IoT-verbinding wilt resetten,houdt u de IoT-knop 3 seconden ingedrukt om de IoT-verbinding te starten.
  • Seite 46 Herinnering overspanning de gedetailleerde / herinnering overspanning Smart PV Hub-indicator foutinformatie in /herinnering kortsluiting / knippert rood Zendure APP en neem herinnering fout contact op met de klantendienst AB1000-indicator Na het inschakelen van knippert groen AB1000-verbinding de Smart PV Hub...
  • Seite 47: Installatie

    Tips: • Kies Bluetooth of wifi op de Zendure-app. Wifi krijgt de voorkeur. 5.3 Installatie • Als u uw zonne-energiesysteem onmiddellijk wilt controleren en in gebruik wilt stellen, voltooit u de installatie wanneer het zonnig weer is. • Het is aanbevolen dat minstens twee personen deelnemen aan de installatie.
  • Seite 48 Als u het zonne-energiesysteem op het balkon hebt geïnstalleerd, moet u het loskoppelen in overeenstemming met de volgende stappen: Koppel de kabels van de micro-omvormer en het huisnet los. Koppel alleen de kabels van het eerste zonnepaneel en de micro- omvormer los.
  • Seite 49: Smart Pv Hub Installeren

    5.3.4 Smart PV Hub installeren Tips: • Installeer de Smart PV Hub op een plaats uit het direct zonlicht. • De lengte van onze zonnekabels bedraagt 3 meter, dus voordat u de installatielocatie van de Smart PV Hub bevestigt, meet u de afstand van de MC4-connector van het zonnepaneel naar de MC4-connector van de Smart PV Hub.
  • Seite 50: Ab1000 Stapelen

    Markeer de locatie, zoek een positie dicht bij de Smart PV Hub, één persoon bevestigt de micro-omvormer aan de wand met zijn handen en de andere persoon markeert de posities van de twee schroefopeningen van de micro-omvormer met een markeerpen. Boren.
  • Seite 51: Aansluiten Met Kabels

    5.3.7 Aansluiten met kabels Tips: Voordat u de aansluit, moet u controleren of het product is uitgeschakeld (houd de IoT-knop ingedrukt gedurende 6 seconden). Kabelaansluiting voor 1-in-1 micro-omvormer Contactdoos Home Socket De pijl op de batterijkabel The arrow on the battery bevindt zich op de voorkant.
  • Seite 52: De Zendure-App Downloaden

    Het vermogen dat naar de micro-omvormer gaat, kan worden ingesteld in een bereik van 100-1200 W. Lees de handleiding van de Zendure-app en krijg hier toegang tot de downloadkoppeling: https://zendure.com/pages/download-center. Privacybeleid...
  • Seite 53 • Het duurt even tot het systeem verbinding maakt met het huisnet en het duur ongeveer 20 minuten om gegevens te synchroniseren met de Zendure-app. Wacht dus na de installatie 20 minuten voordat u naar de app-instellingen gaat. • Het is aanbevolen tijdens de dag zoveel mogelijk stroom op te slaan in de batterij, behalve het basis stroomverbruik.
  • Seite 54: Solarflow Loskoppelen

    5.3.9 SolarFlow loskoppelen Tips: Voordat u deze loskoppelt, schakelt u de SolarFlow uit (Houd de IoT- knop 6 seconden ingedrukt om uit te schakelen) schakel eerst de AB1000 en Smart PV Hub uit (houd de IoT-knop 6 seconden ingedrukt) koppel het huisnet los, koppel de kabels van de micro-omvormer en het stopcontact los.
  • Seite 55: Year Warranty

    * Er wordt een garantie-uitbreiding aangeboden voor sommige van onze producten. Om een garantie-uitbreiding* te ontvangen, moet u uw product registreren in de Zendure-app en er kunnen extra kosten of andere voorwaarden betrokken zijn. De bovenstaande tabel geeft de garantieperioden aan voor producten die zijn aangeschaft bij Zendure of haar retailpartners.
  • Seite 56 Stap 4 Verzend item(s) naar Zendure met uw RMA-nummer op het verzendlabel op de buitenkant van de verpakking. Schrijf het RMA-nummer niet op de groene kartonnen doos. Lees de handleiding van de Zendure-app en krijg hier toegang tot de downloadkoppeling: https://eu.zendure.com/pages/download-center...
  • Seite 57 Familiarícese con las normativas relevantes en su área. Usted es el único responsable de conocer todas las normativas pertinentes y de utilizar los productos de Zendure de manera que se cumplan. Conserve este manual para consulta futura. CONTENIDO 1.
  • Seite 58 Controlador Smart PV Nombre Hub 1200 Modelo ZDSPVH1200 Peso ≈ 4,7 kg Dimensiones (LA*AN*AL) 363×246×64 mm Bluetooth, Wi-Fi de Tipo inalámbrico 2,4 GHz, Nivel de IP IP65 Garantía 10 años Entrada fotovoltaica Potencia de entrada recomendada 210-550 W cada uno Tensión de entrada de CC máxima 60 V Intervalo de tensión MPPT...
  • Seite 59: Instrucciones De Seguridad

    Nombre Batería complementaria AB1000 Modelo ZDAB1000 Peso ≈ 11,5 kg Dimensiones 350×200×186,5mm Capacidad 960 Wh/48 V Tipo LiFePO4 Potencia de salida 1.200W máximo Alimentación de entrada 800W máximo Número máximo de extensión de baterías Capacidad máxima de extensión 3840 Wh Nivel de IP IP65 Color...
  • Seite 60: Declaración De La Fcc

    20cm entre el emisor de radiación y su cuerpo. 3.3 DECLARACIÓN DE CONFORMIDAD CE ZENDURE TECHNOLOGY CO., LIMITED declara que el producto SolarFlow (Smart PV Hub y Batería complementaria AB1000) cumple con la directiva 2014/53/UE (RED), 2011/65/UE (RoHS), 2015/863/UE (RoHS).
  • Seite 61: Sugerencias Importantes

    Compruebe los accesorios antes de la instalación; algunos accesorios deben comprarse por separado. € Después de la instalación, primero descargue la aplicación Zendure para verificar la electricidad producida y establecer la potencia del microinversor. Después de la instalación de SolarFlow, pasarán unos 5 minutos antes de que se pueda conectar a la red y los datos se sincronizarán con la...
  • Seite 62: Procedimientos Iniciales

    5. Procedimientos iniciales 5.1 Contenido del paquete 1* Smart PV Hub 4* Cable solar de 3 m 1* Cable de batería 2* Cable de 1,5 m microinversor 6* Tornillos de montaje 1* Antena 2* Arandela Manual del usuario M4.7*39 mm plana 1.
  • Seite 63 IoT en la aplicación Zendure. Sugerencias: • Una vez que el dispositivo está vinculado a la aplicación Zendure, cuando SolarFlow se vuelve a encender, la luz indicadora de IoT parpadea lentamente hasta que pueda comunicarse con la aplicación de Zendure.
  • Seite 64 El indicador Smart PV Hub exceso de corriente/ del error en la aplicación parpadea en rojo recordatorio de Zendure y póngase en cortocircuito/ contacto con el servicio recordatorio de error de atención al cliente El indicador de la batería AB1000 parpadea en verde Después de que Smart...
  • Seite 65: Instalación

    Sugerencias: • Elija Bluetooth o Wi-Fi en la aplicación Zendure, se prefiere Wi-Fi. 5.3 Instalación • Si desea comprobar y poner en marcha el sistema solar inmediatamente, complete la instalación cuando el clima sea soleado. • Es recomendable que la instalación se realice entre dos personas.
  • Seite 66 Si ha instalado el sistema solar para balcón, debe desconectarlo llevando a cabo los siguientes pasos: Desenchufe los cables del microinversor y de la red doméstica. Desenchufe solamente los cables del primer panel solar y el microinversor. Sugerencias: No es necesario mover la instalación del panel solar a menos que desee cambiar la ubicación.
  • Seite 67: Instalar Smart Pv Hub

    5.3.4 Instalar Smart PV Hub Sugerencias: • Instale el Smart PV Hub en un lugar donde no le dé la luz solar directa. • La longitud de nuestros cables solares es de 3 metros. Por tanto, antes de confirmar la ubicación de la instalación del Smart PV Hub, mida la distancia desde el conector MC4 del panel solar al conector MC4 del Smart PV Hub.
  • Seite 68: Apilar La Batería Ab1000

    Marque la ubicación. Busque una posición junto al Smart PV Hub. Una persona fijará el microinversor a la pared con las manos y la otra marcará las posiciones de los dos orificios para tornillos del microinversor con un rotulador. Taladrado. Perfore dos orificios de montaje de 8 mm de diámetro en las dos posiciones marcadas.
  • Seite 69: Conexión Con Cables

    5.3.7 Conexión con cables Sugerencias: Antes de conectar el cable, asegúrese de que el producto esté apagado (mantenga presionado el botón IoT durante 6 segundos). Conexión del cable para microinversor 1 en 1 Enchufe de casa Home Socket La flecha del cable de la The arrow on the battery batería está...
  • Seite 70: Descarga De La Aplicación Zendure

    AB1000 y a la red doméstica y supervisar la generación de energía. La potencia del microinversor se puede configurar en un intervalo de entre 100 y 1200 W. Lea la guía del usuario de la aplicación Zendure y acceda al vínculo de descarga aquí: https://zendure.com/pages/download-center. Política de privacidad Al utilizar los productos, las aplicaciones y los servicios de Zendure, acepta los términos de uso y la política de...
  • Seite 71 • El sistema tarda un tiempo en conectarse a la red y unos 20 minutos en sincronizar los datos con la aplicación Zendure. Por tanto, después de la instalación, espere 20 minutos antes de ir a la configuración de la aplicación.
  • Seite 72: Desconexión De Solarflow

    5.3.9 Desconexión de SolarFlow Sugerencias: Antes de desconectar, apague su SolarFlow (mantenga presionado el botón IoT durante 6 segundo para apagar) Primero apague la batería AB1000 y su Smart PV Hub (mantenga presionado el botón IoT durante 6 segundos) Desconexión de la red doméstica. Desenchufe los cables del microinversor y el enchufe de casa.
  • Seite 73: Year Warranty

    * Se ofrece una extensión de garantía para algunos de nuestros productos. Para recibir una extensión de la garantía, deberá registrar su producto en la aplicación de Zendure y puede haber costos adicionales u otras condiciones involucradas. La tabla anterior indica los períodos de garantía para los productos comprados a Zendure o sus socios minoristas.
  • Seite 74 Paso 4 Envíe los artículos a Zendure con su número RMA incluido en la etiqueta de envío en el exterior del embalaje. No escriba el número RMA en la caja de cartón verde.
  • Seite 75 à l'utilisation et au fonctionnement en toute sécurité de ce produit. Familiarisez-vous avec les réglementations en vigueur dans votre région. Vous êtes seul responsable de vous tenir informé de toutes les réglementations applicables et d'utiliser les produits Zendure d'une façon conforme. Conservez ce manuel pour référence future.
  • Seite 76 Contrôleur Smart PV Hub 1200 Modèle ZDSPVH1200 Poids ≈ 4,7 kg Dimensions (L*l*H) 363 × 246 × 64 mm Type sans-fil Bluetooth, Wifi 2,4 GHz, Classe IP IP65 Garantie 10 ans Entrée photovoltaïque (PV) Alimentation recommandée en entrée 210-550W chacun Tension CC d'entrée maximale 60 V Plage de tension MPPT...
  • Seite 77: Instructions Relatives À La Sécurité

    Batterie supplémentaire AB1000 Modèle ZDAB1000 Poids ≈ 11,5kg Dimensions 350 × 200 × 186,5 mm Capacité 960 Wh / 48 V Type LiFePO4 Puissance en sortie 1 200W Maxi Alimentation en entrée 800W Maxi Nombre maxi d'extensions de la batterie Capacité...
  • Seite 78: Déclaration De La Fcc

    20cm entre l'émetteur et votre corps 3.3 DÉCLARATION DE CONFORMITÉ CE ZENDURE TECHNOLOGY CO., LIMITED déclare que le produit SolarFlow (Smart PV Hub et batterie supplémentaire AB1000) est conforme aux directives 2014/53/UE (RED) , 2011/65/UE (RoHS) , 2015/863/UE (RoHS).
  • Seite 79: Conseils Importants

    Veuillez vérifier les accessoires avant l'installation. Certains accessoires doivent être achetés séparément. € Après l'installation, veuillez d'abord télécharger l'appli Zendure afin de contrôler l'électricité produite et de régler l'alimentation du Microinverter. Après l'installation de SolarFlow, il faut environ 5 minutes avant qu'il puisse être connecté...
  • Seite 80: Démarrage

    5. Démarrage 5.1 Que contient la boîte 1* Smart PV Hub 4* câble solaire 3 m 1* câble de batterie 2* câble micro- 1,5 m onduleur (Microinverter) 0,6m 6* vis de montage 2* rondelles Mode d'emploi 1* antenne M4,7*39mm plates 1.
  • Seite 81 IoT. Les utilisateurs peuvent se connecter directement à l'IoT sur l'appli Zendure. Conseils : • Une fois que l'appareil est lié aux applis Zendure, lorsque SolarFlow est rallumé, le voyant IoT clignote lentement jusqu'à ce qu'il puisse communiquer avec l'appli Zendure.
  • Seite 82 Réinitialisation matérielle de Smart IoT enfoncé pendant 10 PV Hub et AB1000 secondes Téléchargez l'appli Zendure Smart PV Hub et AB1000 OTA vers OTA Conseils : • Choisissez l'un des modes Bluetooth ou Wifi sur l'appli Zendure, le Wifi est préféré.
  • Seite 83: Installation

    F. Connectez le Microinverter au réseau domestique G. Connectez les panneaux solaires au Smart PV Hub H. Scannez le code QR et téléchargez l'appli Zendure. Suivez les instructions de l'appli pour configurer l'appareil. Après 20 minutes, vous obtenez les données du système de stockage d'énergie SolarFlow sur votre appli Zendure.
  • Seite 84 Si vous avez installé le système solaire de balcon, vous devez le déconnecter selon les étapes suivantes : Débranchez les câbles du micro-onduleur et du réseau domestique. Débranchez uniquement les câbles du premier panneau solaire et du micro-onduleur. Conseils : L'installation du panneau solaire n'a pas besoin d'être déplacée sauf si vous souhaitez changer d'emplacement De la même façon, débranchez les câbles du deuxième panneau solaire...
  • Seite 85: Installer Smart Pv Hub

    5.3.4 Installer Smart PV Hub Conseils : • Veuillez installer le Smart PV Hub dans un endroit à l'abri de la lumière directe du soleil. • La longueur de nos câbles solaires est de 3 mètres, donc avant de confirmer l'emplacement de l'installation du Smart PV Hub, veillez à mesurer la distance entre le connecteur MC4 du panneau solaire et celui du Smart PV Hub.
  • Seite 86: Empilement D'ab1000

    Marquez l'emplacement. Trouvez une position à côté de Smart PV Hub. Une personne plaque le micro-onduleur au mur avec les mains et l'autre personne trace les positions des deux trous de vis du micro-onduleur avec un marqueur. Perçage. Percez deux trous de montage de 8 mm de diamètre aux deux positions marquées.
  • Seite 87: Connecter Avec Des Câbles

    5.3.7 Connecter avec des câbles Conseils : Avant de connecter le câble, assurez-vous que le produit est éteint (maintenez le bouton IoT enfoncé pendant 6 secondes). Branchement des câbles pour Microinverter 1 vers 1 Prise domestique Home Socket La flèche sur le câble The arrow on the battery batterie est à...
  • Seite 88: Télécharger L'appli Zendure

    à AB1000 et au réseau domestique et de surveiller la production d'énergie. La puissance du micro-onduleur peut être réglée dans une plage de 100 à 1200 W. Lisez le guide d'utilisation de l'appli Zendure et accédez au lien de téléchargement ci-après : https://zendure.com/pages/download-center. Politique de confidentialité...
  • Seite 89 • Il faut un certain temps pour que le système se connecte au réseau, et il faut environ 20 minutes pour synchroniser les données avec l'appli Zendure. Ainsi, après l'installation, veuillez attendre 20 minutes avant d'accéder aux paramètres de l'APPLI.
  • Seite 90: Déconnexion De Solarflow

    5.3.9 Déconnexion de SolarFlow Conseils : Avant de déconnecter, veuillez éteindre SolarFlow (Maintenez le bouton IoT enfoncé pendant 6 secondes pour éteindre) Éteignez d'abord l'AB1000 et le Smart PV Hub (Maintenez le bouton IoT enfoncé pendant 6 secondes) Déconnexion du réseau domestique. Débranchez les câbles du Microinverter et de la prise shuko domestique.
  • Seite 91: Year Warranty

    Le tableau ci-dessus indique les périodes de garantie pour les produits achetés auprès de Zendure ou de ses partenaires revendeurs. Les périodes de garantie pour les produits commandés via les campagnes de financement participatif de Zendure (Kickstarter, Indiegogo, etc.) peuvent différer.
  • Seite 92 Veuillez noter que ces termes et conditions de garantie sont sujets à modifications sans préavis. L'équipe d'assistance de Zendure se réserve le droit de prendre une décision finale quant à l'admissibilité au service de garantie et de déterminer la solution appropriée, qui peut inclure le remplacement, la réparation ou le remboursement, à...
  • Seite 93 Acquisire familiarità con le normative pertinenti nella propria area. L'utente è l'unico responsabile della conoscenza di tutte le normative pertinenti e dell'utilizzo dei prodotti Zendure in modo conforme. Conservare il presente manuale per consultazioni future. INDICE 1.
  • Seite 94 Controller Smart PV Nome Hub 1200 Modello ZDSPVH1200 Peso ≈ 4,7 kg Dimensioni(L*P*A) 363×246×64 mm Tipo wireless Bluetooth, Wi-Fi 2,4 GHz, Grado IP IP65 Garanzia 10 anni Ingresso PV Potenza di ingresso consigliata 210-550 W ognuno Tensione CC di ingresso max. 60 V Gamma di tensione MPPT 16-48V...
  • Seite 95: Istruzioni Di Sicurezza

    Nome Batteria aggiuntiva AB1000 Modello ZDAB1000 Peso ≈ 11,5kg Dimensioni 350×200×186,5 mm Capacità 960 Wh/48 V Tipo LiFePO4 Potenza in uscita 1.200W max. Potenza di ingresso 800W max. Numero max. di estensione della batteria Capacità max. di estensione 3.840 Wh Grado IP IP65 Colore...
  • Seite 96: Dichiarazione Fcc

    20 cm tra il radiatore e il corpo. 3.3 DICHIARAZIONE DI CONFORMITÀ CE ZENDURE TECHNOLOGY CO., LIMITED dichiara che il prodotto SolarFlow (Smart PV Hub e batteria aggiuntiva AB1000) è conforme alla direttiva 2014/53/UE (RED), 2011/65/UE (RoHS), 2015/863/UE (RoHS).
  • Seite 97: Suggerimenti Importanti

    Controllare gli accessori prima dell'installazione. Alcuni accessori devono essere acquistati separatamente. € Dopo l'installazione, scaricare prima l'app Zendure per controllare l'elettricità prodotta e impostare la potenza del microinverter. Dopo l'installazione di SolarFlow, occorrono circa 5 minuti prima che possa essere collegato alla rete e i dati verranno sincronizzati con l'app Zendure entro 20 minuti.
  • Seite 98: Operazioni Preliminari

    5. Operazioni preliminari 5.1 Contenuto della confezione 1* Smart PV Hub 4* Cavo solare da 1* Cavo della 2* Cavo del batteria microinverter 1,5 m 0,6m 6* Viti di montaggio 2* Rondella 1* Antenna Manuale d'uso M4.7*39 mm piatta 1. Cavo solare Usato per il collegamento dei pannelli solari 2.
  • Seite 99 IoT. Gli utenti possono connettersi direttamente all'IoT sull'app Zendure. Suggerimenti: • Una volta associato il dispositivo alle app Zendure, quando SolarFlow viene riacceso, l'indicatore luminoso IoT lampeggia lentamente finché non riesce a comunicare con l'app Zendure. • Per riassociare l'account e ripristinare la connessione IoT, tenere premuto il tasto IoT per 3 secondi per avviare la connessione IoT.
  • Seite 100 L’indicatore AB1000 Ricarica di AB1000 lampeggia in verde Visualizzare sull’app Capacità restante della Zendure, scaricare l’app batteria AB1000 Zendure e associare Solar Flow Visualizzare sull’app promemoria di carica Zendure, scaricare l’app Indicatore AB1000 AB1000 bassa Zendure e associare Solar...
  • Seite 101 F. Collegare il microinverter alla rete domestica G. Collegare i pannelli solari a Smart PV Hub H. Eseguire la scansione del codice QR e scaricare l’ a pp Zendure. Osservare le istruzioni dell'app per configurare il dispositivo. Dopo 20 minuti, si riceveranno i dati del sistema di accumulo di energia SolarFlow sull’app...
  • Seite 102 Se si è installato l’impianto solare nel balcone, scollegarlo attenendosi ai seguenti passaggi: Scollegare i cavi del microinverter e della rete domestica. Scollegare solo i cavi del primo pannello solare e del microinverter. Suggerimenti: non è necessario spostare l'installazione del pannello solare a meno che non si desideri modificare la posizione.
  • Seite 103 5.3.4 Installazione di Smart PV Hub Suggerimenti: • Installare Smart PV Hub in un luogo non esposto alla luce solare diretta. • La lunghezza dei nostri cavi solari è di 3 metri, quindi prima di verificare la posizione di installazione di Smart PV Hub, misurare la distanza dal connettore MC4 del pannello solare al connettore MC4 di Smart PV Hub.
  • Seite 104 Contrassegnare la posizione, trovare una posizione accanto a Smart PV Hub. Una persona fissa il microinverter alla parete con le mani e l'altra contrassegna le posizioni dei due fori per viti del microinverter con un pennarello. Foratura: praticare due fori di montaggio di diametro 8 mm nelle due posizioni contrassegnate.
  • Seite 105 5.3.7 Collegamento con cavi Suggerimenti: Prima di collegare il cavo, assicurarsi che il prodotto sia spento (tenere premuto il tasto IoT per 6 secondi). Collegamento via cavo per microinverter 1 in 1 Presa domestica Home Socket La freccia sul cavo della The arrow on the battery batteria è...
  • Seite 106 IoT per 1 secondo). 5.3.8 Download dell’app Zendure L'app Zendure offre agli utenti la possibilità di allocare la potenza ad AB1000 e alla rete domestica e monitorare la generazione di energia. La potenza del microinverter può essere impostata in un intervallo di 100- 1200 W.
  • Seite 107 Su microinverter Suggerimenti: • Occorre un periodo di tempo per il collegamento del sistema alla rete e circa 20 minuti per sincronizzare i dati con l'app Zendure. Quindi, dopo l'installazione, attendere 20 minuti prima di andare alle impostazioni dell'APP. • Si consiglia di accumulare il più possibile nella batteria durante il giorno, ad eccezione del consumo energetico di base.
  • Seite 108 5.3.9 Scollegamento di SolarFlow Suggerimenti: Prima di scollegare, spegnere SolarFlow (tenere premuto il tasto IoT per 6 secondi per spegnerlo). in primo luogo, spegnere AB1000 e Smart PV Hub (tenere premuto il tasto IoT per 6 secondi) scollegamento della rete domestica: scollegare i cavi del microinverter e della shuko domestica.
  • Seite 109: Year Warranty

    Zendure e potrebbero esservi costi aggiuntivi o altre condizioni. La tabella precedente indica i periodi di garanzia per i prodotti acquistati da Zendure o dai suoi partner commerciali. I periodi di garanzia per i prodotti ordinati tramite le campagne di crowdfunding di Zendure (Kickstarter, Indiegogo, ecc.) potrebbero variare.
  • Seite 110 Si noti che questi termini e condizioni di garanzia sono soggetti a modifiche senza preavviso. Il team di assistenza Zendure si riserva il diritto di prendere una decisione finale in merito all'ammissibilità del servizio di garanzia e di determinare la soluzione appropriata, che potrebbe includere la sostituzione, la riparazione o il rimborso, a sua esclusiva discrezione.
  • Seite 111 Należy poznać właściwe przepisy obowiązujące w swoim regionie. Użytkownik ponosi wyłączną odpowiedzialność za przestrzeganie wszystkich odpowiednich przepisów i za używanie produktów firmy Zendure w sposób zgodny z przepisami. Należy zachować tę instrukcję do wykorzystania w przyszłości. SPIS TREŚCI 1. Przed rozpoczęciem 2.
  • Seite 112 Kontroler Smart PV Nazwa Hub 1200 Model ZDSPVH1200 Waga ≈ 4,7 kg Wymiary (D*S*W) 363×246×64 mm Typ połączenia bezprzewodowego Bluetooth, Wi-Fi 2,4GHz, Stopień IP IP65 Gwarancja 10 lat Wejście PV Zalecana moc wejścia 210-550W każdy Maksymalne napięcie wejścia prądu stałego Zakres napięcia MPPT 16-48V Zakres napięcia MPPT przy pracy z pełną...
  • Seite 113: Instrukcja Bezpieczeństwa

    Nazwa Dodatkowy akumulator AB1000 Model ZDAB1000 Waga ≈ 11,5kg Wymiary 350×200×186,5mm Pojemność 960Wh/48V LiFePO4 Moc wyjścia 1 200W maks. Moc wejścia 800W maks. Maksymalna liczba rozbudowy akumulatorów Maksymalna rozbudowa pojemności 3840 Wh Stopień IP IP65 Kolor Szary Temperatura ładowania 0-45℃ Temperatura rozładowania -20-45℃...
  • Seite 114: Oświadczenie Fcc

    20 cm pomiędzy radiatorem a ciałem użytkownika 3.3 DEKLARACJA ZGODNOŚCI WE ZENDURE TECHNOLOGY CO., LIMITED deklaruje, że ten produkt SolarFlow (Smart PV Hub i dodatkowy akumulator AB1000) jest zgodny z dyrektywą 2014/53/EU (RED) , 2011/65/EU(RoHS) , 2015/863/EU(RoHS).
  • Seite 115: Deklaracja Zgodności

    Po instalacji należy najpierw pobrać aplikację Zendure, aby sprawdzić wytwarzaną energię elektryczną i ustawić moc mikrofalownika. Po instalacji SolarFlow, podłączenie do sieci zajmie około 5 minut, a dane zostaną zsynchronizowane z aplikacją Zendure w ciągu 20 minut. Przed ustawieniem wyjścia na mikrofalownik, należy potwierdzić...
  • Seite 116: Rozpoczęcie

    5. Rozpoczęcie 5.1 Co znajduje się w opakowaniu 1* Smart PV Hub 4* Kabel solarny 1* Kabel 2* Kabel akumulatora mikrofalownika 1,5m 0,6m 6* Śruby montażowe M 2* Podkładka 1* Antena Instrukcja obsługi 4,7*39mm płaska 1. Kabel solarny: Używany do podłączenia paneli słonecznych. 2.
  • Seite 117 Port akumulatora Połączenie IoT: Po włączeniu Smart PV Hub, wskaźnik IoT zaczyna szybko migać, a urządzenie automatycznie nawiązuje połączenie IoT. Użytkownicy mogą bezpośrednio łączyć się z IoT w aplikacji Zendure. Wskazówki: • Po powiązaniu urządzenia z aplikacjami Zendure, po ponownym włączeniu SolarFlow, dopóki nie będzie można skomunikować...
  • Seite 118 świecić stałym światłem Wskaźnik AB1000 miga Doładowywanie AB1000 zielonym światłem Wyświetl w aplikacji Pozostała pojemność Zendure, pobierz aplikację akumulatora AB1000 Zendure i powiąż Solar Flow Wyświetl w aplikacji Świeci czerwonym Informacja o niskiej Zendure, pobierz aplikację światłem wskaźnik AB1000 mocy Zendure i powiąż...
  • Seite 119: Instalacja

    Wskazówki: • Wybierz Bluetooth lub Wi-Fi w aplikacji Zendure, preferowane jest Wi-Fi. 5.3 Instalacja • Aby jak najszybciej sprawdzić i uruchomić system fotowoltaiczny, instalację należy wykonać przy słonecznej pogodzie. • Zaleca się, aby w instalacji uczestniczyły co najmniej dwie osoby.
  • Seite 120 Jeśli zainstalowany został balkonowy system solarny, należy go odłączyć według następujących czynności: Odłącz kable od mikrofalownika i sieci domowej. Odłącz tylko kable pierwszego panelu solarnego i mikrofalownika. Wskazówki: Instalacji panelu słonecznego nie należy przenosić, chyba że wymagana jest zmiana lokalizacji W ten sam sposób odłącz kable drugiego panelu solarnego i mikrofalownika.
  • Seite 121: Instalacja Smart Pv Hub

    5.3.4 Instalacja Smart PV Hub Wskazówki: • Smart PV Hub należy zainstalować w miejscu poza zasięgiem bezpośredniego światła słonecznego. • Długość naszych kabli fotowoltaicznych wynosi 3 metry, dlatego przed potwierdzeniem miejsca instalacji Smart PV Hub należy zmierzyć odległość od złącza MC4 panela słonecznego do złącza MC4 Smart PV Hub.
  • Seite 122 Zaznaczenie miejsca instalacji, znajdź pozycję obok Smart PV Hub, jedna osoba przytrzymuje mikrofalownik na ścianie rękami, a druga osoba zaznacza pozycje dwóch otworów na śruby mikrofalownika. Wiercenie, Wywierć w dwóch zaznaczonych miejscach, dwa otwory montażowe o średnicy 8 mm. Instalacja żółtych plastikowych tulejek rozprężnych śrub, Włóż żółte, plastikowe tulejki rozprężne śrub do dwóch otworów wywierconych w czynności 3.
  • Seite 123: Podłączenie Kablami

    5.3.7 Podłączenie kablami Wskazówki: Przed podłączeniem kabla należy się upewnić, że produkt jest wyłączony (naciśnij i przytrzymaj przez 6 sekund przycisk IoT). Połączenie kablowe 1-do-1 z mikrofalownikiem Gniazdo sieci domowej Home Socket Strzałka na kablu The arrow on the battery akumulatora znajduje się...
  • Seite 124: Pobranie Aplikacji Zendure

    Aplikacja Zendure daje użytkownikom możliwość alokacji mocy do AB1000 i sieci domowej oraz monitorowania wytwarzania energii, moc mikrofalownika można ustawić w zakresie 100-1200W. Przeczytaj instrukcję obsługi aplikacji Zendure i uzyskaj dostęp do łącza pobierania: https://zendure.com/pages/download-center. Polityka prywatności Używanie produktów, aplikacji i usług Zendure, oznacza wyrażenie zgody na Warunki użytkowania i Politykę...
  • Seite 125 Wskazówki: • Połączenie systemu z siecią zajmuje trochę czasu, a synchronizacja danych z aplikacją Zendure zajmuje około 20 minut, dlatego po instalacji, przed przejściem do ustawień aplikacji należy zaczekać 20 minut. • Zaleca się, aby w ciągu dnia magazynować jak najwięcej energii w akumulatorze, poza obsługą...
  • Seite 126: Odłączenie Solarflow

    5.3.9 Odłączenie SolarFlow Wskazówki: Przed odłączeniem, Wyłącz SolarFlow (w celu wyłączenia, naciśnij i przytrzymaj przez 6 sekund przycisk IoT) Najpierw wyłącz AB1000 i Smart PV Hub (naciśnij i przytrzymaj przez 6 sekund przycisk IoT) Odłącz sieć domową, odłącz kable mikrofalownika i gniazdo shuko sieci domowej.
  • Seite 127: Year Warranty

    Zendure, co może wiązać się z dodatkowymi kosztami lub innymi warunkami. Powyższa tabela przedstawia okresy gwarancji na produkty zakupione od firmy Zendure lub jej partnerów detalicznych. Okresy gwarancji na produkty zamówione w ramach kampanii crowdfundingowych firmy Zendure (Kickstarter, Indiegogo, itp.) mogą...
  • Seite 128 Czynność 4 Wyślij element(y) do firmy Zendure z numerem RMA podanym na etykiecie wysyłkowej na zewnątrz opakowania. Numeru RMA nie należy zapisywać na zielonym kartonie opakowania. Przeczytaj instrukcję obsługi aplikacji Zendure i uzyskaj dostęp do łącza pobierania:...
  • Seite 129 Користувачі несуть повну відповідальність за безпечну експлуатацію та роботу цього виробу. Дізнайтеся про відповідні правила у своєму регіоні. Ви несете повну відповідальність за ознайомлення з усіма відповідними правилами та адекватну експлуатацію виробів Zendure. Збережіть цей посібник для подальшого користування. ЗМІСТ...
  • Seite 130 Контролер Smart PV Назва Hub 1200 Модель ZDSPVH1200 Ширина =4,7 кг Габарити (довжина х ширина х висота) 363×246×64 mm Бездротовий тип Bluetooth, 2,4 ГГц Wi-Fi, Рівень ІР IP65 Гарантія 10 років Фотоелектричний вхід Рекомендована потужність входу 210-550 Вт для кожного Максимальна...
  • Seite 131: Інструкції З Техніки Безпеки

    Назва Додатковий акумулятор AB1000 Модель ZDAB1000 Ширина ≈ 11,5 кг Габарити 350 × 200 ×186,5 мм Ємність 960 Вт-годин/48 В Тип LiFePO4 Напруга виходу Макс. 1200 Вт Живлення входу Макс. 8000 Вт Максимальна кількість акумуляторів розширення Максимальний обсяг розширення 3840 Вт-годин Рівень...
  • Seite 132 обладнання слід встановити та експлуатувати на відстані мінімум 20 см між випромінювачем і вашим тілом 3.3 ДЕКЛАРАЦІЯ ПРО ВІДПОВІДНІСТЬ ЄС ZENDURE TECHNOLOGY CO., LIMITED заявляє, що виріб SolarFlow (Smart PV Hub і додатковий акумулятор AB1000) відповідає Директивам 2014/53/EU (RED) , 2011/65/EU(RoHS), 2015/863/EU(RoHS) .
  • Seite 133 променів, аби запобігти стрімкому зростанню температури. Перед інсталяцією перевірте аксесуари. Деякі аксесуари слід придбати окремо. € Після інсталяції завантажте додаток Zendure, аби перевіряти, скільки електроенергії було вироблено, і встановлювати живлення мікроінвертора. Після інсталяції SolarFlow знадобиться близько 5 хвилин, перш ніж пристрій зможе підключитися до електромережі, а дані буде...
  • Seite 134: Початок Експлуатації

    5. Початок експлуатації 5.1 Що входить до комплекту 1* Smart PV Hub 4* кабель сонячної 1* кабель 2* кабель панелі 3 м акумулятора мікроінвертера 1 500 мм 0,6m 6* Монтажні гвинти 2* Пласка Посібник 1* Антена M4.7*39мм шайба користувачів 1. Кабель сонячної панелі: Застосовується для підключення сонячних панелей...
  • Seite 135 починає швидко мерехтіти, а пристрій автоматично переходить у з'єднання ІоТ. Можна напряму підключитися до IoT у додатку Zendure. Підказки: • Після того, як пристрій поєднано із додатком Zendure, коли знову вмикається SolarFlow, індикатор ІоТ повільно мерехтить, доки не зможе зв'язатися із додатком Zendure.
  • Seite 136 світитимуться Скидання налаштувань апаратних Натисніть і утримуйте засобів Smart PV Hub & AB1000 кнопку ІоТ 10 секунд Завантаження додатку Smart PV Hub і AB1000 OTA Zendure до ОТА Підказки: • Виберіть Bluetooth або Wi-Fi у додатку Zendure: бажано вибрати Wi-...
  • Seite 137 F. Підключіть мікроінвертор до домашньої мережі G. Підключіть сонячні панелі до Smart PV Hub H. Скануйте QR-код і завантажте додаток Zendure. Виконуйте інструкції з додатку для налаштування пристрою. Через 20 хвилин ви отримаєте дані системи зберігання енергії SolarFlow у додатку...
  • Seite 138 Якщо ви встановили балконну геліосистему, слід відключити її, виконавши наступні кроки: Відключіть кабелі мікроінвертора і домашньої електромережі. Від'єднайте лише кабелі першої сонячної панелі та мікроінвертора. Підказки: Установку сонячної панелі не потрібно переміщати, якщо не хочете змінити місце її розташування Таким же чином відключіть кабелі другої сонячної панелі та мікроінвертора.
  • Seite 139 5.3.4 Інсталюйте Smart PV Hub Підказки: • Встановлюйте Smart PV Hub у місці, захищеному від прямого сонячного світла. • Довжина сонячних кабелів становить 3 метри, тож перш ніж підтвердити місце встановлення Smart PV Hub, виміряйте відстань від з'єднувача MC4 сонячної панелі до з'єднувача MC4 Smart PV Hub. Позначте...
  • Seite 140 Позначте розташування, знайдіть місце поруч із Smart PV Hub, одна особа руками фіксує мікроінвертор на стіні, а інша маркером позначає положення двох отворів для гвинтів мікроінвертора. Свердліть: просвердліть два отвори діаметром 8 мм у двох позначених місцях. Встановлення жовтої пластикової розширювальної трубки гвинтів: відповідно...
  • Seite 141 5.3.7 Підключення кабелями Підказки: Перед підключенням кабелів переконайтеся, що виріб вимкнено (натисніть і утримуйте кнопку ІоТ 6 секунд). Підключення кабелю для мікроінвертора 1-в-1 Р о з е т к а д о м а ш н ь о ї Home Socket електромережі...
  • Seite 142 • Після виконання підключення увімкніть SolarFlow (1 секунду натискайте кнопку ІоТ). 5.3.8 Завантаження додатку Zendure Додаток Zendure надає можливість розподіляти живлення для AB1000 і домашньої електромережі, а також відстежувати виробництво електроенергії; потужність для мікроінвертора можна встановити в діапазоні 100-1200 Вт.
  • Seite 143 На мікроінвертор Підказки: • Для підключення до електромережі знадобиться певний час, близько 20 хвилин піде на синхронізацію додатку Zendure, тож після інсталяції слід почекати 20 хвилин, перш ніж налаштовувати додаток. • Рекомендовано протягом дня зберігати в акумуляторі якомога більше енергії, за винятком базового енергоспоживання енергії. Спосіб...
  • Seite 144 5.3.9 Відключення SolarFlow Підказки: Перед відключенням вимкніть SolarFlow (для цього натисніть і утримуйте кнопку ІоТ 6 секунд) Спочатку вимкніть AB1000 і Smart PV Hub (Натисніть і утримуйте кнопку IoT 6 секунд) Відключіть домашню електромережу і відключіть кабелі мікроінвертора. Відключіть сонячні панелі, відключіть кабелі двох сонячних панелей і...
  • Seite 145 гарантію, слід зареєструвати виріб у додатку Zendure, а це може спричинити додаткові витрати або задіяти інші умови. У таблиці вище вказано гарантійні терміни для виробів, придбаних у Zendure або їхніх партнерів по роздрібній торгівлі. Гарантійні строки для виробів, замовлених через...
  • Seite 146 на ремонт, ремонт на місці або заміна. Крок 4: Надішліть виріб (вироби) до Zendure із номером RMA, указаним на транспортній етикетці на зовнішній стороні упаковки. Не пишіть номер RMA на зеленій картонній коробці. Прочитайте посібник користувача додатку Zendure і перейдіть...
  • Seite 148 Support / Contact: https://zendure.de/pages/contact https://eu.zendure.com/pages/contact-us https://zendure.com/pages/contact Website: https://zendure.de https://eu.zendure.com Zendure USA Inc. https://zendure.com Phone: 800-991-6148 (US) Office Hours: Mon - Fri 9:00 - 17:00 PST EU Importer: Zendure DE GmbH Support / Contact: www.zendure.com/support Address: HoferstraBe 9B,71636 Ludwigsburg Website: www.zendure.com E-mail:support-eu@zendure.com 2023...

Diese Anleitung auch für:

SolarflowPpvh1200

Inhaltsverzeichnis