Herunterladen Inhalt Inhalt Diese Seite drucken
MR MESSKO MPreC Betriebsanleitung
Vorschau ausblenden Andere Handbücher für MESSKO MPreC:

Werbung

Verfügbare Sprachen

Verfügbare Sprachen

MESSKO
®
MESSKO
®
Betriebsanleitung/Operating Instructions
B A 3451 814/00 D E- En
MPreC
PRüfStAnD
®
MPreC
tESt BEnCh
®
.
MES S K O I nS tRUMEnt S

Werbung

Inhaltsverzeichnis
loading

Inhaltszusammenfassung für MR MESSKO MPreC

  • Seite 1 MESSKO MPreC PRüfStAnD ® ® MESSKO MPreC tESt BEnCh ® ® Betriebsanleitung/Operating Instructions B A 3451 814/00 D E- En MES S K O I nS tRUMEnt S...
  • Seite 2 BA 3451814/00 DE-EN...
  • Seite 3: Inhaltsverzeichnis

    Inhaltsverzeichnis/Contents Inhaltsverzeichnis Contents Sicherheit . . . . . . . . . . . . . . . . . . . . . . . . . . . . . 4 Safety .
  • Seite 4: Sicherheit

    Sicherheit Sicherheit ACHTUNG Sicherheitshinweise Einbau, elektrischer Anschluss, Inbetriebnahme und Wartung des Geräts dürfen ausschließlich von Alle Personen, die mit der Montage, der Inbetriebnah- me und dem Betrieb des Geräts zu tun haben, müssen qualifiziertem, ausgebildetem Personal gemäß dieser Betriebsanleitung durchgeführt werden . - fachlich ausreichend qualifiziert sein und Der Betreiber hat für die bestimmungsgemäße - diese Betriebsanleitung genau beachten .
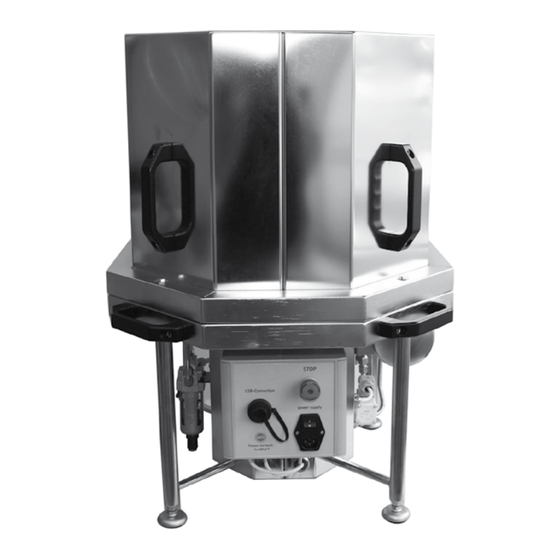
  • Seite 5: Produktbeschreibung

    Wartung von Transformatoren . 1 Abdeckhaube Lieferumfang 2 Handgriff (4x an Abdeckhaube) 3 Handgriff (4x an Unterteil) MESSKO MPreC Prüfstand inkl . Abdeckung Software zum MESSKO MPreC Prüfstand 4 Druckluftanschluss G1/2“ USB 2 .0 Kabel Typ A auf Typ B 5 USB-Anschluss...
  • Seite 6: Inbetriebnahme

    Inbetriebnahme Inbetriebnahme Beschreibung Abbildung Stellen Sie den MPreC Prüfstand auf eine ebene waagerechte Fläche . WARNUNG Achten Sie darauf, dass der Prüfstand einen sicheren Stand hat und nicht abrutschen oder kippen kann . ACHTUNG Es wird empfohlen, den Prüfstand durch zwei oder mehr Personen zu tragen und in Position zu bringen (Gewicht ca .
  • Seite 7 USB-Kabel eine Datenverbindung mit Ihrem PC bzw . Notebook her . Starten Sie das Setupprogramm des MESSKO MPreC Prüfstands von der mitgelieferten CD . Systemvoraussetzung ist Microsoft Windows XP inkl . SP 3 oder eine neuere MS Windows Version .
  • Seite 8: Betrieb

    Betrieb Betrieb Beschreibung Abbildung Entfernen Sie die Abdeckung vom zu prüfenden Druckentlastungsventil . HINWEIS Stellen Sie sicher, dass die Flanschseite des Druckentlastungsventils und insbe- sondere die Montagedichtung frei von Verunreinigungen ist . Die Montage des Druckentlastungs- ventils auf dem Tisch des Prüfstands erfolgt über die 6 Bohrungen am Gehäu- seflansch mittels M12-Schrauben und Unterlegscheiben .
  • Seite 9 Betrieb Beschreibung Abbildung Setzen Sie die Abdeckhaube zu zweit auf den MPreC Prüfstand auf . Achten Sie darauf, dabei nicht gegen den Signalstift zu stoßen . ACHTUNG Es wird empfohlen, die Abdeckhaube durch zwei Personen auf das Unterteil des Prüf- stands aufzusetzen .
  • Seite 10 Betrieb Beschreibung Abbildung Starten Sie die MPreC-Anwendungssoft- ware über das Programmsymbol . Wählen Sie die Sprache der Bediener- oberfläche (English oder Chinese) . Zum Sprachwechsel muss die Software neu gestartet werden . Über „Settings“ können Sie vorgeben, in welchem Format („PDF“ und/oder „Picture“) das Protokoll der Prüfung gespeichert werden soll .
  • Seite 11 Betrieb Beschreibung Abbildung Nach Abschluss des Test wählen Sie „Testresults“, um das Testergebnis zu begutachten . Beispiel für Prüfung mit einem Messzyklus Beispiel für Prüfung mit 10 Messzyklen Wurde das Auswahlfeld „Export (autom.): enabled“ nicht selek- tiert, dann kann nach Prüfablauf durch Auswahl von „PDF-Report“...
  • Seite 12: Wartung Und Service

    Wartung und Service Wartung und Service Der mobile MESSKO MPreC Prüfstand ist wartungsfrei . Es wird empfohlen, alle 3 Jahre den Austausch oder die Kalibrierung des Drucktransmitters vorzuneh- men . ACHTUNG Filterwechsel Vor Filterwechsel unbedingt die Druckluftversorgung unterbrechen . Beschreibung...
  • Seite 13 Wartung und Service Beschreibung Abbildung Filterkartusche nach unten abziehen, wenn die Markierungen I (oben) und II (darunter auf der Kartusche) gegenüberstehen . Filter nach links abdrehen . Filter vom schwarzen Plastikober- und -unterteil trennen und durch neuen ersetzen . Den Einbau in umgekehrter Rei- henfolge vollziehen (Schritte 5, 4, 3 und 2) .
  • Seite 14: Technische Daten

    Wartung und Service Technische Daten Beschreibung Abbildung Verfahren Sie auf gleiche Weise bei der Auswechselung des Hauptfilters. Den Filtereinsatz des Hauptfilters durch neuen ersetzen . Hier bilden heller Filter und schwar- zes Plastikober- und -unterteil eine Einheit und sind gemeinsam zu ersetzen . Hersteller: SMC Best .-Nr . AFM30P-060AS Den Einbau in umgekehrter Reihenfolge (Schritte 5, 4, 3 und 2) vollziehen .
  • Seite 15: Anhang

    Anhang Abmessungen BA 3451814/00 DE-EN...
  • Seite 16: Prüfbescheinigung

    Anhang Prüfbescheinigung BA 3451814/00 DE-EN...
  • Seite 17: Safety

    Safety Safety CAUTION Safety notes Only qualified, trained staff must carry out instal- lation, electrical connection, commissioning and All persons involved with the fitting, commissioning and operation of the device must be maintenance of the device in accordance with these Operating Instructions . - adequately professionally qualified and The operator shall ensure that the device is used - strictly observe these operating instructions .
  • Seite 18: Product Description

    . 1 Hood Scope of supply 2 Handle (4x on hood) MESSKO MPreC test bench incl . hood 3 Handle (4x on base) software for MESSKO MPreC test bench 4 Compressed air connection G1/2“ USB 2 .0 cable type A to type B...
  • Seite 19: Commissioning

    Commissioning Commissioning Description Image Place the MPreC test bench on a level horizontal surface . WARNING Ensure that the testing device has a firm base and cannot slip or tip over. CAUTION It is recomended to carry and position the test bench by two or more people (weight approx .
  • Seite 20 USB port and the USB cable supplied . Launch the setup program of the MESSKO MPreC test bench from the CD supplied . System requirement is Microsoft Windows XP including SP 3 or a newer version of MS Windows .
  • Seite 21: Operation

    Operation Operation Description Image Remove the cover from the pressure relief valve to be tested . NOTE Ensure that the flange side of the pressure relief valve and particularly the installation seal are free of dirt and contamination . Use M12 screws and washers in the 6 holes on the housing flange to install the pressure relief valve on the table of the test bench .
  • Seite 22 Operation Description Image Two people are required to replace the cover on the MPreC test bench . Do not knock the signal pin when doing this . CAUTION It is recomended to fit the hood to the lower part of the test bench by two people . Connect the compressed air supply via the existing G1/2”...
  • Seite 23 Operation Description Image Start the MPreC software via the program icon . Select the language of the user interface (English or Chinese) . Relaunch the software to change the language . Via „Settings“ you can specify the format („PDF“ and/or „Picture“) of the test protocol .
  • Seite 24 Operation Description Image After completion of the test, select “Test results” to examine the test result . Example for testing with one measuring cycle . Example for testing with 10 measuring cycles . If the select box „Export (autom.): enabled“ is not se- lected, then the test protocol can be sto- red as PDF file under the specified path by selecting „PDF-Report“...
  • Seite 25: Maintenance And Service

    Maintenance and service Maintenance and service The mobile MESSKO MPreC test bench is maintenance-free . It is recommended that the pressure transmitter is replaced or calibrated every 3 years . CAUTION Filter change It is essential to disconnect the pressure air supply before replacing the filter.
  • Seite 26 Maintenance and service Description Image Pull the filter cartridge off downwards when the I (above) and II (below on the cartridge) marks are opposite each other . Twist the filter to the left and remove. Separate the filter insert from the plastic top and bottom parts and replace it with a new one . Complete the installation in reverse order (steps 5, 4, 3, and 2) .
  • Seite 27: Technical Data

    Maintenance and service Technical data Description Image Proceed in the same manner when replacing the main filter. Replace the filter insert of the main filter with a new one. In this case, the light-coloured filter and black plastic top and bottom parts form a unit and must be re- placed together . Manufacturer: SMC Part-no . AFM30P-060AS Complete the installation in reverse order (steps 5, 4, 3, and 2) .
  • Seite 28: Appendix

    Appendix Dimensions BA 3451814/00 DE-EN...
  • Seite 29: Test Certificate

    Appendix 7.2 Test certificate BA 3451814/00 DE-EN...
  • Seite 30 BA 3451814/00 DE-EN...
  • Seite 31 BA 3451814/00 DE-EN...
  • Seite 32 Messko GmbH Gewerbegebiet An den Drei Hasen Messko-Platz 1, 61440 Oberursel, Germany Phone: +49 6171 6398-0 Fax: +49 6171 6398-98 E-Mail: info@messko.com www.messko.com Please note: The data in our publications may differ from the data of the devices delivered. We reserve the right to make changes without notice.

Inhaltsverzeichnis