
Verwandte Anleitungen für Wilo Atmos TERA-SCH Serie


Inhaltszusammenfassung für Wilo Atmos TERA-SCH Serie
- Seite 1 Pioneering for You Wilo-Atmos TERA-SCH en Installation and operating instructions de Einbau- und Betriebsanleitung · 6088794 • Ed.01/2020-10...
- Seite 3 English ....................... Deutsch ......................
-
Seite 4: Inhaltsverzeichnis
6 Installation and electrical connection .......................... 19 Personnel qualifications.................................... 19 Operator responsibilities.................................... 19 Preparing the installation.................................... 19 Setting up the pump by itself (variant B, Wilo variant key) ........................ 19 Installing the pump unit on a base ................................ 20 Pipework........................................... 21 Aligning the unit...................................... 23 Electrical connection ...................................... - Seite 5 12.3 Protective clothing ...................................... 47 12.4 Information on the collection of used electrical and electronic products.................... 47 13 Appendix.................................... 47 13.1 Examples for typical installation layouts.............................. 48 13.2 Examples for proper and inappropriate pipework............................ 49 Installation and operating instructions Wilo-Atmos TERA-SCH...
-
Seite 6: General Information
ƒ WARNING! Failure to follow the instructions can lead to (serious) injuries! ƒ CAUTION! Failure to follow the instructions can lead to property damage and a possible total loss. ƒ NOTICE! Useful information on handling the product WILO SE 2020-10... -
Seite 7: Personnel Qualifications
ƒ Electrical work Electrical work must be carried out by a qualified electrician. ƒ When connecting to the mains, comply with the locally applicable laws and regula- tions of the local energy supply company. Installation and operating instructions Wilo-Atmos TERA-SCH... -
Seite 8: Transport
If hazardous defects occur, the operator must immediately deactivate the device. Hazardous defects include: – Malfunction of safety and monitoring devices – Damage to housing parts – Damage to electrical equipment ƒ Open all isolating valves in the piping on the suction and pressure side. WILO SE 2020-10... -
Seite 9: Maintenance Tasks
Collect any leakage of fluid and operating fluid immediately and dispose of it ac- cording to the locally applicable guidelines. ƒ Store tools at the designated locations. ƒ After completing work, reattach all safety and monitoring devices and check that they function properly. Installation and operating instructions Wilo-Atmos TERA-SCH... -
Seite 10: Drive: Iec Standard Motor
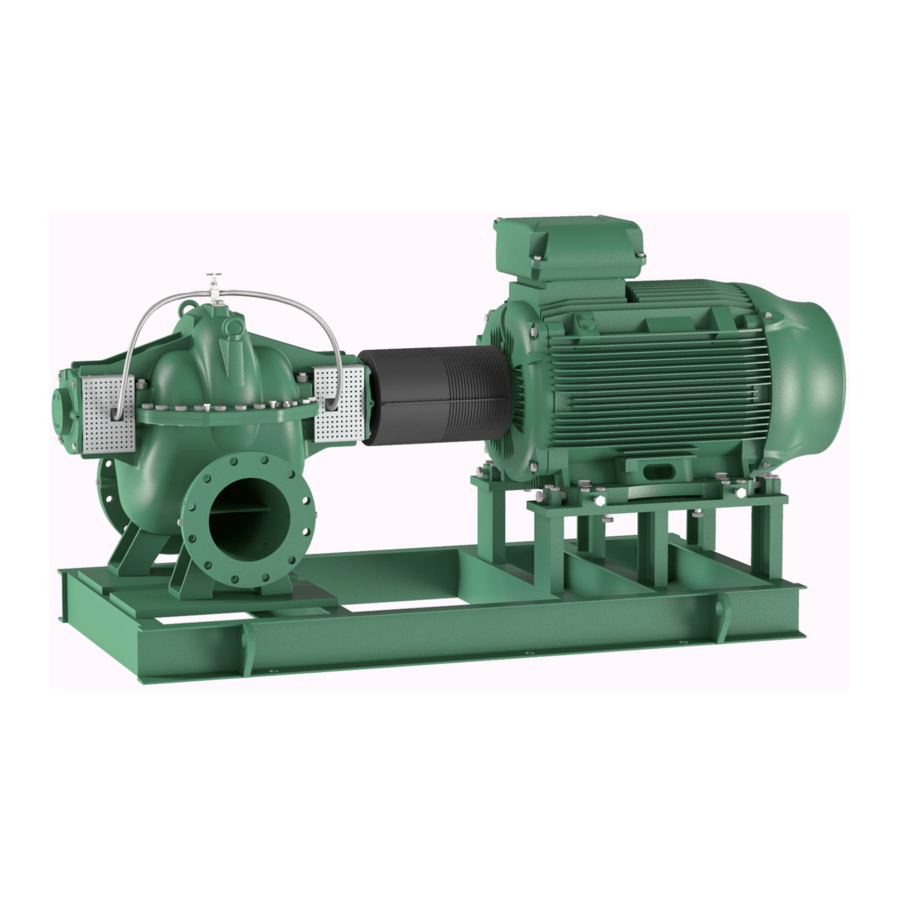
Product description Design The Wilo-Atmos TERA-SCH pump is an axially split case pump mounted on a base frame for horizontal installation. The pump is designed for in-line connection to the piping. Regarding customer specifications, the motor can be fitted on the left or right side of the pump (clockwise or anti-clockwise operation). -
Seite 11: Operation With Frequency Converter
10/16 bar (depending on type) PN 16 in accordance with EN 1092-2 Flanges – Heating water in accordance with VDI 2035 – Cooling/cold water Permissible fluids – Water-glycol mixture up to 40 % vol. – Raw water IP55 Protection class Installation and operating instructions Wilo-Atmos TERA-SCH... -
Seite 12: Connection Details
SSCH 400-490 SSCH 400-550 CG: Compound Ground; PG: Pressure Gauge; PM: Priming; AC: Air Cock; CDS: Casing Drain (Suction); CDD: Casing Drain (Delivery); CD: Casing Drain; GD: Gland Drain; VG: Vibration Gauge; TG: Temperature Gauge Table 1: Connection Details WILO SE 2020-10... -
Seite 13: Rotating Element
Bearing cover (Drive end) Wear ring Lock nut Water thrower Shaft Bearing housing (Non-Drive End) Mechanical seal cover Impeller key O-ring Dowel pin for wear ring Table 3: Rotating element of mechanical seal version without sleeves Installation and operating instructions Wilo-Atmos TERA-SCH... -
Seite 14: Part Description
Accessories have to be ordered separately. For a detailed list, consult the catalogue and spare parts documentation. Anticipated noise levels Pump unit with three-phase motor, 50 Hz Motor power P [kW] Measuring surface sound-pressure level Lp, A [dB(A)] without speed control 2-pole 4-pole ( 6-pole (2900 rpm) 1450 rpm) (980 rpm) 0.75 WILO SE 2020-10... -
Seite 15: Permissible Forces And Torques On The Pump Flanges
2325 1650 1905 3420 Fig. 5: Permissible forces and torques on the 4780 5320 4300 8340 2910 2070 2385 4290 pump flanges – pump made of grey cast iron 5380 5980 4840 9380 3585 2550 2940 5280 Installation and operating instructions Wilo-Atmos TERA-SCH... -
Seite 16: Transport And Storage
Hand and foot injuries due to lack of protective equipment! Danger of (serious) injuries during work. Wear the following protective equipment: • Safety shoes • Safety gloves for protection against cuts • Sealed safety goggles • Safety helmet must be worn if lifting equipment is used! WILO SE 2020-10... - Seite 17 For example, if the operator's field of vision is blocked. ƒ When lifting, make sure that the load limit of the lifting gear is reduced when pulling at an angle. The safety and efficiency of the lifting gear is best guaranteed when all Installation and operating instructions Wilo-Atmos TERA-SCH...
-
Seite 18: Attaching The Unit
Store the product somewhere safe against mechanical damage. ƒ Protect the bearings and couplings from sand, gravel and other foreign objects. ƒ Lubricate the unit to prevent rust and bearing seizing. ƒ Manually rotate the drive shaft several times once a week. WILO SE 2020-10... -
Seite 19: Installation And Electrical Connection
< 10 kW < 40 kW Required addi- 25 % 20 % 15 % 10 % tional power to determine mo- tor rating value Table 7: Motor/shaft power Example: ƒ Duty point water: Q = 100 m /h; H = 35 m ƒ Efficiency: 78 % ƒ Hydraulic power: 12.5 kW Installation and operating instructions Wilo-Atmos TERA-SCH... -
Seite 20: Installing The Pump Unit On A Base
The base must be able to support the unit installed on the base frame indefinitely. The base must be level to ensure there is no tension on the base frame or unit. Wilo recom- mends using premium, non-shrink concrete of an adequate thickness for manufactur- ing. -
Seite 21: Pipework
Coat the unprotected surfaces of the base to protect from moisture. Pipework The pipe connections of the pump are fitted with dust caps so that no foreign objects can penetrate during transport and installation. ƒ These caps must be removed before connecting pipes. Installation and operating instructions Wilo-Atmos TERA-SCH... - Seite 22 3 times the pipe cross section (approximately 100 meshes per cm²). The strainer must be far enough from the bottom to avoid excessive inlet losses, which could impair pumping performance. It is advisable to check that there is no leakage. WILO SE 2020-10...
-
Seite 23: Aligning The Unit
Misalignments can be the cause of: ƒ excessive noise development during pump operation ƒ vibrations ƒ premature wear ƒ excessive coupling wear 6.7.1 Coupling alignment max. max. ∆Ka min. min. Fig. 17: Coupling alignment without spacer Installation and operating instructions Wilo-Atmos TERA-SCH... - Seite 24 0.20 0.15 0.30 0.25 0.20 0.20 0.30 0.25 0.20 0.20 0.30 0.30 0.20 0.20 Permissible shaft displacement ΔS and ΔKr in mm (during operation, rounded) perm. perm. Table 9: Maximum permissible shaft displacement ΔS and ΔKr perm. perm. WILO SE 2020-10...
- Seite 25 180, 194 67.5 200, 218 225, 245 250, 272 280, 305 315, 340 350, 380 400, 430 Fig. 22: Fastening screws B of coupling halves 440, 472 Table 10: Tightening torques for adjusting screws and coupling halves Installation and operating instructions Wilo-Atmos TERA-SCH...
- Seite 26 After correct alignment, mount the coupling guard. The tightening torques for the pump and motor on the base frame are listed in the table “Tightening torques for pump and motor”. Screw: Tightening torque [Nm] Table 11: Tightening torques for pump and motor WILO SE 2020-10...
-
Seite 27: Electrical Connection
Unused cable feedthroughs should be sealed with the sealing plates provided, and screwed tight. ƒ Reinstall any uninstalled safety devices, such as terminal box covers! ƒ Check the direction of rotation of the motor while commissioning! Installation and operating instructions Wilo-Atmos TERA-SCH... -
Seite 28: Protective Devices
• The pump must not be operated outside of the specified operating range. • Do not operate the pump with the shut-off devices closed. • Make sure that the NPSH-A value is always higher than the NPSH-R value. WILO SE 2020-10... -
Seite 29: Personnel Qualifications
The motor can be placed on the right or left side of the pump. The check of the rota- tion direction of the motor is a mandatory step in the commissioning procedure of the pump set! An arrow on top part of the pump housing indicates the correct direction of rotation. Installation and operating instructions Wilo-Atmos TERA-SCH... -
Seite 30: Switching On The Pump
Switch on the pump. ƒ After reaching the speed, slowly open the shut-off device in the pressure pipe and regulate the pump to the duty point. ƒ While the pump is starting, vent completely via the venting screw. WILO SE 2020-10... -
Seite 31: Switching Frequency
Drain the pump completely and rinse thoroughly. ƒ The remaining fluid and rinsing fluid should be drained, collected and disposed off via the drain plug. Observe local regulations along with the notes under “Disposal”! Installation and operating instructions Wilo-Atmos TERA-SCH... -
Seite 32: Maintenance/Repair
Grease or oil the blank components. For this, use silicone-free grease or oil. Observe the manufacturer’s instructions for preservatives. Maintenance/repair It is recommended to have the pump serviced and checked by the Wilo customer ser- vice. Maintenance and repair work require the pump be partially or completely dismantled. -
Seite 33: Maintenance Tasks
Wilo recommends checking the flexible coupling elements regularly and replacing them at the first sign of wear. ƒ Wilo recommends briefly putting the standby pumps into operation at least once a week to ensure they are always ready for operation. Maintenance tasks Atmos TERA-SCH pumps require little routine maintenance. -
Seite 34: Dismantling
If present: Remove the intermediate sleeve of the coupling. ƒ Remove the fastening screws of the motor from the base frame. 9.5.1 Exploded views of hydraulics Fig. 25: Exploded view of Atmos TERA-SCH hydraulic (mechanical seal version without sleeves) WILO SE 2020-10... - Seite 35 Lock washer Mechanical seal Jack screws for opening top housing 32 Lock nut Abutment ring Lifting bolts Bearing housing (Non-Drive End) Sleeve Impeller Table 14: Exploded view of Atmos TERA-SCH hydraulic (mechanical seal version with sleeves) Installation and operating instructions Wilo-Atmos TERA-SCH...
- Seite 36 Remove all bolts (15) that are joining top and bottom housing (20, 22). ƒ Connect suitable lifting tackles to the lifting bolts (16) provided on top half housing (20). ƒ Remove the top housing. ƒ Remove the paper gasket placed in between the two housing halves. WILO SE 2020-10...
- Seite 37 Remove the wear rings (25) from the impeller (21). ƒ Mark the position of impeller (21) on the shaft (22) to ease the reposition it while reassembling! ƒ Remove the impeller (21) carefully. Avoid damage to the impeller key (14)! Installation and operating instructions Wilo-Atmos TERA-SCH...
-
Seite 38: Examination Of Internal Components
If the shaft is not true within 0.1 mm TIR (Total Indicated Reading), replacement or re- pair is recommended. Before any decision on repair work, ask Wilo for further informa- tion. Examine the shaft keys and keyways for damage and wear. Remove and replace dam- aged or worn out keys. -
Seite 39: Installation
Slide the impeller (21) at its position on the shaft (24), matching the marked position done while disassembly. ƒ Place the wear rings (25) on the impeller (21). ƒ Slide sleeve (34) on both sides of the impeller over the shaft. Installation and operating instructions Wilo-Atmos TERA-SCH... - Seite 40 46:8 SCH 400-550 Table 17: Table for Mechanical Seal Adjustment 9.7.2 Reassembly of the pump Ensure that housing is clean, dry, and free from foreign matter. Clean housing wear ring thoroughly and ensure that they have no burrs. WILO SE 2020-10...
- Seite 41 Insert the bolts (1) for bearing housing at respective their position. ƒ Tighten bolts (15) and (1) with a torsion bar with the proper sequence. For tighten- ing torques, see chapter “Screw tightening torques”. Installation and operating instructions Wilo-Atmos TERA-SCH...
-
Seite 42: Screw Tightening Torques
Inspection and repair at the factory. Costs may be incurred if you request customer services! Please contact customer ser- vices for more information. 10.1 Faults Possible error types Error type Description Delivery rate too low Motor overloaded WILO SE 2020-10... -
Seite 43: Causes And Remedies
(consult than the design value with the manufacturer) The pump is strained Correct the pump in- stallation Speed too high Lower speed Pump unit poorly – Correct alignment aligned Installation and operating instructions Wilo-Atmos TERA-SCH... -
Seite 44: Spare Parts
Table 21: Causes of error and remedies Spare parts Spare parts may be ordered via a local installer and/or Wilo customer service. List of ori- ginal spare parts: Refer to the Wilo spare parts documentation and the following in- formation in these installation and operating instructions. - Seite 45 It is strongly recommended to pur- chase the original spares parts from Wilo. In order to avoid any mistake we invite you to supply with any spare parts demand, the information mentioned on the data plate of the pump and / or motor.
-
Seite 46: Disposal
*Only mechanical seal version without sleeve; **Only mechanical seal version with sleeve Table 23: Recommended Spare Parts (mechanical seal version) Disposal 12.1 Oils and lubricants Operating fluid must be collected in suitable tanks and disposed of in accordance with the locally applicable guidelines (e.g. 2008/98/EC). WILO SE 2020-10... -
Seite 47: Water-Glycol Mixture
ƒ Observe the locally applicable regulations! Consult your local municipality, the nearest waste disposal site, or your retailer for in- formation of proper disposal. See www.wilo‑recycling.com for more information about recycling. Subject to change without prior notice! Installation and operating instructions Wilo-Atmos TERA-SCH... -
Seite 48: Appendix
Appendix Appendix 13.1 Examples for typical installation layouts Fig. 31: WILO SE 2020-10... -
Seite 49: Examples For Proper And Inappropriate Pipework
Appendix 13.2 Examples for proper and inappro- priate pipework Ø 2xØ Fig. 32: Installation and operating instructions Wilo-Atmos TERA-SCH... - Seite 50 6 Installation und elektrischer Anschluss .......................... 65 Personalqualifikation...................................... 65 Verantwortlichkeiten des Betreibers ................................ 65 Installationsvorbereitung.................................... 66 Einrichten der Pumpe allein (Variante B, Wilo-Variantenschlüssel) ...................... 66 Installation des Pumpenaufsatzes auf einem Fundament........................ 67 Verrohrung ........................................ 68 Ausrichtung des Aggregats ................................... 70 Elektrischer Anschluss.................................... 74 Schutzeinrichtungen ......................................
- Seite 51 12.1 Öle und Schmiermittel.................................... 95 12.2 Wasser-Glykol-Gemisch.................................... 95 12.3 Körperschutzmittel...................................... 95 12.4 Informationen zur Sammlung genutzter Elektro- und Elektronikprodukte................... 95 13 Anhang ..................................... 95 13.1 Beispiele für typische Installationsanordnungen ............................ 96 13.2 Beispiele für richtige und ungeeignete Verrohrung........................... 97 Einbau- und Betriebsanleitung Wilo-Atmos TERA-SCH...
-
Seite 52: Allgemeines
Die Nichtbeachtung der Sicherheitshinweise führt zu schweren oder tödlichen Ver- letzungen! ƒ WARNUNG! Die Nichtbeachtung der Hinweise kann zu (schweren) Verletzungen führen! ƒ VORSICHT! Die Nichtbeachtung der Hinweise kann zu Sachschäden und einem möglichen Total- verlust führen. WILO SE 2020-10... -
Seite 53: Personalqualifikation
Umgang mit den erforderlichen Werkzeugen und Befestigungsmate- rialien geschult ist. Definition „Elektrofachkraft“ Eine Elektrofachkraft ist eine Person mit entsprechender technischer Ausbildung, Fach- wissen und Erfahrung, die elektrische Gefahren erkennen und vermeiden kann. Einbau- und Betriebsanleitung Wilo-Atmos TERA-SCH... -
Seite 54: Elektroarbeiten
ƒ Sicherstellen, dass keine Explosionsgefahr besteht, wenn jegliche Art von Schweiß- arbeiten oder Arbeiten mit elektrischen Geräten durchgeführt wird. ƒ Während des Betriebs Persönliche Schutzausrüstung tragen: – Sicherheitsschuhe – Schutzhelm (bei Verwendung von Hebemitteln) WILO SE 2020-10... - Seite 55 Örtliche Standards und Vorschriften beachten. Pumpenundichtigkeiten vermeiden, um Personen und die Umwelt vor gefährlichen (explosiven, giftigen oder heißen) Stoffen zu schützen. Sicherstellen, dass ein Trockenlauf der Pumpe nicht möglich ist. Trockenlauf kann die Wellendichtung beschädigen und dadurch Undichtigkeiten verursachen. Einbau- und Betriebsanleitung Wilo-Atmos TERA-SCH...
-
Seite 56: Wartungsarbeiten
Fähigkeiten eingeschränkt sind oder die nur eingeschränkte Erfahrung haben, ist der Umgang mit dem Gerät untersagt! Personen unter 18 Jahren müssen von einem Techniker beaufsichtigt werden. Einsatz/Verwendung Bestimmungsgemäße Verwen- Die Pumpen der Baureihe Wilo-Atmos TERA-SCH dürfen nur für Folgendes verwendet dung werden: ƒ Rohwasserentnahme ƒ... -
Seite 57: Produktbeschreibung
Fremdpartikel wie Sand Produktbeschreibung Bauart Die Wilo-Atmos TERA-SCH ist eine Splitcase-Pumpe, die für den horizontalen Einbau auf einem Fundamentrahmen montiert ist. Die Pumpe ist für den Inline-Anschluss an die Rohrleitung ausgelegt. Je nach Kundenanforderungen kann der Motor auf der linken oder rechten Seite der Pumpe montiert werden (Rechts- oder Linkslauf). -
Seite 58: Anschlussdetails
Zugelassene Fördermedien für Dichtmittel. Heizungspumpen – Zur Korrosionsvermeidung geschlossenes Sys- tem sicherstellen. Gemäß VDI 2035 (CH: SWKI BT 102-01); undichte Stellen instand setzen. Anschlussdetails Fig. 1: Zusätzliche Anschlüsse am Gehäuse Anschlussdetails Pumpe CDD GD SCH 150-555 – SCH 150-230 SSCH 200-320 SCH 200-500 WILO SE 2020-10... -
Seite 59: Rotierendes Teil
Lagergehäuse (Antriebsseite) Stopfbuchspackung Welle Lager Laternenring Laufrad Stützring Hülse Lagerdeckel (Nichtantriebsseite) Lagerdeckel (Antriebsseite) O-Ring für Hülse Sicherungsblech Spritzring Verschleißring Kontermutter Hülsenmutter Zentrierstift für Verschleißring Lagergehäuse (Nichtantriebsseite) Stopfbuchsbrillenabdeckung Laufrad-Passfeder Tab. 2: Rotierendes Teil bei Ausführung mit Stopfbuchspackung Einbau- und Betriebsanleitung Wilo-Atmos TERA-SCH... -
Seite 60: Lieferumfang
Lagerdeckel (Nichtantriebsseite) Spritzring O-Ring für Hülse Sicherungsblech Hülsenmutter Verschleißring Kontermutter Abdeckung Gleitringdichtung Zentrierstift für Verschleißring Lagergehäuse (Nichtantriebsseite) Tab. 4: Rotierendes Teil bei Ausführung mit Gleitringdichtung mit Hülsen Lieferumfang Komplettaggregat ƒ Pumpe Atmos TERA-SCH ƒ Fundamentrahmen ƒ Kupplung und Kupplungsschutz WILO SE 2020-10... -
Seite 61: Zubehör
Zubehör muss gesondert bestellt werden. Eine detaillierte Liste ist dem Katalog und der Ersatzteildokumentation zu entnehmen. Geräuscherwartungswerte Pumpenaufsatz mit Drehstrommotor, 50 Hz Motorleistung (P ) [kW] Messung des Oberflächen-Schalldruckpegels Lp, A ohne Drehzahlregelung [dB(A)] zweipolig vierpolig sechspolig (2900 min-1) (1450 min-1) (980 min-1) 0,75 18,5 – Einbau- und Betriebsanleitung Wilo-Atmos TERA-SCH... -
Seite 62: Zulässige Kräfte Und Drehmomente Auf Die Pumpenflansche
Summen der maximal zulässigen Werte der beiden Pumpenflansche (Zulauf und Auslass). Die algebraischen Vorzeichen von Σ F und Σ M werden in der Kompensations- gleichung nicht berücksichtigt. Transport und Lagerung Lieferung Die Pumpe ist ab Werk auf einer Palette befestigt und gegen Schmutz und Feuchtigkeit geschützt. WILO SE 2020-10... -
Seite 63: Transport
• Nicht die Transportlaschen an der Pumpe oder am Motor verwenden, um das ge- samte Aggregat anzuheben. Sie sind nur für den Transport der einzelnen Bauteile bei der Aufstellung oder Demontage vorgesehen. Außenverpackung erst am Einsatzort entfernen, um sicherzustellen, dass die Pumpe während des Transports nicht beschädigt wird. Einbau- und Betriebsanleitung Wilo-Atmos TERA-SCH... -
Seite 64: Befestigung Der Pumpe
Elemente möglichst vertikal belastet werden. Bei Bedarf einen Hebearm verwenden, an dem das Anschlagmittel vertikal angebracht werden kann. ƒ Vertikales Anheben der Last sicherstellen! ƒ Schwingen der schwebenden Last verhindern! Fig. 8: Befestigung der Pumpe WILO SE 2020-10... -
Seite 65: Befestigung Des Aggregats
Wenn die Pumpe länger als ein Jahr gelagert werden soll, wenden Sie sich an den Hersteller. Installation und elektrischer Anschluss ƒ Personalqualifikation Elektroarbeiten: Elektroarbeiten dürfen ausschließlich von Elektrofachkräften durchgeführt werden. ƒ Verantwortlichkeiten des Betrei- Örtlich geltende Unfallverhütungs- und Sicherheitsvorschriften der Berufsgenos- bers senschaften beachten. Einbau- und Betriebsanleitung Wilo-Atmos TERA-SCH... -
Seite 66: Installationsvorbereitung
Die erforderliche Motorleistung für diesen Betriebspunkt liegt bei 12,5 kW x 1,15 = 14,3 kW. Ein mit einem P von 15 kW bemessener Motor wäre die richtige Wahl. Wilo empfiehlt die Verwendung eines B3-Motors (IM1001) mit Basisinstallation, der mit IEC34-1 kompatibel ist. ƒ 6.4.2 Auswahl der Kupplung Zum Herstellen der Verbindung zwischen der Pumpe mit Lagerträger und dem Motor... -
Seite 67: Installation Des Pumpenaufsatzes Auf Einem Fundament
Durchmesser der Schrauben. Auf diese Weise bleiben die Schrauben beweglich und können ihre Endpositionen erreichen. Wilo empfiehlt, das Fundament zunächst bis etwa 25 mm unterhalb der geplanten Höhe zu gießen. Die Oberfläche des Betonfundaments muss vor dem Aushärten gut kontu- riert sein. -
Seite 68: Ausgießen Des Fundamentrahmens
Ungeschützte Oberflächen des Fundaments zum Schutz vor Feuchtigkeit beschich- teten. Verrohrung Die Rohranschlüsse der Pumpe sind mit Schutzkappen versehen, damit während des Transports und der Installation keine Fremdkörper eindringen können. ƒ Diese Kappen müssen vor dem Anschluss der Rohrleitungen entfernt werden. WILO SE 2020-10... - Seite 69 Rohrquerschnitt (ca. 100 Maschen/cm²) installiert werden. Um zu große Zulauf- verluste zu vermeiden, die Förderleistung beeinträchtigen können, muss der Saug- korb in ausreichendem Abstand vom Boden angebracht werden. Es empfiehlt sich, auf mögliche Undichtigkeiten zu prüfen. Einbau- und Betriebsanleitung Wilo-Atmos TERA-SCH...
-
Seite 70: Ausrichtung Des Aggregats
Pumpenaufsatzes ist die korrekte Ausrichtung von Pumpe und Antriebswelle. Fehlausrichtungen können die Ursache sein für: ƒ übermäßige Geräuschentwicklung während des Pumpenbetriebs ƒ Erschütterungen ƒ vorzeitigen Verschleiß ƒ übermäßigen Kupplungsverschleiß 6.7.1 Kupplungsausrichtung max. max. ∆Ka min. min. Fig. 17: Kupplungsausrichtung ohne Abstandshalter WILO SE 2020-10... - Seite 71 1800 min-1 3000 min-1 3600 min-1 0,20 0,20 0,15 0,15 0,20 0,20 0,15 0,15 0,20 0,20 0,15 0,15 0,20 0,20 0,15 0,15 0,25 0,20 0,15 0,15 0,25 0,25 0,20 0,15 0,30 0,25 0,20 0,20 0,30 0,25 0,20 0,20 Einbau- und Betriebsanleitung Wilo-Atmos TERA-SCH...
-
Seite 72: Anzugsdrehmoment Für Anzugsdrehmoment Für Stellschraube A [Nm]
Stellschraube B [Nm] 80, 88, 95, 103 110, 118 17,5 125, 135 140, 152 Fig. 21: Stellschraube A für axiale Sicherung 160, 172 180, 194 67,5 200, 218 225, 245 250, 272 280, 305 315, 340 350, 380 400, 430 WILO SE 2020-10... -
Seite 73: Anzugsdrehmoment Für Stellschraube A [Nm]
Nach korrekter Ausrichtung den Kupplungsschutz montieren. Die Anzugsdrehmomente für die Pumpe und den Motor auf dem Fundamentrahmen sind in der Tabelle „Anzugsdrehmomente für Pumpe und Motor“ angegeben. Schraube: Anzugsdrehmo- ment [Nm] Tab. 11: Anzugsdrehmomente für Pumpe und Motor Einbau- und Betriebsanleitung Wilo-Atmos TERA-SCH... -
Seite 74: Elektrischer Anschluss
Ansammlung von Tropfwasser zu vermeiden. ƒ Ungenutzte Kabeldurchführungen sollten mit den mitgelieferten Dichtungsplatten abgedichtet und fest verschraubt werden. ƒ Alle demontierten Schutzvorrichtungen, z. B. Klemmenkastendeckel, wieder instal- lieren! ƒ Während der Inbetriebnahme die Drehrichtung des Motors prüfen! WILO SE 2020-10... -
Seite 75: Netzseitige Absicherung
5 Minuten wird nicht empfohlen und ist generell bei Verwendung heißer Fördermedien gefährlich. • Die Pumpe darf nicht außerhalb des angegebenen Betriebsbereichs betrieben wer- den. • Die Pumpe nicht mit geschlossenen Absperrorganen betreiben. • Sicherstellen, dass der NPSH-A-Wert immer höher ist als der NPSH-R-Wert. Einbau- und Betriebsanleitung Wilo-Atmos TERA-SCH... -
Seite 76: Personalqualifikation
Fördermedium über einen Trichter einfüllen, bis der Saughals und die Pumpe voll- ständig gefüllt sind. ƒ Pumpe durch Öffnen des Entlüftungshahns auf der Oberseite der Pumpe entlüften. ƒ Entlüftungshahn schließen, sobald Fördermedium an der Oberseite des Gehäuses austritt. WILO SE 2020-10... -
Seite 77: Prüfen Der Drehrichtung
Verletzungsgefahr durch hohen Systemdruck! Die Leistung und der Zustand der installierten Kreiselpumpen müssen ständig über- wacht werden. • Schließen Sie keine Manometer an eine druckbeaufschlagte Pumpe an. • Montieren Sie auf Saug- und Druckseite Manometer. Einbau- und Betriebsanleitung Wilo-Atmos TERA-SCH... -
Seite 78: Gefahr Von Sachschäden
• Pumpe vollständig entleeren, um Beschädigung zu vermeiden. ƒ Absperrorgan in der Druckleitung schließen. Wenn in der Druckleitung ein Rück- flussverhinderer eingebaut und Gegendruck vorhanden ist, kann das Absperrorgan offen bleiben. ƒ Absperrorgan in der Saugleitung nicht schließen. WILO SE 2020-10... -
Seite 79: Außerbetriebnahme Und Lagerung
Freiliegende Bauteile fetten oder ölen. Hierfür silikonfreies Fett oder Öl verwenden. Anweisungen des Herstellers für Schutzmittel beachten. Instandhaltung Es wird empfohlen, die Pumpen vom Wilo-Kundendienst warten und überprüfen zu las- sen. Für Instandhaltungsarbeiten muss die Pumpe teilweise oder komplett demontiert wer- den. -
Seite 80: Betriebsüberwachung
Die Lebensdauer einer Gleitringdichtung hängt stark von den Betriebsbedingungen (Temperatur, Druck, Eigenschaften des Fördermediums) ab. ƒ Wilo empfiehlt, die flexiblen Kupplungselemente regelmäßig zu überprüfen und bei den ersten Anzeichen von Verschleiß zu ersetzen. ƒ Wilo empfiehlt, die Reservepumpen mindestens einmal wöchentlich kurz in Betrieb zu nehmen, um sicherzustellen, dass sie immer betriebsbereit sind. -
Seite 81: Entleerung Und Reinigung
Unterlegblöcke aus Hartholz und Metall ƒ Gängiges Werkzeug wie Innensechskantschlüssel, Bohrer, Schraubendreher, Feilen usw. ƒ Abziehwerkzeug für Lager und Kupplung Für Instandhaltungsarbeiten muss die Pumpe teilweise oder komplett demontiert wer- den. Das Pumpengehäuse kann in der Rohrleitung installiert bleiben. Einbau- und Betriebsanleitung Wilo-Atmos TERA-SCH... -
Seite 82: Explosionsansicht Der Hydraulik
Abdeckung Gleitringdichtung Abdrückschrauben zum Öffnen des Bolzen für Lagerdeckel oberen Gehäuses O-Ring Schlauchleitung Lagerdeckel (Nichtantriebsseite) Gleitringdichtung Oberes Pumpengehäuse Sicherungsblech Stützring Laufrad Kontermutter Sechskantstopfen Unteres Pumpengehäuse Lagergehäuse (Nichtantriebsseite) Tab. 13: Explosionsansicht der Atmos TERA-SCH-Hydraulik (Ausführung mit Gleitringdichtung ohne Hülsen) WILO SE 2020-10... - Seite 83 O-Ring Schlauchleitung Sicherungsblech Gleitringdichtung Abdrückschrauben zum Öffnen des Kontermutter oberen Gehäuses Stützring Hebeösen Lagergehäuse (Nichtantriebsseite) Hülse Laufrad Tab. 14: Explosionsansicht der Atmos TERA-SCH-Hydraulik (Ausführung mit Gleitringdichtung mit Hülsen) Fig. 27: Explosionsansicht der Atmos TERA-SCH-Hydraulik (Ausführung mit Stopfbuchspackung) Einbau- und Betriebsanleitung Wilo-Atmos TERA-SCH...
-
Seite 84: Demontage Des Gehäuseoberteils
Nabe hin erwärmen. Identische Schritte für alle Pumpentypen ƒ Schrauben/Muttern der Kupplung entfernen. ƒ Bolzen (1) der Lagergehäuse (2, 33) entfernen. ƒ Rotierendes Teil anheben. ƒ Kupplung entfernen. ƒ Lagergehäuse sowohl der Antriebsseite (2) als auch der Nichtantriebsseite (33) ent- fernen. WILO SE 2020-10... -
Seite 85: Untersuchung Der Inneren Bauteile
Durch Vergleich dieser beiden Messwerte kann das Spiel zwischen Ver- schleißring und Laufradhals ermittelt werden. Anzeichen für erforderlichen Austausch des Verschleißrings und Wiederherstellung des ursprünglichen Spiels: ƒ Das Spiel beträgt 150 % oder mehr des ursprünglichen Auslegungsspiels Einbau- und Betriebsanleitung Wilo-Atmos TERA-SCH... -
Seite 86: Überprüfung Von Welle Und Passfeder
Wenn die Welle nicht innerhalb des Toleranzbereichs von 0,1 mm TIR (Total Indicated Reading, Gesamtmessuhrausschlag) liegt, wird ein Austausch oder eine Instandsetzung empfohlen. Bevor über eine Instandsetzung entschieden wird, sollte Wilo konsultiert werden. Passfedern und Nuten der Welle auf Beschädigungen und Verschleiß prüfen. Beschä- digte oder verschlissene Passfedern austauschen. -
Seite 87: Installation
Die Hülse (34) auf beiden Seiten des Laufrads über die Welle ziehen. ƒ O-Ring (35) zwischen Welle (22) und Hülse (34) einsetzen und auf richtige Positio- nierung achten. ƒ Hülsenmutter (36) einschrauben; zu diesem Zeitpunkt noch nicht anziehen, lose las- sen. Einbau- und Betriebsanleitung Wilo-Atmos TERA-SCH... -
Seite 88: Befestigungsschraube Für Stützring
28,5 32,5 SCH 150-230 37,5 41,8 SCH 150-555 37,5 SCH 200-320 37,5 41,8 SCH 200-500 37,5 SCH 250-360 37,5 41,8 SCH 250-380 37,5 41,8 SCH 250-470 37,5 41,8 SCH 300-430 37,5 41,8 SCH 350-500 46,8 SCH 400-490 WILO SE 2020-10... -
Seite 89: Zusammenbauen Der Pumpe
Sicherstellen, dass der dem Verschleißring (25) beigefügte Verschleißring-Zentrier- stift (27) richtig in seiner jeweiligen Position sitzt. ƒ Endlagerdeckel (5, 30) an die Lagergehäuse (2, 33) und das Lagergehäuse an das Ge- häuseunterteil (22) anschrauben. ƒ Spritzring (6), Stopfbuchsbrillenabdeckung (37) und Laternenring (39) auf beiden Seiten zu den Lagern (3) ziehen. Einbau- und Betriebsanleitung Wilo-Atmos TERA-SCH... -
Seite 90: Anzugsdrehmomente Für Schrauben
Weitere Schritte zur Fehlerbehebung Wenn die hier aufgeführten Punkte den Fehler nicht beheben, wenden Sie sich an den Kundendienst. Der Kundendienst kann auf folgende Weise unterstützen: ƒ telefonische oder schriftliche Unterstützung ƒ Unterstützung vor Ort WILO SE 2020-10... -
Seite 91: Störung
Drehzahl zu niedrig – Betrieb mit Frequenz- – Frequenz im zulässi- umrichter gen Bereich erhöhen – Betrieb ohne Fre- – Spannung prüfen quenzumrichter Motor läuft in 2 Phasen – Außenleiter und Si- cherungen prüfen Einbau- und Betriebsanleitung Wilo-Atmos TERA-SCH... -
Seite 92: Ersatzteile
Absper- Druckleitung öffnen rorgan Tab. 21: Fehlerursachen und Beseitigung Ersatzteile Ersatzteile können über einen örtlichen Fachhändler und/oder den Wilo-Kundendienst bestellt werden. Liste der Originalersatzteile: Wilo-Ersatzteildokumentation und die folgenden Informationen in dieser Einbau- und Betriebsanleitung beachten. VORSICHT Gefahr von Sachschäden! Ein störungsfreier Betrieb der Pumpe kann nur unter Verwendung von Originaler- satzteilen garantiert werden. - Seite 93 Ersatzteilsatz zu erwerben. Dadurch lassen sich die Stillstandszeiten der Pumpe auf ein Minimum reduzieren. Es wird dringend empfohlen, die Originalersatzteile von Wilo zu erwerben. Um jeden Irrtum auszuschließen, ist es erforderlich, bei jeder Ersatz- teilbestellung die auf dem Typenschild von Pumpe/Motor angegebenen Daten mitzu- teilen.
-
Seite 94: Empfohlene Ersatzteile (Ausführung Mit Stopfbuchspackung)
Unteres Pumpengehäuse Zentrierstift für Positionierung – Welle Verschleißring • Laufradmutter Zentrierstift für Verschleißring • Bolzen für Abdeckung der Gleitringdichtung Bolzen für Lagerdeckel Endlagerdeckel (Nichtantriebsseite) Sicherungsblech • Kontermutter • Lagergehäuse (Nichtantriebsseite) Hülse 34** O-Ring für Hülse 35** Hülsenmutter 36** WILO SE 2020-10... -
Seite 95: Empfohlene Ersatzteile (Ausführung Mit Gleitringdichtung)
Die örtlich geltenden Vorschriften einhalten. Informationen zur ordnungsgemäßen Entsorgung erhalten Sie bei der örtlichen Kom- mune, dem Wertstoffhof in Ihrer Nähe oder dem Einzelhändler, bei dem Sie das Produkt erworben haben. Weitere Informationen finden Sie unter www.wilo‑recycling.com. Änderungen vorbehalten! Einbau- und Betriebsanleitung Wilo-Atmos TERA-SCH... -
Seite 96: Anhang
Anhang Anhang 13.1 Beispiele für typische Installati- onsanordnungen Fig. 31: WILO SE 2020-10... -
Seite 97: Beispiele Für Richtige Und Ungeeignete Verrohrung
Anhang 13.2 Beispiele für richtige und unge- eignete Verrohrung Ø 2xØ Fig. 32: Einbau- und Betriebsanleitung Wilo-Atmos TERA-SCH... - Seite 100 Local contact at www.wilo.com/contact WILO SE Wilopark 1 44263 Dortmund Germany T +49 (0)231 4102-0 T +49 (0)231 4102-7363 wilo@wilo.com Pioneering for You www.wilo.com...