FLEISCHMANN 18.4 Betriebsanleitung
Baureihe mit varianten
Inhaltsverzeichnis
Verfügbare Sprachen
Verfügbare Sprachen
Z
b
1-2
NEM
Fig. 3
Einbau eines digitalen Empfängerbausteins: Auf die schraffierte Fläche (Metallwinkel) kann ein DCC-DECODER
687403 mit 6-poligem Stecker (NEM 651) geklebt werden. Beim Einbau bitte die Betriebsanleitung des jeweili-
gen Decoders beachten (Fig. 3).
00544007
942601 / 942701
An der schraffierten Stelle kann der Schaltmagnet 942601 / 942701 eingebaut werden (Fig. 4).
Ersatzhaftreifen: 00544007
Ölen: Geölt werden Lagerstellen und Getriebe nur an den gekennzeichneten Lagerstellen (Fig. 4 und 5).
Nur FLEISCHMANN-ÖL 6599 verwenden. Nur ein kleiner Tropfen pro Schmierstelle (
Überölung. Zur Dosierung die in der Verschlusskappe der Ölflasche angebrachte Nadel verwenden.
Fig. 2
Fig. 5
00006538
c
Lampenwechsel: Ein Öffnen des Tenders ist nur zum Lam-
a
penwechsel, zum Ölen des Getriebes und zum Austausch des
· beigelegt
Motors erforderlich. Schrauben c und d
· enclosed
Tendergehäuse nach oben abheben (Fig. 5).
· ajouté
00384025
Wartungsfreier Motor, nicht ölen! Die Motorschleifkohlen sind nicht austauschbar!
Motortausch: Motorhalteklammer leicht aufbiegen und abnehmen. Motor nach oben herausnehmen (Fig. 7). Beim
Öffnen der Lok:
Ein Öffnen
Einbau des neuen Motors auf die richtige Lage achten. Hierzu die rote/schwarze Markierung am Mo tor beachten.
der Lok ist nur zum Einbau ei-
Tauschmotor: 00504118
nes digitalen Empfängerbau-
steins und zum Lampenwech-
sel erforderlich. Schrauben a
Fig. 7
und b
1-2
entfernen und Lokge-
häuse nach oben abnehmen
(Fig. 2).
00504118
Fig. 4
), sonst
rt
Fig. 6
00006538
d
1-2
Platine aufspreizen und abnehmen und Glühlampe
austauschen (Fig. 6).
1-2
lösen und das
Ersatzglühlampe: 00006538
Fig. 8
Hinweis:
Falls diese Lok bereits ab Werk mit
angesteckten Kolbenschutzrohren
ausgestattet ist, müssen diese für
Fahrbetrieb abgenommen werden
(Fig. 8). Ansonsten besteht Entglei-
sungsgefahr.
1. In Pfeilrichtung abziehen
Steck-Tauschkupplung
6511
Hinweis:
Falls diese Lok bereits ab Werk mit angesteckten Kupplungsattrappen ausgestattet ist, müssen diese für Fahrbe-
trieb abgenommen werden und gegen die beiliegenden Funktionskupplungen ausgetauscht werden.
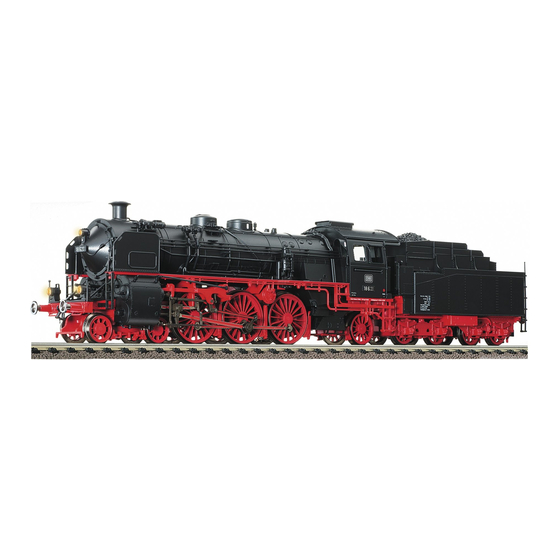
Class 18.4/18.5/18.6 (bay. S 3/6) with variants
She was a legend on German rails, and ranked amongst the most good looking locomotives – the Bavarian S 3/6. At the beginning of the
1950's, the DB (German Federal Railways) modernised thirty of these successful engines and then designated them as class 18.6 (Fig. 1).
Opening the loco: Opening the loco is only necessary to install a digital receiver and to change the bulbs. Remove screws a and b
Lift the loco body gentle upwards (Fig. 2). Spare bulb: 00006538
Installing a digital decoder: a DCC-DECODER 687403 with 6-pole interface (NEM 651) can be glued onto the cross-hatched surface
(Fig. 3). Please consult the instructions included with the decoder for fitting the advice.
The indicated point can be used for locating the switching magnet 942601 / 942701 (Fig. 4).
Spare traction tyres: 00544007
Lubrication: The bearings and gear-box need only be lightly oiled at the bearing points marked (Fig. 4 and 6). Only use FLEISCHMANN-
oil 6599. Only put a tiny drop in each place (rt), otherwise it will be overoiled. An applicator needle is located in the cap of the oil bottle
for your use.
Changing Bulbs (tender): Opening the tender is only necessary to change bulbs, oil the gear train and to change the motor. Undo
screws c and d
, and lift up the tender body (Fig. 5). After spreading it outwards, remove the contact plate and change the bulb
1-2
(Fig. 6). Spare bulb: 00006538
The motor brushes do not need to be changed! Do not oil – motor is maintenance-free!
Changing the Motor: Gently bend open the motor retainer clip and remove. Lift up the motor and take it out (Fig. 7). When installing the
new motor, please take care to insert the new motor the right way round. The red/black markings on the motor indicate the correct posi-
tion.
Exchange Motor: 00504118
Note: If this loco is already factory equipped with inserted piston protection tubes, these must be removed for driving (Fig. 8). Otherwise,
there is danger of derailment.
Exchange coupling: Clip exchange coupling: 6511 · FLEISCHMANN- PRO FI Clip coupling: 6515. 1. Pull off in direction of arrow. ·
2. Insert exchange coupling in direction of arrow until clipped in position.
Note: If this loco is factory-fitted with detachable coupling dummies, these must be removed for driving and be replaced with the attached
function couplings.
Série 18.4/18.5/18.6 (bay. S 3/6) avec variantes
La S 3/6 bavaroise a été une légende du chemin de fer allemand et était l'une des locomotives les plus réussies sur le plan esthétique. Au
début des annés 50, la DB a modernisé trente de ces fameuses machines avant de les baptiser type 18.6 (Fig. 1).
Ouverture de la locomotive: Vous n'avez besoin d'ouvrir la locomotive que pour monter un module récepteur digital et pour remplacer de
lampes. Soulever soigneusement le toit. Dévisser les vis a, b
et soulever le circuit imprimé (Fig. 2). Lampes de remplacement: 00006538
1-2
Montage d'un module récepteur digital : La zone hachurée permet de coller un DÉCODEUR-DCC 687403 à 6 pôles (NEM 651) (Fig.
3). Pour le montage, se référer au mode d'emploi du décodeur.
L'aimant permanent 942601 / 942701 peut être monté à l'endroit indiqué (Fig. 4).
Bandages de rechange: 00544007
Graissage : Les supports et les engrenages doivent être huilés uniquement aux endroits indiqués (Fig. 4 et 6). N'utilisez que l'huile
FLEISCHMANN 6599. Une seule goutte par point à lubrifier ( rt), afin d'éviter tout excès. L'aiguille montée dans le bouchon du
petit flacon convient parfaitement à cet usage.
Remplacement de lampes (tender) : Une ouverture du tender est indispensable pour remplacer les lampes, lubrifier le mécanisme
et remplacer le moteur. Enlever les vis c et d
et retirer la carrosserie en la soulevant (Fig. 5). Démonter la platine en dégagent horizon-
1-2
talement et remplacer les lampes (Fig. 6). Lampes de remplacement : 00006538
Les charbons du moteur ne doivent pas être remplacés ! Ne jamais lubrifier le moteur (sans entretien).
Remplacement du moteur : Déformer légèrement les clames de maintien du moteur et enlever. Retirer le moteur vers le haut (Fig. 7). Au
remontage veiller à ce que le moteur pose correctement dans le logement. Tenir compte du marquage rouge/noir sur le moteur.
Moteur de remplacement : 00504118
Note: Si ce locomotive est équipé départ usine de tubes protection piston insérés, ils doivent être les retirés au conduite (Fig. 8). Sinon, il
ya danger de déraillement.
Changement des attelages : Attelage à emboîtement d'autres marques : 6511 · FLEISCHMANN- PRO FI-Attelages à emboîtement :
6515. 1. Retirer dans le sens de la flèche. · 2. Replacer le nouvel attelage jusqu'à enclancheent de la buttée.
Note: Si ce locomotive est monté en usine avec des imitations d'attelage amovible, celles-ci doivent être enlevés pour la conduite et être
remplacés par des attelages à fonctions attachées.
2. Ersatzkupplung in Pfeil-
richtung einstecken, bis
Halteklammern einrasten
PROFI-Steckkupplung
6515
.
1-2
Kapitel
Inhaltsverzeichnis

Verwandte Anleitungen für FLEISCHMANN 18.4


Inhaltszusammenfassung für FLEISCHMANN 18.4
- Seite 1 Einbau des neuen Motors auf die richtige Lage achten. Hierzu die rote/schwarze Markierung am Mo tor beachten. der Lok ist nur zum Einbau ei- Lubrication: The bearings and gear-box need only be lightly oiled at the bearing points marked (Fig. 4 and 6). Only use FLEISCHMANN- Tauschmotor: 00504118 oil 6599.
- Seite 2 Anvisning på en good elektromagnetisk funktion: Gennem en god hjul-skinne-kontakt undgås eventuelle elektromagnetiske Smøring: Smør kun aksler og gangtøj på de viste steder (Fig. 4 er 6). Anvend kun FLEISCHMANN-oIie 6599. Kun en enkelt dråbe for forstyrrelser! • Consiglio sulla compatibilià elettromagnetica: Per un buon contatto ruota-rotaia evitare possibili interferenze Skinnerengøring: Hvis toget kører ujævnt p.g.a.
-
Seite 3: Dbetriebsanleitung Für Triebfahr- Zeuge Mit Sound-Digitaldecoder
BETRIEBSANLEITUNG FÜR TRIEBFAHR- ZEUGE MIT SOUND-DIGITALDECODER Allgemeine Betriebsanleitung für Loks und Triebwagen Herzlichen Glückwunsch zum Erwerb eines FLEISCHMANN- Fahrzeuges mit dem Sound-Digitaldecoder! Mit Sound klingen Ihre Lokomotiven endlich wie das große Vorbild. Sie werden bald BETRIEBSANLEITUNG bemerken, dass Ihr Modell immer im Mittelpunkt des Interes ses steht. -
Seite 4: Eigenschaften Des Sound-Decoders
Decoders haben, so lesen Sie bitte die folgenden Seiten. Wir sind ter. Nähere Informationen dazu siehe Tabellenblatt. Weiterhin sicher, dass Sie eine Antwort auf Ihre Fragen finden werden. werden ggf. Geräusche vorbildgerecht in Abhängigkeit der entsprechenden Betriebssituationen automatisch erzeugt, wie 2. - Seite 5 besten Geräusch eigenschaften, wenn es auf reinen DCC-Betrieb Stellen Sie also entweder das Basisgerät auf 28 Fahr stufen um oder program- eingestellt wird. Er ist ab Software-Version V1.100 Ihres TWIN- mieren Sie den Sound-Decoder auf 14 Fahr stufen (siehe CV29 in Kapitel 5). CENTERs voreingestellt, kann sich jedoch im Laufe des vergange- 2.
- Seite 6 Hersteller-ID NMRA-Identifikationsnummer des Her- 29 Konfigurations- Bit 0=0 Bit 0: Mit Bit 0=1 wird die Fahrtrichtung stellers Zimo. Durch Programmieren werte des Fahrzeugs umgedreht. dieser CV mit dem Wert 8 wird ein Reset Bit 1=1 Bit 1: Grundwert 1 gilt für das Betreiben dieses Decoders auf die Werks- des Decoders mit 28 bzw.
-
Seite 7: Programmieren Mit Der Märklin**-Zentrale 6021
67 Veränderung In jede der 28 CVs von 67 bis 94 kann 287 Bremssound- Je größer der Wert, umso früher wird bis der Regel- ein Geschwindigkeits wert zwischen 0 schwelle nach beim Bremsen das Bremsgeräusch 94 charakteristik und 255 eingegeben werden. In CV67 gestartet. -
Seite 8: Programmieren Mit Der Märklin**-Mobile Station: Achtung
In der Märklin**-Mobile Station Datenbank sind nur Märklinloks enthalten. 2. Langmodus: Die einzugebenden Werte werden aufgeteilt und in jeweils zwei Schritten Für das Anlegen von Fleischmann Lokomotiven in der Märklin**-Mobile Station übergeben (CV-Bereich 1-799, Wertebereich 0-255). verwenden Sie eine der zwei Universalnummern 36330 oder 37962. Diese sind Nach Aufruf des Programmiermodus ist immer der Kurzmodus aktiv. - Seite 9 Notizen: Wiederholen Sie dann die Schritte: "Lok in der Datenbank anlegen" (1-8), nur daß Sie bei 5. zum Menüpunkt "Adresse" gehen und bei 7. die Adresse Ihrer Lok einstellen. Suchen Sie über den Drehregler das gewünschte Symbol aus und bestätigen Sie die Eingabe mit dem Drehregler. Die Funktionen F1 - F4 können mit den 4 linken Tasten der Märklin**-Mobile Station aufgerufen werden.
- Seite 10 Factory settings for operations: – Standard address for DCC-operation: 3 Congratulations on your purchase of a FLEISCHMANN vehicle with the Sound – Address for Motorola* see the section 5, CV1. (Depending on the loco type there decoder! At last your locomotive will sound just like the real thing! You’ll soon are different addresses preset: Steam loco: 78, diesel loco: 72, electric loco: 24, notice that your loco will become the focal point of interest.
-
Seite 11: Analog Operation
after careful consideration. In chapter 5 you will find a list of the parameters that 2.2 Digital 4-voice sound module with uniquely interesting you can alter for yourself. The setting of the CV’s can be undertaken on any features: equipment that conforms to the NMRA/DCC system. –... - Seite 12 28 speed steps. Probably the running of the loco has been set to 14 steps. Simply 6 Middle accor- Running voltage setting for the middle voltage ding area speed steps. re-set the equipment to 28 steps, or re-program the Sound decoder to to the By using this CV it is possible to set a 14 steps (see CV29 in chapter 5).
- Seite 13 18 Long Lower section of long addresses. lower than 128 decrease. With 0, addresses Effective on DCC with CV29 Bit 5 = 1. nothing more will happen. 29 Configuration Bit 0=0 Bit 0: With Bit 0 = 1 the direction of the 67 Modification of A speed value between 0 and 255 can values...
- Seite 14 287 Brakesound- accor- The greater the value, the earlier the Two operating modes are now available for programming: threshold ding brakesound is started while braking. 1. Short mode: Only the CV's 1-79 and the value range 0-79 are programmable. to the Adjustment range 0 - 255 2.
-
Seite 15: Programming With Märklin**-Mobile Station
Functions F1 - F4 are called up by pressing the 4 left buttons of the Märklin**-Mobile To attach Fleischmann locos to the database, please use either one of the uni- Station. The top button matches function F1. The activatet functions cannot be dis- versal numbers 36330 or 37962. - Seite 16 Réglages d'usine : – Adresse pour fonctionnement DCC : Standard 3 Vous venez de faire l'acquisition d'un véhicule FLEISCHMANN équipé du Sound- – Adresse pour Motorola* : voir chap. 5, CV1. (Dépendant à l’type de la locomo- Digitaldecoder et nous vous en félicitons ! Grâce à Sound, vos locomotives font tive existént des adresses diverses : Loco vapeur : 78, loco diesel : 72, loco...
-
Seite 17: Mise En Service
– Distance de freinage : les décodeurs Sound fonctionnent avec des systè- Le décodeur Sound est compatible avec le standard NMRA/DCC. Autrement dit mes de freinage digitaux (DCC, Motorola*). tous les paramètres déterminant le comportement du Sound-Decoder sont fixés par les dénommées CV (de l'anglais «Configuration Variables»). Le Sound- 2.2 Module de bruits à... -
Seite 18: Recherche Des Pannes
et 2 sur la position ON au dos de la Control Unit 6021 (voir aussi chap. 6). Retard au selon Valeur du retard au freinage freinage loco L'ancien format Motorola* et le système Delta** permettent certes de tracter, mais pas de produire des bruits. Tension selon Cette CV règle la tension au niveau de... - Seite 19 17 Adresse Elément supérieur de l'adresse longue. 94 est activée (service DCC seulement). longue Devient effectif en DCC avec CV29 Bit 5=0 Bit 5 : sélectionner Bit 5=1 pour utiliser (partie Bit 5=1. La programmation d'une adres- l'adresse longue 128 à 9999. supérieure) se longue avec le TWIN-CENTER ou le 60 Atténuation de...
- Seite 20 6.1 Mode de programmation de la centrale Märklin** 6021: 266 Volume sonore selon Le volume sonore des bruits peut être loco réglé sur des niveaux de 0 = faible Avant de commencer, assurez-vous que la loco est complètement à l'arrêt et le à...
- Seite 21 "Adresse" et de 7. ajustez l'adresse de votre loco. Suchen Sie über den Cherchez Pour créer Fleischmann locos dans la base de données de la Märklin**-Mobile avec le bouton tournant sur l'icône souhaitée et confirmez la saisie avec appuyer le Station, appliquez l'un des deux nombres universelles 36330 ou 37962 Ce sont bouton tournant.
- Seite 22 Notices : * Motorola est une marque déposée de Motorola Inc., Tempe-Phoenix (Arizona/Etats-Unis) ** Märklin et Delta-System sont des marques déposées de Gebr. Märklin & Cie. GmbH, Göppingen.
- Seite 23 – Adres voor Motorola* zie hoffdstuk 5, CV1. (Hangend van het loco type er zijn verschillende adressen instellen vooraf af: Stoom loco: 78, dieselloco: 72, Hartelijk gefeliciteerd met de aanschaf van een FLEISCHMANN voertuig met de elektrische loco: 24, railcars: 60. Die weg, kan de locos gelopen worden door Sound digitaaldecoder! Met Sound klinken uw locomotieven eindelijk zoals bij de Märklin**-delta systeem gebruikend het beeld menu ook.)
-
Seite 24: In Bedrijf Nemen
2.2 Digitale vierstemmige geluidsmodule met unieke kenmer- eerste aanwijzing van de enorm vele instellingsmogelijkheden die de Sound ken: decoder biedt. – Originele opnames: De geluiden van een echt voorbeeldvoertuig werden met Alle CVs zijn al optimaal op uw model aangepast en dienen slechts uiterst voor- hoogwaardige microfoons opgenomen en digitaal op een opslagbouwsteen zichtig te worden veranderd. -
Seite 25: Fout Zoeken
4. FOUT ZOEKEN spanning gelang hoogste rijstap, maximaal mogelijk is 252. Zie ook CV2. de loc 1. De loc rijdt normaal vooruit en achteruit, maar de verlichting werkt niet: Conform het systeem is dit correct bij gelijkstroombedrijf. Midden Rijspanningsinstelling voor de middel- Al naar Bij DCC is de Sound fabrieksmatig decoder op 28 rijstappen ingesteld. - Seite 26 Bij het programmeren van lange adres- 60 Lichtdimmung Al naar De waarde van deze CV bepaalt de sen met het TWIN-CENTER of het geland maximale helderheid van de front PROFI-BOSS worden automatisch de de loc licht. 0=uit op 255=licht CVs 17, 18 en 29 ingesteld, met het 66 Snelheidsaanpas- Getalwaarde tussen 1 en 255 voor het multiMaus of het multiMAUS...
- Seite 27 267 Stoomstoot- Al naar De waarde van deze CV bepaalt de Toegang tot de programmering: pauze afstand tussen twee stoomstoten geland 1. Selecteer het adres van de locomotief en is afhankelijk van het loctype. de loc 2. "STOP"-knop op het bedieningspaneel drukken en wacht een paar seconden Indien de stoomstoten van uw voertuig 3.
- Seite 28 7. het adres van de loc te stellen. Zoekt over de draaiknop het gewenste pictogram en bevestig de invoer met de draaiknop. Voor het maken van Fleischmann locomotieven in de Märklin**-Mobile Station via een van de twee universele nummers 36330 of 37962. Deze zijn als volgt...
- Seite 29 Generel vejledning for loks og motorvogne – 28 trin DCC/ 14 trin Motorola* – Forsinkelser. Max hastighed passende til den enkelte maskine. Tillykke med valget af en FLEISCHMANN-maskine med Sound-Digital- Funktionstasternes betydning fremgår af tabellen, der er vedlagt dette decoder! køretøj.
- Seite 30 3.2 Drift med MOTOROLA* (fra 6021) – Lejlighedslyde: Både i hold og i fart kommer der lyde med tilfældigt mellem- Basisstationen Control Unit 6021 fra Märklin** er i stand til at sende det nye rum, f.eks. luftpumpe, vandpumpe, trykluft. m.v. Motorola*-format.
- Seite 31 5. Liste med vigtige CV’er Forsigtighed: Når du aktiverer flere funktioner (værdi CV navn Grund- Beskrivelse forøgelse) på CV'er i analog tilstand, det værdi kommer til samtidig fuldbyrdelse. lokadresse efter Beskrivelse: Definerer lok-decoderens 14 fnalog mode 01 - Baglygte front DCC-adresse (3) og Motorola* 1-byte 02 - Baglygte bag F9 til F12,...
- Seite 32 sektioner (se "Bremse") er ren digital- 266 lydstyrke efter Lydstyrken kan indstilles i trin fra drift indkoblet. 0 = lav til 255 = højt. Bit 4=0 Bit 4: Med bit 4=0 bliver motostyrings- 267 dampstøds- efter Værdien i denne CV fastlægger mellem- linien beregnet ud fra CV 2,5 og 6.
- Seite 33 På Märklin**-Mobile Station databasen kun indeholdt Märklinloks. (CV'er 1-799, rækkevidden 0-255). For at skabe Fleischmann lokomotiver i Märklin**-Mobile Station ved hjælp af en Efter at kalde programmering mode er altid den kort mode aktiv. Hvis du vil ændre til- standen, programmet værdien af 80 i CV80 (Indtast adressen 80 og tilbageførsel af de to universelle tal 36330 eller 37962 e.
- Seite 34 Indstilling det rigtige adressen: 1. Tryk "ESC"-tasten 2. Med drejeknappen til menupunktet "Lok ændre" 3. Tryk drejeknappen 4. Menupunktet "Adressen" vælger 5. Tryk drejeknappen 6. Adresse på lokomotivet vælge 7. Tryk drejeknappen Hvis lok kører nu ikke, derefter slette lok fra databasen: 1.
-
Seite 35: Decoder Digitale Completo Dalle Caratteristiche Straordinarie
Istruzioni generali per locomotive e motrici. mare tutte le funzioni Sound. Complimenti per aver acquistato un veicolo FLEISCHMANN dotato di decoder Impostazioni per l’esercizio: digitale Sound. Con Sound le vostre locomotive finalmente potranno emettere gli –... -
Seite 36: Messa In Funzione
3. MESSA IN FUNZIONE anche lo sviluppo di calore e la durata vengono influenzati positivamente. 3.1 Impostazione dei parametri con apparecchi conformi a DCC – Regolazione del motore: Il decoder Sound offre un sistema appositamente adattato di regolazione del carico. In questo modo il veicolo mantiene la Il decoder Sound è... -
Seite 37: Ricerca Errori
f8 regolando il Decoder in modo che reagisca anche alle funzioni speciali da f1 Tensione di in base Questa CV imposta la tensione motore avviamento alla nella posizione di marcia 1 quando la a f4 per l’indirizzo di veicolo superiore successivo (vedere cap. 5, CV 49, Bit 3). loco- curva caratteristica di comando del Assicurarsi che l’indirizzo superiore successivo non sia occupato da una locomo-... - Seite 38 Attenzione: Bit 2 = 0 è valido solo il funzionamento Quando si attiva più funzioni (aggiunta digitale. In caso di utilizzo su impianti di valore) del CV in modalità analogica, con linguaggi di comando multipli misti, si tratta di esecuzione simultanea. per es.
- Seite 39 attiva con CV 29 Bit 4 = 1 Per polarità indipendente freni DC (Märklin**-sezioni del freno) anche 95 Adattamento Come CV 66, solo per la marcia bisogno CV29, Bit 2 = 0 e CV124, Bit 5 velocità marcia indietro. = 1 e addizionale CV112, Bit 6 = 1! indietro 112 Configurazione Bit 3=0 Bit 3=0: normale (per ogni indirizzo...
- Seite 40 Nel database di Märklin**-Mobile Station ci sono solo Märklin lok. Per la creazione di locomotive Fleischmann in Märklin**-Mobile Station nell'uso Le funzioni F1 - F4 può essere chiamato con i 4 pulsanti sulla sinistra della Märklin**- Mobile Station. Corrisponde al pulsante in alto della funzione F1. Le funzioni attivate non uno dei due numeri universale 36330 o 37962.
- Seite 41 Funzionamento con trasformatore Märklin Nota: Per invertire la direzione di marcia con un trasformatore Märklin è assolutamente necessario che il veicolo sia completamente fermo prima di invertire la marcia. Informazioni dettagliate sono disponibili all'indirizzo www.zimo.at * Motorola è un marchio registrato di Motorola Inc., Tempe-Phoenix (Arizona/USA).
- Seite 42 GEBR. FLEISCHMANN GMBH & CO. KG D-91560 Heilsbronn, Germany http://www.fleischmann.de 5 – 24 V~ 012.1 E 21/74000-0105 09/10...
- Seite 43 Lichtmaschine ein/aus (Nur bei Loks mit Lichtmaschine) Departure signal Shrill whistle before departure* Tür Tür und Abfahrt* Tableau des bruits individuels de votre véhicule, type 18.4, 18.5, S 3/6 (Remarque : Inertia on/off F6=1: no acceleration or braking inertia Licht ein Spitzenbeleuchtung schaltet sich ein Pour activer les fonctions de votre commande réspective digital voir les instructions de...
- Seite 44 Liste der bei dieser Lok abweichenden CV-Grundwerte (gegenüber der Betriebsanleitung „Sound“) Tabella dei suoni personalizzati del vostro veicolo, serie 18.4, 18.5, S 3/6 (Nota: FleiScHmANN Digital Komponenten sind komplexe elek- List of CV basic values special to this loco (with respect to the ‘Sound’ operating instructions) tronische Systeme.
- Seite 45 Schienenlaufband Stationary Loop Rail Rails roulants Schienenlaufband Stationary Loop Rail ▶ Benutzerhandbuch ▶ User Manual ▶ Manuel d’utilisation...
- Seite 47 Seite 3 Deutsch Page 31 English Page 59 Français...
- Seite 48 Impressum Alle Rechte, Änderungen, Irrtümer und Liefermöglichkeiten vorbehalten. Spezifi kationen und Abbildungen ohne Gewähr. Änderung vorbehalten. Herausgeber: Modelleisenbahn München GmbH / Triebstr. 14 / 80993 München / Germany Änderungen von Konstruktion und Ausführung vorbehalten! • We reserve the right to change the construction and design! • Nous nous réservons le droit de modifi er la construction et le dessin ! •...
- Seite 49 Vorwort Vorwort Herzlichen Dank, dass Sie sich für smartRail entschieden haben! Setzen Sie mit smartRail Ihre schönsten Lokomotiven perfekt in Szene: Das intelligente Schienenlaufband mit integrierter Digitalzentrale bringt Ihre Dampf-, Diesel- und E-Lokomotiven auf einem eleganten Podest optimal zur Geltung – im Fahrbetrieb und mit Zugriff auf alle Digitalfunktionen. So können Sie erstmals auch bei Lokomotiven in der Vitrine, im Regal oder auf dem Schreibtisch den Lok-Sound, die Frontbeleuch- tung, den Dampf oder die digital gesteuerten Stromabnehmer aktivieren.
-
Seite 50: Rechtliche Hinweise
Rechtliche Hinweise Rechtliche Hinweise Bitte beachten Sie vor der Inbetriebnahme von smartRail folgende Hinweise: Wenn Sie Roco- oder Fleischmann-Komponenten mit Produkten von Drittherstellern kombinieren, ▶ besteht keine Gewährleistung bei Beschädigungen oder Fehlfunktionen. Durch das Öff nen des Gehäuses von smartRail erlischt Ihr Anspruch auf Gewährleistung. -
Seite 51: Inhaltsverzeichnis
Inhaltsverzeichnis Inhalt smartRail – Die Funktionen im Überblick ....................8 Touch-Panel und Anschlüsse ........................9 1. smartRail – Bedienung mit dem Touch-Panel ................10 1.1 So schließen Sie smartRail an ....................... 10 1.2 So nehmen sie smartRail in Betrieb ..................... 10 1.3 Tipps zum Aufgleisen ........................ -
Seite 52: Smartrail - Die Funktionen Im Überblick
Die Funktionen im Überblick smartRail – Die Funktionen im Überblick smartRail ist ein intelligentes Schienenlaufband mit integrierter Z21-Technologie und inte- griertem WLAN-Router. smartRail ermöglicht es Ihnen, Ihre schönsten digitalen Gleich- strom- und Wechselstromlokomotiven in der Vitrine oder auf dem Schreibtisch im Stand fahren zu lassen –... -
Seite 53: Touch-Panel Und Anschlüsse
Touch-Panel und Anschlüsse Touch-Panel LED-Übersicht 3. Leiter für Infrarot- Wechselstrom- Schienen- Infrarot- Sensor Modelle laufband Sensor Taste „ “ Oberseite Blau: Standby ▶ Weiß: Ein ▶ „ “ Tasten F1-F4, Dunkel: Funktion aus ▶ Hell: Funktion ein ▶ Taste „ “ F1 F2 F3 F4 Blinkt lange rot mit kurzen ▶... -
Seite 54: Smartrail - Bedienung Mit Dem Touch-Panel
Touch-Panel-Bedienung 1. smartRail – Bedienung mit dem Touch-Panel Auf den folgenden Seiten erfahren Sie, wie Sie smartRail in Betrieb nehmen und Ihre Lieblings- ▶ Stellen Sie smartRail nicht in der Nähe lokomotiven mit dem integrierten Touch-Panel steuern. von Heizkörpern oder unter direkter Sonneneinstrahlung auf! 1.1 So schließen Sie smartRail an ▶... -
Seite 55: Tipps Zum Aufgleisen
Touch-Panel-Bedienung 1.3 Tipps zum Aufgleisen 1. Setzen Sie die Lok vorsichtig von Hand oder mit einem Aufgleisgerät auf das smartRail-Gleis. 2. Solange sich Ihre Hand im Auslesebereich der Sensoren bewegt, bleibt smartRail im Standby- Modus. Dies wird durch ständiges, rotes Blinken der Taste „ “signalisiert. So funktioniert der Scan der Lok-Adressen: 1. -
Seite 56: Reset Und Update Von Smartrail
Touch-Panel-Bedienung 1.5 Reset und Update von smartRail Wenn smartRail nicht einwandfrei funktioniert, setzen Sie die integrierte Z21-Digitalzentrale bitte folgendermaßen auf die werkseitigen Einstellungen zurück: 1. Halten Sie die Taste „ “ für 5 Sekunden gedrückt. Die LED-Leuchte beginnt blau zu blinken. Danach ist smartRail in den Werkszustand zurückgesetzt. -
Seite 57: Externe Steuergeräte: Smartphone, Tablet-Pc, Multimaus
Externe Steuergeräte 2. Externe Steuergeräte: Smartphone, Tablet-PC, multiMAUS Das Touch-Panel ist der einfachste, schnellste und bequemste Weg, um Ihre Lokomotiven auf smartRail zu steuern. Es gibt aber trotzdem gute Gründe, um auf ein Smartphone, einen Tablet-PC oder eine multi- MAUS als externes Steuergerät zurückzugreifen – zum Beispiel: um mehr als nur die vier Grundfunktionen (F1 bis F4) Ihrer Lokomotiven zu nutzen. -
Seite 58: Bedienung Mit Smartphone/Tablet-Pc Und Z21-Mobile-App
Bedienung mit der Z21-Mobile-App 3. Bedienung mit Smartphone/Tablet-PC und Z21-Mobile-App 3.1 Installation der Z21-Mobile-App Stellen Sie sicher, dass Ihr Smartphone oder Tablet-PC mit dem Internet verbunden ist. ▶ Nutzen Sie ein iPad (ab v1.3), oder ein iPhone bzw. iPod (ab iOS 4.2), starten Sie den App Store. ▶... -
Seite 59: Wlan-Anmeldung
Bedienung mit der Z21-Mobile-App WLAN-Anmeldung ▶ ▶ 7u9dk4db Unterseite von smartRail Konfi guration iOS Konfi guration Android 15 15... -
Seite 60: Erste Schritte Mit Der Z21-Mobile-App
Bedienung mit der Z21-Mobile-App 3.3 Erste Schritte mit der Z21-Mobile-App Auf den folgenden Seiten erfahren Sie alles, was Sie wissen müssen, um Ihre digitalen Lokomotiven Sie bekommen die Z21-Mobile-App auf smartRail über Ihr Smartphone oder Ihren Tablet-PC zu steuern. Wenn Sie die Z21-Mobile-App kostenlos im App Store von Apple sowie starten, sehen Sie folgenden Start-Bildschirm: bei Google Play. -
Seite 61: Steuerung
Bedienung mit der Z21-Mobile-App 3.4 Steuerung Die „Steuerung“ der Z21-Mobile-App ermöglicht es Ihnen, Digitallokomotiven auf smartRail bequem per Touch zu steuern. Die Oberfläche setzt dabei auf eindeutige, intuitiv verständliche Icons in ergo- Die Highlights: ▶ Universalsteuerung für alle nomischer Anordnung: Digitallokomotiven ▶... -
Seite 62: Einstellungen
Bedienung mit der Z21-Mobile-App 3.5 Einstellungen In dieser Registerkarte können Sie alle wichtigen Einstellungen für Ihr Z21-Digitalsystem vornehmen, von der grundlegenden Systemkonfi guration über die Einstellungen der Z21-Zentrale bis hin zum Die Highlights: ▶ Alle wichtigen Systemparameter Festlegen individueller Parameter für Ihre Lokbibliothek. auf einen Blick ▶... -
Seite 63: Lokomotivbibliothek
Bedienung mit der Z21-Mobile-App 3.6 Lokomotivbibliothek Wenn Sie Ihre DCC-Lokomotiven bereits in der Z21-Mobile-App erfasst haben, können Sie diese Bib- liothek natürlich auch beim Fahren auf smartRail nutzen. Und wenn nicht? Dann erfassen Sie einfach Die Highlights: ▶ Übersichtliche Bibliothek Ihrer jede Lok beim ersten Auftritt auf dem Laufweg –... -
Seite 64: Lokeinstellungen
Bedienung mit der Z21-Mobile-App 3.7 Lokeinstellungen In der Registerkarte „Lok Einstellungen“ können Sie die Basiseinstellungen für jede Ihrer Lokomotiven festlegen. Sie fi nden hier nur die wichtigsten Parameter – so fi nden sich auch Die Highlights: ▶ Übersichtlicher Zugriff auf die Einsteiger auf Anhieb zurecht. -
Seite 65: Zugriff Auf Lokfunktionen
Bedienung mit der Z21-Mobile-App 3.8 Zugriff auf Lokfunktionen Über die Registerkarte „Funktionen“ greifen Sie einfach und schnell auf die Digitalfunktionen Ihrer Lokomotiven zu. Statt unverständliche Codes einzugeben, tippen Sie auf eindeutige Icons – so Die Highlights: ▶ Schneller Zugriff auf alle Digital- macht das Fahren gleich doppelt Spaß. -
Seite 66: Zuweisung Der Digitalfunktionen
Bedienung mit der Z21-Mobile-App 3.9 Zuweisung der Digitalfunktionen Hier können Sie die Digitalfunktionen Ihrer Lokomotiven mit wenigen Handgriff en ordnen, benennen und programmieren. Die Highlights: ▶ Schneller Zugriff auf die wichtigsten Funktionsparameter ▶ Individuelle Konfi guration Ihrer Lokomotiven ▶ Einfache Programmierung per Touch ▶... -
Seite 67: Bedienungen Mit Tablet-Pc Und Z21-Führerstand-App
Sie erhalten erstere im App Store und letztere bei Google Play. In Zukunft wird es für alle wichtigen ▶ Blenden Sie eigene Hintergrundbilder Modell-Neuheiten und viele beliebte Klassiker aus dem Sortiment von Roco und Fleischmann eigene und Diashows ein, um perfekte Führerstand-Apps geben –... -
Seite 68: Allgemeine Hinweise Zur Bedienung Der Führerstände
Bedienung mit dem Z21-Führerstand 4.2 Allgemeine Hinweise zur Bedienung der Führerstände 1. Schalter, Taster und Hebel bedienen Sie, indem Sie zunächst darauf drücken, bis die Oberansicht erscheint. Dann wechseln Sie die Stellung, ohne dazwischen loszulassen. Tipp: Fahren mit Auf- und Abrüsten 2. -
Seite 69: Quick Start Guide: Fahren Und Bremsen
Bedienung mit dem Z21-Führerstand 4.3 Quick Start Guide: Fahren und Bremsen Jetzt aber los: Schritt für Schritt bringen wir unseren Taurus in Fahrt. Schritt 1: Lösen Sie die kombinierte Luft- und E-Bremse (A), indem Sie den Hebel nach vorne auf „0“ schieben. Wie das Vorbild besitzt der virtuelle Führerstand eine kombinierte Bremse, sodass Luft- und E-Bremse stets gleichzeitig bedient werden. -
Seite 70: Die Funktionstasten Im Überblick
Bedienung mit dem Z21-Führerstand 4.4 Die Funktionstasten im Überblick... - Seite 71 Bedienung mit dem Z21-Führerstand Hauptschalter Entspricht der F1-Taste und schaltet den Lichtschalter Schaltet die Funktion „F0“. Lok-Sound ein. (Schalter vorne = EIN) Kombi-Bremse Beim Vorbild bedient der linke Hebel die Schalter Fernlichter Schalterstellung hinten heißt „Fernlicht Luft- und der rechte die E-Bremse. Im AUS“.
-
Seite 72: Bedienung Mit Der Multimaus
Bedienung mit der multiMAUS 5. Bedienung mit der multiMAUS Wenn Sie bereits eine digitale Roco- oder Fleischmann-Modellbahn Ihr Eigen nennen, können Sie die Lokomotiven auf smartRail alternativ auch mit Ihrer bewährten multiMAUS steuern. Sie haben eine mulitMAUS, aber keine Die multiMAUS wird dafür einfach an der X-BUS-Buchse an der smartRail-Unterseite angeschlossen. -
Seite 73: Pflegehinweise
Pflegehinweise 6. Pflegehinweise Pflege der Holzteile ▶ Reinigen Sie die Holzteile bei Bedarf mit einem leicht mit Wasser befeuchteten Tuch. Bitte verwenden Sie keine zusätzlichen Reinigungs- oder Pflegemittel. Pflege der schwarzen Plexiglasplatte ▶ Reinigen Sie das dunkle Plexiglas stets nur mit einem trockenen Tuch, da es unmittelbar am smartRail- Gleis anliegt –... - Seite 75 Seite 3 Deutsch Page 31 English Page 59 Français...
- Seite 103 Seite 3 Deutsch Page 31 English Page 59 Français...
- Seite 104 Mentions légales Tous droits, changements, erreurs et possibilités de livraison restent réservés. Spécifi cations et illustrations sans garantie. Sous réserve de modifi cations techniques. Editeur : Modelleisenbahn München GmbH / Triebstr. 14 / 80993 München / Germany Änderungen von Konstruktion und Ausführung vorbehalten! • We reserve the right to change the construction and design! • Nous nous réservons le droit de modifi er la construction et le dessin ! •...
- Seite 130 Notizen...
- Seite 131 Apple, iPad, iPhone, iOS are trademarks of Apple Inc., registered in the U.S. and other countries. / App Store is a service mark of Apple Inc. / Android is a trademark of Google Inc. / Google Play is a service mark of Google Inc.
- Seite 132 8010815920 www.smartrail.eu ▶...