Inhaltsverzeichnis
Werbung
Verfügbare Sprachen
Verfügbare Sprachen
Quicklinks
Werbung
Inhaltsverzeichnis
Fehlerbehebung

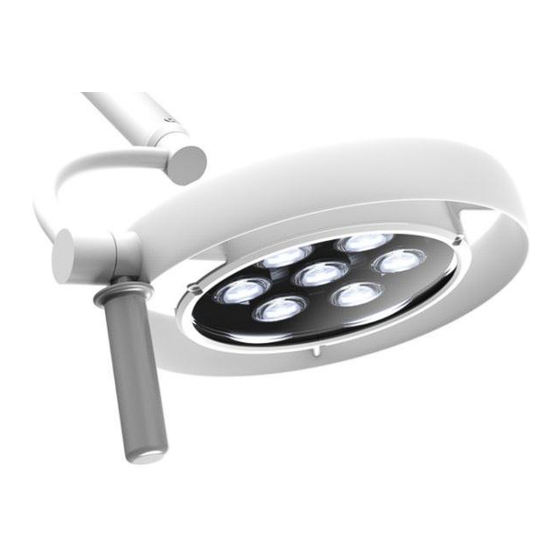
Verwandte Anleitungen für Derungs D med IRIS LED 10


Inhaltszusammenfassung für Derungs D med IRIS LED 10
- Seite 1 Montage- und Gebrauchsanweisung 8 Installation and operating instructions 24 Instructions d'installation et de fonctionnement 40 Istruzioni per il montaggio e l’uso 56 IRIS LED 10 med® Untersuchungsleuchte Examination light Lampe d’examens Apparecchio per visita...
- Seite 2 SYMBOLE; SYMBOLS; SYMBOLES; SIMBOLI Das Warnsymbol kennzeichnet alle für die Sicherheit wichtigen Anweisungen. Nichtbeachtung kann zu Verletzungen, Schäden an der Leuchte oder der Einrichtung führen! In Verbindungmit den folgenden Signalwörtern steht das Warnsymbol für: The warning symbols indicate all instructions that are important for safety. Failure to comply with them can lead to injury, damage to the luminaire or the equipment.
- Seite 3 Hersteller; Manufacturer; Fabricant; Fabbricante Herstellungsdatum; Date of manufacture; Date de fabrication ; Data di produzione Artikelnummer; Item number; N° d’article ; Codice articolo Chargencode; Batch code; N° de lot ; Codice di carico Seriennummer; Serial Number; N° de série ; Numero di serie Bevollmächtigter in der EU;...
-
Seite 4: Inhaltsverzeichnis
INHALT SICHERHEITSHINWEISE ............................8 Verwendungszweck ............................ 8 Nutzerprofile ..............................8 Sicherheitshinweise ............................ 8 Warnstufen ..............................8 Spezifische Befestigungshinweise ......................8 LIEFERUMFANG ..............................9 IRIS LED 10 C ............................... 9 IRIS LED Duo 10/10 C ..........................9 IRIS LED 10 W .............................. 9 IRIS LED 10 F ............................... - Seite 5 DISINFECTION CLEANING AND STERILISATION ....................34 Sterilisable hand grip ..........................35 SAFETY INSPECTIONS ............................35 10.1 Setting the spring force ..........................35 DISASSEMBLY ..............................36 11.1 Disposal ..............................36 ACCESSORIES ..............................36 ADDITIONAL INSTRUCTIONS ..........................36 TROUBLESHOOTING ............................37 TECHNICAL DATA ..............................37 ELECTROMAGNETIC COMPATIBILITY (EMC) ....................
- Seite 6 Sommario INDICAZIONI SULLA SICUREZZA ........................56 Destinazione d’uso ............................ 56 Profilo dell'utente ............................56 Indicazioni sulla sicurezza ........................56 Livelli di attenzione ........................... 56 Indicazioni specifiche per il fissaggio ...................... 56 CONTENUTO DELLA FORNITURA ........................57 IRIS LED 10 C ............................. 57 IRIS LED Duo 10/10 C ..........................
- Seite 7 VARIANTEN / VARIANTS / VARIANTES / VARIANTI IRIS LED 10 C / IRIS LED 10 C Flood IRIS LED Duo 10/10 C / IRIS LED Duo 10/10 C Flood IRIS LED 10 W / IRIS LED 10 W Flood IRIS LED 10 F / IRIS LED 10 F Flood...
-
Seite 8: Sicherheitshinweise
Leuchtenkopf und das Armsystem SICHERHEITSHINWEISE zusätzlich beladen. Die Leuchte darf im Betriebszustand nicht mit Verwendungszweck einem Tuch oder Ähnlichem abgedeckt werden. med® Leuchte IRIS eine Die Lüftungsöffnungen (falls vorhanden) müssen im Betriebsfall immer frei sein! Untersuchungsleuchte. Sie ist dazu bestimmt, den Leuchte darf nicht in der Nähe von externen Körper eines... -
Seite 9: Lieferumfang
IRIS LED 10 W LIEFERUMFANG im Lieferumfang enthalten: IRIS LED 10 C im Lieferumfang enthalten: 1x Wandhalterung (Innenseite von B) 1x Wandhaube 1x Abschlussring 1x Wandwinkel 1x Deckenhalterung (Innenseite von B) 1x Federarm (vormontiert) 1x Deckenhaube 1x Leuchtenkopf 1x Abschlussring 1x Handgriff 1x Deckenrohr 1x Federarm (vormontiert) -
Seite 10: Montage Iris Led 10 C
VORSICHT MONTAGE IRIS LED 10 C Vor der Montage Aktionsradius beachten und Lastdaten Leuchte Richtung gewünschten Aktionsfeldes ausrichten Biegemoment M 90Nm Senkrechte Gewichtskraft F 118N Montage Armsystem GEFAHR Montage durch qualifiziertes Personal Montage darf nur durch eine qualifizierte Fachkraft erfolgen. -
Seite 11: Herabstürzende Leuchte Bei Unsachgemässer Befestigung
WARNUNG Herabstürzende Leuchte bei unsachgemässer Befestigung Gewindestift muss vollständig und korrekt eingeschraubt werden. Diesen Montageschritt auf einer ebene Fläche ausführen: Deckenhaube und Abschlussring auf Deckenrohr aufsetzten Arm 1 flach hinlegen Leuchtenkabel von Deckenrohr durch Fassung Kabel (vom Arm) durch Deckenrohr 2 ziehen ... -
Seite 12: Montage Iris Led Duo 10/10 C
GEFAHR Lebensgefahr durch Stromschlag Leuchte muss durch einen externen Schalter allpolig vom Netz getrennt werden können (gehört nicht zum Lieferumfang). GEFAHR Leuchte ans Netz anschliessend Lebensgefahr durch Stromschlag Die Spannungsversorgung am Netzanschluss muss allpolig über einen Überstromauslöser (gemäss nationalen Installationsvorschriften) - Seite 13 Diesen Montageschritt auf einer ebene Fläche ausführen: Deckenrohr 1 in Deckenhalterung 2 einsetzen und mit Ø= 9mm bohren 3. Bestehende Bohrung des Deckenlagers als Führung verwenden. 4x Senkschraube M3 lösen und Abdeckung 1 entfernen Verbindungsstück 2 flach hinlegen ...
- Seite 14 Deckenhaube und Abschlussring auf Deckenrohr aufsetzten Einen Arm 6 flach hinlegen Gleitstück 4 oben in Nut des Armes einsetzen Verbindungsstück 2 hochkant aufrichten Verbindungsstück 2 (mit Bohrung nach oben ausgerichtet) und Arm 6 zusammenschieben Gleitstück mittels Einschrauben...
-
Seite 15: Montage Iris Led 10 W
GEFAHR Lebensgefahr durch Stromschlag Leuchte muss durch einen externen Schalter allpolig vom Netz getrennt werden können (gehört nicht zum Lieferumfang). GEFAHR Leuchte ans Netz anschliessend Lebensgefahr durch Stromschlag Die Spannungsversorgung am Netzanschluss muss allpolig über einen Überstromauslöser (gemäss nationalen Installationsvorschriften) - Seite 16 Wandwinkel 1 (mit Abschlussring 2 und Haube 3 aufgesteckt) in Wandhalterung 4 einführen Wandenhalterung Wand halten Maueranker mit Hammer einschlagen und gleichzeitig das Kabel durch rechteckige Aussparung hindruchziehen Befestigung nach Herstellerangaben festziehen WARNUNG Herabstürzende Leuchte bei unsachgemässer Befestigung ...
-
Seite 17: Montage Iris Led 10 F
MONTAGE LEUCHTENKOPF WARNUNG Verletzungsgefahr durch herabstürzenden Leuchtenkopf Stellen Sie sicher, dass der Leuchtenkopf ordnungsgemäss gesichert ist. Sachschaden durch mangelhaft montierten Leuchtenkopf. Haube und Abschlussring über Wandhalterung schieben und festschrauben (0.5Nm) Kabel zusammenstecken Weiter mit Leuchtenkopfmontage siehe Kap.7 Leuchtenkopf 1 (mit Nasen 2 nach oben ... -
Seite 18: Iris Led 10 F
IRIS LED 10 F VORSICHT GEFAHR Sachschaden durch falsche Reinigung Lebensgefahr durch Stromschlag Zur Desinfektion dürfen nur solche Mittel verwendet werden, welche Keine beschädigten Netzkabel einstecken. Funktionsfähigkeit Leuchte nicht Bei Anzeichen von Schäden am Netzkabel, beeinträchtigen. dieses sofort durch ein neues ersetzen. ... -
Seite 19: Sterilisation Handgriff
Sterilisation Handgriff 10.1 Federkraft einstellen Sterilisation 17665-1 GEFAHR (Sterilisation von Medizinprodukten in feuchter Hitze) zu beachten Verletzungsgefahr Federkraft darf nur durch qualifizierte Fachkraft VORSICHT eingestellt werden. Beschädigung am Handgriff Der Federarm steht unter einer hohen Feder- kraft. Wird das Endgerät nicht in der obersten ... -
Seite 20: Demontage
DEMONTAGE GEFAHR Lebensgefahr durch Stromschlag Vor der Demontage Stecker vom Netz trennen und Schalter auf Aus- Stellung bringen. GEFAHR Verletzungsgefahr, Kabelhalter abschrauben Wenn beide Kabelhalter abgeschraubt werden, Verbindungsstück lose fällt herunter, was zu Verletzungen und Schäden an Kabel und Gerät führen kann. 11.1 Entsorgung Geben Sie die Leuchte nicht in den Hausmüll. -
Seite 21: Fehlerbehebung
FEHLERBEHEBUNG Störung Mögliche Ursache Fehlerbehebung Nutzerprofile Leuchte brennt nicht Kontaktstörung Erneut einschalten Alle Leuchte brennt nicht Leuchtmittel defekt Herstellerservice kontaktieren Nur durch Herstellerservice Leuchte brennt nicht Keine Netzspannung Spannung prüfen, alle Anschlüsse Elektrofachkraft kontrollieren TECHNISCHE DATEN Elektrische Werte: Eingangs Nennspannung 120V oder 220-240V siehe Typenschild der Leuchte Frequenzbereich... -
Seite 22: Klassifizierung
Betriebsart: Betriebsart Dauerbetrieb Klassifizierung: IRIS LED 10 Schutzklasse I Schutzart nach IEC 529 IP 20 Klassifizierung gemäss Richtlinie 93/42 EWG – Anhang IX (Medizinproduktklasse) Klasse I U.S. FDA Device Class Klasse I Elektrische Sicherheitsprüfung und EMV nach: EN/IEC 60601-1 EN/IEC 60601-2-41 EN/IEC 60601-1-2 GMDN-Code 12276... -
Seite 23: Elektromagnetische Verträglichkeit (Emv)
ELEKTROMAGNETISCHE VERTRÄGLICHKEIT (EMV) Leitlinien- Elektromagnetische Störaussendungen Das Medizinprodukt ist für den Betrieb in einer wie unten angegebenen elektromagnetischen Umgebung bestimmt. Der Anwender muss sicherstellen, dass es in einer derartigen Umgebung betrieben wird. Aussendungen Übereinstimmung Elektromagnetische Umgebung HF-Aussendungen Gruppe 1 Das Medizinprodukt verwendet HF-Energie ausschließlich zu seiner internen (CISPR 11) Funktion. -
Seite 24: Safety Instructions
The luminaire must not be covered by a cloth or SAFETY INSTRUCTIONS any similar item while it is in operation. The ventilation openings (where they exist) must Intended use be free whenever the luminaire is in operation. med® The luminaire must not be operated near to The luminaire D IRIS LED is an examination light. -
Seite 25: Scope Of Supply
IRIS LED 10 W SCOPE OF SUPPLY The following are included in the delivery scope: IRIS LED 10 C The following are included in the delivery scope: 1x wall bracket (inner surface of B) 1x wall cover 1x retaining ring 1x wall angle 1x cantilever arm (pre-assembled) 1x ceiling bracket (inner surface of B) -
Seite 26: Assembly Iris Led 10 C
ASSEMBLY IRIS LED 10 C Load data Bending moment M 90Nm Vertical weight F 118N Assembly arm system DANGER Assembly by qualified personnel Assembly must be carried out by qualified personnel only. Lack of appropriate knowledge could be life-threatening. DANGER Life-threatening danger from falling luminaire Insert ceiling tube 1 into ceiling bracket 2 and... - Seite 27 Perform this assembly step on a flat surface: Place cover and end ring on the ceiling tube Lay arm 1 down flat Pull cable (from arm) through ceiling conduit 2 Insert slide pad 3 into the groove at the top ...
-
Seite 28: Assembly Iris Led Duo 10/10 C
DANGER Electric shocks are life threatening It must be possible to separate the light from the mains by an external all-pole switch (not included). DANGER Connect luminaire to mains Electric shocks are life-threatening Voltage supply from the power connection must be protected on all poles by means of an overcurrent release (according to national installation requirements;... - Seite 29 Perform this assembly step on a flat surface: Insert ceiling tube 1 into ceiling bracket 2 and drill with Ø = 9mm 3. Use the existing hole in the ceiling bearing as a guide. Loosen 4x countersunk screw M3 and remove cover 1 ...
- Seite 30 Place cover and end ring on the ceiling tube Lay one arm 6 down flat Insert slide pad 4 into the groove at the top of the arm Align connecting piece 2 upright Push connecting piece 2 (with boring aligned ...
-
Seite 31: Assembly Iris Led 10 W
DANGER Electric shocks are life threatening It must be possible to separate the light from the mains by an external all-pole switch (not included). DANGER Connect luminaire to mains Electric shocks are life-threatening Voltage supply from the power connection must be protected on all poles by means of an overcurrent release (according to national installation requirements;... - Seite 32 Insert wall angle 1 (with closure ring 2 and hood 3 in position) into the wall bracket 4 and Hold the wall bearing onto the wall and strike the wall anchor with a hammer simultaneously pull the cable through the rectangular cutout ...
-
Seite 33: Assembly Iris Led 10 F
ASSEMBLY LUMINAIRE HEAD WARNING Danger from falling luminaire head Ensure that the luminaire head has been correctly secured. An incorrectly mounted luminaire head can cause damage to property. Push cover and end ring over the wall bracket and tighten them (0.5Nm) ... -
Seite 34: Iris Led 10 F
IRIS LED 10 F CAUTION DANGER Damage to property caused by incorrect cleaning Electric shocks are life threatening Use only disinfectants that will not affect the Do not insert any power cable that is damaged. functional capability of the luminaire. ... -
Seite 35: Sterilisable Hand Grip
Sterilisable hand grip 10.1 Setting the spring force Sterilization must be carried out in accordance DANGER with ISO 17665-1 (Sterilization of health care products - Moist heat). Injury hazard The spring force must be set by qualified CAUTION professionals only ... -
Seite 36: Disassembly
DISASSEMBLY DANGER Electric shocks are life threatening Before disassembly remove connector from the power supply and put the switch in the "OFF" position. DANGER Risk of injury – never unscrew the cable holder When both cable holders are unscrewed, the connecting piece is loose and falls downward, which could lead to injuries and/or damage to the cable and/or the device. -
Seite 37: Troubleshooting
TROUBLESHOOTING Fault Possible cause Troubleshooting User profiles The luminaire does not Contact problem Switch on again light The luminaire does not Bulb defective Contact manufacturer service By manufacturer service light only The luminaire does not No mains voltage Check mains voltage, check all Qualified electrician light connections... -
Seite 38: Operation Mode
Operation mode: Operating mode Continuous operation Classification: IRIS LED 10 Protection class I Degree of protection according to IEC 60529 IP 20 Classification according to directive 93/42/EWG – annex IX (medical device class) Class I U.S. FDA Device Class Class I Electrical safety test and EMC according to: EN/IEC 60601-1 EN/IEC 60601-2-41... -
Seite 39: Electromagnetic Compatibility (Emc)
ELECTROMAGNETIC COMPATIBILITY (EMC) Electromagnetic interference guidelines The medical device is intended for operation in an electromagnetic environment such as the one specified below. The user must ensure that it is operated in such an environment. Emissions In accordance Electromagnetic environment High-frequency emissions Group 1 The medical device uses HF energy exclusively for its internal function. -
Seite 40: Consignes De Sécurité
Ne jamais mettre de charges supplémentaires sur CONSIGNES DE SÉCURITÉ la tête ou le bras de la lampe. Ne pas couvrir la lampe d'un chiffon ou d’un Usage prévu élément similaire lorsqu'elle est allumée. med® Les aérations (si elles existent) doivent être luminaire IRIS lampe... -
Seite 41: Contenu De La Livraison
IRIS LED 10 W CONTENU DE LA LIVRAISON Pièces fournies : IRIS LED 10 C Pièces fournies : 1x Support mural (Face intérieure de B) 1x Cache mural 1x Bague de terminaison 1x Équerre murale 1x Bras à ressort (préassemblé) 1x Support de fixation au plafond 1x Tête de la lampe (Face intérieure de B) -
Seite 42: Assemblage Du Iris Led 10 C
ASSEMBLAGE DU IRIS LED 10 C Données de charge Moment de flexion M 90Nm Retirer la vis de fixation. Poids à la verticale F 118N ATTENTION Avant le montage, tenir compte du rayon d’action Assemblage du système du bras et orienter le luminaire dans le sens du champ DANGER d’action souhaité. - Seite 43 Effectuer les perçages et souffler à l’aide d’un Fixer la fixation pour plafond au plafond et soufflet. enfoncer l’armature murale à l’aide d’un marteau. Serrer conformément aux indications du fabricant. AVERTISSEMENT Risque de chute de la lampe en cas de fixation non réglementaire ...
-
Seite 44: Assemblage Du Iris Led Duo 10/10 C
DANGER Danger de mort provoquée par la chute de la lampe Le plafond doit être en béton dur pour garantir la sécurité de la fixation. DANGER Etablir le raccordement au secteur Danger de mort par choc électrique Tous les pôles de la lampe doivent être déconnectables du réseau au moyen d’un interrupteur externe (non fourni). - Seite 45 Réaliser cette étape du montage sur une surface plane : Insérer la tige de fixation au plafond 1 dans la fixation pour plafond 2 et percer 3 à l’aide d’un foret de Ø= 9 mm. Utiliser le perçage de la fixation pour plafond en résultant comme un guide.
- Seite 46 AVERTISSEMENT Risque de blessure en cas de chute de pièces Deux personnes sont nécessaires pour montage. AVERTISSEMENT Serrer la vis de sécurité et l’écrou M8 1 (20 Nm). Serrer les 4 tiges filetées 2 (5 Nm). Risque de blessure en raison d’une chute de la lampe.
-
Seite 47: Assemblage Du Iris Led 10 W
ASSEMBLAGE DU IRIS LED 10 W Données de charge Moment de flexion M 160Nm Poids à la verticale F 108N Assemblage du système du bras DANGER Tracer au moins 4 marques aux endroits devant Assemblage par du personnel qualifié être percés (Ø13mm), respecter la position des forages Ø60mm en raison des branchements ... - Seite 48 Réaliser cette étape du montage sur une DANGER surface plane : Danger de mort par choc électrique Avant toute opération niveau raccordement secteur, mettre raccordement hors tension et le protéger contre tout redémarrage involontaire. Poser le bras 1 à plat ...
-
Seite 49: Assemblage Du Iris Led 10 F
ASSEMBLAGE DU IRIS LED 10 F Emboîter la tête de lampe 1 (les languettes 2 orientées vers le haut) et le bras 3 Fixer la tête de lampe 1 à l’aide de deux vis à tête conique M4 4 (toutes deux avec des rondelles Poser le tube vertical 1 sur le pied à... -
Seite 50: Désinfection Et Stérilisation
ATTENTION AVERTISSEMENT Risques de lésions oculaires Dommages matériels provoqués par un mauvais nettoyage Ne jamais regarder directement dans le cône de lumière Pour la désinfection, n’utiliser que des produits qui n’affectent pas le bon fonctionnement de la lampe. ATTENTION ... -
Seite 51: Contrôles De Sécurité
Il convient d'emballer la poignée dans un sac stérile avant sa stérilisation. La poignée est exclusivement conçue pour une stérilisation à l'autoclave avec trois cycles de vide préalable fractionnés et injection de vapeur saturée : Température 134 °C ... -
Seite 52: 11.1 Élimination Des Déchets
11.1 Élimination des déchets Ne pas jeter la lampe avec les déchets ménagers. La lampe doit être déposée à un point de collecte, conformément règles locales, ou retournée à un revendeur avec un service de recyclage. Couper le câble au niveau du boîtier. -
Seite 53: Dépannage
DÉPANNAGE Défaillance Cause possible Dépannage Profils d‘utilisateurs La lampe ne s’allume Défaut de contact Rallumer Tous La lampe ne s’allume Ampoule défectueuse Contacter le service après-vente du Uniquement service fabricant après-vente du fabricant La lampe ne s’allume Absence de tension sur le Vérifier la tension, vérifier tous les Électricien professionnel secteur... -
Seite 54: Mode De Fonctionnement
Mode de fonctionnement : Mode de fonctionnement Fonctionnement continu Classification : IRIS LED 10 Classe de protection I Type de protection conforme à CEI 529 IP 20 Classification selon la directive 93/42 CEE - Annexe IX (catégorie de Classe I dispositifs médicaux) U.S. -
Seite 55: Compatibilité Électromagnétique (Cem)
COMPATIBILITÉ ÉLECTROMAGNÉTIQUE (CEM) Perturbations électromagnétiques - lignes directrices Ce dispositif médical est conçu pour une utilisation dans un environnement électromagnétique décrit ci-dessous. L’utilisateur doit veiller à ce qu’il soit bien employé dans un environnement de ce type. Emissions Compatibilité Environnement électromagnétique Emissions HF Groupe 1 Ce dispositif médical utilise une énergie HF uniquement pour son... -
Seite 56: Indicazioni Sulla Sicurezza
Non caricare mai la testa della lampada e il sistema INDICAZIONI SULLA del braccio con carichi aggiuntivi. SICUREZZA In condizione di funzionamento la lampada non deve essere coperta con un panno o simili. Destinazione d’uso Le aperture di ventilazione (se presenti) devono ... -
Seite 57: Contenuto Della Fornitura
CONTENUTO DELLA IRIS LED 10 W FORNITURA Nella fornitura sono contenuti: IRIS LED 10 C Nella fornitura sono contenuti: 1x sostegno a parete (lato interno di B) 1x calotta a parete 1x anello di chiusura 1x squadretta murale 1x braccio elastico (premontato) 1x sostegno a soffitto (lato interno di B) 1x testa della lampada 1x impugnatura... -
Seite 58: Montaggio Iris Led 10 C
ATTENZIONE MONTAGGIO IRIS LED 10 C Prima dell'assemblaggio, tenere conto del raggio e Dati di carico orientare l'apparecchio d'illuminazione in direzione del campo d'azione desiderato. Momento flettente M 90Nm Forza peso verticale F 118 N Montaggio di sistema braccio PERICOLO Montaggio da parte di personale qualificato ... -
Seite 59: Inserire Il Pezzo Scorrevole 3 In Alto Nella
AVVERTENZA Caduta dell'apparecchio d'illuminazione in caso di fissaggio non eseguito a regola d'arte Il perno filettato deve essere avvitato completamente e correttamente. Tenere la staffa a soffitto contro il soffitto, quindi Eseguire questa fase di montaggio su una ... -
Seite 60: Montaggio Di Iris Led Duo 10/10 C
PERICOLO Pericolo morte caso caduta dell'apparecchio d'illuminazione Al fine di garantire una tenuta sicura, il soffitto deve essere di calcestruzzo. Stabilire il collegamento alla rete PERICOLO Pericolo di morte per scarica elettrica L'apparecchio d'illuminazione deve poter essere scollegato dalla rete tramite interruttore esterno su tutti i poli (non in dotazione). -
Seite 61: Inserire Il Pezzo Scorrevole 4 In Alto Nella
Eseguire questa fase di montaggio su una superficie piana: Inserire il tubo a soffitto 1 nella staffa a soffitto 2 e forare con Ø = 9mm 3. Utilizzare il foro pre- esistente del supporto a soffitto come guida. ... - Seite 62 Collocare calotta e anello di chiusura sul tubo a soffitto Porre un braccio 6 in posizione piana Inserire il pezzo scorrevole 4 in alto nella scanalatura del braccio Raddrizzare di taglio il pezzo di collegamento 2 Avvicinare spingendo pezzo di collegamento 2 ...
-
Seite 63: Montaggio Di Iris Led 10 W
PERICOLO Pericolo di morte per scarica elettrica L'apparecchio d'illuminazione deve poter essere scollegato dalla rete tramite interruttore esterno su tutti i poli (non in dotazione). PERICOLO Collegare l’apparecchio d'illuminazione alla rete Pericolo di morte per scarica elettrica L'alimentazione elettrica sul collegamento alla rete deve essere protetta su tutti i poli con un sganciatore di sovracorrente (secondo le norme... - Seite 64 Introdurre la squadretta murale 1 (con anello di chiusura 2 e calotta 3 inseriti) nel sostegno a Tenere fermo sulla parete il sostegno a parete e parete 4 e nello stesso tempo far passare il cavo conficcare con un martello l’ancoraggio a muro ...
-
Seite 65: Montaggio Di Iris Led 10 F
MONTAGGIO DELLA TESTA DELL'APPARECCHIO AVVERTIMENTO Pericolo di lesioni a causa di caduta della testa della lampada. Accertarsi che la testa della lampada sia assicurata in modo regolare. Danni materiali a causa di testa della lampada montata in modo difettoso. Spingere la copertura e l'anello terminale sopra il supporto a muro e avvitarli (0.5Nm) ... -
Seite 66: Iris Led 10 F
IRIS LED 10 F ATTENZIONE PERICOLO Danni materiali causati da pulizia errata Pericolo di morte a causa di scossa elettrica. Per la disinfezione devono essere utilizzati solo mezzi tali da non compromettere la capacità di Non collegare alla presa cavi di alimentazione funzionamento della lampada. -
Seite 67: Controlli Tecnici Di Sicurezza
L'impugnatura deve essere imballata prima della ATTENZIONE sterilizzazione in una sacca sterile L'impugnatura è progettata esclusivamente per la La forza elastica deve essere regolata in modo sterilizzazione a vapore con 3 fasi di pre-vuoto ottimale al momento della consegna frazionato e vapore saturo con i seguenti parametri: Temperatura... -
Seite 68: 11.1 Smaltimento
11.1 Smaltimento gettare lampada rifiuti generici. Conferire la lampada a un centro smaltimento rispetto delle disposizioni locali o consegnarla a un rivenditore fornisca relativo servizio. Tagliare cavo direttamente sull’alloggiamento. I prodotti indicati sopra sono riciclabili per oltre il 95%. Pertanto, dopo la fine della durata utile di questi prodotti, i materiali utilizzati possono essere per la maggior parte riciclati dal punto di vista... -
Seite 69: Eliminazione Dei Guasti
ELIMINAZIONE DEI GUASTI Guasto Possibile causa Eliminazione del guasto Profili dell’utente La lampada non si accende Problema Riaccendere Tutti contatto La lampada non si accende Lampadina difettosa Contattare l’assistenza del Solo a cura dell’assistenza fabbricante del fabbricante La lampada non si accende Assenza di tensione Controllare la tensione, Elettricista... -
Seite 70: Modalità Di Funzionamento
Modalità di funzionamento: Modalità di funzionamento Funzionamento continuo Classificazione: IRIS LED 10 Classe di protezione I Grado di protezione secondo IEC 60529 IP 20 Classificazione ai sensi della direttiva 93/42 CEE - appendice IX Classe I (classificazione dei dispositivi medici) U.S. -
Seite 71: Compatibilità Elettromagnetica (Cem)
COMPATIBILITÀ ELETTROMAGNETICA (CEM) Linee guida - interferenze elettromagnetiche Il dispositivo medico è destinato all'uso in un ambiente come descritto sotto. L'utilizzatore deve accertarsi che venga utilizzato in un ambiente conforme alla descrizione. Emissioni Conformità Ambiente elettromagnetico Emissioni ad alta frequenza Gruppo 1 Il dispositivo medico impiega l'energia ad alta frequenza esclusivamente per (CISPR 11) - Seite 72 Waldmann BV Lingewei 19 4004 LK Tiel Netherlands Telephone +31 344 631 019 Fax +31 344 627 856 www.waldmann.com info-nl@waldmann.com Derungs Licht AG Herbert Waldmann GmbH & Co. KG Hofmattstrasse 12 Postfach 5062 CH-9200 Gossau SG 78057 Villingen-Schwenningen Switzerland Germany...