Herunterladen Inhalt Inhalt Diese Seite drucken
bürkert 8630 Betriebsanleitung
Vorschau ausblenden Andere Handbücher für 8630:
Inhaltsverzeichnis

Werbung

Verfügbare Sprachen

Verfügbare Sprachen

F l u i d C o n t r o l S y s t e m s
Top Control Continuous
Type 8630
Betriebsanleitung / Operating Instructions / Instructions de service

Werbung

Inhaltsverzeichnis
loading

Inhaltszusammenfassung für bürkert 8630

  • Seite 1 F l u i d C o n t r o l S y s t e m s Top Control Continuous Type 8630 Betriebsanleitung / Operating Instructions / Instructions de service...
  • Seite 2: Inhaltsverzeichnis

    TOP CONTROL CONTINUOUS TYP 8630 Inhalt: Seite ALLGEMEINE HINWEISE ..................3 Darstellungsmittel ........................... 3 Sicherheitshinweise ..........................3 Schutz gegen Beschädigung durch elektrostatische Aufladung ............3 Lieferumfang ............................4 Garantiebestimmungen .......................... 4 SYSTEMKONFIGURATION..................5 BESCHREIBUNG DES TOP CONTROL ..............7 Aufbau ..............................7 Funktion ..............................
  • Seite 3 Seite BEDIENUNG ......................33 Bedien- und Anzeigeelemente ......................33 Bedienebenen ............................33 Inbetriebnahme und Einrichten als Stellungsregler ................34 6.3.1 Grundeinstellungen ..........................34 6.3.2 Vorgehensweise zum Festlegen der Grundeinstellungen ................ 34 Konfigurieren der Zusatzfunktionen ....................38 6.4.1 Tasten in der Konfigurierebene ........................ 38 6.4.2 Konfiguriermenü...
  • Seite 4: Allgemeine Hinweise

    ALLGEMEINE HINWEISE Darstellungsmittel In dieser Betriebsanleitung werden folgende Darstellungsmittel verwendet: markiert einen Arbeitsschritt, den Sie ausführen müssen ACHTUNG! kennzeichnet Hinweise, bei deren Nichtbeachtung Ihre Gesundheit oder die Funktionsfähigkeit des Gerätes gefährdet ist HINWEIS kennzeichnet wichtige Zusatzinformationen, Tips und Empfehlungen Sicherheitshinweise Bitte beachten Sie die Hinweise dieser Betriebsanleitung sowie die Einsatzbedingungen und zulässigen Daten, die in den Daten- blättern des Top Control sowie des jeweiligen pneumatisch betätigten Ventils spezifiziert sind, damit das Gerät einwandfrei funk- tioniert und lange einsatzfähig bleibt:...
  • Seite 5: Lieferumfang

    Lieferumfang Überzeugen Sie sich unmittelbar nach Erhalt der Sendung, daß der Inhalt nicht beschädigt ist und mit dem auf dem beigelegten Packzettel angegebenen Lieferumfang übereinstimmt. Generell besteht dieser aus: • pneumatisch betätigtem Ventil der Typen 2652, 2655, 2672, 2700, 2712, 2730, 2731 oder 2731K mit angebautem Top Control Continuous •...
  • Seite 6: Systemkonfiguration

    Bild 2.1 zeigt eine Übersicht über die möglichen Kombinationen von Top Control und verschiedenen pneumatisch betätigten Venti- len. Für jeden Typ sind verschiedene, hier nicht abgebildete Antriebsgrößen und Ventilnennweiten lieferbar. Genauere Angaben hierzu entnehmen Sie den jeweiligen Datenblättern. Die Produktpalette wird laufend erweitert. Top Control Typ 8630 mit Geradsitzventil mit Schrägsitzventil mit Membranventil...
  • Seite 7: Merkmale Der Ventiltypen

    Je nach Einsatzbedingungen können verschiedene Prozeßventile aus dem Bürkert-Programm mit dem Top Control kombiniert werden. Geeignet sind mit Regelkegel versehene Schrägsitz-, Membran- oder Kugelventile. Als Antrieb können pneumatisch betätigte Kolbenantriebe und Drehantriebe verwendet werden. In Kombination mit dem Top Control wer- den sowohl einfachwirkende als auch doppeltwirkende Antriebe angeboten.
  • Seite 8: Beschreibung Des Top Control

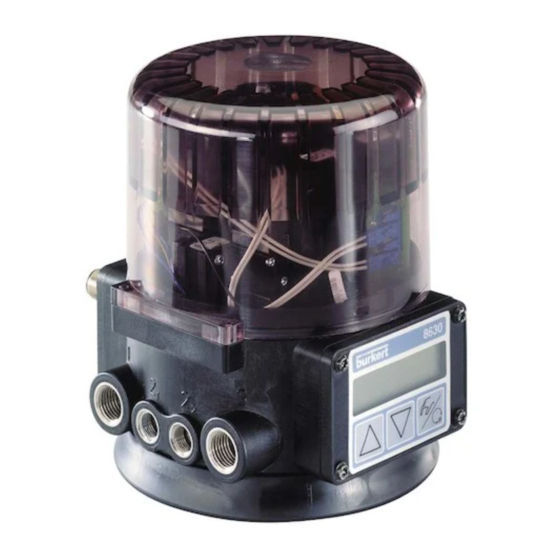
    BESCHREIBUNG DES TOP CONTROL Der Top Control Continuous ist ein elektropneumatische Stellungsregler, der mit verschiedenen pneumatisch betätigbaren Ventilen kombiniert werden kann. Top Control und pneumatischer Antrieb sind mechanisch verbunden und bilden eine funktio- nelle Einheit. Aufbau Der Top Control Continuous (Bild 3.1) ist modular aufgebaut, so daß verschiedene Ausführungen und elektrische Anschluß- konzepte realisiert werden können.
  • Seite 9: Merkmale Des Aufbaus

    Merkmale des Aufbaus: • Ausführungen: für einfachwirkende oder doppeltwirkende Ventilantriebe • Wegmeßsystem: sehr hoch auflösendes Leitplastikpotentiometer, spielfrei mit der Kolbenstange des pneumatischen Antriebs gekoppelt • Mikroprozessorgesteuerte Elektronik: für die Signalverarbeitung, Regelung und Ventilansteuerung • Bedienmodul: Bedienung des Geräts über 3 Tasten. 8stelliges 16-Segment- LC-Display zur Anzeige von Soll- oder Istwert sowie zur Konfigurierung und Parametrierung über Menüfunktionen.
  • Seite 10: Funktion

    Funktion Bild 3.4 zeigt das Funktionsschema des Top Control Continuous in Verbindung mit einem Kolbenstellventil mit einfach- wirkendem Antrieb. Prozeß-Istwert Prozeß- Sollwert Soll- Prozeß- Position Regler externer Stellungs- Sollwert Stellungs- Stellsystem Regler 1: Belüftungsventil Ist- 2: Entlüftungsventil Position Stellsystem Top Control Druckluft- Wegmeß- versorgung...
  • Seite 11: Betrieb Als Stellungsregler

    Bild 3.5: Beispiel für eine Prozeßregelung: TopControl mit Sensor 3.2.1 Betrieb als Stellungsregler (Bild 3.6) Über das Wegmeßsystem wird die aktuelle Position (POS) des pneumatischen Antriebs erfaßt. Dieser Stellungs-Istwert wird vom Regler mit dem als Normsignal vorgebbaren Sollwert (CMD) verglichen. Liegt eine Regeldifferenz (Xd1) vor, wird als Stellgröße an das Stellsystem ein pulsweitenmoduliertes Spannungssignal gegeben.
  • Seite 12: Betrieb Als Prozeßregler

    3.2.2 Betrieb als Prozeßregler (Bild 3.7) Bei Betreiben des Top Control Continuous als Prozeßregler wird die zuvor erwähnte Stellungsregelung zum untergeordneten Hilfsregelkreis; es ergibt sich eine Kaskadenregelung. Der Prozeßregler im Hauptregelkreis des Top Control Continuous hat eine PID-Funktion. Als Sollwert wird der Prozeß-Sollwert (SP) vorgegeben und mit dem Istwert (PV) der zu regelnden Prozeß- größe verglichen.
  • Seite 13: Varianten Des Topcontrol Continuous

    Sie zwischen einem Prozeß-Istwert-Eingang oder zwei binären Ausgängen. Bild 3.9: Schnittstellen des TopControl Continuous bei den Varianten mit PG-Verschraubung und QUICKON-Anschlüssen HINWEIS Der Top Control Typ 8630 ist ein 3-Leiter-Gerät, d.h. die Spannungsversorgung (24 V DC) erfolgt getrennt vom Sollwert-Signal. Betriebsanleitung-Nr. 800607...
  • Seite 14: Eigenschaften Der Software

    Eigenschaften der Software Zusatzfunktion Wirkung Stellungsregler mit Zusatzfunktionen Ventil schließt außerhalb des Regelbereiches dicht Dichtschließfunktion Angabe eines Wertes (in %), ab dem der Antrieb vollständig entlüftet (bei 0 %) bzw. belüftet (bei 100 %) wird. Hubbegrenzung Mech. Ventilkolbenbewegung nur innerhalb eines definierten Hubbereiches Signalbereichsaufteilung Aufteilung des Einheitssignalbereichs auf zwei oder mehr Positioner Korrekturkennlinie zur Anpassung der...
  • Seite 15: Technische Daten

    Technische Daten 3.5.1 Sicherheitsstellungen nach Ausfall der elektrischen bzw. pneumatischen Hilfsenergie Antriebsart Bezeichnung Sicherheitseinstellung nach Ausfall der Hilfsenergie elektrisch pneumatisch einfachwirkend down down WW A einfachwirkend WW B doppeltwirkend down / up nicht definiert WW I (je nach Anschluß der Steuerleitungen Betriebsanleitung-Nr.
  • Seite 16: Werkseinstellungan Des Top Control Continuous

    3.5.2 Werkseinstellungan des Top Control Continuous Funktion Werkseinstellung Funktion Werkseinstellung = 1 %; = 99% = 0 (%); = 100 (%) = 0%, = 100% keine Begrenzung Top Control Continuous...
  • Seite 17: Daten Des Topcontrol Continuous

    3.5.3 Daten des Top Control Continuous Betriebsbedingungen Umgebungstemperatur 0...+50°C Schutzart IP 65 nach EN 60529 (nur bei korrekt angeschlossenem Kabel bzw. Stecker und Buchsen) Konformität mit folgenden Normen konform bzgl. EMV-Richtlinie 89/336/EWG Mechanische Daten Maße siehe Datenblatt Gehäusematerial Top Control außen: POM, PSU, innen: PA 6 Dichtmaterial Top Control Elektrische Daten...
  • Seite 18: Erste Inbetriebnahme

    ERSTE INBETRIEBNAHME HINWEIS Dieser Abschnitt ermöglicht Ihnen, den Top Control zur Funktionskontrolle schnell in Betrieb zu nehmen. Auf nicht erforderliche Zusatzfunktionen wird in diesem Zusammenhang nicht eingegangen. Ausführliche Erläu- terungen über Bedienung und Funktionen siehe Kapitel 5 und 6. Fluidische Installation Bauen Sie das Ventil laut beiliegender Bedienungsanleitung ein.
  • Seite 19: Anschlußklemmen Bei Pg-Verschraubungen

    4.2.2 Anschlußklemmen bei PG-Verschraubungen Zugänglich machen der Anschlußklemmen: Lösen Sie den Deckel mit den PG-Verschraubungen, drehen Sie dazu die 4 selbstschneidenden Schrauben heraus. Die Anordnung der Schraubklemmen zeigt Bild 4.2. Legen Sie das Sollwertsignal und die Versorgungs- Schraubklemmen spannung an die entsprechenden Klemmen (siehe Klemmenbelegung bei PG-Verschraubungen).
  • Seite 20: Quickon-Anschlüsse

    4.2.3 QUICKON-Anschlüsse QUICKON-Anschluß PG9, 3polig Bild 4.3: QUICKON-Anschlüsse QUICKON-Anschluß PG11, 4polig am TopControl Legen Sie das Sollwertsignal an den QUICKON-Anschluß PG11 / 4-polig Belegung äußere Beschaltung + (0/4..20 mA oder 0..5 / 10V) Sollwert GND Sollwert + Legen Sie die Versorgungsspannung an den QUICKON-Anschluß PG9 / 3-polig: Belegung äußere Beschaltung Betriebsspannung +24 V...
  • Seite 21 bei der Erstinbetriebnahme überspringen Bild 4.5: Grundeinstellungen Betriebsanleitung-Nr. 800607...
  • Seite 22 Einstellungen in den Menüpunkten: Wirkungsweise des Antriebs SNGL - einfachwirkend DOUB - doppeltwirkend gewähltes Einheitssignal 4’20A - Strom 4..20 mA 0’20A - Strom 0..20 mA 0’10V - Spannung 0..10 V 0’5V - Spannung 0..5 V überspringen Auslösen der Selbstparametrierung (Bild 4.4) Rücksprung in den Betriebszustand AUTOMATIK;...
  • Seite 23 Eingabe der Sollposition im Betriebszustand AUTOMATIK Der Top Control Continuous arbeitet nach der Auswahl der Grundeinstellungen und Rücksprung in den Betriebszustand AUTOMATIK als Stellungsregler. Geben Sie die Sollposition über das Eingangssignal vor. Umschalten zwischen den Anzeigemöglichkeiten: Anzeige des Display: • Ist-Position des Ventilantriebs (0..100%) •...
  • Seite 24: Installation

    INSTALLATION Abmessungen des Top Control und der verschiedenen Komplettgerätevarianten bestehend aus Top Control , pneumatischem Antrieb und Ventil siehe Datenblatt. Installation des Ventils HINWEIS Der Antrieb muß nicht angeschlossen werden. Abmessungen und Gewindearten siehe Datenblatt des Prozeßventils. Drehen des Top Control Continuous Falls nach Einbau des Stetigventils das Display des Top Control Continuous schlecht einsehbar ist oder die Anschlußkabel bzw.
  • Seite 25: Fluidischer Anschluß Des Top Control Continuous

    Fluidischer Anschluß des Top Control Continuous Legen Sie den Versorgungsdruck an den Druckanschluß 1 - (Bild 5.1) (3 .. 7 bar; Instrumentenluft, öl-, wasser- und staubfrei) Montieren Sie die Abluftleitung oder den Schalldämpfer an den Abluftanschluß 3 (Bild 5.1) Versorgungsdruckan- schluß...
  • Seite 26: Multipolstecker

    5.4.1 Multipolstecker Die Bezeichnung der Multipolstecker bzw. -buchsen und die Bezeichnung der Kontakte zeigt Bild 5.2. Betriebsspannung Signale zur SPS Initiatoren Prozeß-Istwert Bild 5.2: Rundstecker mit Bezeichnung der Kontakte Ausgangssignale zur SPS ( Rundstecker M 16) Belegung äußere Beschaltung / Signalpegel Sollwert GND + (0/4..20 mA oder 0..5 / 10V) komplett galvanisch getrennt...
  • Seite 27 Betriebsspannung (Rundstecker M 12) Belegung äußere Beschaltung + 24 V nicht belegt 24 V DC ± 10 % max. Restwelligkeit 10 % nicht belegt Induktive Näherungsschalter (Buchse rund M 8) Belegung Signalpegel Näherungsschalter 1 + (NO) +24 V DC offen / 24 V Näherungsschalter 1 GND Näherungsschalter 2 + (NO)
  • Seite 28: Anschlußklemmen Für Pg-Verschraubungen

    5.4.2 Anschlußklemmen für PG-Verschraubungen Zugänglich machen der Anschlußklemmen: Drehen Sie die 4 selbstschneidenden Schrauben heraus, um den Deckel mit den PG-Verschraubungen zu lösen. Die Anordnung der Schraubklemmen zeigt Bild 5.3. Jumper Schraubklemmen Bild 5.3: Anschlußplatine des TopControl mit Schraubklemmen und Jumpern Klemmenbelegung bei PG-Verschraubungen Klemme Belegung...
  • Seite 29 Auswahl zwischen binären Ausgängen und Prozeß-Istwert-Eingang: Wählen Sie über die Jumper: 2 binäre Ausgänge (siehe Klemmenbelegung bei Wahl der binären Ausgänge) oder Prozeß-Istwert-Eingang (siehe Klemmenbelegung bei Wahl des Prozeß-Istwert-Eingangs). Die Klemmen 7 bis 10 werden mit den entsprechenden Signalen belegt. Klemmenbelegung bei Wahl der binären Ausgänge: Jumper Klemme...
  • Seite 30: Quickon-Anschlüsse

    5.4.3 QUICKON-Anschlüsse QUICKON-Anschluß PG9, 3polig QUICKON-Anschluß QUICKON-Anschluß Bild 5.4:QUICKON-Anschlüsse am PG11, 4polig PG11, 4polig TopControl QUICKON-Anschluß PG9, 3-polig Belegung äußere Beschaltung Betriebsspannung +24 V 24 V DC ± 10 % max. Restwelligkeit 10 % Betriebsspannung GND nicht belegt QUICKON-Anschluß PG11, 4-polig Belegung äußere Beschaltung Analoge Stellungsrückmeldung GND...
  • Seite 31 a) Pinbelegung bei Wahl der binären Ausgänge Jumper QUICKON-Pin Belegung äußere Beschaltung 24 V / 0V Binärer Ausgang 1+ Binärer Ausgang 1- Binärer Ausgang 2+ 24 V / 0V Binärer Ausgang 2- b) Pinbelegung bei Wahl des Prozeß-Istwert-Eingangs den Eingangstyp stellen Sie über das Konfiguriermenü ein (siehe Kap. 6.3.2). Eingangstyp Jumper Belegung...
  • Seite 32: Angaben Zum Anschluß Der Quickon-Verbindungen An Kabel

    Angaben zum Anschluß der QUICKON-Verbindungen an Kabel QUICKON PG9, 3-polig Querschnittsbereich der Adern 0,34..0,75 mm² Litzenaufbau / kleinster Durchmesser VDE 0295 Klasse 2 bis 5 / 0,2 Aderisolationsmaterial PVC / PE Leitungsaußendurchmesser 4..6 mm ≤ 2,5 mm Aderdurchmesser (incl. Isolation) Bemessungsspannung 160 V bei Überspannungskategorie / Verschnutzungsgrad...
  • Seite 33: Einstellen Der Induktiven Näherungsschalter (Option)

    Einstellen der induktiven Näherungsschalter (Option) ACHTUNG! Um die induktiven Näherungsschalter einzustellen, muß das Gehäuse des Top Control Continuous geöff- net werden. Schalten Sie vor diesem Eingriff die Betriebsspannung ab! Öffnen des Top Control -Gehäuses: Entfernen Sie eventuell vorhandene Verplombungen bzw. Verschraubungen zwischen Deckel und Gehäuse. Drehen Sie den Deckel nach links und heben Sie ihn ab.
  • Seite 34: Bedienung

    BEDIENUNG Bedien- und Anzeigeelemente Der Top Control Continuous ist mit einem 3-Tasten-Bedien- und Anzeigeelement mit LC-Display ausgestattet (Bild 6.1). Die Funktion der Tasten ist in den folgenden Kapiteln beschrieben. Pfeiltaste "oben" HAND / AUTOMATIK-Taste LED (in der HAND / AUTOMATIK-Taste) Pfeiltaste "unten"...
  • Seite 35: Inbetriebnahme Und Einrichten Als Stellungsregler

    Inbetriebnahme und Einrichten als Stellungsregler Führen Sie vor Beginn der Inbetriebnahme die fluidische und elektrische Installation aus (Kapitel 5). 6.3.1 Grundeinstellungen Nehmen Sie bei der ersten Inbetriebnahme des Top Control Continuous folgende Grundeinstellungen vor: • Angabe der Wirkungsweise des verwendeten pneumatischen Antriebs. •...
  • Seite 36 Hauptmenü für die Einstellungen bei der Inbetriebnahme: bei der Erstinbetriebnahme überspringen Bild 6.3: Einstellungen im Hauptmenü Top Control Continuous...
  • Seite 37 Beschreibung der Vorgehensweise (Bild 6.3): Nach dem Einschalten der Betriebsspannung befindet sich der Top Control Continuous in der Prozeßbedienebene im Betriebs- zustand AUTOMATIK . Zum Festlegen der Grundeinstellungen schalten Sie in die Konfigurierebene um. Halten Sie dazu die HAND/AUTOMATIK-Taste 5 Sekunden lang gedrückt. Danach erscheint auf dem Display mit der erste Menüpunkt des Hauptmenüs.
  • Seite 38 X.tune Autotune für Stellungsregler Über den Menüpunkt starten Sie das Programm zur automatischen Parametrierung des Top Control . Folgende Funktionen werden selbsttätig ausgelöst: • Anpassung des Sensorsignals an den (physikalischen) Hub des verwendeten Stellgliedes Ermittlung von Parametern der PWM-Signale zur Ansteuerung der im Top Control integrierten Magnetventile •...
  • Seite 39: Konfigurieren Der Zusatzfunktionen

    Konfigurieren der Zusatzfunktionen HINWEIS Das Bedienkonzept für den Top Control Continuous basiert auf einer strikten Trennung zwischen Grund- und Zusatzfunktionen. Im Auslieferungszustand des Gerätes sind nur die Grundfunktionen aktiviert. Sie dienen dazu, bei der Erstinbetriebnahme gerätespezifische Grundeinstellungen vorzunehmen (Kap. 4). Sie sind für den normalen Betrieb ausreichend.
  • Seite 40: Hauptmenü

    Aufnahme von Zusatzfunktionen ins Hauptmenü Wählen Sie im Hauptmenü den Menüpunkt aus. Sie gelangen durch Betätigen der HAND/AUTOMATIK-Taste in das Zusatzmenü. Wählen Sie mit den Pfeil-Tasten die gewünschte Zusatzfunktion aus. Durch Drücken der HAND/AUTOMATIK-Taste bestätigen Sie die Aufnahme der Zusatzfunktion in das Hauptmenü. Die Funktion wird automatisch mit einem Stern (*) gekennzeichnet.
  • Seite 41: Zusatzfunktionen

    6.4.3 Zusatzfunktionen Auswahl der Übertragungskennlinie zwischen Eingangssignal und Hub (Korrekturkennlinie) Dichtschließfunktion Wirksinn zwischen Eingangssignal und Soll- position Zuordnung des Belüftungszustands der Antriebs- kammer (Anschluß 2 ) zur Istposition Signalbereichsaufteilung; Eingangssignal in %, für den das Ventil den gesamten Hubbereich durchläuft. Begrenzung des mechanischen Hubbereichs Begrenzung der Stellgeschwindigkeit Parametrierung des Stellungsreglers...
  • Seite 42 Charact Auswahl der Übertragungskennlinie zwischen Eingangssignal und Hub (Korrekturkennlinie) Kundenspezifische Kennlinie (Characteristic) Werkseinstellung: Mit dieser Zusatzfunktion wählen Sie eine Übertragungskennlinie bezüglich Stellungssollwert (Soll-Position) und Ventilhub zur Korrektur der Durchfluß- bzw. Betriebskennlinie aus. Lineare Kennlinie Gleichprozentige Kennlinie 1 : 25 Gleichprozentige Kennlinie 1 : 33 Gleichprozentige Kennlinie 1 : 50 Invers gleichprozentige Kennlinie 25 : 1 Invers gleichprozentige Kennlinie 33 : 1...
  • Seite 43 Eingabe der frei programmierbaren Kennlinie Die Kennlinie wird über 21 Stützstellen definiert, die gleichmäßig über den Stellungssollwertbereich von 0..100 % verteilt sind. Ihr Abstand beträgt 5 %. Jeder Stützstelle kann ein frei wählbarer Hub (Einstellbereich 0..100 %) zugeordnet werden (Bild 6.8). Die Differenz zwischen den Hubwerten zweier benachbarter Stützstellen darf nicht größer als 20 % sein.
  • Seite 44 Cutoff Dichtschließfunktion Werkseinstellung: = 1 %; = 99% Diese Funktion bewirkt, daß das Ventil außerhalb des Regelbereiches dicht schließt. Geben Sie hier Grenzen für den Sollwert ein (in %), ab denen der Antrieb vollständig entlüftet bzw. belüftet wird. Bei der Schnellbe-/Schnellentlüftungsvariante werden je- weils zwei Ventile angesteuert, um schneller vollständig zu be- und entlüften.
  • Seite 45 Sollposition RISE FALL Eingangs- signal Bild 6.10: Wirkungssinn zwischen Eingangssignal und Sollposition Dir.act Wirkungssinn bzw. Wirkungsrichtung (Direction) des Stellantriebs ARISE Werkseinstellung: Über diese Zusatzfunktion stellen Sie den Wirkungssinn zwischen dem Belüftungszustand des Antriebs und der Istposition ein (Bild 6.11). Direkte Wirkungsrichtung (entlüftet →...
  • Seite 46 SPLtrng Signalbereichsaufteilung (Split range); Min. und Max.-Werte des Eingangssignal in %, für den das Ventil den gesamten Hubbereich durchläuft. Werkseinstellung: = 0 (%); = 100 (%) Mit dieser Zusatzfunktion schränken Sie den Sollwertbereich des Top Control Continuous durch Festlegen eines minimalen und eines maximalen Wertes ein.
  • Seite 47 X.limit Begrenzung des mechanischen Hubbereichs Werkseinstellung: = 0%, = 100% Diese Zusatzfunktion begrenzt den (physikalischen) Hub auf vorgegebene %-Werte (minimal und maximal) (Bild 6.13). Dabei wird der Hubbereich des begrenzten Hubes gleich 100 % gesetzt. Wird im Betrieb der begrenzte Hubbereich verlassen, werden negative POS-Werte oder POS-Werte größer 100 % angezeigt. Eingabe des Anfangswertes des Hubbereichs in % 0..50% des Gesamthubes Eingabe des Endwertes des Hubbereichs in %...
  • Seite 48 Ventilhub Sollwert Istwert T.OPN Bild 6.14: Auswirkung einer Begrenzung der Öffnungsgeschwindigkeit bei einem Sollwertsprung X.contrl Parametrierung des Stellungsreglers Unempfindlichkeitsbereich (Totband) des Stellungsreglers Eingabe des Totbands in %, bezogen auf den skalierten Hubbereich; d. h. minus (siehe Funktion Durch diese Funktion wird erreicht, daß der Stellungsregler erst ab einer bestimmten Regeldifferenz anspricht (Bild 6.15).
  • Seite 49 Xd1' Regel- zum Regler Stellungssollwert differenz Xd1' Totband Stellungs- Istwert Bild 6.15: Unempfindlichkeitsbereich bei Stellungsregelung P.contrl Parametrierung des Prozeßreglers Unempfindlichkeitsbereich (Totband) des PID-Prozeß- reglers Parameter des PID-Prozeßreglers Art der Sollwertvorgabe Angabe der Signalart für Prozeß-Istwert Filterung des Prozeß-Istwerteingangs Skalierung des Prozeßreglers Speichern der neuen Parameter Ende der Parametrierung des Prozeßreglers P.co - dbnd...
  • Seite 50 Eingabe des Totbands in % bezogen auf die Spanne des gewählten Prozeß-Istwert-Eingangs Für PV verwendeter Bereich Spanne (als Bezug Beispiel: Eingangstyp für das Totband) 1% Tontband entsprechen 4..20 mA 4 .. 20 mA 16 mA 0,16 mA Frequenz 0 .. 1000Hz 1000 Hz 10 Hz Pt100...
  • Seite 51 P.co - setp Art der Sollwertvorgabe (intern / extern) Sollwertvorgabe intern über die Tasten am TopControl Sollwertvorgabe extern über den Einheitssignaleingang P.co - inp Angabe der Signalart für den Prozeß-Istwert Einheitssignal Strom 4...20 mA (Durchfluß, Druck, Niveau) Frequenzsignal (Durchfluß) Beschaltung mit Pt100 (Temperatur) P.co - filt Filterung des Prozeß-Istwerteingangs.
  • Seite 52 P.CO SCAL Skalierung des Prozeßreglers bei Auswahl des Analogeingangs "4 ..20 mA" (P.CO inp 4-20A) (Beispiel siehe unten) Position des Dezimalpunkts für Prozeß-Istwert- und Sollwert (Einstellbereich: 0..3) Unterer Skalierungswert für den Prozeß-Istwert (process value); der Wert wird 4 mA zugeordnet. Oberer Skalierungswert für den Prozeß-Istwert (process value);...
  • Seite 53 Skalierung des Prozeßreglers bei Auswahl des Frequenzeingangs (P.CO inp Freq) HINWEIS Beim Einstieg in dieses Menü wird das Ventil geschlossen, um für das Durchführen der Teach-In-Funktion einen definierten Ausgangszustand zu haben. Einheit l/s Einheit l/m Einheit m³/min Einheit m³/h Einheit gal(US)/s Einheit gal(US)/min Einheit gal(US)/h Einheit gal(Imperial)/s...
  • Seite 54 Einstellung der gewünschten Einheit für den Durchfluß Position des Dezimalpunkts für Prozeß-Istwert und -Sollwert (Einstellbereich: 0..3). Unterer Skalierungswert für den Prozeß-Sollwert (setpoint); der Wert wird dem kleinsten Strom- bzw. Spannungswert des Einheitssignals zugeordnet. Diese Einstellung ist nur aktiv, wenn gewählt ist. Oberer Skalierungswert für den Prozeß-Sollwert (setpoint);...
  • Seite 55 Skalierung des Prozeßreglers bei Auswahl des Pt-100-Eingangs (P.CO inp pt100) Position des Dezimalpunkts (Einstellbereich: 0..3) Unterer Skalierungswert für externen Prozeß-Sollwert der Wert wird dem kleinsten Strom- bzw. Spannungs- wert des Einheitssignals zugeordnet (nur aktiv, wenn gewählt ist) Oberer Skalierungswert für externen Prozeß-Sollwert der Wert wird dem größten Strom- bzw.
  • Seite 56 BIN-IN Aktivierung des Binäreingangs Auswahl der Funktion des Binäreingangs Anfahren einer Sicherheits- position Binäreingang deaktiviert Eingabe der Sicherheits- position (0..100%) * Typ des Binäreingangs normally closed (0..5 V = 1; 10..30 V = 0) normally open (0..5 V = 0; 10..30 V = 1) Ende der Einstellung des Binäreingangs Beträgt die Sicherheitsposition 0% oder 100%, so wird der Antrieb vollständig entlüftet bzw.
  • Seite 57 out ANL Einheitssignal für den analogen Stellungsausgang analoge Ausgabe der Ist-Position des Ventilantriebs analoge Ausgabe der Soll-Position des Ventilantriebs bei aktivem Prozeßregler: analoge Ausgabe des Prozeß- Sollwerts (Option) bei aktivem Prozeßregler: analoge Ausgabe des Prozeß- Istwerts (Option) Strom 4..20 mA Strom 0..20 mA Spannung 0..10 V Spannung 0..5 V...
  • Seite 58: Stellungsregler Aktiviert

    cal.user Kalibrierung der Istwert-Anzeige, der Eingänge für Stellungs-Sollwert und Prozeß-Sollwert und Prozeß-Istwert, sowie des K-Faktors für das Ventil A) STELLUNGSREGLER AKTIVIERT Beschreibung siehe nächste Seite nur bei analoger Stellungsrückmeldung aktiv Ende der Kalibrierung HINWEIS Die in Klammern gesetzten Signalarten werden in diesem Menü nur angezeigt, sie können hier nicht verän- dert werden.
  • Seite 59 C A l . p o s Kalibrierung der Positionsanzeige (0 - 100 %) Übernahme der minimalen Position: minimale Position des Ventils über Pfeiltasten anfahren und durch Drücken der HAND/AUTOMATIK-Taste bestätigen Übernahme der maximalen Position: Fahren Sie die maximale Position des Ventils über die Pfeiltasten an und bestätigen Sie diesen Wert durch Drücken der HAND/AUTOMATIK-Taste cal inp Kalibrierung des Stellungs-Sollwerts (4..20 mA;...
  • Seite 60: Prozessregler Aktiviert

    B) PROZESSREGLER AKTIVIERT Beschreibung siehe nächste Seite nur bei analoger Stellungsrück- meldung aktiv Ende der Kalibrierung HINWEIS Die in Klammern gesetzten Signalarten bzw. Vorgaben werden in diesem Menü nur angezeigt, sie können hier nicht verändert werden. Angezeigt werden die Signalart bzw. Vorgaben, die Sie in den zugehörigen Me- nüs ausgewählt haben: Anzeige der Auswahl im Menü...
  • Seite 61 CAl pos Kalibrierung der Positionsanzeige Übernahme der minimalen Position: Fahren Sie die minimale Position des Ventils über Pfeiltasten an und bestätigen Sie diese durch Drücken der HAND/AUTOMATIK-Taste Übernahme der maximalen Position: Fahren Sie die maximale Position des Ventils über Pfeiltasten an und bestätigen Sie diese durch Drücken der HAND/AUTOMATIK-Taste cal sp Kalibrierung des Prozeß-Sollwerts;...
  • Seite 62: Einrichten Einer Prozeßregelung

    Einrichten einer Prozeßregelung Um den Top Control Continuous als Prozeßregler betreiben zu können, führen Sie folgende Schritte aus: Führen Sie in jedem Fall zunächst die Selbstparametrierung für Stellungsregler ( - siehe Abschnitt 6.3.2) durch. Nehmen Sie Zusatzfunktion über das Konfiguriermenü ins Hauptmenü auf (Abschnitt 6.4). Mit der Funktion wird auch die Funktion ins Hauptmenü...
  • Seite 63: Prozeßbedienen

    Prozeßbedienen Nach jedem Einschalten der Betriebsspannung befindet sich der Top Control Continuous automatisch in der Prozeßbedienebene. Aus der Konfigurierebene wechseln Sie durch Bestätigen des Menüpunkts mit der HAND/AUTOMA- TIK-Taste in die Prozeßbedienebene. Von der Prozeßbedienebene aus wird der normale Regelbetrieb ausgeführt und überwacht (Betriebszustand AUTOMATIK ), sowie das Ventil manuell auf- oder zugefahren (Betriebszustand HAND ).
  • Seite 64: Anzeigen Im Betriebszustand Automatik

    Anzeigen im Betriebszustand AUTOMATIK: Prozeßregler nicht aktiv Bezüglich des Stellungsreglers sind folgende Anzeigen möglich: • Ist-Position des Ventilantriebs: (0..100%) • Soll-Position des Ventilantriebs nach Umskalierung durch evtl. aktivierte Split-Range-Funktion oder Korrekturkennlinie: (0..100%) • Eingangssignal für Soll-Position: (0 .. 5/10 V oder 0/4 .. 20 mA) •...
  • Seite 65: Prozeßregler Aktiv

    Prozeßregler aktiv Bei aktiviertem Prozeßregler können folgende Größen angezeigt werden: • Istwert der Prozeßgröße (Prozeßistwert): (-999..9999) • Sollwert der Prozeßgröße (Prozeßsollwert): (-999..9999) • Ist-Position des Ventilantriebs: (0..100%) • Soll-Position des Ventilantriebs nach Umskalierung durch evtl. aktivierte Split-Range-Funktion oder Korrekturkennlinie: (0..100%) •...
  • Seite 66: Manuelles Verändern Des Prozeßsollwerts

    Manuelles Verändern des Prozeßsollwerts: Wurde beim Konfigurieren die Zusatzfunktion oder > 3 sec (Einstellen des Sollwertes über Tasten) spezifiziert, kann bei eingestellter Anzeige (Setpoint) durch Betätigen einer der beiden Pfeiltasten von länger als 3 Sekunden der Modus zum Verän- dern des Prozeßsollwertes aktiviert werden (Bild 6.18, 6.19). Nach dem Loslassen der Taste blinkt die erste Stelle des Prozeßsollwertes.
  • Seite 67 Betriebszustand AUTOMATIK Betriebszustand HAND Ventil zu - Keine Ventil auf - Normalgang Bedien- Normalgang Taste loslassen Taste loslassen handlung (> 5 Sek.) loslassen loslassen Menüpunkt Ventil zu - Ventil auf - Schnellgang Schnellgang Konfigurieren Bild 6.21: Bedienstruktur und Bedienabläufe im Betriebszustand HAND Betriebsanleitung-Nr.
  • Seite 68: Wartung Und Fehlerbehebung

    WARTUNG UND FEHLERBEHEBUNG Der Top Control Continuous ist bei Betrieb entsprechend den in dieser Anleitung angegebenen Anweisungen wartungsfrei. Fehlermeldungen auf dem LC-Display • Fehlermeldungen beim Einschalten: Anzeige Fehlerursachen Abhilfe Interner Fehler nicht möglich, Gerät defekt • Fehlermeldungen bei der Durchführung der Autotune-Funktion: Anzeige Fehlerursachen Abhilfe...
  • Seite 69 Betriebsanleitung-Nr. 800607...
  • Seite 70: Auswahlkriterien Für Stetigventile

    ANHANG A Auswahlkriterien für Stetigventile Von entscheidender Bedeutung für ein optimales Regelverhalten und das Erreichen des gewünschten Maximaldurchflusses sind folgende Kriterien: • die richtige Wahl des Durchflußbeiwertes, der im wesentlichen durch die Nennweite des Ventils definiert wird; • eine gute Abstimmung der Ventilnennweite auf die Druckverhältnisse unter Berücksichtigung der übrigen Strömungs- widerstände in der Anlage.
  • Seite 71 -Wert des Stetigventils ist über die sogenannte Ventilautorität Ψ mög- Eine praxisgerechte Festlegung der Obergrenze für den k lich: ∆ Ψ ∆ (∆p) : Druckabfall über das voll geöffnete Ventil Bei einer Ventilautorität Ψ Ψ Ψ Ψ Ψ < 0,3 ist das Stetigventil überdimensioniert. HINWEIS Bei voller Öffnung des Stetigventils ist in diesem Fall der Strömungswiderstand wesentlich kleiner als der der übrigen fluidischen Komponenten in der Anlage.
  • Seite 72: Eigenschaften Von Pid-Reglern

    Eigenschaften von PID-Reglern Ein PID-Regler besitzt einen Proportional-, einen Integral- und einen Differentialanteil (P-, I- und D-Anteil). P-Anteil: Funktion: Y = Kp · Xd Kp ist der Proportionalbeiwert (Verstärkungsfaktor). Er ergibt sich als Verhältnis von Stellbereich ∆Y zu Proportionalbereich ∆Xd. Kennlinie Sprungantwort Bild 8.1: Kennlinie und Sprungantwort des P-Anteils eines PID-Reglers...
  • Seite 73 Eigenschaften: Ein reiner I-Regler beseitigt die Auswirkungen auftretender Störungen vollständig. Er besitzt also ein günstiges statisches Verhal- ten. Er arbeitet aufgrund seiner endlichen Stellgeschwindigkeit langsamer als der P-Regler und neigt zu Schwingungen. Er ist also dynamisch relativ ungünstig. D-Anteil: Funktion: Y = Kd d Xd/dt Kd ist der Differenzierbeiwert.
  • Seite 74 D-Anteil I-Anteil I-Anteil D-Anteil P-Anteil P-Anteil Nachstellzeit Tn Vorhaltezeit Tv Sprungantwort des PID-Reglers Anstiegsantwort des PID-Reglers Bild 8.4: Sprungantwort und Anstiegsantwort des PID-Reglers Realisierter PID-Regler D-Anteil mit Verzögerung: Im Prozeßregler des Positioners ist der D-Anteil mit einer Verzögerung T realisiert. Funktion: + Y = Kd Überlagerung von P-, I- und DT- Anteil:...
  • Seite 75 Funktion des realen PID-Reglers: ∫ ∫ ∫ ∫ ∫ Xd dt + Tv + Y = Kp (Xd + Sprungantwort des realen PID-Reglers: Bild 8.6: Sprungantwort des realen PID-Reglers Betriebsanleitung-Nr. 800607...
  • Seite 76: Einstellregeln Für Pid-Regler

    Einstellregeln für PID-Regler In der regelungstechnischen Literatur werden eine Reihe von Einstellregeln angegeben, mit denen auf experimentellem Wege eine günstige Einstellung der Reglerparameter ermittelt werden kann. Um dabei Fehleinstellungen zu vermeiden, sind stets die Bedingungen zu beachten, unter denen die jeweiligen Einstellregeln aufgestellt worden sind. Neben den Eigenschaften der Regelstrecke und des Reglers selbst spielt dabei eine Rolle, ob eine Störgrößenänderung oder eine Führungsgrößenänderung ausgeregelt werden soll.
  • Seite 77 Stellgröße Y Istwert Ks * ∆Y Regelgröße Bild 8.8: Verlauf der Regelgröße nach einem Stellgrößensprung ∆ Y Vorgehensweise: • Regler auf HAND schalten • Stellgrößensprung ausgeben und Regelgröße mit einem Schreiber aufnehmen • Bei kritischen Verläufen (z.B. bei Überhitzungsgefahr) rechtzeitig abschalten. HINWEIS Es ist zu beachten, daß...
  • Seite 78: Anhang B: Bedienstruktur Des Top Control Continuous

    ANHANG B: BEDIENSTRUKTUR DES TOP CONTROL CONTINUOUS Top Control Positioner...
  • Seite 79 bei PCO INP = 4'20A nur bei externem Sollwert (unter P:CO SETP / SETPEXT angewählt) bei PCO INP = FREQ nur bei externem Sollwert (unter P:CO SETP / SETPEXT angewählt) bei PCO INP = FREQ nur bei externem Sollwert (unter P:CO SETP / SETPEXT angewählt) Betriebsanleitung-Nr.
  • Seite 80 Stellungsregler aktiv Prozeßregler aktiv Prozeßregler aktiv analoge Stellungsrück- meldung Top Control Continuous...
  • Seite 81 Betriebsanleitung-Nr. 800607...
  • Seite 82: Anhang C: Tabellen

    ANHANG C: TABELLEN FÜR IHRE EINSTELLUNGEN Einstellungen in der freiprogrammierbaren Kennlinie Stützstelle Ventilhub [%] (Stellungs- Datum: Datum: Datum: Datum: sollwert in %) Eingestellte Parameter des Prozeßreglers Datum: Datum: Datum: Datum: DBND Top Control Continuous...
  • Seite 83 NOTIZEN Betriebsanleitung-Nr. 800607...
  • Seite 84 Top Control Continuous...
  • Seite 85: Mastercode

    MASTERCODE: 7175 Betriebsanleitung-Nr. 800607...
  • Seite 86 TOP CONTROL CONTINUOUS TYPE 8630 CONTENTS: GENERAL INFORMATION ..................87 Symbols ..............................87 Safety information ..........................87 Important for Handling ......................... 87 Scope of delivery ..........................87 Warranty conditions ..........................88 Master code ............................88 SYSTEM CONFIGURATION ..................89 DESCRIPTION OF THE TOP CONTROL CONTINUOUS ......... 91 Construction ............................
  • Seite 87 OPERATION ......................117 Control and display elements ......................117 Operating levels ..........................117 Commissioning as a position controller................... 118 6.3.1 Basic configuration ..........................118 6.3.2 Operating mode for basic configuration ....................118 Configuration of the additional functions ..................122 6.4.1 Keys in the configuration menu ......................
  • Seite 88: General Information

    GENERAL INFORMATION Symbols The following symbols are used in these operating instructions: indicates a working step which must be performed ATTENTION! Indicates information, which if not observed can result in harmful effects on the health or the serviceability of the unit. NOTE Indicates important additional information, tips and recommendations.
  • Seite 89: Scope Of Delivery

    Scope of delivery Check the contents of the delivery for damage and agreement with the details specified on the delivery note immediately following receipt. This normally comprises: • pneumatically actuated valve of types 2652, 2655, 2672, 2700, 2712, 2730, 2731 or 2731K with the Top Control Continuous •...
  • Seite 90: System Configuration

    A vast range of connections and valve diameters is available, although not displayed in the figure below. All technical informations about these products are described in the relevant data sheets. The product range will be continuously increased. Top Control Type 8630 with flat seat valve Type 2712 with slanted seat with diaphragm valve...
  • Seite 91 Various control valves from the Bürkert range may be used in connection with the Top Control Continuous depending on the installation conditions. Angle valves, diaphragm valves, including ball valves fitted with a control cone are suitable, as well as piston or rotary driven pneumatic actuators.
  • Seite 92: Description Of The Top Control Continuous

    The Top Control Continuous and pneumatic actuator are joined together to build one functional unit. Construction The design of the type 8630 Top Control Continuous (Fig. 3.1) is based on a modular concept. Wide ranges of pneumatic and electrical connections are available as options.
  • Seite 93: Construction Features

    CONSTRUCTION FEATURES: • Design: for single/double-acting actuators • Path measuring system: high linear resolution with plastic potentiometer. Freely coupled to the piston rod of the actuator • Electronic system piloted by a microprocessor: ensure an efficient configuration, control, and drive of the actuator •...
  • Seite 94: Function

    Function The figure 3.4 shows the functional diagram of the Top Control Continuous in combination with a single acting piston valve. Process value Process setpoint Position Process setpoint controller external position setpoint Position Actuator controler 1: Air inlet valve Position 2: Air exhaust valve feedback Actuator...
  • Seite 95: Working As Position Controller

    Fig. 3.5: Process control example: TopControl with sensor 3.2.1 Working of the Top Control Continuous as position controller (Fig. 3.6) The actual position (POS) is measured by the displacement measuring system. This position value is compared to the normalized position setpoint signal (CMD). In cases of difference (Xd1), a voltage pulse-width modulation signal is sent as control signal. With single-acting actuators, a positive error exists and pulses are sent from output B to activate the air supply.
  • Seite 96: Using As Process Controller

    3.2.2 Using the Top Control Continuous as a process controller (Fig. 3.7) By using the Top Control Continuous as a process controller, the previous position control function is a component of the main control loop. The process controller within the main control loop posseses a PID function. The process setpoint (SP) is used and compared to the controlled process value (PV).
  • Seite 97: Top Control Variants

    Top Control Continuous variants The Top Control Continuous is available in 3 forms, varying in electrical connection and control functions. • Multipole connection with complete functions (Fig. 3.8) • Terminal with PG cable glands and terminals with restricted functions (Fig. 3.9) •...
  • Seite 98: Software Characteristics

    Software characteristics Additional function Operation Positon controller with additional functions Close tight function Valve tightly closed over the tightness process range Statement of a value (in %) above which the drive is completely de-aerated (at 0 %) or ventilated (at 100 %) Plug travel limitation Mechanical movement of the valve piston within a specified stroke range Split range...
  • Seite 99: Technical Characteristics

    Technical characteristics 3.5.1 Safety positions according to electrical and pneumatic power supplys Type of actuator Designation Safety settings following failure or auxillary power supply electrical pneumatic single acting down down WW A single acting WW B double acting down / up not assigned WW I (depending on con-...
  • Seite 100: Factory Settings Of The Top Control Continuous

    3.5.2 Factory settings of the Top Control Continuous Function Factory setting Function Factory setting = 1 % = 99% 0 (%) = 100 (%) = 0% = 100% no limitation Top Control Continuous...
  • Seite 101: Characteristics Of The Top Control Continuous

    3.5.3 Characteristics of the Top Control Continuous Operating data Operating temperature 0...+50°C Degree of protection IP 65 according to EN 60529 (in correct electrical installation conditions) Conformity to norms According to CE 89/336 Mechanical data Dimensions refer to data sheet Material of the body external POM, PSU...
  • Seite 102: Initial Commissioning

    INITIAL COMMISSIONING NOTE This section allows you to perform the quick commissioning of the Top Control Continuous. The not essenti- al additional functions are not described in this section. See chapter 5 and 6 for complete explanations about commissioning and the functions available. Pneumatic connection Install the valve according to the specific requirements.
  • Seite 103: Cable Gland Connection

    4.2.2 Cable gland connection Easy connection of the terminal box: Remove the 4 self-cutting screws to open the cover of the terminal box. The connections of the terminals are shown in figure 4.2. Terminals Connect the external position setpoint signal and power supply wires to the terminals (according to the PG-terminal assignment).
  • Seite 104: Quickon Connections

    4.2.3 QUICKON connectors QUICKON Pg9, 3-pole Fig. 4.3: QUICKON connectors on QUICKON Pg11, 4-pole TopControl Lay the set-point signal on the QUICKON connector PG11, 4-pole: Assignment External connection + (0/4..20 mA or 0..5 / 10V) Set-point GND Set-point + Lay the supply voltage on the QUICKON connector PG9, 3-pole: Assignment External connection Operating voltage +24 V...
  • Seite 105 AUTOMATIC Mode MANUAL Mode Omit during first commissioning Fig. 4.5: Basic configuration Operating instructions no. 800607...
  • Seite 106 Configuration within the MAIN menu: Function of the actuator SNGL - single acting DOUB - double acting Selection of the input signal 4’20A - Current 4..20 mA 0’20A - Current 0..20 mA 0’10V - Voltage 0..10 V 0’5V - Voltage 0..5 V Omit for quick commissioning Activation of the self-calibration (Fig.
  • Seite 107 Entry of the setpoint within the AUTOMATIC mode After the configuration the Top Control acts as a position controller. Enter the setpoint as a signal input. Switch between the display possibilities: Message on display: • Actual position of the actuator (0..100%) •...
  • Seite 108: Installation

    INSTALLATION Please refer to the data sheets for dimensions of the Top Control Continuous and complete instrument variants of the Top Control , pneumatic actuators and valves. Installation of the valve NOTE The actuator must not be connected. For dimensions and thread types, see data sheet of process valve. Turning the Top Control Continuous If after installation of the continuous valve, the display of the Top Control Continuous is poorly visible or the cables or hoses are difficult to connect, the Top Control Continuous can be turned relative to the pneumatic actuator.
  • Seite 109: Pneumatic Connection Of The Top Control Continuous

    Pneumatic connection of the Top Control Continuous Connect the air supply (3..7 bar, instrument air, oil, water and duster) to port 1 (Fig. 5.1). Mount the exhaust air pipe or noise reducer on port 3 (Fig. 5.1). Supply pressure connector (inscription: 1) Outlet air connector (inscription: 3) Bild 5.1: Fluidic connections of the TopControl...
  • Seite 110: Multipole Connection

    5.4.1 Multipole connection The figure 5.2 indicates the functions of the multipole connectors and assignment of the pins. Power supply Signal to SPS Initiators Process value Fig 5.2: Circular connector with pin assignment Output signal to SPS (circular connector M16) Assignment External connection Setpoint GND...
  • Seite 111 Power supply (circular connector M12) Assignment External connection + 24 V not connected 24 V DC ± 10 % Residual ripple 10 % not connected Inductive proximity switch (circular connector M8) Assignment External connection Proximity switch 1 + (NO) +24 V DC open / 24 V Proximity switch 1 Proximity switch 2 +...
  • Seite 112: Cable Gland Connection

    5.4.2 Cable gland connection Easy connection of the terminal box: Remove the 4 self-cutting screws to open the cover of the terminal box. The disposal of the terminal is shown on figure 5.3. Straps Terminals Fig. 5.3: TopControl terminals and straps Connection of terminals (with cable glands) Terminal Assignment...
  • Seite 113 Selection between digital output and process value input: Select using the strap: 2 digital outputs (see terminal assignment when digital output selected) process value inputs (see terminal assignment when process value is selected). The terminals 7 to 10 are connected to the corresponding signals. Connect the limit switches to the terminals: Strap Terminal...
  • Seite 114: Quickon Connections

    5.4.3 QUICKON connectors QUICKON PG9, 3-pole QUICKON Pg11, (Technical QUICKON Pg11, Fig. 5.4: QUICKON connectors on 4-pole Earth) 4-pole TopControl QUICKON connector PG9, 3-pole: Assignment External connection Operating voltage +24 V 24 V DC ± 10 % Residual ripple 10 % Operating voltage GND not connected QUICKON connector PG11, 4-pole:...
  • Seite 115 a) Pin assignment on selection of the binary outputs Jumper QUICKON pin Assignment External connection 24 V / 0V Binary output 1+ Binary output 1- Binary output 2+ 24 V / 0V Binary output 2- b) Pin assignment on selection of the process actual value input The input type is set via the configuration menu (see 6.3.2).
  • Seite 116 Information on connecting the QUICKON connectors to cable QUICKON PG9 / 3-pole Range of wire cross-sections 0.34..0.75 mm² Strand structure / smallest diameter VDE 0295 Class 2 to 5 / 0.2 Wire insolation material PVC / PE Outside diameter of conductors 4...6 mm ≤...
  • Seite 117: Adjusting The Inductive Proximity Switch (Option)

    Adjusting the inductive proximity switch (option) ATTENTION! It is necessary to open the Top Control housing to install the inductive proximity switch. Disconnect the power supply before opening open the Top Control . Opening the Top Control : Remove the screws and possible seals between the cover and the housing. Twist the cover to the left and remove it.
  • Seite 118: Operation

    OPERATION Control and display elements The Top Control Continuous has 3 keys and a LCD (Fig 6.1). The functions of the keys are described in the following section. Arrow up key MANUAL/AUTOMATIC key (in the MANUAL/ AUTOMATIC key) Arrow down key Fig.
  • Seite 119: Commissioning As A Position Controller

    Commissioning as a position controller Follow the pneumatic and electrical connection instructions before commissioning (chapter 5). 6.3.1 Basic configuration Select the following basic configuration for the initial commissioning : • Enter the displacement range of the pneumatic actuator. • Enter the unit of the selected input signal (4..20 mA, 0..20 mA, 0..10 V or 0..5 V). Start the self-calibration of the Top Control Continuous to the selected operating conditions(Autotune).
  • Seite 120 Main menu for configuration during servicing: AUTOMATIC Mode MANUAL Mode Omit during first commissioning Fig. 6.3: Setting within the main menu Top Control Continuous...
  • Seite 121 Description of the overview (Fig. 6.3): After switching the power on, the Top Control Continuous is in the process operation level in the AUTOMATIC mode. To enter the basic configuration, within the configuration level, press the MANUAL/AUTOMATIC key for a duration of 5 seconds. The submenu will then be displayed as the first step of the main menu.
  • Seite 122 X.tune Autotuning of the Top Control Continuous With the sub-menu, you start a program that performs an automatic parametring of the Top Control Continuous. The following parameters are automatically calculated: • Matching the sensor signal to the (physical) stroke of the control valve •...
  • Seite 123: Configuration Of The Additional Functions

    Configuration of the additional functions NOTE The operating concept of the Top Control Continuous is based on a separate basic and additional functions. Only the basic functions of the unit are activated on delivery. This enables the basic settings such as specific units to be set during the initial setting up of the unit (Chapter 4).
  • Seite 124 Selection of additional functions within the main menu Select the sub menu within the main menu. By pressing the MANUAL/AUTOMATIC key, enter within the additional sub-menu. Select the required function with the arrow-keys. By pressing the MANUAL/AUTOMATIC key, validate the additional function within the main menu. The function is marked with a star (*).
  • Seite 125: Additional Functions

    6.4.3 Additional functions Selection of the transmission characteristic curve between the input signal and stroke (correction characteristic curve) Close tight function Relationship between the input signal and the setpoint Relationship between the indicated position value and the air supply state (Connection 2 Split range: min.
  • Seite 126 Charact Selection of the transmission characteristic curve between the input signal and the stroke (correction characteristic curve) User specific characteristic curve (Characteristic) Factory setting: With this function you select a transmission characteristic curve in relation to the position set value (position setpoint) and to the valve stroke to correct the flow rate respectively the operating characteristic curve.
  • Seite 127 Input of the freely-programmable characteristic curve The characteristic curve is defined by means of 21 restart points distributed uniformly over the set positioning range of 0 ... 100%. These are spaced at 5%. A freely selectable stroke (range 0 ... 100%) can be assigned to each restart (Fig. 6.8). The difference between the values of the stroke of two adjacent restart points shall not exceed 20%.
  • Seite 128 Cutoff Close tight function Factory setting: = 1 %; = 99% The closed tight function ensures that the valve is tightly closed outside the control range. Specification of a value (%) from which the actuator air is completely exhausted or supplied with air. With the fast pressurizing/venting version, two valves are driven in each case in order to completely vent and pressurize more rapidly.
  • Seite 129 Setpoint RISE FALL Input signal Fig. 6.10: Sense of action between input signal and setpoint Dir.act Relationship or direction of the actuator ARISE Factory setting: This function determines the direction of action between the air supply state and the actual value indication of the actuator (Fig.
  • Seite 130 SPLtrng Splitrange; minimal and maximum values of the input signal (in %) generating the complete displacement of the valve all over the plug range. Factory setting: = 0 (%); = 100 (%) This additional function enables the set value range of a Top Control Continuous to be restricted by stipulating a minimum and maximum value.
  • Seite 131 X.limit Mechanical stroke limitation Factory setting: = 0%, = 100% This additional function enables the (physical) stroke to be limited to a given MIN and MAX percentage value (Fig. 6.13). There, the stroke range of the limited stroke is set to equal 100%. If during servicing the selected plug travel is overpassed, then the display of POS value may be greater than 100 % or lower than 0%.
  • Seite 132 Valve stroke Set-point value Actual value T.OPN Fig. 6.14: Effect of limiting the opening speed for a jump in the set-point value X.contrl Parameters setting for the Top Control Continuous Deadband of the Top Control Continuous Enter the deadband in % ( 0 = automatic) Factory setting: 1 % This function ensures that the Top Control Continuous acts only then a selected control difference is measured (Fig.
  • Seite 133 Xd1' Control difference Position setpoint to the controller Xd1' DBND Actual position Fig. 6.15: Deadband by position control P.control Parameters setting of the process controller Dead band of the controller Parameters of the PID controller Mode of setpoint entry Filtering of the process actual value input Scale of the controller Storage of the new parameters End of the parametering setting of the controller...
  • Seite 134 Entry of the dead band in % relative to the range of the selected process set-point input Input type used for Range Spread (as reference Example: for the dead band) 1% dead band corresponds to 4..20 mA 4 .. 20 mA 16 mA 0,16 mA Frequency...
  • Seite 135 P.co - setp Type of setpoint (internal/external) Internal setpoint by keys on the TopControl External setpoint by analogue input P.co - inp Analogue input type Enter the analogue input signal type according to the transmitter signal. Analogue input 4...20 mA (Flow;...
  • Seite 136 P.CO SCAL "4 ..20 mA" (P.CO inp 4-20A) Scale limit for process control by selection of (example see below) Position of the decimal point for the process setpoint and actual value (Selectable value: 0..3) Lower range value for process actual value (process value);...
  • Seite 137 Scale limit for process control by selection of frequency input (P.CO inp Freq) NOTE The valve is closed as this menu is activated. Then, the Teach-In is performed with a defined output conditions. Unit l/s Unit l/m Unit m³/min Unit m³/h Unit gal(US)/s Unit gal(US)/min Unit gal(US)/h...
  • Seite 138 Entry of the required flow unit Position of the decimal point for the process setpoint and actual value (Selectable value: 0..3). Lower range value for process setpoint ; assigned to the lower current/voltage value of the external setpoint signal. This setting is only activated if is selected.
  • Seite 139 Scale limit for process control with Pt100 (P.CO inp pt100) Position of the decimal point for the process setpoint and actual value (Selectable value: 0..3) Lower range value for external process setpoint Assigned to the lower current/voltage value of the external setpoint signal (this setting is only activated if is selected).
  • Seite 140 BIN-IN Configuration of the binary input Selection of the function of the binary input Searching of a security position Binary input not activated Enter the security position (0..100%) * Type of binary input normally closed (0..5 V = 1; 10..30 V = 0) normally open (0..5 V = 0;...
  • Seite 141 out ANL Unit of analogue position indication analog output of the actual position of the valve actuator analog output of the set position of the valve actuator with process controller active: analog output of the set value of the process (option) with process controller active: analog output of the actual value of the process (option) Current 4..20 mA...
  • Seite 142 cal.user Calibration of the actual value display, entries for position and process control setpoint, process value, and K-Factor of the valve. A) POSITION CONTROL ACTIVATED Description see next page only activated in case of analogue position indication end of the calibration NOTE The signal values within parenthesis are only available as a display and cannot be modified.
  • Seite 143 C A l . p o s Calibration of the position indication (0 - 100 %) Entry of the minimal position: set the minimal position of valve with the arrow key, then validate by pressing the MANUAL/AUTOMATIC key Entry of the maximal position: set the valve to the maximal position with the arrow key, then validate by pressing the MANUAL/ AUTOMATIC key cal inp...
  • Seite 144 B) PROCESS CONTROL ACTIVATED Description see next page only activated in case of analogue position indication end of the calibration NOTE The signal units within parenthesis are only available as a display and cannot be modified. The type of signal as previously selected in the configuration menu is displayed: Display of the selection within the menu Display of the selection within the...
  • Seite 145 CAl pos Calibration of the position indication Entry of the minimal position: Set the minimal position of valve with the arrow key, then validate by pressing the MANUAL/ AUTOMATIC key Entry of the maximal position: Set the valve to the maximal position with the arrow key, then validate by pressing the MANUAL/ AUTOMATIC key cal sp Calibration of the position setpoint;...
  • Seite 146: Setting A Process Control Function

    Setting a process control function In order to use the Top Control Continuous as a process controller, apply the following requirements: Perform first the self-calibration procedure for the position controller ( - see 6.3.2). Select the additional function within the configuration mode in the main menu (see 6.4). The function will also be activated into the main menu.
  • Seite 147: Process Operation Level

    Process operation level The process operating level is automatically set each time the unit is switched on. From configuration level you can change over to the process operation level by using the MANUAL/AUTOMATIC key and after validation of the instruction of the menu.
  • Seite 148 Display indications in AUTOMATIC operating mode: Process controller not active The following information from the Top Control Continuous is possible: • Actual position of the valve actuator : (0..100%) • Set position of the actuator after scaling i.e. split range function or characteristic curves modification: (0..100%) •...
  • Seite 149 Active process controller The following points are shown: • Actual process value: (-999..9999) • Process set point: (-999..9999) • Actual position of the actuator: (0..100%) • Set position of the actuator after scaling i.e. split range function or characteristic curves modification: (0..100%) Internal temperature of the Top Control Continuous: •...
  • Seite 150: Manual Operating Mode

    Manual modification of the process set-point: If programming the additional functions > 3 s is required, it is possible to activate the process set point mode by using one of the arrow keys. Press the key for more than 3 sec. (Fig. 6.18, 6.19). After the first digit of the process set point will blink.
  • Seite 151 AUTOMATIC mode MANUAL mode Valve No activity Valve closed - of the open - Leave the key Leave the key normal speed operator normal speed (> 5 s) Leave the key Leave the key Point of menu Valve Valve open - closed - high speed high speed...
  • Seite 152: Failures And Report Errors

    FAILURES AND REPORT ERRORS The Top Control Continuous is maintenance free if used according to the recommendations of this manual. Report errors on LCD display • Faults during initial activation: Message Possible cause Remedy Internal fault Not possible, unit defective •...
  • Seite 153 Operating instructions no. 800607...
  • Seite 154: Appendix A

    APPENDIX A Selection criteria for continuous valves For optional control behaviour and the reaching of the desired maximum flowrate the following criteria must be observed: • The correct selection of the k value, which is in fact defined by the valve size; •...
  • Seite 155 A practical rule for the determination of the k value for the upper limits in respect to continuous valves consists of using the so called ‘valve authority Ψ : ∆ Ψ ∆ with (∆p) : pressure drop with a fully open valve (∆p) pressured drop over the complete installation For valve authority Ψ...
  • Seite 156: Characteristics Of Pid Controllers

    Characteristics of PID controllers A PID controller has a proportional, an integral and a differential component (P, I and D components). P component: Function: Y = Kp · Xd Kp is the proportional action coefficient. It results from the ratio of the manipulating range ∆Y to the proportional range ∆Xd. Proportional range ∆...
  • Seite 157 Characteristics: A pure I controller eliminates the effects of occuring disturbances completely. Therefore, it has a favorable static response. Owing to its finite manipulating speed, it operates more slowly than the P controller and tends to oscillate. Therefore, it is relatively unfavorable from the dynamic point of view.
  • Seite 158 Fig. 8.4: Step response and rise response of the PID controller Realised PID controller D component with delay: In the Top Control 8630, the D component is realised with a delay T. Function: + Y = Kd Superposition of P, I and DT components Fig.
  • Seite 159 Function of the real PID controller : ∫ ∫ ∫ ∫ ∫ Xd dt + Tv + Y = Kp (Xd + Step response of the real PID controller: Fig. 8.6: Step response of the real PID controller Operating instructions no. 800607...
  • Seite 160: Rules For Adjusting Pid Controllers

    Rules for adjusting PID controllers The litterature on control systems specifies a series of adjustment rules with which a favorable adjustment of controller parameters can be achieved experimentally. To avoid bad adjustments, the conditions under which the respective adjustment rules have been elaborated must always be observed.
  • Seite 161 Correcting variable Y Actual value Ks * ∆Y Controlled variable Figure 8.8: Progression of the controlled variable after a manipulated variable change ∆ Y Method: • Set the controller to MANUAL mode • Output a manipulated variable change and record the controlled variable with a recorder •...
  • Seite 162: Appendix B

    APPENDIX B: OPERATING STRUCTURE OF THE TOP CONTROL CONTINUOUS Top Control Positioner...
  • Seite 163 PCO INP = 4'20A Only in the case of external set values PCO INP = FREQ Only in the case of external set values PCO INP = FREQ Only in the case of external set values Betriebsanleitung-Nr. 800607...
  • Seite 164 Position controller active Process controller active Process controller active Analog position feedback Top Control Continuous...
  • Seite 165 Operating instructions no. 800607...
  • Seite 166: Tables For Your Settings

    APPENDIX C TABLES FOR YOUR SETTINGS Settings in the freely programmable characteristic Ref. point Valve stroke [%] (Set point of Date: Date: Date: Date: position in %) Parameters set in the process controller Date: Date: Date: Date: DBND Top Control Continuous...
  • Seite 167 NOTES Betriebsanleitung-Nr. 800607...
  • Seite 168 Top Control Continuous...
  • Seite 169: Mastercode

    MASTERCODE: 7175 Betriebsanleitung-Nr. 800607...
  • Seite 170 TOP CONTROL CONTINUOUS TYPE 8630 TABLE DES MATIERES: Page INDICATIONS GÉNÉRALES ..................171 Symboles graphiques ..........................171 Indications de sécurité .......................... 171 Important pour toute manipulation ...................... 171 Volume de livraison ..........................172 Clauses de garantie ..........................172 Code maître (master code) ....................
  • Seite 171 CONFIGURATION ....................... 200 Eléments de commande et d’affichage ....................200 Mode de fonctionnement ........................200 Mise en service comme régulateur de position .................. 201 6.3.1 Configuration de base ..........................201 6.3.2 Mode de fonctionnement pour configuration de base ................201 Configuration des fonctions additionnelles ..................
  • Seite 172: Indications Générales

    INDICATIONS GÉNÉRALES Symboles graphiques Les symboles suivants sont utilisés dans ce mode d’emploi: indique une opération que vous devez exécuter ATTENTION! Signale des consignes, dont l’inobservation peut mettre en danger votre santé ou altérer la capacité de fonctionnement de l’appareil. REMARQUE signale des informations complémentaires importantes, des conseils ou des recommandation Indications de sécurité...
  • Seite 173: Volume De Livraison

    Volume de livraison Assurez-vous immédiatement à la réception de l’envoi, que le contenu n’est pas endommagé et qu’il correspond au volume de livraison indiqué sur la fiche d’emballage. Il se compose en général de: Control • vannes à entraînement pneumatique des types 2652, 2665, 2672, 2700, 2712, 2730, 2731 ou 2731K avec Top Continuous intégré...
  • Seite 174: Configuration Générale

    Toutes les informations techniques concernant ces produits sont disponibles dans leurs fiches techniques respectives. La gamme des produits disponibles est régulièrement élargie. Top Control type 8630 avec robinet à soupape à tête avec robinet à avec soupape à diaphragme droite type 2712 (ici avec soupape à...
  • Seite 175 Selon les conditions d’utilisation, différentes vannes de régulations de la gamme Burkert peuvent être pilotées par le Top Control Continuous.Vanne à siège inclinés, vanne à membranes, y compris les vannes à boisseau sphérique équipées de cônes de contrôle sont utilisables.
  • Seite 176: Description Du Topcontrol

    Top Control Continuous et l’actionneur pneumatique sont assemblés pour former une unité fonctionnelle. Construction Le design du type 8630 Top Control Continuous (Fig. 3.1)est basé sur un concept modulaire. Une large variété de connections pneumatiques et électriques sont disponibles en option.
  • Seite 177 Construction: • Design: Pour actionneurs simple/double-effet • Mesure de déplacement: Résolution linéaire élevée avec potentiomètre en plastique couplé à la tige du piston de l’actionneur • Système électronique piloté par microprocesseur: Assure une configuration optimale, pour le contrôle, et le pilotage de l’actionneur •...
  • Seite 178: Fonction

    Fonction La figure 3.4 présente le schéma fonctionnel du Top Control Continuous associé avec une vanne à piston simple effet. Valeur mesurée Prozeß- Sollwert Valeur de Régulateur consigne de Valeur de position process consigne externe Régulateur Actionneur 1: Alimentation d’air position Valeur de 2: Purge d’air...
  • Seite 179: Action Du Topcontrol Continuous Comme Régulateur De Position (Fig. 3.6)

    Fig. 3.5: Exemple de régulation de procédé: TopControl avec capteur 3.2.1 Action du Top Control Continuous comme régulateur de position (Fig. 3.6) La position actuelle (POS) est mesurée par le système de mesure du déplacement. Cette valeur de position est comparée au signal normalisé...
  • Seite 180: Topcontrol Continuous Utilisé Comme Régulateur De Process (Fig. 3.7)

    3.2.2 Top Control Continuous utilisé comme régulateur de process (Fig. 3.7) Si le Top Control Continuous fonctionne en tant que régulateur de process, la fonction antérieure de régulation de position devient une composante de la boucle de régulation principale. Le régulateur de process de la boucle de régulation principale possède une fonction PID.
  • Seite 181: Options Du Topcontrol

    Options du Top Control Le Top Control Continuous est disponible en 3 versions, variant dans la connexion électrique et les fonctions de commande: • Connecteur multipôles avec fonctions complètes (Fig. 3.8) • Bornier avec presse-étoupes et borniers avec fonctions réduites (Fig. 3.9) •...
  • Seite 182: Fonctions Logicielles

    Fonctions logicielles Fonctions additionnelles Commande Régulateur de position avec fonctions additionelles La soupape ne se ferme pas hors de la plage de régulation. Indication d'une Fonction fermeture étanche valeur (en %) depuis l'entraînement complètement purgé d'air (à 0%) ou aéré (à...
  • Seite 183: Caractéristiques Techniques

    Caractéristiques techniques 3.5.1 Positions de sécurité selon alimentations électriques et pneumatiques Type d’actionneur Désignation Position de sécurité nach Ausfall der Hilfsenergie Electrique Pneumatique Simple effet WW A haut Simple effet haut haut WW B haut Double effet bas / haut non défini WW I (selon connexion)
  • Seite 184: Configuration Usine

    3.5.2 Configuration usine Fonction Configuration usine Fonction Configuration usine = 1 %; = 99% = 0 (%); = 100 (%) = 0%, = 100% sans limitation 3.5.3 Caractéristiques du Top Control Continuous Caractéristiques techniques Température de service 0...+50°C Classe de protection IP 65 selon EN60529 (pour une installation électrique conforme) Conformité...
  • Seite 185 Caractéristiques électriques Connections connecteur multipôles ou bornier avec 2 presse-étoupes filetés de 9 ou connecteur QUICKON Alimentation 24 V DC ± 10 % Condulation résiduelle max. 10 % Pas d’alimentation continue technique! Consommation < 5 W Résistance d’entrée pour signal de valeur de consigne 180 W à...
  • Seite 186: Mise En Service Initiale

    MISE EN SERVICE INITIALE REMARQUE Ce chapitre permet d’effectuer la mise en service rapide du Top Control Continuous. Les fonctions additionnelles non indispensables ne sont pas décrites dans ce chapitre. Voir chapitres 5 et 6 pour une description complète détaillée de la mise en service et des fonctions disponibles. Connexion pneumatique Monter la vanne selon les consignes spécifiques.
  • Seite 187 b) Connexion par presse-étoupe Easy connexion du bornier: Retirer les 4 vis auto-foreuses pour ouvrir le couvercle du bornier. Les connections du bornier sont représentées figure 4.2. Borniers Connecter les consignes externes de position et câbles d’alimentation au bornier (selon l’affectation du bornier avec presse-étoupe).
  • Seite 188: Configuration De Base

    4.2.3 Raccordements QUICKON QUICKON PG9, à 3 pôles Figure 4.3 : raccordements QUICKON QUICKON Pg11, à 4 pôles sur le Top Control Connectez le signal de valeur théorique sur le raccordement QUICKON PG11, 4 pôles broches configuration connexion externe + (0/4..20 mA ou 0..5 / 10V) valeur théorique GND valeur théorique + Connectez la tension d’alimentation sur le raccordement QUICKON PG9, 3 pôles...
  • Seite 189 Mode AUTOMA- TIQUE MODE MANUAL Ignorer pour mise en service rapide Fig. 4.4: Configuration de base Instructions de Service N 800607...
  • Seite 190 Configuration dans le menu principal: Fonction de l’actionneur SNGL - simple effet DOUB - double effet Sélection du signal d’entrée 4’20A - Courant 4..20 mA 0’20A - Courant 0..20 mA 0’10V - Tension 0..10 V 0’5V - Tension 0..5 V Ignorer Activation de l’auto-calibration (Fig.
  • Seite 191: Installation

    INSTALLATION Veuillez vous référer aux fiches techniques pour les dimensions du Top Control et des accessoires optionnels du Top Control , actionneurs pneumatiques et vannes. Installation de la soupape REMARQUE L’entraînement ne doit pas être raccordé. Dimensions et types de filet, voir fiche technique de la soupape de processus. Rotation du Top Control Continuous Si après le montage de la soupape de réglage l’affichage du TopControl Continuous n’est pas très visible ou que le câble de raccordement ou les tubes souples sont mal montés, le TopControl Contimuous peut être tourné...
  • Seite 192: Connexion Pneumatique Du Topcontrol

    Connexion pneumatique du Top Control Connecter l’alimentation en air à l’orifice 1 - (Fig. 5.1) (3 .. 7 bar; air pour instruments exempt d’huile, d’eau et de poussière) Connecter la purge d’air ou le silencieux à l’orifice 3 - (Fig. 5.1) Raccordement pour pression d’alimentation (marquage: 1) Raccordement...
  • Seite 193: Connecteur Multipôles

    5.4.1 Connecteur multipôles Le schéma 5.2 indique les fonctions du connecteur multipôles et affectation des broches. Signal vers Alimentation l’automate Valeur Indicateurs mesurée de position Fig. 5.2: Connecteur circulaire avec affectation des broches Sortie signal vers l’automate (connecteur circulaire M16) Broche Affectation Signal externe...
  • Seite 194 Alimentation (connecteur circulaire M12) Broche Affectation Connexion externe + 24 V non connectée 24 V DC ± 10 % Condulation résiduelle 10 % non connectée Fin de courses (connecteur circulaire M8) Broche Affectation Connexion externe Fin de course 1 + Fin de course 1 GND Fin de course 2 + Fin de course 2 GND...
  • Seite 195: Connexion Par Presse-Étoupe

    5.4.2 Connexion par presse-étoupe Easy connexion du bornier: Retirer les 4 vis auto-foreuses pour ouvrir le couvercle du bornier. Le schéma du bornier est représenté figure 5.3. Straps Bornes Fig. 5.3: Bornier TopControl avec bornes et straps Connexion avec bornier Bornier Affectation Signal externe...
  • Seite 196 Commutation entre sortie binaire et entrée de la valeur mesurée: Sélection par position des cavaliers: 2 sorties binaires (voir affectation du bornier lorsque la sortie binaire est sélectionnée) entrée de la valeur mesurée (voir affectation du bornier lorsque la valeur mesurée est sélectionnée). Les bornes 7 à...
  • Seite 197: Raccordements Quickon

    5.4.3 Raccordements QUICKON QUICKON PG9, à 3 pôles TE (terre QUICKON Pg11, technique) QUICKON Pg11, Figure 5.4: raccordements QUICKON à 4 pôles à 4 pôles sur Top Control Raccordement QUICKON PG9, à 3 pôles broches configuration connexion externe tension de service +24 V 24 V DC ±...
  • Seite 198 a) Disposition des broches lors du choix des sorties binaires pont broche QUICKON disposition connexion externe 24 V / 0V sortie binaire 1+ sortie binaire 1- sortie binaire 2+ 24 V / 0V sortie binaire 2- b) Disposition des broches lors du choix de l’entrée de valeur réelle processuelle Sélectionner le type d’entrée au-dessus du menu de configuration (voir 6.3.2) Type d’entrée Broche de...
  • Seite 199 Indications relatives au raccordement des liaisons QUICKON sur les câbles QUICKON PG9 / à 3 pôles section des conducteurs 0,34..0,75 mm² structure du fil / diamètre le plus petit VDE 0295, classe 2 à 5 / 0,2 matériau isolant du conducteur PVC / PE diamètre extérieur de la conduite 4..6 mm...
  • Seite 200: Installation Des Détecteurs De Position (Option)

    Installation des détecteurs de position (option) ATTENTION! Il est nécessaire d’ouvrir le Boîtier du Top Control pour installer les détecteurs de position . Interrompre l’alimentation avant d’ouvrir le Top Control ! Ouverture du Top Control : Retirer les vis et scellés éventuels entre le couvercle et le boîtier. Tourner le couvercle à...
  • Seite 201: Configuration

    CONFIGURATION Eléments de commande et d’affichage Le Top Control a 3 touches et un afficheur LCD (Fig. 6.1). Les fonctions des touches sont décrites dans les chapitres suivants. Flèche haute Touche MANUEL/ AUTOMATIQUE LED (dans la touche MANUEL/ AUTOMATIQUE) Flèche basse Fig.
  • Seite 202: Mise En Service Comme Régulateur De Position

    Mise en service comme régulateur de position Respecter les instructions de connexion pneumatique et électrique avant mise en service (Chap.5). 6.3.1 Configuration de base Sélection de la configuration de base pour la mise en service initiale: • Saisir la plage de fonctionnement de l’actionneur pneumatique. •...
  • Seite 203 Menu principal pour configuration durant la mise en service: Mode AUTOMATIQUE Mode MANUEL Ignorer lors de la première mise en service Fig. 6.3: Configuration dans le menu principal Instructions de Service N 800607...
  • Seite 204 Description du synoptique (Fig. 6.3): Après la mise sous tension, le Top Control Continuous est dans le niveau contrôle de process du mode AUTOMATIQUE. Pour saisir le configuration de base, en mode configuration, presser sur la touche MANUEL/AUTOMATIQUE durant 5 secondes. Le sous-menu du menu principal s’affiche en premier.
  • Seite 205 X.tune Adaptation automatique du positionneur Le sous-menu active le programme réalisant le paramétrage automatique du positionneur. Les paramètres suivants sont calculés automatiquement: • Adaptation du signal de l’indicateur de position à la course de la vanne utilisée • Détermination des paramètres des signaux PWM contrôlant les électrovannes internes •...
  • Seite 206: Configuration Des Fonctions Additionnelles

    Configuration des fonctions additionnelles REMARQUE Le concept de commande du Top Control Continuous repose sur une séparation stricte entre fonctions de base et fonctions additionnelles. A la livraison de l’appareil, seules les fonctions de base sont activées. Elles servent à effectuer les réglages de base spécifiques de l’appareil lors de la première mise en service (Kap. 4), et suffisent pour un fonctionnement normal.
  • Seite 207 Sélection des fonctions additionnelles dans le menu principal Sélection du sous-menu dans le menu principal. Presser sur la touche MANUEL/AUTOMATIQUE pour activer le sous-menu additionnel. Choisir la fonction sélectionnée avec les flèches. Presser sur la touche MANUEL/AUTOMATIQUE, pour valider les fonctions additionnelles dans le menu principal. La fonction validée est repérée d’une étoile (*).
  • Seite 208: Fonctions Additionnelles

    6.4.3 Fonctions additionnelles Sélection de la courbe caractéristique de transfert entre le signal d’entrée et la course (courbe caractéristique de correction) Fonction fermeture étanche Relation entre le signal d’entrée et la valeur de consigne Affectation de l’état de ventilation de la chambre d’entraînement (raccord 2 ) à...
  • Seite 209 Charact Sélection de la courbe caractéristique de transfert entre le signal d’entrée et la course (courbe caractéristique de correction) Courbe caractéristique spécifique de l’utilisateur (Characteristic) Configuration usine: Avec cette fonction, sélectionner la courbe des caractéristiques de transfert entre la valeur de consigne (position de consigne) et de la course de la vanne pour corriger le débit ou la courbe caractéristique de fonctionnement.
  • Seite 210 Saisie de la courbe caractéristique programmable La courbe caractéristique est définie à partir de 21 points répartis régulièrement sur la plage de la valeur de réglage de cons igne; de 0...100 %. Leur écart est de 5 %. Il est possible d’attribuer à chaque point une course qui peut être choisie librement (domain e de réglage 0 ...
  • Seite 211 Cutoff Fonction fermeture étanche Configuration usine: = 1 %; = 99% Par la fonction fermeture étanche, la vanne ferme de manière étanche hors de la plage de réglage. Saisie d’une valeur (en %), à partir de laquelle l’organe de commande purge ou ventile totalement. Avec la variante d’alimentation rapide et de purge rapide, on pilote chaque fois deux vannes afin de réaliser une purge et une alimentation d’air complète plus rapide.
  • Seite 212 Valeur de consigne RISE FALL Signal d'entrée Fig. 6.10: Relation entre signal d’entrée et consigne Dir.act Action ou sens de l’actionneur ARISE Configuration usine: Cette fonction détermine le sens de l’action entre l’alimentation en air et le sens de déplacement de l’actionneur (Fig. 6.11). Commande directe (purgé...
  • Seite 213 SPLtrng Répartition de la plage du signal d’entrée; valeurs minimales et maximales du signal d’entrée (en %) commandant la course complète de l’actionneur de la vanne Configuration usine: = 0 (%); = 100 (%) Par la fonction, la plage de la valeur de consigne d’un Top Control Continuous peut être limitée en fixant une valeur minimale et une valeur maximale.
  • Seite 214 X.limit Limitation de la course Configuration usine: = 0%, = 100% Par cette fonction additionnelle, la course (physique) peut être limitée à des valeurs en % MIN et MAX (Fig. 6.13). En mode MANUEL, c’est la course physique qui est affichée. (Il faut donc noter qu’une course limitée est affichée de manière différente en mode AUTOMA- TIQUE et en mode MANUEL).
  • Seite 215 Levée de la soupape Valeur de consigne Valeur réelle T.OPN Figure.6.14: effet de la limitation de la vitesse d’ouverture lors d’un saut de valeur de consigne X.control Paramètrage du positionneur Bande morte relative du positionneur Saisir la bande morte en % ( 0 = automatique) Configuration usine: Cette fonction limite l’action du régulateur à...
  • Seite 216 Xd1' Différence de Vers Consigne de position régulation régulateur Xd1' DBND Position actuelle Fig. 6.15: Bande morte relative à la différence de réglage pour contrôle de position P.control Paramètres de configuration du régulateur de process Bande d’insensibilité (zone morte) du régulateur de processus PID Paramètres du régulateur de process PID Mode de saisie de la valeur de consigne...
  • Seite 217 Bande morte relative à la différence de réglage pour régulation de procédé Type d’entrée Plage Ecart (comme référence Exemple: 1% de bande morte utilisé pour PV pour la bande morte) correspondent à 4..20 mA 4 .. 20 mA 16 mA 0,16 mA Fréquence 0 ..
  • Seite 218 P.co - setp Type de valeur de consigne (interne/externe) Valeur de consigne interne par touches du Top Control Valeur de consigne externe par signal analoqique P.co - inp Type de signal analoqique Entrée analoqique 4...20 mA (Débit; Pression; Niveau) Entrée analoqique fréquence (Débit) Entrée analoqique Pt100 (Température) P.co - filt Filtra...
  • Seite 219 P.CO SCAL Choix d’échelle pour régulation de procédé avec signal d’entrée "4 ..20 mA" (P.CO inp 4-20A) (exemple voir ci-dessous) Position du point décimal pour la valeur de consigne exter- ne et la variable contrôlée (Sélection: 0..3) Valeur d’échelle inférieure de la valeur mesurée; Valeur associée à...
  • Seite 220 Choix d’échelle pour régulation de procédé avec signal d’entrée en fréquence (P.CO inp Freq) REMARQUE Afin de réaliser le Teach-In dans les conditions de sortie définies, la vanne doit être fermée à l’activation de ce menu. Unité l/s Unité l/m Unité...
  • Seite 221 Saisie de l’unité de débit requise Position du point décimal pour la valeur de consigne externe et la variable contrôlée (Gamme de réglage: 0..3). Valeur d’échelle inférieure pour valeur de consigne externe; associée à la valeur inférieure courant/tension du signal de consigne externe. Cette fonction est activée seulement si est sélectionné.
  • Seite 222 Choix d’échelle pour régulation de procédé avec Pt100 (P.CO inp pt100) Position du point décimal (Gamme de réglage: 0..3) Valeur d’échelle inférieure pour valeur de consigne externe; associée à la valeur inférieure courant/tension du signal de consigne externe (cette fonction est activée seulement si est sélectionné) Valeur d’échelle supérieure pour valeur de consigne...
  • Seite 223 BIN-IN Configuration de l’entrée binaire Sélection de la fonction de l’entrée binaire Recherche de la position de sécurité Entrée binaire désactivée Saisir la position de sécurité (0..100%) * Type des entrées binaires Normalement fermé (0..5 V = 1; 10..30 V = 0) Normalement ouvert (0..5 V = 0;...
  • Seite 224 out ANL Unité de l’indication analogique de position Indication analogique de la position réelle de l’entraînement de la vanne Indication analogique de la position de consigne de l’entraînement de la vanne Pour régulateur de processus actif: indication analogique de valeur de consigne du processus (option) Pour régulateur de processus actif: indication analogique de valeur réelle du processus (option) Courant 4..20 mA...
  • Seite 225 cal.user Calibration de la variable contrôlée affichage, des valeurs de consignes pour régulation de position et de procédé, valeur mesurée, et Facteur K de la vanne A) Contrôle de position activé Description voir page suivante Activé seulement en cas d’indication analogique de position fin de la calibration REMARQUE Les grandeurs entre parenthèses sont exclusivement affichées et ne peuvent être modifiées.
  • Seite 226 CAl.pos Calibration de l’indication de position (0 - 100 %) Saisie de la position minimale: sélectionner la position minimale de la vanne avec les flèches, puis valider. Presser sur la touche MANUEL/AUTOMATIQUE Saisie de la position maximale: Sélectionner la position maximale de la vanne avec les flèches, puis valider. Presser sur la touche MANUEL/AUTOMATIQUE cal inp Calibration de la consigne de position (4..20 mA;...
  • Seite 227 B) Régulation de procédé activée Description voir page suivante activé seulement en cas d’indication analogique de position Fin de la calibration REMARQUE Les grandeurs entre parenthèses sont exclusivement affichées et ne peuvent être modifiées. Le type de signal affiché est celui antérieurement sélectionné dans le menu configuration: Affichage de la sélection dans le menu Affichage de la sélection dans le menu Affichage de la sélection dans le menu...
  • Seite 228 CAl pos Calibration de l’indication de position Saisie de la position minimale: Sélectionner la position minimale de la vanne avec les flèches, puis valider. Presser sur la touche MANUEL/AUTOMATIQUE Saisie de la position maximale: Sélectionner la position maximale de la vanne avec les flèches, puis valider. Presser sur la touche MANUEL/AUTOMATIQUE cal sp Calibration de la consigne de position;...
  • Seite 229: Configuration De La Régulation De Process

    Configuration de la régulation de process Pour utiliser le Top Control Continuous comme régulateur de process, appliquer la procédure suivante: Lancer d’abord la procédure d’auto-calibration pour le régulateur de position ( - voir 6.3.2). Sélectionner les fonctions additionnelles dans le menu principal en menu configuration (voir 6.4). La fonction P.QLIN du menu principal doit également être activée.
  • Seite 230: Mode Procédé

    Mode Procédé Lors du démarrage de l’appareil le mode procédé est automatiquement sélectionné. Pour commuter du menu configuration au mode procédé presser la touche MANUEL/AUTOMATIQUE, après validation de la fonction du menu. Le mode procédé permet le contrôle des fonctions de commande normales (mode AUTOMATIQUE) et l’ouverture et fermeture manuelle de la vanne (mode MANUEL).
  • Seite 231 Affichage en mode AUTOMATIQUE: Régulation de process inactive Les affichages suivants du contrôleur de position sont possibles: • Position actuelle de l’actionneur de vanne: (0..100%) • Valeur de consigne de l’actionneur après affectation de l’échelle par répartition de la plage du signal ou correction de la courbe caractéristique: (0..100%) •...
  • Seite 232 Régulation de process active Bei aktiviertem Prozeßregler können folgende Größen angezeigt werden: • Valeur de process mesurée: (-999..9999) • Consigne de process: (-999..9999) • Position actuelle de l’actionneur: (0..100%) • Valeur de consigne de l’actionneur après affectation de l’échelle par répartition de la plage du signal ou correction de la courbe caractéristique: (0..100%) •...
  • Seite 233: Mode Manuel (Led Jaune Éteinte)

    6.6.2 Mode MANUEL (LED jaune éteinte) En mode MANUEL la vanne peut être ouverte ou fermée manuellement. Touches fonctions en mode MANUEL: Appui sur la flèche haute: Opens l’actionneur Appui sur la flèche basse: Fermeture de l’actionneur Maintenir la flèche haute appuyée et presser simultanément la flèche basse: Provoque l’ouverture rapide Maintenir la flèche basse appuyée et presser simultanément la flèche haute: Provoque la fermeture rapide...
  • Seite 234: Entretien Et Messages D'erreur

    ENTRETIEN ET MESSAGES D’ERREUR Le positioneur TopControl, installé conformément aux spécifications de ce manuel, ne nécessite pas d’entretien. Message d’erreur sur afficheur • Erreurs à la mise en service: Message Cause possible Solution Erreur interne Aucun, appareil défectueux • Message d’erreur durant la fonction AUTOTUNE: Message Cause possible Solution...
  • Seite 235 Instructions de Service N 800607...
  • Seite 236: Annexe A

    ANNEXE A Critères de sélection des vannes continues Les critères suivants sont particulièrement importants pour une régulation optimale et l’obtention rapide du débit maximum souhaité: • Sélection du k , celui-ci dépendant en fait du diamètre de la vanne; • Adaptation correcte de la taille de la vanne à...
  • Seite 237 Une détermination pratique de la valeur supériere du k d’une vanne continue est possible par l’utilisation du principe directeur de la vanne Ψ: ∆ Ψ ∆ avec (∆p) : Perte de charge de la vanne totalement ouverte (∆p) Perte de charge du système complet Si principe directeur de la vanne Ψ...
  • Seite 238: Caractéristiques Des Régulateurs Pid

    Caractéristiques des régulateurs PID Un régulateur PID possède une part proportionnelle, une part intégrale et une part différentielle (part P, I et D). Part P: Fonction: Y = Kp · Xd Kp est le coefficient d’action proportionnelle, rapport entre la plage de réglage ∆Y et la plage proportionnelle ∆Xd. Plage proportionnelle Fonction caractéristique Réponse à...
  • Seite 239 Caractéristiques: L'action intégrale tend à supprimer le bruit.Elle diminue l'erreur statique mais en raison de sa vitesse limitée, elle est plus lente que le régulateur P, et introduit de l'instabilité. Elle est donc relativement défavorable sur le plan dynamique. Part D: Fonction: Y = Kd d Xd/dt Kd est le coefficient d’action dérivée.
  • Seite 240 Part D Part I Part I Part D Part P Part P Temps de Temps d'action dérivée compensation Tn Résponse à un échelon du régulateur PID Résponse à une rampe du régulateur PID Fig. 8.4: Résponse à un échelon et résponse à une rampedu régulateur PID Régulateur PID réalisé...
  • Seite 241 Fonction d'un régulateur PID réel : ∫ ∫ ∫ ∫ ∫ Xd dt + Tv + Y = Kp (Xd + Réponse à un sau du régulateur PID réel: Fig. 8.6: Réponse à un sau du régulateur PID réel Instructions de Service N 800607...
  • Seite 242: Règles D'ajustement Pour Les Régulateurs Pid

    Règles d'ajustement pour les régulateurs PID La littérature technique spécialisée dans la régulation donne une série de règles d'ajustement qui permettent de déterminer expéri- mentalement un réglage favorable des paramètres du régulateur. Pour éviter les erreurs de réglage, il est indispensable de toujours tenir compte des conditions dans lesquelles les règles d'ajustement ont été...
  • Seite 243 BILD VERÄNDERN Variable réglante Grandeur réglée Variable réglante Y Valeur instantanée Ks * ∆Y Grandeur réglée Fig. 8.8: Caractéristique de la variable réglée après un saut de la variable réglante ∆ Y Manière de procéder: • Mettre le régulateur sur MANUEL •...
  • Seite 244: Annexe B

    ANNEXE B STRUCTURE DE COMMANDE DE TOP CONTROL CONTINUOUS Top Control Positioner...
  • Seite 245 PCO INP = 4'20A Only in the case of external set values PCO INP = FREQ Only in the case of external set values PCO INP = FREQ Only in the case of external set values Betriebsanleitung-Nr. 800607...
  • Seite 246 Position controller active Process controller active Process controller active Analog position feedback Top Control Continuous...
  • Seite 247 Operating instructions no. 800607...
  • Seite 248: Annexe C

    ANNEXE C: LES TABLEAUS Réglage sur la courbe caractéristique librement programmable Point d'appui Levée de soupape [%] (valeur de onsigne de position en %) Date: Date: Date: Date: Paramètres ajustés du régulateur de processus Date: Date: Date: Date: DBND Top Control Continuous...
  • Seite 249 NOTES Operating instructions no. 800607...
  • Seite 250 Top Control Continuous...
  • Seite 251 Operating instructions no. 800607...
  • Seite 252 Top Control Continuous...
  • Seite 253 MASTERCODE: 7175 Operating instructions no. 800607...
  • Seite 254 Berlin: Tel. (0 30) 67 97 17-0 Dresden: Tel. (03 59 52) 36 30-0 Steuer- und Regeltechnik Frankfurt: Tel. (0 61 03) 94 14-0 Christian-Bürkert-Str. 13-17 Hannover: Tel. (05 11) 902 76-0 74653 Ingelfingen Dortmund: Tel. (0 23 73) 96 81-0 Telefon (0 79 40) 10-0 München: Tel.

Inhaltsverzeichnis