Endress+Hauser iTEMP TMT84 Kurzanleitung
Temperature head transmitter
with profibus pa protocol
Vorschau ausblenden
Andere Handbücher für iTEMP TMT84:
- Betriebsanleitung (110 Seiten) ,
- Kurzanleitung (20 Seiten) ,
- Bedienungsanleitung (16 Seiten)
Inhaltsverzeichnis
Verfügbare Sprachen
Verfügbare Sprachen
K00A258R/09/A2/03.16
71313605
8
Products
Brief Operating Instructions
iTEMP TMT84
Temperature Head Transmitter
®
with PROFIBUS
These instructions are Brief Operating Instructions; they do
not replace the Operating Instructions included in the scope of
supply.
Detailed information can be found in the Operating Instruc-
tions and the additional documentation.
Available for all device versions via:
• Internet: www.endress.com/deviceviewer
• Smart phone/tablet: Endress+Hauser Operations App
Solutions
PA Protocol
Services
Kapitel
Inhaltsverzeichnis

Verwandte Anleitungen für Endress+Hauser iTEMP TMT84


Inhaltszusammenfassung für Endress+Hauser iTEMP TMT84
- Seite 2 TMT84 Order code 00X00-XXXX0XX0XXX Ser. No.: X000X000000 TAG No.: XXX000 Serial number www.endress.com/deviceviewer Endress+Hauser Operations App Endress+Hauser...
-
Seite 4: Inhaltsverzeichnis
5.6 Parametrierung freigeben ................23 Endress+Hauser... -
Seite 5: Sicherheitshinweise
Transmittergehäuse. Explosionsgefährdeter Bereich Bei Einsatz in explosionsgefährdeten Bereichen sind die entsprechenden nationalen Normen einzuhalten. Für Messsysteme, die im explosionsgefährdetem Bereich eingesetzt werden, gilt zusätzlich die separate Ex-Dokumentation. Die darin aufgeführten Installationsvorschriften, Anschlusswerte und Sicherheitshinweise müssen konsequent beachtet werden! Endress+Hauser... -
Seite 6: Störsicherheit
A0011191-DE kann. HINWEIS Dieser Hinweis enthält Informationen zu Vorgehensweisen und weiterführenden Sachverhalten, die keine Körperverletzung nach sich ziehen. A0011192-DE ESD - Electrostatic discharge Klemmen vor elektrostatischer Entladung schützen. Ein Nichtbeachten kann zur Zerstörung von Teilen der Elektronik führen. A0012751 Endress+Hauser... -
Seite 7: Identifizierung
• Gedruckte, mehrsprachige Kurzanleitung • Zusätzliche Dokumentation für Geräte, die für den Einsatz im explosionsgefährdeten Bereich 0 2 1 ) geeignet sind, wie z.B. Sicherheitshinweise (XA...), Control oder Installation Drawings (ZD...). Beachten Sie die Zubehörteile des Gerätes im Kapitel “Zubehör” der Betriebsanleitung. Endress+Hauser... -
Seite 8: Zertifikate Und Zulassungen
• Ist die gelieferte Ware vollständig? Vergleichen Sie den Lieferumfang mit Ihrer Bestellung. 3.1.2 Transport und Lagerung Beachten Sie folgende Punkte: • Für Lagerung (und Transport) ist das Gerät stoßsicher zu verpacken. • Die zulässige Lagertemperatur beträgt -40 bis +100 °C (-40 bis 212 °F). Endress+Hauser... -
Seite 9: Montagebedingungen
• Umgebungstemperatur: -40 bis +85°C (-40 bis +185 °F). • Betauung nach IEC 60068-2-33 zulässig; Max. rel. Feuchte: 95% • Klimaklasse gemäß IEC 60654-1, Klasse C • Schraubklemmen: Schutzart IP00 Federklemmen: Schutzart IP30 Im eingebauten Zustand ist die Schutzart vom verwendeten Anschlusskopf oder Feldgehäuse abhängig. Endress+Hauser... -
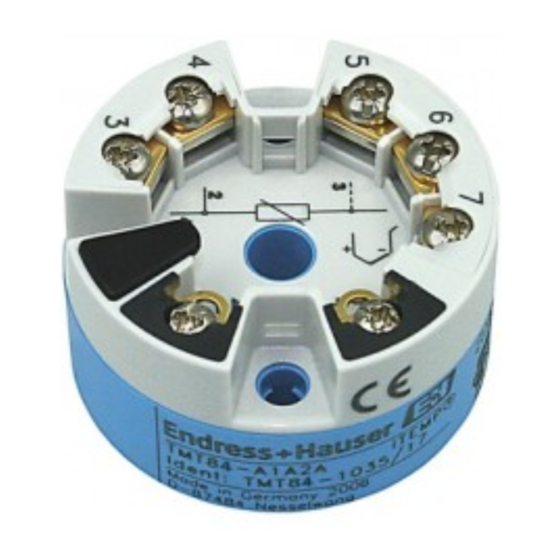
Seite 10: Montage
Führen Sie die Montageschrauben (7) durch die seitlichen Bohrungen des Kopftransmitters und des Messeinsatzes (3). Fixieren Sie danach beide Montageschrauben mit den Sicherungsringen (2). Schrauben Sie anschließend den Kopftransmitter (5) mit dem Messeinsatz (3) im Anschlusskopf fest. Schließen Sie nach erfolgter Verdrahtung (siehe Kapitel 4) den Anschlusskopfdeckel (8) wieder. Endress+Hauser... - Seite 11 Schrauben Sie den Kopftransmitter (2) am DIN rail clip (4) fest. Befestigungswinkel für Wandmontage (Wandmontageset als Zubehör erhältlich) . 5 1 i n ) 6.5 mm . 8 3 (0.25 in) i n ) . 7 2 i n ) A0024604 Endress+Hauser...
- Seite 12 • Schrauben Sie den Anschlusskopf (4) mit dem eingebauten und verdrahteten Kopftransmit- ter auf die bereits installierten Nippel und Adapter (3). HINWEIS Anforderungen des Explosionsschutzes ‣ Nach erfolgter Verdrahtung den Anschlusskopfdeckel wieder fest anschrauben. Der Anschlusskopfdeckel muss ordnungsgemäß befestigt werden. Endress+Hauser...
-
Seite 13: Montagekontrolle
Sie besonders → Seite 15. Ziehen Sie die Kabelverschraubung wieder an und schließen Sie den Gehäusedeckel. Um Anschlussfehler zu vermeiden, beachten Sie in jedem Falle vor der Inbetriebnahme die Hinweise in der Anschlusskontrolle (→ Seite 18)! Endress+Hauser... -
Seite 14: Verdrahtung Auf Einen Blick
Sensoren entsteht. Die dadurch auftretenden Ausgleichsströme führen zu erheblichen Verfälschungen der Messung. Die Sensoren müssen zueinander galvanisch getrennt bleiben, indem jeder Sensor separat an einen Transmitter ange- schlossen wird. Das Gerät gewährleistet eine ausreichende galvanische Trennung (> 2 kV AC) zwischen Ein- und Ausgang. Endress+Hauser... -
Seite 15: Anschluss An Federklemmen
Verbindung durch leichtes Ziehen am Leiter überprüfen, ggf. ab 1. wiederholen. Pos. B, Feindrähtige Leiter ohne Leiterende abisolieren. Abisolierlänge min. 10 mm (0.39 in). Aderendhülse: Hebelöffner mit Werkzeug betätigen (B). Leiterende in die Klemmstelle einführen (B). Hebelöffner loslassen. Verbindung durch leichtes Ziehen am Leiter überprüfen, ggf. ab 1. wiederholen. Endress+Hauser... -
Seite 16: Feldbusanschluss
Die Klemmen für den Feldbusanschluss (1+ und 2-) sind verpolungsunabhängig. ‣ Leitungsquerschnitt: – max. 2,5 mm bei Schraubklemmen – max. 1,5 mm bei Federklemmen. Abisolierlänge des Leiters min. 10 mm (0,39 in). ‣ Für den Anschluss ist grundsätzlich ein abgeschirmtes Kabel zu verwenden. Endress+Hauser... -
Seite 17: Schirmung Und Erdung
Schirmung auf der speisenden Seite (ohne kapazitivem Abschluss am Feldgerät) erzielt. Damit ist ein Betrieb bei Störgrößen gemäß NAMUR NE21 sichergestellt. A0008770 Abb. 8: Schirmung und einseitige Erdung des Feldbus-Kabelschirms Speisegerät Verteilerbox (T-box) Busabschluss Erdungspunkt für Feldbus-Kabelschirm Optionale Erdung des Feldgerätes, isoliert vom Kabelschirm. Endress+Hauser... -
Seite 18: Anschlusskontrolle
Wurde jedes Feldbussegment beidseitig mit einem Busabschluss terminiert? Wurde die max. Länge der Feldbusleitung gemäß den Feldbusspezifikatio- nen eingehalten? Wurde die max. Länge der Stichleitungen gemäß den Feldbusspezifikatio- nen eingehalten? Ist das Feldbuskabel lückenlos abgeschirmt und korrekt geerdet? Endress+Hauser... -
Seite 19: Bedienung Und Inbetriebnahme
• der elektrische Anschluss richtig ist. Anzeige- und Bedienelemente (optional) Option: Display mit Transmitter. Das Display kann auch nachbestellt werden (siehe Kapitel ’Zubehör’ in der Betriebsanlei- tung). A0010227 Abb. 9: Display auf Transmitter stecken 5.2.1 Anzeigedarstellung A0008549 Abb. 10: LC Display des Kopftransmitters Endress+Hauser... -
Seite 20: Anzeigesymbole
PA-Funktionen sowie gerätespezifischer Parameter erfolgt über die Feldbus-Kommunikation. Dafür stehen folgende Konfigurationssysteme zur Verfü- gung: • Endress+Hauser FieldCare (DTM) • SIMATIC PDM (EDD) In der ausführlichen Betriebsanleitung ist das schrittweise Vorgehen für die Erst-Inbe- triebnahme der Feldbusfunktionen ausführlich beschrieben; ebenso die Konfiguration gerätespezifischer Parameter. -
Seite 21: Hardware-Einstellungen (Dip-Schalter)
DIP-Schalter auf der Rückseite des Displays entsprechend konfigurieren. Generell: Schalter auf ON = Funktion ist aktiv, Schalter auf OFF = Funktion ist deaktiviert. Display in der richtigen Position auf den Kopftransmitter stecken. Die Einstellungen wer- den vom Kopftransmitter innerhalb von einer Sekunde übernommen. Endress+Hauser... -
Seite 22: Einstellen Der Geräteadresse
Geräteadresse vom Kopftransmitter übernommen und gespeichert wird. A0009701 Abb. 12: Einstellung der Geräteadresse am Beispiel Busadresse 49. DIP-Schalter auf ON: 32 + 16 + 1 = 49. Desweiteren DIP-Schalter SW/HW auf “HW” und ADDR ACTIVE auf “ON”. Endress+Hauser... -
Seite 23: Einschalten Des Kopftransmitters
Bei aktivem Hardware-Schreibschutz (Schreibschutzschalter auf der Rückseite des Dis- plays in Position “ON”), kann der Schreibschutz via Bedientool nicht deaktiviert wer- den. Der Hardware-Schreibschutz muss in jedem Fall zuerst deaktiviert werden, bevor der Software-Schreibschutz aktiviert oder deaktiviert werden kann. Endress+Hauser... - Seite 44 www.addresses.endress.com...