Herunterladen Inhalt Inhalt Diese Seite drucken
Vorschau ausblenden Andere Handbücher für UNIQA:
Inhaltsverzeichnis

Werbung

Verfügbare Sprachen
  • DE

Verfügbare Sprachen

  • DEUTSCH, seite 75
better together
IT
Manuale di prima installazione
EN
First installation manual
FR
Manuel de première installation
Elettropompe sommergibili ad alta efficienza
High efficiency submersible electric pumps
Électropompes submersibles haute performance
Hocheffiziente Tauchmotorpumpen
Electrobombas sumergibles de elevada eficiencia
Погружные высокопроизводительные электронасосы
DE
Anleitung für die Erstinstallation
ES
Manual de primera instalación
RU
Руководство по первоначальной установке
10

Werbung

Inhaltsverzeichnis
loading

Inhaltszusammenfassung für Zenit UNIQA

  • Seite 1 better together Elettropompe sommergibili ad alta efficienza High efficiency submersible electric pumps Électropompes submersibles haute performance Hocheffiziente Tauchmotorpumpen Electrobombas sumergibles de elevada eficiencia Погружные высокопроизводительные электронасосы Manuale di prima installazione Anleitung für die Erstinstallation First installation manual Manual de primera instalación Manuel de première installation Руководство...
  • Seite 2 I dati riportati potrebbero differire da quelli tatsächlichen Aussehen des Produkts abweichen. Die aufgeführten Angaben reali. Zenit si riserva la facoltà di apportare modifiche al prodotto senza könnten sich von den tatsächlichen unterscheiden. Zenit behält sich das Recht alcun preavviso.
  • Seite 3: Inhaltsverzeichnis

    Manuale di prima installazione - Istruzioni originali better together SOMMARIO 1. INFORMAZIONI GENERALI ................................4 1.1 Identificazione del costruttore ................................4 1.2 Significato della simbologia utilizzata nel manuale..........................4 1.3 Sicurezza ......................................4 1.4 Formazione del personale addetto all’installazione e manutenzione ....................4 1.5 Rischi residui ......................................4 1.6 Descrizione del prodotto / Destinazioni d’uso.............................4 1.7 Copertura della garanzia ..................................5 1.8 Descrizione nome prodotto.................................5...
  • Seite 4: Informazioni Generali

    5 mm. Le pompe sommergibili serie UNIQA non devono essere mai utilizzate per pompare liquidi esplosivi, infiammabili o combustibili. L’involucro del motore elettrico è identificato da una o due lettere che indicano tipologia e materiale: •...
  • Seite 5: Copertura Della Garanzia

    1.7 Copertura della garanzia Zenit si impegna a riparare o sostituire il prodotto qualora i guasti siano dovuti a difetti di progettazione, lavorazione e assemblaggio e siano segnalati a Zenit entro il periodo di garanzia. Non sono coperti da garanzia i guasti dovuti a: normale usura;...
  • Seite 6: Identificazione Del Modello

    1.9 Identificazione del modello Per identificare un modello in relazione alla dotazione di accessori e alle installazioni consentite, Zenit utilizza la sigla relativa ai motori con potenza P2 e poli. In Tabella 1 sono riportati i motori elettrici UNIQA che utilizzano involucri di tipo G o X;...
  • Seite 7 Manuale di prima installazione - Istruzioni originali better together Tabella 2 – Motori elettrici UNIQA che utilizzano involucri di tipo M o MX Potenza P2 (kW) Poli Variante motore Versione W=Wet; D= Dry Tipo involucro 4, 5.5 M08S-MX08S 1.5, 1.8 5.5, 7.5...
  • Seite 8: Targa Dati Elettropompa

    Anno di produzione Involucro motore tipo G o X, M o MX Versione prodotto Numero di serie Zenit Italia s.r.l. Tensione e corrente (collegamento a triangolo) via dell’Industria, 11 I-41018 S.Cesario s.P. (MO) Tensione e corrente (collegamento a stella) zenit.com...
  • Seite 9: Etichette Adesive Applicate Al Prodotto

    Manuale di prima installazione - Istruzioni originali better together 1.12 Etichette adesive applicate al prodotto www.zenit.com Zenit Italia s.r.l. S.N. via dell’Industria, 11 I-41018 S.Cesario s.P. (MO) zenit.com Δ Δ TYPE cos φ I.CL μF VERS S.N. Ø η cos φ...
  • Seite 10: Trasporto E Stoccaggio

    Verificare visivamente che l’imballo non abbia subito danni. Segnalare sui documenti di trasporto se il prodotto dovesse risultare danneggiato in modo significativo. Se dovessero presentarsi articoli mancanti rivolgersi a Zenit (o al suo distributore) o alla società di spedizione. Rimuovere i materiali da imballaggio e smaltirli in accordo alla normativa vigente.
  • Seite 11: Installazione

    Manuale di prima installazione - Istruzioni originali better together 3. INSTALLAZIONE 3.1 Avvertenze generali di sicurezza • Circoscrivere adeguatamente l’area di lavoro e indossare dispositivi di protezione individuale. • Prima di qualsiasi operazione accertare che l’elettropompa ed il quadro elettrico siano isolati dalla rete e non possano essere messi inavverti- tamente in tensione.
  • Seite 12: Tipi Di Installazione Ammessi

    11 C 3.4 Tipi di installazione ammessi Foratura flangia Foratura flangia mandata aspirazione Tipo Accessorio installazione Zenit DAC-V / DAC-H KBS-H Standard Optional * Foratura possibile per accessori non Zenit. Per la tipologia di foratura vedere la scheda tecnica del prodotto.
  • Seite 13: Installazione Con Dispositivo Di Accoppiamento Da Fondo Dac (Tipo P)

    Manuale di prima installazione - Istruzioni originali better together 3.5 Installazione con dispositivo di accoppiamento da fondo DAC (TIPO P) (Fig. 12) Questo tipo di installazione (TIPO P) permette di estrarre l’elettropompa dalla vasca e di riposizionarla in modo rapido senza richiedere interven- ti sull’impianto.
  • Seite 14: Installazione Mobile (Tipo S)

    Manuale di prima installazione - Istruzioni originali better together 3.6 Installazione mobile (TIPO S) (Fig. 14) Nell’installazione mobile (TIPO S) l’elettropompa è fissata a uno specifico basamento (KBS) che la mantiene in posizione verticale sul fondo della vasca e garantisce la corretta altezza della bocca di aspirazione. 14 A 14 B 3.6.1 Procedura di installazione...
  • Seite 15: Installazione Orizzontale In Camera A Secco (Tipo Z)

    15. Collegare i cavi elettrici al quadro di comando secondo lo schema riportato al paragrafo 4.2 “Collegamento elettrico”. 3.9 Installazione non predefinita (TIPO X) L’elettropompa è predisposta con tutte le forature per l’installazione standard con accessori Zenit. Per conoscere il dettaglio delle forature disponibili vedere la scheda tecnica.
  • Seite 16: Collegamenti Elettrici

    Fissare i cavi elettrici in modo che non siano soggetti a torsione, strappo e/o schiacciamento. • Se il cavo risultasse danneggiato non provvedere alla sua sostituzione ma rivolgersi a Zenit o ad un Centro Assistenza Autorizzato. • Non sottovalutare i problemi correlati alla caduta di tensione.
  • Seite 17: Collegamento Elettrico (Versione Standard)

    Manuale di prima installazione - Istruzioni originali better together Su richiesta, l’elettropompa può essere equipaggiata con sonde singole per il rilevamento di acqua o umidità all’interno della camera olio delle tenute meccaniche (S1), del vano motore (S2) e del vano morsettiera (S3) (Fig.
  • Seite 18: Guida Alla Risoluzione Di Problemi

    Manuale di prima installazione - Istruzioni originali better together 6. GUIDA ALLA RISOLUZIONE DI PROBLEMI Problema Possibile causa Soluzione Mancanza di alimentazione Verificare la presenza di tensione nell’impianto Cavo scollegato o danneggiato Connettere la pompa alla rete o controllare l’integrità del cavo Fusibili bruciati Controllare il tipo di fusibili e sostituirli con altri di valore adeguato Intervento della protezione magnetoter-...
  • Seite 19: Manutenzione E Assistenza

    Un contratto di assistenza e manutenzione programmata con un Centro Assistenza Autorizzato Zenit garantisce il miglior servizio tecnico. Le condizioni di garanzia Zenit sono valide solo se i lavori di riparazione e manutenzione straordinaria sono effettuati da un Centro Assistenza Autorizzato.
  • Seite 20: Controlli Periodici

    Manuale di prima installazione - Istruzioni originali better together 7.4 Controlli periodici Intervallo Versioni STD Versioni -EX Quotidiana Assorbimento: - Verificare che la corrente assorbita sia entro il valore nominale Variazione di tensione massima ammessa: - Funzionamento continuo = max ± 5% del valore nominale - Funzionamento intermittente periodico = max ±...
  • Seite 21 7. Riempire la camera delle tenute meccaniche con olio lubrificante biodegradabile con indice di viscosità 190. Zenit consiglia: - CASTROL PRODUCT L 320 - TOTAL Bio Hydraulic TMP FR46 Qualora l’olio indicato non sia reperibile, contattare Zenit. Quantità d’olio Tipo camera tenute meccaniche (ml) G05M...
  • Seite 22 2x 3/8” DIN 906 attenzione! Usare frenafiletti tipo Loctite 243. Tipo (WET) Tappo olio M10S - M10L M12N 2x M30x30.5 (ricambio ZENIT) M13N M15N 2x O-ring 18.64x3.53 M17N M21S - M21L attenzione! Sostituire gli OR sui tappi della camera olio utilizzando un kit guarnizioni disponibile come ricambio.
  • Seite 23 - CASTROL PRODUCT L 320 - TOTAL Bio Hydraulic TMP FR46 Qualora l’olio indicato non sia reperibile, contattare Zenit. 9. Avvitare il tappo superiore della camera olio. Tipo M10S - M10L - M12N - M13N - M15N - M17N - M21S - M21L Versione DRY 1.
  • Seite 24 Manuale di prima installazione - Istruzioni originali better together 4. Tenendo fermo il dado esagonale (I) con una chiave a forchetta, 5. Lasciare scaricare l’olio in un recipiente di dimensioni idonee e svitare il tappo interno inferiore (II) della camera olio. possibilmente trasparente.
  • Seite 25: Sostituzione Del Liquido Di Raffreddamento

    13100 Zenit consiglia: - CASTROL PRODUCT L 320 - TOTAL Bio Hydraulic TMP FR46 Qualora l’olio indicato non sia reperibile, contattare Zenit. 9. Avvitare il tappo interno superiore (II) della camera olio. attenzione! Usare frenafiletti tipo Loctite 243. 7.6 Sostituzione del liquido di raffreddamento I modelli con camicia di raffreddamento utilizzano come refrigerante una miscela di acqua e glicole propilenico al 30% che mantiene inalterate le proprie caratteristiche fino alla temperatura di -13°C (9°F).
  • Seite 26 Manuale di prima installazione - Istruzioni originali better together Per riempire il sistema di raffreddamento operare nel modo seguente (Fig. 24): 1. Posizionare l’elettropompa verticalmente su un piano regolare e stabile; 2. Assicurare l’elettropompa con una catena o fune di dimensioni adeguate agganciata alla maniglia superiore per evitare cadute accidentali; 3.
  • Seite 27 First installation manual – Translation of original instructions better together CONTENTS 1. GENERAL INFORMATION ..................................28 1.1 Manufacturer’s details ..................................28 1.2 Key to the symbols used in the manual .............................28 1.3 Safety .........................................28 1.4 Training of installation and maintenance staff ...........................28 1.5 Residual risks .....................................28 1.6 Product description / Intended use ..............................28 1.7 Warranty cover ....................................29...
  • Seite 28: General Information

    M, MX= electric motor casing type M with constructional material in cast iron or type MX with constructional material in stainless steel. The equipment is available in two version: WET and DRY. • WET version: suitable to operate in S1 continuous duty type fully submerged. Contact Zenit for periodic, intermittent duty type (S3) in dry condition...
  • Seite 29: Warranty Cover

    The pump can be installed in VERTICAL or HORIZONTAL position. 1.7 Warranty cover Zenit undertakes to repair or replace the product if failures are due to design, manufacturing and assembly defects and are reported to Zenit during the warranty period.
  • Seite 30: Model Identification

    1.9 Model identification To identify a model based on its accessories and admissible installations, Zenit uses the abbreviation relative to motors with power P2 and poles. Chart 1: reports the UNIQA electric motors usable with enclosure type G or X;...
  • Seite 31 First installation manual – Translation of original instructions better together Chart 2 - UNIQA electric motors usable with enclosure type M or MX Enclosure description P2 Power Ratings No of Poles Motor Variant Operating mode (kW) W=Wet; D= Dry 4, 5.5...
  • Seite 32: Nameplate

    Product name Year of manufacture Enclosure type G or X, M or MX Product version Serial number Voltage and current (delta connection) Zenit Italia s.r.l. Voltage and current (Y connection) via dell’Industria, 11 I-41018 S.Cesario s.P. (MO) Frequency zenit.com Power factor...
  • Seite 33: Decals Applied To The Product

    First installation manual – Translation of original instructions better together 1.12 Decals applied to the product www.zenit.com Zenit Italia s.r.l. S.N. via dell’Industria, 11 I-41018 S.Cesario s.P. (MO) zenit.com Δ Δ TYPE cos φ I.CL μF VERS S.N. Ø η...
  • Seite 34: Transport And Storage

    Make a visual inspection of the packaging for damage. Record any significant damage to the product in the transport documents. If articles are missing, contact Zenit (or its dealer) or the forwarders. Remove the packaging materials and dispose of them as required by law. Take special care not to injure yourself with sharp tools and not to damage to the product, especially the electrical wiring.
  • Seite 35: Installation

    First installation manual – Translation of original instructions better together 3. INSTALLATION 3.1 General safety precautions • Fence off the working area by appropriate means and wear personal protection equipment. • Before carrying out any operation, make sure that the pump and electrical panel are disconnected from the electrical mains and cannot be accidentally powered up.
  • Seite 36: Permitted Installation Types

    11 B 11 C 3.4 Permitted installation types Discharge flange Suction flange Type of Zenit accessory installation DAC-V / DAC-H KBS-H Standard Optional * Possible holes for non Zenit accessories (For the mounting holes required, refer to the product technical sheet)
  • Seite 37: Installation With Dac Coupling Device (Type P)

    First installation manual – Translation of original instructions better together 3.5 Installation with DAC coupling device (TYPE P) (Fig. 12) With this type of installation (TYPE P), the pump can be removed from and replaced in the tank quickly without any work on the system. 12 A 12 B 3.5.1 System components...
  • Seite 38: Mobile Installation (Type S)

    First installation manual – Translation of original instructions better together 3.6 Mobile installation (TYPE S) (Fig. 14) In mobile installation (TYPE S), the pump is mounted on a specific base which keeps it vertically on the bottom of the tank and ensures that the intake is at the correct height.
  • Seite 39: Horizontal Installation In Dry Chamber (Type Z)

    15. Connect the electric cables to the control panel as explained to Chapter 4. “Electrical connections”. 3.9 Unspecified installation (TYPE X) The pump has all the holes required for standard installation with Zenit accessories. Refer to the technical sheet for a detailed illustration of the available holes.
  • Seite 40: Electrical Connections

    • The electrical operation and safety of ZENIT electric pumps are guaranteed for the configuration supplied by the manufacturer: any changes (e.g. addition of extra lengths of cable to the original power lead) may cause a deterioration in the pump’s characteristics.
  • Seite 41: Connection Diagrams (Standard Version)

    First installation manual – Translation of original instructions better together maintenance. The cable is marked with a label with the letter “S” and must be connected to the corresponding terminal of the control panel. On request, the electric pump can be equipped with single probes for the detection of water or humidity inside the oil chamber of the mechanical seals (S1), the motor compartment (S2) and the terminal board compartment (S3) (Fig.
  • Seite 42: Troubleshooting Guide

    First installation manual – Translation of original instructions better together 6. TROUBLESHOOTING GUIDE Problem Possible cause Solution No power supply Check power supply line. Damaged or disconnected cable Check the cable connections and make sure that it’s not damaged. Fuses blowed Check fuses type and rating and replace them with correct ones.
  • Seite 43: Maintenance

    Failure to comply with this rule causes loss of -Ex approval. A service and planned maintenance contract with the Zenit Authorised Service Centre guarantees the best technical service. The Zenit warranty is only valid if repairs and reactive maintenance are performed by an Authorised Service Centre.
  • Seite 44: Daily And Periodic Inspection

    First installation manual – Translation of original instructions better together 7.4 Daily and periodic inspection Interval STANDARD version -EX version Daily Measuring the operating current: - To be within the rated current Measuring the power voltage variation: Continuous running duty = within ± 5% of the rated voltage Intermittent periodic duty = within ±...
  • Seite 45 7. Fill the mechanical seal sump with biodegradable lubricating oil having viscosity index 190. Zenit recommends: - CASTROL PRODUCT L 320 - TOTAL Bio Hydraulic TMP FR46 If the recommended oil is not available, contact Zenit. Mechanical seal sump Enclosure type oil capacity (ml) G05M...
  • Seite 46 2x 3/8” DIN 906 warning! Use Loctite 243 threadlocker Enclosure type (WET) Oil sump plug M10S - M10L M12N 2x M30x30.5 (ZENIT spare part) M13N M15N 2x O-ring 18.64x3.53 M17N M21S - M21L warning! Replace the O-rings on the oil sump plugs using a seal set available as a spare part.
  • Seite 47 - CASTROL PRODUCT L 320 - TOTAL Bio Hydraulic TMP FR46 If the recommended oil is not available, contact Zenit. 9. Screw the top plug onto the oil sump. Enclosure type M10S - M10L - M12N - M13N - M15N - M17N - M21S - M21L Version DRY 1.
  • Seite 48 First installation manual – Translation of original instructions better together 4. Holding the hexagonal nut (I) still with a spanner, 5. Allow the oil to drain into a vessel of suitable size, unscrew the inner bottom plug (II) of the oil sump. transparent if possible.
  • Seite 49: Changing The Cooling Fluid

    Zenit recommends: - CASTROL PRODUCT L 320 - TOTAL Bio Hydraulic TMP FR46 If the recommended oil is not available, contact Zenit. The quantity of oil required and the pump position for filling are provided in the table. 9. Screw the inner top plug (II) onto the oil sump.
  • Seite 50 First installation manual – Translation of original instructions better together Do the following to fill up the cooling system (Fig. 24): 1. Set the electric pump up vertically on a smooth and stable surface; 2. Secure the electric pump by a suitably sized chain or rope hooked onto the top handle, to avoid it from accidentally falling; 3.
  • Seite 51 Manuel de première installation- Traduction des instructions originales better together SOMMAIRE 1. GÉNÉRALITÉS ....................................52 1.1 Identification du fabricant..................................52 1.2 Symboles utilisés dans le manuel ..............................52 1.3 Sécurité ......................................52 1.4 Formation des préposés à l'installation et à la maintenance ......................52 1.5 Risques résiduels ....................................52 1.6 Description du produit / Domaines d'application ..........................52 1.7 Couverture de la garantie ...................................53...
  • Seite 52: Généralités

    L'utilisateur est tenu d'établir un programme de contrôle approprié pour éviter que l'accumulation de la poussière, à la surface de l'électropompe, ne dépasse 5 mm d'épaisseur. Les pompes submersibles UNIQA ne doivent jamais être utilisées pour pomper des liquides explosifs, inflammables ou combu- stibles.
  • Seite 53: Couverture De La Garantie

    1.7 Couverture de la garantie Zenit s'engage à réparer ou à remplacer le produit dans la mesure où les pannes sont provoquées par des défauts de conception, d'usinage et d'assemblage, et que celles-ci sont signalées à Zenit dans la période de garantie. La garantie ne couvre pas les pannes occasionnées par : •...
  • Seite 54: Identification Du Modèle

    1.9 Identification du modèle Pour identifier un modèle et connaître ses accessoires et les installations autorisées, Zenit utilise le sigle relatif aux moteurs avec puissance P2 et pôles. Le tableau 1 contient les moteurs électriques UNIQA avec carcasses de type G ou X ;...
  • Seite 55 Manuel de première installation- Traduction des instructions originales better together Tableau 2 - Moteurs électriques UNIQA avec carcasses de type M ou MX Puissance P2 (kW) Pôles Variante moteur Version W=Wet ; D= Dry Type carcasse 4, 5.5 M08S-MX08S 1.5, 1.8 5.5, 7.5...
  • Seite 56: Plaque Signalétique De L'électropompe

    Année de fabrication Carcasse moteur type G ou X, M ou MX Version produit Numéro de série Zenit Italia s.r.l. Tension et courant (montage en triangle) via dell’Industria, 11 I-41018 S.Cesario s.P. (MO) Tension et courant (montage en étoile) zenit.com Fréquence...
  • Seite 57: Autocollants Sur Le Produit

    Manuel de première installation- Traduction des instructions originales better together 1.12 Autocollants sur le produit www.zenit.com Zenit Italia s.r.l. S.N. via dell’Industria, 11 I-41018 S.Cesario s.P. (MO) zenit.com Δ Δ TYPE cos φ I.CL μF VERS S.N. Ø η cos φ...
  • Seite 58: Transport Et Stockage

    Faire un contrôle visuel pour s'assurer que l'emballage n'est pas abîmé. Si le produit est fort endommagé, le signaler sur les documents de transport. S'il manque des articles, contacter Zenit (ou son revendeur) ou l'entreprise de transport. Déballer le produit, puis jeter l'emballage conformément à la réglementation en vigueur.
  • Seite 59: Installation

    Manuel de première installation- Traduction des instructions originales better together 3. INSTALLATION 3.1 Consignes générales de sécurité • Délimiter correctement le périmètre de travail et utiliser un équipement de protection individuelle. • Avant toute intervention, s'assurer que l'électropompe et le tableau électrique ne sont pas sous tension, et que toute mise sous tension invo- lontaire est impossible.
  • Seite 60: Installations Autorisées

    3.4 Installations autorisées Perçage Bride de Perçage Bride refoulement d'aspiration Type Accessoire installation Zenit DAC-V / DAC-H KBS-H De série En option * Perçage possible pour les accessoires non Zenit. Pour le type de perçage, consulter la fiche technique du produit.
  • Seite 61: Installation Avec Dispositif D'accouplement Au Fond (Dac) (Type P)

    Manuel de première installation- Traduction des instructions originales better together 3.5 Installation avec dispositif d'accouplement au fond (DAC) (TYPE P) (Fig. 12) Ce genre d'installation (TYPE P) permet de retirer l'électropompe de la cuve et de la réinstaller rapidement sans intervenir sur le système. 12 A 12 B 3.5.1 Composants du système...
  • Seite 62: Installation Mobile (Type S)

    Manuel de première installation- Traduction des instructions originales better together 3.6 Installation mobile (TYPE S) (Fig. 14) Dans le cas de l'installation mobile (TYPE S), l'électropompe est fixée sur une embase spéciale qui la garde à la verticale sur le fond de la cuve et place l'orifice d'aspiration à...
  • Seite 63: Installation Horizontale En Fosses Sèches (Type Z)

    15. Raccorder les câbles électriques au tableau électrique selon le schéma représenté au paragraphe 4.2 « Branchement électrique ». 3.9 Installation non prédéfinie (TYPE X) L'électropompe comporte tous les perçages nécessaires pour l'installation standard avec accessoires Zenit. Pour plus d'informations sur les perçages, voir la fiche technique.
  • Seite 64: Branchements Électriques

    • La fonctionnalité et la sécurité électrique des électropompes ZENIT sont garanties pour la configuration d'usine : toute modification (ex. : ajout d'une rallonge au câble d'origine) peut diminuer la performance de l'électropompe. Avant l'installation et la première mise en service, contrôler que les câbles électriques ne sont pas endommagés pour éviter les courts-circuits.
  • Seite 65: Branchement Électrique (Version Standard)

    Manuel de première installation- Traduction des instructions originales better together Le câble est identifié par l'étiquette « S ». Il doit être branché sur la borne correspondante du tableau électrique. Sur demande, l'électropompe peut être équipée de sondes simples pour la détection de l'eau ou de l'humidité dans la chambre à huile des garnitures mécaniques (S1), dans le compartiment moteur (S2) et dans le compartiment de la plaque à...
  • Seite 66: Résolution Des Problèmes

    Manuel de première installation- Traduction des instructions originales better together 6. RÉSOLUTION DES PROBLÈMES Problème Cause possible Solution Absence d'alimentation Contrôler la tension Câble débranché ou abîmé Brancher la pompe sur le réseau ou contrôler que le câble est en bon état Contrôler le type de fusibles, puis les remplacer par d'autres de valeur Fusibles brûlés appropriée...
  • Seite 67: Maintenance Et Assistance

    REMARQUE : Le contrôle et le remplacement des composants exigent des outils spécifiques. Pour procéder à ces opérations, contacter le revendeur où le produit a été acheté ou le bureau commercial ZENIT de la région. Toutes les interventions sur les électropompes en version -EX doivent être faites par un personnel technique qualifié auprès d'un centre d'assistance certifié...
  • Seite 68: Contrôles Périodiques

    Manuel de première installation- Traduction des instructions originales better together 7.4 Contrôles périodiques Intervalle Versions STD Versions -EX Tous les jours Consommation : - Contrôler que la consommation ne dépasse pas la valeur nominale Variation de tension maximale admissible : - Service continu = max ±...
  • Seite 69 190. Zenit recommande : - CASTROL PRODUCT L 320 - TOTAL Bio Hydraulic TMP FR46 Si l'huile mentionnée n'est pas disponible dans le commerce, contacter Zenit. Quantité d’huile Type chambre des garnitures mécaniques (ml) G05M...
  • Seite 70 Utiliser un frein-filet type Loctite 243 Type (WET) Bouchons de la chambre à huile M10S - M10L M12N 2x M30x30.5 M13N (pièces détachées ZENIT) M15N M17N 2x O-ring 18.64x3.53 M21S - M21L attention ! Remplacer les joints toriques sur les bouchons de la chambre à...
  • Seite 71 18000 M17N 38000 M21S - M10L 28400 Zenit recommande : - CASTROL PRODUCT L 320 - TOTAL Bio Hydraulic TMP FR46 Si l’huile mentionnée n’est pas disponible dans le commerce, contacter Zenit. 9. Visser le bouchon supérieur de la chambre à huile.
  • Seite 72 Manuel de première installation- Traduction des instructions originales better together 4. Immobiliser l'écrou hexagonal (I) avec une clé plate, puis 5. Laisser couler l'huile dans un récipient de dimensions dévisser le bouchon interne inférieur (II) de la chambre à huile. appropriées et, si possible, transparent.
  • Seite 73: Vidange Du Liquide De Refroidissement

    6500 M17N 14700 M21S - M21L 13100 Zenit recommande : - CASTROL PRODUCT L 320 - TOTAL Bio Hydraulic TMP FR46 Si l’huile mentionnée n’est pas disponible dans le commerce, contacter Zenit. 9. Visser le bouchon interne supérieur (II) de la chambre à huile.
  • Seite 74 Manuel de première installation- Traduction des instructions originales better together Pour remplir le système de refroidissement, procéder comme suit (Fig. 24) : 1. Placer l’électropompe à la verticale sur une surface lisse et stable ; 2. Attacher l’électropompe à la chaîne ou à l’élingue dimensionnée qui est accrochée à la poignée supérieure pour éviter les chutes accidentel- les ;...
  • Seite 75 Handbuch für die Erstinstallation – Übersetzung der Originalanleitungen better together INHALTSVERZEICHNIS 1. ALLGEMEINE INFORMATIONEN ...............................76 1.1 Angaben zum Hersteller ..................................76 1.2 Symbolik ......................................76 1.3 Sicherheit......................................76 1.4 Qualifizierung des Installations- und Instandhaltungspersonals ......................76 1.5 Restrisiken ......................................76 1.6 Beschreibung des Produkts / Zweckbestimmung..........................76 1.7 Gewährleistung....................................77 1.8 Typenschlüssel ....................................77 1.9 Modellkennzeichnung ..................................78...
  • Seite 76: Allgemeine Informationen

    Die Elektromotorpumpe muss während ihres Transports, ihrer Installation oder ihres Ausbaus vom Schaltschrank getrennt sein. 1.6 Beschreibung des Produkts / Zweckbestimmung Zenit UNIQA ist eine Baureihe von Tauchmotorpumpen, die mit einem Motor mit hoher Energieeffizienz ausgerüstet sind. Diese Produkte sind für den Einsatz in privaten, industriellen und kommunalen Klär- und Hebeanlagen bestimmt.
  • Seite 77: Gewährleistung

    Kühlmantel ausgestattet. Für die VERTIKALE als auch HORIZONTALE Installation geeignet. 1.7 Gewährleistung Zenit verpflichtet sich zur Reparatur oder zum Austausch des Produkts im Falle von Mängeln, die auf Konstruktions-, Verarbeitungs- oder Mon- tagefehler zurückzuführen sind und Zenit innerhalb des Gewährleistungszeitraums angezeigt werden. Von der Gewährleistung ausgeschlossen sind Schäden infolge der nachstehenden Ursachen:...
  • Seite 78: Modellkennzeichnung

    Handbuch für die Erstinstallation – Übersetzung der Originalanleitungen better together 1.9 Modellkennzeichnung Zur Kennzeichnung eines Modells bezüglich der Zubehörausstattung und der zulässigen Installationen verwendet Zenit das Kürzel, das die Nennleistung (P2) und die Polzahl angibt. Tabelle 1 enthält die Elektromotorpumpen UNIQA mit dem Gehäusetyp G oder X;...
  • Seite 79 Handbuch für die Erstinstallation – Übersetzung der Originalanleitungen better together Tabelle 2 - Elektromotorpumpen UNIQA mit dem Gehäusetyp M oder MX Leistung P2 (kW) Polzahl Variante Motor Version W=Wet; D=Dry Gehäusetyp 4, 5.5 M08S-MX08S 1.5, 1.8 5.5, 7.5 7.5, 9, 11...
  • Seite 80: Typenschild Der Elektromotorpumpe

    1.10 Typenschild der Elektromotorpumpe Produkttyp Baujahr Motorgehäuse Typ G oder X, M oder MX Produktversion Seriennummer Zenit Italia s.r.l. Spannung und Strom (Dreieckschaltung) via dell’Industria, 11 I-41018 S.Cesario s.P. (MO) Spannung und Strom (Sternschaltung) zenit.com Frequenz TYPE Leistungsfaktor...
  • Seite 81: Klebeetiketten Am Produkt

    Handbuch für die Erstinstallation – Übersetzung der Originalanleitungen better together 1.12 Klebeetiketten am Produkt www.zenit.com Zenit Italia s.r.l. S.N. via dell’Industria, 11 I-41018 S.Cesario s.P. (MO) zenit.com Δ Δ TYPE cos φ I.CL μF VERS S.N. Ø η cos φ...
  • Seite 82: Transport Und Lagerung

    2.1 Sichtkontrolle Per Sichtkontrolle prüfen, dass die Verpackung unbeschädigt ist. Etwaige signifikante Produktschäden in den Versandunterlagen vermerken. Im Fall von Fehlteilen Firma Zenit (oder ihren Händler) oder das Transportunternehmen kontaktieren. Verpackungsmaterial entfernen und vorschriftsmäßig entsorgen. Bei der Verwendung von Schneidwerkzeugen darauf achten, weder sich selbst zu verletzten noch das Produkt, insbesondere die Stromkabel, zu beschädigen.
  • Seite 83: Installation

    Handbuch für die Erstinstallation – Übersetzung der Originalanleitungen better together 3. INSTALLATION 3.1 Allgemeine Sicherheitshinweise • Arbeitsbereich entsprechend abgrenzen und persönliche Schutzausrüstung tragen. • Vor Ausführung jeglicher Tätigkeit sicherstellen, dass die Elektromotorpumpe und der Schaltschrank vom Stromnetz getrennt sind und nicht unbeabsichtigt eingeschaltet werden können.
  • Seite 84: Zulässige Installationstypen

    10 C 11 A 11 B 11 C 3.4 Zulässige Installationstypen Bohrung Bohrung Druckflansch Saugflansch Installations- Zubehör Installation Zenit DAC-V / DAC-H KBS-H Standard Optional * Mögliche Bohrung für Zubehör von Fremdfirmen. Für den Bohrungstyp siehe das technische Datenblatt des Produkts.
  • Seite 85: Installation Mit Bodenbefestigtem Kupplungsfuß Dac (Typ P)

    Handbuch für die Erstinstallation – Übersetzung der Originalanleitungen better together 3.5 Installation mit bodenbefestigtem Kupplungsfuß DAC (TYP P) (Abb. 12) Diese Installationsart (TYP P) ermöglicht den schnellen Aus- und Einbau der Elektromotorpumpe aus dem bzw. in das Becken, ohne dass Ein- griffe an der Anlage erforderlich sind.
  • Seite 86: Mobile Installation (Typ S)

    Handbuch für die Erstinstallation – Übersetzung der Originalanleitungen better together 3.6 Mobile Installation (TYP S) (Abb. 14) Bei der mobilen Installation (TYP S) wird die Elektromotorpumpe an einem Sockel befestigt, der sie in der vertikalen Lage am Beckenboden hält und die richtige Höhe des Saugstutzens garantiert. 14 A 14 B 3.6.1 Installationsverfahren...
  • Seite 87: Horizontale Installation Im Trockenschacht (Typ Z)

    15. Die Stromkabel gemäß dem Schaubild im Abschnitt 4.2 „Elektrischer Anschluss" an den Schaltschrank anschließen. 3.9 Beliebige Installation (TYP X) Die Elektromotorpumpe ist mit allen Bohrungen versehen, die für die Standardinstallation mit Zubehör von Zenit erforderlich sind. Für detaillierte Informationen zu den verfügbaren Bohrungen siehe das technische Datenblatt.
  • Seite 88: Elektrische Anschlüsse

    Schutzeinrichtungen kann zur Entstehung von Gefahrensituationen und den Verfall des Gewährleistungsanspruchs führen. • Die einwandfreie Funktionsfähigkeit und elektrische Sicherheit der Elektromotorpumpen von ZENIT werden für die vom Werk gelieferte Konfi- guration gewährleistet. Jede Änderung (z.B. das Hinzufügen eines Kabelstücks am Originalkabel) kann die Leistungsmerkmale der Elektromo- torpumpe beeinträchtigen.
  • Seite 89: Elektrischer Anschluss (Standardversion)

    Handbuch für die Erstinstallation – Übersetzung der Originalanleitungen better together trafo gespeist werden. Das Kabel ist mit einem Schild mit dem Buchstaben "S" gekennzeichnet und muss an die entsprechende Klemme im Schaltschrank angesch- lossen werden. Auf Anfrage kann die Elektromotorpumpe mit einzelnen Sensoren zum Erfassen von Wasser oder Feuchtigkeit in der Ölkammer der Glei- tringdichtungen (S1), dem Motorraum (S2) und dem Klemmenkasten (S3) (Abb.
  • Seite 90: Störungen: Ursachen Und Abhilfe

    Handbuch für die Erstinstallation – Übersetzung der Originalanleitungen better together 6. STÖRUNGEN: URSACHEN UND ABHILFE Störung Mögliche Ursache Lösung Keine Stromversorgung Kontrollieren, dass an der Anlage Spannung anliegt Pumpe an das Stromnetz anschließen oder Unversehrtheit des Ka- Kabel abgeklemmt oder beschädigt bel prüfen Sicherungstyp kontrollieren und gegen andere mit geeignetem Wert Sicherungen durchgeschmolzen...
  • Seite 91: Wartung Und Kundendienst

    HINWEIS: Für die Kontrolle und den Ersatz der Bauteile sind Spezialwerkzeuge erforderlich. Zur Durchführung dieser Arbeiten ist der Händler, bei dem das Produkt gekauft wurde, oder das nächste ZENIT Vertriebsbüro zu kontaktieren. Eingriffe an Elektromotorpumpen mit Ex-Schutz dürfen nur vom qualifizierten Fachmann bei einem für Eingriffe an Produkten mit Ex-Schutz autorisierten Kundendienstzentrum (gemäß...
  • Seite 92: Regelmäßige Kontrollen

    Handbuch für die Erstinstallation – Übersetzung der Originalanleitungen better together 7.4 Regelmäßige Kontrollen Intervall Standardversionen Ex-Versionen Täglich Stromaufnahme: - Prüfen, dass die Stromaufnahme den angegebenen Nennwert nicht überschreitet; Zulässige maximale Abweichung von der Nennspannung: - Dauerbetrieb = max. ± 5% vom Nennwert - Periodischer Aussetzbetrieb = max.
  • Seite 93 7. Die Ölkammer der Gleitringdichtungen mit biologisch abbaubarem Schmieröl mit Viskositätsindex 190 füllen. Zenit empfiehlt: - CASTROL PRODUCT L 320 - TOTAL Bio Hydraulic TMP FR46 Sollte die angegebene Ölsorte nicht erhältlich sein, wenden Sie sich bitte an Zenit. Ölmenge Gehäusetyp Kammer der Gleitringdichtungen (ml) G05M...
  • Seite 94 2x 3/8” DIN 906 Achtung! Schraubensicherung vom Typ Loctite 243 verwenden Gehäusetyp (WET) Verschluss der Ölkammer M10S - M10L M12N 2x M30x30.5 (Ersatzteil ZENIT) M13N M15N 2x O-ring 18.64x3.53 M17N M21S - M21L Achtung! Die O-Ringe der Verschlüsse der Ölkammer austauschen;...
  • Seite 95 18000 M17N 38000 M21S - M10L 28400 Zenit empfiehlt: - CASTROL PRODUCT L 320 - TOTAL Bio Hydraulic TMP FR46 Sollte die angegebene Ölsorte nicht erhältlich sein, wenden Sie sich bitte an Zenit. 9. Den oberen Verschluss der Ölkammer einschrauben.
  • Seite 96 Handbuch für die Erstinstallation – Übersetzung der Originalanleitungen better together 4. Die Sechskantmutter (I) mit einem Gabelschlüssel blockieren und 5. Das Öl in einen ausreichend großen und nach Möglichkeit den inneren unteren Verschluss (II) der Ölkammer abschrauben. transparenten Behälter ablaufen lassen. HINWEIS: Die richtige Größe dieses Behälters kann man anhand der in der Ölkammer enthaltenen Ölmenge bestimmen, die in der Tabelle Achtung!
  • Seite 97: Wechsel Der Kühlflüssigkeit

    - CASTROL PRODUCT L 320 - TOTAL Bio Hydraulic TMP FR46 Sollte die angegebene Ölsorte nicht erhältlich sein, wenden Sie sich bitte an Zenit. 9. Den inneren oberen Verschluss (II) der Ölkammer einschrauben. Achtung! Schraubensicherung vom Typ Loctite 243 verwenden 7.6 Wechsel der Kühlflüssigkeit...
  • Seite 98 Handbuch für die Erstinstallation – Übersetzung der Originalanleitungen better together Zum Füllen des Kühlsystems wie folgt verfahren (Abb. 24): 1. Die Elektromotorpumpe senkrecht auf einer ebenen und stabilen Fläche aufstellen. 2. Die Elektromotorpumpe mit einer angemessen ausgelegten Kette oder Rundschlinge, die am oberen Griff angeschlagen ist, sichern, damit sie nicht umfallen kann.
  • Seite 99 Manual de primera instalación - Traducción de las instrucciones originales better together ÍNDICE 1. INFORMACIÓN GENERAL ..................................100 1.1 Identificación del fabricante ................................100 1.2 Significado de los símbolos utilizados en el manual ..........................100 1.3 Seguridad ......................................100 1.4 Formación del personal encargado de la instalación y el mantenimiento ..................100 1.5 Riesgos residuales .....................................100 1.6 Descripción del producto / Usos previstos ............................100 1.7 Cobertura de la garantía..................................101...
  • Seite 100: Información General

    1. INFORMACIÓN GENERAL 1.1 Identificación del fabricante Zenit Italia S.r.l. - via dell’Industria, 11 - 41018 S. Cesario sul Panaro (Módena) - Italia 1.2 Significado de los símbolos utilizados en el manual Peligro para la seguridad de los operadores y la protección de la electrobomba Presencia de riesgos de tipo eléctrico...
  • Seite 101: Cobertura De La Garantía

    1.7 Cobertura de la garantía Zenit se compromete a reparar o sustituir el producto cuando las averías o desperfectos se deban a defectos de diseño, manufactura o montaje y siempre que se le comuniquen a Zenit durante el periodo de garantía. La garantía no cubre las averías o desperfectos debidos a: •...
  • Seite 102: Identificación Del Modelo

    1.9 Identificación del modelo Para identificar un modelo según los accesorios disponibles y los tipos de instalación permitidos, Zenit utiliza la sigla referida a los motores con potencia P2 y los polos. En la tabla 1 figuran los motores eléctricos UNIQA que utilizan carcasas de tipo G o X.
  • Seite 103 Manual de primera instalación - Traducción de las instrucciones originales better together Tabla 2. Motores eléctricos UNIQA que utilizan carcasas de tipo M o MX Potencia P2 (kW) Polos Variante del motor Versión W=Wet; D=Dry Tipo de carcasa 4, 5.5 M08S-MX08S 1.5, 1.8...
  • Seite 104: Placa De Datos De La Electrobomba

    Año de producción Carcasa del motor tipo G o X, M o MX Versión de producto Número de serie Zenit Italia s.r.l. Tensión y corriente (conexión de triángulo) via dell’Industria, 11 I-41018 S.Cesario s.P. (MO) Tensión y corriente (conexión de estrella) zenit.com...
  • Seite 105: Etiquetas Adhesivas Aplicadas Al Producto

    Manual de primera instalación - Traducción de las instrucciones originales better together 1.12 Etiquetas adhesivas aplicadas al producto www.zenit.com Zenit Italia s.r.l. S.N. via dell’Industria, 11 I-41018 S.Cesario s.P. (MO) zenit.com Δ Δ TYPE cos φ I.CL μF VERS S.N.
  • Seite 106: Transporte Y Almacenamiento

    Compruebe visualmente que el embalaje no esté dañado. Si el producto está dañado de forma significativa, indíquelo en los documentos de transporte. Si falta algún artículo, póngase en contacto con Zenit (o su distribuidor) o con la empresa transportista. Retire el material de embalaje y deséchelo de conformidad con la normativa vigente.
  • Seite 107: Instalación

    Manual de primera instalación - Traducción de las instrucciones originales better together 3. INSTALACIÓN 3.1 Advertencias generales de seguridad • Delimite la zona de trabajo de forma adecuada y utilice siempre los equipos de protección individual. • Antes de realizar toda operación, asegúrese de que la electrobomba y el cuadro eléctrico estén aislados de la red y que no puedan ponerse bajo tensión de forma accidental.
  • Seite 108: Tipos De Instalación Permitidos

    Perforación brida de salida de aspiración Tipo Accesorio instalación Zenit DAC-V / DAC-H KBS-H Estándar Opcional * Perforación posible para accesorios que no son de Zenit. Para saber más acerca del tipo de perforación, consulte la ficha técnica del producto.
  • Seite 109: Instalación Con Dispositivo De Acoplamiento De Fondo Dac (Tipo P)

    Manual de primera instalación - Traducción de las instrucciones originales better together 3.5 Instalación con dispositivo de acoplamiento de fondo DAC (TIPO P) (Fig. 12) Este tipo de instalación (TIPO P) permite extraer la electrobomba del depósito y volver a colocarla de forma rápida, sin necesidad de hacer operaciones en el sistema.
  • Seite 110: Instalación Libre (Tipo S)

    Manual de primera instalación - Traducción de las instrucciones originales better together 3.6 Instalación libre (TIPO S) (Fig. 14) En la instalación libre (TIPO S), la electrobomba se fija a una base específica que la mantiene en posición vertical en el fondo del depósito y garantiza la altura correcta de la boca de aspiración.
  • Seite 111: Instalación Horizontal En Cámara En Seco (Tipo Z)

    15. Conecte los cables eléctricos en el cuadro eléctrico según el esquema que aparece en el apartado 4.2 «Conexión eléctrica». 3.9 Instalación no predefinida (TIPO X) La electrobomba dispone de todos los orificios necesarios para la instalación estándar con accesorios de Zenit. Para conocer con mayor detalle los orificios disponibles, consulte la ficha técnica.
  • Seite 112: Conexiones Eléctricas

    • El funcionamiento y la seguridad eléctrica de las electrobombas de Zenit están garantizados en la configuración de fábrica: toda modificación (p. ej., añadir un trozo de cable al original) puede degradar las características de la electrobomba.
  • Seite 113: Esquemas De Conexión (Versión Estándar)

    Manual de primera instalación - Traducción de las instrucciones originales better together Bajo pedido, la electrobomba se puede equipar con sondas simples para la detección de agua o humedad en el interior de la cámara de aceite de los cierres mecánicos (S1), el compartimento del motor (S2) y el compartimento de la placa de bornes (S3) (Fig.
  • Seite 114: Guía De Solución De Problemas

    Manual de primera instalación - Traducción de las instrucciones originales better together 6. GUÍA DE SOLUCIÓN DE PROBLEMAS Problema Causa posible Solución Ausencia de alimentación Compruebe que haya tensión en la instalación. Conecte la bomba a la red eléctrica o compruebe que el cable esté en Cable desconectado o dañado buen estado.
  • Seite 115: Mantenimiento Y Asistencia

    NOTA: Para realizar el control y la sustitución de los componentes, se requieren herramientas específicas. Si necesita efectuar estas operaciones, póngase en contacto con el vendedor del producto o con la oficina de ventas de ZENIT de su zona. Las operaciones en las electrobombas en versión -Ex solo pueden ser realizadas por personal técnico cualificado en un centro de asistencia certificado -Ex (de conformidad con las normas internacionales y/o del país de uso) o bien por los centros de...
  • Seite 116: Controles Periódicos

    Manual de primera instalación - Traducción de las instrucciones originales better together 7.4 Controles periódicos Intervalo Versiones STD Versiones -Ex Diario Absorción: - compruebe que la corriente absorbida respete el valor nominal. Variación de tensión máxima permitida: - funcionamiento continuo = máx. ±5 % del valor nominal - funcionamiento intermitente periódico = máx.
  • Seite 117 índice de viscosidad de 190. Zenit recomienda: - CASTROL PRODUCT L 320 - TOTAL Bio Hydraulic TMP FR46 Si no encuentra el tipo de aceite indicado, póngase en contacto con Zenit. Cantidad de aceite Tipo de carcasa de la cámara de cierres mecánicos (ml)
  • Seite 118 2x 3/8” DIN 906 ¡Atención! Use fijador de roscas tipo Loctite 243. Tipo de carcasa (WET) Tapón de la cámara de aceite M10S - M10L M12N 2x M30x30.5 (recambio ZENIT) M13N M15N 2x O-ring 18.64x3.53 M17N M21S - M21L ¡Atención! Sustituya las juntas tóricas de los tapones de la cámara de aceite...
  • Seite 119 - TOTAL Bio Hydraulic TMP FR46 Si no encuentra el tipo de aceite indicado, póngase en contacto con Zenit. 9. Enrosque el tapón superior de la cámara de aceite. Tipo de carcasa M10S - M10L - M12N - M13N - M15N - M17N - M21S - M21L Versión DRY...
  • Seite 120 Manual de primera instalación - Traducción de las instrucciones originales better together 4. Sujete la tuerca hexagonal (I) con una llave de boca fija y 5. Descargue el aceite en un recipiente de tamaño adecuado y, si desenrosque el tapón interno inferior (II) de la cámara de aceite. es posible, transparente.
  • Seite 121: Cambio Del Líquido Refrigerante

    - CASTROL PRODUCT L 320 - TOTAL Bio Hydraulic TMP FR46 Si no encuentra el tipo de aceite indicado, póngase en contacto con Zenit. 9. Enrosque el tapón interno superior (II) de la cámara de aceite. ¡Atención! Use fijador de roscas tipo Loctite 243.
  • Seite 122 Manual de primera instalación - Traducción de las instrucciones originales better together Para llenar el sistema de refrigeración, siga este procedimiento (Fig. 24): 1. Coloque la electrobomba en vertical sobre una superficie uniforme y estable. 2. Fije la electrobomba con una cadena o un cable de tamaño adecuado, enganchado al puño superior para evitar caídas accidentales. 3.
  • Seite 123 Руководство по подготовке к установке – Перевод оригинальных инструкций better together СОДЕРЖАНИЕ 1. ОБЩИЕ СВЕДЕНИЯ ...................................124 1.1 Идентификация производителя ..............................124 1.2 Значение символов, используемых в этом руководстве ....................... 124 1.3 Техника безопасности ..................................124 1.4 Подготовка монтажников и обслуживающих специалистов......................124 1.5 Остаточный...
  • Seite 124: Общие Сведения

    работе и отменить действие гарантии. 1. ОБЩИЕ СВЕДЕНИЯ 1.1 Идентификация производителя ZENIT Italia s.r.l. - via dell’Industria, 11 - 41018 S.Cesario sul Panaro (Modena) - Italia 1.2 Значение символов, используемых в этом руководстве Опасность для здоровья работников и сохранности электронасоса...
  • Seite 125: Гарантийные Условия

    установка. 1.7 Гарантийные условия Компания Zenit обязуется отремонтировать или заменить изделие, неисправность которого вызвана дефектами проектирования, обработки или сборки, если о таких дефектах будет сообщено компании Zenit в течение гарантийного срока. Гарантия не распространяется на неисправности, вызванные: • обычным износом;...
  • Seite 126: Определение Модели

    1.9 Определение модели Для определения комплектации и разрешенных видов установки той или иной модели компания Zenit использует коды, в которых указываются двигатели с мощностью Р2 и количество полюсов. В Таблице 1 приводятся электродвигатели UNIQA, использующие корпуса типа G или Х;...
  • Seite 127 Руководство по подготовке к установке – Перевод оригинальных инструкций better together Таблица 2 - Электродвигатели UNIQA, использующие корпуса типа M или МХ Мощность Р2 (кВт) Полюсы Вариант двигателя Версия W=Wet; D= Dry Тип корпуса 4, 5.5 M08S-MX08S 1.5, 1.8 5.5, 7.5 7.5, 9, 11...
  • Seite 128: Паспортная Табличка Электронасоса

    1.10 Паспортная табличка электронасоса Тип изделия Год выпуска Корпус двигателя типа G или Х, M или MX Исполнение изделия Заводской номер Zenit Italia s.r.l. Напряжение и ток (подключение треугольником) via dell’Industria, 11 I-41018 S.Cesario s.P. (MO) Напряжение и ток (подключение звездой) zenit.com Частота...
  • Seite 129: Самоклеящиеся Этикетки, Приклеенные К Изделию

    Руководство по подготовке к установке – Перевод оригинальных инструкций better together 1.12 Самоклеящиеся этикетки, приклеенные к изделию www.zenit.com Zenit Italia s.r.l. S.N. via dell’Industria, 11 I-41018 S.Cesario s.P. (MO) zenit.com Δ Δ TYPE cos φ I.CL μF VERS S.N. Ø...
  • Seite 130: Перевозка И Хранение

    Осмотрите упаковку и убедитесь, что она не повреждена. Зафиксируйте в транспортных документах возможные заметные повреждения изделия. При обнаружении недостачи обратитесь в компанию Zenit (или к ее дистрибьютору) или к экспедитору. Удалите упаковочные материалы и утилизируйте их в соответствии с действующими правилами.
  • Seite 131: Установка

    Руководство по подготовке к установке – Перевод оригинальных инструкций better together 3. УСТАНОВКА 3.1 Общие предупреждения по безопасности • Обозначьте должным образом рабочую зону и наденьте средства индивидуальной защиты. • Перед выполнением каких бы то ни было действий убедитесь, что электронасос и электрический щит отключены от сети и на них не может...
  • Seite 132: Допустимые Типы Установки

    11 B 11 C 3.4 Допустимые типы установки Сверление напорного Сверление фланца всасывающего фланца Тип Аксессуар установки Zenit DAC-V / DAC-H KBS-H Стандартно * Возможное сверление для аксессуаров не производства Zenit. Тип сверления см. в технических характеристиках изделия. По заказу...
  • Seite 133: Установка С Донным Соединительным Устройством Dac (Типа "Р")

    Руководство по подготовке к установке – Перевод оригинальных инструкций better together 3.5 Установка с донным соединительным устройством DAC (ТИПА "Р") (рис. 12) Этот тип установки (ТИПА “Р”) позволяет быстро извлечь электронасос из резервуара и снова установить его на место без выполнения...
  • Seite 134: Нестационарная Установка (Типа "S")

    Руководство по подготовке к установке – Перевод оригинальных инструкций better together 3.6 Нестационарная установка (ТИПА "S") (рис. 14) В нестационарной установке (ТИПА "S") электронасос устанавливается на специальную подставку, держащую его в вертикальном положении на дне резервуара и обеспечивающую нужную высоту всасывающей горловины. 14 A 14 B 3.6.1 Процедура...
  • Seite 135: Горизонтальная Установка В Сухой Камере (Типа "Z")

    15. Подключите электрические провода к щиту управления в соответствии со схемой, указанной в пункте 4.2 "Электрическое подключение". 3.9 Непредопределенная установка (ТИПА "Х) Электронасос подготовлен для сверления всех отверстий, необходимых для выполнения стандартной установки с использованием аксессуаров Zenit. Детальную информацию о возможности сверления см. в технических характеристиках. Фланец Фланец...
  • Seite 136: Электрическое Подключение

    Закрепите электрические провода так, чтобы они были защищены от случайного скручивания, разрыва и/или раздавливания. • В случае повреждения электрического провода не заменяйте его, а обратитесь в компанию Zenit или в уполномоченный сервисный центр. • Не недооценивайте проблемы, связанные с падением напряжения.
  • Seite 137: Электрическое Подключение (Стандартное Исполнение)

    Руководство по подготовке к установке – Перевод оригинальных инструкций better together Провод обозначен биркой с буквой “S”, и он должен подключаться к соответствующей клемме электрического щита управления. По заказу электронасос может оборудоваться отдельными датчиками для обнаружения наличия воды в масляной камере сальников...
  • Seite 138: Поиск И Устранение Неисправностей

    Руководство по подготовке к установке – Перевод оригинальных инструкций better together 6. ПОИСК И УСТРАНЕНИЕ НЕИСПРАВНОСТЕЙ Неисправность Возможная причина Решение Отсутствует питание Проверьте наличие напряжения в системе Отключен или поврежден кабель Подключите насос к сети или же проверьте сохранность кабеля Проверьте...
  • Seite 139: Обслуживание И Техпомощь

    7. ОБСЛУЖИВАНИЕ И ТЕХПОМОЩЬ 7.1 Вступление Погружные электронасосы Zenit UNIQA подвергаются тщательному конечному контролю перед их выпуском на рынок. Надежность изделия основана на применении высококачественных компонентов, но она зависит также и от периодического контроля, который должен проводить пользователь.
  • Seite 140: Периодическая Проверка

    Руководство по подготовке к установке – Перевод оригинальных инструкций better together 7.4 Периодическая проверка Периодичность Версии STD Версии -EX Ежедневно Потребление: - Убедитесь, что потребляемый ток находится в пределах номинальных значений Максимально допустимое изменение напряжения: - Непрерывная работа = макс. ± 5% номинального значения - Периодическая...
  • Seite 141 сервисном центре. 6. Положите насос горизонтально на верстак 7. Заполните камеру сальников биоразлагающимся маслом с индексом вязкости 190. Компания Zenit рекомендует: - CASTROL PRODUCT L 320 - TOTAL Bio Hydraulic TMP FR46 В случае невозможности приобретения указанного масла, обратитесь в...
  • Seite 142 2x 3/8” DIN 906 внимание! Используйте клей типа Loctite 243. Тип корпуса (WET) Пробку камеры с маслом M10S - M10L M12N 2x M30x30.5 (запасной ZENIT) M13N M15N 2x O-ring 18.64x3.53 M17N M21S - M21L внимание! Замените уплотнительные кольца на пробках камеры...
  • Seite 143 - TOTAL Bio Hydraulic TMP FR46 В случае невозможности приобретения указанного масла, обратитесь в компанию Zenit. 9. Завинтите верхнюю пробку камеры с маслом. Тип корпуса M10S - M10L - M12N - M13N - M15N - M17N - M21S - M21L Версия...
  • Seite 144 Руководство по подготовке к установке – Перевод оригинальных инструкций better together 4. Удерживая шестигранную гайку (I) гаечным ключом, 5. Слейте масло в емкость соответствующего объема, отвинтите внутреннюю нижнюю пробку (II) камеры с маслом. желательно прозрачную. ПРИМЕЧАНИЕ: чтобы проверить, достаточен ли объем...
  • Seite 145: Замена Охлаждающей Жидкости

    Компания Zenit рекомендует: - CASTROL PRODUCT L 320 - TOTAL Bio Hydraulic TMP FR46 В случае невозможности приобретения указанного масла, обратитесь в компанию Zenit. 9. Завинтите внутреннюю верхнюю пробку (II) камеры с маслом. внимание! Используйте клей типа Loctite 243. 7.6 Замена охлаждающей жидкости...
  • Seite 146 Руководство по подготовке к установке – Перевод оригинальных инструкций better together Для заполнения системы охлаждения выполните следующие операции (рис. 24): 1. Установите электронасос вертикально на ровную и прочную поверхность; 2. Зацепите цепь или трос подходящих размеров за верхнюю ручку во избежание неожиданного падения; 3.
  • Seite 147: Collegamento Elettrico

    better together COLLEGAMENTO ELETTRICO ELEKTRISCHE ANSCHLÜSSE ELECTRICAL CONNECTIONS CONEXIONES ELÉCTRICAS BRANCHEMENTS ÉLECTRIQUES СХЕМЫ ЭЛЕКТРИЧЕСКИХ СОЕДИНЕНИЙ Cavo STANDARD Kabel STANDARD STANDARD cable Cable ESTÁNDAR Câble STANDARD СТАНДАРТНЫЙ провод DOL / SOFT START / VFD Y / D TP TP V1 W1 U2 V2 W2 TP TP TP TP V1 W1 U2 V2 W2...
  • Seite 148 En caso de disconformidades en el color de los con- ductores, póngase en contacto con el distribuidor donde compró 2 CAVI IN PARALLELO el producto o con la oficina de ventas de ZENIT de su zona. 2 POWER CABLES // 2 CÂBLES ÉLECTRIQUES // внимание!
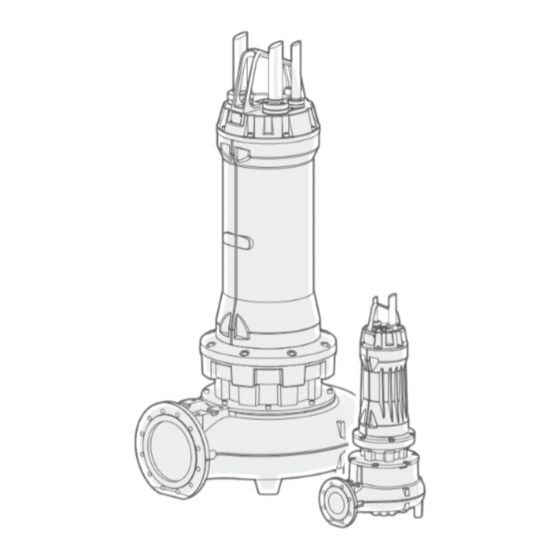
  • Seite 149: Componenti Principali

    better together COMPONENTI PRINCIPALI WICHTIGSTE BAUTEILE MAIN COMPONENTS COMPONENTES PRINCIPALES COMPOSANTS PRINCIPAUX ОСНОВНЫЕ КОМПОНЕНТЫ...
  • Seite 150 better together Modelli senza camicia di raffreddamento Modelli con camicia di raffreddamento Models without cooling jacket Models with cooling jacket Modèles sans chemise de refroidissement Modèles avec chemise de refroidissement Modelle ohne Kühlmantel Modelle mit Kühlmantel Modelos sin camisa de refrigeración Modelos con camisa de refrigeración Модели...
  • Seite 151 better together Descrizione Materiale 15 Cuscinetto inferiore Acciaio Maniglia Acciaio 16 Tenuta meccanica Gomma/metallo/SiC 17 Tappo olio Cavo Gomma/Rame Acciaio Pressacavo Ghisa/Acciaio 18 Supporto intermedio Ghisa Tappo 1/8” NPT Acciaio 19 Piatto pompa Ghisa Connessione di terra Acciaio 20 Boccola Bronzo Coperchio motore Ghisa...
  • Seite 152 better together Beschreibung Werkstoff 15 Unteres Lager Stahl Griff Stahl 16 Gleitringdichtung Gummi/Metall/Siliciumcarbid 17 Ölstopfen Kabel Gummi/Kupfer Stahl 18 Zwischenhalterung Kabeldurchführung Gusseisen/Stahl Gusseisen Verschluss 1/8” NPT Stahl 19 Pumpenplatte Gusseisen Erdungsanschluss Stahl 20 Buchse Bronze Motordeckel Gusseisen 21 Pumpengehäuse Gusseisen Sensor Stahl 22 Laufrad...
  • Seite 153: Appendice 1: Installazione Con Dispositivo Di Accoppiamento Da Fondo Dac

    better together APPENDICE 1: Installazione con dispositivo di accoppiamento da fondo DAC APPENDIX 1: Installation with DAC coupling device ANNEXE 1: Installation avec dispositif d’accouplement au fond (DAC) ANHANG 1: Installation mit bodenbefestigtem Kupplungsfuß DAC APÉNDICE 1: Instalación con dispositivo de acoplamiento de fondo DAC ПРИЛОЖЕНИЕ...
  • Seite 154: Appendice 2: Installazione Mobile

    better together APPENDICE 2: Installazione mobile APPENDIX 2: Mobile installation ANNEXE 2: Installation mobile ANHANG 2: Mobile Installation APÉNDICE 2: Instalación móvil ПРИЛОЖЕНИЕ 2: Нестационарная установка...
  • Seite 155: Appendice 3: Installazione Verticale In Camera A Secco

    better together APPENDICE 3: Installazione verticale in camera a secco APPENDIX 3: Vertical installation in dry chamber ANNEXE 3 : Installation verticale en fosses sèches ANHANG 3: Vertikale Installation im Trockenschacht APÉNDICE 3: Instalación vertical en cámara en seco ПРИЛОЖЕНИЕ 3: Вертикальная установка в сухой камере...
  • Seite 156: Appendice 4: Installazione Orizzontale In Camera A Secco Appendice 4: Installazione Orizzontale In Camera A Secco

    better together APPENDICE 4: Installazione orizzontale in camera a secco APPENDICE 4: Horizontal installation in dry chamber ANNEXE 4 : Installation horizontale en fosses sèches ANHANG 4: Horizontale Installation im Trockenschacht APÉNDICE 4: Instalación horizontal en cámara en seco ПРИЛОЖЕНИЕ 4: Горизонтальная установка в сухой камере...
  • Seite 157 better together...
  • Seite 158 better together...
  • Seite 160 27270100901800200 zenit.com Rev. 8 - 06/12/19 better together...

Inhaltsverzeichnis