Herunterladen Inhalt Inhalt Diese Seite drucken
Inhaltsverzeichnis

Werbung

Verfügbare Sprachen

Verfügbare Sprachen

H0
H0e
TT
10812
10830
10832
Handbuch
Manual
Manuel
Manuale
www.roco.cc

Werbung

Inhaltsverzeichnis
loading

Inhaltszusammenfassung für roco multiMAUS PRO

  • Seite 1 10812 10830 10832 Handbuch Manual Manuel Manuale www.roco.cc...
  • Seite 2: Auspacken - Anschließen - Losfahren

    Auspacken – Anschließen – Losfahren | Getting started ~ 230 V Transformator/ Schaltnetzteil Transformer/ Switching power supply AAA (Micro) 2. Sprache Language 4. Text...
  • Seite 3 Auspacken – Anschließen – Losfahren | Getting started 1. > 3 Sekunden | > 3 seconds LED-Lauflicht LED lights in sequence Fahren | Driving Lokauswahl Nothalt Licht Loco selection Emerg. Stop Light Funktionen | Functions F1 – F10 F11 – F20 Weichen | Turnouts zurück back...
  • Seite 4: Inhaltsverzeichnis

    Inhaltsverzeichnis Auspacken – Anschließen – Losfahren Alles in einer Hand – Die Modellbahn-Zentrale der Zukunft multiMAUS und multiZENTRALE im Überblick Teil 1 Grundlagen – Lernen Sie die multiMAUS und multiZENTRALE kennen ▪ 1.1 Anschluss von multiMAUS und multiZENTRALE 1.2 multiZENTRALE : Wichtige Kontrollleuchten 1.3 multiMAUS : Das Display...
  • Seite 5 Inhaltsverzeichnis 3.2 Das Menü „PROGRAMMIEREN“ 3.3 Das Menü „EINSTELLUNGEN“ 3.4 Das Menü „FAHRWEGE“ Teil 4 Die multiZENTRALE ▪ 4.1 Stromversorgung 4.2 Anschlüsse 4.3 Haupt- und Programmiergleis 4.4 Zurücksetzen der multiZENTRALE 4.5 Update von multiZENTRALE und multiMAUS Teil 5 Anhang – Wissenswertes rund um multiMAUS , multiZENTRALE und das Thema Digital ▪...
  • Seite 6: Alles In Einer Hand - Die Modellbahn-Zentrale Der Zukunft

    ▪ Rastung der 0-Stellung des Drehreglers ▪ Kompatibilität zu anderen DCC /NMRA-kompatiblen Steuerungen ▪ das ROCO Digital-System ist ausbaubar auf bis zu 31 Eingabe-Geräte wie weitere Lokmäuse /multiMÄUSE oder multiMÄUSE , RouteControl usw. ▪ Zukunftssicher durch Updatemöglichkeiten über USB und RS485-Anschlüsse ▪...
  • Seite 7: Anschluss Von Multimaus

    Artikel: einen Transformator oder Schaltnetzteil (z. B. ROC0 10725, 10850, Fleischmann 681301, s. auch S. 38), ▪ einen Gleisanschluss ohne Kondensator (z. B. geoLINE 61190, ROCO LINE 42517, Fleischmann 9400, ▪ 22217 (N), 6430 (H0)). Die Fig. 2 auf Seite 89 zeigt den grundsätzlichen Anschluss der einzelnen Geräte.
  • Seite 8: Multizentrale Pro : Wichtige Kontrollleuchten

    Ihre neue multiZENTRALE ist mit LED-Kontrollleuchten ausgestattet, die Ihnen auf einen Blick eine Übersicht über die wichtigsten Funktionen Ihres ROCO-Digitalsystems gestatten. Die Zentrale sollte daher auch so platziert sein, dass Sie die LEDs gut erkennen können. Grün: Leuchtet die grüne LED (ganz links), besteht Funkkontakt zur...
  • Seite 9: Die Tasten

    Ein komplett angezeigtes Funksymbol im Display zeigt eine optimale Verbindung an. Je schlechter die Verbindung wird, desto weniger der drei Balken sind sichtbar. Bei sehr schlechter Funkverbindung ist nur noch das Antennensymbol zu sehen. Es kann durchaus sein, dass Funktionen nicht mehr sicher ausgeführt werden. Besteht überhaupt keine Funkverbindung mehr zwischen multiZENTRALE und multiMAUS , blinkt das...
  • Seite 10 Tasten und Bezeichnung Funktion im Fahrbetrieb: Nothalt auf der gesamten Anlage ▪ Stop im Menübetrieb: Rückkehr aus der jeweiligen Menüebene ▪ in Kombination mit im Fahrbetrieb: selektiver Nothalt der ausgewählten, im Display angezeigten Lok ▪ Shift im Menü „FAHRWEGE“ – „BEARBEITEN“: löschen einer Weiche ▪...
  • Seite 11: Start

    ▪ Trotz ihrer vielen Möglichkeiten ist die multiMAUS leicht und intuitiv bedienbar. Ein Konzept, das von ROCO schon mit den Lokmäusen der ersten und zweiten Generation erfolgreich eingeführt und mit der multiMAUS fortgesetzt wurde. Im Folgenden zeigen wir Ihnen an Hand praktischer Beispiele die Bedienung der multiMAUS .
  • Seite 12: Neueintragung Einer Lok

    Aufrufen von anderen, bereits in die Bibliothek aufgenommenen Loks („Blättern“) Die Sortierung der Loks in der Bibliothek erfolgt in der Reihenfolge der Eingabe. Sie können diese Reihenfolge selbstverständlich ändern: Lok auswählen oder Diese Tastenkombinationen (gleichzeitig drücken) verschieben die Lok in der Bibliothek nach oben oder unten. Sie können die neu geordnete Bibliothek mit den „Pfeiltasten“...
  • Seite 13 Display Eingabe Bemerkung Bestätigen Sie mit „OK“ Danach wechselt die multiMAUS auf die Lok adresse. Angezeigt wird ein „Vorschlags- wert“, hier „3“. oder Verändern Sie den „Vorschlagswert“ ent- weder mit Hilfe der „Shift“-Taste und einer „Pfeiltaste“ oder über eine direkte Eingabe der Nummer über die „Funktionstasten“.
  • Seite 14: Der Lokadress-Modus

    2.2.3 Der Lokadress-Modus Die multiMAUS bietet Ihnen auch die Möglichkeit, Ihre Loks einfach nur über die Decoder-Adresse zu steuern. Das Display zeigt Ihnen dabei die Lokadresse mit voran gestelltem „L“ – hier die Lokadresse 36, das Loksymbol sowie die aus- gewählten Funktionen.
  • Seite 15: Die Nothalt-Funktionen

    Welche Funktionen für Ihre Lok verfügbar sind, entnehmen Sie bitte deren Betriebsanleitung. Das Loklicht schalten Sie mit der „Licht / OK“-Taste ein- oder aus. Zur Bestätigung für eingeschaltetes Loklicht ▪ leuchtet der Stern „ “ rechts unten im Display. 2.4 Die Nothalt-Funktionen Wenn es mal brenzlig wird: Mit der „STOP“-Taste können Sie jederzeit und sofort größeres Unheil verhindern.
  • Seite 16: Selektiver Nothalt

    Durch Drehen des Fahrreglers wird der Lokhalt aufgelöst, die Lok fährt wieder. 2.5 Doppeltraktion Wie beim Vorbild ist auch mit dem neuen ROCO-Digitalsystem die Doppeltraktion, d. h. die Steuerung zweier Lokomotiven vor einem Zug, möglich. Dabei werden zwei Loks gekuppelt und können von einer der beiden Lok-Adressen zugleich gesteuert werden.
  • Seite 17: Tipps Für Doppeltraktionen

    Eingabe Display Bemerkung Im Display erscheint „GLEICHE RICHTUNG“. Hier stellen Sie die Fahrtrichtung der zweiten Lok im Ver- hältnis zur ersten Lok ein. Dabei ist nicht die zuletzt gewählte Fahrtrichtung der Loks ausschlaggebend, sondern wie sie mit ihren Führerständen zueinander stehen.
  • Seite 18: Weichensteuerung

    2.6 Weichensteuerung Mit der multiMAUS können Sie bis zu 2.048 digitale Weichenantriebe mit echten Weichenadressen steuern, ohne dazu eine Lokadresse (wie z. B. bei der Lokmaus 2 /R3) verbrauchen zu müssen. Dazu können Sie jeder- zeit während des Fahrbetriebes durch Drücken der „Lok /Weichentaste“ in den Weichen-Modus und zurück wechseln.
  • Seite 19: Drei Nützliche Hilfsmittel Der Multimaus

    Beispiel: Sie wollen eine Lok (momentane Fahrtrichtung links) über den Abzweig der Weiche Nr. 24 fahren. Eingabe Display Bemerkung Nach Betätigung der „Lok /Weichentaste“ wechselt die multiMAUS aus dem Fahrbetrieb (Bibliotheks- oder Lokadress-Modus) in den Weichen-Modus. Es erscheint immer die zuletzt aufgerufene Weiche, hier die Weiche „6“, Stellung „Gerade“.
  • Seite 20: Fahrwege

    2.7 Fahrwege Die multiMAUS bietet nicht nur die Möglichkeit, einzelne Weichen zu schalten, sondern mehrere Weichen zu einem Fahrweg zusammen zu legen und durch einen einzigen Tastendruck gemeinsam zu schalten. Als Fahrweg bezeichnet man dabei die Strecke, die ein Zug über mehrere Weichen zurücklegt. Auf diese Weise kann beispielsweise ein Güterzug von einem Anschlussgleis ohne Unterbrechung über mehrere durch einen einzigen Befehl geschaltete Weichen auf die Hauptstrecke fahren.
  • Seite 21: Aktivieren Und Deaktivieren Von Fahrwegen

    Eingabe Display Bemerkung Geben Sie die Nummer der ersten Weiche des Fahrweges ein hier als Beispiel die Wei- che Nr. 5, die auf Abzweig gestellt wird. Nachdem Sie die „5“ eingegeben haben, blinkt die „5“ so lange, bis Sie im nächsten Schritt der Fahrweg festgelegt haben.
  • Seite 22: Schnellprogrammierung Von Loks Und Decodern

    Wird die Programmierung auf dem normalen Fahrgleis durchgeführt und befindet sich mehr als eine Digital- Lokomotive auf dem Gleis (oder auch andere Weichendecoder als die ROCO-Artikel 42624 und 10775), werden mit einem Programmierbefehl die Einstellungen aller Decoder im System verändert. So könnten Sie z. B. aus Versehen alle Decoder auf die gleiche Lokadresse programmieren.
  • Seite 23: Kurzschluss Und Überlastung

    Kapitel „Tipps, Hinweise und Kurzhilfe“ im fünften Teil weiterhelfen. 2.9 Kurzschluss und Überlastung Tritt an der Anlage ein Kurzschluss oder eine Überlastung auf, so zeigt das ROCO-Digitalsystem dies zweifach an. Im Display der multiMAUS blinken zwei Symbole: einen Blitz und das STOP-Zeichen. An der multiZENTRALE blinkt die rote LED.
  • Seite 24: Die Menü-Funktionen Der Multimaus

    Teil 3 Die Menüs ▪ Die Menü-Funktionen der multiMAUS Die multiMAUS verfügt über vier Haupt-Menüs, mit denen Sie sowohl umfangreich programmieren, als auch die Grundeinstellungen der multiMAUS verändern können. Diese Menüebene erreichen Sie durch zwei Tasten- kombinationen: ca. 5 Sekunden Drücken nur der „MENU“-Taste (Dauer ist einstellbar im Menü „EINSTELLUNGEN“), praktisch ▪...
  • Seite 25 Zum Verlassen der Menü-Ebene haben Sie zwei Möglichkeiten: Drücken der „STOP“-Taste. Dies ist eventuell mehrmals notwendig, je nachdem, in welchem Unter-Menü Sie ▪ sich befinden. Jeder Druck auf „STOP“ bringt Sie eine Ebene weiter zurück. Drücken der „MENU“-Taste (mit oder ohne „Shift“-Taste“) bringt Sie aus allen Ebenen sofort in den Lok- oder ▪...
  • Seite 26: Programmieren

    CV-AENDERN Menü 1: Menü 2: PROGRAMMIEREN BEARBEITEN LANGE ADRESSE RICHTUNG VERTAUSCHEN 28 FAHRSTUFEN LOESCHEN ANALOG FAHREN NMRA-BIDI GESCHWINDIGKEITS- TABELLE SUCHEN LANGE ADRESSE CVBIT-AENDERN SENDEN PROG-MODUS NICHT LESEN BITWEISE EMPFANGEN LESE-MODUS BYTEWEISE BIT UND BYTEWEISE ADRESSE BIBLIOTHEK...
  • Seite 27: Einstellungen

    HELLIGKEIT KONTRAST DISPLAY Menü 3: Menü 4: LICHTZEIT EINSTELLUNGEN FAHRWEGE SPRACHE MENU-TASTENZEIT BEDIENUNG BEARBEITEN MOMENTFUNKTIONEN KINDERSICHERUNG NICHTS SYSTEMEINSTELLUNGEN ZURUECKSETZEN LOESCHEN LOK-BIBLIOTHEK FAHRWEGE DOPPELTRAKTIONEN STOPTASTE EINZELWEICHEN ALLES FUNKUNTERBRECHUNG FAHRWEGE STOPMODUS KALIBRIEREN VERZOEGERUNG SOFTWARE MAC-ADDR X-BUS ZENTRALE STROM-ZENTRALE ANMELDEN FUNKMODUL PANID BATTERIESPANNUNG KANAL-ANZAHL RSSI AUSSCHALTZEIT...
  • Seite 28: Das „Lok"-Menü

    Das „LOK“-Menü Im „Lok“-Menü werden alle Daten verwaltet, die für die Lok-Bibliothek und die Identifizierung einer Lok erforderlich sind. Auch können Sie hier die multiMAUS grundsätzlich auf Bibliotheks- oder Adress-Bedienung einstellen. „NEU“ In diesem Menüpunkt können Sie eine neue Lok in die Bibliothek aufnehmen. Der Ablauf ist ausführlich ab Seite 12 beschrieben und dargestellt.
  • Seite 29 „SUCHEN“ Dies könnte zu einer wichtigen Funktion Ihrer multiMAUS werden. Mit diesem Menüpunkt können Sie eine Lokadresse der jeweiligen Lok in der Bibliothek zuordnen. Geben Sie einfach eine Lokadresse über die „Funktionstasten“ ein und die multiMAUS sucht Ihnen die dazu gehörende Lok aus der Bibliothek heraus.
  • Seite 30: Das Menü „Programmieren

    Erläuterungen zum Thema � Bits und Bytes im „Glossar“ im fünften Teil des Handbuches. Von ROCO bereits in Lokomotiven eingebaute Decoder werden üblicherweise mit praxisgerechten Einstellungen ausgeliefert. Daher prüfen Sie vor jeder Programmierung, ob diese tatsächlich notwendig ist. Beachten Sie dazu die Anleitung Ihres Decoders bzw.
  • Seite 31 Programmierverfahren überhaupt unterstützt. Über die Funktionsweise und Einstellmöglichkeiten der CV29 informiert Sie die dem Decoder beiliegende Anleitung. Zur leichteren Programmierung hat ROCO die einzelnen Einstellmöglichkeiten direkt mit den dazu gehörenden Bezeichnungen versehen. Das erste Bild des Displays zeigt „C 29“ und geht dann sofort auf die erste Einstellmöglichkeit „RICHTUNG ▪...
  • Seite 32 „LESE-MODUS“ Die Auslesefähigkeit der multiMAUS können Sie über dieses Menü einstellen. Ausgelesen werden die Daten dann über „CV AENDERN“, „CV29“ und „CVBIT“. Wählen Sie den jeweiligen Unterpunkt über die „Pfeiltasten“ aus und bestätigen Sie eine Eingabe mit der „Licht /OK“-Taste. Werkseinstellung: „BIT UND BYTEWEISE“...
  • Seite 33: Das Menü „Einstellungen

    Über das Untermenü „SPRACHE“ kann eine andere Landessprache aufgerufen werden. Wählen Sie über die „Pfeiltasten“ Ihre Sprachversion aus. Sollte Ihre Landessprache nicht dabei sein, schauen Sie auf der ROCO-Homepage www.roco.cc nach einer Updatemöglichkeit. Bestätigen Sie mit der „Licht /OK“-Taste. Sie kommen auf die Ausgangsebene „SPRACHE“ zurück.
  • Seite 34 kurz, wird die gewünschte Funktion ganz normal eingeschaltet. Den gewünschten Zustand „EIN“ oder „AUS“ wählen Sie über die „Pfeiltasten“ aus. Werkseinstellung: AUS Bestätigen Sie mit der „Licht /OK“-Taste. Sie kommen auf die Ausgangsebene „MOMENT- ▪ FUNKTIONEN“ zurück. 3.2.4 Die multiMAUS verfügt über eine mehrstufig einstellbare „KINDERSICHERUNG“, die Sie nach Aufrufen des Menüpunktes über die „Pfeiltasten“...
  • Seite 35: "Funkunterbrechung": Wenn Sich Die Multimaus Multizentrale

    „STOPMODUS“ Im Falle eines Falles wird durch einen Druck auf die „STOP“-Taste während des Fahrbetriebes ein sofortiger Nothalt ausgelöst. Im Menüpunkt „STOPMODUS“ legen Sie fest, wie sich dieser Nothalt auswirken soll. 3.4.1 „STOPTASTE“: Hier stellen Sie ein, ob bei Betätigung der Stop-Taste die gesamte Anlage von der Span- nungsversorgung getrennt wird („SPANNUNG AUS“), oder ob lediglich die Lokomotiven sofort ange- halten werden („NOTSTOP“).
  • Seite 36 „FUNK“ 3.6.1 „ANMELDEN“ Normalerweise müssen Sie Ihre multiMAUS nur einmal bei Ihrer multiZENTRALE anmelden. Möchten Sie Ihre multiMAUS z. B. mal mit zu einer anderen Anlage mitnehmen, die ebenfalls über eine multiZENTRALE verfügt, müssen Sie Ihre Maus dort anmelden. Dies machen Sie über diesen Unterpunkt.
  • Seite 37: Das Menü „Fahrwege

    Das Menü „FAHRWEGE“ Im Menü „FAHRWEGE“ verwaltet die multiMAUS alle Daten, die für die Fahrwege-Bibliothek und die Schaltung der entsprechenden Weichen erforderlich sind. „NEU“ In diesem Menüpunkt können Sie einen neuen Fahrweg in die Bibliothek aufnehmen. Der Ablauf ist ausführlich im zweiten Teil, Kapitel 2.7 ab Seite 20 beschrieben und dargestellt.
  • Seite 38: Stromversorgung

    RocoNet-Adressen im System zu ermöglichen. Wenn die drei Anschlüsse nicht ausreichen, können Sie über den Datenbus-Verteiler 10758 weitere Geräte anschließen. Die Buchse „Feedback BUS“ ist für Rückmelder wie z. B. ROCO Art. Nr. 10787 gedacht. Über die vom Rückmel- ▪...
  • Seite 39: Zurücksetzen Der Multizentrale

    Schließen Sie dazu die multiZENTRALE an den USB-Ausgang (USB 1.1) eines PC (ab Windows 98 SP 2) an. Das auf der ROCO-Internetseite zur Verfügung stehende Updateprogramm laden Sie herunter und starten es. Ein Benutzer- Menü leitet Sie durch den Vorgang.
  • Seite 40: Teil 5 ▪ Anhang

    Auch Lokomotiven anderer Hersteller können mit ROCO Lokdecodern ausgerüstet werden. Sind sie mit einer Digi- talschnittstelle ausgerüstet, dann ist die Umrüstung genau so einfach wie bei einer ROCO-Lok. Möchten Sie den lastgeregelten Lokdecoder 10745 einbauen, dann muss die Lokomotive über einen Gleichstrommotor verfügen oder...
  • Seite 41: Anschluss Mehrerer Steuergeräte

    Mäusen angezeigt. 5.4 Kombination von digitalen und nicht digitalen Anlagenteilen Alle ROCO Digital-Lokomotiven fahren ohne Probleme sowohl auf einer digitalen als auch auf einer „normalen“ Gleichstromanlage. Der Lokdecoder erkennt automatisch, auf welchem System er sich befindet. Deshalb ist es leicht möglich, auf einer Anlage beide Systeme zu nutzen, damit z.
  • Seite 42: Der Booster 10765

    Überlastung durch zu viele Verbraucher (Lokomotiven, beleuchtete Wagen, usw.) vor. Feststellen können Sie dies an der blinkenden roten LED an der multiZENTRALE Der Booster stellt in Verbindung mit einem weiteren Trafo (z. B. ROCO 10718, 10725 oder 10850) weitere Energie zur Verfügung und behebt dadurch die Überlastung.
  • Seite 43: Glossar

    Die ROCO Kehrschleifenmodule 10767 oder 10769 beseitigen im Digitalbetrieb die Schaltprobleme einer Kehrschleife. Trennen Sie die Kehrschleife auf beiden Seiten zweipolig auf, indem Sie mit Hilfe von Isolierverbindern die Kehrschleife elektrisch völlig vom Rest der Anlage abtrennen (siehe Fig. 6 auf Seite 93). Die abgetrennte Fahrstrecke innerhalb der Kehrschleife muss unbedingt länger sein als der längste Zug, der durch die Kehrschleife fahren soll.
  • Seite 44: Tipps, Hinweise Und Kurzhilfe

    � Decoder Um die digitalen Steuersignale von multiMAUS und multiZENTRALE der „konventionellen“ Technik einer Lok verständlich zu machen, braucht es einen „Übersetzer“ – den Decoder. Er ersetzt keines der in analogen Gleichstrom- Loks befindlichen Bauteile, sondern ist eine notwendige Ergänzung und muss im Lokgehäuse ebenfalls noch Platz finden.
  • Seite 45: Programmierhilfe Lokmaus 2 /R3 - Multimaus

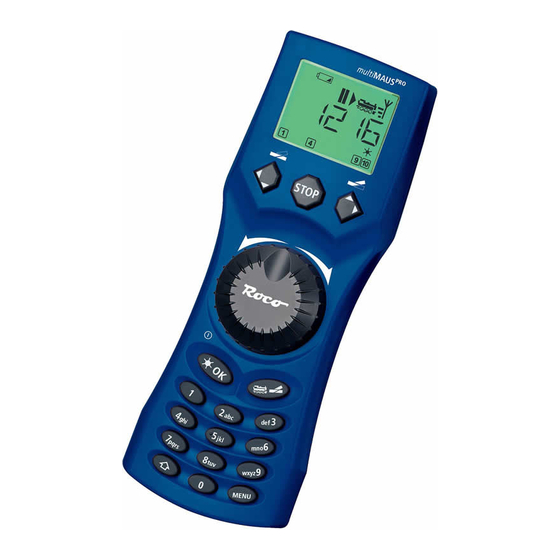
    5.8.1 Programmierhilfe Lok 2 /R3 – In den bisher ausgelieferten Anleitungen zu ROCO-Digitalartikeln (wie z. B. dem Weichenantrieb 42624) wurde nur der Standardprogrammiermodus mit der Lokmaus 2 /R3 beschrieben. Im folgenden finden Sie eine Tabelle, die die Programmierprozedur der Lokmaus 2 /R3 mit der Schnellprogrammierung (siehe Kapitel 2.8 auf Seite 20) der multiMAUS gegenüberstellt.
  • Seite 46 Table of Content Getting Started One–Stop–Shop – The Model Railway Center of the Future multiMAUS and multiZENTRALE Overview Part 1 Basics – Become Familiar with the multiMAUS and multiZENTRALE ▪ 1.1 Connecting the multiMAUS and multiZENTRALE 1.2 multiZENTRALE : Important LEDs 1.3 multiMAUS : The Display Screen 1.4 multiMAUS...
  • Seite 47 Table of Content 3.2 The “PROGRAM” Menu 3.3 The “SETTINGS” Menu 3.4 The “ROUTES” Menu Part 4 multiZENTRALE ▪ 4.1 Power Supply 4.2 Connections 4.3 Main and Programming Track 4.4 Resetting the multiZENTRALE 4.5 Updating the multiZENTRALE and multiMAUS Part 5 Appendix –...
  • Seite 48: One-Stop-Shop - The Model Railway Center Of The Future

    ▪ Rotary knob with zero locking position ▪ Compatibility with other DCC / NMRA-compatible controllers ▪ The ROCO digital system is expandable to include up to 31 input devices such as extra Lokmaus/multiMAUS units or multiMAUS , route controller units, etc.
  • Seite 49: Pro And Multizentrale

    A functional ROCO digital system with multiMAUS and multiZENTRALE requires the following items: A transformer or switching power supply unit (e.g. ROCO 10850, Fleischmann 681301, see also page 80), ▪ A feeder track without capacitor (e.g. geoLINE 61190, ROCO LINE 42517, Fleischmann 9400, 22217 (N), ▪...
  • Seite 50: Multizentrale Pro : Important Leds

    LED indicator lights that provide a quick overview over the most impor- tant functions of your ROCO digital system. You should place the control center where you can easily see the LEDs. Green: If the green LED (all the way to the left) lights up, a wireless con-...
  • Seite 51: Multimaus Pro : The Keys

    A completely depicted wireless symbol in the display indicates an optimal connection. The better the con- nection, the more bars are displayed. If the wireless connection is very bad, only the antenna symbol is depicted. If this is the case, it is possible that the system will lose some of its functionality.
  • Seite 52 Keys Function In drive mode: Emergency stop on entire system ▪ Stop key In menu mode: Return from the respective menu level ▪ in combination with In drive mode: Selective emergency stop for the locomotive selected and displayed ▪ Shift key In the “ROUTE”...
  • Seite 53: Start

    Part 2 Operation – Driving and Switching ▪ Despite its numerous options, operation of the multiMAUS is simple and intuitive. A concept which had already been successfully introduced for the Lokmaus models of the first and second generation. The following shows you how to operate the multiMAUS based on practical examples.
  • Seite 54: Entering A New Locomotive

    Calling up other locomotives already entered in the library (“scrolling”) Locomotives in the library are sorted in the order in which they were entered. You can of course change this order: Select locomotive These key combinations (press keys together) move the locomotive up or down in the library. You can check the new order for the library with the arrow keys.
  • Seite 55 Display message Input Comment Confirm by pressing “OK.” The multiMAUS then switches to the locomotive address. The “suggested value” is displayed, in this case “3.” Change the suggested value by either using the “shift” key and one of the “arrow keys” or by entering the number directly using the “function keys”.
  • Seite 56: Locomotive Address Mode

    2.2.3 Locomotive Address Mode The multiMAUS also gives you the option of controlling your locomotives us- ing the decoder address only. The display screen shows the locomotive address with the letter “L” before it (in this case, locomotive address 36), the locomotive symbol and all the selected functions.
  • Seite 57: The Emergency Stop Functions

    See the operating manual for the functions which are available for your locomotive. You switch the locomotive light on or off using the “Light /OK” key. The star “ ” at the bottom right of the ▪ display lights up to confirm that the locomotive lighting is switched on. 2.4 The Emergency Stop Functions When a situation becomes dangerous: You can use the “STOP“...
  • Seite 58: Selective Locomotive Stop

    2.5 Double Heading The new ROCO digital system also allows for double heading, which means controlling two locomotives in front of a train. Two locomotives are coupled and can be controlled centrally at once from one of the two locomotive addresses.
  • Seite 59: Double Heading Tips

    Input Display message Comment The display depicts “EQUAL DIRECTION”. You now set up the direction of travel of the second locomo- tive in reference to the first locomotive. The last selected direction of travel of the locomotives is not the decisive factor here but the position of the driver cabs.
  • Seite 60: Turnout Control

    2.6 Turnout control You can use the multiMAUS to control up to 2,048 digital turnout drives with genuine turnout addresses without having to use up a locomotive address (as is the case with the Lokmaus 2 /R3). To do so, you can switch to turnout mode and back at any time by pressing the “Locomotive /turnout”...
  • Seite 61 Example: You wish to drive a locomotive (travel direction left) to branch off at turnout no. 24. Input Display message Comment After the “Locomotive /turnout” key has been pressed, the multiMAUS switches from drive mode (library or locomotive address mode) to turn- out mode.
  • Seite 62: Routes

    2.7 Routes The multiMAUS does not only offer the possibility to switch individual turnouts but can also combine several turnouts into one route and switch together by pressing only one key. A route is a distance covered by a train crossing several turnouts.
  • Seite 63: Activating And Deactivating Routes

    Input Display message Comment Enter the number of the first turnout of the route, in this case turnout number 5 set to a branch line. After entering the number “5”, the number flashes until the next step of the route has been configured.
  • Seite 64: Quick Programming Of Locomotives And Decoders

    If programming is carried out on the regular track and if more than one digital locomotive is located on that track (or turnout decoders other than the ROCO articles 42624 and 10775), the settings of all decoders in the system are changed with one programming command. This means it is possible to accidentally change all decoders to the same locomotive address, for example.
  • Seite 65: Short Circuit And Overload

    Shortcuts” in Part 5 for additional help. 2.9 Short Circuit and Overload If a system short circuit or overload occurs, the ROCO digital system indicates this in two different ways. Two symbols flash in the display of the multiMAUS namely a lightning or thunderbolt symbol and the STOP sign. The red LED flashes on the multiZENTRALE .
  • Seite 66: The Menu Functions Of The Multimaus

    Part 3 Menus ▪ The Menu Functions of the multiMAUS The multiMAUS has four main menus with which you can both perform comprehensive programming and change the basic settings of the multiMAUS . This menu level can be accessed using two simple key combinations: Press the “MENU”...
  • Seite 67 There are two ways to exit the menu level: Press the “STOP” key. You may need to do this several times depending on the submenu which you are currently ▪ in. Each time you press “STOP” you go back one level. Press the “MENU”...
  • Seite 68: Die Menüstruktur In Der Übersicht

    CV MODIFICATION Menu 1: Menu 2: LOCO PROGRAM LONG ADDRESS REVERSE DIRECTION 28 SPEED STEPS DELETE ANALOG DRIVING NMRA-BIDI SPEED TABLE LONG ADDRESS SEARCH SEND PROG-MODE NO READING BIT ONLY RECEIVE READ-MODE BYTE ONLY BIT AND BYTE ADDRESS LIBRARY...
  • Seite 69 BACKLIGHT CONTRAST DISPLAY Menu 3: Menu 4: TIME SETTINGS ROUTES LANGUAGE MENU-KEY-TIME USERINTERFACE FUNCTION KEYS CHILD LOCK CANCEL SETTINGS RESET DELETE LOCO-LIBRARY ROUTES DOUBLE HEADING STOPKEY SPEED TABLE TURNOUT FACTORY RESET RADIO INTERRUPTION ROUTES CALIBRATION STOPMODE MODE DELAY SOFTWARE MAC-ADDR X-BUS CENTRE CURRENT CENTRE...
  • Seite 70: The "Loco" Menu

    The “LOCO” Menu The multiMAUS uses the “LOCO” menu to manage all data which is required for the locomotive library and for identification of a locomotive. You can also use this menu to set the multiMAUS to library or address mode. “NEW”...
  • Seite 71 “SEARCH” This could be one of the most important functions of your multiMAUS . You can use this menu item to assign a locomotive address to the corresponding locomotive in the library. Simply enter a locomotive address using the “function keys” and the multiMAUS will find the corresponding locomotive in the library.
  • Seite 72: The "Program" Menu

    � “Bits and Bytes” listed in the glossary in Part 5 of the menu. ROCO decoders already installed in locomotives are usually delivered with suitable settings. Check before per- forming programming whether it is really necessary. See the instruction manual for your decoder or locomotive.
  • Seite 73 Please consult the decoder manual for details about the function and configuration options of the CV 29. To simplify programming, ROCO has labeled the individual configuration options. The first image of the display depicts “C 29” and then immediately switches to the first configuration option ▪...
  • Seite 74 “READ MODE“ Use this menu to configure the readout options of the multiMAUS . Data are then read out with “CV MODI- FICATION,” “CV29,” and “CVBIT.” Select the respective subitem with the arrow keys and confirm with the “Light /OK” key. Factory setting: “BIT AND BYTE”...
  • Seite 75: The "Settings" Menu

    3.2.1 Another language for the menu navigation is selected using the “LANGUAGE” submenu. Select your language using the “arrow keys”. If your national language is not included, visit the ROCO website www.roco.cc for an update. To confirm, press the “Light /OK” key. You return to the start level “LANGUAGE.”...
  • Seite 76 3.2.4 The multiMAUS has “CHILD LOCK” which can be set tomultiple levels and can be activated after calling up the menu item using the “arrow keys.” To block an area, you will need to enter a code which is comprised of 4 numbers (no letters!). The password is then always requested when you wish to call up a protected area of the multiMAUS Factory setting: NONE “DISABLE MENU”: The three main menus cannot be called up;...
  • Seite 77 tives (“EMERGENCY STOP”). Use the arrow keys to make a selection and confirm with “Light /OK.” Factory setting: DISABLE VOLTAGE You can still trigger a “selective emergency stop” that only affects the selected locomotive in spite of this setting. See page 57 for additional details. 3.4.2 “RADIO INTERRUPTION“: If the multiMAUS is outside of the reception range of the multiZENT-...
  • Seite 78 3.6.2 “PANID” is information only for service technicians. 3.6.3 “NUMBER OF CHANNELS” The wireless connection between the multiMAUS and the multiZENTRALE uses technology that protects the system from interference from other wireless networks such as a WLAN. The devices search automatically for the best wireless channel for optimal wireless transmissions when being paired.
  • Seite 79 “ROUTES” Menu The multiMAUS uses the “ROUTES” menu to manage all data, which is required for the locomotive library and for switching the corresponding turnouts. “NEW” Use this menu item to add a new route to the library. The sequence of steps is described and depicted in detail starting on page 62 (Part 2, Chapter 2.7).
  • Seite 80: Power Supply

    RocoNet addresses are properly and correctly assigned within the system. If these three connections are not enough, use the data bus distributor 10758 to connect additional devices. The “feedback BUS” socket is intended for feedback modules such as the ROCO Art. No. 10787. Up to 20 feed- ▪...
  • Seite 81: Resetting The Multizentrale

    Simply connect the multiZENTRALE to the USB port (USB 1.1) of a PC (Windows 98 SP 2 or higher). Download and start the update program available from the ROCO Internet site. Follow the instructions of the user menu. Note: During the update process of the multiZENTRALE...
  • Seite 82: Previous Lokmaus Systems

    Even locomotives made by other manufacturers can be equipped with ROCO decoders if the necessary room for installation is available. If they are equipped with a digital interface the conversion is just as easy as with a ROCO locomotive. If you wish to install the 10745 load-controlled locomotive decoder, the locomotive will require a direct...
  • Seite 83: Connecting Several Controllers

    5.4 Combination of Digital and non-Digital System Parts All ROCO digital locomotives can be driven on both digital and “normal” direct current systems without any compli- cations. The locomotive decoder automatically detects the type of system it is on. It is therefore simple to use both types of systems together so that you can still use non-digital locomotives on the direct current section of the system.
  • Seite 84: The Booster 10765

    The ROCO 10769 terminal loop module solves the problems of a terminal loop in digital operation. Isolate the terminal loop with both poles on both sides by disconnecting the terminal loop completely from the rest of the...
  • Seite 85: Glossary

    If these values are added up, a max. value of 255 per byte (with each bit activated, i.e. set to 1) is derived, which returns us to the decimal system. The min. value is 0, all bits are set to 0. ROCO has significantly simplified programming individual bits in the multiMAUS . If supported by the decoder, you no longer need to calculate certain values but simply select whether to set or not to set a bit in the “PROGRAM”...
  • Seite 86: Tips, Information, And Shortcuts

    direct current locomotive but is a necessary addition and must also be given a place in the locomotive housing. For alternating current locomotives on the other hand, the change-over module or relay is replaced by the decoder, not in DCC format but of course Motorola format. �...
  • Seite 87: Programming Help For Lokmaus 2 /R3 - Multimaus

    5.8.1 Programming Help for Lokmaus 2 /R3 – multiMAUS Previous operating manuals for digital ROCO articles (e.g. 42624 turnout drive) only describe the standard program- ming mode for Lokmaus 2 /R3. The following includes a table which compares the programming procedure for the Lokmaus 2 /R3 and quick programming (see chapter 2.8 on page 64) on the multiMAUS...
  • Seite 88 Fig. 1 LC-Display Stop-Taste LC display Stop Key Écran touche »Stop« LC display Tasto di arresto Pfeiltaste Pfeiltaste (links) (rechts) Arrow Key Arrow Key (left) (right) touche »flèche« touche »flèche« (à gauche) (à droite) Tasto freccia Tasto freccia (sinistra) (destra) Fahrregler control knob Licht /OK-Taste...
  • Seite 89 Fig. 2 Aufbau des ROCO Digital-Systems (Europa-Version mit 230 V). Setting up the ROCO digital system (Europe version with 230 V). Structure de la commande numérique ROCO (version européene à 230 V). Struttura del sistema digitale ROCO (versione europea a 230 V).
  • Seite 90 Fig. 3 multiZENTRALE Anschluss Hauptgleis Programmiergleis Main track connection Programming track Câblage de la voie principale Voie de programmation Binario principale di collegamento Binario di programmazione Anschluss von Haupt- und Programmiergleis an die multiZENTRALE Connection of main and programming track to the multiZENTRALE Comment câbler la voie principale et de programmation avec multiZENTRALE Collegamento del binario principale e di programmazione alla multiZENTRALE 90 90...
  • Seite 91 Fig. 4 Anschluss eines Boosters 10765 an die multiZENTRALE und die Gleisanlage. Wiring diagram of the multiZENTRALE , the booster 10765 and the tracks. Comment câbler l‘amplificateur complémentaire réf. 10765 avec multiZENTRALE et la voie. Come collegare multiZENTRALE , il booster 10765 e i binari.
  • Seite 92 Fig. 5 Übergangsstrecke Digital — Gleichstrom mit dem Trennmodul 10768 (werkseitig ausverkauft). Pass-over section with additional tracks from digital to DC-layout controlled by the Separator module 10768 (Sold out by the factory). Canton de transition de la section en commande numérique à celle en commande analogique avec le module 10768 (vendu en usine).
  • Seite 93 Fig. 6 Symbolische Darstellung Symbolic Illustration Illustration figurative rappresentazione simbolica Eine digitale Kehrschleife mit den Kehrschleifenmodulen 10769 (werkseitig ausverkauft) oder 10767. A digital turning loop with the turning loop control module 10769 (sold out by the factory) or 10767. Branchement d‘une bouclew de retournement en commande numérique contrôlée par les modules 10769 (vendu en usine) ou 10767.
  • Seite 94: Déballer - Brancher - Démarrer

    Déballer – Brancher – Démarrer | Sballare – Collegare – Iniziare DEL / LED DEL / LED ~ 230 V Transformateur/ Transformateur mural Trasformatore/ Alimentatore AAA (Micro) 2. Langue Lingua 4. Texte Testo 94 94...
  • Seite 95 Déballer – Brancher – Démarrer | Sballare – Collegare – Iniziare 1. > 3 secondi | > 3 secondes DEL / LED Chenillard à DEL Luce scorrevole LED Circulation | Marcia Sélection de locomotives Arrêt d‘urgence Feux Selezione locomotiva Arresto d’emergenza Luce Fonctions | Funzioni F1 –...
  • Seite 96 Table des matières Déballer – Brancher – Démarrer Commande à une seule main – La centrale des trains miniatures de demain La multiMAUS et la multiZENTRALE en un clin d‘oeil Chapitre 1 Faire connaissance avec la multiMAUS et la multiZENTRALE ▪...
  • Seite 97 «Lokmaus 2» et «R3» Fig. 1 à 6 : Comment elle se présente et comment la câbler 88–93 Le terme utilisé jusqu’à présent dans les modes d’emploi, Roco «Loco-SOURIS» et «multiSOURIS», est remplacé dans ce manuel /aide-mémoire par «multiMAUS ».
  • Seite 98: Commande À Une Seule Main - La Centrale Des Trains Miniatures De Demain

    . En réunissant la toute dernière radio trans- mission avec une centrale de commande de nouvelle conception, l‘équipe de développement ROCO a su répondre aux attentes des utilisateurs. Une commande flexible de vos trains, une double traction, une lecture et une programmation facilitées des données de décodeur, de nombreuses possibilités de raccordement et de mise à...
  • Seite 99: Raccordement De La Multimaus

    : un transformateur ou SMPS (par ex. ROC0 10725 et 10850, Fleischmann 681301, voir aussi page 131), ▪ une voie de raccordement sans condensateur (par ex. geoLINE 61190, ROCO LINE 42517, Fleischmann 9400, 22217 ▪ (N), 6430 H0)).
  • Seite 100: La Multizentrale Pro : Principaux Voyants Lumineux

    équipée de voyants lumineux DEL, qui vous permettent en un coup d‘oeil d‘avoir un aperçu sur les fonctions essentielles de votre système numérique ROCO. La centrale doit donc être placée, de sorte que vous puissiez bien distinguer les DEL.
  • Seite 101: La Multimaus Pro : Les Touches

    Un symbole radio entièrement affiché sur l‘écran indique une liaison optimale. Plus la liaison est mauvaise, moins les barres (3) sont visibles. En cas de liaison radio très mauvaise, seulement le symbole d‘antenne s‘affiche. Il se peut très bien que les fonctions ne soient plus exécutées de façon sûre.
  • Seite 102 Touche[s]… Fonction en régime «exploitation» : Arrêt d’urgence sur l’ensemble du réseau ▪ «Stop» en régime «menus» : Retour d’un menu inférieur au menu supérieur ▪ combinées avec en régime «exploitation» : arrêt d’urgence uniquement pour la machine actuellement sélectionnée et affi- ▪...
  • Seite 103: On Démarre

    Dotée de nombreuses possibilités, la multiMAUS est néanmoins d’un maniement facile et intuitif. Cet esprit fut déjà appliqué par ROCO lors de la réalisation des loco-souris de première et deuxième générations. Les exemples suivants vous montrent et expliquent le maniement de la multiMAUS En cas de problèmes lors du maniement ou de la programmation se référer aux pages 94 et suivantes qui fournissent...
  • Seite 104: Nouvel Enregistrement D'une Locomotive

    Affichage à l’écran (autorail «TGV-A», par exemple) : nom de la machine (ici : «TGV-A») et symbole »locomotive« ▪ Sens de la marche (ici : la machine était/est à l’arrêt, son dernier sens de ▪ marche est indiqué par la flèche) feux (ici : les feux de la machine sont allumés) ▪...
  • Seite 105 Affichage correspondant à Touches actionnées pour Remarque l’écran saisir les données La touche «0», une fois pressée, donne un «blanc», deux fois pressée le chiffre «0». Vous avez accès aux caractères spéciaux (/, –, \, , [ , ], ‹, ›) en pressant plusieurs fois ✱...
  • Seite 106: Le Mode Adresse Locomotive

    Affichage correspondant à Touches actionnées pour Remarque l’écran saisir les données La touche «OK» pressée encore une fois, l’enregistrement de la machine dans la biblio- thèque est terminé. Vérifiez maintenant encore si l’adresse de la machine enregistrée dans la bibliothèque est effectivement iden- tique avec celle enregistrée dans le décodeur.
  • Seite 107: Les Fonctions D'arrêt D'urgence

    Si une locomotive est commandée par une autre multiMAUS , multiMAUS, loco-souris ou un PC, le symbole de locomotive clignote. Tenez compte également du paragraphe 5.3 «Câblage de plusieurs appareils de com- mande» à la page 134. Les différentes fonctions complémentaires (les bruits d’une locomotive sonorisée, par exemple) sont à activer ▪...
  • Seite 108: Arrêt D'urgence

    Comme dans l‘exemple, la double traction, c‘est-à-dire la commande de deux locomotives devant un train, est également possible avec le nouveau système à commande numérique ROCO. Les deux locomotives sont alors accouplées et peuvent être commandées simultanément par l‘une des deux adresses de locomotive.
  • Seite 109 Touches à actionner L’écran affiche Remarque Pressez la touche «MENU» et la «touche fonctions 0». La première locomotive est créée . Les éventuels sym- boles de fonction et les symboles de conduite ne sont pas affichés. Sélectionnez la deuxième locomotive à l‘aide des touches flèche.
  • Seite 110: Astuces Pour Doubles Tractions

    A noter : Vous reconnaîtrez les locomotives en double traction toujours à l‘étoile clignotante à la place du pre- mier chiffre. 2.5.2 Astuces pour doubles tractions 1. Si on a créé plusieurs doubles tractions, on perd rapidement la vue d‘ensemble que doit avoir la locomotive. Toutefois, cela peut être facilement contrôlé...
  • Seite 111 droite déviée Les aiguilles changent de position au moment ou vous pressez une des deux touches «flèches». En même temps, la nouvelle position des aiguilles est mémorisée par la multiMAUS et confirmée par la mise à «0» des premiers chiffres libres suivant la lettre «A», si l’adresse du moteur n’a que trois chiffres maxi. L’affichage de la position des aiguilles à...
  • Seite 112: Les Voies

    En pressant la touche «Locomotive/aiguillage» de nouveau, vous retournez au régime «exploitation» (mode «bibliothèque» ou «adresse machine»). Trois petits »plus« bien utiles de la multiMAUS sur mode «aiguillages» : La bascule En pressant la touche «Feux /OK» vous passez de l’aiguillage actuellement affiché à l’écran à l’aiguillage com- mandé...
  • Seite 113: Nouvelle Création De Voie

    2.7.1 Nouvelle création d’itinéraire Touches à actionner L’écran affiche Remarque Appuyez sur la touche «Locomotive/ aiguillages». Vous arrivez à l‘aiguillage sélectionné en dernier, ici par ex. l‘aiguillage En pressant simultanément les touches «majuscules et «Locomotive/aiguillages», vous arrivez en mode itinéraire. Si aucun itinéraire n’a été...
  • Seite 114: Activer Et Désactiver Les Voies

    Touches à actionner L’écran affiche Remarque Vous pouvez entrer l’aiguillage suivant après avoir actionné la «touche majuscules» et les «touches flèche». L’entrée des données s’effectue comme pour les deux étapes précédentes. Lorsque vous avez créé tous les aiguillages, pressez la touche «Feux /OK». Vous revenez alors à...
  • Seite 115 Si la programmation est exécutée sur la voie normale et s‘il y a plus d‘une locomotive à commande numé- rique sur la voie (ou également d‘autres décodeurs d‘aiguillages que les articles 42624 et 10775 ROCO), les réglages sont modifiés par un ordre de programmation de tous les décodeurs, dans le système. Ainsi vous pourriez, par exemple, programmer par mégarde tous les décodeurs à...
  • Seite 116: Court-Circuit Et Surcharge

    2.9 Court-circuit et surcharge S‘il se produit un court-circuit ou une surcharge au niveau de l‘installation, le système numérique ROCO l‘affiche deux fois. Sur l‘écran d‘affichage de la multiMAUS deux symboles clignotent : un éclair et le signe STOP. Sur la multiZENTRALE , la DEL rouge clignote.
  • Seite 117: Les Menus De La Multimaus

    Chapitre 3 Les menus ▪ Les menus de la multiMAUS et leurs fonctions La multiMAUS dispose de quatre menus principaux vous permettant une programmation complexe et une modi- fication facile des réglages de base de la multiMAUS . Vous avez accès à ce niveau de menus par deux combinai- sons de touches : soit en pressant pendant env.
  • Seite 118 Pour quitter le mode «MENU» vous avez également deux possibilités : Soit vous pressez la touche «STOP». Il sera peut-être nécessaire de la presser plusieurs fois, cela dépend du ▪ niveau actuel hiérarchique sur lequel vous vous trouvez à ce moment. Chaque action sur la touche «STOP» vous ramène d’un niveau actuel au niveau supérieur.
  • Seite 119: Pro En Un Coup D'oeil

    NOUVELLE MODIFIER VARIABLE Le menu 1: Le menu 2: LOCO PROGRAMMER MODIFIER ADRESSE LONGUE CHANGEMENT DE DIRECTION 28 CRANS DE EFFACER MARCHE MARCHE ANALOGIQUE NMRA-BIDI TABLEAU DES VITESSES CHERCHER ADRESSE LONGUE VARIABLE PROGRAMMER EN ENVOYER LIGNE BIT PAR BIT ET MOT PAR MOT RECEVOIR MODE-LECTURE...
  • Seite 120 ECLAIRAGE CONTRASTE NOUVELLE Le menu 3: Le menu 4: TEMPS ECLAIRAGE REGLAGES ITINERAIRES LANGUE DELAI TOUCHE MENU MODIFIER FONCTION TOUCHE VERROUILLAGE VALEURS D ORIGINE REINITIALISER EFFACER LOCO-BIBLIOTHEQUE ITINERAIRES DOUBLE TRACTIONS MODE TOUCHE STOP AIGUILLES TOUT INTERRUPTION DE RADIO ITINERAIRES MODE STOP CALIBRAGE RETARD LOGICIEL...
  • Seite 121: Le Menu «Loco

    Le menu «LOCO» Le menu «LOCO» vous permet de faire gérer par votre multiMAUS toutes les données indispensables pour la bibliothèque «matériel moteur» et pour l’identification d’un engin moteur. Ce menu vous permet également de préenclencher la multiMAUS aux modes «bibliothèque» ou «adresses machines». «NOUVELLE»...
  • Seite 122 «CHERCHER» Il est possible que ce menu secondaire devienne pour vous, à la longue, une des fonctions les plus importantes de la multiMAUS . Ce menu secondaire vous permet de retrouver une machine dans la bibliothèque en ne connaissant que l’adresse. Composez tout simplement l’adresse de la machine par les touches des fonctions «1»...
  • Seite 123: Le Menu «Programmer

    Tenez également compte des explications sur le thème � «Bits et Bytes (octets)» dans le «Glossaire» du chapitre 5 de ce manuel. Les décodeurs déjà installés dans des locomotives ROCO par l‘usine sont habituellement livrés avec des réglages adaptés aux caractéristiques individuelles des machines. Par conséquent, contrôlez avant toute programmation, si elle est vraiment nécessaire.
  • Seite 124 à bit. Le mode d‘emploi joint au décodeur vous informe de la manière de fonctionner et des possibilités de réglage de CV29. Pour faciliter la programmation, ROCO a attribué directement des désignations associées à chaque possibilité de réglage.
  • Seite 125 «MODE-LECTURE» Ce menu vous permet de régler la capacité de lecture de la multiMAUS . Les données sont lues via «MODI- FIER VARIABLE», «CV29» et «CVBIT». Sélectionnez l‘option de menu respective à l‘aide des «touches flèche» et confirmez une entrée avec la touche «Feux /OK».
  • Seite 126: Le Menu «Reglages

    Par le menu secondaire «LANGUE» on peut activer une autre langue. Sélectionner la langue souhaitée par les touches »flèches«. Si votre langue préférée n’est pas mémori- sée, consulter le site www.roco.cc (actuellement ce site n’existe qu’en langues allemande et anglaise) pour y trouver une possibilité éventuelle de mise à jour.
  • Seite 127 3.2.3 Le menu «FONCTION TOUCHE» détermine le caractère des fonctions «F1» à «F20» des ma-chines (le sifflet d’une locomotive sonorisée, par exemple, ou la commande d’un attelage à télécommande). Si vous pressez les touches de fonction correspondantes pendant moins d’une seconde, la fonction est activée et reste activée.
  • Seite 128 Tourner le bouton régulateur à gauche jusqu’à sa buttée. Confirmer ensuite la position du bouton ▪ par la touche «Feux /OK». Apparaît alors la mention «POSITION NEUTRE» à l’écran. Tourner le bouton régulateur à sa position centrale (position neutre «0»), puis confirmer la position ▪...
  • Seite 129 type de RocoNet («X-BUS»), la «UNITE CENTRALE» attribuée à la multiMAUS et le «MODULE RADIO». Les informations sur la consommation de courant actuelle de la centrale («COURANT DE CENTRALE», mA) et la valeur de tension actuelle des piles ou accus («TENSION BATTERIE», mV) sont pratiques pour l‘utilisateur. Les informations souhaitées sont activées à...
  • Seite 130: Le Menu «Itineraires

    Le menu «ITINERAIRES» Dans le menu «ITINERAIRES», la multiMAUS gère toutes les données, qui sont nécessaires à la bibliothèque itinéraires et la connexion des aiguillages correspondants. «NOUVELLE» Dans cette option, vous pouvez intégrer un nouvel itinéraire à la bibliothèque. Le procédé est décrit et présenté en détail dans le chapitre 2, paragraphe 2.7 à...
  • Seite 131: Alimentation En Courant

    Si les trois câblages ne suffisent pas, vous pouvez raccorder d‘autres appareils par le répartiteur de bus de données 10758. La prise «Feedback BUS» est conçue pour les répétiteurs comme par ex. B. ROCO art. n° 10787. La ligne BUS ▪...
  • Seite 132: Réinitialisation De La Multizentrale

    à la sortie USB (USB 1.1) d‘un PC (à partir de Windows 98 SP 2). Vous pouvez télé- charger le programme de mise à jour sur le site Internet de ROCO et le démarrer. Un menu utilisateur vous guidera dans le procédé à suivre.
  • Seite 133 10718, 10725 et 10850 (ROCO) et 6811, 6812 et 681301 (Fleischmann) conviennent pour l‘alimentation en courant. Les actuels amplificateurs ROCO 10761 et 10764 avec la multiMAUS et/ou la «Lokmaus 2» ne doivent en aucun cas être raccordés à la multiMAUS et à...
  • Seite 134: Câblage De Plusieurs Appareils De Commande

    ROCO. Si vous voulez installer un décodeur «traction» avec compensation de charge (réf. 10745), il est indispensable que la machine dispose d’un moteur «courant continu». Si la machine dispose d‘un moteur universel (donc fonctionnant en «courant alternatif» également), il doit être transformé en moteur classique «courant continu»...
  • Seite 135: Canton De Passage

    concernant sa machine et le train continue sa marche en fonction des instructions reçues. Lors de ce passage, le décodeur compare également le sens de marche actuel de sa machine avec le sens demandé par les instructions numériques s’adressant à sa machine. Si les deux sont antagonistes, le décodeur freine de nouveau sa machine jusqu’à...
  • Seite 136: Boucles De Retournement En Commande Numérique

    à maîtriser et causera inévitablement un court-circuit. Les modules de boucle de retournement ROCO 10767 ou 10769 éliminent dans le fonctionnement numérique les pro- blèmes de connexion d‘une boucle de retournement. Isoler après l’aiguillage d’entrée en boucle de retournement les deux profilés de rail par des éclisses isolantes à...
  • Seite 137: Glossaire

    «1»), à cet effet nous sommes à nouveau dans le système décimal. La valeur minimum est «0», tous les bits sont mis sur «0». ROCO a nettement simplifié la programmation des bits dans la multiMAUS . Si le décodeur l‘accepte, vous ne devez plus calculé...
  • Seite 138: Astuces, Renseignements Et Petits Dépannages Rapides

    vous automatiquement sur le nombre de crans de marche réglé dans la commande de train – multiMAUS multiZENTRALE –, de sorte à ne pas avoir besoin de régler le décodeur. Pour savoir si vos décodeurs sont équipés ou non de cette adaptation automatique et quels sont les regimes de crans de marche qu’ils connaissent, veuillez consulter les modes d’emploi des décodeurs.
  • Seite 139: Programmation De La Multimaus

    5.8.1 Programmation de la par rapport aux «Lokmaus 2» et «R3» Les modes d’emploi des composants de la commande numérique ROCO commercialisés avant la multiMAUS moteur d’aiguilles réf. 42624 avec décodeur intégré, par exemple) ne décrivent que le mode standard de program- mation par les «Lokmaus 2»...
  • Seite 140 Indice Sballare – Collegare – Iniziare Tutto in una mano – La centralina per ferromodellismo del futuro Panoramica multiMAUS e multiZENTRALE Parte 1 Nozioni di base – Conosciamo il multiMAUS e la multiZENTRALE ▪ 1.1 Allacciamento del multiMAUS e della multiZENTRALE 1.2 multiZENTRALE : Lampade spia importanti 1.3 multiMAUS...
  • Seite 141 Indice 3.2 Il menu “PROGRAMMARE” 3.3 Il menu “REGOLAZIONE” 3.4 Il menu “PERCORSI” Parte 4 La multiZENTRALE ▪ 4.1 Alimentazione 4.2 Allacciamenti 4.3 Binario principale e binario di programmazione 4.4 Ripristino della multiZENTRALE 4.5 Aggiornamento di multiZENTRALE e multiMAUS Parte 5 Supplemento –...
  • Seite 142: Panoramica Multimaus Pro E Multizentrale

    ROCO ha preso veramente sul serio le esigenze degli utenti. Flessibilità nel comando dei treni, possibilità di tra- zione doppia, facile lettura e programmazione dei dati decoder, svariate e durature possibilità di connessione e di aggiornamento, combinate con il pratico formato del rinomato multiMAUS, nonché...
  • Seite 143: Collegamento Del Multimaus

    Prima di iniziare i lavori di collegamento tenere presenti le seguenti istruzioni: In caso di utilizzo di componenti di terze parti insieme a componenti ROCO e/o Fleischmann non viene fornita alcuna garanzia per eventuali danni o malfunzionamenti. Il diritto alla garanzia viene a decadere anche in caso di apertura dell’involucro del multiMAUS...
  • Seite 144: Multizentrale Pro : Lampade Spia Importanti

    La nuova multiZENTRALE è dotata di spie di controllo LED che consentono una panoramica a colpo d’occhio delle principali funzioni del sistema digitale ROCO. La centralina dovrebbe essere quindi collocata in modo tale che i LED siano facilmente visibili. Verde: Se il LED verde (a sinistra) è acceso, significa che il contatto radio con multiMAUS è...
  • Seite 145: Pro : I Tasti

    La visualizzazione completa sul display del simbolo del collegamento radio indica un collegamento ottimale. Il numero di trattini visualizzato indica il livello del segnale del collegamento radio. In caso di scarso collegamento radio rimane visibile solo il simbolo dell‘antenna. In questa condizione può verificarsi che le funzioni non siano più...
  • Seite 146 Tasti Funzione in modalità marcia: arresto di emergenza sull’intero impianto ▪ Tasto Stop in funzionamento di menu: uscita dal relativo piano di menu ▪ in combinazione con in modalità marcia: arresto di emergenza selettivo della locomotiva selezionata e visualizzata nel display ▪...
  • Seite 147: Inizio

    Nonostante le molte funzionalità il multiMAUS è facile ed intuitivo da utilizzare. Un concetto introdotto con successo dalla ditta ROCO già con i Lokmaus di prima e seconda generazione. Di seguito illustreremo sulla base di esempi pratici il funzionamento del multiMAUS .
  • Seite 148: Nuova Registrazione Di Una Locomotiva

    Richiamo di altre locomotive già presenti nell’archivio (“Sfoglia”) La classificazione delle locomotive nell’archivio avviene nella sequenza dell’immissione. Ovviamente la se- quenza può essere modificata: Seleziona locomotiva oppure Queste combinazioni di tasti (premere contemporaneamente) spostano la locomotiva nell’archivio verso l’alto o verso il basso. L’archivio riordinato può essere verificato con i “tasti freccia”. 2.2.2 Nuova registrazione di una locomotiva (qui ad es.
  • Seite 149 Immissione Messaggio display Nota Confermare con “OK”. Il multiMAUS passa quindi all’indirizzo della locomotiva. Viene visualizzato un “valore di suggerimento”, qui “3”. oppure Modificare il “valore di suggerimento” utiliz- zando il tasto “Maiusc” ed un “tasto freccia” o immettendo direttamente il numero con i “tasti funzione”.
  • Seite 150: La Modalità Indirizzo Locomotiva

    2.2.3 La modalità indirizzo locomotiva Il multiMAUS offre anche la possibilità di poter controllare le locomotive sem- plicemente attraverso il solo indirizzo del decoder. Il display mostra l’indirizzo della locomotiva preceduto da una “L” – qui l’indirizzo della locomotiva 36, il simbolo della locomotiva e le funzioni selezionate.
  • Seite 151: Le Funzioni Di Arresto D'emergenza

    Le funzioni disponibili per la vostra locomotiva sono riportate nel relativo manuale d’uso. La luce della locomotiva può essere attivata o disattivata con il tasto “Luce /OK”. Come conferma della luce ▪ attivata della locomotiva si accende la stella “ ” in basso a destra sul display. 2.4 Le funzioni di arresto di emergenza In situazioni critiche: Con il tasto “STOP”...
  • Seite 152: Arresto D'emergenza Selettivo

    Ruotando il regolatore di marcia viene annullato l’arresto e la locomotiva continua a correre. 2.5 Doppia trazione Anche con il nuovo sistema digitale ROCO è possibile la trazione doppia, cioè il controllo di due locomotive in coppia davanti ad un treno. In questo caso si possono accoppiare due locomotive e comandarle simultane- amente da uno dei due indirizzi locomotiva.
  • Seite 153: Suggerimenti Per Doppie Trazioni

    Immissione Messaggio display Nota Sul display compare “STESSO”. Qui è possibile impo- stare la direzione della seconda locomotiva rispetto alla prima locomotiva. Quindi non è determinante la direzione scelta per ultima della locomotiva, ma come le loro cabine di guida sono posizionate una rispetto all’altra.
  • Seite 154: Comando Scambi

    2.6 Comando degli scambi Con il multiMAUS è possibile controllare fino a 2.048 scambi digitali con veri indirizzi di scambi senza dover utilizzare un indirizzo di una locomotiva (come per il Lokmaus 2 /R3). Durante la marcia è possibile passare in qualsiasi momento premendo il “Tasto Locomotiva /Scambi”...
  • Seite 155 Esempio: Si desidera spostare una locomotiva (direzione di marcia momentanea a sinistra) attraverso la dira- mazione dello scambio N. 24. Immissione Messaggio display Nota Dopo aver premuto il tasto “Locomotiva /Scam- bio” il multiMAUS passa dalla modalità di mar- cia (modalità Archivio o Indirizzo locomotiva) alla modalità...
  • Seite 156: Percorsi

    2.7 Percorsi Il multiMAUS non offre solo la possibilità di commutare singoli scambi, ma anche di impostare insieme più scambi per un percorso e di commutarli tutti insieme con un solo tasto. Con percorso viene qui inteso il tragitto che un treno percorre passando su diversi scambi. In questo modo, ad esempio, un treno merci può andare senza interruzione da un binario di raccordo fino al percorso principale, attraverso diversi scambi commutati tramite un unico comando.
  • Seite 157: Attivazione E Disattivazione Di Percorsi

    Immissione Messaggio display Nota Immettere il numero del primo scambio del percorso, qui ad esempio lo scambio n° 5, che è impostato come diramazione. Dopo che è stato immesso il “5”, il “5” lam- peggia fino a quando nel passo successivo non è...
  • Seite 158: Programmazione Rapida Di Locomotive E Decoder

    Nel caso in cui la programmazione venga eseguita sul binario di marcia normale e su di esso è presente più di una locomotiva digitale (o anche altri decoder per scambi invece dei ROCO articolo 42624 e 10775), con un comando di programmazione vengono modificate nel sistema le impostazioni di tutti i decoder.
  • Seite 159: Corto Circuito E Sovraccarico

    “I menu” e nel capitolo 5.8 “Suggerimenti, avvisi e breve guida” nella parte quinta. 2.9 Corto circuito e sovraccarico Se nell’impianto si verifica un corto circuito o un sovraccarico, il sistema digitale ROCO lo visualizza in due modi. Sul display del multiMAUS lampeggiano due simboli: un fulmine ed il segno STOP.
  • Seite 160: Le Funzioni Di Menu Del Multimaus

    Parte 3 I Menu ▪ Le Funzioni di Menu del multiMAUS Il multiMAUS dispone di quattro menu principali con i quali è possibile sia programmare che modificare ampia- mente le impostazioni di base del multiMAUS . Questo livello di menu può essere raggiunto con due combina- zioni di tasti: premere per 5 secondi il solo tasto “MENU”...
  • Seite 161 Per uscire dal piano di meni si hanno due possibilità: premere il tasto “STOP”. Tale operazione potrebbe essere necessaria più volte in base al sottomenu nel quale ▪ ci si trova. Ogni pressione su “STOP” comporta un arretramento di un piano, premendo il tasto “MENU”...
  • Seite 162: La Struttura Dei Menu Nella Panoramica

    MODIFICARE CV Il Menu 1: Il Menu 2: LOCOMOTIVA PROGRAMMARE MODIFICARE INDIRIZZO LUNGO CAMBIARE DIREZIONE CANCELLARE 28 LIVELLI DI MARCIA NMRA-BIDI TABELLA VELOCITA INDIRIZZO LUNGO CERCARE PROGRAMMARE IN INVIARE LINEA NON LEGGERE SOLO BIT PER BIT RICEVERE MODALITA LETTURA SOLO BYTE PER BYTE BIT PER BIT E BYTE PER BYTE INDIRIZZI...
  • Seite 163 ILLUMINAZIONE CONTRASTO DISPLAY Il Menu 3: Il Menu 4: TEMPO LUCE REGOLAZIONE PERCORSI LINGUA TEMPO TASTO MENU UTILIZZO MODIFICARE FUNZIONE INSERITA SICUREZZA BAMBINI REGOLAZIONI RINIZIALIZZARE CANCELLARE ARCHIVIO DATI PERCORSI DOPPIA TRAZIONI STOPTASTO SCAMBIO SINGOLO TUTTO INTERRUZIONE RADIO PERCORSI STOP-MODALITA MODO CALIBRARE RALLENTAMENTO SOFTWARE...
  • Seite 164: Il Menu "Locomotiva

    Il Menu “LOCOMOTIVA” Nel menu “Locomotiva” il multiMAUS gestisce tutti i dati necessari per l’archivio delle locomotive e per l’identifi- cazione di una locomotiva. multiMAUS può essere impostato anche per il funzionamento ad Archivio o Indirizzo. “NUOVO” In questa voce di menu è possibile inserire nella biblioteca una nuova locomotiva. La procedura è descritta in dettaglio e visualizzata a partire da pagina 148.
  • Seite 165 “CERCARE” Questo comando potrebbe diventare un’importante funzione del vostro multiMAUS . Con questa voce di menu è possibile assegnare un indirizzo nell’archivio alla relativa locomotiva. Immettere un indirizzo attraverso i “tasti funzione” ed il multiMAUS cercherà la locomotiva corrispondente nell’archivio. Premendo il tasto “Luce /OK”...
  • Seite 166 � “Bit e Byte” nel “Glossario” nella quinta parte del manuale. I decoder già integrati nelle locomotive dalla ROCO, sono forniti comunemente con impostazioni adeguate all’impiego pratico. Prima di ogni programmazione è quindi necessario verificare se essa sia effettivamente necessaria.
  • Seite 167 Informazioni sul modo di funzionamento e le possibilità di regolazione del CV29 sono reperibili nelle istruzioni allegate al decoder. Al fine di agevolare la programmazione, ROCO ha provvisto le singole possibilità d’impostazione direttamente degli identificatori ad esse associati.
  • Seite 168 “MODALITÀ LETTURA” Tramite questo menu è possibile impostare la capacità di lettura del multiMAUS . Vengono selezionati i dati relativi a “Modifica CV”, “CV29” e “CVBIT”. Selezionare la sotto-voce di menù corrispondente tramite i “Tasti freccia” e confermare l’immissione con il tasto “Luce /OK”.
  • Seite 169 Attraverso il sottomenu “LINGUA” è comunque possibile selezionare un’altra lingua. Selezionare la lingua con i “tasti freccia”. Nel caso in cui non dovesse essere presente la lingua desi- derata, si prega di visitare il sito della ditta ROCO all’indirizzo www.roco.cc per verificare se esistono degli aggiornamenti.
  • Seite 170 3.2.4 Il multiMAUS dispone di una “SICUREZZA BAMBINI” che può essere attivata dopo aver richiamato la voce di menu attraverso i “tasti freccia”. Per il blocco di un’area è necessaria l’immissione di una Codice comporta da 4 cifre (nessuna lettera!). La Codice viene richiesta quando si desidera richiamare un campo protetto del multiMAUS Impostazione di fabbrica: SPENTO “MENU BLOCCATO”: I tre menu principali non possono essere richiamati;...
  • Seite 171 ▪ “INFORMAZIONE” Una voce di menu che fornisce informazioni complete circa la versione del software (“SOFTWARE”), l’indirizzo Mac (“MAC ADDR”), il tipo di rete Roco (“X-BUS”), la “CENTRALE” associata al multiMAUS ed il “MODULO RADIO”. Molto pratiche per gli utenti sono le informazioni sul consumo momentaneo di corrente della centralina (“CORRANTE CENTRALE”) e sulla tensione momentanea delle pile o batterie ricaricabili (“TENSIONE...
  • Seite 172 “RADIO” 3.6.1 “REGISTRARE” Normalmente, la registrare del multiMAUS nella multiZENTRALE deve venire effettuata una sola volta. Se si desidera portare con sé il proprio multiMAUS , ad esempio per usarlo su un altro impianto dotato anch’esso di multiZENTRALE , è necessario effettuare la registrazione del mouse. Questo può...
  • Seite 173 Il menu “PERCORSI” Nel menu “PERCORSI” il multiMAUS gestisce tutti i dati che sono necessari per la biblioteca percorsi e per la commutazione degli scambi corrispondenti. “NUOVO” In questa voce di menu è possibile inserire nella biblioteca un nuovo percorso. La procedura è descritta in dettaglio e visualizzata nella parte seconda, capitolo 2.7, a partire da pagina 156.
  • Seite 174: Alimentazione Elettrica

    RocoNet nel sistema. Se i tre collegamenti non sono sufficienti, è possibile collegare altri apparecchi tramite il l’adattatore DataBUS 10758 (modulo a Y). La presa “Feedback BUS” è predisposta per l’allacciamento di rilevatori di posizione come il ROCO 10787. ▪...
  • Seite 175 Per fare l’aggiornamento collegare la multiZENTRALE alla porta USB (USB 1.1) di un PC (Windows 98 SP 2). Sca- ricare l’eventuale programma di aggiornamento disponibile sul sito Internet ROCO ed eseguirlo. Un menu utente vi guiderà attraverso il processo. Nota: Durante il processo di aggiornamento della multiZENTRALE non è...
  • Seite 176 Anche le locomotive di altre case produttrici possono essere dotati di decoder ROCO per locomotive. Se sono dotati di un’interfaccia digitale, la modifica è semplice come nel caso di una locomotiva ROCO. Nel caso in cui si desideri installare il decoder per locomotive 10745 con regolazione del carico, allora è necessario che la locomotiva disponga di un motore a corrente continua o il motore universale presente deve essere convertito prima della modifica in un motore a corrente continua.
  • Seite 177: Combinazione Di Componenti Digitali E Non Digitali Dell'impianto

    L’elemento digitale ed analogico del vostro impianto deve essere isolato sui due lati dei punti di passaggio affinché tra i due sistemi non esista alcun collegamento elettrico. Utilizzare al suo posto il giunto isolante per binari ROCO 42611, 61192, Fleischmann 6433 (H0), 9403 (N).
  • Seite 178 Per il montaggio del Booster è necessario disattivare l’impianto. Suddividere l’impianto in sezioni di alimentazione. Scollegare i binari elettricamente tra loro ai relativi punti (su entrambi i lati!) con i connettori isolanti di binari ROCO 42611 o 61192, con i binari di separazione o segando i profili dei binari. Inserire nella nuova sezione di alimentazione un elemento di binario di giunzione (ad es.
  • Seite 179: Anelli Di Ritorno In Funzionamento Digitale

    I moduli per anello d’inversione ROCO 10767 o 10769 evitano i problemi di commutazione di un anello d’inversione nel funzionamento digitale. Scollegare elettricamente l’anello di ritorno sui due lati in modo bipolare impiegando dei connettori isolanti o segando i profili dei binari isolandoli completamente dal resto dell’impianto (vedi Fig.
  • Seite 180 I CV possono presentare un campo di valori compreso tra “0” e “255”. Ciò rende evidente che una modifica della programmazione presuppone una certa esperienza, poiché dei CV impostati in modo errato potrebbero pregiudicare il comportamento del decoder. � Decoder Per rendere comprensibili, alla tecnica “convenzionale”...
  • Seite 181 5.8 Consigli, suggerimenti e aiuto rapido Il multiMAUS non si accende. Controllare le batterie e se necessario sostituirle. ▪ Il multiMAUS è acceso, ma sono accesi i sim- Sull’impianto è presente un corto circuito (il LED rosso ▪ boli di cortocircuito e di STOP. della multiZENTRALE lampeggia).
  • Seite 182 5.8.1 Guida di Programmazione Lokmaus 2 /R3 – multiMAUS Nelle istruzioni relative agli articoli digitali ROCO finora riportate (quali ad es. l’azionamento degli scambi 42624) hanno riguardato solo il modo di programmazione standard con il Lokmaus 2 /R3. Di seguito è riportata una tabella...
  • Seite 184 ▪ retain these instructions for further reference! Pière d‘bien vouloir con- ▪ 8010832920 X / 2011 server ce mode d’emploi en vue d’une future utilisation! Conservate que- ▪ ste istruczioni per un futuro utiliozzo! Deze handleding altijd bewaren. ▪ www.roco.cc...

Diese Anleitung auch für:

Multizentrale pro108121083010832

Inhaltsverzeichnis