Herunterladen Inhalt Inhalt Diese Seite drucken
Parkside PLEM 50 A1 Bedienungs- Und Sicherheitshinweise

Parkside PLEM 50 A1 Bedienungs- Und Sicherheitshinweise

Vorschau ausblenden Andere Handbücher für PLEM 50 A1:
Inhaltsverzeichnis

Werbung

Verfügbare Sprachen
  • DE

Verfügbare Sprachen

  • DEUTSCH, seite 1
LASER-ENTFERNUNGSMESSER PLEM 50 A1 /
LASER DISTANCE MEASURER PLEM 50 A1 /
TÉLÉMÈTRE LASER PLEM 50 A1
LASER-ENTFERNUNGSMESSER
PLEM 50 A1
Bedienungs- und Sicherheitshinweise
TÉLÉMÈTRE LASER PLEM 50 A1
Instructions d'utilisation et consignes de sécurité
DALMIERZ LASEROWY
PLEM 50 A1
Wskazówki dotyczące obsługi bezpieczeństwa
LASEROVÝ MERAČ
VZDIALENOSTI PLEM 50 A1
Pokyny pre obsluhu a bezpečnostné pokyny
IAN 309823
LASER DISTANCE MEASURER
PLEM 50 A1
Operation and safety notes
LASERAFSTANDSMETER
PLEM 50 A1
Bedienings- en veiligheidsinstructies
LASEROVÝ MĚŘIČ
VZDÁLENOSTI PLEM 50 A1
Pokyny pro obsluhu a bezpečnostní pokyny

Werbung

Inhaltsverzeichnis
loading

Inhaltszusammenfassung für Parkside PLEM 50 A1

  • Seite 1 LASER-ENTFERNUNGSMESSER PLEM 50 A1 / LASER DISTANCE MEASURER PLEM 50 A1 / TÉLÉMÈTRE LASER PLEM 50 A1 LASER-ENTFERNUNGSMESSER LASER DISTANCE MEASURER PLEM 50 A1 PLEM 50 A1 Bedienungs- und Sicherheitshinweise Operation and safety notes TÉLÉMÈTRE LASER PLEM 50 A1 LASERAFSTANDSMETER Instructions d‘utilisation et consignes de sécurité...
  • Seite 2 DE / AT / CH Bedienungs- und Sicherheitshinweise Seite GB / IE Operation and safety notes Page FR / BE Instructions d‘utilisation et consignes de sécurité Page NL / BE Bedienings- en veiligheidsinstructies Pagina Wskazówki dotyczące obsługi i bezpieczeństwa Strona 117 Pokyny pro obsluhu a bezpečnostní...
  • Seite 5: Inhaltsverzeichnis

    Legende der verwendeten Piktogramme ............Seite Einleitung ..............Seite Bestimmungsgemäße Verwendung ......... Seite Teilebeschreibung ............Seite Lieferumfang ..............Seite 10 Technische Daten ............. Seite 10 Allgemeine Sicherheitshinweise ....Seite 11 Sicherheitshinweise für Batterien / Akkus ......Seite 13 Vor der Inbetriebnahme .........
  • Seite 6 Messwertfunktionen .......... Seite 21 Fläche ................Seite 21 Volumen ................Seite 22 Pythagoras einfach ............Seite 22 Pythagoras doppelt ............Seite 23 Addition (Plus) ..............Seite 24 Subtraktion (Minus) ............Seite 25 Historienspeicher ........... Seite 25 Aufrufen eines gespeicherten Datensatzes ..... Seite 26 Entfernen / Löschen von gespeicherten und von einzelnen gespeicherten Datensätzen .....
  • Seite 7: Legende Der Verwendeten Piktogramme

    Schutzhandschuhe tragen! Achtung! Schützen Sie sich vor Laserstrahlung! Nicht in den Laserstrahl blicken! Laser-Entfernungsmesser PLEM 50 A1 Einleitung Wir beglückwünschen Sie zum Kauf Ihres neuen Produkts. Sie haben sich damit für ein hochwertiges Produkt entschieden. Die Bedienungs- anleitung ist Teil dieses Produkts. Sie enthält wichtige Hinweise für Sicherheit, Gebrauch und Entsorgung.
  • Seite 8: Bestimmungsgemäße Verwendung

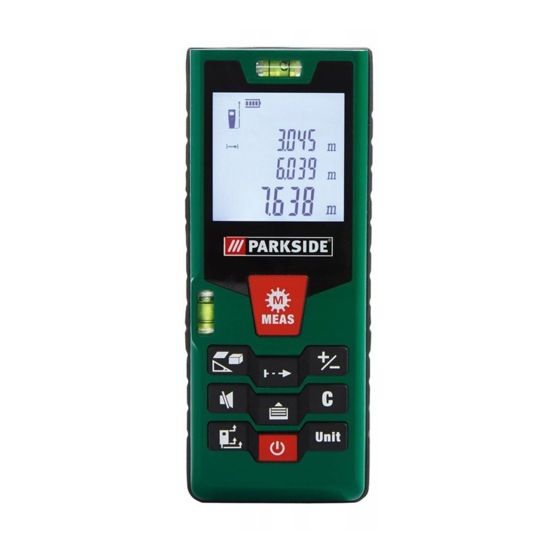
    angegebenen Einsatzbereiche. Händigen Sie alle Unterlagen bei Weitergabe des Produkts an Dritte mit aus. Bestimmungsgemäße Verwendung Dieser Laser-Entfernungsmesser (nachstehend Gerät) eignet sich zum Messen von Entfernungen, Längen, Höhen, Abständen und zum Berechnen von Flächen und Volumen in Innenräumen. Jede andere Verwendung oder Veränderung des Produkts gilt als nicht bestimmungsgemäß...
  • Seite 9 Tastenfeld Taste Addieren / Subtrahieren Taste Zurück / Löschen Speichertaste Einheitentaste Ein- / Aus-Taste Bezugspunkttaste Tontaste Dauermesstaste Funktionsauswahltaste MEAS-Taste Display Batteriestatussymbol Messeinheiten Zeile Wert-1 / Zeile Speicherortnummer Zeile Wert-2 Max.- / Min.-Werte Zeile Wert-3 Ergebniszeile Addieren / Subtrahieren Anzeigesymbol Messmodus Symbol Entfernungsmessungsmodus Speichersymbol Bezugspunkt (Endstück)
  • Seite 10: Lieferumfang

    Lasche Batteriefachabdeckung Lasche Batteriefachabdeckung Klappbares Endstück Endstück Lieferumfang 1 Laser-Entfernungsmesser 2 1,5 V-Batterien LR03 (AAA) 1 Gürteltasche 1 Bedienungsanleitung Technische Daten Maximaler Messbereich: 0,05–50 m* (Messung von Oberseite) 0,17–50 m* (Messung von Unterseite) Messgenauigkeit: ± 1,5 mm ** Messeinheiten: m / in / ft / ft + in Laserklasse: Klasse 2 Lasertyp:...
  • Seite 11: Allgemeine Sicherheitshinweise

    Gewicht: 98,3 g (ohne Batterien) Abmessungen: 120 x 48 x 27,8 mm *) Bei Tageslicht oder bei schlechten Reflektionseigenschaften des Ziels verwenden Sie bitte die Zieltafel. **) Bei günstigen Bedingungen ist mit einem Einfluss von + / - 0,05 mm / m zu rechnen. Bei ungünstigen Bedingungen, zum Beispiel intensiver Sonnenschein, schlecht reflektierende Ziel- oberfläche (schwarze Oberfläche) oder starken Temperatur- schwankungen, wird eine höhere Abweichung erwartet.
  • Seite 12 Lassen Sie das Produkt nicht unbeaufsichtigt, wenn dieses in Gebrauch ist. Andere Personen könnten vom Laserstrahl ge- blendet werden. Schützen Sie das Produkt vor Nässe und direkter Sonnenein- strahlung. Setzen Sie das Produkt keinen extremen Temperaturen oder Temperaturschwankungen aus. Lassen Sie es z. B. nicht län- gere Zeit im Auto liegen.
  • Seite 13: Sicherheitshinweise Für Batterien / Akkus

    Verfahrensweisen ausgeführt werden, kann dies zu gefährlicher Strahlungsexposition führen. Richten Sie den Laserstrahl niemals auf reflektierende Flächen, Personen oder Tiere. Bereits ein kurzer Sichtkontakt mit dem Laserstrahl kann zu Augenschäden führen. Sicherheitshinweise für Batterien / Akkus LEBENSGEFAHR! Halten Sie Batterien / Akkus außer Reich- weite von Kindern.
  • Seite 14: Risiko Der Beschädigung Des Produkts

    SCHUTZHANDSCHUHE TRAGEN! Ausge- laufene oder beschädigte Batterien / Akkus können bei Berührung mit der Haut Verätzungen verursachen. Tragen Sie deshalb in diesem Fall geeignete Schutzhandschuhe. Im Falle eines Auslaufens der Batterien / Akkus entfernen Sie diese sofort aus dem Produkt, um Beschädigungen zu vermeiden. Verwenden Sie nur Batterien / Akkus des gleichen Typs.
  • Seite 15: Batterien Einsetzen / Austauschen

    Batterien einsetzen / austauschen Wenn das Batteriesymbol erstmals im Bildschirm erscheint, sind noch einige Messungen möglich. Erscheint das leere Batterie- symbol , müssen Sie die Batterien auswechseln. Messungen sind nicht mehr möglich. Öffnen Sie den Batteriefachdeckel , indem Sie die Rast- klinke des Deckels vorsichtig nach unten drücken.
  • Seite 16: Handhabung Und Bedienung

    - Bei einem Fehler ist ein längerer Piepton zu hören. - Im Dauermessmodus ist fortlaufend eine schnelle Abfolge von kurzen Pieptönen zu hören und bei einem Fehler verlangsamt sich die schnelle Abfolge der Pieptöne. - Halten Sie die Tontaste kurz gedrückt, um den Piepton in jedem Modus zu aktivieren oder deaktivieren.
  • Seite 17: Zurück / Löschen

    Länge Bereich Volumen 0.000 m 0.000 m 0.000 m 0.000 ft 0.000 ft 0.00 ft 0’0” 1/16 in 0.00 ft 0.00 ft 0’0” 1/16 0.00 ft 0.00 ft Zurück / Löschen Drücken Sie in einem beliebigen Modus mehrmals die Taste Zurück / Löschen , um die zuletzt gemessenen Werte zu löschen und zum vorherigen Wert oder in den vorherigen...
  • Seite 18: Endstück-Bezugspunkt

    werden, bis der gewünschte Bezugspunkt in der oberen linken Ecke des Displays angezeigt wird. Endstück-Bezugspunkt Das Endstück ist hilfreich, wenn eine Entfernung von einer Ecke (diagonaler Raum) oder von einer schwierig zu erreichenden Stelle gemessen wird. Das Endstück befindet sich an der Rückseite des Geräts.
  • Seite 19: Dauermessmodus

    3. Drücken Sie kurz die MEAS-Taste , um den Laser zu aktivieren. Wenn der Laser eingeschaltet ist, wird dies durch das Laser- symbol auf dem Bildschirm angezeigt. Hinweis: Schritt 3 kann übersprungen werden, wenn der Laserstrahl bereits aktiviert ist. 4. Richten Sie den Laser jetzt auf den Zielpunkt und drücken Sie erneut kurz die MEAS-Taste , um eine Messung vorzunehmen.
  • Seite 20 gegenüberliegende Wände sind oder mit einer Funktion die maxi- malen Werte messen. 1. Beginnen Sie die Dauermessung durch kurzes Drücken der Dauermesstaste . Beim Anzeigen der ersten Messung auf dem Display kann es zu einer kurzen Verzögerung kommen. Das ist normal. Jetzt wird jeder Messwert auf dem Display angezeigt.
  • Seite 21: Messwertfunktionen

    Messwertfunktionen Um das Verarbeiten der Messergebnisse zu vereinfachen, bietet das Gerät eine Reihe von integrierten Funktionen an. Durch wie- derholtes Drücken der Funktionsauswahltaste können Sie die folgenden Funktionen nacheinander aktivieren: Fläche, Volumen, Pythagoras einfach, Pythagoras doppelt. Hinweis: Die gewünschte Funktion muss vor der Messung aus- gewählt werden.
  • Seite 22: Volumen

    Volumen 1. Drücken Sie die Funktionsauswahltaste zweimal. Das Volu- mensymbol des Messmodus-Anzeigesymbols erscheint auf dem Display. 2. Messen Sie jetzt die Länge, Breite und Höhe des zu messenden Volumens, indem Sie die MEAS-Taste drücken. Die entspre- chende Zeile des Volumensymbols blinkt für die einzelnen Messwerte auf dem Bildschirm.
  • Seite 23: Pythagoras Doppelt

    Drücken der MEAS-Taste gemessen. Die entsprechende Zeile des Symbols "Pythagoras einfach" blinkt für die einzelnen Messwerte auf. Gleich nach der zweiten Messung wird die berechnete Länge in der Ergebniszeile des Displays an- gezeigt und die entsprechende Zeile des Symbols "Pythagoras einfach"...
  • Seite 24: Addition (Plus)

    Zeile des Dreieckssymbols "Pythagoras doppelt" auf. Gleich nach der dritten Messung wird die berechnete Länge in der Ergebniszeile des Displays angezeigt und die entsprech- enden Zeile des Dreieckssymbols "Pythagoras doppelt" hört auf zu blinken. Die einzelnen Messwerte werden in den obersten 3 Zeilen des Displays angezeigt.
  • Seite 25: Subtraktion (Minus)

    Hinweis: - Die Addition kann mit allen Einheiten (Länge, Fläche, Volumen) durchgeführt werden. Sie können auch die Messergebnisse von Funktionen wie Fläche und Volumen in die Addition einschließen. - Nur Werte der gleichen Einheiten können addiert werden. Der erste gemessene / berechnete Wert legt die zu verwendende Einheit fest.
  • Seite 26: Aufrufen Eines Gespeicherten Datensatzes

    Speicherorte belegt sind, wird die älteste Speicheraufzeichnung von dem neuesten Datensatz überschrieben. Aufrufen eines gespeicherten Datensatzes Halten Sie die Speichertaste kurz gedrückt, um den zuletzt gespeicherten Datensatz anzuzeigen. Auf dem Display wird das Speichersymbol angezeigt und die entsprechende Speicherortnummer wird in der Zeile Speicherortnummer angezeigt.
  • Seite 27: Entfernen/Löschen Aller Gespeicherten Datensätze

    Entfernen/Löschen aller gespeicherten Datensätze Halten Sie im Speichermodus die Speichertaste und die Taste Löschen / Zurück zusammen länger als 5 Sekunden gedrückt, um alle gespeicherten Datensätze zu löschen. Auf dem Display wird eine Sekunde lang "CLEAR ALL" angezeigt und als Bestätigung ertönt ein kurzer Piepton. Speichermodus verlassen Drücken Sie die Taste Löschen / Zurück kurz, um den Histo-...
  • Seite 28: Fehler, Störungen & Fehlerbehebung

    Fehler, Störungen & Fehlerbehebung Problem Ursache Lösung Berechnungsfehler Siehe Bedienungsan- leitung, wiederholen Sie die Vorgänge. Schwache Batterie Tauschen Sie die Batterien aus oder laden Sie diese auf. Das empfangene Verbessern Sie die reflek- Signal ist zu schwach tierende Oberfläche oder die Messdauer (verwenden Sie eine zu lang.
  • Seite 29: Wartung Und Reinigung

    Wartung und Reinigung Das Produkt ist wartungsfrei. ACHTUNG! Tauchen Sie das Produkt niemals in Wasser oder andere Flüssigkeiten. Beim Reinigen darf keine Feuchtig- keit in das Produkt dringen. Reinigen Sie die Laserstrahlaustrittsöffnung und die Emp- fangslinse mit einem sanften Luftstrahl. Bei stärkeren Verunreinigungen entfernen Sie den Schmutz mit einem leicht angefeuchteten Wattestäbchen.
  • Seite 30: Entsorgung

    Entsorgung Die Verpackung besteht aus umweltfreundlichen Materialien, die Sie über die örtlichen Recyclingstellen entsorgen können. Beachten Sie die Kennzeichnung der Verpackungsmate- rialien bei der Abfalltrennung, diese sind gekennzeichnet mit Abkürzungen (a) und Nummern (b) mit folgender Bedeutung: 1–7: Kunststoffe / 20–22: Papier und Pappe / 80–98: Verbundstoffe.
  • Seite 31: Garantie

    Umweltschäden durch falsche Entsorgung der Batterien / Akkus! Batterien / Akkus dürfen nicht über den Hausmüll entsorgt werden. Sie können giftige Schwermetalle enthalten und unterliegen der Sondermüllbehandlung. Die chemischen Symbole der Schwerme- talle sind wie folgt: Cd = Cadmium, Hg = Quecksilber, Pb = Blei. Geben Sie deshalb verbrauchte Batterien / Akkus bei einer kom- munalen Sammelstelle ab.
  • Seite 32: Abwicklung Im Garantiefall

    Die Garantieleistung gilt für Material- oder Fabrikationsfehler. Diese Garantie erstreckt sich nicht auf Produktteile, die normaler Abnut- zung ausgesetzt sind (z. B. Batterien) und daher als Verschleißteile angesehen werden können oder Beschädigungen an zerbrechlichen Teilen, z. B. Schalter, Akkus oder die aus Glas gefertigt sind. Abwicklung im Garantiefall Um eine schnelle Bearbeitung ihres Anliegens zu gewährleisten, folgen Sie bitte den folgenden Hinweisen:...
  • Seite 33: Service

    Service Service Deutschland Tel.: 0800 5435 111 (kostenfrei aus dem dt. Festnetz / Mobilfunknetz) E-Mail: owim@lidl.de Service Österreich Tel.: 0820 201 222 (0,15 EUR/Min.) E-Mail: owim@lidl.at Service Schweiz Tel.: 0842 665566 (0,08 CHF/Min., Mobilfunk max. 0,40 CHF/Min.) E-Mail: owim@lidl.ch DE/AT/CH...
  • Seite 34 List of pictograms used ........Page 36 Introduction ..............Page 36 Intended use ..............Page 37 Parts description ............... Page 37 Scope of delivery ............. Page 39 Technical data ..............Page 39 General safety instructions ......Page 40 Safety instructions for batteries / rechargeable batteries.............
  • Seite 35 Measurement value functions ....Page 49 Area .................. Page 49 Volumes ................Page 50 Simple Pythagoras ............Page 50 Double Pythagoras ............Page 51 Addition (Plus) ..............Page 52 Subtraction (Minus)............Page 53 Historical memory ..........Page 53 Calling up a stored memory ..........Page 53 Clearing / deleting memory record and single memory record ............
  • Seite 36: List Of Pictograms Used

    Attention! Protect yourself from laser radiation! Do not stare into the laser beam! Laser distance measurer PLEM 50 A1 Introduction We congratulate you on the purchase of your new product. You have chosen a high quality product. The instructions for use are part of the product.
  • Seite 37: Intended Use

    applications. If you pass the product on to anyone else, please ensure that you also pass on all the documentation with it. Intended use This laser distance measurer (hereinafter device) is suitable for measuring distances, lengths, heights, gaps and for calculating areas and volumes in indoor spaces.
  • Seite 38 Power button Reference button Beep button Continuous Measurement button Function selection button MEAS button Display Battery status icon Measuring units Value-1 row / Memory location number row Value-2 row Max / Min values Value-3 row Bottom row Add / Subtract Measuring mode indication symbol Distance measurement mode icon Memory icon...
  • Seite 39: Scope Of Delivery

    Scope of delivery 1 Laser Distance Measurer 2 1.5 V batteries LR03 (AAA) 1 Belt pouch 1 Instruction manual Technical data Maximum measuring range: 0.05–50 meter* (measure from top side); 0.17–50 meter* (measure from bottom side) Measuring accuracy: ±1.5 mm** Measuring units: m / in / ft / ft+in Laser class:...
  • Seite 40: General Safety Instructions

    as intense sunshine, poorly reflecting target surface (black surface) or high temperature variations, a higher deviation is expected. General safety instructions Choking hazard! Packaging material (e. g. foils or polystyrol) are not to be toyed with. Keep children away from packaging material.
  • Seite 41 Avoid hefty knocks or dropping the measuring tool. Protect yourself from laser radiation! EN 60825-1:2014 CAUTION LASER RADIATION! DO NOT STARE INTO BEAM! CLASS 2 LASER PRODUCT! Never look directly into the laser beam or into the opening from which it emerges. Looking at a laser beam through optical instru- ments (e.g.
  • Seite 42: Safety Instructions For Batteries / Rechargeable Batteries

    Safety instructions for batteries / rechargeable batteries DANGER TO LIFE! Keep batteries / rechargeable batteries out of reach of children. If accidentally swallowed seek imme- diate medical attention. DANGER OF EXPLOSION! Never recharge non-rechargeable batteries. Do not short-circuit batteries / rechargeable batteries and / or open them.
  • Seite 43: Before Using

    Remove batteries / rechargeable batteries if the product will not be used for a longer period. Risk of damage of the product Only use the specified type of battery / rechargeable battery! Insert batteries / rechargeable batteries according to polarity marks (+) and (-) on the battery / rechargeable battery and the product.
  • Seite 44: Start-Up

    Remove the used batteries from the battery compartment if necessary. Insert the (new) batteries. Ensure the correct polarity as shown on the diagram inside the battery compartment Replace the battery compartment cover as shown (fig. A). Start-up Power ON / OFF Press power button to power on the device.
  • Seite 45: Handling And Operation

    Home-screen mode: Briefly press power button at any mode to Clear all data shown on the display and to go to Home-screen mode. At Home-screen mode, there won't be any data on the display and user can press any particular button at this home-screen mode to go to any specific mode.
  • Seite 46: Selection Of The Reference Point

    Press "Return / Clear" button multiple times to go back to Home-screen (see Home-screen part for more detail). Note: Pressing "Return / Clear" button under continuous measurement mode will stop the measurement. Selection of the reference point The rear reference point (base) or the end piece reference point or the front reference point of the device can be used as the contact surface for any measurement.
  • Seite 47: Measuring Lengths

    Measuring lengths Single Measurement mode 1. Place or hold the reference plane of the device on or against the desired base surface from which you want to determine a distance. 2. Check the flatness of the device by use of both the bubble lev- .
  • Seite 48: Continuous Measurement Mode

    - If no button is pressed for 30 seconds, the laser pointer and display back-light will turn off. If no button is pressed for 3 minutes, the device will power off itself. Continuous Measurement mode Continuous measurement involves taking series of measurements from which the maximum (MAX) and minimum (MIN) values are displayed.
  • Seite 49: Measurement Value Functions

    button and add / subtract button will be inactive at this mode. - If no button is pressed for 3 minutes, the device will power off itself. Measurement value functions To make it easier to process measurement results, the device offers a number of integrated functions.
  • Seite 50: Volumes

    Volumes 1. Press the Function button twice. The volume icon of meas- uring mode indication symbol appears on the display. 2. Now measure the length, width and height of the volume to be measured by pressing the MEAS button . The correspond- ing line of the volume icon flashes on the display for the indi- vidual measurement values.
  • Seite 51: Double Pythagoras

    Right after the second measurement, the calculated length is shown on the bottom row of the display and the correspond- ing line of the "Simple Pythagoras" icon stop flashing. The indi- vidual measured values will be shown on the top two rows of the display.
  • Seite 52: Addition (Plus)

    triangle icon stop flashing. The individual measured values will be shown on the top 3 rows of the display. Note: Please note that angular error (no right angles) will lead to incorrect results. Ensure that the measured distances lie on a plane (alignment).
  • Seite 53: Subtraction (Minus)

    - Result of an addition and the individual values of the addition are automatically stored in the memory. Subtraction (Minus) The subtraction of measurements is carried out in the same way as the addition. The only difference is that the add / subtract button has to be pressed again while the plus symbol is flashing on the display to get minus symbol on the display.
  • Seite 54: Clearing / Deleting Memory Record And Single Memory Record

    Press and hold the memory button for more than 1.5 sec- onds will scroll down the memory record fast by jumping the re- cord from 10 to 20 to 30..100. Clearing / deleting memory record and single memory record Under memory mode, press and hold memory button Clear / return button together for less than 1.5 seconds to Clear currently viewing memory.
  • Seite 55: Belt Pouch

    number will also be disappeared from the "memory location number row" Belt pouch Use the supplied belt pouch to protect the device when not in use. Error, faults & troubleshooting Faults Cause Solution Calculation error Refer to user manual, repeat the procedures. Low battery Replace batteries or charge the batteries.
  • Seite 56: Maintenance And Cleaning

    Faults Cause Solution Hardware error Switch on / off the device, if the symbol still appears after several times, please contact with your dealer. Maintenance and cleaning The product is maintenance-free. CAUTION! Never submerse the product in water or other liquids.
  • Seite 57: Disposal

    Disposal The packaging is made entirely of recyclable materials, which you may dispose of at local recycling facilities. Observe the marking of the packaging materials for waste separation, which are marked with abbreviations (a) and numbers (b) with following meaning: 1–7: plastics / 20–22: paper and fibreboard / 80–98: composite materials.
  • Seite 58: Warranty

    Environmental damage through incorrect disposal of the batteries / rechargeable batteries! Batteries / rechargeable batteries may not be disposed of with the usual domestic waste. They may contain toxic heavy metals and are subject to hazardous waste treatment rules and regulations. The chemical symbols for heavy metals are as follows: Cd = cad- mium, Hg = mercury, Pb = lead.
  • Seite 59: Warranty Claim Procedure

    The warranty applies to defects in material or manufacture. This warranty does not cover product parts subject to normal wear, thus possibly considered consumables (e.g. batteries) or for damage to fragile parts, e.g. switches, rechargeable batteries or glass parts. Warranty claim procedure To ensure quick processing of your case, please observe the following instructions: Please have the till receipt and the item number (e.g.
  • Seite 60: Service

    Service Service Great Britain Tel.: 0800 404 7657 E-Mail: owim@lidl.co.uk Service Ireland Tel.: 1890 930 034 (0,08 EUR/Min., (peak)) (0,06 EUR/Min., (off peak)) E-Mail: owim@lidl.ie 60 GB/IE...
  • Seite 61 Légende des pictogrammes utilisés ..Page 63 Introduction ..............Page 63 Utilisation conforme ............Page 64 Descriptif des pièces ............Page 64 Contenu de la livraison ............ Page 66 Caractéristiques techniques ..........Page 66 Instructions générales de sécurité ..Page 67 Consignes de sécurité...
  • Seite 62 Fonctions de valeur de mesure ....Page 76 Surface ................Page 77 Volume ................Page 77 Pythagore simple .............. Page 78 Pythagore double ............. Page 79 Addition (Plus) ..............Page 80 Soustraction (Moins) ............Page 81 Mémoire historique ..........Page 81 Accès à...
  • Seite 63: Légende Des Pictogrammes Utilisés

    Porter des gants de protection ! Attention ! Protégez-vous contre les rayons laser ! Ne regardez pas le rayon laser ! Télémètre laser PLEM 50 A1 Introduction Ce télémètre à laser (désigné par appareil dans la suite) est ap- proprié à la mesure d'éloignements, longueurs, hauteurs, distances et au calcul de surfaces et volumes dans des espaces intérieurs.
  • Seite 64: Utilisation Conforme

    d‘utilisation et de sécurité du produit. Ce produit doit uniquement être utilisé conformément aux instructions et dans les domaines d‘application spécifiés. Lors d‘une cession à tiers, veuillez également remettre tous les documents. Utilisation conforme Le produit est conçu pour mesurer des distances, des longueurs, des auteurs et des écarts.
  • Seite 65 Touche d'unités Touche Marche / Arrêt Touche de point de référence Touche de sonorité Touche de mesure en continu Touche de sélection de fonction Touche MEAS Écran Symbole d'état des piles Unités de mesure Ligne Valeur 1 / Ligne Numéro d'emplacement de mémoire Ligne Valeur 2 Valeurs Min./Max.
  • Seite 66: Contenu De La Livraison

    Contenu de la livraison 1 télémètre à laser 2 piles 1,5 V LR03 (AAA) 1 sac à ceinture 1 mode d'emploi Caractéristiques techniques Étendue maximale de mesure : 0,05–50 m* (mesure de côté supérieur) 0,17–50 m* (mesure de côté inférieur) Précision de mesure : ±...
  • Seite 67: Instructions Générales De Sécurité

    par exemple fort ensoleillement, surface cible réfléchissant mal (surface noire) ou fortes variations de température, on doit s'at- tendre à un écart plus important. Instructions générales de sécurité Risque d'asphyxie ! Les matériaux d'emballages (par.ex. plas- tiques ou en polystyrène) ne doivent pas être utilisés comme jouet.
  • Seite 68 s'il a été exposé à de fortes variations de température. Lors de températures ou variations de température extrêmes, la préci- sion du produit peut être altérée. Évitez les chocs violents ou la chute du produit. Protégez-vous contre les rayons laser ! EN 60825-1:2014 ATTENTION RAYON LASER ! NE PAS REGARDER DANS LE FAISCEAU LASER ! CLASSE DE LASER 2 !
  • Seite 69: Consignes De Sécurité Relatives Aux Piles / Aux Piles Rechargeables

    Consignes de sécurité relatives aux piles / aux piles rechargeables DANGER DE MORT ! Rangez les piles / piles rechargea- bles hors de la portée des enfants. En cas d’ingestion, con- sultez immédiatement un médecin ! RISQUE D‘EXPLOSION ! Ne rechargez jamais des piles non rechargeables.
  • Seite 70: Risque D'endommagement Du Produit

    En cas de fuite des piles / piles rechargeables, retirez-les aus- sitôt du produit pour éviter tout endommagement. Utilisez uniquement des piles / piles rechargeables du même type. Ne mélangez pas des piles / piles rechargeables usées et neuves ! Retirez les piles / piles rechargeables, si vous ne comptez pas utiliser le produit pendant une période prolongée.
  • Seite 71: Insérer / Remplacer Les Piles

    Insérer / remplacer les piles Lorsque le symbole de piles apparaît pour la première fois sur l'écran , quelques mesures sont encore possibles. Si le symbole de piles déchargées apparaît , vous devez les remplacer. Ouvrez le couvercle du compartiment à piles en appuyant doucement sur le loquet du couvercle Retirez les piles usagées du compartiment à...
  • Seite 72: Manipulation Et Utilisation

    - Un bip de longue durée se fait entendre en cas d'erreur. - En mode de mesure en continu, une succession rapide de bips sonores brefs se fait entendre. En cas d'erreur, la succession se fait plus lente. - Maintenez la touche de sonorité brièvement enfoncée afin d'activer/ de désactiver le bip sonore dans chaque mode.
  • Seite 73: Retour /Supprimer

    Longueur Surface Volume 0’0” 1/16 in 0.00 ft 0.00 ft 0’0” 1/16 0.00 ft 0.00 ft Retour /Supprimer Appuyez dans un mode quelconque plusieurs fois la touche Retour /Supprimer pour effacer les valeurs mesurées en dernier et revenir à la valeur précédente ou au mode précédent. Appuyez plusieurs fois sur la touche Retour/Supprimer pour revenir à...
  • Seite 74: Point De Référence De Pièce Finale

    Point de référence de pièce finale La pièce finale est pratique lorsqu'une distance est mesurée à partir d'un coin (pièce diagonale) ou d'un endroit difficile d'accès. La pièce finale est située sur le côté arrière de l'appareil. La pièce finale peut être dépliée comme indiqué...
  • Seite 75: Mode De Mesure En Continu

    la ligne inférieure de l'écran. Les mesures précédentes sont décalées vers le haut. Remarque : - Répétez le cas échéant les étapes 1 à 4 pour effectuer une autre mesure de distance. - Le symbole de mode de mesure de distance reste allumé...
  • Seite 76: Fonctions De Valeur De Mesure

    2. Arrêtez la mesure en pressant la touche de mesure en continu , la touche MEAS ou la touche Retour / Supprimer Sur l'écran sont maintenant affichées les valeurs maximales (MAX) et minimales (MIN) de cette série de mesure ainsi que la dernière valeur mesurée.
  • Seite 77: Surface

    Surface 1. Pressez une fois la touche de sélection de fonction . Le symbole de surface du symbole d'affichage de mode de mesure apparaît sur l'écran. 2. Mesurez à présent la longueur et la largeur de la surface à mesurer en appuyant sur la touche MEAS .
  • Seite 78: Pythagore Simple

    Pythagore simple Le théorème de Pythagore met en lumière l'interdépendance des longueurs des côtés d'un triangle rectangle, et ce de la manière suivante : a² + b² = c², a et b étant les côtés et c l'hypoténuse du triangle. La fonction "Pythagore simple" permet de calculer la lon- gueur de l'un des côtés.
  • Seite 79: Pythagore Double

    Pythagore double Cette fonction permet d'appliquer le théorème de Pythagore à deux triangles rectangles présentant un côté commun. Il est ainsi possible de calculer la longueur de la base de chaque triangle. Cette fonction calcule la distance entre deux points quelconques et est particu- lièrement utile pour des points de mesure inaccessibles.
  • Seite 80: Addition (Plus)

    Addition (Plus) 1. Afin d'additionner deux valeurs individuelles, servez-vous d'une mesure (longueur, surface ou volume), afin que l'écran affiche une valeur. 2. Appuyez ensuite sur la touche Addition / Soustraction pour lancer la fonction d'addition (Plus). Le symbole Plus clignote maintenant dans la ligne "Valeur 3" sur l'écran.
  • Seite 81: Soustraction (Moins)

    Soustraction (Moins) La soustraction de mesures est effectuée de la même manière que l'addition. La seule différence est que la touche Addition / Sou- straction doit être de nouveau pressée pendant que le symbole Plus clignote sur l'écran, ceci afin d'obtenir le symbole Moins sur l'écran.
  • Seite 82: Éliminer / Supprimer Des Séries De Données Mémorisées Et Mémorisées Individuellement

    Maintenez enfoncée la touche de mémoire pendant plus de 1,5 secondes afin de naviguer rapidement vers le bas dans les séries de données mémorisées, ceci de 10 à 20, puis 30..100. Éliminer / Supprimer des séries de données mémorisées et mémorisées individuellement En mode de mémoire, maintenez la touche de mémoire la touche Supprimer / Retour...
  • Seite 83: Uitter Le Mode De Mémoire

    Quitter le mode de mémoire Pressez brièvement la touche Supprimer / Retour pour quit- ter le mode de mémoire historique et passer au mode d'écran principal. Le symbole de mémoire a maintenant disparu de l'écran. Le numéro d'emplacement de mémoire va également disparaître de la ligne Numéro d'emplacement de mémoire Sac à...
  • Seite 84: Entretien Et Nettoyage

    Cause Solution Pro- blème Le signal reçu est trop Améliorez la surface fort. réfléchissante (utilisez une plaque de mire ou ne visez pas vers une lumière intense). Hors de la zone de Mesurez la distance mesure à l'intérieur de la zone de mesure.
  • Seite 85: Rangement

    N’utilisez en aucun cas de l’essence, des solvants ou des nettoyants attaquant le plastique. Le produit ne peut être ouvert que par un spécialiste s'il a besoin d'être réparé. Utilisez un chiffon sec pour le nettoyage du boîtier. Nettoyez le produit régulièrement, de préférence après chaque utilisation.
  • Seite 86 Votre mairie ou votre municipalité vous renseigneront sur les possibilités de mise au rebut des produits usagés. Afin de contribuer à la protection de l'environnement, veuillez ne pas jeter votre produit usagé dans les or- dures ménagères, mais éliminez-le de manière appro- priée.
  • Seite 87: Garantie

    Garantie Le produit a été fabriqué selon des critères de qualité stricts et contrôlé consciencieusement avant sa livraison. En cas de défaillance, vous êtes en droit de retourner ce produit au vendeur. La présente ga- rantie ne constitue pas une restriction de vos droits légaux. Ce produit bénéficie d‘une garantie de 3 ans à...
  • Seite 88: Service Après-Vente

    Veuillez conserver le ticket de caisse et la référence du produit (par ex. IAN 123456) à titre de preuve d’achat pour toute de- mande. Le numéro de référence de l’article est indiqué sur la plaque d’identification, gravé sur la page de titre de votre manuel (en bas à...
  • Seite 89 Legenda van de gebruikte pictogrammen ............. Pagina 91 Inleiding ..............Pagina 91 Correct gebruik ............Pagina 92 Beschrijving van de onderdelen ......... Pagina 92 Omvang van de levering ..........Pagina 94 Technische gegevens ..........Pagina 94 Algemene veiligheidsinstructies ..Pagina 95 Veiligheidsinstructies voor batterijen / accu‘s ....
  • Seite 90 Meetwaarde-functies ........Pagina 104 Oppervlak ..............Pagina 104 Volume ................. Pagina 105 Pythagoras enkel ............Pagina 105 Pythagoras dubbel ............Pagina 106 Optellen (Plus) ............. Pagina 107 Aftrekken (Min) ............Pagina 108 Opslag ............... Pagina 108 Opvragen van opgeslagen gegevens ....... Pagina 109 Verwijderen / Wissen van (afzonderlijk) opgeslagen gegevens ..........
  • Seite 91: Legenda Van De Gebruikte Pictogrammen

    Veiligheidshandschoenen dragen! Opgelet! Bescherm u tegen laserstraling! Niet in de laserstraal kijken! Laserafstandsmeter PLEM 50 A1 Inleiding Hartelijk gefeliciteerd met de aankoop van uw nieuwe product. U heeft voor een hoogwaardig product gekozen. De gebruiksaan- wijzing is een deel van het product. Deze bevat belangrijke aan- wijzingen voor veiligheid, gebruik en verwijdering.
  • Seite 92: Correct Gebruik

    zoals beschreven en voor de aangegeven toepassingsgebieden. Overhandig alle documenten bij doorgifte van het product aan derden. Correct gebruik Deze laserafstandsmeter (hierna apparaat) is geschikt voor het meten van afstanden, lengtes, hoogtes, dieptes en voor het be- rekenen van oppervlakken en volumes binnenshuis. Elke wijziging of elk ander gebruik van het product is niet doelmatig en houdt een aanzienlijk ongevalrisico in.
  • Seite 93: Uitklapbaar Eindstuk

    Eenheden-toets Aan- / Uit-toets Referentiepunt-toets Geluidstoets Toets voor continu meten Functiekeuze-toets MEAS-toets Display Batterijstatus-symbool Meeteenheden Waarde-1 / Opslaglocatienummer Waarde-2 Max.- / Min.-waarden Waarde-3 Resultaat Optellen / Aftrekken Symbool voor de meetmodus Symbool afstandsmeting-modus Opslag-symbool Referentiepunt (eindstuk) Referentiepunt (achterkant) Referentiepunt (voorkant) Symbool voor Laser aan Lip batterijvak-deksel Lip batterijvak-deksel...
  • Seite 94: Omvang Van De Levering

    Omvang van de levering 1 laser-afstandsmeter 2 1,5 V-batterijen LR03 (AAA) 1 riemtas 1 gebruiksaanwijzing Technische gegevens Maximaal meetbereik: 0,05–50 m* (meting vanaf de bovenkant) 0,17–50 m* (meting vanaf de onderkant) Meetnauwkeurigheid: ± 1,5 mm ** Meeteenheden: m / in / ft / ft + in Laserklasse: klasse 2 Lasertype:...
  • Seite 95: Algemene Veiligheidsinstructies

    **) Bij gunstige omstandigheden moet rekening worden gehouden met een afwijking van + / - 0,05 mm / m. Bij ongunstige omstandig- heden, bijvoorbeeld veel zonlicht, slecht reflecterend doelopper- vlak (zwarte oppervlakken) of grote temperatuurschommelingen kan de verwachte afwijking hoger zijn. Algemene veiligheidsinstructies Verstikkingsgevaar! Verpakkingsmateriaal (bijv.
  • Seite 96 tijd in de auto liggen. Laat het product bij grote temperatuur- schommelingen eerst acclimatiseren alvorens het in bedrijf te nemen. Bij extreme temperaturen of temperatuurschommelingen kan de nauwkeurigheid van het product beïnvloed worden. Vermijd heftige schokken of het laten vallen van het product. Bescherm u tegen laserstraling! EN 60825-1:2014 VOORZICHTIG LASERSTRALING! NIET IN DE...
  • Seite 97: Veiligheidsinstructies Voor Batterijen / Accu's

    Veiligheidsinstructies voor batterijen / accu‘s LEVENSGEVAAR! Houd batterijen / accu‘s buiten het bereik van kinderen. Raadpleeg bij inslikken onmiddellijk een arts! EXPLOSIEGEVAAR! Laad niet oplaadbare bat- terijen nooit op. Sluit de batterijen / accu‘s niet kort en / of open deze niet. Daardoor kan de batterij oververhit raken, in brand vliegen of exploderen.
  • Seite 98: Voor De Ingebruikname

    Verwijder de batterijen / accu‘s, als u het product gedurende een langere periode niet gebruikt. Risico op beschadiging van het product Gebruik uitsluitend het aangegeven type batterij / accu! Plaats de batterijen / accu‘s volgens de weergegeven polariteit (+) en (-) op batterij / accu en op product. Reinig de contacten van de batterij / accu en die in het batterijvak, voordat u deze plaatst! Verwijder verbruikte batterijen / accu‘s direct uit het product.
  • Seite 99: Ingebruikname

    Sluit het deksel van het batterijvak zoals aangegeven (afb. A). Ingebruikname In- / uitschakelen Druk op de Aan- / Uit-toets om het apparaat in te schakelen. Houd voor het uitschakelen van het apparaat de Aan- / Uit-toets ingedrukt totdat het lcd-display uit gaat. Opmerking: als er 3 minuten lang geen toets wordt ingedrukt, schakelt het apparaat zichzelf automatisch uit.
  • Seite 100: Gebruik En Bediening

    gebruiker kan hier op elke willekeurige toets drukken om naar een bepaalde modus te gaan. Gebruik en bediening Lengte-eenheid kiezen Gelijk na het inschakelen van het apparaat wordt op het display de laatst gebruikte lengte-eenheid weergegeven. Druk op de eenheden-toets om een andere eenheid te kiezen.
  • Seite 101: Referentiepunt Kiezen

    Opmerking: door het indrukken van de toets Terug / Wissen tijdens de modus voor continu meten, wordt de meting gestopt. Referentiepunt kiezen Het achterste referentiepunt (basis), het referentiepunt van het ein- dstuk of het voorste referentiepunt van het apparaat kunnen als contactvlak voor alle metingen worden gebruikt.
  • Seite 102: Meten Van Lengtes

    Meten van lengtes Enkele meting 1. Plaats of houd het referentievlak van het apparaat op of tegen het gewenste basisoppervlak van waaruit u een afstand wilt meten. 2. Controleer de horizontale positie van het apparaat met behulp van de waterpas .
  • Seite 103: Continu Meten

    - Op het display kunnen gelijktijdig maximaal 4 gemeten waarden worden weergegeven. - Als er langer dan 30 seconden geen toets wordt ingedrukt, worden de laserpointer en de achtergrondverlichting van het display uitgeschakeld. Als er 3 minuten lang geen toets wordt ingedrukt, schakelt het apparaat zichzelf uit.
  • Seite 104: Meetwaarde-Functies

    - Tijdens het continu meten knippert het symbool voor de afstands- meting-modus zolang de meting wordt uitgevoerd. - Optellen, aftrekken, oppervlakte- en volumemetingen kunnen in deze modus niet worden uitgevoerd. Daarom zijn de functiekeu- ze-toets en de toets Optellen / Aftrekken in deze modus niet actief.
  • Seite 105: Volume

    wordt het berekende oppervlak als resultaat op het display weergegeven en de desbetreffende regel voor het oppervlak- symbool stopt met knipperen. Lengte, breedte en omtrek worden in volgorde in de bovenste drie regels van het display weerge- geven. Volume 1. Druk tweemaal op de functiekeuze-toets .
  • Seite 106: Pythagoras Dubbel

    1. Druk driemaal op de functiekeuze-toets . Het driehoek-sym- bool "Pythagoras enkel" als symbool voor de meetmodus verschijnt op het display. 2. Nu wordt de schuine zijde (grootste afstand) en één van de benen (kortste afstand) door het indrukken van de MEAS-toets gemeten.
  • Seite 107: Optellen (Plus)

    2. Meet nu de linker schuine zijde (grootste afstand naar links) en vervolgens een been (kortste afstand tot het meetoppervlak) en tot slot de rechter schuine zijde (grootste afstand naar rechts) door op de MEAS-toets te drukken. Voor de afzonderlijke meetwaarden knippert de desbetreffende regel voor het drie- hoek-symbool "Pythagoras dubbel".
  • Seite 108: Aftrekken (Min)

    gemeten / berekende waarde wordt in de regel voor "Waarde-2" op het display weergegeven. Opmerking: - De optelling kan met alle eenheden (lengte, oppervlak, volume) worden uitgevoerd. U kunt ook de meetresultaten van functies zoals oppervlak en volume bij de optelling betrekken. - Alleen waarden met gelijke eenheden kunnen worden opgeteld.
  • Seite 109: Opvragen Van Opgeslagen Gegevens

    worden samen met de desbetreffende afzonderlijke waarden op- geslagen. Er kunnen in totaal 100 metingen worden opgeslagen. Zodra alle 100 plaatsen vol zijn, worden de oudste gegevens door de nieuwste overschreven. Opvragen van opgeslagen gegevens Houd de opslag-toets kort ingedrukt om de laatst opgeslagen gegevens weer te geven.
  • Seite 110: Verwijderen / Wissen Van Alle Opgeslagen Gegevens

    Verwijderen / Wissen van alle opgeslagen gegevens Houd in de opslagmodus de opslag-toets en de toets Wissen / Terug samen langer dan 5 seconden ingedrukt om alle opgeslagen gegevens te wissen. Op het display wordt een seconde lang "CLEAR ALL" weergegeven en als bevestiging klinkt er een korte pieptoon.
  • Seite 111: Fouten, Storingen & Storing Oplossen

    Fouten, storingen & storing oplossen Oorzaak Oplossing Pro- bleem Berekeningsfout Zie gebruiksaanwijzing, herhaal het proces. Zwakke batterij Vervang de batterijen of laad deze op. Het ontvangen sig- Verbeter het reflecterende naal is te zwak of de oppervlak (gebruik een meetduur te lang. doelbord, wit papier).
  • Seite 112: Onderhoud En Reiniging

    Onderhoud en reiniging Het product is onderhoudsvrij. LET OP! Dompel het product nooit onder in water of andere vloeistoffen. Bij het reinigen mag er geen vocht in het product binnendringen. Reinig de uitgang van de laserstraal en het sensor-oog met een zachte luchtstroom. Bij sterkere verontreinigingen het vuil verwijderen met een licht vochtig gemaakt wattenstaafje.
  • Seite 113: Afvoer

    Afvoer De verpakking bestaat uit milieuvriendelijke grondstoffen die u via de plaatselijke recyclingcontainers kunt afvoeren. Neem de aanduiding van de verpakkingsmaterialen voor de afvalscheiding in acht. Deze zijn gemarkeerd met de afkortingen (a) en een cijfers (b) met de vol- gende betekenis: 1–7: kunststoffen / 20–22: papier en vezelplaten / 80–98: composietmaterialen.
  • Seite 114: Garantie

    Milieuschade door foutieve verwijdering van de batterijen / accu‘s! Batterijen / accu‘s mogen niet via het huisvuil worden weggegooid. Ze kunnen giftige zware metalen bevatten en vallen onder het chemisch afval. De chemische symbolen van de zware metalen zijn: Cd = cadmium, Hg = kwik, Pb = lood. Geef verbruikte batte- rijen / accu‘s daarom af bij een gemeentelijk inzamelpunt.
  • Seite 115: Afwikkeling In Geval Van Garantie

    De garantie geldt voor materiaal- en productiefouten. Deze garan- tie is niet van toepassing op productonderdelen, die onderhevig zijn aan normale slijtage en hierdoor als aan slijtage onderhevige onderdelen gelden (bijv. batterijen) of voor beschadigingen aan breekbare onderdelen, zoals bijv. schakelaars, accu’s of dergelijke onderdelen, die gemaakt zijn van glas.
  • Seite 116: Service

    Service Service Nederland Tel.: 0900 0400 223 (0,10 EUR/Min.) E-Mail: owim@lidl.nl Service Belgiё Tel.: 070 270 171 (0,15 EUR/Min.) E-Mail: owim@lidl.be 116 NL/BE...
  • Seite 117 Legenda zastosowanych piktogramów ............Strona 119 Wstęp ................. Strona 119 Zastosowanie zgodne z przeznaczeniem ....Strona 120 Opis części ..............Strona 120 Zawartość ..............Strona 122 Dane techniczne ............Strona 122 Ogólne wskazówki bezpieczeństwa ..........Strona 123 Wskazówki bezpieczeństwa dla baterii / akumulatorów ..........
  • Seite 118 Funkcje wartości pomiaru ......Strona 132 Powierzchnia ............... Strona 133 Objętość ..............Strona 133 Pitagoras prosty ............Strona 134 Pitagoras podwójny ............ Strona 135 Dodawanie (Plus) ............Strona 136 Odejmowanie (Minus) ..........Strona 137 Pamięć historii ............. Strona 137 Wyświetlanie zapisanego zestawu danych ....Strona 137 Usuwanie / Kasowanie zapisanych i pojedynczo zapisanych zestawów danych ....
  • Seite 119: Legenda Zastosowanych Piktogramów

    Uwaga! Należy chronić się przed promieniowaniem laserowym! Nie wpatrywać się w promień lasera! Dalmierz laserowy PLEM 50 A1 Wstęp Gratulujemy Państwu zakupu nowego produktu. Tym samym zde- cydowali się Państwo na zakup produktu wysokiej jakości. Instrukcja obsługi jest częścią tego produktu. Zawiera ona ważne wskazówki dotyczące bezpieczeństwa, użytkowania i utylizacji.
  • Seite 120: Zastosowanie Zgodne Z Przeznaczeniem

    wyłącznie zgodnie z jego poniżej opisanym przeznaczeniem. W przypadku przekazania produktu innej osobie należy dołą- czyć do niego całą jego dokumentację. Zastosowanie zgodne z przeznaczeniem Ten dalmierz laserowy (w dalszej części nazywany urządzeniem) nadaje się do pomiaru odległości, długości, wysokości, odstępów i do obliczania powierzchni i objętości w pomieszczeniach zamkniętych.
  • Seite 121 Klawiatura Przycisk Dodawanie / Odejmowanie Przycisk Wstecz / Usuń Przycisk pamięci Przycisk jednostki Przycisk Włącz / Wyłącz Przycisk punktu odniesienia Przycisk dźwięku Przycisk pomiaru stałego Przycisk wyboru funkcji Przycisk MEAS Wyświetlacz Symbol statusu baterii Jednostki pomiaru Wiersz wartość-1 / Wiersz numer miejsca w pamięci Wiersz wartość-2 Wartości Maks.
  • Seite 122: Zawartość

    Zawleczka pokrywa komory baterii Zawleczka pokrywa komory baterii Składana końcówka Końcówka Zawartość 1 dalmierz laserowy 2 baterie 1,5 V LR03 (AAA) 1 torba na pas 1 instrukcja obsługi Dane techniczne Maksymalny zakres pomiaru: 0,05–50 m* (pomiar od strony górnej) 0,17–50 m* (pomiar od strony dolnej) Dokładność...
  • Seite 123: Ogólne Wskazówki Bezpieczeństwa

    Względna wilgotność powietrza: 90 % maks. Baterie: 2 x 1,5 V LR03 (AAA) Ciężar: 98,3 g (bez baterii) Wymiary: 120 x 48 x 27,8 mm *) W świetle dziennym lub przy złych właściwościach odbijających celu proszę użyć tablicy celowniczej. **) W korzystnych warunkach należy liczyć się z wpływem ± 0,05 mm / m.
  • Seite 124 z niego zagrożenia. Dzieci nie mogą bawić się produktem. Czyszczenie i konserwacja nie mogą być wykonywane przez dzieci bez nadzoru. Nie pozostawiać produktu bez nadzoru, jeśli jest używany. Inne osoby mogłyby zostać oślepione promieniem lasera. Chronić produkt przed wilgocią i bezpośrednim promieniowa- niem słonecznym.
  • Seite 125: Wskazówki Bezpieczeństwa Dla Baterii / Akumulatorów

    UWAGA! Jeśli używa się innych urządzeń manipulacyjnych lub regulacyjnych lub stosuje inne metody postępowania niż tutaj podane, może dojść do niebezpiecznej ekspozycji na promieniowanie. Nigdy nie należy kierować promienia lasera w stronę odbija- jących powierzchni, osób lub zwierząt. Już krótki kontakt wzrokowy z promieniem lasera może prowadzić...
  • Seite 126: Przed Uruchomieniem

    Jeśli wyciekną baterie / akumulatory, należy unikać kontaktu skóry, oczu i błon śluzowych z chemikaliami! Dotknięte miejsca natychmiast przepłukać czystą wodą i udać się do lekarza! ZAKŁADAĆ RĘKAWICE OCHRONNE! Wy- lane lub uszkodzone baterie / akumulatory po do- tknięciu skóry mogą spowodować poparzenia chemiczne.
  • Seite 127: Zakładanie/Wymiana Baterii

    Zakładanie/Wymiana baterii Jeśli symbol baterii pojawi się pierwszy raz na wyświetlaczu możliwe jest wykonanie jeszcze kilku pomiarów. Jeśli pojawi się symbol pustej baterii , należy wymienić baterię. Pomiary nie są już możliwe. Otworzyć pokrywę komory baterii , ostrożnie wciskając zapadkę pokrywy w dół.
  • Seite 128: Zastosowanie I Obsługa

    - W razie błędu słyszalne jest dłuższe piknięcie. - W trybie pomiaru stałego słyszalna jest ciągła szybka sekwencja krótkich piknięć i w razie błędu szybka sekwencja piknięć staje się wolniejsza. - Przytrzymać krótko wciśnięty przycisk dźwięku , aby aktywować lub dezaktywować pikanie w każdym trybie. Tryb ekranu głównego: Przytrzymać...
  • Seite 129: Wstecz / Usuń

    Długość Zakres Objętość 0’0” 1/16 0,00 ft 0,00 ft Wstecz / Usuń W dowolnym trybie nacisnąć kilkakrotnie przycisk Wstecz / Usuń , aby usunąć ostatnio zmierzone wartości i wrócić do wcześniejszej wartości lub wcześniejszego trybu. Nacisnąć kilka razy przycisk Wstecz / Usuń , aby wrócić...
  • Seite 130: Punkt Odniesienia Końcówki

    Punkt odniesienia końcówki Końcówka jest pomocna, jeśli odległość jest mierzona od narożnika (pomieszczenie diagonalne) lub z trudno dostępnego miejsca. Końcówka znajduje się na odwrotnej stronie urządzenia. Końcówkę można rozłożyć jak pokazano na rys. D ostrym narzędziem lub paznokciem. Po użyciu końcówkę należy złożyć...
  • Seite 131: Tryb Pomiaru Stałego

    się powiedzie, wynik pomiaru jest wskazywany w dolnym wierszu wyświetlacza. Wcześniejsze pomiary są przesu- wane w górę. Wskazówka: - W razie potrzeby powtórzyć kroki 1 do 4, aby zmierzyć inną odległość. - Symbol trybu pomiaru odległości pozostaje włączony pod trybem pomiaru pojedynczego (nie miga). - Na wyświetlaczu może być...
  • Seite 132: Funkcje Wartości Pomiaru

    2. Zatrzymać pomiar poprzez naciśnięcie przycisku pomiaru sta- łego , przycisku MEAS lub przycisku Wstecz / Usuń Na wyświetlaczu wskazywane są teraz maksymalne (MAX) i minimalne (MIN) wartości określonego szeregu pomiarów oraz ostatnio zmierzoną wartość. Wskazówka: - W razie potrzeby powtórzyć kroki 1 i 2, aby wykonać kolejne pomiary.
  • Seite 133: Powierzchnia

    Powierzchnia 1. Nacisnąć jeden raz przycisk wyboru funkcji . Symbol powi- erzchni symbolu wskaźnika trybu pomiaru pojawia się na wyświetlaczu. 2. Teraz zmierzyć długość i szerokość mierzonej powierzchni poprzez naciśnięcie przycisku MEAS . Odpowiedni wiersz symbolu powierzchni miga na wyświetlaczu dla poszczegól- nych wartości pomiaru.
  • Seite 134: Pitagoras Prosty

    Pitagoras prosty Twierdzenie Pitagorasa opisuje zależność długości boków trójkąta prostokątnego następująco: a² + b² = c², przy czym a i b są przyprostokątnymi, a c przeciwprostokątną trójkąta. Z funkcją "Pitagoras prosty" możliwe jest obliczenie długości jednej z przyprostokątnych. Funkcja ta jest szczególnie pomocna przy trudno dostępnych punktach pomiaru.
  • Seite 135: Pitagoras Podwójny

    Pitagoras podwójny W tej funkcji twierdzenie Pitagorasa stosowane jest na dwóch trójkątach prostokątnych, które posiadają wspólną przyprostokątną. Dzięki temu możliwe jest obliczenie boku podstawowego każdego trójkąta. Funkcja ta oblicza odległość między dowolnymi punktami i jest szczególnie przydatna przy niedostępnych punktach pomiaru. 1.
  • Seite 136: Dodawanie (Plus)

    Dodawanie (Plus) 1. W celu dodania dwóch pojedynczych wartości wykonać pomiar (długość, powierzchnia lub objętość), tak, aby wyświetlacz wskazywał wartość. 2. Następnie nacisnąć przycisk Dodawanie / Odejmowanie aby uruchomić funkcję dodawania (Plus). Teraz miga symbol Plus- w wierszu "Wartosć-3" na wyświetlaczu. 3.
  • Seite 137: Odejmowanie (Minus)

    Odejmowanie (Minus) Odejmowanie pomiarów można przeprowadzać w taki sam sposób jak dodawanie. Jedyną różnicą jest to, że należy ponownie nacisnąć przycisk Dodawanie / Odejmowanie , podczas gdy na wyświe- tlaczu miga symbol Plus, aby na wyświetlaczu zachować symbol Minus. Reszta jest taka sama. Pamięć...
  • Seite 138: Usuwanie / Kasowanie Zapisanych I Pojedynczo Zapisanych Zestawów Danych

    Przytrzymać wciśnięty przycisk pamięci dłużej niż 1,5 se- kundy, aby szybko przeglądać zapisane zestawy danych od 10 do 20 do 30..100 w dół. Usuwanie / Kasowanie zapisanych i pojedynczo zapisanych zestawów danych W trybie pamięci przytrzymać wciśnięte przycisk pamięci przycisk Wstecz/ Usuń razem przez mniej niż...
  • Seite 139: Torba Na Pas

    symbol pamięci znika z wyświetlacza. Numer miejsca w pa- mięci również znika z wiersza numer miejsca w pamięci Torba na pas Należy używać dołączonej torby na pas, aby chronić urządzenie w razie nieużywania. Błędy, zakłócenia i usuwanie usterek Problem Przyczyna Rozwiązanie Błąd obliczeniowy Patrz instrukcja obsługi,...
  • Seite 140: Konserwacja I Czyszczenie

    Problem Przyczyna Rozwiązanie Błąd sprzętu Włączyć / Wyłączyć urządzenie. Jeśli symbol pojawia się jeszcze po wielu próbach, proszę skontaktować się ze sprzedawcą. Konserwacja i czyszczenie Niniejszy produkt nie wymaga konserwacji. UWAGA! Nigdy nie należy zanurzać produktu w wodzie lub innych cieczach. Przy czyszczeniu do produktu nie może wniknąć...
  • Seite 141: Przechowywanie

    Przechowywanie Jeśli produkt nie jest używany przez dłuższy czas, należy wyjąć baterie i przechowywać je w czystym, suchym miejscu bez bezpośrednich promieni słonecznych. Utylizacja Opakowanie wykonane jest z materiałów przyjaznych dla środo- wiska, które można przekazać do utylizacji w lokalnym punkcie przetwarzania surowców wtórnych.
  • Seite 142: Gwarancja

    Z uwagi na ochronę środowiska nie wyrzucać urządzenia po zakończeniu eksploatacji do odpadów domowych, lecz prawidłowo zutylizować. Informacji o punktach zbiorczych i ich godzinach otwarcia udziela odpowiedni urząd. Uszkodzone lub zużyte baterie / akumulatory muszą być poddane recyklingowi zgodnie z dyrektywą 2006/66/WE i jej zmianami. Oddać...
  • Seite 143: Sposób Postępowania W Przypadku Naprawy Gwarancyjnej

    Produkt objęte jest 3 gwarancją, licząc od daty zakupu. Gwaran- cja wygasa w razie zawinionego przez użytkownika uszkodzenia produktu, niewłaściwego użycia lub konserwacji. W przypadku wystąpienia w ciągu 3 lat od daty zakupu wad materiałowych lub fabrycznych, dokonujemy – według własnej oceny –...
  • Seite 144: Serwis

    Produkt uznany za uszkodzony można następnie z dołączeniem dowodu zakupu (paragonu) i podaniem, na czym polega wada i kiedy wystąpiła, przesłać bezpłatnie na podany Państwu adres serwisu. Serwis Serwis Polska Tel.: 22 397 4996 E-Mail: owim@lidl.pl 144 PL...
  • Seite 145 Legenda použitých piktogramů ..Strana 147 Úvod ................Strana 147 Použití ke stanovenému účelu........Strana 148 Popis dílů ..............Strana 148 Obsah dodávky ............Strana 150 Technické data .............Strana 150 Všeobecná bezpečnostní upozornění .............Strana 151 Bezpečnostní pokyny pro baterie a akumulátory ..Strana 152 Před uvedením do provozu ......Strana 154 Vložení...
  • Seite 146 Funkce měření hodnot ........Strana 159 Plocha ................Strana 160 Objem ................Strana 160 Pythagorova věta jednoduše ........Strana 160 Pythagorova věta dvojitě ..........Strana 161 Sčítání (Plus) ..............Strana 162 Odečítání (mínus) ............Strana 163 Paměť historie .............Strana 163 Vyvolání datového záznamu z paměti .......Strana 164 Odstranění...
  • Seite 147: Legenda Použitých Piktogramů

    Noste ochranné rukavice! Pozor! Chraňte se před laserovým zářením! Nedívat se do laserového paprsku! Laserový měřič vzdálenosti PLEM 50 A1 Úvod Blahopřejeme Vám ke koupi nového výrobku. Rozhodli jste se pro kvalitní produkt. Návod k obsluze je součástí tohoto výrobku. Ob- sahuje důležité...
  • Seite 148: Použití Ke Stanovenému Účelu

    a na uvedených místech. Při předání výrobku třetí osobě předejte i všechny podklady. Použití ke stanovenému účelu Tento laserový měřič vzdáleností (v dalším textu nazýván jen přístroj) je vhodný na měření vzdáleností, délek, výšek odstupů a na výpočet velikostí ploch a objemů ve vnitřních prostorech. Jakékoli jiné pou- žití...
  • Seite 149 Vypínač Tlačítko referenčních bodů Tlačítko zvuku Tlačítko pro trvalé měření Tlačítko volby funkce Tlačítko MEAS Displej Symbol stavu baterie Měřící jednotky Řádka Hodnota-1 / Řádka číslo umístění v paměti Řádka Hodnota-2 Maximální hodnoty/ Minimální hodnoty Řádka Hodnota-3 Řádka výsledku Sečítání / Odečítání Symbol režimu měření...
  • Seite 150: Obsah Dodávky

    Obsah dodávky 1 laserový měřič vzdáleností 2 baterie 1,5 V LR03 (AAA) 1 taška na opasek 1 návod k obsluze Technické data Maximální měřící rozsah: 0,05 – 50 m* (měření od horní strany) 0,17 – 50 m* (měření od dolní strany) Přesnost měření: ±...
  • Seite 151: Všeobecná Bezpečnostní Upozornění

    ření, špatně reflektující cílové ploše (černý povrch) nebo při velkých výkyvech teploty lze očekávat větší odchylku. Všeobecná bezpečnostní upozornění Nebezpečí udušení! S obalovými materiály (např. s fóliemi nebo polystyrolem) si děti nesmí hrát. Držte neustále obalový materiál mimo dosah dětí. Obalový materiál není hračkou. Nepoužívejte výrobek v prostředí, ve kterém hrozí...
  • Seite 152: Bezpečnostní Pokyny Pro Baterie A Akumulátory

    Chraňte se před laserovým zářením! EN 60825-1:2014 POZOR LASEROVÉ ZÁŘENÍ! NEDÍVAT SE DO PA- PRSKU! LASER TŘÍDY 2! Nedívejte se nikdy přímo do laserového paprsku resp. do výstupního otvoru. Pozorování laserového paprsku optickými instrumenty (např. lupou, zvětšovacími skly, aj.) ohrožuje oči. POZOR! Při použití...
  • Seite 153 NEBEZPEČÍ VÝBUCHU! Nenabíjecí baterie nikdy znovu nenabíjejte. Baterie nebo akumulátory nezkra- tujte ani je neotevírejte. Hrozí přehřátí, nebezpečí požáru nebo jejich prasknutí. Nikdy neházejte baterie nebo akumulátory do ohně ani do vody. Nevystavujte baterie nebo akumulátory mechanickému zatí- žení. Nebezpečí vytečení baterií / akumulátorů Zabraňte extrémním podmínkám a teplotám, např.
  • Seite 154: Před Uvedením Do Provozu

    Nasazujte baterie nebo akumulátory podle označení polarity (+) a (-) na bateriích nebo akumulátorech a na výrobku. Vyčistěte před vložením kontakty baterie nebo akumulátoru a kontakty v přihrádce na baterie! Vybité baterie nebo akumulátory ihned vyjměte z výrobku. Před uvedením do provozu Zkontrolujte úplnost obsahu dodávky a jeho bezvadný...
  • Seite 155: Uvedení Do Provozu

    Uvedení do provozu Zapínání / vypínání K zapnutí přístroje stiskněte vypínač K vypnutí přístroje přidržte vypínač až se LC-displej vypne. Upozornění: Přístroj se automaticky vypne, jestliže nebylo po dobu 3 minut stisknuté žádné tlačítko. Akustický signál: - Každé stisknutí tlačítka a každá bezchybně provedená funkce se potvrzuje krátkým signálem.
  • Seite 156: Manipulace A Obsluha

    Manipulace a obsluha Volba jednotky délky Po zapnutí přístroje se na displeji zobrazí naposledy použitá jed- notka délky. Pro volbu jiné jednotky stiskněte tlačítko jednotek . Jednotky délek můžete v tomto pořadí volit: Délka Oblast Objem: 0.000 m 0.000 m 0.000 m 0.000 stopa 0.000 stopa...
  • Seite 157: Volba Referenčního Bodu

    Volba referenčního bodu Zadní referenční bod (základna), referenční bod zadního kusu nebo přední referenční bod přístroje můžete zvolit pro všechna měření. Referenční bod se musí určit před měřením. Jinak se výsledek odchy- luje od skutečné hodnoty. Standardní nastavení referenčního bodu je od zadní...
  • Seite 158: Režim Nepřetržitého Měření

    určitého úhlu zajistěte, aby se bublinka nacházela uprostřed vodováhy příslušného úhlu. 3. Stiskněte k aktivaci laseru krátce tlačítko MEAS . Zapnutý laser je označen symbolem Laser zapnutý Poznámka: Krok 3 lze přeskočit, jestliže je laser již aktivovaný. 4. Nyní nasměrujte laser na cílový bod a k měření stiskněte znovu krátce tlačítko MEAS .
  • Seite 159: Funkce Měření Hodnot

    1. Zahajte nepřetržité měření krátkým stisknutím tlačítka pro trvalé měření . Při zobrazení prvního měření na displeji může dojít k krátkému zpoždění. Toto je normální. Nyní se naměřená hodnota zobrazí na displeji. 2. Měření můžete zastavit stisknutím tlačítka pro trvalé měření tlačítkem MEAS nebo tlačítkem Zpět/ Smazat .
  • Seite 160: Plocha

    Plocha 1. Stiskněte jednou tlačítko volby funkce . Symbol plochy jako symbol režimu měření se objeví na displeji. 2. Nyní změřte délku a šířku požadované plochy stisknutím tlačítka MEAS . Příslušná řádka symbolu plochy na displeji bliká pro jednotlivé naměřené hodnoty. Ihned po druhém měření se zobrazí...
  • Seite 161: Pythagorova Věta Dvojitě

    jednoduše" je možné vypočítat délku odvěsny trojúhelníku. Tato funkce je užitečná obzvlášť při těžko přístupných bodech pro měření. 1. Stiskněte třikrát tlačítko volby funkce . Symbol trojúhelníku "Pythagorova věta jednoduše" jako symbol režimu měření se objeví na displeji. 2. Nyní se měří přepona (nejdelší vzdálenost) a jedna odvěsna (nejkratší...
  • Seite 162: Sčítání (Plus)

    1. Stiskněte čtyřikrát tlačítko volby funkce . Symbol trojúhelníku "Pythagorova věta dvojitě" jako symbol režimu měření objeví na displeji. 2. Změřte levou přeponu (největší odstup k levé) a potom jednu odvěsnu (nejkratší vzdálenost k měřenému povrchu) a nakonec pravou přeponu (největší vzdálenost k pravé) stisknutím tlačítka MEAS .
  • Seite 163: Odečítání (Mínus)

    Upozornění: - Sčítání je možné provádět se všemi jednotkami (délky, plochy, objemu). Sčítání můžete provádět i z výsledků měření funkcí pro plochu a objem. - Sčítat lze jen hodnoty ve stejných jednotkách. První naměřená / vypočítaná hodnota určuje používanou jednotku. - U Pythagorovy věty nelze sčítání...
  • Seite 164: Vyvolání Datového Záznamu Z Paměti

    Vyvolání datového záznamu z paměti Přidržte krátce tlačítko uložení do paměti k zobrazení na- posledy uloženého datového záznamu do paměti. Na displeji se zobrazí symbol uložení do paměti a odpovídající číslo umístění v paměti v řádce čísla umístění v paměti Pro přechod k dalšímu umístění...
  • Seite 165: Výstup Z Režimu Uložení Do Paměti

    5 vteřin. Na displeji se na jednu vteřinu objeví "CLEAR ALL" a jako potvrzení zazní krátký tón. Výstup z režimu uložení do paměti Pro přechod zpět do režimu hlavního displeje z režimu historie ukládání do paměti stiskněte krátce tlačítko Smazat / Zpět Nyní...
  • Seite 166: Údržba A Čištění

    Problém Příčina Řešení Přijímaný signál je Zlepšete odrazový povrch příliš silný. (použijte cílovou tabulku nebo nemiřte do silného světla). Mimo měřící rozsah Měřte vzdálenost v měřícím rozsahu. Chyba hardwaru Zapněte/ vypněte přístroj. Jestliže se symbol i po více pokusech stále objevuje, kontaktujte Vašeho prodejce.
  • Seite 167: Skladování

    Skladování V případě, že nebudete výrobek delší dobu používat, vyjměte baterie a skladujte ho na čistém, suchém, před prachem a pří- mým sluncem chráněném místě. Zlikvidování Obal se skládá z ekologických materiálů, které můžete zlikvidovat prostřednictvím místních sběren recyklovatelných materiálů. Při třídění odpadu se řiďte podle označení obalových materiálů...
  • Seite 168: Záruka

    Vadné nebo vybité baterie resp. akumulátory se musí, podle směrnice 2006/66/ES a jejích příslušných změn, recyklovat. Baterie, aku- mulátory i výrobek odevzdejte zpět do nabízených sběren. Ekologické škody v důsledku chybné likvidace baterií / akumulátorů! Baterie / akumulátory se nesmí zlikvidovat v domácím odpadu. Mohou obsahovat jedovaté...
  • Seite 169: Postup V Případě Uplatňování Záruky

    zaniká, jestliže se výrobek poškodí, neodborně použil nebo neob- držel pravidelnou údržbu. Záruka platí na vady materiálu a výrobní vady. Tato záruka se nevztahuje na díly výrobku podléhající opotřebení (např. na baterie), dále na poškození křehkých, choulostivých dílů, např. vypínačů, akumulátorů...
  • Seite 170: Servis

    Servis Servis Česká republika Tel.: 800 143 873 E-Mail: owim@lidl.cz 170 CZ...
  • Seite 171 Legenda použitých piktogramov ..Strana 173 Úvod ................Strana 173 Používanie v súlade s určeným účelom ......Strana 174 Popis častí ..............Strana 174 Obsah dodávky ............Strana 176 Technické údaje ............Strana 176 Všeobecné bezpečnostné upozornenia ............Strana 177 Bezpečnostné upozornenia týkajúce sa batérií / akumulátorových batérií ........Strana 178 Pred uvedením do prevádzky ....Strana 180 Vkladanie / výmena batérií...
  • Seite 172 Funkcie nameraných hodnôt ....Strana 185 Plocha ................Strana 186 Objem ................Strana 186 Pytagoras jednoduchý ..........Strana 187 Pytagoras dvojitý ............Strana 187 Sčítavanie (plus) ............Strana 188 Odčítanie (mínus) ............Strana 189 Pamäť histórie .............Strana 189 Načítanie uloženého záznamu ........Strana 190 Odstránenie / vymazanie uložených a jednotlivých uložených záznamov ......Strana 190 Odstránenie / vymazanie všetkých uložených záznamov ..............Strana 191...
  • Seite 173: Legenda Použitých Piktogramov

    Noste ochranné rukavice! Pozor! Chráňte sa pred laserovým žiarením! Nepozerajte do laserového lúča! Laserový merač vzdialenosti PLEM 50 A1 Úvod Blahoželáme Vám ku kúpe Vášho nového výrobku. Rozhodli ste sa pre veľmi kvalitný výrobok. Návod na obsluhu je súčasťou tohto výrobku.
  • Seite 174: Používanie V Súlade S Určeným Účelom

    používania. V prípade postúpenia výrobku ďalším osobám odo- vzdajte aj všetky dokumenty patriace k výrobku. Používanie v súlade s určeným účelom Tento laserový merač vzdialeností (následne nazývaný prístroj) je vhodný na meranie vzdialeností, dĺžok, výšok, odstupov a na vypočítavanie plochy a objemu vo vnútorných priestoroch. Akékoľvek iné...
  • Seite 175 ZA-/VYPÍNAČ Tlačidlo referenčného bodu Zvukové tlačidlo Tlačidlo permanentného merania Tlačidlo pre výber funkcie Tlačidlo MEAS Displej Symbol stavu batérie Meracie jednotky Riadok hodnota-1 / Riadok číslo pamäťového miesta Riadok hodnota-2 Max. / Min. hodnoty Riadok hodnota-3 Výsledkový riadok Spočítavanie / odpočítavanie Symbol zobrazujúci režim merania Symbol režimu merania vzdialenosti Symbol pamäte...
  • Seite 176: Obsah Dodávky

    Obsah dodávky 1 laserový merač vzdialeností 2 1,5 V-batérie LR03 (AAA) 1 taška na opasok 1 návod na používanie Technické údaje Maximálny rozsah merania: 0,05–50 m* (Meranie od hornej strany) 0,17–50 m* (Meranie od dolnej strany) Presnosť merania: ± 1,5 mm ** Meracie jednotky: m / in / ft / ft + in Laserová...
  • Seite 177: Všeobecné Bezpečnostné Upozornenia

    intenzívne slnečné žiarenie, zle reflektujúci povrch (čierne povrchy) alebo silné teplotné výkyvy, sa očakáva vyššia odchýlka. Všeobecné bezpečnostné upozornenia Nebezpečenstvo zadusenia! Obalový materiál (napr. fólie alebo polystyrén) nesmie byť používaný na hranie. Obalový materiál držte vždy mimo dosahu detí. Obalový materiál nie je hračka.
  • Seite 178: Bezpečnostné Upozornenia Týkajúce Sa Batérií / Akumulátorových Batérií

    Zabráňte silným nárazom alebo pádom produktu. Chráňte sa pred laserovým žiarením! EN 60825-1:2014 POZOR LASEROVÉ ŽIARENIE! NEPOZERAJTE SA DO LÚČA! TRIEDA LASERA 2! Nepozerajte sa priamo do laserového lúča resp. do otvoru. Pozorovanie laserového lúča optickými nástrojmi (napr. lupa, zväčšovacie sklá a pod.) je spojené s ohrozením očí.
  • Seite 179 NEBEZPEČENSTVO EXPLÓZIE! Nenabíjateľné batérie nikdy znova nenabíjajte. Batérie / akumulá- torové batérie neskratujte a / alebo neotvárajte. Následkom môže byť prehriatie, požiar alebo explózia. Batérie / akumulátorové batérie nikdy nehádžte do ohňa alebo vody. Nevystavujte batérie / akumulátorové batérie mechanickej záťaži.
  • Seite 180: Pred Uvedením Do Prevádzky

    Riziko poškodenia produktu Používajte výhradne uvedený typ batérií / akumulátorových batérií! Vložte batérie / akumulátorové batérie podľa označenia polarity (+) a (-) na batérii / akumulátorovej batérii a výrobku. Pred vložením vyčistite kontakty na batérii / akumulátorovej batérii a v priečinku pre batérie! Vybité...
  • Seite 181: Uvedenie Do Prevádzky

    Uvedenie do prevádzky Zapnutie / Vypnutie Stlačte ZA- / VYPÍNAČ pre zapnutie prístroja. Pre vypnutie prístroja držte stlačený ZA- / VYPÍNAČ kým sa LC-displej vypne. Poznámka: Keď 3 minúty nestlačíte žiadne tlačidlo, prístroj sa sám automaticky vypne. Akustický signál: - Každé stlačenie tlačidla a každá správne vykonaná funkcia je potvrdená...
  • Seite 182: Manipulácia A Ovládanie

    Manipulácia a ovládanie Výber dĺžkovej jednotky Hneď po zapnutí prístroja sa na displeji objaví naposledy použitá dĺžková jednotka. Stlačte tlačidlo pre výber jednotky , aby ste zvolili inú jed- notku. Môžete vybrať nasledujúce dĺžkové jednotky v tomto poradí: Dĺžka Oblasť Objem 0.000 m 0.000 m...
  • Seite 183: Výber Referenčného Bodu

    Výber referenčného bodu Zadný referenčný bod (základňa), referenčný bod koncovky alebo predný referenčný bod prístroja môžu byť použité ako kontaktná plocha pre všetky merania. Referenčný bod musí byť stanovený pred meraním. V opačnom prípade sa výsledok odchyľuje od skutočnej hodnoty. Štandardné nastavenie referenčného bodu je zo zadnej strany prístroja.
  • Seite 184: Režim Permanentného Merania

    2. Skontrolujte rovnosť prístroja pomocou vodováh . Bublina vodováhy slúži na skontrolovanie horizontálnej roviny a druhá na skontrolovanie vertikálnej roviny. Pri kontrole rovnosti určitého uhla sa ubezpečte, že sa bublina nachádza v strede príslušného uhla vodováhy. 3. Krátko stlačte tlačidlo MEAS , aby ste aktivovali laser.
  • Seite 185: Funkcie Nameraných Hodnôt

    ktorej chcete merať vzdialenosť. Môžete napríklad zmerať, nakoľko paralelné sú dve protiľahlé steny alebo pomocou funkcie zmerať maximálne hodnoty. 1. Spustite permanentné meranie krátkym stlačením tlačidla per- manentného merania . Pri zobrazení prvého merania na displeji môže dôjsť ku krátkemu spomaleniu. Je to normálne. Teraz sa na displeji zobrazí...
  • Seite 186: Plocha

    pre výber funkcie môžete po sebe aktivovať nasledujúce funkcie: plocha, objem, Pytagoras jednoduchý, Pytagoras dvojitý. Poznámka: Želaná funkcia musí byť zvolená pred meraním. Plocha 1. Raz stlačte tlačidlo pre výber funkcie . Na displeji sa objaví symbol plochy symbolu zobrazujúceho režim merania 2.
  • Seite 187: Pytagoras Jednoduchý

    Pytagoras jednoduchý Pytagorova veta popisuje závislosť dĺžok strán pravouhlého trojuhol- níka nasledovne: a² + b² = c², pričom a, b sú odvesny, c je prepona trojuholníka. Pomocou funkcie "Pytagoras jednoduchý" je možné vypočítať dĺžku jednej odvesny. Táto funkcia je mimoriadne užitočná predovšetkým pri ťažko prístupných meracích bodoch.
  • Seite 188: Sčítavanie (Plus)

    vypočítava vzdialenosť medzi dvoma ľubovoľnými bodmi a je mimoriadne užitočná pre neprístupné meracie body. 1. Štyrikrát stlačte tlačidlo pre výber funkcie . Symbol trojuhol- níka "Pytagoras dvojitý" symbolu zobrazujúceho režim mera- sa objaví na displeji. 2. Teraz zmerajte ľavú preponu (najväčšia vzdialenosť vľavo) a potom jednu odvesnu (najkratšia vzdialenosť...
  • Seite 189: Odčítanie (Mínus)

    3. Teraz uskutočnite druhé meranie (dĺžka, plocha alebo objem). Druhá nameraná / vypočítaná hodnota sa zobrazí v riadku "hodnota-3" displeja. Hneď po druhom meraní sa výsle- dok sčítania objaví vo výsledkovom riadku displeja. Prvá nameraná / vypočítaná hodnota sa zobrazí v riadku "hod- nota-2"...
  • Seite 190: Načítanie Uloženého Záznamu

    plocha alebo objem). Vypočítané hodnoty sú ukladané s ich prís- lušnými jednotlivými hodnotami. K dispozícii je celkovo 100 pamä- ťových miest. Keď je všetkých 100 pamäťovým miest obsadených, najstarší pamäťový zápis je prepísaný najnovším záznamom. Načítanie uloženého záznamu Krátko podržte stlačené pamäťové tlačidlo , aby sa zobrazil naposledy uložený...
  • Seite 191: Odstránenie / Vymazanie Všetkých Uložených Záznamov

    Odstránenie / vymazanie všetkých uložených záznamov V pamäťovom režime podržte stlačené naraz tlačidlo pamäte a tlačidlo vymazať / naspäť dlhšie ako 5 sekúnd, aby ste vymazali všetky uložené záznamy. Na displeji sa na sekundu zobrazí "CLEAR ALL" a ako potvrdenie zaznie krátky pípavý tón.
  • Seite 192: Chyby, Poruchy & Odstraňovanie Chýb

    Chyby, poruchy & odstraňovanie chýb Problém Príčina Riešenie Chyba vo výpočte Prečítajte si návod na obsluhu, zopakujte postupy. Slabá batéria Vymeňte batérie alebo ich nabite. Prijímaný signál je Zlepšite reflektujúci povrch príliš slabý alebo (použite cieľovú tabuľku, meranie príliš dlhé. biely papier).
  • Seite 193: Údržba A Čistenie

    Údržba a čistenie Výrobok si nevyžaduje údržbu. POZOR! Výrobok nikdy neponárajte do vody alebo iných kvapalín. Pri čistení do produktu nesmie preniknúť vlhkosť. Výstupný otvor pre laserový lúč a prijímaciu šošovku čistite jemným prúdom vzduchu. Pri silnejších znečisteniach odstráňte nečistotu jemne navlhčenou vatovou tyčinkou. Nevyvíjajte pritom silný...
  • Seite 194: Likvidácia

    Likvidácia Obal pozostáva z ekologických materiálov, ktoré môžete odovzdať na miestnych recyklačných zberných miestach. Všímajte si prosím označenie obalových materiálov pre triedenie odpadu, sú označené skratkami (a) a číslami (b) s nasledujúcim významom: 1–7: Plasty / 20–22: Papier a kartón / 80–98: Spojené látky. Výrobok a obalové...
  • Seite 195: Záruka

    Nesprávna likvidácia batérií / akumulátorových batérií ničí životné prostredie! Batérie / akumulátorové batérie sa nesmú likvidovať spolu s domovým odpadom. Môžu obsahovať jedovaté ťažké kovy a je potrebné za- obchádzať s nimi ako s nebezpečným odpadom. Chemické značky ťažkých kovov sú nasledovné: Cd = kadmium, Hg = ortuť, Pb = olovo. Opotrebované...
  • Seite 196: Postup V Prípade Poškodenia V Záruke

    Poskytnutie záruky sa vzťahuje na chyby materiálu a výrobné chyby. Táto záruka sa nevzťahuje na časti produktu, ktoré sú vystavené normálnemu opotrebovaniu, a preto ich je možné považovať za opotrebovateľné diely (napr. batérie) alebo na poškodenia na rozbitných dieloch, napr. na spínači, akumulátorových batériach alebo častiach, ktoré...
  • Seite 197: Servis

    Servis Servis Slovensko Tel.: 0850 232001 E-pošta: owim@lidl.sk...
  • Seite 198 OWIM GmbH & Co. KG Stiftsbergstraße 1 DE-74167 Neckarsulm GERMANY Model-No.: HG04282 Version: 09 / 2018 Stand der Informationen · Last Information Update · Version des informations · Stand van de informatie · Stan informacji · Stav informací · Stav informácií: 07 / 2018 ·...

Inhaltsverzeichnis