Inhaltsverzeichnis
Werbung
Verfügbare Sprachen
Verfügbare Sprachen
Quicklinks
Werbung
Kapitel
Inhaltsverzeichnis

Verwandte Anleitungen für SPORTSTECH BT400


Inhaltszusammenfassung für SPORTSTECH BT400
- Seite 1 FITNESS TECHNOLOGY MADE IN GERMANY BT400...
-
Seite 2: Deutsch
BENUTZERHANDBUCH DEUTSCH... -
Seite 3: Video Tutorials
Video Tutorials Unsere für dich! Aufbau Benutzung Abbau In 3 einfachen Schritten zum schnellen und sicheren Start: 1. QR-Code scannen 2. Videos anschauen 3. schnell und sicher starten Link zu den Videos: https://sportstech.de/qr/bt400.html... - Seite 4 SEHR GEEHRTER KUNDE, wir freuen uns, dass Sie sich für ein Gerät aus der SPORTSTECH Produktpalette entschieden haben. SPORTSTECH Sportgeräte bieten Ihnen höchste Qualität und neueste Technologie. Um die Leistungsfähigkeit des Gerätes voll nutzen zu können und viele Jahre Freude an Ihrem Gerät zu haben, lesen Sie bitte vor der Inbetriebnahme und dem Beginn des Trainings dieses Benutzerhandbuch sorgfältig durch und verwenden...
-
Seite 5: Inhaltsverzeichnis
INHALT DEUTSCH Wichtige Sicherheitshinweise Explosionszeichnung Teileliste Montageanleitung Dehnungsübungen Wie man Übungen macht Wichtiger Hinweis Zusammenklappen Anweisungen für den Computer Wartung und Reinigung... -
Seite 6: Wichtige Sicherheitshinweise
WICHTIGE SICHERHEITSHINWEISE Bitte diese Anleitung zum späteren Nachlesen an einem sicheren Ort aufbewahren. 1. Bitte lesen Sie die ganze Anleitung vor der Montage und der Benutzung des Gerätes sorgfältig durch. Eine sichere und wirksame Benutzung lässt sich nur erreichen, wenn das Gerät einwandfrei zusammengebaut, gepflegt und benutzt wird. -
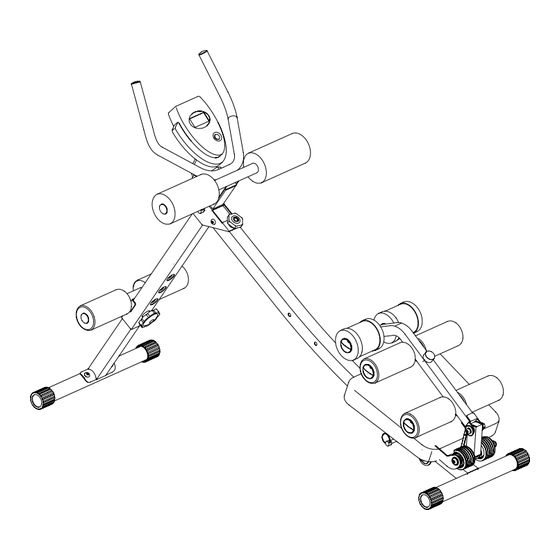
Seite 7: Explosionszeichnung
EXPLOSIONSZEICHNUNG... -
Seite 8: Teileliste
TEILELISTE Teil Beschreibung Anzahl Teil Beschreibung Anzahl Fußabdeckung Ø38 Unterlegscheibe T-förmiges Rohr Sechskantschraube M8*20 Schraube M8*35 Schraube M8*40 Vorderes Stützrohr 1 Lagerbuchse Kunststoffabdeckung Ø25 Hauptteil 2 Schaumstoff Baumwolle Lagerbuchse Ø75-L133 Schraube M8*60 Einstellknopf M10 Schraube M8*40 Handauflage Schraube M8*55 Vorderes Stützrohr 2 Stift Ø10*40 Steckstift-Kontakte Kunststoffbuchse... -
Seite 10: Montageanleitung
MONTAGEANLEITUNG 1. SCHRITT: Nehmen Sie die Teile heraus und montieren Sie sie wie im Bild links dargestellt. Bitte befestigen Sie die Knöpfe. Befestigen Sie Schraube (e) korrekt mit Werkzeug (g) und lassen dabei etwas Spiel, damit das Rahmenrohr sich zum Zusammenklappen bewegen lässt. - Seite 11 3. SCHRITT: Befestigen Sie den Knopf im Rahmen und stecken Sie den Steckstift in die Stiftkontakte. Überprüfen Sie bitte, ob die Funktion des Computers normal ist. Funktion: Power Plank und Sit-up-Bank. SO STELLEN SIE DIE NEIGUNG EIN: 4 Stufen zum Einstellen der Steigung...
- Seite 12 EIN RAHMENROHR MIT DOPPELFÜHRUNGSSCHIENE ZUM WECHSELN Führungsschiene 1 Führungsschiene 2...
-
Seite 13: Dehnungsübungen
DEHNUNGSÜBUNGEN Bevor Sie das Laufband benutzen, ist es am besten, 5 bis 10 Minuten zum Aufwärmen Stretching- Übungen durchzuführen. Dehnen vor dem Training hilft die Flexibilität zu verbessern und das Verletzungsrisiko zu mindern. MIT DEM KOPF ROLLEN Drehen Sie den Kopf nach rechts für eine Sekunde, fühlen Sie die Streckung auf der linken Seite des Nackens, dann drehen Sie den Kopf zurück für eine Sekunde, recken Sie Ihr Kinn nach oben und lassen Ihren Mund geöffnet. -
Seite 14: Wie Man Übungen Macht
WIE MAN ÜBUNGEN MACHT HIER SIND 2 FUNKTIONEN ZU IHRER WAHL: 1: Sitz-up-Bank 2: Power Plank 1. FUNKTION ALS SIT-UP-BANK: 1. SCHRITT: Passen Sie die Sitzposition an und achten Sie darauf, dass das unter dem Sitz befindliche Loch mit dem Loch im Rahmenrohr übereinstimmt, und setzen Sie dann den Stift zum Befestigen ein. -
Seite 15: Funktion Als Power Plank
2. FUNKTION ALS POWER PLANK: 1. SCHRITT: Ziehen Sie den Stift heraus und stellen Sie sicher, dass der Sitz leichter bewegt werden kann. Nachdem der Stift herausgezogen wurde, wird der Sitz bis zum Boden des Rahmenrohrs heruntergleiten. 2. SCHRITT: Stellen Sie die Rückenlehne auf den Sitz ein wie unten abgebildet ÜBUNG:... -
Seite 16: Wichtiger Hinweis
WICHTIGER HINWEIS Die freie Fläche rund um den Trainingsbereich herum in den Richtungen, von denen aus auf das Gerät zugegriffen wird, muss zumindest 60 cm betragen. Die freie Fläche muss auch den Bereich für ein Absteigen vom Gerät im Notfall einschließen. -
Seite 17: Zusammenklappen
ZUSAMMENKLAPPEN 1. SCHRITT: Ziehen Sie den Steckstift des Computers aus den Steckstift-Kontakten heraus. 2. SCHRITT: Entfernen Sie den 2xM8-Knopf wie im nachstehenden Bild. 3. SCHRITT: Ziehen Sie Teil A bis zum Ende heraus und drehen es um 90 Grad, wie durch den Pfeil angezeigt. - Seite 18 4. SCHRITT: Drehen Sie die Handgriffstange der Pfeilrichtung folgend um 90°. Wenn Sie sie zum Training herausnehmen, montieren Sie sie wieder in umgekehrter Reihenfolge der Schritte zum Zusammenklappen.
-
Seite 19: Anweisungen Für Den Computer
ANWEISUNGEN FÜR DEN COMPUTER 1. Step/Min: Anzahl der Bewegungen pro Minute. 2. SCAN: Trainingszeit, Bewegungszeiten, Gesamtanzahl und Kalorienverbrauch werden angezeigt. 3. CNT: Die Anzahl der Bewegungen. 4. TIME: Die Kontrollanzeige zeigt die Zeitdauer der Bewegungen seit Beginn der Trainingssitzung an. 5. -
Seite 20: Wartung Und Reinigung
WARTUNG UND REINIGUNG 1. Achten Sie darauf, alle Teile wie alle Muttern, Bolzen, Schrauben und Rahmen zu überprüfen, um sicherzustellen, dass sie fest und sicher sind, insbesondere vor Übungsbeginn. Dies stellt sicher, dass alle Teile in gutem Zustand sind und keine langfristige Abnutzung erfahren, die zum Ausfall der Maschine führen könnte. 2. - Seite 21 EUROPÄISCHE ENTSORGUNGSRICHTLINIE 2002/96/EG Entsorgen Sie Ihr Trainingsgerät in keinem Fall über den normalen Hausmüll. Entsorgen Sie das Gerät ausschließlich über einen kommunalen oder zugelassenen Entsorgungsbetrieb.Beachten Sie hierbei die aktuell geltenden Vorschriften.Erkundigen Sie sich im Zweifelsfall bei Ihrer Stadt- bzw. Gemeindeverwaltung nach einer sach- und umweltgerechten Entsorgungsmöglichkeit.
-
Seite 22: English
USER MANUAL ENGLISH... - Seite 23 3 simple steps for a fast and safe start: 1. scan the QR code 2. watch videos 3. start fast and safely Link to the videos: https://sportstech.de/qr/bt400.html...
- Seite 24 DEAR CUSTOMER, We are pleased you chose a device from the SPORTSTECH product range. With sports equipment from SPORTSTECH you get the highest quality and latest technology. In order to fully use the potential of your device and be able to enjoy it for many years, please read this manual carefully before starting up and beginning of training, and use the device according to the instructions.
- Seite 25 INDEX ENGLISH Important Safety Information Explosion Diagramme Parts List Assembly Instructions Stretch exercise How to make exercise Important note How to fold Instructions for the computer Maintenance and Cleaning...
-
Seite 26: Important Safety Information
IMPORTANT SAFETY INFORMATION Please keep this manual in a safe place for easy reference. 1. It is important to read this entire manual before assembling and using the equipment. Safe and effective use can only be achieved if the equipment is assembled, maintained and used properly. It is your responsibility to ensure that all users of the equipment are informed of all warnings and precautions. -
Seite 27: Explosion Diagramme
EXPLOSION DIAGRAMME... -
Seite 28: Parts List
PARTS LIST Part Description Qty. Part Description Qty. Foot cover Ø38 Bearing bush T shape tube Main body 2 Bolt M8*35 Bearing bush Front support tube 1 Bolt M8*60 Plastic cover Ø25 Bolt M8*40 Foam cotton Ø75-L133 Bolt M8*55 Adjustment knob M10 Hand support Front support tube 2 Pin Ø10*40... -
Seite 30: Assembly Instructions
ASSEMBLY INSTRUCTIONS STEP 1: Take out the parts and assemble them as shown left picture. Please fasten the knobs. But for Screw (e) please fasten it properly by Tools (g) and ensure the frame tube can move freely when folding. STEP 2: Assemble the handle bar, computer and backrest foam as per the following picture. - Seite 31 STEP 3: Fasten the knob into the frame and insert the Plug pin into Pin contacts, pls check the Function of computer is Normal. Function: Power plank and Sit up bench. HOW TO ADJUST INCLINE: 4 levels to adjust the incline...
- Seite 32 SAME FRAME TUBE WITH DUAL GUIDE RAIL TO CHANGE Guide rail 1 Guide rail 2...
-
Seite 33: Stretch Exercise
STRETCH EXERCISE No matter how you do sports, please do some stretch at first, The warm muscle will extend easily, so warm up yourself with 5-10minutes, Then We suggest the following stretch exercise, five times.10counts for each time or longer do these exercise again after sports. HEAD ROLLS Rotate your head to the right for one count, feeling the stretch up the left side of your neck, then rotate your head back for one count, stretching your chin to the ceiling and letting your mouth open. -
Seite 34: How To Make Exercise
HOW TO MAKE EXERCISE THERE ARE 2 BELOW FUNCTIONS FOR YOUR CHOICE: 1: Sit up bench 2: Power Plank 1. SIT UP BENCH FUNCTION: STEP 1: Adjust the position of seat and make the hole which is under seat match with the hole of frame tube , then insert the Pin to fasten. - Seite 35 2. POWER PLANK FUNCTION: STEP 1: Pull out the Pin and make sure the Seat can move easier. After the pin pull out , the seat will be slip down to bottom of frame tube. STEP 2: Adjust the backrest onto the seat as in below picture EXERCISE WAY:...
-
Seite 36: Important Note
IMPORTANT NOTE Free area shall be not less than 0.6m greater than training area in the direction from which the equipment is accessed. Free area must also include the area for emergency dismount. -
Seite 37: How To Fold
HOW TO FOLD STEP 1: Pull out the Plug- Pin of computer from Plug-Pin contacts. STEP 2 : Remove 2XM8 Knob as per blow picture. STEP 3: Pull out Part A to end and rotate by 90 degrees as pointed by the arrow. - Seite 38 STEP 4: Rotary the handle bar with 90° as per arrow. When you take it out to exercise, please assemble in opposite steps as way of folding.
-
Seite 39: Instructions For The Computer
INSTRUCTIONS FOR THE COMPUTER 1. Step/Min: number of movement in 1 minute. 2. SCAN: Exercise time, movement times, total number of times, and calorie consumption are show in turn. 3. CNT: The number of movements. 4. TIME: The control display will show the time for movement when you start to exercise. 5. -
Seite 40: Maintenance And Cleaning
MAINTENANCE AND CLEANING 1. Be sure to check all parts like all nuts, bolts, screws and frame in order to be ensure that they are tight and secure especially after you start to do the exercise. This is to assure that all the parts are in good condition and not suffered any long-term wear that may cause the machine break down. - Seite 41 EUROPEAN DISPOSAL DIRECTIVE 2002/96/EG Never dispose your training device in your regular household waste. Dispose the device only at a local or approved disposal. Take care of the currently applicable regulations. If you have doubts contact your local authorities for information about a correct and environment friendly disposal option.
-
Seite 42: Español
MANUAL DE USUARIO ESPAÑOL... - Seite 43 Nuestros para usted! Construcción Utilizar Reducción En 3 sencillos pasos para un arranque rápido y seguro: 1. Escanear el código QR 2. Ver vídeos 3. Comienza rápido y seguro Enlace a los videos: https://sportstech.de/qr/bt400.html...
- Seite 44 ESTIMADO CLIENTE, Nos complace que haya elegido un dispositivo de la línea de productos SPORTSTECH. Con el equipo deportivo de SPORTSTECH usted obtiene la más alta calidad y la mejor tecnología. Con el fin de usar todo el potencial de su dispositivo y para que pueda disfrutarlo durante muchos años, por favor lea este manual cuidadosamente antes de comenzar a ejercitarse, y use el dispositivo de acuerdo a las instrucciones.
- Seite 45 CONTENIDOS ESPAÑOL Información de seguridad importante Vista en despiece Lista de piezas Instrucciones de ensamblaje Ejercicios de estiramiento Cómo hacer ejercicio Nota importante Cómo plegar Instrucciones del ordenador Mantenimiento y limpieza...
-
Seite 46: Información De Seguridad Importante
INFORMACIÓN DE SEGURIDAD IMPORTANTE Por favor guarde este manual en un lugar seguro para su referencia. 1. Es importante leer todo el manual antes de ensamblar y usar el equipo. Sólo puede lograrse un uso seguro y efectivo si el equipo se ensambla, mantiene y usa adecuadamente. Es su responsabilidad garantizar que todos los usuarios del equipo conozcan todas las advertencias y precauciones. -
Seite 47: Vista En Despiece
VISTA EN DESPIECE... -
Seite 48: Lista De Piezas
LISTA DE PIEZAS Pieza Descripción Qtd. Pieza Descripción Qtd. Cubierta Ø38 Tornillo M8*40 Tubo en forma de T Casquillo de cojinete Tornillo M8*35 Estructura principal 2 Tubo frontal de soporte 1 Casquillo de cojinete Cubierta plástica Ø25 Tornillo M8*60 Espuma de algodón Ø75-L133 Tornillo M8*40 Perilla de ajuste M10 Tornillo M8*55... -
Seite 50: Instrucciones De Ensamblaje
INSTRUCCIONES DE ENSAMBLAJE PASO 1: Saque las piezas y ensámblelas como se muestra en la imagen izquierda. Por favor apriete las perillas. Por favor apriete el tornillo (e) adecuadamente con las herramientas (g) y haga que el tubo de la estructura pueda moverse cuando sea plegable. - Seite 51 PASO 3: Apriete la perilla en la estructura e inserte el pin conector en los contactos del pin, por favor revise que el funcionamiento del ordenador sea normal. Función: Máquina de abdominales y banco de abdominales. CÓMO AJUSTAR LA INCLINACIÓN: 4 niveles para ajustar la inclinación...
- Seite 52 4 NIVELES PARA AJUSTAR LA INCLINACIÓN Riel guía-forma 1 Riel guía-forma 2...
-
Seite 53: Ejercicios De Estiramiento
EJERCICIOS DE ESTIRAMIENTO No importa cómo se ejercite, siempre haga algo de estiramiento primero. El calentamiento muscular hará que sus músculos se extiendan fácilmente, así que caliente al menos 5-10 minutos. Luego le sugerimos hacer los siguientes ejercicios de estiramiento cinco veces. El estiramiento antes del ejercicio le ayuda a mejorar la flexibilidad y reduce los riesgos de lesiones. -
Seite 54: Cómo Hacer Ejercicio
CÓMO HACER EJERCICIO AQUÍ HAY DOS FUNCIONES PARA SU ELECCIÓN: 1: Banco de abdominales 2: Máquina de abdominales 1. FUNCIÓN COMO BANCO DE ABDOMINALES: PASO 1: Ajuste la posición del asiento y haga que el agujero debajo del asiento coincida con el agujero del tubo en la estructura, después inserte el pin para ajustar. - Seite 55 2. FUNCIÓN DE MÁQUINA ABDOMINAL: PASO 1: Retire el pin y asegúrese de que el asiento pueda moverse fácilmente. Después de retirar el pin, el asiento se deslizará hacia la parte baja del tubo en la estructura. PASO 2: Ajuste el respaldo en el asiento como muestra la siguiente imagen FORMA DE EJERCITARSE:...
-
Seite 56: Nota Importante
NOTA IMPORTANTE La zona libre no debe tener menos de 0.6m en la zona de ejercicio en la dirección desde la cual se acceda al equipo. La zona libre también debe incluir una zona para desmote de emergencia. -
Seite 57: Cómo Plegar
CÓMO PLEGAR PASO 1: Retire el pin conector del ordenador desde los contactos del pin conector. PASO 2: Retire la perilla 2XM8 como muestra la imagen. PASO 3: Retire la pieza A hasta el extremo y gírela 90 grados como indica la flecha. - Seite 58 PASO 4: Gire el manillar 90° como indica la flecha. Cuando saque el equipo para ejercitarse, por favor ensámblelo de manera opuesta al paso de plegado.
-
Seite 59: Instrucciones Del Ordenador
INSTRUCCIONES DEL ORDENADOR 1. Step/Min: número de movimientos en un 1 minuto. 2. SCAN: Tiempo del ejercicio, número de movimientos, número total de veces y consumo calórico como se muestra sucesivamente. 3. CNT: Número de movimientos. 4. TIME: La pantalla de control mostrará el tiempo del movimiento cuando comience a ejercitarse. 5. -
Seite 60: Mantenimiento Y Limpieza
MANTENIMIENTO Y LIMPIEZA 1. Asegúrese de revisar todas las piezas como tuercas, tornillos y la estructura para asegurarse de que estén apretados y asegurados especialmente después de comenzar a ejercitarse. Esto garantiza que todas las piezas estén en buen estado y que ningún desgaste a largo plazo pueda dañar la máquina. 2. - Seite 61 DIRECTIVA EUROPEA DE RESIDUOS 2002/96/EG Nunca elimine su dispositivo de entrenamiento en su basura doméstica ordinaria. Elimine el dispositivo únicamente en un sitio de eliminación aprobado. Tenga en cuenta las normativas aplicables actualmente. Si tiene dudas contacte a las autoridades locales para conseguir información sobre una opción de eliminación adecuada y ecológica.
-
Seite 62: Français
MANUEL FRANÇAIS... - Seite 63 3 étapes simples pour un démarrage rapide et sécurisé: 1. Scannez le code QR 2. Regarder les vidéos 3. Démarrez rapidement et en toute sécurité. Lien vers les vidéos: https://sportstech.de/qr/bt400.html...
- Seite 64 CHER CLIENT, Nous sommes ravis que vous ayez choisi un appareil de la gamme de produits SPORTSTECH. Avec les équipements sportifs de SPORTSTECH, vous obtenez la plus haute qualité et la meilleure technologie. Afin d'utiliser pleinement le potentiel de votre appareil et de pouvoir l'apprécier pendant de nombreuses années, lisez attentivement ce manuel avant l'utilisation et le début de votre entraînement et utilisez l'appareil conformément aux...
- Seite 65 CONTENU FRANÇAIS Informations de sécurité importantes Vue en éclaté Liste des composants Instructions d'assemblage Excercice d'étirement Comment effectuer les exercices Remarque importante Comment replier l'appareil Instructions pour l'ordinateur Entretien et nettoyage...
-
Seite 66: Informations De Sécurité Importantes
INFORMATIONS DE SÉCURITÉ IMPORTANTES Veuillez conserver ce manuel dans un endroit sûr pour référence ultérieure. 1. Il est important de lire ce manuel entièrement avant tout assemblage et utilisation de l'appareil. Pour un entraînement efficace et en toute sécurité, il est impératif de l'assembler, de l'entretenir et de l'utiliser de manière appropriée. Il y va de votre responsabilité... -
Seite 67: Vue En Éclaté
VUE EN ÉCLATÉ... -
Seite 68: Liste Des Composants
LISTE DES COMPOSANTS Composant Description Qté. Composant Description Qté. Revêtement des pieds Ø38 Boulon M8*20 Tube en T Boulon M8*40 Boulon M8*35 Palier lisse Tube de support avant 1 Structure principale 2 Cache en plastique Ø25 Palier lisse Mousse Ø75-L133 Boulon M8*60 Bouton de réglage M10 Boulon M8*40... -
Seite 70: Instructions D'assemblage
INSTRUCTIONS D'ASSEMBLAGE ÉTAPE 1 : Sortez tous les composants et assemblez-les comme indiqué sur le schéma de gauche. Fixez bien fermement les boulons. Serrez la vis (e) en vous servant de l'outil (g) tout en vous assurant que le cadre puisse encore être replié. ÉTAPE 2 : Assemblez la barre de maintien, l'ordinateur et le capitonnage du dossier en suivant le schéma suivant. - Seite 71 ÉTAPE 3 : Fixez les boulons dans le cadre et insérez les fiches dans les connecteurs. Vérifiez ensuite que l'ordinateur fonctionne correctement. Fonctions : banc de gainage et de sit-ups COMMENT RÉGLER L'INCLINAISON : 4 niveaux d'inclinaison...
- Seite 72 CADRE AVEC DOUBLE BARRE DE RÉGLAGE Barre de réglage 1 Barre de réglage 2...
-
Seite 73: Excercice D'étirement
EXCERCICE D'ÉTIREMENT Peu importe comment vous pratiquez le sport, Veuillez faire quelques étirements avant de commencer votre entraî-nement, le muscle chaud s’étendra facilement, donc réchauffez vous durant 5-10minutes, nous suggérons l'exercice d'étirement suivant : 5 fois ,10 comptes pour chaque fois ou plus, faire ces exercices à... -
Seite 74: Comment Effectuer Les Exercices
COMMENT EFFECTUER LES EXERCICES 2 FONCTIONS AU CHOIX: 1 : banc à abdominaux (sit-ups) 2 : banc de gainage 1. FONCTION BANC À ABDOMINAUX (SIT-UPS) ÉTAPE 1 : Ajustez la position du siège en faisant correspondre le trou de la barre de réglage avec le trou dans le tube du cadre puis en insérant la goupille. - Seite 75 2. BANC DE GAINAGE: ÉTAPE 1 : Retirez la goupille et faites glisser le siège jusqu'à la base du cadre. ÉTAPE 2 : Ajustez le dossier sur le siège comme indiqué sur le schéma ci-dessous : EXERCICE :...
-
Seite 76: Remarque Importante
REMARQUE IMPORTANTE L'espace libre autour de l'appareil ne doit pas être inférieur à 0,6 m et doit inclure un espace suffisant pour descendre de l'appareil en cas d'urgence. -
Seite 77: Comment Replier L'appareil
COMMENT REPLIER L'APPAREIL ÉTAPE 1: Retirez la fiche d'ordinateur du connecteur. ÉTAPE 2: Retirez les boulons 2XM8 comme indiqué sur le schéma ci-dessous. ÉTAPE 3: Tirez la partie A jusqu'à la base et faites-la pivoter à 90° comme indiqué par les flèches. - Seite 78 ÉTAPE 4 : Faites pivoter la barre de maintien à 90° comme indiqué par les flèches. Lorsque vous souhaitez remonter l'appareil pour vous exercer, veuillez répéter ces instructions à l'opposé.
-
Seite 79: Instructions Pour L'ordinateur
INSTRUCTIONS POUR L'ORDINATEUR 1. Step/Min : nombre de mouvements en 1 minute 2. SCAN : temps d'exercice, nombre de mouvements, nombre total et nombre de calories brûlées sont affichés tour à tour. 3. CNT : nombre de mouvements 4. TIME : l'affichage indiquera les temps de mouvement lorsque vous commencez l'exercice. 5. -
Seite 80: Entretien Et Nettoyage
ENTRETIEN ET NETTOYAGE 1. Assurez-vous que chaque composant, tel que les écrous, les boulons, les vis et le cadre, soit bien fixé et sécurisé à chaque utilisation. Il est important de vérifier que les composants soient toujours en bonne condition et qu'ils ne présentent pas de traces d'usure, ce qui pourrait causer un dysfonctionnement de l'appareil. - Seite 81 DIRECTIVE EUROPÉENNE N° 2002/96/EG RELATIVE AUX DÉCHETS Ne jeter en aucun cas l‘appareil avec les ordures ménagères. Ne disposez de l‘appareil que dans les décharges publiques (Gestion des déchets communaux de la ville). Pour leur élimination respectez les réglementations en vigueur locales. Renseignez-vous à la mairie ou à la commune de votre ville sur les possibilités offertes pour éliminer votre appareil correctement et en respectant l‘environnement.
-
Seite 82: Italiano
MANUALE D’USO ITALIANO... - Seite 83 Video Tutorial Il nostro per te! Montaggio Utilizzo Smontaggio 3 semplici passaggi per un inizio veloce e sicuro: 1. Scannerizza il QR-Code 2. Guarda il Video 3. Inizia ad allenarti! Link per il Video: https://sportstech.de/qr/bt400.html...
- Seite 84 GENTILE CLIENTE, Siamo lieti che abbiate scelto un dispositivo della gamma SPORTSTECH. Con le attrezzature sportive di SPORSTECH potrete usufruire della più alta qualità e della più recente tecnologia. Per sfruttare a pieno il potenziale del dispositivo e poterlo utilizzare per molti anni, raccomandiamo di leggere attentamente questo manuale prima di iniziare l’allenamento e di utilizzare il dispositivo seguendo le istruzioni.
- Seite 85 INDICE ITALIANO Informazioni importanti di sicurezza Diagramma esploso Elenco dei pezzi Istruzioni di assemblaggio Esercizi di stretching Come fare esercizio Nota importante Come piegare Istruzioni per il computer Manutenzione e Pulizia...
-
Seite 86: Informazioni Importanti Di Sicurezza
INFORMAZIONI IMPORTANTI DI SICUREZZA Per favore conserva questo manuale in un posto sicuro per consultarlo facilmente 1. è importante leggere questo manuale prima di montare e usare l'attrezzatura. E' possibile effettuare un uso sicuro ed efficiente solo se l'attrezzatura è stata montata, mantenuta e usata appropriatamente. E' tua responsabilità assicurarti che tutti gli utenti dell'attrezzatura sono informati di tutti gli avvisi e precauzioni. -
Seite 87: Diagramma Esploso
DIAGRAMMA ESPLOSO... -
Seite 88: Elenco Dei Pezzi
ELENCO DEI PEZZI Pezzo Descrizione Quantità Pezzo Descrizione Quantità Copertura piedi Bullone M8*40 Tubo a T Boccola cuscinetto Bullone M8*35 Corpo principale 2 Tubo di supporto frontale Boccola cuscinetto Copertura in plastica Ø25 Bullone M8*60 Cotone schiumoso Ø75-L133 Bullone M8*40 Manopola di regolazione M10 Bullone M8*55 Supporto mani... -
Seite 90: Istruzioni Di Assemblaggio
ISTRUZIONI DI ASSEMBLAGGIO STEP 1: Tira fuori i pezzi e assemblali come nella figura a sinistra. Per favore avvita le manopole. Ma per le viti (h) per favore avvitale correttamente con gli Strumenti (e) e fai in modo che il tubo del telaio non si possa muovere quando è piegabile. STEP 2: Assembla il manubrio, il computer e la schiuma dello schienale come nella seguente imagine. - Seite 91 STEP 3: Avvita la manopola nel telaio e inserisci le spine Pin nei contatti Pin, per favore controlla che la Funzionalità del computer sia normale. Funzionalità: Panca plank e addominali. COME REGOLARE L'INCLINAZIONE: 4 livelli per regolare l'inclinazione...
- Seite 92 STESSO TUBO TELAIO CON GUIDA DI SCORRIMENTO DUALE DA CAMBIARE Guida di scorrimento 1 Guida di scorrimento 2...
-
Seite 93: Esercizi Di Stretching
ESERCIZI DI STRETCHING Non importa la ragione per cui fai sport, fai in modo di fare sempre esercizi di stretching prima di cominciare. Il uscolo riscaldato si allungherà facilmente, quindi scaldati con degli esercizi per 5-10 minuti. Ti suggeriamo di eseguire i seguenti esercizi cinque volte conta fino a dieci ogni volta o anche più a lungo quando ripeti l’esercizio dopo aver praticato sport. -
Seite 94: Come Fare Esercizio
COME FARE ESERCIZIO QUI SOTTO DUE FUNZIONI A TUA SCELTA: 1: panca addominali 2: panca plank 1. FUNZIONE PANCA ADDOMINALI: STEP 1: Regola la posizione del sellino e fai in modo che il buco che si trova sotto il sellino coincida con il buco del tubo del telaio, quindi inserisci il pin per assicurare. - Seite 95 2. FUNZIONE POWER PLANK: STEP 1: Tira fuori il Pin e assicurati che il sellino si possa muovere facilmente. Dopo aver estratto il pin, il sellino scivolerà in fondo al tubo del telaio. STEP 2: Regola lo schienale sul sellino come nella figura sotto MODALITÀ...
-
Seite 96: Nota Importante
NOTA IMPORTANTE Lo spazio libero deve essere almeno 0.6m più grande dell'area di allenamento nella direzione in cui si accede all'attrezzatura. Lo spazio libero deve anche includere l'area per la discesa di emergenza. -
Seite 97: Come Piegare
COME PIEGARE STEP 1: Estrai la spina dal computer dai contatti Pin. STEP 2 : Rimuovi la manopola 2XM8 come in figura. STEP 3: Estrai la Parte A fino alla fine e ruota di 90 gradi come indicato dalla freccia. - Seite 98 STEP 4: Ruota il manubrio di 90° come dice la freccia. Quando lo porti fuori per allenarti, per favore montalo in maniera opposta a come lo hai piegato.
-
Seite 99: Istruzioni Per Il Computer
ISTRUZIONI PER IL COMPUTER 1. Step/Min: numero di movimetni in 1 minuto. 2. SCAN: Tempo d'allenamento, movimenti, numero totale dei tempi e consumo calorico sono mostrati a turno. 3. CNT: Il numero di movimenti. 4. TIME: Il display di controllo mostrerà il tempo per movimento quando cominci l'esercizio. 5. -
Seite 100: Manutenzione E Pulizia
MANUTENZIONE E PULIZIA 1. Assicurati di controllare tutte le parti come bulloni, dadi, viti e telaio per essere sicuro che sono stretti e assicurati, specialmente dopo che hai cominciato l'esercizio. Ciò assicura che tutte le parti sono in buone condizioni e non soffrono di logoramenti che potrebbero causare una rottura della macchina. - Seite 101 DIRETTIVE EUROPEE 2002/96/EG PER LO SMALTIMENTO Non gettare mai il tuo attrezzo sportivo nell’immondizia normale. Smaltisci l’attrezzo solo tramite un sistema locale o approvato. Tieni in conto le regole applicabili correntemente. Se hai dubbi contatta le autorità locali per informazioni circa le opzioni per uno smaltimento corretto ed ecosostenibile. BATTERIE / BATTERIE RICARICABILI In accordo con il regolamento per le batterie, sei obbligato legalmente a ritornare tutte le batterie usate ed esaurite.
- Seite 102 Verkauf durch / Distributed by / Distribuido por / Distribué / Distribuito da InnovaMaxx GmbH Potsdamer Platz 11 10785 Berlin +49 30-220 66 35 69 service@innovamaxx.de http://www.sportstech.de...