Telecom Behnke myintercom Plus Anleitung

Verwandte Anleitungen für Telecom Behnke myintercom Plus


Inhaltszusammenfassung für Telecom Behnke myintercom Plus
- Seite 1 Version 1.0 myintercom Plus IP-Video Türstation Seite ...3 myintercom Plus IP video door station Page ... 43...
- Seite 2 Anleitung myintercom Plus IP-Video Türstation Wichtige Hinweise Wichtige Hinweise Bitte beachten Sie, dass Behnke Sprech- Achten Sie bitte darauf, dass die Geräte stellen und Zubehörteile ausschließlich von vor Wartungs- oder Reparaturarbeiten vom Elektrofachkräften unter Einhaltung der Stromnetz (Steckernetzteil) und vom Netz- entsprechenden Sicherheitsbestimmungen werk getrennt sind.
-
Seite 3: Inhaltsverzeichnis
Inhalt INHALT 1. Einleitung 1.1. Lieferumfang ........................4 1.2. Allgemein ........................4 1.3. Die myintercom Plus IP-Video Türstation ................ 6 1.4. Empfohlene Montage-Position ..................7 1.5. Lichtverhältnisse ......................7 1.6. Beschriftungsfelder wechseln ..................7 1.7. Türstation anbringen ....................... 8 1.8. Einsatzszenarien ......................9 2. -
Seite 4: Einleitung
Anleitung myintercom Plus IP-Video Türstation Einleitung 1. EINLEITUNG 1.1. Lieferumfang für die myintercom IP-Video Türstation. Der Nutzer sieht mit dem Smartphone oder Tablet, ▸ myintercom Plus IP-Video Türstation wer vor der Tür steht, spricht mit ihm oder ihr ▸ Bedienungsanleitung und öffnet bei Bedarf per Knopfdruck von dem... - Seite 5 Anleitung myintercom Plus IP-Video Türstation Einleitung Systemvoraussetzungen Achtung: Bitte bewahren Sie das Beiblatt „Einrichtung“ sorgfältig auf. Ohne die darauf Zur Nutzung der myintercom IP-Video abgedruckten Zugangsdaten ist eine spätere Türstation sind folgende Mindestvoraus- setzungen erforderlich: Änderung der Konfiguration nicht möglich.
-
Seite 6: Die Myintercom Plus Ip-Video Türstation
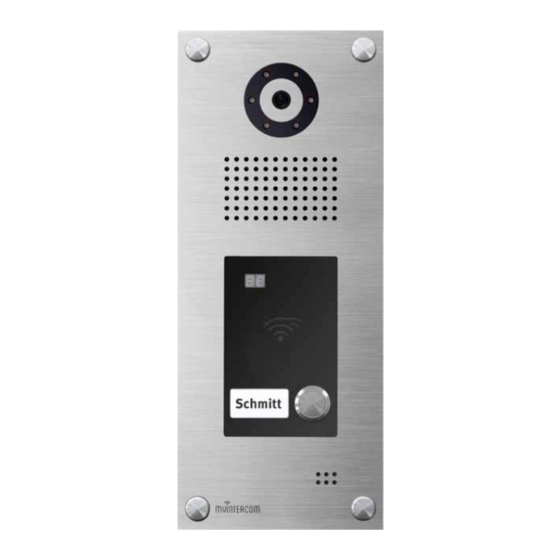
Anleitung myintercom Plus IP-Video Türstation Einleitung 1.3. Die myintercom Plus IP-Video Türstation Kamera Beleuchtungsring Lautsprecher Ruftaste Beschriftungsfeld Mikrofon Schraubenabdeckung Kartenleser Kartenleseranzeige www.behnke-online.de... -
Seite 7: Empfohlene Montage-Position
Anleitung myintercom Plus IP-Video Türstation Inbetriebnahme 1.4. Empfohlene Montage-Position 1.6. Beschriftungsfelder wechseln Für einen optimalen Blickwinkel der Kamera, wird eine Installationshöhe von 155 cm emp- fohlen. Weitere Einzelheiten entnehmen Sie bitte der Abbildung. 1.5. Lichtverhältnisse Um eine bessere Bildqualität bei schlechten Um die Beschriftungsfelder zu wechseln, nehmen Sie zuerst den Gehäusedeckel der Türstation ab. -
Seite 8: Türstation Anbringen
Anleitung myintercom Plus IP-Video Türstation Inbetriebnahme 1.7. Türstation anbringen Aufputzgehäuse für Kabelzuführung vorbereiten Gehäuse anbringen und die Türstation anschließen Türstation ins Gehäuse einsetzen und mit vier Schrauben mit dem Aufputzgehäuse verschrauben. Danach die Schraubenabdeckungen aufschrauben - fertig! Das Beispiel zeigt die Montage der Aufputz- variante. -
Seite 9: Einsatzszenarien
Anleitung myintercom Plus IP-Video Türstation Inbetriebnahme 1.8. Einsatzszenarien Lokal Die Grafik zeigt die Verwendung innerhalb eines Wohn- oder Bürogebäudes mit Zugriff über das lokale WLAN. Büro-Etage Tablet / Smartphone WLAN myintercom Plus Video- Foyer Türstation mit Kamera WLAN DSL-Rou- ter / Switch... - Seite 10 Anleitung myintercom Plus IP-Video Türstation Einleitung Global Die Grafik zeigt die Verwendung außerhalb eines Wohn- oder Bürogebäudes mit Zugriff via Internet. INTERNET Büro-Etage WLAN / 3G / LTE Sprache, Bild myintercom Plus Video- Foyer Türstation mit Kamera DSL-Rou- ter / Switch...
- Seite 11 Anleitung myintercom Plus IP-Video Türstation Einleitung Lokal oder Global (mit Sicherheitsrelais) Die Grafik zeigt die Verwendung innerhalb eines Wohn- oder Bürogebäudes mit innenlie- gendem Sicherheitsrelais. Büro-Etage Tablet / Smartphone WLAN myintercom Plus Video- Foyer Türstation mit Kamera WLAN DSL-Rou- ter / Switch...
-
Seite 12: Installation
Anleitung myintercom Plus IP-Video Türstation Installation 2. INSTALLATION Elektronik der Türstation Ethernetbuchse Der LAN-Anschluss erfolgt üblicherweise über einen RJ-45 Stecker . Alternativ lassen sich die einzelnen Adern aber auch via Klemm- leiste anbinden : Das Netzwerk wird auf die mit 1 (orange-weiß), 2 (orange) 3 (grün- weiß) und 6 (grün) bezeichneten Klemmen... - Seite 13 Anschluss für Türöffnertaster Siehe Kapitel 2.4 Türöffner / Relais / Gong. Anschlussbuchse für Koaxialkabel Datenübertragungs- und Versorgungsmög- lichkeit für die myintercom Plus Video-Tür- station. Siehe Kapitel 2-Drahtrahttechnik auf Seite 14. Achtung: Eine gleichzeitige Nutzung von 2-Draht Übertrager und Ethernet ist nicht zulässig.
-
Seite 14: Poe
Anleitung myintercom Plus IP-Video Türstation Installation 2.2. Zweidrahttechnik Die myintercom Plus IP-Video Türstation bietet mehrere Optionen die Türstation und die Zusatzmodule mit Energie zu versorgen. Eine weitere Option die Türstation zu ver- sorgen, besteht in der Verwendung des 2.1. POE Zusatzmoduls 2-Draht Übertrager. -
Seite 15: Türöffner/ Relais / Gong
Anleitung myintercom Plus IP-Video Türstation Installation 2.3. Türöffner/ Relais / Gong Relais 1 steht an der Klemme mit der Bezeich- Nehmen Sie den Gehäusedeckel der Türsta- nung „R1“ und Relais 2 steht an der Klemme tion ab und schließen Sie die Komponenten mit der Bezeichnung „R2“... -
Seite 16: Türgong Einstellen
Anleitung myintercom Plus IP-Video Türstation Installation 2.4. Türgong einstellen Die Türgongs werden an die Anschlussklem- men mit der Bezeichnung „Gong“ angeschlos- sen. Taste 1 schaltet Gong 1, Taste 2 schaltet Die Anzahl der pro Tastendruck an der Türsta- Gong 2,… Die Tasten sind von oben nach unten tion ausgelösten Gongschläge kann einge-... -
Seite 17: Zusatzmodule
Anleitung myintercom Plus IP-Video Türstation Zusatzmodule 3. ZUSATZMODULE 3.1. Sicherheitsrelais Dieses Modul bietet weitergehende Sicher- heitsmaßnahmen, indem es den Türöffner und die beiden Relais in den geschützten Innenbe- reich des Hauses verlagert. Das Sicherheitsrelais wird mit vier Adern an die Türstation angeschlossen und durch diese auch mit Energie versorgt. - Seite 18 Anleitung myintercom Plus IP-Video Türstation Zusatzmodule Mit Hilfe des Resettasters wird ein Reset Ebenfalls besteht die Möglichkeit bei diesem der Türstation durchgeführt, wenn der Zusatzmodul ein zweites Zusatzrelais zu nutz- Sabotagekontakt ausgelöst hat. Stellen Sie en. Darüber kann beispielsweise ein Garagen- dazu sicher, dass der Gehäusedeckel der...
- Seite 19 (siehe techn. Merkmale) Relais 1 und Türöffner Relais 2 Wichtig! Bitte beachten Sie, dass die myintercom Plus IP-Video Türstation lediglich einen Türöffner direkt betreiben kann. Dieser darf nur am Sicherheitsrelais oder nur an der Türstation angeschlossen werden. Hinweis: Das Sicherheitsrelais stellt keine separat ansteuerbaren Relais bereit, es ersetzt Relais 1 und 2, sowie die Türöffnerspannung der Türstation.
-
Seite 20: Kartenleser
Anleitung myintercom Plus IP-Video Türstation Kartenleser 4. KARTENLESER Wenn die Anzeige blinkt, können Änderungen vorgenommen werden. Es besteht die Möglichkeit die myintercom Weitere Betriebsanzeigen: Plus IP-Video Türstation mit einem integrier- ten Kartenleser zu erwerben. So kann eine einfache Zugangskontrolle realisiert werden, indem alle berechtigten Personen eine RFID Karte erhalten, die an der Türstation registriert... -
Seite 21: Speicherplatz Auswählen
Anleitung myintercom Plus IP-Video Türstation Kartenleser 4.1. Speicherplatz auswählen 4.2. Transponder Transponder programmieren Halten Sie die Masterkarte vor den Kartenle- ser. Die Anzeige schaltet sich ein: Achtung: Bei der Programmierung ist darauf zu achten, dass kein bereits belegter Speicherplatz mit einer neuen Nummer überschrieben wird, da... -
Seite 22: Türöffnerzeit Konfigurieren
Anleitung myintercom Plus IP-Video Türstation Kartenleser 4.3. Türöffnerzeit konfigurieren Transponder löschen Halten Sie die Masterkarte vor den Karten- Die Türöffnerzeit kann vom Benutzer von 0,5 leser und wählen Sie den gewünschten Sekunden bis 9 Sekunden eingestellt werden. Speicherplatz aus (siehe „4.1. Speicherplatz Werksseitig ist eine Haltezeit von 4 Sekunden auswählen“... -
Seite 23: Zweite Masterkarte
Anleitung myintercom Plus IP-Video Türstation Kartenleser 4.4. Zweite Masterkarte Halten Sie die Masterkarte erneut vor den Kartenleser, während die Anzeige blinkt. Die Zweite Masterkarte programmieren angezeigte Zeit wird programmiert und der rechte Dezimalpunkt leuchtet. Um ein Höchstmaß an Sicherheit zu gewähr- leisten, kann die Werksmasterkarte nur von Telecom Behnke GmbH programmiert werden. - Seite 24 Anleitung myintercom Plus IP-Video Türstation Kartenleser Halten Sie die Werksmasterkarte vor den Kar- tenleser. Die zweite Masterkarte wird gelöscht und der rechte Dezimalpunkt erlischt. Die zweite Masterkarte kann nun entfernt werden. Die Anzeige erlischt. Hinweis: Ein bereits als Ausweis gespeicher- ter Transponder kann nicht als 2.Masterkarte...
-
Seite 25: Konfiguration
Anleitung myintercom Plus IP-Video Türstation Zusatzmodule 5. KONFIGURATION Die myintercom App wird laufend um neue Features und Funktionen erweitert, das neuste Handbuch kann über die Webseite www.myintercom.de angefordert werden. 5.1. Starten der App „myintercom“ 5.2. Übersicht Laden Sie die App „myintercom“ je nach... - Seite 26 Anleitung myintercom Plus IP-Video Türstation Konfiguration Historie Administration Auf dieser Seite können Sie die letzten Anrufe Auf dieser Seite nehmen Sie die Einrichtung von der Tür mit Uhrzeit und Bild einsehen. Die der Video-Türstation und der App vor. Sprache wird nicht aufgezeichnet. Pro Video- Türstation wird eine Historie von 20 Besuchern...
-
Seite 27: Administration Der Video-Türstation
Anleitung myintercom Plus IP-Video Türstation Konfiguration 5.3. Administration der Video-Türstation “ aus, um Wählen Sie hier „Administration die Video-Türstation zu verwalten. Vorher Alle für das myintercom-System notwendigen werden Benutzername und Passwort Einstellungen können mit Hilfe der App auf abgefragt: dem Smartphone oder Tablet vorgenommen werden. - Seite 28 Anleitung myintercom Plus IP-Video Türstation Konfiguration Administration Benutzer verwalten Drücken Sie „Hinzufügen“, um einen neuen Benutzer anzulegen oder auf einen Benut- zernamen, um die Benutzereinstellungen zu ändern. Administrationsbereich können Sie ▸ Benutzer hinzufügen ▸ Benutzer verwalten ▸ Entscheiden, ob das Licht der Video-Tür-...
- Seite 29 Anleitung myintercom Plus IP-Video Türstation Konfiguration Der Benutzername und das Passwort Weisen Sie hier dem Benutzer eine Türklingel werden automatisch ausgefüllt. Geben Sie “ ein, um den Benutzer später einen „Namen leichter identifizieren zu können. Ein „Spei- “ ist ohne Eingabe eines Namens nicht chern möglich.
-
Seite 30: Verwalten Von Video-Türstationen
Anleitung myintercom Plus IP-Video Türstation Konfiguration 5.4. Verwalten von Video-Türstationen um erweiterte Informationen und Hilfestellung zur installierten App zu erhalten. Mit dem “ können Sie den Drücken Sie auf dem Startbildschirm auf „Ein- Schalter „Freisprechen stellungen“, der Einstellungs-Bildschirm wird Freisprechmodus aktivieren bzw. deaktivieren. - Seite 31 Anleitung myintercom Plus IP-Video Türstation Konfiguration Türstation hinzufügen Bezug zur IP-Video Türstation wird auch hier wieder über den Benutzernamen hergestellt. Somit ist keine weitere Angabe der hinzu- zufügenden IP-Video Türstation notwendig. Schalten Sie Push-Meldungen aus, wenn Sie nicht gestört werden möchten. Mittels Schiebe- regler kann die Lautsprecher-Lautstärke der...
-
Seite 32: Bedienung Der App
Anleitung myintercom Plus IP-Video Türstation Konfiguration 5.5. Bedienung der App “ , um weitere Drücken Sie auf „Impressum Informationen zum Hersteller der App zu erhalten. Die App gliedert sich in zwei Teile: Live-Video und Historie. Der Benutzer kann jederzeit auf “... - Seite 33 Anleitung myintercom Plus IP-Video Türstation Konfiguration Türstationen. Der Punkt vor dem Namen Historie zeigt die Erreichbarkeit der Video-Türstation an. Video-Türstationen mit rotem Punkt Mit Hilfe der Historien-Funktion können Sie sind offline, Video-Türstationen mit grünem später nachvollziehen, wer während Ihrer Punkt sind online. Durch Druck auf die Zeile Abwesenheit geklingelt hat.
-
Seite 34: Technische Merkmale
Anleitung myintercom Plus IP-Video Türstation Technische Merkmale 6. TECHNISCHE MERKMALE Standardmerkmale der IP-Video Türstation: ▸ Auflösung, Framerate und Qualität wird ▸ IP-Kamera dynamisch an die Netzwerkverbindung ▸ Beleuchtungsring angepasst ▸ Lautsprecher ▸ Mikrofon Audio ▸ Echounterdrückung ▸ Proprietäre Audio-Übertragung zur ▸... - Seite 35 Anleitung myintercom Plus IP-Video Türstation Technische Merkmale Wichtig! Bitte beachten Sie, dass es sich bei der angegebenen Leistungsaufnahme ledig- lich um die Aufnahme der Türstation inklusive der Zusatzmodule handelt. Achten Sie bei Verwendung eines Netzgerätes darauf, dass die maximale Leistungsabgabe nicht unter der Leistungsaufnahme der Türstation zusätzlich...
-
Seite 36: Fehlerbehebung
Anleitung myintercom Plus IP-Video Türstation Fehlerbehebung 7. FEHLERBEHEBUNG Die Relais schalten nicht Kein Zugriff auf die Türstation möglich ▸ Lokal Bitte überprüfen Sie Ihre Installation und Bitte überprüfen Sie, ob der Gehäusedeckel vergewissern sich, dass der Aufbau zu der angeschraubt ist, da sonst der Sabotagekon- jeweiligen Anschlussmöglichkeit passt... -
Seite 37: Bemaßung
Anleitung myintercom Plus IP-Video Türstation Bemaßung 8. BEMASSUNG Frontblende Seitenansicht 12,5 Benötigter Wand-Hohlraum Breite 101 mm Höhe 271 mm ▸ Wir empfehlen eine Hohlraumtiefe von 60-70 mm (inklusive Platz für die Verkabelung) ▸ Bohrungen mit Gewinde M4 = www.behnke-online.de... - Seite 38 Anleitung myintercom Plus IP-Video Türstation Bemaßung Unterputzgehäuse Ø 5,5 Aufputzgehäuse Ø 4 Ø 3 www.behnke-online.de...
-
Seite 39: Rechtliche Hinweise
Anleitung myintercom Plus IP-Video Türstation Rechtliche Hinweise 9. RECHTLICHE HINWEISE Infos zum Produkthaftungsgesetz: 1. Änderungen an unseren Produkten, die dem 1. Alle Produkte aus dieser Anleitung dürfen technischen Fortschritt dienen, behalten wir nur für den angegebenen Zweck verwendet uns vor. Die abgebildeten Produkte können im werden. -
Seite 40: Konformitätserklärung
Anleitung myintercom Plus IP-Video Türstation Konformitätserklärung www.behnke-online.de... - Seite 84 Version 1.0 Kirkel, Februar 2014 telecoM BeHnKe gMBH Telecom Behnke GmbH Info-Hotline: +49 (0) 68 41 / 81 77-700 Gewerbepark „An der Autobahn“ Service-Hotline: +49 (0) 68 41 / 81 77-777 Robert-Jungk-Straße 3 Telefax: +49 (0) 68 41 / 81 77-750 66459 Kirkel info@behnke-online.de...