Herunterladen Inhalt Inhalt Diese Seite drucken
Vorschau ausblenden Andere Handbücher für myintercom:
Inhaltsverzeichnis

Werbung

Verfügbare Sprachen

Verfügbare Sprachen

myintercom
D – Version 2.0
Anleitung
Downloaded from
www.Manualslib.com
manuals search engine

Werbung

Inhaltsverzeichnis
loading

Inhaltszusammenfassung für Telecom Behnke myintercom

  • Seite 1 D – Version 2.0 Anleitung Downloaded from www.Manualslib.com manuals search engine...
  • Seite 2: Wichtige Hinweise

    Anleitung myintercom Wichtige Hinweise Wichtige Hinweise – bitte beachten! 1. Die Installation und die Wartung der 2. Trennen Sie die Geräte vor Wartungs- und Behnke Telefone und ihrer Zubehörteile Reparaturarbeiten vom Stromnetz (Stecker- dürfen nur durch eine Elektrofachkraft erfol- netzteil) und vom Netzwerk.
  • Seite 3: Inhaltsverzeichnis

    ▸ Systemvoraussetzungen 1.3. Die myintercom Video-Türstation 1.4. Empfohlene Montage-Position 1.5. Lichtverhältnisse 1.6. Beschriftungsfeld wechseln 1.7. Video-Türstation anbringen 1.8. Einsatzszenarien ▸ Lokal ▸ Global 1.9. Anschließen der myintercom Video-Türstation ▸ LAN-Anschluss ▸ Stromversorgung ▸ Schaltausgang ▸ Ausgang 12 V ~ 1 A ▸ Schaltausgang ▸ Netzteil Türöffner bauseits nicht vorhanden ▸...
  • Seite 4: Einleitung

    Uhrzeit in der Kamera gespeichert. 1.2. Allgemeines Systemvoraussetzungen Leistungsmerkmale Um die myintercom Video-Türstation nutzen zu können, müssen folgende Voraussetzun- Bei der myintercom Video-Türstation handelt es gen gegeben sein: ▸ sich um ein Kompaktgerät mit integrierter Ka- Stromversorgung an der Tür ▸...
  • Seite 5: Die Myintercom Video-Türstation

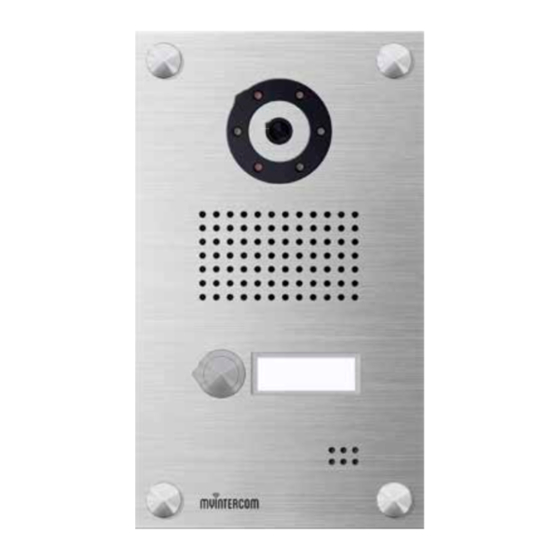
    Anleitung myintercom Einleitung 1.3. Die myintercom Video-Türstation Kamera Beleuchtungsring Lautsprecher Ruftaste Beschriftungsfeld Mikrofon Schraubenabdeckung Downloaded from www.Manualslib.com manuals search engine...
  • Seite 6: Empfohlene Montage-Position

    Anleitung myintercom Einleitung 1.4. Empfohlene Montage-Position 1.6. Beschriftungsfeld wechseln Da der Blickwinkel der Kamera begrenzt ist, ist die Installations-Position der myintercom Video-Türstation von entscheidender Bedeu- tung. Dementsprechend sollte die Höhe der Kamera je nach den örtlichen Gegebenheiten etwa 155 cm betragen. Weitere Einzelheiten Beschriftungsfeld mit Hilfe eines Schraubendrehers aus der Video-Türstation hebeln.
  • Seite 7: Video-Türstation Anbringen

    Anleitung myintercom Einleitung 1.7. Video-Türstation anbringen Gehäuse für Kabelzuführung vorbereiten AP-Gehäuse anbringen und Gerät anschließen Gerät ins Gehäuse einsetzen. Zierkappenring auf Schraube stecken und das Gerät mit dem Gehäuse verschrauben. Zierkappe aufschrauben – fertig! Das Beispiel zeigt die Montage der Aufputz- variante.
  • Seite 8: Einsatzszenarien

    Anleitung myintercom Inbetriebnahme 1.8. Einsatzszenarien Lokal Die Grafik zeigt die Verwendung innerhalb eines Wohn- oder Bürogebäudes Büro-Etage Tablet / Smartphone WLAN myintercom Video-Türstation Foyer mit Kamera WLAN DSL-Router / Switch Türöffner Ethernet Downloaded from www.Manualslib.com manuals search engine...
  • Seite 9: Global

    Anleitung myintercom Inbetriebnahme Global Die Grafik zeigt die Verwendung außerhalb eines Wohn- oder Bürogebäudes INTERNET Büro-Etage WLAN / UMTS myintercom Video-Türstation Foyer WLAN / UMTS, mit Kamera Sprache, Bild DSL-Router / Switch Türöffner Ethernet Downloaded from www.Manualslib.com manuals search engine...
  • Seite 10: Anschließen Der Myintercom Video-Türstation

    568 B angeschlossen. Die Zahl bezeichnet die Pin-Nummer des RJ-45 Steckers / der RJ-45 Dose. Ext. Türöffner Taste Stromversorgung (bauseits) Die Stromversorgung der myintercom Video- TÖ Türstation erfolgt über das Behnke 15 V Ext. Türöffner Netzteil max. 24 V, 2 A Steckernetzteil.
  • Seite 11: Konfiguration Und Inbetriebnahme

    Verbindung der myintercom Video-Türsta- tion mit einem 100 Mbit Ethernet LAN ▸ Stromversorgung mit Behnke 15 V Netzteil Verbindung über Ethernet Die myintercom Video-Türstation ist im Stan- dard als DHCP-Client konfiguriert, bezieht ihre IP-Adresse also von einem DHCP-Server. Downloaded from www.Manualslib.com...
  • Seite 12: Starten Der App

    Anleitung myintercom Inbetriebnahme 2.2. Starten der App 2.3. Übersicht Laden Sie die myintercom App je nach Typ Nachfolgend sind die drei wichtigsten Bild- des Smartphones oder Tablet aus dem Apple schirme der myintercom App dargestellt. AppStore bzw. Google Play Store herunter. Die in dieser Anleitung gezeigten Screens- Hauptbildschirm hots wurden auf einem iOS-Gerät erstellt.
  • Seite 13: Historie

    Anleitung myintercom Inbetriebnahme Historie Administration Auf dieser Seite können Sie die letzten Anrufe Auf dieser Seite nehmen Sie die Einrichtung von der Tür mit Uhrzeit und Bild einsehen. Die der Video-Türstation und der App vor. Sprache wird nicht aufgezeichnet. Pro Video- Türstation wird eine Historie von 20 Besuchern...
  • Seite 14: Administration Der Video-Türstation

    Anleitung myintercom Inbetriebnahme 2.4. Administration der Video-Türstation Wählen Sie hier „Administration “ aus, um die Video-Türstation zu verwalten. Vorher Alle für das myintercom-System notwendigen werden Benutzername und Passwort Einstellungen können mit Hilfe der App auf abgefragt: dem Smartphone oder Tablet vorgenommen werden.
  • Seite 15 Anleitung myintercom Inbetriebnahme Im Administrationsbereich können Sie ▸ Benutzer hinzufügen ▸ Benutzer verwalten ▸ Entscheiden, ob das Licht der Video-Tür- station beim Rufaufbau automatisch akti- viert wird ▸ Den NTP-Server einrichten (Somit wird im Anrufprotokoll immer die korrekte Uhr- zeit angezeigt) Downloaded from www.Manualslib.com...
  • Seite 16: Benutzer Verwalten

    Anleitung myintercom Inbetriebnahme Benutzer verwalten Drücken Sie „Speichern“, um den Benutzer auf der Video-Türstation hinzuzufügen. „Löschen Drücken Sie „Hinzufügen“, um einen neuen “ löscht den Benutzer von der Video-Tür- Benutzer anzulegen oder auf einen Benut- station. Dieser gelöschte Benutzer hat danach zernamen, um die Benutzereinstellungen zu keinen Zugriff mehr auf die Video-Türstation.
  • Seite 17: Verwalten Von Video-Türstationen

    Anleitung myintercom Inbetriebnahme 2.5. Verwalten von Video-Türstationen Tragen Sie die Daten des unter „Administra- tion“ angelegten Benutzers hier ein. Unter Drücken Sie auf dem Startbildschirm auf „Ein- „Türstation “ können Sie eine Beschreibung stellungen“, der Einstellungs-Bildschirm wird für den Eingang eingeben. Der Bezug zur angezeigt.
  • Seite 18: Bedienung Der App

    Anleitung myintercom Inbetriebnahme 2.6. Bedienung der App In der unteren Liste sehen Sie die auf diesem Smartphone konfigurierten Video- Die App gliedert sich in zwei Teile: Live-Video Türstationen. Der Punkt vor dem Namen und Historie. Der Benutzer kann jederzeit auf zeigt die Erreichbarkeit der Video-Türstation das Live-Bild der Video-Türstation zugreifen.
  • Seite 19: Historie

    Anleitung myintercom Inbetriebnahme Historie Mit Hilfe der Historien Funktion „Aufnahmen“ können Sie später nachvollziehen, wer wäh- rend Ihrer Abwesenheit geklingelt hat. In der Oberen Leiste wird der Zeitpunkt des Türrufes angezeigt . Mittels wischen oder der Pfeil- Knöpfe in der oberen Leiste können Sie die bis zu 20 Einträge abrufen.
  • Seite 20: Anhang

    Anleitung myintercom Anhang 3. ANHANG 3.1. Technische Daten Video ▸ Motion-JPEG, H.264 Kompression ▸ Ausstattung Auflösung 160 x 90 bis 640 x 480 pixel ▸ ▸ Stromversorgung mittels 15 V Netzteil 30 Bilder / S in allen Auflösungen und ▸ Beleuchtungs-Ring mit weißen LEDs Kompressionsarten ▸...
  • Seite 21: Maße In Mm

    Anleitung myintercom Anhang 3.2. Maße in mm Frontblende Hinterer Gehäuseteil 12,5 AP-Gehäuse UP-Gehäuse Ø 4 Downloaded from www.Manualslib.com manuals search engine...
  • Seite 22: Rechtliche Hinweise

    Anleitung myintercom Rechtliche Hinweise 4. RECHTLICHE HINWEISE Infos zum Produkthaftungsgesetz: 1. AXIS ist ein registriertes Warenzeichen von 1. Alle Produkte aus dieser Anleitung dürfen nur Axis AB. für den angegebenen Zweck verwendet werden. Wenn Zweifel bestehen, muss dies mit einem 2.
  • Seite 23 GB – Version 2.0 Instructions Downloaded from www.Manualslib.com manuals search engine...
  • Seite 24 Instructions for myintercom Important information Important information – please note! 1. Installation and maintenance of Behnke 2. Before commencing any installation or repair telephones and accessory components must work, disconnect devices from the mains supply be performed by a qualified electrical service (wall-plug power supply) and the network.
  • Seite 25 1.4. Recommended installation position 1.5. Light conditions 1.6. Changing the name plate 1.7. Installing the video door intercom 1.8. User scenarios ▸ Local ▸ Global 1.9. Connecting the myintercom video door intercom ▸ LAN connection ▸ Power supply ▸ Switch output ▸ 12V ~ 1A output ▸...
  • Seite 26: Introduction

    1.2. General Required Performance features The following requirements must be complied with to use the myintercom video door inter- The myintercom video door intercom is a com- com unit: ▸ pact device with integrated camera, loudspeaker Mains supply available near door ▸...
  • Seite 27: The Myintercom Video Door Intercom

    Instructions for myintercom Introduction 1.3. The myintercom video door intercom Camera Luminous ring Loudspeaker Call button Name plate Microphone Screw cover Downloaded from www.Manualslib.com manuals search engine...
  • Seite 28: Recommended Installation Position

    1.4. Recommended installation position 1.6. Changing the name plate Since the camera has a restricted angle of view, the position at which the myintercom video door intercom is installed is of decisive importance. Accordingly, the camera should be mounted at a height of approximately 155cm, depending on the local conditions.
  • Seite 29: Installing The Video Door Intercom

    Instructions for myintercom Introduction 1.7. Installing the video door intercom Prepare casing for cable feed Attach surface-mount casing and connect device Place device in casing Place decorative ring cap over screw and screw device to casing. Screw on decorative cap The example is for surface-mounting installa- tion.
  • Seite 30: User Scenarios

    Operation 1.8. User scenarios Local The illustration shows the unit in use in a residential or office building. Office floor Tablet or smartphone WLAN myintercom video door intercom Foyer With camera WLAN Broadband router / switch Door opener Ethernet Downloaded from www.Manualslib.com...
  • Seite 31: Global

    Instructions for myintercom Operation Global The illustration shows the unit in use outside of a residential or office building. INTERNET Office floor WLAN / UMTS myintercom video door intercom Foyer WLAN / UMTS, With camera Voice, Video Broadband router / switch...
  • Seite 32: Connecting The Myintercom Video Door Intercom

    2 (orange) whereby the number denotes the respective pin of the RJ-45 plug or socket. Power supply Power is supplied to the myintercom video TÖ = Door opener Ext. door open button door intercom via the Behnke 15V wall-plug (on site) power supply.
  • Seite 33: Configuration And Operation

    Instructions for myintercom Operation 2. CONFIGURATION AND OPERATION 2.1. Preparation ▸ Connect the myintercom video door inter- com with a 100 Mbit Ethernet LAN ▸ Connect the Behnke 15V power supply Ethernet connection The default configuration for the myintercom video door intercom is as a DHCP client; it therefore obtains its IP-address from a DHCP server.
  • Seite 34: Running The App

    After starting up the App, you will first of all see an empty startup screen. Before you can use the App together with your myintercom video door intercom, you need to add a user to the video door intercom, as described in the section: Administration of the Video Door Station.
  • Seite 35: History

    Instructions for myintercom Operation History Administration This page shows the most recent calls, This is the page in which you set up the video together with the time and camera image. No door intercom and the App. voice recording is made. Each video intercom stores the last 20 visitors.
  • Seite 36: Administration Of The Video Door Intercom

    All the settings that are necessary for the myintercom system can be made with the App on your smartphone or tablet computer. You do not require a separate computer to do this. Administration of the video door intercom is...
  • Seite 37 Instructions for myintercom Operation You can perform the following in the Adminis- tration area ▸ Add a user ▸ Manage users ▸ Determine whether the light of the video door intercom should be automatically activated when a call is made ▸...
  • Seite 38: Managing Users

    Instructions for myintercom Operation Managing users Press Change to change the user’s pass- word. A new random password is generated and Press Add to add a new user or a user name to saved in the camera. This new password is sub- change the settings for this user.
  • Seite 39: Managing Video Door Intercom Units

    Instructions for myintercom Operation 2.5. Managing video door intercom units Enter the data for the user created under Admi- nistration here . Enter a description of the In the startup screen, press Settings to display entrance under Door Intercom System the settings screen.
  • Seite 40: Using The App

    Instructions for myintercom Operation 2.6. Using the App The list at the bottom shows the video door intercoms configured on this smart- The App is divided into two sections: live video phone. The dot before the name indicates the and history. The user can access the live video accessibility of the video door intercom.
  • Seite 41: History

    Instructions for myintercom Operation History The history function, Recordings, allows you to determine who has rung your doorbell while you have been away. The time of the call is shown in the bar at the top. You can display up to 20 entries by swiping or using the arrow buttons in the top bar .
  • Seite 42: Appendix

    Instructions for myintercom Appendix 3. APPENDIX 3.1. Technichal specifications Video ▸ Technical features Motion JPEG, H.264 compression ▸ ▸ 15V power supply Resolution 160 x 90 to 1280 x 800 pixels ▸ ▸ Luminous ring comprising white LEDs 30 frames per second in all resolutions and ▸...
  • Seite 43: Dimensions In Mm

    Instructions for myintercom Appendix 3.2. Dimensions in mm Front panel Rear section of casing 12,5 Surface-mounted casing Flush-mounted casing Ø 4 Downloaded from www.Manualslib.com manuals search engine...
  • Seite 44: Legal Information

    Instructions for myintercom Legal information 4. LEGAL INFORMATION Information about the Product Liability Law: 1. AXIS is a registered trademark of Axis AB. 1. All products referred to in this manual may only be used for the stated purpose. If in any 2.
  • Seite 45 F – Version 2.0 Mode d’emploi Downloaded from www.Manualslib.com manuals search engine...
  • Seite 46: Information Importante

    Mode d’emploi de myintercom Information importante Information importante – SVP veuillez noter! 2. Avant de poursuivre l’installation ou répa- ration, veuillez déconnecter les appareils de 1. L’installation et l’entretien des téléphones et la source d’alimentation principale (source accessoires Behnke doivent être réalisés par un d’alimentation avec prise murale) et du réseau.
  • Seite 47 Mode d’emploi de myintercom Table de matières 1. Introduction 1.1. Contenu de la boîte 1.2. Général ▸ Performances ▸ Spécifications du système 1.3. Le visiophone myintercom 1.4. Position recommandée pour l’installation 1.5. Conditions de luminosité 1.6. Changement de la plaque nominative 1.7. Installation du visiophone 1.8. Scénarios d’utilisateur ▸...
  • Seite 48: Introduction

    1. INTRODUCTION 1.2. Général 1.1. Contenu de la boîte Performances ▸ Boîtier visiophone myintercom Le visiophone myintercom est un appareil com- ▸ Mode d’emploi pact avec caméra, haut-parleur et microphone ▸ Instructions supplémentaires: Configuration intégrés, en plus d’un bouton d’appel avec une plaque nominative éclairée.
  • Seite 49: Spécifications Du Système

    Plaque nominative ▸ Port réseau disponible sur le commutateur ou Microphone le routeur Cache-vis ▸ Application myintercom sur Apple AppStore ou Google Play Store ▸ WLAN ▸ Serveur DHCP fournissant une adresse IP, un masque sous-réseau, une passerelle et un serveur DNS (standard) ▸...
  • Seite 50: Position Recommandée Pour L'installation

    Puisque la caméra a un angle de vue restreint, la position du visiophone myintercom est décisive. Ainsi, la caméra doit être installée à une hauteur d’à peu près 155 cm, en fonction des conditions sur place. Pour plus de détails, Détacher la plaque nominative de la surface du...
  • Seite 51: Installation Du Visiophone

    Mode d’emploi de myintercom Introduction 1.7. Installation du visiophone Préparer le chemin de câbles Fixer le chemin de câbles sur la surface et connecter l’appareil Placer l’appareil dans le boîtier Introduire le capuchon décoratif sur le rebord et visser l’appareil dans le boîtier Fixer le capuchon décoratif...
  • Seite 52: Scénarios D'utilisateur

    Mode d’emploi de myintercom Fonctionnement 1.8. Scénarios d’utilisateur Local L’illustration suivante montre le visiophone utilisé dans un immeuble de logements ou de bureaux. Étage de bureau Tablette tactile ou Smartphone WLAN Visiophone myintercom Accueil Avec caméra WLAN Routeur/ Commutateur à haut débit Mécanisme...
  • Seite 53: Global

    Mode d’emploi de myintercom Fonctionnement Global L’illustration suivante montre le visiophone utilisé en dehors d’un logement ou immeuble de bureaux. INTERNET Étage de bureau WLAN / UMTS Visiophone myintercom Accueil WLAN / UMTS, Avec caméra Voix, Vidéo Routeur/ Commutateur à...
  • Seite 54: Connexion Du Visiophone Myintercom

    6 (vert), 1 (orange-blanc) et 2 (orange). Le nombre indique la fiche correspondante de la prise ou du connecteur RJ-45. Source d’alimentation Le courant est fourni au visiophone myintercom TÖ = Mécanisme Bouton externe pour l’ouver- via la prise murale de 15V. L’utilisation de toute d’ouverture de...
  • Seite 55: Configuration Et Fonctionnement

    LAN Ethernet 100 Mbit ▸ Connecter la source d’alimentation de 15V Connexion Ethernet La configuration par défaut du visiophone myintercom est en tant que client DHCP; l’adresse IP est donc fournie par un serveur DHCP. Downloaded from www.Manualslib.com manuals search engine...
  • Seite 56: Démarrage De L'application

    Assurez-vous d’abord de créer un nouvel uti- lisateur dans le visiophone. Si comme option vous voulez utiliser la fonction de myintercom hors de votre réseau via UMTS, vous aurez besoin d’activer la licence adéquate sur notre Voici l’écran d’accueil affiché lors du démar- site.
  • Seite 57: Historique

    Mode d’emploi de myintercom Fonctionnement Historique Administration Cette page montre les derniers appels (image et Voici la page pour configurer le visiophone et heure). Pas d’enregistrement de d’appel. Chaque l’application. visiophone enregistre les 20 derniers appels. Downloaded from www.Manualslib.com manuals search engine...
  • Seite 58: Administration Du Visiophone

    Il vous sera demandé votre nom Tous les paramètres nécessaires pour le sys- d’utilisateur et mot de passe tème myintercom peuvent être configurés avec l’application sur votre Smartphone ou tablette tactile. Vous n’avez pas besoin d’un autre ordinateur. L’administration du visiophone est possible depuis tout appareil cible, même si...
  • Seite 59 Mode d’emploi de myintercom Fonctionnement Les commandes suivantes peuvent être réali- sées dans l’espace « Administration » : ▸ Ajouter un utilisateur ▸ Gérer les utilisateurs ▸ Déterminer si l’éclairage du visiophone s’enclenche automatiquement à chaque appel ▸ Configurer le serveur NTP (dans ce cas, le temps exact sera toujours affiché...
  • Seite 60: Gestion D'utilisateurs

    Mode d’emploi de myintercom Fonctionnement Gestion d’utilisateurs l’utilisateur du visiophone. Une fois sup- primé, l’utilisateur ne pourra plus accéder au Cliquez sur « Ajouter » pour ajouter un nouvel visiophone. Cliquez sur « Modifier » pour utilisateur ou modifier le profil de l’utilisateur.
  • Seite 61: Gestion Des Visiophones

    Mode d’emploi de myintercom Fonctionnement 2.5. Gestion des visiophones Introduisez les données pour l’utilisateur crées sur « Administration ». Introduisez une Dans l’écran d’accueil, cliquez sur « Paramètres description de l’entrée sur « Système de visio- » pour afficher l’écran de paramètres.
  • Seite 62: Utilisation De L'application

    Mode d’emploi de myintercom Fonctionnement 2.6. Utilisation de l’application La liste en bas de l’écran indique les visiophones configurés sur ce Smartphone. Le L’application est divisée en deux sections: signal avant le nom indique la disponibilité du vidéo en direct et historique. L’utilisateur peut visiophone.
  • Seite 63: Historique

    Mode d’emploi de myintercom Fonctionnement Historique La fonction d’historique, « Enregistrements », vous permet de déterminer qui a sonné à votre interphone pendant votre absence. L’heure d’appel est affiché dans la barre en haut de la page. Vous pouvez afficher jusqu’à 20 entrées en glissant ou en utilisant les flèches...
  • Seite 64: Annexe

    Mode d’emploi de myintercom Annexe 3. ANNEXE 3.1. Spécifications techniques Vidéo ▸ Caractéristiques techniques Motion JPEG, compression H.264 ▸ ▸ Source d’alimentation de 15V Résolution 160 x 90 à 640 x 480 pixels ▸ ▸ Rétroéclairage avec LEDs blanches 30 images par seconde dans toutes les ▸...
  • Seite 65: Dimensions En Mm

    Mode d’emploi de myintercom Annexe 3.2. Dimensions en mm Panneau frontal Panneau arrière du boîtier 12,5 Boîtier pour fixation sur paroi Boîtier encastrable Ø 4 Downloaded from www.Manualslib.com manuals search engine...
  • Seite 66: Informations Légales

    Mode d’emploi de myintercom Informations légales 4. INFORMATIONS LÉGALES Information sur le droit relatif à la responsa- bilité du fait des produits : 1. AXIS est une marque déposée d’Axis AB. 1. Tous les produits visés au présent manuel ne 2.
  • Seite 67 E – Version 2.0 Instrucciones Downloaded from www.Manualslib.com manuals search engine...
  • Seite 68 Instrucciones de myintercom Información importante Información importante – ¡tome nota! 1. La instalación y el mantenimiento de teléfo- 2. Antes de empezar cualquier instalación o nos y accesorios Behnke debe realizarse por un reparación, desconecte los aparatos de la fuente operario técnico calificado en servicio eléctrico.
  • Seite 69 Contenidos 1. Introducción 1.1. Contenidos del paquete 1.2. General ▸ Prestaciones ▸ Requisitos del sistema 1.3. Intercomunicador con cámara integrada myintercom 1.4. Posición de instalación recomendada 1.5. Condiciones de iluminación 1.6. Modificación de la placa de identificación 1.7. Instalación del intercomunicador 1.8. Posibilidades de uso ▸ Local ▸...
  • Seite 70: Introducción

    El sistema myintercom le permite utilizar su ya existente infraestructura técnica para comunica- ción por audio y video. Con myintercom, la señal del intercomunicador se transmite directamente a su smartphone o tableta como estación remota.
  • Seite 71: Requisitos Del Sistema

    ▸ Puerto de red disponible en conmutador Micrófono o router Tuerca decorativa para tapar los tornillos. ▸ Aplicación myintercom de la Apple AppStore o Google Play Store ▸ WLAN ▸ Servidor DHCP que proporciona una dirección IP, máscara de subred, pasarela y servidor DNS (estándar)
  • Seite 72: Posición De Instalación Recomendada

    Instrucciones de myintercom Introducción 1.4. Posición de instalación 1.6. Modificación de la placa de recomendada identificación Dado que la cámara tiene un ángulo de visión restringido, la posición en la que se instala el intercomunicador es de suma importancia. Así pues, la cámara debería instalarse a una altura aproximada de 155cm, en función de las...
  • Seite 73: Instalación Del Intercomunicador

    Instrucciones de myintercom Introducción 1.7. Instalación del intercomunicador Preparar la caja para la alimentación por cable Fijar la caja a la superficie, conectar el intercomunicador atornillar sobre el rebestimiento Atornillar las tuercas decorativas El siguiente ejemplo es el modelo para mon- taje en superficie.
  • Seite 74: Posibilidades De Uso

    Instrucciones de myintercom Funcionamiento 1.8. Posibilidades de uso Local La ilustración muestra el intercomunicador usado en un edificio residencial o de ofici- nas.. Planta de oficina Tableta gráfica o smartphone WLAN Intercomunicador myintercom Recibidor Con cámara WLAN Router/ Conmutador de banda ancha...
  • Seite 75: Global

    Instrucciones de myintercom Funcionamiento Global La siguiente ilustración muestra el dispositivo en su uso fuera de un edificio residencial o de oficinas. INTERNET Planta de oficina WLAN / UMTS Intercomunicador myintercom Recibidor WLAN / UMTS, Con cámara Voz, Vídeo Router/...
  • Seite 76: Conexión Del Intercomunicador Myintercom

    RJ-45. Fuente de alimentación La corriente eléctrica del intercomunicador myintercom se obtiene vía la fuente de alimen- TÖ = Abrepuertas Botón abrepuertas externo tación de 15V para enchufe de pared. No se per- (in situ) mite el uso de otras fuentes de alimentación.
  • Seite 77: Configuración Y Funcionamiento

    ▸ Conecte la fuente de alimentación de 15V ▸ Conexión Ethernet La configuración por defecto del intercomu- nicador myintercom es como cliente DHCP. Por tanto, el intercomunicador obtiene la dirección IP desde un servidor DHCP. Downloaded from www.Manualslib.com manuals search engine...
  • Seite 78: Puesta En Marcha De La Aplicación

    Instrucciones de myintercom Funcionamiento 2.2. Puesta en marcha de la aplicación 2.3. Resumen Puede descargar la aplicación de myintercom Las siguientes capturas de imagen corres- tanto desde la Apple AppStore como desde la ponden a las tres pantallas principales de la Google Play Store, en función del modelo de aplicación myintercom.
  • Seite 79: Historial

    Instrucciones de myintercom Funcionamiento Historial Administración Esta página muestra las llamadas más reci- Esta es la página donde se configura el inter- entes (con hora e imagen de la cámara). No comunicador y las aplicaciónes. hay grabación de voz. Cada intercomunicador almacena las 20 últimas comunicaciones.
  • Seite 80: Administración Del Intercomunicador

    Todos los ajustes necesarios para el funcio- nombre de usuario y contraseña. namiento del sistema myintercom se pueden Puede encontrar sus datos de conexión en las configurar con la aplicación desde su smart- phone o tableta. No necesita otro ordenador para hacerlo.
  • Seite 81 Instrucciones de myintercom Funcionamiento Puede hacer las siguientes operaciones desde el area de Administración: ▸ Añadir un usuario ▸ Gestionar usuarios ▸ Determinar si la luz del intercomunicador debe encenderse automáticamente al recibir una llamada ▸ Configurar el servidor NTP (en cuyo caso la hora exacta aparecerá...
  • Seite 82: Gestión De Usuarios

    Instrucciones de myintercom Funcionamiento Gestión de usuarios borrar el usuario del intercomunicador. Una vez eliminado, el usuario ya no podrá acceder al Pulse “Añadir” para añadir un nuevo usuario o intercomunicador. Pulse “Modificar ” para nombre de usuario a fin de modificar los ajus- cambiar la contraseña de usuario.
  • Seite 83: Gestión De Los Intercomunicadores Con Vídeo

    Instrucciones de myintercom Funcionamiento 2.5. Gestión de los intercomunicadores con vídeo En la pantalla de inicio, pulse “Ajustes” para Introduzca los datos para el usuario creado visualizar la pantalla de ajustes. según este apartado de “Administración”. Introduzca una descripción de la entrada en “Sistema del intercomunicador”.
  • Seite 84: Utilización De La Aplicación De App

    Instrucciones de myintercom Funcionamiento 2.6. Utilización de la aplicación de App La lista en la parte inferior de la pantalla muestra los intercomunicadores configurados La aplicación se divide en dos secciones: video en el smartphone. El punto delante del nombre en directo e historial. El usuario puede acceder a indica la disponibilidad del intercomunicador.
  • Seite 85: Historial

    Instrucciones de myintercom Funcionamiento Historial La función de historial, “Grabaciones”, le permite saber quién ha llamado a su puerta durante su ausencia. La hora de la llamada aparece en la barra en la parte superior de la pantalla. Puede visualizar hasta 20 llamadas deslizando el dedo o utilizando la flecha en la pantalla.
  • Seite 86: Anexo

    Instrucciones de myintercom Anexo 3. ANEXO 3.1. Especificaciones técnicas Vídeo ▸ Prestaciones técnicas Motion JPEG, compresión H.264 ▸ ▸ Fuente de alimentación de 15V Resolución 160 x 90 to 640 x 480 píxeles ▸ ▸ Iluminación al rededor de la cámara integrada 30 imágenes por segundo en todas las reso-...
  • Seite 87: Dimensiones En Mm

    Instrucciones de myintercom Anexo 3.2. Dimensiones en mm Panel frontal Sección trasera de la caja 12,5 Caja de montaje en superficie Caja de montaje empotrada Ø 4 Downloaded from www.Manualslib.com manuals search engine...
  • Seite 88: Información Legal

    Instrucciones de myintercom Información legal 4. INFORMACIÓN LEGAL Información acerca de la normativa sobre la responsabilidad por productos: 1. AXIS es una marca registrada de Axis AB. 1. Todos los productos mencionados en este 2. Apple, el logo Apple, Mac, Mac OS, Macin manual se deberán utilizar para los fines...
  • Seite 89 Instrucciones de myintercom Notizen Downloaded from www.Manualslib.com manuals search engine...
  • Seite 90 Version: 2.0 August 2012 Telecom Behnke GmbH Gewerbepark „An der Autobahn“ Robert-Jungk-Straße 3 66459 Kirkel Deutschland/Germany Info-Hotline: +49 (0) 68 41/81 77-700 Service-Hotline: +49 (0) 68 41/81 77-777 Telefax: +49 (0) 68 41/81 77-750 Internet: www.behnke-online.de E-Mail: info@behnke-online.de Downloaded from www.Manualslib.com...

Inhaltsverzeichnis