Herunterladen Inhalt Inhalt Diese Seite drucken
Inhaltsverzeichnis

Werbung

Verfügbare Sprachen

Verfügbare Sprachen

BEDIENUNGSANLEITUNG
USER MANUAL
MODE D'EMPLOI
MANUAL DEL USUARIO
CL-48 LED-CLUSTER
Color Changer
©
Für weiteren Gebrauch aufbewahren!
Copyright
Keep this manual for future needs!
Nachdruck verboten!
Gardez ce mode d'emploi pour des
Reproduction prohibited!
utilisations ultérieures!
Réproduction interdit!
Guarde este manual para posteriores usos.
Prohibida toda reproducción.

Werbung

Inhaltsverzeichnis
loading

Inhaltszusammenfassung für Futurelight CL-48 Led-Cluster

  • Seite 1 BEDIENUNGSANLEITUNG USER MANUAL MODE D'EMPLOI MANUAL DEL USUARIO CL-48 LED-CLUSTER Color Changer © Für weiteren Gebrauch aufbewahren! Copyright Keep this manual for future needs! Nachdruck verboten! Gardez ce mode d’emploi pour des Reproduction prohibited! utilisations ultérieures! Réproduction interdit! Guarde este manual para posteriores usos.
  • Seite 2: Inhaltsverzeichnis

    MULTI-LANGUAGE-INSTRUCTIONS Inhaltsverzeichnis/Table of contents Sommaire/Contenido EINFÜHRUNG..............................4 Lieferumfang ..............................4 SICHERHEITSHINWEISE..........................5 BESTIMMUNGSGEMÄßE VERWENDUNG..................... 6 GERÄTEBESCHREIBUNG ..........................7 Features ................................. 7 Geräteübersicht.............................. 8 INSTALLATION ..............................9 Überkopfmontage............................9 Anschluss des Gerätes ..........................11 Anschluss ans Netz ............................. 11 BEDIENUNG ..............................11 Stand Alone-Betrieb .............................
  • Seite 3 You can find the latest update of this user manual in the Internet under: Vous pouvez trouvez la dernière version de ce mode d'emploi dans l'Internet sous: Vd. puede encontrar la versión más reciente de este manual en el Internet bajo: www.futurelight.com 3/55 51841355_V_1_0.DOC...
  • Seite 4: Einführung

    - sich die letzte Version der Anleitung im Internet herunter laden EINFÜHRUNG Wir freuen uns, dass Sie sich für einen FUTURELIGHT CL-48 LED-CLUSTER entschieden haben. Wenn Sie nachfolgende Hinweise beachten, sind wir sicher, dass Sie lange Zeit Freude an Ihrem Kauf haben werden.
  • Seite 5: Sicherheitshinweise

    SICHERHEITSHINWEISE ACHTUNG! Seien Sie besonders vorsichtig beim Umgang mit gefährlicher Netzspannung. Bei die- ser Spannung können Sie einen lebensgefährlichen elektrischen Schlag erhalten! Dieses Gerät hat das Werk in sicherheitstechnisch einwandfreiem Zustand verlassen. Um diesen Zustand zu erhalten und einen gefahrlosen Betrieb sicherzustellen, muss der Anwender die Sicherheitshinweise und die Warnvermerke unbedingt beachten, die in dieser Bedienungsanleitung enthalten sind.
  • Seite 6: Bestimmungsgemäße Verwendung

    Es dürfen unter keinen Umständen Flüssigkeiten aller Art in Steckdosen, Steckverbindungen oder in irgendwelche Geräteöffnungen oder Geräteritzen eindringen. Besteht der Verdacht, dass - auch nur minimale - Flüssigkeit in das Gerät eingedrungen sein könnte, muss das Gerät sofort allpolig vom Netz getrennt werden.
  • Seite 7: Gerätebeschreibung

    Das Gerät darf nur über den Montagebügel installiert werden. Um eine gute Luftzirkulation zu gewährleisten, muss um das Gerät ein Freiraum von mindestens 50 cm eingehalten werden. Das Gehäuse darf niemals umliegende Gegenstände oder Flächen berühren! Achten Sie bei der Montage, beim Abbau und bei der Durchführung von Servicearbeiten darauf, dass der Bereich unterhalb des Montageortes abgesperrt ist.
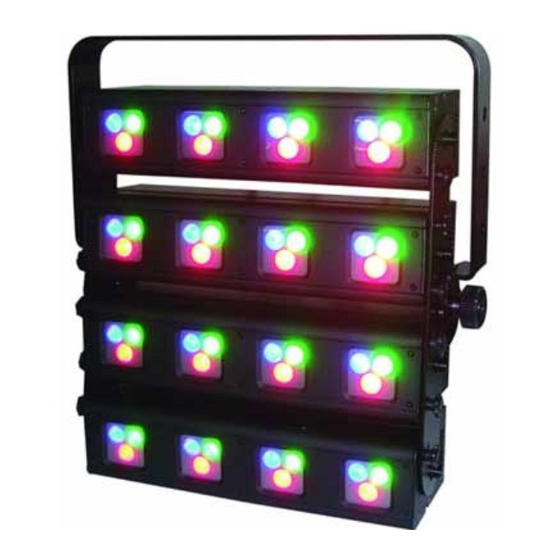
  • Seite 8: Geräteübersicht

    Geräteübersicht (1) Feststellschraube (2) Feststellschraube für Rahmen (3) Gehäuse (4) LEDs (5) DIP-Schalter (6) Netzschalter (7) Spannungsversorgungsausgang (8) Spannungsversorgungseingang / Sicherungshalter (9) Fangseilöse (10) DMX-Ausgangsbuchse (11) DMX-Eingangsbuchse 8/55 51841355_V_1_0.DOC...
  • Seite 9: Installation

    (12) Hängebügel (13) Lüftungsschlitz INSTALLATION Überkopfmontage Die Aufhängevorrichtungen des Gerätes muss so gebaut und bemessen sein, dass sie 1 Stunde lang ohne dauernde schädliche Deformierung das 10-fache der Nutzlast aushalten kann. Die Installation muss immer mit einer zweiten, unabhängigen Aufhängung, z. B. einem geeigneten Fangnetz, erfolgen.
  • Seite 10 Vorgehensweise: Das Gerät sollte idealerweise außerhalb des Aufenthaltsbereiches von Personen installiert werden. WICHTIG! ÜBERKOPFMONTAGE ERFORDERT EIN HOHES MAß AN ERFAHRUNG. Dies beinhaltet (aber beschränkt sich nicht allein auf) Berechnungen zur Definition der Tragfähigkeit, verwendetes Installations- material und regelmäßige Sicherheitsinspektionen des verwendeten Materials und des Gerätes. Versuchen Sie niemals, die Installation selbst vorzunehmen, wenn Sie nicht über eine solche Qualifikation verfügen, sondern beauftragen Sie einen professionellen Installateur.
  • Seite 11: Anschluss Des Gerätes

    Anschluss des Gerätes An der Rückseite des CL-48 LED-CLUSTER befinden sich je vier XLR-Einbaubuchsen (DMX Out) und XLR- Einbaustecker (DMX In). Verbinden Sie, mit den drei beiliegenden XLR-Kabeln, immer einen Ausgang mit dem Eingang der nächsten Leiste bis alle Leisten angeschlossen sind.
  • Seite 12: Non-Dmx Modi

    Non-DMX Modi Tabelle 1: Betriebsmodus per DIP-Schaltereinstellung Betriebsmodus Keine Funktion Sound control – Stand Alone Farbintensität RGB Blau Blau Grün Grün (s. Tabelle 2) Internes Programm 1 speed speed Internes Programm 2 speed speed Internes Programm 3 speed speed Internes Programm 4 speed speed Internes Programm 5...
  • Seite 13: Dmx-Gesteuerter Betrieb

    DIP-Schalter 11 und 12 aufrufen. Stellen Sie die DIP-Schalter 11 und 12 nach nachfolgender Tabelle ein, um den gewünschten DMX-Modus aufzurufen. Die Angaben der benötigten DMX-Kanäle beziehen sich hierbei auf je eine der vier LED-Leisten des CL-48 LED-CLUSTER. Tabelle 4: DMX-Kanäle...
  • Seite 14: Adressierung Des Projektors

    Die Startadresse ist der erste Kanal, auf den die Leiste auf Signale vom Controller reagiert. Bitte vergewissern Sie sich, dass sich die Steuerkanäle nicht mit anderen Geräten überlappen, damit der CL-48 LED-CLUSTER korrekt und unabhängig von anderen Geräten in der DMX-Verbindung funktioniert. Werden mehrere LED-Leisten auf eine Adresse definiert, arbeiten sie synchron.
  • Seite 15: Reinigung Und Wartung

    Die Verbindung zwischen Controller und Projektor sowie zwischen den einzelnen Geräten muss mit einem zweipoligen geschirmten Kabel erfolgen. Die Steckverbindung geht über 3-polige XLR-Stecker und -Kupplungen. Belegung der XLR-Verbindung: Wenn Sie Controller mit dieser XLR-Belegung verwenden, können Sie den DMX-Ausgang des Controllers direkt mit dem DMX-Eingang des ersten Gerätes der DMX-Kette verbinden.
  • Seite 16: Sicherungswechsel

    Mindestabstand zum angestrahlten Objekt: 0,1 m Sicherung: F 2 A, 250 V Zubehör: FUTURELIGHT CP-240 Controller Best.-Nr. 51834265 FUTURELIGHT CP-256/64 Controller 16bit Best.-Nr. 51834288 FUTURELIGHT CP-512/64 Controller 16bit Best.-Nr. 51834295 Wizard-512 USB DMX-Software + Interface Best.-Nr. 51860102 Wizard-1024 USB DMX-Software + Interface Best.-Nr.
  • Seite 17: Introduction

    - download the ultimate version of the user manual from the Internet INTRODUCTION Thank you for having chosen a FUTURELIGHT CL-48 LED-CLUSTER. If you follow the instructions given in this manual, we are sure that you will enjoy this device for a long period of time.
  • Seite 18: Safety Instructions

    SAFETY INSTRUCTIONS CAUTION! Be careful with your operations. With a dangerous voltage you can suffer a dangerous electric shock when touching the wires! This device has left our premises in absolutely perfect condition. In order to maintain this condition and to ensure a safe operation, it is absolutely necessary for the user to follow the safety instructions and warning notes written in this user manual.
  • Seite 19: Health Hazard

    running, the device must be checked by a specialist if the liquid has reduced any insulation. Reduced insulation can cause mortal electrical shock. There must never be any objects entering into the device. This is especially valid for metal parts. If any metal parts like staples or coarse metal chips enter into the device, the device must be taken out of operation and disconnected immediately.
  • Seite 20: Description Of The Device

    The maximum ambient temperature T = 45° C must never be exceeded. Operate the device only after having become familiarized with its functions. Do not permit operation by persons not qualified for operating the device. Most damages are the result of unprofessional operation! Never use solvents or aggressive detergents in order to clean the device! Rather use a soft and damp cloth.
  • Seite 21: Overview

    Overview (1) Fixation screw (2) Frame fixation screw (3) Housing (4) LEDs (5) DIP-switches (6) Power switch (7) Power output (8) Power input / Fuseholder (9) Safety eyelet (10) DMX-Out socket (11) DMX-In socket 21/55 51841355_V_1_0.DOC...
  • Seite 22: Installation

    (12) Mounting bracket (13) Venting slot INSTALLATION Overhead rigging The installation of the device has to be built and constructed in a way that it can hold 10 times the weight for 1 hour without any harming deformation. The installation must always be secured with a secondary safety attachment, e.g. an appropriate catch net. This secondary safety attachment must be constructed in a way that no part of the installation can fall down if the main attachment fails.
  • Seite 23: Danger Of Fire

    Before taking into operation for the first time, the installation has to be approved by an expert! Connecting the device On the rear panel of the CL-48 LED-CLUSTER you can find four XLR-jacks (DMX Out) and four XLR-plugs (DMX In). Connect each DMX OUT-jack with the DMX IN-plug of the next bar.
  • Seite 24: Connection With The Mains

    Connect the effect to the mains and switch it on via the POWER-switch. Stand Alone-operation In the Stand Alone mode, the CL-48 LED-CLUSTER can be used without controller. You can do without a controller as the features a built-in microphone, which provides automatic sound control.
  • Seite 25: Non-Dmx Modes

    Non-DMX modes Table 1: Set operating mode via DIP-switches Operating mode No function Sound control - Stand Alone RGB Intensity blue blue green green (see table 2) Internal program 1 speed speed Internal program 2 speed speed Internal program 3 speed speed Internal program 4...
  • Seite 26: Dmx-Controlled Operation

    DMX-controlled operation You can control the projectors individually via your DMX-controller. Every DMX-channel has a different occupation with different features. The CL-48 LED-CLUSTER has 3 DMX-modes. Set DIP-switches 11 and 12 according to the table below. Table 4: DMX-channels Internal...
  • Seite 27: Addressing

    Addressing Depending on the DMX-mode (see table 4), each bar of the CL-48 LED-CLUSTER occupies 15, 12 or 6 DMX-channels. If you select program “R, G, B control per group“ for example, one bar of the Cluster occupies 6 DMX-channels. To ensure that the control signals are properly directed to each device, it requires adressing.
  • Seite 28: Cleaning And Maintenance

    Occupation of the XLR-connection: If you are using controllers with this occupation, you can connect the DMX-output of the controller directly with the DMX-input of the first fixture in the DMX-chain. If you wish to connect DMX-controllers with other XLR-outputs, you need to use adapter-cables. Building a serial DMX-chain: Connect the DMX-output of the first fixture in the DMX-chain with the DMX-input of the next fixture.
  • Seite 29: Replacing The Fuse

    Min.distance to lighted object: 0.1m Fuse: F 2 A, 250 V Accessory: FUTURELIGHT CP-240 controller No. 51834265 FUTURELIGHT CP-256/64 controller 16bit No. 51834288 FUTURELIGHT CP-512/64 controller 16bit No. 51834295 Wizard-512 USB DMX-Software + Interface No. 51860102 Wizard-1024 USB DMX-Software + Interface No.
  • Seite 30: Introduction

    - télécharger la version ultérieure du mode d'emploi d'Internet INTRODUCTION Nous vous remercions d'avoir choisi un FUTURELIGHT CL-48 LED-CLUSTER. Si vous respectez les instructions de service suivantes, vous allez profiter longtemps de votre achat. Sortez le CL-48 LED-CLUSTER de son emballage.
  • Seite 31: Instructions De Sécurité

    INSTRUCTIONS DE SÉCURITÉ ATTENTION! Soyez prudent, lors de manipulations électriques avec une tension dangereuse vous êtes soumis à des risques d'électrocution! Cet appareil a quitté les ateliers dans un état irréprochable. Pour assurer un bon fonctionnement, sans danger, l'utilisateur doit suivre les instructions contenues dans ce mode d'emploi. Attention: Tout dommage occasionné...
  • Seite 32: Emploi Selon Les Prescriptions

    Dans aucun cas des liquides de tout genre doivent pénétrer dans des fiches secteur, des connecteurs ou dans des ouvertures d'appareil ou dans des fentes d'appareil. S'il y a un doute sur le fait que même une quantité minimale de liquide aurait pénétré dans l'appareil, il faut immédiatement séparer l'appareil du secteur avec tous les pôles.
  • Seite 33: Description De L'appareil

    - - -m Le symbole indique la distance minimale des objets illuminés. Ne jamais prendre une distance en- dessous de 0,1 mètres entre la sortie de lumière et la surface à illuminer! Cet appareil a seulement été conçu pour une installation grâce à la lyre de montage. Afin d'assurer une ventilation optimale, il est nécéssaire de laisser un espace d'au moins 50 cm autour de l'appareil.
  • Seite 34: Aperçue Des Parties

    Aperçue des parties (1) Vis de fixation (2) Vis de fixation (3) Boîtier (4) DELs (5) Sélecteurs DIP (6) Interrupteur secteur (7) Sortie d‘alimentation (8) Entrèe d’alimentation / Portefusible (9) Oeillet de sécurité (10) Sortie DMX (11) Entrée DMX 34/55 51841355_V_1_0.DOC...
  • Seite 35: Installation

    (12) Lyre de fixation (13) Grille d’aération INSTALLATION Montage par dessus de la tête Les dispositifs de suspension doivent être construits et concus de telle manière qu’ils puissent supporter sa charge utile de 10 fois pour 1 heure sans déformation permanente nuisible. L’installation doit toujours être effectuée avec une deuxième suspension indépendante, par ex.
  • Seite 36: Danger D'incendie

    Avant la première mise en marche, l’installation doit être contrôlé par un organisme agrée! Connexion d‘appareil Au dos de l'CL-48 LED-CLUSTER, vous pouvez trouver 4 douilles XLR (DMX Out) et 4 prises XLR (DMX In) et 4 sorties C.E.I. (Power Input) et 4 entrées C.E.I. (Power Output). Toujours connectez une sortie avec une entrée de l'CL-48 LED-CLUSTER prochaine jusqu'à...
  • Seite 37: Alimentation

    Avec l'interrupteur POWER, vous pouvez mettre l'appareil sous/hors tension. Opération Stand Alone En mode Stand Alone, vous pouvez utiliser le CL-48 LED-CLUSTER sans contrôleur. L'appareil est contrôlé par le microphone integré, donc on n'a pas besoin de contrôleur. Débranchez le FUTURELIGHT CL-48 LED-CLUSTER du contrôleur et codez l’interrupteur DIP no. 10 à ON et l’interrupteur DIP no.
  • Seite 38: Modes Non-Dmx

    Quand vous connectez l'appareil au contrôleur DMX, vous ne pouvez pas le contrôlé avec les interrupteurs dip. Si la connexion DMX est interrompue, l'appareil reste en mode DMX. Débranchez le CL-48 LED-CLUSTER du alimentation, pour changer le mode d'opération. 38/55...
  • Seite 39: Contrôle Par Dmx

    DMX a une ocupation différente avec des caractéristiques différentes. Les canaux DMX individuels et leur caractéristiques se trouvent dans le chapitre Protocôle DMX. Chaque CL-48 LED-CLUSTER dispose de 3 modes DMX. Pour choisir le mode DMX, codez les interrupteurs DIP comme specifié dans le tableau 4.
  • Seite 40: Codage Du Appareil

    Codage du appareil Chaque bande du CL-48 LED-CLUSTER occupe 15,12 ou 6 canals de contrôle (voir tableau 4). Pour que les signals de commande s’adressent correctement à chaque projecteur, les bandes doivent être codés. Le codage doit être effectué séparément à chaque appareil: régler les minirupteurs selon le relévé ci-contre.
  • Seite 41: Nettoyage Et Maintenance

    Occupation de la connection XLR: Quand vous utilitsez un contrôleur avec cette occupation, vous pouvez directement connecter la sortie DMX du contrôleur avec l'entrée DMX du premier appareil de la chaîne DMX. Quand vous voulez connecter des contrôleurs DMX avec des sorties DMX différentes, il est nécéssaire d'utiliser des câbles d'adaptation. Connecter une chaîne DMX serielle: Connectez la sortie DMX du premièr appareil de la chaîne avec l'entrée DMX de l'appareil prochaine.
  • Seite 42: Remplacer Le Fusible

    Wizard-512 USB DMX-Software + Interface N° d'art. 51860102 Wizard-1024 USB DMX-Software + Interface N° d'art. 51860110 FUTURELIGHT DES-3 Fiche termination 3pôle N° d'art. 51834001 Attention! Les donnés imprimée dans ce mode d’emploi sont susceptibles d’être modifiées sans préavis. 15.12.2006 ©...
  • Seite 43: Introcucción

    -pasar el manual a cada sucesivo poseedor o usuario del producto -descargar la última versión del manual del Internet INTROCUCCIÓN Gracias por haber elegido un FUTURELIGHT CL-48 LED-CLUSTER. Si Vd. respecte las instrucciones sucesivas, aseguremos que vaya a gozarse mucho de su compra. Desembale su CL-48 LED-CLUSTER.
  • Seite 44: Instrucciones De Seguridad

    INSTRUCCIONES DE SEGURIDAD ¡PRECAUCIÓN! ¡Tenga cuidado cuando opere con este aparato. Con un voltaje peligroso puede sufrir una peligrosa descarga eléctrica al tocar los cables! Este aparato ha salido de nuestro establecimiento en absolutas perfectas condiciones. Para mantener esta condición y asegurar un manejo seguro, es absolutamente necesario para el usuario seguir las instrucciones de seguridad y notas de advertencia escritas en este manual del usuario.
  • Seite 45: Peligro Para La Salud

    ¡PELIGRO PARA LA SALUD! ¡No mirar directamente a la fuente de luz, las personas sensibles pueden recibir un shock epiléptico (especialmente dirigido a los epilépticos)! Manténgalo lejos del alcance de los niños y de personal no profesional. Nunca operar el aparato sin observación. INSTRUCCIONES DE MANEJO Este aparato es un efecto luminoso para crear efectos de decoración.
  • Seite 46: Descripción Del Aparato

    Si el aparato debe ser transportado, utilize el embalaje original para evitar daños de transporte. Asegúrese de que Vd. envia el aparato en el estado original. No utilice disolventes o detergentes agresivos para limpiar el aparato. Utilice mejor un paño suave y húmedo.
  • Seite 47: Descripción De Las Partes

    Descripción de las partes (1) Tornillo de fijación (2) Tornillo de fijación (3) Caja (4) LEDs (5) Selector DIP (6) Interruptor de alimentación (7) Salida de alimentación (8) Entrada de alimentación (9) Ojete de seguridad (10) Salida DMX (11) Entrada DMX 47/55 51841355_V_1_0.DOC...
  • Seite 48: Instalación

    (12) Lira de montaje (13) Rejilla de ventilación INSTALACIÓN Montaje por encima de la cabeza La suspensión del aparato debe ser fabricado de una manera que puede llevar 10 vezes la carga por una hora sin sufrir deformaciones dañosas permanentes. La instalación siempre debe ser efectuada con una segunda suspensión independiente, por ejemplo una red de anclaje apropriada.
  • Seite 49: Peligro De Incendio

    ¡Antes de la primera puesta en marcha, la instalación debe ser inspeccionada por un perito! Conexión del aparato En el panel trasero del CL-48 LED-CLUSTER hay 4 casquillos XLR incorporado (DMX Out) y 4 clavijas XLR incorporada (DMX In) así 4 salidas C.E.I. (Power Out) y 4 entradas C.E.I. (Power In) para conectar el aparato.
  • Seite 50: Alimentación

    Operación Stand Alone En el modo Stand Alone, Vd. puede utilizar el CL-48 LED-CLUSTER sin controlador. Usted puede manejarlo sin controlador ya que el CL-48 LED-CLUSTER lleva un micrófono incorporado, que le provee de control de sonido automático. Desconecte el FUTURELIGHT CL-48 LED-CLUSTER del controlador y ajuste el interruptor DIP no. 10 en "ON"...
  • Seite 51: Modos Non-Dmx

    Modos Non-DMX Tabla 1: Modo de operación Modo de operación No función Sound control - Stand Alone Intensidad RGB Azul Azul Verde Verde Rojo Rojo (Tabla 2) Programa interna 1 speed speed Programa interna 2 speed speed Programa interna 3 speed speed Programa interna 4...
  • Seite 52: Control Por Dmx

    Control por DMX Vd. puede controlar los CL-48 LED-CLUSTER individuales mediante su controlador DMX. Cada canal DMX tiene otra ocupación con caracteristicas diferentes. Vd. puede ver los canales individuales y sus características bajo Protócolo DMX. El CL-48 LED-CLUSTER tiene 3 modos DMX. Ajuste los interruptores DIP como especificado en tabla 4.
  • Seite 53: Direccionamiento Del Proyector

    Direccionamiento del proyector Cada listón del CL-48 LED-CLUSTER ocupa 15, 12 o 6 canales DMX (véase tabla 4). Para direccionar las señales de control correctamente a cada listón, es necesario de codificar los aparatos. Cada aparato tiene que ser codificado individualmente en ajustar los interruptores como descrito en la tabla.
  • Seite 54: Limpieza Y Mantenimiento

    La ocupación de la conexión XLR es: Cuando Vd. utilice los controladores con la ocupación descrita, puede conectar la salida DMX del controlador directamente con la entrada DMX del primer aparato de la cadena DMX. Cuando Vd. quiere conectar controladores DMX con otros salidas DMX, se tiene que utilizar cables de adaptación. Instalación de una cadena DMX: Conecte la salida DMX del primero aparato de la cadena con la entrada DMX del próximo aparato.
  • Seite 55: Reemplazar El Fusible

    Referencia 51834295 Wizard-512 USB DMX-Software + Interface Referencia 51860102 Wizard-1024 USB DMX-Software + Interface Referencia 51860110 FUTURELIGHT DES-3 Clavija terminación 3-p Referencia 51834001 Nota: Todas las especificaciones dadas en este manual están sujetas a modificación sin previo aviso. 15.12.2006 © 55/55...

Inhaltsverzeichnis