Herunterladen Inhalt Inhalt Diese Seite drucken
Inhaltsverzeichnis

Werbung

Verfügbare Sprachen
  • DE

Verfügbare Sprachen

  • DEUTSCH, seite 1
FITNESS TECHNOLOGY MADE IN GERMANY
EX400
DE
EN
ES
FR
IT

Werbung

Inhaltsverzeichnis
loading

Inhaltszusammenfassung für SPORTSTECH EX400

  • Seite 1 FITNESS TECHNOLOGY MADE IN GERMANY EX400...
  • Seite 2 BENUTZERHANDBUCH DEUTSCH Sehr geehrter Kunde, Vielen Dank für den Kauf dieses Produkts Informationen zum Einrichten und Bedienen des Geräts sowie Informationen zum Kundensupport finden Sie unter folgenden Link:...
  • Seite 3: Inhaltsverzeichnis

    INHALTSVERZEICHNIS 1. SICHERHEITSHINWEISE ..................4 2. CHECK LISTE ......................7 3. MONTAGEANLEITUNG .................... 10 4. EXPLOSIONSZEICHNUNG ..................15 5. TEILELISTE ......................16 6. KONSOLEN-BEDIENUNGSANLEITUNG ..............17 6.1. DISPLAY FUNKTIONEN ..................18 6.2. FUNKTIONEN DER TASTEN .................. 20 6.3. LCD-ANZEIGE ....................20 6.4.
  • Seite 4: Sicherheitshinweise

    1. SICHERHEITSHINWEISE BEVOR SIE MIT DEM TRAINING BEGINNEN, MACHEN SIE SICH BITTE UNBEDINGT MIT DER GESAMTEN BEDIE- NUNGSANLEITUNG, INSBESONDERE DEN SICHERHEIT- SINFORMATIONEN, DEN WARTUNGS- & REINIGUNGS- UND TRAININGSINFORMATIONEN VERTRAUT. SORGEN SIE AUCH DAFÜR, DASS JEDER DER DIESES TRAININGS- GERÄT NUTZT, EBENFALLS MIT DIESEN INFORMATIO- NEN VERTRAUT IST UND DIESE BEACHTET.
  • Seite 5: Trainingsumgebung

    Um empfindliche Böden, wie Holz, Lamina, Fliesen, etc. zu scho- nen und vor Beschädigungen wie Kratzern zu schützen, empfiehlt es sich eine Sportstech Bodenschutzmatte dauerhaft unter das Gerät zu legen. Achten Sie darauf, dass die Unterlage gegen ein mögliches Verrutschen gesichert ist.
  • Seite 6 Beginnen Sie Ihr Trainingseinheiten immer mit einer niedrigen Belastung und steigern Sie diese im Verlauf Ihres Trainings gleichmäßig und schonend. Reduzieren Sie ge- gen Ende Ihrer Trainingseinheit die Belastung wieder. Achten Sie darauf, dass Sie während des Trainings geeignete Sportbekleidung und Sportschuhe tragen.
  • Seite 7: Check Liste

    2. CHECK LISTE Beschreibung Skizze 26 / 7 Hauptrahmen / 1 Set Ketten-Abdeckung / Kurbel 61 / 55 Lenker mit / Schaumstoffgriff / 1 Set / 56 Puls-Sensor 31 / 35 Sitzstütze / Gleitbügel / Knauf 1 Set / 32 45 / 44 Vorderer Träger / mittleres Sen- 1 Set...
  • Seite 8 Beschreibung Skizze Schloss-Schraube M8x75 Gewölbte Federscheibe 18/8,5x1,5 Federring Kopfmutter M8 PVC-Unterlegscheibe Schraube Buchse Unterlegscheibe T-Knopf Abdeckung Werkzeug 1 Werkzeug 2...
  • Seite 10: Montageanleitung

    3. MONTAGEANLEITUNG Nehmen Sie alle Teile Ihres Rades aus dem Karton und legen Sie sie vorsichtig auf dem Boden ab. Der Zusammenbau Ihres Rades ist einfach. Befolgen Sie diese An- weisungen bitte sorgfältig, und es sollte etwa 15 bis 20 Minuten dauern. Schritt 1 BEFESTIGEN SIE DIE STABILISATOREN •...
  • Seite 11 Schritt 2 BEFESTIGEN SIE DEN SITZ UND DIE SITZSTÜTZE • Entfernen Sie die vormontierten Nylonmuttern (22) und Unterlegscheiben (33) von der Rückseite des Sitzes (36). Befestigen Sie den Sitz (36) mit dem oberen Sitz-Gleit- bügel (35) und befestigen ihn mit Nylonmutter (22) und Unterlegscheibe (33). •...
  • Seite 12 Schritt 3 BEFESTIGEN SIE DEN VORDEREN HALTER • Entfernen Sie die vormontierten 4 Inbusschrauben (38) und 2 Plastik-Unterlegschei- ben (37), 2 gewölbten Federscheiben (11), 4 Unterlegscheiben (12) und 2 Feder- scheiben (12) aus dem Hauptrahmen (26). • Verbinden Sie das Sensorkabel für den mittleren Abschnitt (44) des vorderen Trägers (45) sicher mit dem Sensorkabel für den unteren Abschnitt (41).
  • Seite 13 Schritt 4 BEFESTIGEN SIE DEN LENKER UND DER KONSOLE • Befestigen Sie den Lenker (61) mit zwei Handpuls-Sensoren (56) und Griff (55) im Lenkerhalter oben am vorderen Träger (45). • Befestigen Sie den Klemmdeckel (56) am Aufnahmerohr für den Träger mittels Un- terlegscheibe (33), Buchse (59) und „T“-Knopf (60).
  • Seite 14 Ⅰ Ⅱ...
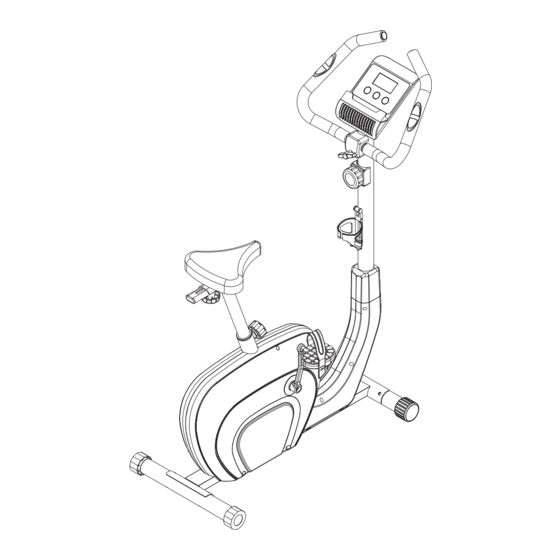
  • Seite 15: Explosionszeichnung

    4. EXPLOSIONSZEICHNUNG...
  • Seite 16: Teileliste

    5. TEILELISTE Beschreibung Anz Nr Beschreibung Pedal Leerlaufrad Kurbel-Abschlusskappe Hauptrahmen Kurbel R & L Sensor Kurbel-Abdeckung Schraube M3x15 Schraube M4x20 Knopf Schraube M4x20 Kappe Ketten-Abdeckung R & L Sitzstütze Einstellbare Abschlusskappe Knopf Hinterer Stabilisator Unterlegscheibe Schloss-Schraube M8x65 Abschlusskappe Gewölbte Federscheibe Gleitschiene Federring Sitz...
  • Seite 17: Konsolen-Bedienungsanleitung

    Beschreibung Anz Nr Beschreibung Schraube M5x30 Klemmdeckel Schraube M5x12 Buchse Handpuls-Kabel Knopf M8 Konsolen-Kabel Lenker Konsolen-Kabel Federscheibe Konsole Riemenscheibe Schaumstoff-Griff Stopp-Mutter M6 Handpuls-Sensor Unterlegscheibe Abschlusskappe Schraube M6x15 6. KONSOLEN-BEDIENUNGSANLEITUNG...
  • Seite 18: Display Funktionen

    6.1. DISPLAY FUNKTIONEN SCAN • Die Reihenfolge der Anzeige: TMR > SPD > DST > CAL > ODO > PULSE. • Im SCAN-Modus, MODE-Taste drücken, um andere Funktionen zu wählen. • Automatisch durch jeden Modus scannen mit einer Sequenz von jeweils 6 Sekun- den.
  • Seite 19: Odo Wegstreckenzähler

    CALORIES (CAL) Kalorien • Wenn kein Sollwert eingestellt wird, werden die Kalorien aufwärts gezählt. • Bei Einstellung eines Sollwerts werden die Kalorien von Ihrem Kalorienzielwert auf 0 heruntergezählt, und wenn 0 erreicht ist, ertönt ein entsprechender Alarm. • Bereich 0,0~9999 Cals. •...
  • Seite 20: Funktionen Der Tasten

    6.2. FUNKTIONEN DER TASTEN RESET Zurücksetzen • Drücken Sie im Eingabemodus RESET einmal, um die aktuellen Funktions-Werte zurückzusetzen. • Halten Sie die RESET-Taste für 2 Sekunden gedrückt, um alle Funktions-Werte zu- rückzusetzen, wobei ein Doppelton als Bestätigung zu hören ist. SET Eingabe •...
  • Seite 21: Ausschalten

    Ausschalten • Wenn für 4 Minuten lang kein Signal an die Konsole übertragen worden ist, wird diese in den Ruhemodus gehen. Bedienung • Wenn die Konsole eingeschaltet ist (oder Sie drücken MODE, dann die RESET Taste und halten sie für 3 Sekunden gedrückt), werden in der LCD-Anzeige alle Segmen- te, bestätigt durch einen Doppelton, für eine Sekunde angezeigt und dann in den SCAN-Modus gewechselt, wie in Abbildung B dargestellt.
  • Seite 22: Hinweise

    6.5. HINWEISE Kompatibel mit iOS und Android-System Nach Verbindung von Konsole und mobiler Geräte über Tunelinc schaltet sich das LCD-Display aus. Wenn Sie das Training für 4 Minuten anhalten, wird sich die Konsole ausschalten. Wenn das Display unnormale Zeichen anzeigt, setzen Sie bitte eine neue Batterie ein und versuchen es erneut.
  • Seite 23: Aufwärmübungen

    8. AUFWÄRMÜBUNGEN 20 Sekunden je 15 Sekunden 20 Sekunden 25 Sekunden 20 Sekunden 20 Sekunden 25 Sekunden für jedes Bein 30 Sekunden 30 Sekunden 20 Sekunden 5 Sekunden x 3 mal 20 Sekunden 20 Sekunden für jedes Bein 5 mal 15 Sekunden...
  • Seite 24: Smartphone-App Bedienungsanleitung

    9. SMARTPHONE-APP BEDIENUNGSANLEITUNG Voraussetzungen für Smartphone-App Installation: IOS System sollte nicht niedriger als Version 7.1 sein und Bluetooth 4.0 unterstützen, iPhone 4S und aufwärts. Für Android ist eine Version von nicht weniger als 4.3 erforderlich, und das Smart- phone muss Bluetooth 4.0 unterstützen. Smartphone App Download: •...
  • Seite 25: Seite Für Datenanzeige In Echtzeit

    befinden sollte, muss der Benutzer das Fitness-Rad benutzen oder die Taste für die Aktivierung des Computers betätigen, dann auf „Das Gerät suchen“ klicken und die Suche für Sportgeräte erneut starten. • Die App wird eine Bluetooth-Gerät-Aufforderung geben, wenn es den Computer findet.
  • Seite 27: Telefonnummer

    Garantie Füllen Sie die nachfolgenden Felder aus, um Ihr Gerät für die Garantie zu registrieren. Geräte-Daten: SPORTSTECH EX400 Produktname/model: Seriennummer: Kaufdatum: Rechnungsnummer: Persönliche Daten: Vorname/Nachname: Straße : PLZ / Ort: Land: E-Mail: Telefonnummer*: *freiwillige Angaben, die restlichen Felder sind Pflichtfelder, die unbedingt ausgefüllt werden müssen.
  • Seite 29 Europäische Entsorgungsrichtlinie 2002/96/EG Entsorgen Sie Ihr Trainingsgerät in keinem Fall über den normalen Hausmüll. Entsorgen Sie das Gerät ausschließlich über einen kommunalen oder zugelassenen Entsorgungsbetrieb. Beachten Sie hierbei die aktuell geltenden Vorschriften. Erkundigen Sie sich im Zweifelsfall bei Ihrer Stadt- bzw. Gemeindeverwaltung nach einer sach- und umweltgerechten Entsorgungsmöglichkeit. Batterien / Akkus Gemäß...
  • Seite 30 USER MANUAL ENGLISH Dear customer Thank you for purchasing this product. It will improve your health. For information on how to set up or operate the device, as well as information on customer support, please refer to the following link:...
  • Seite 31 TABLE OF CONTENTS 1. IMPORTANT SAFETY INFORMATION ................. 32 2. CHECK LIST ......................35 3. ASSEMBLY INSTRUCTION ..................38 4. EXPLODE DRAWING ....................43 5. PART LIST ......................44 6. METER DESCRIPTION ..................... 45 6.1. DISPLAY FUNCTIONS ..................46 6.2. BUTTON FUNCTION ................... 48 6.3.
  • Seite 32: Important Safety Information

    1. IMPORTANT SAFETY INFORMATION BEFORE YOU START TRAINING, PLEASE MAKE SURE THAT YOU HAVE READ THE WHOLE USER MANUAL, ESPECIALLY THE SAFETY NOTES, MAINTENANCE IN- FORMATION AND CLEANING INFORMATION. MAKE SURE THAT EVERYONE WHO IS USING THE DEVICE HAS READ THIS INFORMATION.
  • Seite 33 To protect delicate floors such as wood, lamina, tiles, etc., and to prevent damage, such as scratches, it is recommended to put a Sportstech floor protection mat under the unit. Make sure that the mat is secured against a possible slippage.
  • Seite 34 Repair work by customer can be done only after consultation and approval by our service department. Use only original spare parts. Your training equipment should be cleaned after each use. Remove all impurities that were caused by body perspiration or other liquids. Make sure that liquids (drinks, perspiration, etc.) do not getz in any case inside the housing parts or the cockpit, as this can lead to corrosion and damage to the me- chanical and electronic components.
  • Seite 35: Check List

    2. CHECK LIST Description Sketch 26 / 7 Main frame / chain cover / 1 Set crank 61 / 55 Handlebar with / foam grip / 1 Set / 56 handle pulse 31 / 35 Seat tube / slide bracket / 1 Set / 32 knob...
  • Seite 36 Description Scetch Carriage bolt M8x75 Curved washer 18/8,5x1,5 Spring washer Head nut M8 PVC plastic washer Screw Bushing Flat washer T knob Clamp cover Tool 1 Tool 2...
  • Seite 38: Assembly Instruction

    3. ASSEMBLY INSTRUCTION Remove all the part of your cycle from the carton and place them to the floor care- fully. Assembling your cycle is simple. Follow these instructions carefully and it should take you around 15-20 minutes. Step 1 ATTACH THE STABILIZERS •...
  • Seite 39 Step 2 ATTACH THE SEAT AND SEAT POST • Remove the pre-assembled nylon nuts (22) and flat washer (33) from back of the seat (36). Fix the seat (36) with the top seat sliding bracket (35) and fasten with nylon nut (22) and flat washer (33). •...
  • Seite 40 Step 3 ATTACH THE FRONT POST • Remove the pre-assembled 4 Allen head bolts (38) and 2 plastic washer (37) ,2 curve washers (11) and 4 flat washer (12) 2 spring washer (12) from the main frame (26). • Connect the middle section sensor wire (44) of the front post (45) with the lower section sensor wire (41) securely.
  • Seite 41 Step 4 ATTACH HANDLEBAR AND METER • Put handlebar (61) with 2 hand pulse (56), grip (55) to the top welded shape hand- lebar bracket of the front post (45). • Fasten clamp cover (56) to the post tube with flat washer (33) and bushing (59) and T knob (60).
  • Seite 42 Ⅰ Ⅱ...
  • Seite 43: Explode Drawing

    4. EXPLODE DRAWING...
  • Seite 44: Part List

    5. PART LIST Description Description Pedal Idal wheel Crank end cap Main frame Crank R & L Sensor Crank cover Screw M3x15 Screw M4x20 Knob Screw M4x20 Middle cup Chain cover R & L Seat tube 12 adjustable End cap Knob Rear stabilizer Flat washer...
  • Seite 45: Meter Description

    Description Description Screw M5x30 Clamp cover Screw M5x12 Bushing Hand pulse wire Knob M8 Meter wire Handlebar Meter wire Spring Meter Pulley Foam grip Stop nut M6 Hand pulse Flat washer End cap Bolt M6x15 6. METER DESCRIPTION...
  • Seite 46: Display Functions

    6.1. DISPLAY FUNCTIONS SCAN • The sequence of display: TMR > SPD > DST > CAL > ODO > PULSE. • In SCAN mode, press MODE key to choose other functions. • Automatically scan through each mode in sequence every 6 seconds. SPEED (SPD) •...
  • Seite 47 CALORIES (CAL) • W/O setting the target value, calorie will count up. • With setting the target value, calories will count down from your target calorie to 0, and as 0 is achieved calorie alarm. • Range 0.0~9999 Cals • Calorie count on the display only serves as a general guideline.
  • Seite 48: Button Function

    6.2. BUTTON FUNCTION RESET • In setting condition, press RESET key once to reset the current function figures. • Press RESET key and hold for 2 seconds to reset all function figures, and have Bi sound for prompt at the same time. •...
  • Seite 49: Trouble Shooting

    Operation • When monitor power on (or press MODE, RESET key and hold for 3 seconds), LCD will display all segments with Bi sound for one second and enter to SCAN mode as Drawing B. • With any signal been transmitted into the monitor, the value of TMR, DST, and CAL will start to count up as Drawing C.
  • Seite 50: Note

    6.5. NOTE Compatible with iOS and Android system Console and mobile device connection via Tunelinc, once connecting, the display will be off. Stop training for 4 minutes, the main screen will be off. If the computer displays abnormally, please re-install the battery and try again. Battery Spec: 1.5V UM-3 or AA (4PCS).
  • Seite 51: Warm Up Exercise

    8. WARM UP EXERCISE 15 seconds for each 20 seconds 20 seconds 25 seconds 20 seconds 20 seconds 30 seconds 30 seconds 25 seconds for each leg 20 seconds 5 seconds x 3 times 20 seconds 20 seconds for each leg 5 times 15 seconds...
  • Seite 52: Cell-Phone App Operating Instructions

    9. CELL-PHONE APP OPERATING INSTRUCTIONS Requirements for Cell-phone APP Installation: IOS cell-phone system should be no lower than 7.1 version and support Bluetooth 4.0, iphone 4s and beyond. For Android, a system no lower than 4.3 is required and the cell-phone shall support bluetooth 4.0.
  • Seite 53 • APP will give a Bluetooth Device prompt when it finds the Bluetooth electronic watch . For initial use, the user needs to manually search the Bluetooth device and connect to the device. In following uses, open APP , click –upright bike(XXXX), make sure the Bluetooth electronic watch is in wake-up status.
  • Seite 55 *voluntary information, the remaining fields are required and must be filled out. I have read the warranty conditions and product specific operation/maintance instructions and accept them with my signature. For warratny purposes I agree with the savinng of my personal data. The warranty conditions can be viewed at: www.sportstech.de/garantie city date...
  • Seite 57 European Disposal Directive 2002/96/EG Never dispose your training device in your regular household waste. Dispose the device only at a local or approved disposal. Take care of the currently applicable regulations. If you have doubts contact your local authorities for information about a correct and environment friendly disposal option. batteries/rechargable batteries In accordance with the battery regulation you are legally obliged as an end user to return all used batteries.
  • Seite 58 MANUAL ESPAÑOL Estimado cliente, Gracias por comprar este producto. Le ayudará a mejorar su salud. Para obtener información sobre cómo configurar o utilizar el dispositivo, así como información sobre asistencia al cliente, consulte el siguiente enlace:...
  • Seite 59 CONTENIDO 1. INDICACIONES DE SEGURIDAD ................60 2. LISTA DE VERIFICACIÓN ..................63 3. INSTRUCCIONES DE ENSAMBLAJE ................66 4. VISTA EN DESPIECE ....................71 5. LISTA DE PIEZAS ....................72 6. MANUAL DE MEDIDOR ................... 73 6.1. FUNCIONES DE VISUALIZACIÓN ................74 6.2.
  • Seite 60: Indicaciones De Seguridad

    1. INDICACIONES DE SEGURIDAD ANTES DE COMENZAR SU ENTRENAMIENTO, POR FAVOR ASEGÚRESE DE HABER LEÍDO LA TOTALIDAD DE ESTE MANUAL DE USUARIO, EN ESPECIAL LAS INDICACIONES DE SEGURIDAD, LA INFORMACIÓN DE MANTENIMIENTO Y LA INFORMACIÓN DE LIMPIEZA. ASEGÚRESE DE QUE TODOS LOS QUE USEN EL DISPOSITIVO HAYAN LEÍDO LA INFORMACIÓN.
  • Seite 61 Para proteger los pisos delicados como laminados en madera, azulejos, etc., y para prevenir daños, tales como rasguños, es recomendable poner una esterilla protec- tora para piso de Sportstech debajo de la unidad. Asegúrese de que la esterilla esté asegurada contra posibles deslizamientos.
  • Seite 62 Siempre comience sus ejercicios con una carga baja e increméntela ligeramente en el curso del ejercicio. Reduzca la carga otra vez al final de su entrenamiento. Asegúrese de vestir ropa y zapatos deportivo adecuados durante el ejercicio. Tenga en cuenta que la ropa holgada puede quedar atrapada durante el entrenamiento o en partes movibles y puede causar accidentes graves.
  • Seite 63: Lista De Verificación

    2. LISTA DE VERIFICACIÓN Descripción Diagramma 26 / 7 Estructura principal / Cubierta 1 Set de la cadena / Biela 61 / 55 Manillar / Agarre de espuma / 1 Set / 56 Sensor de pulsor 31 / 35 Tubo del asiento / 1 Set / 32 Soporte deslizable / Perilla...
  • Seite 64 Descripción Diagramma Tornillo redondo M8x75 Arandela curva 18/8,5x1,5 Arandela elástica Tuerca M8 Arandela plástica Tornillo Rodamiento Arandela plana Perilla en „t“ Cubierta de fijación Herramienta 1 Herramienta 2...
  • Seite 66: Instrucciones De Ensamblaje

    3. INSTRUCCIONES DE ENSAMBLAJE Saque todas las piezas de su bicicleta de la caja y ubíquelas sobre el suelo cuidado- samente. Ensamblar su bicicleta es fácil. Siga estas instrucciones y terminará en 15-20 minutos. Paso 1 AJUSTE LOS ESTABILIZADORES • Ajuste el estabilizador posterior (9) con 2 tapas de extremo ajustables (8) al soporte de barra soldado en la estructura principal (26) y apriete con 2 arandelas plásticas (37), 2 arandelas curvas (11), 1 arandela elástica (12), 1 tuerca (13) y dos tornillos...
  • Seite 67 Paso 2 AJUSTE EL ASIENTO Y EL POSTE DEL ASIENTO • Retire las tuercas de nylon preensambladas (22) y la arandela plana de la parte posterior del asiento (36). Fije el asiento (36) con el soporte superior deslizable (35) y apriete con 1 tuerca de nylon (22) y 1 arandela plana (33). •...
  • Seite 68 Paso 3 AJUSTE EL POSTE FRONTAL • Retire los 4 tornillos Allen preensamblados (38) y 2 arandelas plásticas (37), 2 arandelas curvas (11) y 4 arandelas planas (12) 2 arandelas elásticas (12) de la estructura principal (26). • Conecte el cable central del sensor (44) del poste frontal (45) con el cable inferior del sensor (41) firmemente.
  • Seite 69 Paso 4 AJUSTE EL MANILLAR Y EL MEDIDOR • Asegure el manillar (61) con los 2 sensores de pulso (56), y el agarre (55) al soporte superior del manillar soldado en el poste frontal (45). • Ajuste la cubierta de fijación (56) al tubo del poste con 1 arandela plana (33), roda- mientos (59) y la perilla en „t“...
  • Seite 70 Ⅰ Ⅱ...
  • Seite 71: Vista En Despiece

    4. VISTA EN DESPIECE...
  • Seite 72: Lista De Piezas

    5. LISTA DE PIEZAS Descripción Ctd No Descripción Pedal Rueda inactiva Tapa de extremo de la biela Estructura principal Biela R & L Sensor Cubierta de la biela Tornillo M3x15 Tornillo M4x20 Perilla Tornillo M4x20 Copa central Cubierta de la cadena R & L Tubo del asiento Tapas de extremo ajustables Perilla...
  • Seite 73: Manual De Medidor

    Descripción Ctd No Descripción Tornillo M5x30 Cubierta de fijación Tornillo M5x12 Rodamiento Cable del sensor de pulso Perilla M8 Cable del medidor Manillar Cable del medidor Resorte Medidor Polea Agarre de espuma Tuerca de bloqueo M6 Sensor de pulso Arandela plana Tapa de extremo Tornillo M6x15 6.
  • Seite 74: Funciones De Visualización

    6.1. FUNCIONES DE VISUALIZACIÓN SCAN • Secuencia de la pantalla: TMR > SPD > DST > CAL > ODO > PULSE. • En el modo SCAN, presione la tecla MODE para elegir otras funciones. • Escanea automáticamente durante cada modo en secuencia cada 6 segundos. SPEED (SPD) Velocidad •...
  • Seite 75 CALORIES (CAL) Calorias • Al configurar el valor objetivo, las calorías comenzarán a contar. • Configurando el valor objetivo, las calorías harán una cuenta regresiva desde su valor objetivo hasta 0, y tan pronto lleguen a 0 sonará una alarma. •...
  • Seite 76: Funciones De Las Teclas

    6.2. FUNCIONES DE LAS TECLAS RESET • Cuando esté configurando, presione la tecla RESET una vez para restablecer los valores de la función actual. • Presione la tecla RESET y manténgala durante 2 segundos para restablecer todos los valores de la función, escuchará un sonido de confirmación al mismo tiempo. •...
  • Seite 77: Solución De Problemas

    Apagado • Si la pantalla no recibe ninguna señal durante 4 minutos entrará en modo SLEEP. Funcionamiento • Cuando la pantalla se encienda (o cuando presione la tecla MODE, RESET y la man- tenga durante 3 segundos), la pantalla LCD mostrará todos los segmentos haciendo un sonido durante un segundo y entrará...
  • Seite 78: Nota

    6.5. NOTA Compatible con sistemas iOS y Android. Conexión de consola y dispositivo móvil mediante Tunelinc, una vez esté conectando, la pantalla se apagará. Si deja de ejercitarse durante 4 minutos, la pantalla se apagará. Si el ordenador no se muestra con normalidad, por favor vuelva a instalar la batería y pruebe de nuevo.
  • Seite 79: Ejercicios De Calentamiento

    8. EJERCICIOS DE CALENTAMIENTO 20 segundos 15 segundos para cada uno 20 segundos 25 segundos 20 segundos 20 segundos 25 segundos para cada pierna 30 segundos 30 segundos 20 segundos 5 segundos x 3 veces 20 segundos 20 segundos üara cada pierna 5 veces 15 segundos...
  • Seite 80: Instrucciones De La Aplicación

    9. INSTRUCCIONES DE LA APLICACIÓN Requisitos para la instalación de la aplicación: Los teléfonos móviles con sistema IOS deben tener una versión mínima de 7.1 y deben soportar Bluetooth 4.0, iphone 4s y superior. Para Android, se requiere un sistema no menor a 4.3 y el teléfono móvil debe so- portar Bluetooth 4.0.
  • Seite 81 del reloj o si el dispositivo está en modo reposo. Si está en modo reposo, el usuario necesitará montar la bicicleta o presionar la tecla para reactivar el reloj electrónico Bluetooth, luego haga clic en „buscar dispositivo“ y busque el equipo deportivo. •...
  • Seite 83 *información voluntaria, los demás campos son obligatorios y deben ser completado. He leído las condiciones de garantía y de funcionamiento / instrucciones maintance del producto y aceptarlos con mi firma. Para efectos warratny Acepto la savinng de mis datos personales. Las condiciones de garantía pueden consultarse en: www.sportstech.de/garantie ciudad firma...
  • Seite 85 Directiva Europea de Residuos 2002/96/EG Nunca elimine su dispositivo de entrenamiento en su basura doméstica ordinaria. Elimine el dispositivo únicamente en un sitio de eliminación aprobado. Tenga en cuenta las normativas aplicables actualmente. Si tiene dudas contacte a las autoridades locales para conseguir información sobre una opción de eliminación adecuada y ecológica. Baterías/baterías recargables De acuerdo a la normativa de baterías usted está...
  • Seite 86 MANUEL FRANÇAIS Cher client, Merci d’avoir acheté notre produit. Cela va vous permettre d’avoir une santé plus saine. Pour plus d‘informations sur la configuration et l‘utilisation de l‘appareil, ainsi que sur le support client, veuillez consulter le lien suivant:...
  • Seite 87 TABLE DES MATIÈRES 1. CONSIGNES DE SÉCURITÉ ..................88 2. LISTE DE VÉRIFICATION ..................91 3. INSTRUCTIONS DE MONTAGE ................. 94 4. VUE ÉCLATÉE ......................99 5. LISTE DES PIÈCES ....................100 6. MANUEL CONSOLES ..................... 101 6.1. FONCTIONS D‘AFFICHAGE .................. 102 6.2.
  • Seite 88: Consignes De Sécurité

    1. CONSIGNES DE SÉCURITÉ AVANT DE COMMENCER VOTRE ENTRAÎNEMENT, VEUIL- LEZ VOUS ASSURER QUE VOUS AVEZ LU LE MODE D‘EM- PLOI EN ENTIER, EN PARTICULIER LES CONSIGNES DE SÉCURITÉ, LES INFORMATIONS DE MAINTENANCE ET LES INFORMATIONS DE NETTOYAGE. ASSUREZ-VOUS QUE CETTE INFORMATION SOIT LUE AVANT L’UTILISATI- ON DE L’APPAREIL PAR QUICONQUE.
  • Seite 89: Zone D'entraînement

    Pour protéger les sols délicats tels que le bois, lamina, tuiles, etc., et pour prévenir les dommages, tels que les rayures, il est recommandé de mettre un tapis de protection de plancher de Sportstech sous l‘unité. Assurez-vous que le tapis est fixé contre un glissement possible.
  • Seite 90 Commencez vos séances d‘entraînement toujours avec une faible charge et aug- mentez-la doucement dans le cadre de la formation. Réduisez à nouveau la charge à la fin de votre séance d‘entraînement. Assurez-vous que vous portez des vêtements de sport et des chaussures approp- riées pendant l‘exercice.
  • Seite 91: Liste De Vérification

    2. LISTE DE VÉRIFICATION Description Qté Shéma 26 / 7 Cadre principal / Couvercle de 1 Set chaîne / Manivelle 61 / 55 Poignée avec Poignée mousse 1 Set / 56 / Pouls poignée 31 / 35 Tube de selle / support coulis- 1 Set / 32 sant / Bouton...
  • Seite 92 Description Qté Shéma Boulon de carrosserie M8x75 Rondelle ondulée 18/8,5x1,5 Rondelle à ressort Tête d‘écrou M8 Rondelle en plastique PVC Bague Rondelle plate Bouton „t“ Cache-borne Outil 1 Outil 2...
  • Seite 94: Instructions De Montage

    3. INSTRUCTIONS DE MONTAGE Prenez toutes les pièces de votre appareil du carton et placez-les sur le sol soigneu- sement. L‘assemblage de votre appareil est simple. Suivez ces instructions attenti- vement et cela devrait vous prendre environ 15-20 minutes. Étape 1 ATTACHEZ LES STABILISATEURS •...
  • Seite 95 Étape 2 FIXEZ LE SIÈGE ET LE POSTE DE SIÈGE • Retirez les écrous en nylon pré-assemblés (22) et la rondelle plate (33) de l‘arrière du siège (36). Fixez le siège (36) avec le support coulissant du siège supérieur (35) et fixez le avec un écrou en nylon (22) et une rondelle plate (33).
  • Seite 96 Étape 3 ATTACHEZ LE POSTE AVANT • Retirez les 4 boulons pré-assemblés à tête d‘Allen (38) et les 2 rondelles en plas- tique (37), 2 rondelles courbes (11) et 4 rondelles plates (12) 2 rondelles élastiques (12) du cadre principal (26). •...
  • Seite 97 Étape 4 ATTACHEZ LE GUIDON ET LE COMPTEUR • Mettez le guidon (61) avec 2 impulsions de main (56), poignée (55) sur le support de guidon supérieur soudé du poste avant (45). • Fixez le couvercle de serrage (56) au tube de tige avec une rondelle plate (33) une bague (59) et un bouton „t“...
  • Seite 98 Ⅰ Ⅱ...
  • Seite 99: Vue Éclatée

    4. VUE ÉCLATÉE...
  • Seite 100: Liste Des Pièces

    5. LISTE DES PIÈCES Description Qté No Description Qté Pédale Roue Idal Embout de manivelle Cadre principal Manivelle R & L Capteur Couvercle de manivelle Vis M3x15 Vis M4x20 Bouton Vis M4x20 Coupe du milieu Capot de chaîne R & L Tube de siège 12 embouts réglables Bouton...
  • Seite 101: Manuel Consoles

    Description Qté No Description Qté Vis M5x30 Couvercle de serrage Vis M5x12 Bague Fil d'impulsion manuelle Bouton M8 Fil de mesure Guidon Fil de mesure Ressort Compteur Poulie Poignée en mousse Ecrou d'arrêt M6 Impulsion manuelle Rondelle plate Embout Boulon M6x15 6.
  • Seite 102: Fonctions D'affichage

    6.1. FONCTIONS D‘AFFICHAGE SCAN • La séquence d‘affichage: TMR > SPD > DST > CAL > ODO > PULSE. • En mode SCAN, appuyez sur la touche MODE pour choisir d‘autres fonctions. • Analyse automatique de chaque mode en séquence toutes les 6 secondes. SPEED (SPD) Vitesse •...
  • Seite 103 CALORIES (CAL) • Si vous ne définissez pas une valeur cible, le nombre de calories augmentera. • En définissant la valeur cible, Il y‘aura un compte à rebours des calories cible jusqu‘à 0, et lorsque 0 est atteint, l‘alarme se déclenchera. •...
  • Seite 104: Bouton De Fonction

    6.2. BOUTON DE FONCTION RESET Réinitialiser • Dans les réglages, appuyez une fois sur la touche RESET pour réinitialiser les chiffres de la fonction actuelle. • Appuyez sur la touche RESET et maintenez-la enfoncée pendant 2 secondes pour réinitialiser tous les chiffres de la fonction, et avoir le son bi rapidement en même temps.
  • Seite 105: Diagnostic Des Anomalies

    Éteindre: • Sans qu‘aucun signal ne soit transmis dans le moniteur pendant 4 minutes, ce der- nier va se mettre en veille. Opération • Lorsque le moniteur s‘allume (ou appuyez sur la touche MODE, RESET et mainte- nez-la enfoncée pendant 3 secondes), l‘écran LCD affichera tous les segments avec le son Bi pendant une seconde et passe en mode SCAN comme le dessin B.
  • Seite 106: Remarque

    6.5. REMARQUE Compatible avec iOS et le système Android La connexion de la console et de l‘appareil mobile via Tunelinc, une fois connectée, l‘écran sera éteint. Arrêtez l‘entraînement pendant 4 minutes, l‘écran principal sera éteint. Si l‘ordinateur s‘affiche de façon anormale, réinstallez la batterie et réessayez. Spécifications de batterie: 1.5V UM-3 ou AA (4PCS).
  • Seite 107: Exercices D'échauffement Musculaire

    8. EXERCICES D’ÉCHAUFFEMENT MUSCULAIRE 20 secondes 15 secondes pour chaque 20 secondes 25 secondes 20 secondes 20 secondes 25 secondes pour chaque jambe 30 secondes 30 secondes 20 secondes 5 secondes x 3 fois 20 secondes 20 secondes pour chaque jambe 15 secondes 5 fois...
  • Seite 108: Mode D'emploi De L'app

    9. MODE D‘EMPLOI DE L‘APP Les exigences pour l‘installation de l‘APP: La version de l‘IOS sur le téléphone ne devrait pas être inférieur à 7.1 et le support Bluetooth 4.0, iphone 4s et au-delà. Pour Android, une version qui n‘est pas inférieure à 4.3 est nécessaire et le télépho- ne doit prendre en charge le bluetooth 4.0.
  • Seite 109 est en mode veille. S‘il est en mode veuille, l‘utilisateur doit monter sur le vélo droit ou appuyer sur le bouton pour faire fonctionner la montre électronique Bluetooth, puis cliquez sur „rechercher l‘appareil“ et rechercher de nouveau l‘équipement sportif. • L‘APP donnera une invitation Bluetooth Device lorsqu‘elle trouvera la montre élec- tronique Bluetooth.
  • Seite 111 Je ai lu les conditions de garantie et d‘exploitation / instructions spécifiques maintance produits et de les accepter avec ma signature. Aux fins de warratny Je suis d‘accord avec le savinng de mes données personnelles. Les conditions de garantie peuvent être consultés à l‘adresse: www.sportstech.de/garantie ville signature date Envoyer la carte de garantie remplie par lettre * à...
  • Seite 113 Directiva Europea de Residuos 2002/96/EG Nunca elimine su dispositivo de entrenamiento en su basura doméstica ordinaria. Elimine el dispositivo únicamente en un sitio de eliminación aprobado. Tenga en cuenta las normativas aplicables actualmente. Si tiene dudas contacte a las autoridades locales para conseguir información sobre una opción de eliminación adecuada y ecológica. Baterías/baterías recargables De acuerdo a la normativa de baterías usted está...
  • Seite 114 MANUALE D’USO ITALIANO Caro cliente, Grazie per aver acquistato questo prodotto. Migliorerà la vostra salute Per informazioni su come impostare o utilizzare il dispositivo, nonché informazioni su assistenza clienti, si prega di fare riferimento al seguente link:...
  • Seite 115 INDICE 1. INDICAZIONI DI SICUREZZA ..................116 2. CHECKLIST ......................119 3. ISTRUZIONI DI MONTAGGIO ..................122 4. DIAGRAMMA ESPLOSO ..................127 5. LISTA PARTI ......................128 6. MANUALE DI CONSOLE ..................129 6.1. FUNZIONI DI VISUALIZZAZIONE ................130 6.2. FUNZIONI DEI PULSANTI ..................132 6.3.
  • Seite 116: Indicazioni Di Sicurezza

    1. INDICAZIONI DI SICUREZZA PRIMA DI INIZIARE L’ALLENAMENTO, ASSICURARSI DI AVER LETTO L’INTERO MANUALE D’USO, IN PARTICOLA- RE LE INDICAZIONI DI SICUREZZA, DI MANUTENZIONE E PULIZIA. ASSICURARSI CHE TUTTI COLORO CHE USA- NO IL DISPOSITIVO ABBIANO LETTO QUESTE INFORMA- ZIONI. Assicurarsi di seguire rigorosamente le istruzioni di sicurezza e sulla manutenzione.
  • Seite 117 Per proteggere pavimenti delicati come quelli in legno, laminati, piastrelle, ecc., e per evitare di danneggiarli, cioè di graffiarli, si raccomanda di mettere un tappetino Sportstech di protezione per il pavimento sotto il dispositivo di allenamento. Non posizionare il dispositivo di allenamento su tappeti bianchi o leggeri e in generale sopra nessun tappeto, perchè...
  • Seite 118 niziare l’allenamento con dei piccoli sforzi per poi incrementarli pian piano nel corso dell’allenamento.Verso la fine dell’allenamento, diminuire di nuovo lo sforzo fisico. Assicurarsi di indossare abbigliamento sportivo e scarpe adeguate durante l’allena- mento. Gli abiti larghi potrebbero impigliarsi nel dispositivo causando gravi incidenti. Il dispositivo di allenamento può...
  • Seite 119: Checklist

    2. CHECKLIST Descrizione Qtà Schizzo 26 / 7 Telaio principale / Protezione 1 Set della catena / Manovella Manubrio / Impugnatura in 61 / 55 schiuma / Impugnatura per 1 Set / 56 pulsazioni 31 / 35 Tubo sella / Staffa scorrevole / 1 Set / 32 Pomello...
  • Seite 120 Descrizione Qtà Schizzo Bullone M8x75 Rondella curva 18/8,5x1,5 Rondella elastica Dado a brugola M8 Rondella di plastica PVC Vite Boccola Rondella piatta Manopola a „t“ Copertura del morsetto Strumento 1 Strumento 2...
  • Seite 122: Istruzioni Di Montaggio

    3. ISTRUZIONI DI MONTAGGIO Rimuovere tutte le componenti della cyclette dalla confezione e posizionarle con attenzione sul pavimento. L‘assemblaggio della cyclette è semplice. Basta seguire con attenzione queste istruzioni e ci vorranno 15-20 minuti all‘incirca. Passo 1 COLLEGARE GLI STABILIZZATORI •...
  • Seite 123 Passo 2 COLLEGARE LA SELLA E IL REGGISELLA • Rimuovere i dadi premontati in nylon (22) e la rondella piatta (33) dalla parte posteri- ore della sella (36). Fissare la sella (36) con la parte superiore della staffa scorrevole della sella (35) e fissare con il dado in nylon (22) e la rondella piatta (33). •...
  • Seite 124 Passo 3 COLLEGARE IL PALO ANTERIORE • Rimuovere le 4 viti a brugola preassemblate (38) e le 2 rondelle in plastica (37), le 2 rondelle curve (11) e le 4 rondelle piatte (12), le 2 rondelle elastiche (12) dal telaio principale (26).
  • Seite 125 Passo 4 COLLEGARE IL MANUBRIO E IL MISURATORE • Posizionare il manubrio (61) con i 2 polsi (56), l‘impugnatura (55) alla parte anteriore della staffa del manubrio saldata del palo anteriore (45) . • Fissare la copertura del morsetto (56) al tubo del palo con la rondella piatta (33), la boccola (59) e la rondella a “T”...
  • Seite 126 Ⅰ Ⅱ...
  • Seite 127: Diagramma Esploso

    4. DIAGRAMMA ESPLOSO...
  • Seite 128: Lista Parti

    5. LISTA PARTI Descrizione Qtà No Descrizione Qtà Pedale Rotella Idal Capoguaina manovella Telaio principale Manovella R & L Sensore Copertura manovella Vite M3x15 Vite M4x20 Manopola Vite M4x20 Tappo centrale Copertura catena R & L Tubo sella 12 capoguaine regolabili Manopola Stabilizzatore posteriore Rondella piatta...
  • Seite 129: Manuale Di Console

    Descrizione Qtà No Descrizione Qtà Vite M5x30 Copertura del morsetto Vite M5x12 Boccola Cavohand pulse Pomello M8 Cavo misuratore Manubrio Cavo misuratore Molla Misuratore Puleggia Impugnatura in schiuma Dado finecorsa M6 Sensore palmare Rondella piatta Tappo di chiusura Bullone M6x15 6.
  • Seite 130: Funzioni Di Visualizzazione

    6.1. FUNZIONI DI VISUALIZZAZIONE SCAN • La sequenza di visualizzazione: TMR > SPD > DST > CAL > ODO > PULSE. • In modalità SCAN, premere il tasto MODE per selezionare le altre funzioni • Verrà eseguita la ricerca automatica attraverso ciascuna delle modalità in sequenza ogni 6 secondi.
  • Seite 131 CALORIES (CAL) Calorie • Non impostando il valore target, verranno conteggiate le calorie. • Impostando il valore target, inizierà il conto alla rovescia delle calorie, dal valore target a 0, e quando si arriva a 0 si sente l‘allarme. • Fascia 0.0~9999 Calorie •...
  • Seite 132: Funzioni Dei Pulsanti

    6.2. FUNZIONI DEI PULSANTI RESET Riazzerramento • In modalità impostazione, premere il tasto RESET una volta per riazzerare i dati della funzione corrente. • Premere il tasto RESET e tenere premuto per 2 secondi per ripristinare tutti i dati della funzione, e avere il Bi audio pronto allo stesso tempo. SET Impostazione •...
  • Seite 133: Risoluzione Dei Problemi

    Spegnimento • Se non viene trasmesso nessun segnale al monitor per 4 minuti, il monitor entrerà nella modalità SLEEP. Funzionamento • Quando il monitor è acceso (oppure premere MODE, RESET e tenere premuto per 3 secondi), l‘LCD visualizzerà tutti i segnemtni con un audio Bi per un secondo ed entrerà...
  • Seite 134: Nota

    6.5. NOTA Compatibile con i sistemi iOS e Android. Connessione della console e del dispositivo mobile via Tunelinc, una volta collegato, il display si spegne. Se non vi allenate per 4 minuti, lo schermo principale si spegne. Se il computer visualizza i dati in maniera anomala, riinstallare le batterie e riprovare. Batterie: 1.5V UM-3 o AA (4PCS).
  • Seite 135: Esercizio Di Riscaldamento

    8. ESERCIZIO DI RISCALDAMENTO 20 secondi 15 secondi ciascuno 20 secondi 25 secondi 20 secondi 20 secondi 25 secondi per ciascuna gamba 30 secondi 30 secondi 20 secondi 5 secondi x 3 volte 20 secondi 20 secondi per ciascuna gamba 5 volte 15 secondi...
  • Seite 136: Istruzioni Per L'uso App Per Cellulare

    9. ISTRUZIONI PER L‘USO APP PER CELLULARE Requisiti per installazione APP cellulare: Sistema operativo per IOS non deve essere inferiore a 7.1 versione e supporto Bluetooth 4.0, iPhone 4S e oltre. Per Android, il sistema non deve essere inferiore al 4.3 e il telefono cellulare deve supportare il Bluetooth 4.0.
  • Seite 137: Pagina Di Visualizzazione In Tempo Reale Dei Dati

    trovato, controllare l‘alimentazione dell‘orologio elettronico Bluetooth o se il disposi- tivo è in modalità di sospensione. Se si è in modalità di sospensione, l‘utente deve salire sulla cyclette o premere il pulsante per riattivare l‘orologio elettronico Bluetooth, quindi fare clic su „ricerca del dispositivo“ e ricerca di attrezzature sportive. •...
  • Seite 139 Ho letto le condizioni di garanzia e / specifiche istruzioni gestibile per il funzionamento del prodotto e le accetto con la mia firma. Ai fini warratny sono d‘accordo con la savinng dei miei dati personali. Le condizioni di garanzia possono essere visualizzate sul sito: www.sportstech.de/garantie città...
  • Seite 141 Direttive Europee 2002/96/EG per lo smaltimento Non gettare mai il tuo attrezzo sportivo nell’immondizia normale. Smaltisci l’attrezzo solo tramite un sistema locale o approvato. Tieni in conto le regole applicabili correntemente. Se hai dubbi contatta le autorità locali per informazioni circa le opzioni per uno smaltimento corretto ed ecosostenibile.
  • Seite 142 Verkauf durch / Distributed by / Distribuido por / Distribué / Distribuito da InnovaMaxx GmbH Potsdamer Str. 144 10783 Berlin +49 30 364 286 628 service@innovamaxx.de http://www.sportstech.de...

Inhaltsverzeichnis