
Verwandte Anleitungen für Guntermann & Drunck LwLVision-Rem


Inhaltszusammenfassung für Guntermann & Drunck LwLVision-Rem
- Seite 1 Guntermann & Drunck GmbH www.gdsys.de G&D LwLVision Installation und Bedienung Installation and Operation A9100003-1.93...
-
Seite 2: Einsatzbereich : Dieg
Guntermann & Drunck GmbH Installations- und Bedienungsanleitung LwLVision INWEISE Achtung M DAS ISIKO EINES TROMSCHLAGES ZU VERMEIDEN SOLLTEN ERÄT NICHT ÖFFNEN ODER BDECKUNGEN ENTFERNEN ERVICEFALL WENDEN IE SICH BITTE AN UNSERE ECHNIKER ESEN IE DIE EDIENUNGSANLEITUNG SORGFÄLTIG BEVOR IE DAS ERÄT IN ETRIEB NEHMEN EFOLGEN... -
Seite 3: Inhaltsverzeichnis
6.3.1.3 Einstellungen im Menü Image Config ........21 6.3.2 Kein Bild am LwLVision-Rem.............23 Konfiguration .......................24 Default-Zustand „REM SCREEN CONFIG“ über lokale Tastatur ....24 Konfiguration am LwLVision-Rem über OSD (AdonIS) .......25 7.2.1 Image Config..................26 7.2.2 Console Setup..................26 7.2.2.1 Einstellung des ScreenSaver ...........26 7.2.2.2... - Seite 4 Guntermann & Drunck GmbH Installations- und Bedienungsanleitung LwLVision 7.2.3.3 System Config ................. 38 7.2.3.3.1 Definition des ersten Hotkeys ..........38 7.2.3.3.2 Festlegung des Doppel-HotKey .......... 39 7.2.3.3.3 Set System Defaults (Supervisor-Funktion)......39 7.2.3.3.4 Reset Videomode table............40 7.2.3.3.5 Remote Video ..............40 7.2.3.3.6 Local Video .................
- Seite 5 Guntermann & Drunck GmbH Installations- und Bedienungsanleitung LwLVision Anhang........................66 13.1 HotKey-Belegungstabelle ................66 13.2 Passwort ......................67 Seite 5...
-
Seite 6: Laser Sicherheitshinweis
Guntermann & Drunck GmbH Installations- und Bedienungsanleitung LwLVision Laser Sicherheitshinweis Dieses Gerät verwendet Laser Technologie und entspricht der Laser Klasse 1. Es erfüllt die Richtlinien gemäß EN 60825-1:2014 sowie U.S. CFR 1040.10 und 1040.11. Es wird empfohlen, die optischen Anschlüsse immer mit einem Stecker oder einer Staubschutzkappe abzudecken. -
Seite 7: Beschreibung
Guntermann & Drunck GmbH Installations- und Bedienungsanleitung LwLVision Beschreibung Das LwLVision-System besteht aus einem Sender und einem Empfänger und ermöglicht es, einen Rechner aus einer Entfernung bis zu 550 bzw. 10.000 Metern fern zu bedienen. Zusätzlich kann auch eine lokale Bedienstation am Sender angeschlossen werden. -
Seite 8: Lieferumfang
Guntermann & Drunck GmbH Installations- und Bedienungsanleitung LwLVision Lieferumfang: LwLVision-PC Sendeeinheit bzw. LwLVision/MC2-PC LwLVision-REM Empfangseinheit LwLVision/MC2-REM Anschlusskabel HD15-M/DVI-I-M-2 Video (VGA): DVI-D-M/M-2 Video (DVI): SOKA-G2 Keyboard/Mouse PS/2: USB-AM/BM-2 Keyboard/Mouse USB: RS232-M /F-2 Seriell Audio-M/M-2 ... -
Seite 9: Installationsanleitung
Guntermann & Drunck GmbH Installations- und Bedienungsanleitung LwLVision Installationsanleitung Das LwLVision-System ermöglicht die Übertragung der Keyboard-, Video- und Mousesignale über ein 2-Faser Lichtwellenleiterkabel (Singlemode- und Multimodefaser). Für die Übertragung eines zweiten Videokanals wird eine dritte Faser benötigt. Dazu werden zwei Systeme angeboten, die auf die beiden möglichen Lichtwellenleiterkabel spezialisiert sind: ... -
Seite 10: Installation Der Sendeeinheit Lwlvision-Pc
Possible eye injury! USB 1.1 Service Transmission DVI / VGA Out DVI / VGA CPU Red. Power Anschluß des LwLVision-Rem über das Kabel K-LwLs-x Rechnerseitiger Anschluß des Anschluß des digitalen Monitors Monitors; entweder digital oder für die lokale Konsole; analog... - Seite 11 Guntermann & Drunck GmbH Installations- und Bedienungsanleitung LwLVision Monitor Verbinden Sie anschließend den DVI-I-Stecker des jeweils eingesetzten Kabels (ist bei beiden Kabeln identisch) mit der Schnittstelle DVI/VGA IN des LwLVision-PC Keyboard/Mouse -> PS/2 Installation: SOKA-G2 Stellen Sie nun mittels der beiden PS/2-Stecker des Kabels die Verbindung zur Keyboard- und Mouseschnittstelle des Rechners her.
-
Seite 12: Anschluss Der Lokalen Konsole
Guntermann & Drunck GmbH Installations- und Bedienungsanleitung LwLVision Anschluss der lokalen Konsole: Den Stecker der lokalen Tastatur und der lokalen Maus in die Schnittstelle Keyb. beziehungsweise MOUSE PS/2 an der Sendeeinheit LwLVision-PC stecken. Den lokalen Monitor an die Buchse DVI/VGA Out anschließen. Beim Einsatz eines analogen Monitors (VGA-Signal), verwenden Sie bitte einen optionalen Adapter zum Anschluss am LwLVision-PC 3.2.1... -
Seite 13: Installation Der Empfangseinheit Lwlvision-Rem
Konsole Die Empfangseinheit aufstellen. Das Verlängerungskabel K-LwL(S)-x (bzw. K-LwL(M)-x) in die Schnittstelle TRANSMISSION der Empfangseinheit LwLVision-REM einstecken. Monitor: Den analogen Monitor an die Buchse VGA Out anschließen. Den digitalen Monitor an die Buchse DVI Out anschließen. -
Seite 14: Videoanschluss Am Lwlvision/Mc2-Rem
Bedienungsanleitung LwLVision Keyboard/Mouse-Anschluss: Die PS/2-Tastatur an der Schnittstelle Keyb. PS/2 am LwLVision-REM anschließen; die Maus an die Buchse MOUSE PS/2 anstecken Die USB-Tastatur an der Schnittstelle Keyb. USB am LwLVision-REM anschließen; die Maus an die Buchse MOUSE... -
Seite 15: Weitere Anschlussmöglichkeiten
Anschluss von USB1.1 Zum Anschluss Ihrer USB-Geräte stecken Sie die USB-Geräte auf der Frontseite des LwLVision-Rem in eine der verfügbaren USB-A- Buchsen (2 x auf der Rückseite, 2 x auf der Frontseite). Hinweis: Es handelt sich hier um die transparente Verlängerung von USB-Signalen an den angeschlossenen Rechner. -
Seite 16: Stromversorgung
Bedienungsanleitung LwLVision Stromversorgung Schließen Sie das mitgelieferten Kabel PowerCable-2 an der Kaltgeräte- buchse Main POWER der Geräte (LwLVision-PC und LwLVision-REM) an. Optional kann über die Buchse Red. Power ein redundantes Netzteil angeschlossen werden. Verwenden Sie dazu das optional erhältliche Steckernetzteil. -
Seite 17: Einschalten Des Gerätes / Led Anzeigen
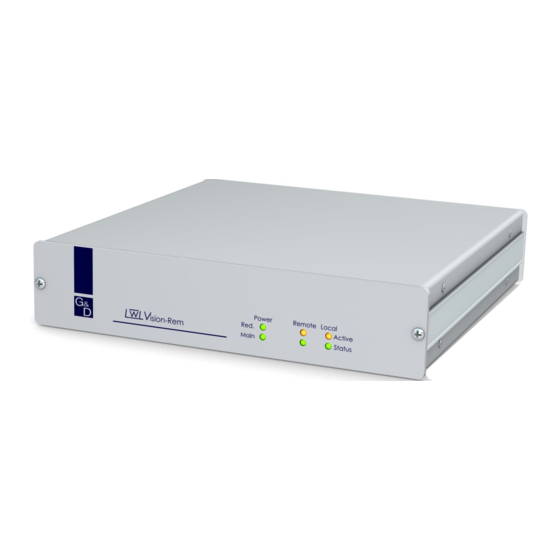
Nach dem Anschluss der Kaltgerätekabel schalten Sie erst das LwLVision- REM und anschließend das LwLVision-PC über den Kippschalter auf der Rückseite der Geräte ein. Die LEDs auf der Frontseite der beiden Geräten haben folgende Bedeutung: LwLVision-PC LwLVision-REM Power Redundant Leuchtet, wenn... -
Seite 18: Video
Guntermann & Drunck GmbH Installations- und Bedienungsanleitung LwLVision Video Unterstützte Auflösungen Das LwLVision-System unterstützt folgende Auflösungen: Eingangsauflösung Local out Remote out 640 × 350 @ 60-120 Hz wie Eingang 640 × 350 @ 70/85 Hz 640 × 400 @ 50-120 Hz wie Eingang 640 ×... -
Seite 19: Signale
Automatic Video Scaling (AuVisc) Liefert die Grafikkarte eine Auflösung, die vom angeschlossenen Monitor am LwLVision-REM nicht dargestellt werden kann, so skaliert der Sender LwLVision-PC automatisch die Auflösung herunter, ohne dass ein Informationsverlust entsteht. Vorrausetzung dafür ist, dass Monitor und Grafikkarte DDC unterstützen müssen! Somit lässt sich das System nach Inbetriebnahme sofort ohne weitere... -
Seite 20: Videoeinstellungen / Image Config
LwLVision mitgeteilt. Einstellungen über das Image Config sind nicht möglich. Bei analogen Signalen werden die Bildwerte durch das LwLVision-PC ermittelt, digitalisiert und an das LwLVision-Rem übertragen. An der entfernten Konsole können nun diese Information über das Image Config exakt an Ihre Anforderungen angepasst werden. -
Seite 21: Einstellungen Im Menü Image Config
Guntermann & Drunck GmbH Installations- und Bedienungsanleitung LwLVision 6.3.1.3 Einstellungen im Menü Image Config Nachdem Sie das Image Config aufgerufen haben, stehen Ihnen in dem geöffneten Fenster folgende Einstellmöglichkeiten für analoge Bildsignale zur Verfügung: Festlegung des Videokanalwechsel (nur LwLVision/MC2-System) ... - Seite 22 Guntermann & Drunck GmbH Installations- und Bedienungsanleitung LwLVision Tracking: Einstellung der Bildpunkte horizontal pro Zeile inkl. Schwarzschulter. Bestimmt unmittelbar die Abtastfrequenz bei der Umwandlung von analogen Bildsignalen in digitale Bilddaten. Jeder Bildpunkt darf nur genau ein mal digitalisiert werden um ein scharfes Bild zu erreichen.
-
Seite 23: Kein Bild Am Lwlvision-Rem
Guntermann & Drunck GmbH Installations- und Bedienungsanleitung LwLVision 6.3.2 Kein Bild am LwLVision-Rem Sollte eine Störung in der Verbindung zwischen LwLVision-PC und LwLVision-Rem existieren, so erscheint am entfernten Monitor (LwLVision- Rem) folgender Warnhinweis: LWL VISION REMOTE NO FIBER LINK SN: 000000 PON: 0001 VERSION: 3.03 GD... -
Seite 24: Konfiguration
Guntermann & Drunck GmbH Installations- und Bedienungsanleitung LwLVision Konfiguration Default-Zustand „REM SCREEN CONFIG“ über lokale Tastatur Über die lokale Tastatur (am LwLVision-PC) können Sie das REM SCREEN CONFIG-Menü per Tastatureingabe in den Default-Zustand zurückversetzen. CTRL Aufgerufen wird dieser Modus durch die Tastaturkombination BACKSPACE. -
Seite 25: Konfiguration Am Lwlvision-Rem Über Osd (Adonis)
Installations- und Bedienungsanleitung LwLVision Konfiguration am LwLVision-Rem über OSD (AdonIS) Das LwLVision -System ist an der entfernten Konsole (LwLVision-Rem) mit einem OSD ausgestattet. Über dieses OSD (AdonIS) kann das gesamte System an Ihre Bedürfnisse angepasst werden. CTRL öffnen Sie das AdonIS:... -
Seite 26: Image Config
Guntermann & Drunck GmbH Installations- und Bedienungsanleitung LwLVision 7.2.1 Image Config vgl. Kap. 6.3.1 7.2.2 Console Setup im Function Menü gelangen Sie in das Console Durch drücken der Taste Setup. C O N S O L E S E T U P L W L M Screen Saver: AutoLogout:... -
Seite 27: Einstellung Des Autologout
Guntermann & Drunck GmbH Installations- und Bedienungsanleitung LwLVision 7.2.2.2 Einstellung des AutoLogout Über diese Einstellung können Sie einen automatischen LOGOUT des Systems aktivieren. Der automatische LOGOUT führt, gleich dem manuellen (Taste F8), zurück zur LOGIN Maske. Das System wird damit gegen nicht autorisierten Zugriff geschützt und erst nach einer Passwort-Eingabe im LOGIN Fenster kann wieder auf die Rechner zugegriffen werden. -
Seite 28: Aktivierung Der Kanalanzeige Display
Guntermann & Drunck GmbH Installations- und Bedienungsanleitung LwLVision 7.2.2.4 Aktivierung der Kanalanzeige Display Hier besteht die Möglichkeit, die Anzeige für den gewählten Rechner entweder Dauernd => Yes oder Temporär => No (verschwindet ca. 5 Sek. nach Umschaltung) einzustellen. Nach dem Fahren des Cursors auf das Feld DISPLAY können Sie über die SPACE Taste (toggle) oder die Tasten... -
Seite 29: Einstellung Der Menu-Position
Guntermann & Drunck GmbH Installations- und Bedienungsanleitung LwLVision 7.2.2.6 Einstellung der Menu-Position Verändern Sie hier die Lage aller AdonIS-Fenster. Fahren Sie den Cursor auf den entsprechenden Eintrag im Menü CONSOLE SETUP. ENTER Nach Drücken der Taste gelangen Sie in den Editiermodus und Pfeiltasten können nun über die oder mittels der Mouse die Anzeige an die... -
Seite 30: Keyboard Layout
Guntermann & Drunck GmbH Installations- und Bedienungsanleitung LwLVision 7.2.2.8 Keyboard Layout Passen Sie hier den, durch den LwLVision verwendeten Keyboard-Satz an das tatsächliche Layout des angeschlossenen Keyboards an. Sie sollten z. B. eine Umstellung vornehmen, wenn Sie eine Y/Z-Vertauschung feststellen (amerikanisch/deutsches Layout). - Seite 31 Guntermann & Drunck GmbH Installations- und Bedienungsanleitung LwLVision Open Access: Zugriff ist nur über Passwortabfrage möglich! A C C E S S C O N F I G L W L M Please enter your login: Name: max. 14 Zeichen Password: max.
-
Seite 32: Image Config
(toggle) oder den Pfeil-Tasten (rechts/links) wechseln (nur bei LwLVision/MC2). Inaktive Kanäle werden durch eine hellblaue Schrift angezeigt. Wurde am LwLVision-Rem ein DDC-fähiger Monitor angeschlossen, so werden die vom Monitor zur Verfügung gestellten Information (z. B. Bildwiederholrate, Auflösung...) durch das System entsprechend berücksichtigt. - Seite 33 Guntermann & Drunck GmbH Installations- und Bedienungsanleitung LwLVision Abweichend von den automatischen Einstellungen, können Sie in diesem Menü die Monitorwerte individuell anpassen. In den folgenden Kapiteln werden diese Einstellmöglichkeiten erläutert. 7.2.3.2.1 Res. Limit In diesem Menü wird die Limitation bzgl. der Bildschirmauflösung definiert: ...
-
Seite 34: Hochskalieren
Guntermann & Drunck GmbH Installations- und Bedienungsanleitung LwLVision Enter Drücken Sie die Taste öffnet sich ein weiteres Fenster: L W L M I N F O Press Enter during the next 15 s to keep the new settings Sie haben innerhalb von 15 Sekunden die Gelegenheit, durch Drücken der Enter Taste Ihre Änderungen dauerhaft zu übernehmen. -
Seite 35: Refreshrate
Die in diesem Bereich getroffene Änderungen werden entsprechend dem Kapitel 7.2.3.2.1 mit den Informationsfenster begleitet. 7.2.3.2.5 Sync Output Die hier zu treffenden Einstellungen gelten nur für analoge Monitore, die am LwLVision-REM angeschlossen werden und nicht alle Sync-Standards unterstützen as input: Bildausgabe ist gleich Bildeingang On green: Sync auf Grün... -
Seite 36: View Ddc Data
Select Monitor go to Rem Screen Config In diesem Menü können Sie zwischen den Monitoren auswählen, die sich am LwLVision-PC (Local) oder LwLVision-Rem (Remote) befinden. Als weiteres Unterscheidungsmerkmal wird zwischen analogem und digitalem Monitor unterschieden. Mit den Pfeiltasten der Tastatur wechseln Sie zwischen den einzelnen Monitor- Einträgen. - Seite 37 Guntermann & Drunck GmbH Installations- und Bedienungsanleitung LwLVision Ihre Auswahl bestätigen Sie durch Drücken der Taste Enter. Danach öffnet sich folgendes Fenster. L W L M D D C I N F O M o n i t o r L o c a l A n a l o g Horiz.
-
Seite 38: System Config
Guntermann & Drunck GmbH Installations- und Bedienungsanleitung LwLVision 7.2.3.3 System Config Steppen Sie im Config Menü auf den Eintrag System Config und drücken Sie die Taste Enter. Folgendes Fenster öffnet sich: L W L M S Y S T E M C O N F I G HotKey CTRL Double Hotkey... -
Seite 39: Festlegung Des Doppel-Hotkey
Guntermann & Drunck GmbH Installations- und Bedienungsanleitung LwLVision Bitte beachten Sie, dass der hier eingestellte HotKey ferner auch als erste AdonIS Taste zum Aufruf des dient ( z.B. Um die Einstellung zu speichern, verlassen Sie dies Menü mit 7.2.3.3.2 Festlegung des Doppel-HotKey AdonIS Hier legen Sie fest, ob Sie zum Aufruf des oder des ImageConfig... -
Seite 40: Reset Videomode Table
Guntermann & Drunck GmbH Installations- und Bedienungsanleitung LwLVision Steppen Sie mittels der Pfeiltasten auf den entsprechenden Menüpunkt. ENTER Durch Eingabe von wird die Funktion ausgeführt und folgendes Infofenster öffnet sich. L W L M Info This function will delete all settings. Press Enter to continue Esc to cancel Bestätigten Sie hier nochmals mit der Taste ENTER. -
Seite 41: Local Video
Kap. 7.2.3.3.5, aber bezogen auf das lokale Bild (Monitor am LwLVision-PC). 7.2.3.3.7 Permanent Access Sowohl für die entfernte Station (LwLVision-Rem) als auch die lokale Bedienstation am LwLVision-PC besteht die Möglichkeit, einen permanenten Zugriff (Haltefunktion; vgl. Kap. 8.3) zu aktivieren (Permanent Access). -
Seite 42: Aktivieren Des Protected Mode
Guntermann & Drunck GmbH Installations- und Bedienungsanleitung LwLVision Steppen Sie dazu mit der Cursor-Taste auf den Eintrag Time-Out. Durch Eingabe einer beliebigen Zeit können Sie die Verzögerungszeit in einem Intervall von 1 – 90 Sekunden individuell bestimmen. Um die Einstellung zu speichern, verlassen Sie dies Menü mit 7.2.3.3.9 Aktivieren des Protected Mode Mit dieser Einstellung legen Sie fest, ob der Protected Mode (vgl. -
Seite 43: Festlegung Des Scancodesatzes Remote
Guntermann & Drunck GmbH Installations- und Bedienungsanleitung LwLVision Durch Betätigen der SPACE-Taste können Sie dann zwischen folgenden Alternativen wählen: 3 oder 2 Um die Einstellung zu speichern, verlassen Sie dies Menü mit 7.2.3.3.12 Festlegung des Scancodesatzes remote Funktion entsprechend wie in Kap. - Seite 44 Guntermann & Drunck GmbH Installations- und Bedienungsanleitung LwLVision Zeilenanzahl haben. Ein Beispiel hierfür sind 1024x768/60Hz und 1360x768/60Hz. Um Zweifelsfälle eindeutig aufzulösen, kann hier das bevorzugte Bildformat angegeben werden. Dies wirkt sich nur dann aus, wenn das System keine eindeutige Entscheidung treffen kann und nur bei analogen Eingangssignalen. Bei digitalem Eingangssignal (DVI) hat diese Einstellung keine Bedeutung.
- Seite 45 Guntermann & Drunck GmbH Installations- und Bedienungsanleitung LwLVision 7.2.3.4 User Account Steppen Sie im Config Menü auf den Eintrag User Account und drücken Sie die Taste Enter. Folgendes Fenster öffnet sich: SELECT ACCOUNT LWLM USER 01 USER 02 USER 03 USER 04 bis User 08 OpenAccess...
-
Seite 46: User Account
Guntermann & Drunck GmbH Installations- und Bedienungsanleitung LwLVision Hier können sie die Einstellungen für den im SELECT ACCOUNT ausgewählten User ändern. Derzeit können 8 User, SUPERVISOR + OpenAccess verwaltet werden. U S E R A C C O U N T L W L M A c c o u n t N o . -
Seite 47: Vergabe Des User-Namens
Guntermann & Drunck GmbH Installations- und Bedienungsanleitung LwLVision 7.2.3.4.2 Vergabe des User-Namens User name USER 01 Geben Sie mit max. 14 Zeichen den Namen des diesem Account zugeordneten Users ein. Vorhergehende Einträge können überschrieben werden. ENTER Steuern Sie den Cursor auf dieses Feld. Drücken Sie die -Taste, um in den Editiermodus für dieses Feld zu gelangen. -
Seite 48: Set Account Defaults
Guntermann & Drunck GmbH Installations- und Bedienungsanleitung LwLVision 7.2.3.4.3 Set Account Defaults Set Account Defaults Diese Funktion setzt alle Änderungen des USER ACCOUNT zurück auf den Lieferzustand, der in diesem Kapitel jeweils am Ende eines Abschnitts als „default“ angegeben ist. Ausnahme: User Name + User Password ENTER Bewegen Sie den Cursor auf den Eintrag und betätigen Sie dann die... -
Seite 49: System Config Access
Guntermann & Drunck GmbH Installations- und Bedienungsanleitung LwLVision 7.2.3.4.6 System Config access System Config access... No/Yes Hier können Sie dem Inhaber dieses Accounts den Zugang zum Menü System Config gewähren oder entziehen. Steuern Sie das Feld an und gewähren Sie den Zugang zum System Config oder verwehren Sie diesen durch N. -
Seite 50: Change Password
Guntermann & Drunck GmbH Installations- und Bedienungsanleitung LwLVision 7.2.3.4.8 Change Password Change password... Hier können Sie das User Password festlegen. Achten Sie darauf, dass weder das Passwort noch der USER-Name zweimal vergeben wird. Die Eingabe ist alphanumerisch möglich. Fahren Sie den Cursor auf den entsprechenden Eintrag im Menü USER ACCOUNT. -
Seite 51: Mouse Utility
Guntermann & Drunck GmbH Installations- und Bedienungsanleitung LwLVision Mouse Utility Sollte die Mouse eines Rechners während des Betriebes nicht mehr funktionieren (Mouse-Pfeil bewegt sich nicht), besteht die Möglichkeit, eine Reinitialisierung durchzuführen. Überprüfen Sie jedoch zunächst alle Anschlusskabel auf korrekten Sitz. + NUM)auf. -
Seite 52: System Info
Guntermann & Drunck GmbH Installations- und Bedienungsanleitung LwLVision Enable Intelli (MS-Intelli-Mouse) Wählen Sie diese Funktion bei Nicht-Windows-Systemen (z. B. Linux), sollte der angeschlossene Rechner den MS-Intelli-Mousetreiber geladen haben. Enable Int Explorer (MS-Intelli-Mouse) Wählen Sie diese Funktion bei Nicht-Windows-Systemen (z. B. Linux), sollte der angeschlossene Rechner den MS-Intelli-Explorer Mousetreiber geladen haben. -
Seite 53: Monitor Info
Sie dieses Menü und wechseln wieder in das Menü FUNCTION. In diesem Menü können Sie zwischen den Monitoren auswählen, die sich am LwLVision-PC (Local) oder LwLVision-Rem (Remote) befinden. Als weiteres Unterscheidungsmerkmal wird zwischen analogem und digitalem Monitor unterschieden. Mit den Pfeiltasten der Tastatur wechseln Sie zwischen den einzelnen Monitor- Einträgen. - Seite 54 Guntermann & Drunck GmbH Installations- und Bedienungsanleitung LwLVision Ihre Auswahl bestätigen Sie durch Drücken der Taste Enter. Danach öffnet sich folgendes Fenster. L W L M D D C I N F O M o n i t o r L o c a l A n a l o g Horiz.
-
Seite 55: Systembedienung
Guntermann & Drunck GmbH Installations- und Bedienungsanleitung LwLVision Systembedienung Zugriffsmöglichkeiten Folgende Zugriffsmöglichkeiten bestehen auf das System: Open Access: freier Zugang zum System über definierte User: Anmeldung mit Passwort und Name erforderlich als Supervisor Im den nachfolgenden Kapiteln werden die einzelnen Zugriffsmöglichkeiten näher erläutert. - Seite 56 Guntermann & Drunck GmbH Installations- und Bedienungsanleitung LwLVision Dort befindet sich am unteren Ende des Fensters der Eintrag OpenAccess. SELECT ACCOUNT LWLM USER 01 USER 02 USER 03 USER 04 bis User 08 OpenAccess SUPERVISOR Enter Bewegen Sie den Cursor auf diesen Eintrag und drücken Sie die Taste Enter. Folgendes Fenster öffnet sich: U S E R A C C O U N T L W L M...
-
Seite 57: Zugriff Über Definierte User
Guntermann & Drunck GmbH Installations- und Bedienungsanleitung LwLVision 8.1.2 Zugriff über definierte User Sobald durch den Supervisor im Menü UserAccount Benutzer angelegt worden sind, ist der Zugriff auf des System über einen Login-Namen und einem Passwort möglich. Diesem Benutzer können bestimmte Rechte zugewiesen sein. Das Verfahren zum Anlegen von Benutzern wird in Kapitel 7.2.3.4 beschrieben. -
Seite 58: Manuelle Haltefunktion
an der Konsole, welche durch die Haltefunktion gesperrt wurde, durch schnell blinkende Keyboard-Led „Scroll Lock“, die ACTIVE LED LOCAL (z. B. bei LwLVision-Rem) erlischt und die ACTIVE LED leuchtet das Display wird folgendermaßen dargestellt LWLM PERMANENT ACCESS CTRL Die Haltefunktion wird durch erneutes Drücken der Tastenkombination... -
Seite 59: Protected Mode
Guntermann & Drunck GmbH Installations- und Bedienungsanleitung LwLVision Protected Mode Der Protected Mode bietet Ihnen die Möglichkeit, dass entweder die lokale oder die entfernte (remote) Arbeitsstation den Rechner exklusiv bedienen kann. In Grundzustand des Protected Mode sind alle angeschlossenen Konsolen für Keyboard- und Mouseeingaben gesperrt und alle Monitore dunkel geschaltet. -
Seite 60: Dunkelschaltung Des Monitors
Guntermann & Drunck GmbH Installations- und Bedienungsanleitung LwLVision Dunkelschaltung des Monitors Die Dunkelschaltung des nicht aktiven Monitors ist bei einer Keyboard und Mouseaktion und im Modus der „Haltefunktion“ möglich. Bedingung ist, dass die Dunkelschaltung erlaubt wurde (vgl. Kap. 7.1.6 bzw. 7.3.3.5 und 7.3.3.6). -
Seite 61: Manueller Logout
Guntermann & Drunck GmbH Installations- und Bedienungsanleitung LwLVision Manueller Logout Function Durch Drücken der Taste Menü führen Sie einen Logout durch. Diese Funktion hebt die Zuordnung zu dem angeschlossenen Rechner und Ihre Anmeldung im LwLVision auf. LOGIN Nach der Ausführung wechselt der LwLVision zum Fenster: Sollten Sie sich noch im Modus OPEN ACCESS befinden, können Sie ... -
Seite 62: Informationen Zur Audioübertragung
Mouse PS/2 US Possible eye injury! USB 1.1 DVI / VGA CPU Red. Power Service Transmission DVI / VGA Out Am LwLVision-Rem befinden sich folgende Audioschnittstellen: Line In Micro In Speaker Main Power Micro In Speaker RS 232 Keyb. -
Seite 63: Informationen Zur Optionalen Übertragung Von Usb 1.1 (Transparent)
Guntermann & Drunck GmbH Installations- und Bedienungsanleitung LwLVision Informationen zur optionalen Übertragung von USB 1.1 (transparent) Mit dem LwLVision-System überwinden Sie aufgrund der eingesetzten Technologie die übliche 5-Meter Grenze für die Entfernung zwischen CPU und USB-Peripheriegerät. Die Übertragungsrate beträgt bis zu 12 MBit/s. USB-Geräte können mit dem LwLVision-System bis zu 2000 Meter vom Rechner entfernt angeschlossen werden. -
Seite 64: Technische Daten
Guntermann & Drunck GmbH Installations- und Bedienungsanleitung LwLVision Technische Daten Video Auflösung (lokal): max. 1920 × 1200 Bildpunkte (max. Wert) Auflösung (entfernt): max. 1920 × 1200 Bildpunkte (max. Wert) Übertragungslänge: - Singlemodefaser: 10.000m - Multimodefaser: 550m übertragbare Signale: R, G, B, H-Sync., V-Sync., Sync im Grün Keyboard / Mouse - + U... - Seite 65 Hauptstromversorgung Redundante Stromvers. LwLVision-PC 100 – 240 VAC primär 12 VCD, 1,2 A 50 – 60 Hz, 0,3A LwLVision-Rem 100 – 240 VAC primär 12 VCD, 2,2 A 50 – 60 Hz, 0,5A LwLVision/MC2-PC 100 – 240 VAC primär 12 VCD, 1,9 A 50 –...
- Seite 66 Guntermann & Drunck GmbH Installations- und Bedienungsanleitung LwLVision Anhang 13.1 HotKey-Belegungstabelle Funktion Default-HotKey Persönlicher HotKey Kapitel im Handbuch Manuelle Haltefunktion CTRL + DRUCK Kap. 8.3 Aufruf des Setup- CTRL + Kap. 7.1 Modus BACKSPACE Seite 66...
- Seite 67 Guntermann & Drunck GmbH Installations- und Bedienungsanleitung LwLVision 13.2 Passwort Für den OpenAccess muss kein Name und Passwort eingegeben werden. Wollen Sie Konfigurationen am System vornehmen, müssen Sie sich als SUPVERVISOR anmelden! SUPERVISOR L O G I N L W L M 4658 Please enter your login: Name...
- Seite 68 Guntermann & Drunck GmbH Operating Instructions LwLVision NFORMATION Warning N ORDER TO AVOID THE RISK OF AN ELECTRIC SHOCK THE DEVICE IS NOT TO BE OPENED OR THE COVERS NOT TO BE REMOVED N CASE OF AN ERROR PLEASE CONTACT OUR TECHNICIANS EFORE YOU T AKE THIS D EVICE INTO OP ERATION PLEASE READ TH E OPERATING INSTRUCTIONS CAREFULLY OLLOW ALL THE WARNINGS OR OPERATING HI NTS WHICH ARE ON THE DEVICE OR IN THE...
- Seite 69 Information to the Optical Fibre Cable ............9 Installation of the transmitting unit LwLVision-PC........10 3.2.1 Video connection to the LwLVision/MC2-PC ........12 3.2.2 Other connections ................12 Installation of the receiving unit LwLVision-REM .........13 3.3.1 Video connection to the LwLVision/MC2-Rem........14 3.3.2 Other connections ................15 Power Supply .......................16 Switching on the Devices / LED Display............17...
- Seite 70 Guntermann & Drunck GmbH Operating Instructions LwLVision 7.2.3.3 System Config ................. 37 7.2.3.3.1 Definition of the first Hotkey ..........37 7.2.3.3.2 Definition of the Double-HotKey.......... 38 7.2.3.3.3 Set System Defaults (Supervisor Funktion) ......38 7.2.3.3.4 Reset Videomode table............39 7.2.3.3.5 Remote Video ..............
- Seite 71 Guntermann & Drunck GmbH Operating Instructions LwLVision Appendix.......................65 13.1 HotKey Seizure Table ..................65 13.2 Password .....................66 Page 5...
-
Seite 72: Laser Safety Information
Guntermann & Drunck GmbH Operating Instructions LwLVision Laser Safety Information This device uses the laser technology and corresponds to laser class 1. It fulfils the guidelines according to EN 60825-1:2014 as well as U.S. CFR 1040.10 and 1040.11. It is recommended always to cover the optical connections with a connector or a dust cap. -
Seite 73: Description
RS232 interface. Also audio signals in CD quality can be transmitted via optical fibre cable. Power Local Red. Active ision -PC Main Status Front panel LwLVision-PC Power Local Red. Active ision -Rem Main Status Front panel LwLVision-Rem Page 7... -
Seite 74: Scope Of Delivery
Guntermann & Drunck GmbH Operating Instructions LwLVision Scope of Delivery: LwLVision-PC Transmitting unit LwLVision/MC2-PC LwLVision-REM Receiving unit LwLVision/MC2-REM Connecting cable HD15-M/DVI-I-M-2 Video: DVI-D-M/M-2 Video: SOKA-G2 Keyboard/Mouse PS/2: USB-AM/BM-2 Keyboard/Mouse USB: RS232-M/F-2 Serial Audio-M/M-2 ... -
Seite 75: Installation
Guntermann & Drunck GmbH Operating Instructions LwLVision Installation The LwLVision System makes it possible to transmit keyboard, video and mouse signals via 2-fibre optical fibre cable (single mode and multi mode fibre). For this two systems are offered which are specialized in both optical fibre cables: ... -
Seite 76: Installation Of The Transmitting Unit Lwlvision-Pc
Service Transmission DVI / VGA Out DVI / VGA CPU Red. Power Connection of the LwLVision-Rem via K-LwLs-x Connection of the digital monitor Computer sided connection of of the local console; for connecting the monitor; either digital or analogue an analogue Monitor use an an optional adaptor ... - Seite 77 Guntermann & Drunck GmbH Operating Instructions LwLVision Keyboard/Mouse -> PS/2 Installation: Now establish a connection with the keyboard and mouse interface SOKA-G2 of the computer by means of both PS/2 connectors of the cable. Both connectors have corresponding symbols. Then connect the HD15 connector with the interface CPU Keyb./Mouse CPU PS/2 of the LwLVision-PC.
-
Seite 78: Video Connection To The Lwlvision/Mc2-Pc
Guntermann & Drunck GmbH Operating Instructions LwLVision Connection of the local console: Connect the connector of the local keyboard and mouse with the interface Keyb. and MOUSE PS/2 at the transmitting unit LwLVision- Connect the local monitor to the DVI/VGA Out jack. If you use an analogue monitor (VGA signal) please also use an optional adaptor for the connection to the LwLVision-PC. -
Seite 79: Installation Of The Receiving Unit Lwlvision-Rem
Put up the receiving unit. Connect the K-LwL(S)-x (K-LwL(M)-x) extension cable with the TRANSMISSION interface of the receiving unit LwLVision-REM. Monitor: Connect the analogue monitor to VGA Out. Connect the digital monitor to DVI Out. -
Seite 80: Video Connection To The Lwlvision/Mc2-Rem
Keyboard/mouse: Connect the PS/2 keyboard to the Keyb. PS/2 interface at the LwLVision-REM and the mouse to MOUSE PS/2. Connect the USB keyboard to the Keyb. USB interface at the LwLVision-REM and the mouse to MOUSE USB. -
Seite 81: Other Connections
Guntermann & Drunck GmbH Operating Instructions LwLVision 3.3.2 Other connections Connection of a microfon and speakers Main Power RS 232 Micro In Speaker Keyb. Mouse USB 1.1 USB 1.1 Keyb. PS/2 Mouse Possible eye injury! Red. Power Service Transmission Devices Devices VGA Out DVI Out... -
Seite 82: Power Supply
Operating Instructions LwLVision Power Supply Connect the delivered Power cord-2 to the main power jack of the devices (LwLVision-PC and LwLVision-REM). You can also connect a redundant power set to the redundant power jack. Use the optional Power-Set 12/Type2 for this. -
Seite 83: Switching On The Devices / Led Display
12 V Remote Active Shines when there is a Flashes as long as no remote connection keyboard is found. When a LwLVision-REM and when keyboard is found the LED is/can remote flashes as long as the remote controlled. -
Seite 84: Video
Guntermann & Drunck GmbH Operating Instructions LwLVision Video Supported Resolutions The LwLVision system supports the following resolutions: Input resolution Local out Remote out 640 × 350 @ 60-120 Hz as input 640 × 350 @ 70/85 Hz 640 × 400 @ 50-120 Hz as input 640 ×... -
Seite 85: Signals
Automatic Video Scaling (AuVisc) If the graphics card delivers a resolution which can not be displayed by the monitor at the LwLVision-REM the transmitting unit LwLVision-PC automatically scales the resolution without a loss of information. Precondition for this is that monitor and graphics card support DDC! With this the system can be used directly without any further adjustments. -
Seite 86: Video Settings / Image Config
At analogue signals the values are calculated and digitalized by the LwLVision-PC and passed to the LwLVision-Rem. At the remote console these data now can be adjusted to your demands through Image Config. Video adjustment via remote keyboard is only done for analogue video signals. -
Seite 87: Settings In The Menu Image Config
Guntermann & Drunck GmbH Operating Instructions LwLVision 6.3.1.3 Settings in the menu Image Config After you have called up Image Config you can use the following setting possibilities for analogue video signals: Changing the horizontal display position (X Pos.) Changing the vertical display position (Y Pos.) ... -
Seite 88: No Picture At The Lwlvision-Rem
After all settings are made you save these by pressing ESC. The menu Image Config is closed. 6.3.2 No picture at the LwLVision-Rem If there is a malfunction in the connection between LwLVision-PC and LwLVision-Rem the following warning will appear at the remote monitor (LwLVision-Rem): LWL VISION REMOTE NO FIBER LINK SN: 000000 PON: 0001 VERSION: 3.03 GD... -
Seite 89: Configuration
Guntermann & Drunck GmbH Operating Instructions LwLVision Configuration Default Condition “REM SCREEN CONFIG” via local keyboard Via local keyboard entry (at the LwLVision-PC) you can reset the REM SCEEN CONFIG menu to default. This mode is called up by pressing CTRL + BACKSPACE. -
Seite 90: Configuration At The Lwlvision-Rem Via Osd (Adonis)
Guntermann & Drunck GmbH Operating Instructions LwLVision Configuration at the LwLVision-Rem via OSD (AdonIS) The LwLVision system at the remote console (LwLVision-Rem) is equipped with an OSD. Via OSD (AdonIS) you can adjust the whole system to your needs. With... -
Seite 91: Image Config
Guntermann & Drunck GmbH Operating Instructions LwLVision 7.2.1 Image Config See chapter 6.3.1 7.2.2 Console Setup By pressing in the Function menu you will get to the Console Setup. C O N S O L E S E T U P L W L M Screen Saver: AutoLogout:... -
Seite 92: Setting Of Autologout
Guntermann & Drunck GmbH Operating Instructions LwLVision 7.2.2.2 Setting of AutoLogout Through this setting you can activate an automatic LOGOUT of the system. The automatic LOGOUT leads you back to the LOGIN mask like the manual LOGIN with F8. With this the system is protected against non authorized access and only after a password entry in the LOGIN menu you can have access again to the computers. -
Seite 93: Activation Of The Channel Display
Guntermann & Drunck GmbH Operating Instructions LwLVision 7.2.2.4 Activation of the Channel Display With this you have the possibility to set the display for the selected computer to constant => Yes temporary => No (disappears approx 5 seconds after switching). After you have moved the cursor to the array DISPLAY you can select the... -
Seite 94: Setting Of The Menu Position
Guntermann & Drunck GmbH Operating Instructions LwLVision 7.2.2.6 Setting of the Menu Position Here you change the position of all AdonIS windows. Move the cursor to the corresponding entry in the menu CONSOLE SETUP. By pressing ENTER you will get in the edit mode and can change the position of the display through ↑... -
Seite 95: Keyboard Layout
Guntermann & Drunck GmbH Operating Instructions LwLVision 7.2.2.8 Keyboard Layout Here you can adapt the keyboard layout used from LwLVision to the layout of the connected keyboard. You should make a change if y and z are not at the right place (American/German layout). - Seite 96 Guntermann & Drunck GmbH Operating Instructions LwLVision Open Access: Access on possible via password query! A C C E S S C O N F I G L W L M Please enter your login: Name: max 14 characters Password: max 12 characters Enter After having entered name and password the Config Menu opens.
-
Seite 97: Image Config
(right/left) (only with LwLVision/MC2). Inactive channels are displayed by bright blue letters. If a DDC monitor was connected to the LwLVision-Rem the monitor data (e.g. repetition rate, resolution) is considered from the system. DDC: The monitor passes its possible operation range to the system (which resolutions are possible at which repetition rates). - Seite 98 Guntermann & Drunck GmbH Operating Instructions LwLVision 7.2.3.2.1 Res. Limit In this menu the limits of the screen resolution is defined: as input: picture output equals the picture input always: resolution corresponds to the setting of “resolution” never above: resolution is always below the setting of “resolution” The default settings are always related to the settings of Resolution.
- Seite 99 Guntermann & Drunck GmbH Operating Instructions LwLVision 7.2.3.2.2 Resolution Here you define the used screen resolution. as input: picture output equals the picture input 640 x 480 800 x 600 1024 x 768 1152 x 864 ...
-
Seite 100: Refresh Rate
7.2.3.2.1. 7.2.3.2.5 Sync Output The changes to be made here are only valid for analogue monitors who are connected to the LwLVision-REM and do not support all sync standards: as input: picture output equals the picture input On green: Sync on green ... -
Seite 101: View Ddc Data
Rem Screen Config In this menu you can chose between the monitors who are either connected to LwLVision-PC (local) or LwLVision-Rem (remote). Furthermore it is distinguished between analogue and digital monitor. With the cursor control keys you switch between the different monitor entries. - Seite 102 LwLVision- PC (e.g. the graphics card of the PC connected to LwLVision-PC transmits 85 Hz but the monitor at the LwLVision-Rem can only work with 75 Hz, so the result is 75 Hz).
-
Seite 103: System Config
Guntermann & Drunck GmbH Operating Instructions LwLVision 7.2.3.3 System Config Move to the entry System Config in the Config Menu and press Enter. The following window will open: L W L M S Y S T E M C O N F I G HotKey CTRL Double Hotkey... -
Seite 104: Definition Of The Double-Hotkey
Guntermann & Drunck GmbH Operating Instructions LwLVision Please remember that these hotkeys can also be used as first key for calling AdonIS (e.g. + NUM). In order to save the settings and close this menu, press F1. 7.2.3.3.2 Definition of the Double-HotKey With this you define whether to use a double-hotkey for calling up AdonIS ImageConfig. -
Seite 105: Reset Videomode Table
Guntermann & Drunck GmbH Operating Instructions LwLVision L W L M Info This function will delete all settings. Press Enter to continue Esc to cancel Confirm again with ENTER. The window will change to the menu FUNCTION. 7.2.3.3.4 Reset Videomode table If you manually change the settings calculated from the system in the menu Image Config by ... -
Seite 106: Local Video
(monitor at the LwLVision-PC). 7.2.3.3.7 Permanent Access For the remote station (LwLVision-Rem) as well as for the local console at the LwLVision-PC there is the possibility to activate permanent access (hold function; see chapter 8.3). -
Seite 107: Activation Of The Protected Mode
Guntermann & Drunck GmbH Operating Instructions LwLVision 7.2.3.3.9 Activation of the Protected Mode With this setting you define whether the Protected Mode (see chapter 8.4) is to be activated. Move the cursor to the entry Protected Mode. By pressing SPACE you can chose between Yes or NO. -
Seite 108: V24 Mouse Enable
Guntermann & Drunck GmbH Operating Instructions LwLVision 7.2.3.3.13 V24 Mouse Enable With this setting you define whether a V24 mouse is to be supported for using the LwLVision system or not. Move the cursor to the entry V24 mouse enable. By pressing SPACE you can chose between Yes or NO. - Seite 109 Guntermann & Drunck GmbH Operating Instructions LwLVision By pressing the SPACE-button you can choose between two alternatives: Standard or Wide To save your settings, press the button to leave this window. Addtionally the menu Analog Input Config can called up via a Hotkey (default CTRL + SCROLL).
-
Seite 110: User Account
Guntermann & Drunck GmbH Operating Instructions LwLVision 7.2.3.4 User Account Move to the entry User Account in Config Menu and press Enter. The following window will open: SELECT ACCOUNT LWLM USER 01 USER 02 USER 03 USER 04 bis User 08 OpenAccess SUPERVISOR Enter... -
Seite 111: Account Enable / Disable
Guntermann & Drunck GmbH Operating Instructions LwLVision If you have selected an account (e.g. user 1) you get to a submenu with the window USER ACCOUNT. Here you can change the settings for the user selected SELECT ACCOUNT. At present 8 users, SUPERVISOR + OpenAccess can be managed. U S E R A C C O U N T L W L M A c c o u n t N o . -
Seite 112: Allocation Of The User Name
Guntermann & Drunck GmbH Operating Instructions LwLVision 7.2.3.4.2 Allocation of the User Name User name USER 01 For the name of the user of this account you can use maximum 14 characters. Previous entries can be overwritten. Move the cursor to this array. Then press ENTER to get into the edit mode for this array. -
Seite 113: Set Account Defaults
Guntermann & Drunck GmbH Operating Instructions LwLVision 7.2.3.4.3 Set Account Defaults Set Account Defaults This function sets back all changes made in USER ACCOUNT to default except User Name + User Password (see “default” at the end of each chapter). Move the cursor to the corresponding entry and confirm with ENTER. -
Seite 114: System Config Access
Guntermann & Drunck GmbH Operating Instructions LwLVision 7.2.3.4.6 System Config Access System Config access... No/Yes Here you can give/deny access to System Config to the owner of this account. Move the cursor to the corresponding array and give (deny) access to System Config by pressing (N) or by using SPACE. -
Seite 115: Change Password
Guntermann & Drunck GmbH Operating Instructions LwLVision 7.2.3.4.8 Change Password Change password... Here you can define the User Password. Be sure that neither password nor user name are used twice. For the entry you can use alphanumerical characters. Move the cursor to the corresponding entry in the menu USER ACCOUNT. By pressing ENTER you will get to a submenu where you will be asked to enter... -
Seite 116: Mouse Utility
Guntermann & Drunck GmbH Operating Instructions LwLVision Mouse Utility If the mouse of one computer does not work (mouse cursor does not move) during operation there is the possibility of re-initialization. First check whether all connecting cables are connected correctly. Call up the FUNCTION Menu (CTRL + NUM). -
Seite 117: System Info
Guntermann & Drunck GmbH Operating Instructions LwLVision Enable Intelli (MS Intelli Mouse) Select this function at non-Windows systems (e.g. Linux) if the connected computers works with the MS Intelli mouse driver. Enable Int Explorer (MS Intelli Mouse) Select this function at non-Windows systems (e.g. Linux) if the connected computer works with the MS Intelli Explorer mouse. -
Seite 118: Monitor Info
FUNCTION. Here you can chose between the monitor either connected to LwLVision-PC (local) or LwLVision-Rem (remote). It is also distinguished between analogue and digital monitor. With the cursor control keys you switch between the different monitor entries. - Seite 119 LwLVision- PC (e.g. the graphics card transmits 85 Hz to the computer connected to the LwLVision-PC but the monitor at the LwLVision-Rem can only work with 75 Hz, so the result is only 75 Hz).
-
Seite 120: System Operation
Guntermann & Drunck GmbH Operating Instructions LwLVision System Operation Access Possibilities The following access possibilities to the system exist: Open Access: free access to the system. Via defined user: log-in with password and name required. As supervisor. In the following chapters the different access possibilities are described in detail. - Seite 121 Guntermann & Drunck GmbH Operating Instructions LwLVision At the bottom of the window you will find the entry OpenAccess. SELECT ACCOUNT LWLM USER 01 USER 02 USER 03 USER 04 bis User 08 OpenAccess SUPERVISOR Enter Move the cursor to this entry and press Enter. The following window will open: U S E R A C C O U N T L W L M O p e n A c c e s s...
-
Seite 122: Access Via Defined User
Guntermann & Drunck GmbH Operating Instructions LwLVision 8.1.2 Access via defined User As soon as the supervisor has compiled users in the menu UserAccount access to the system is only possible via name and password login. These users are assigned certain rights. The procedure for compiling users is described in chapter 7.2.3.4. -
Seite 123: Manual Hold Function
Guntermann & Drunck GmbH Operating Instructions LwLVision Manual Hold Function By the LwLVision system it is possible to control the computer either via local or remote console exclusively. With this the system can not release the other console after the preset time-out of approximately 1 second. PRINT By keeping CTRL... -
Seite 124: Protected Mode
Guntermann & Drunck GmbH Operating Instructions LwLVision Protected Mode With the Protected Mode you have the possibility to control the computer either with the local or the remote workstation. In the default condition of the Protected Mode all connected consoles are blocked for keyboard and mouse entries and all monitors are switched dark. -
Seite 125: Dark Switching Of The Monitor
Guntermann & Drunck GmbH Operating Instructions LwLVision Dark Switching of the Monitor The dark switching of the non-active monitor is possible at keyboard and mouse action and in the hold function mode but only if the dark switching was enabled (see chapters 7.1.6, 7.3.3.5 and 7.3.3.6). -
Seite 126: Manual Logout
Guntermann & Drunck GmbH Operating Instructions LwLVision Manual Logout Function By pressing in the Menu you will do a logout. This function abolishes the assignment to the connected computer and their log-in in LwLVision. LOGIN After execution LwLVision will change to If you are still in the OPEN ACCESS mode you can log in directly by ... -
Seite 127: Informations About The Audio Transmission
Keyb. PS/2 Mouse PS/2 Possible eye injury! USB 1.1 Service Transmission DVI / VGA Out DVI / VGA CPU Red. Power LwLVision-Rem provides following audio interfaces: Line In Micro In Speaker Main Power RS 232 Micro In Speaker Keyb. - Seite 128 Guntermann & Drunck GmbH Operating Instructions LwLVision Informations about the transmission of USB 1.1 (transparent) Due to the used technologie you overcome the transmitting limitation of the USB standard between the PC and the USB – device.(normally up to 5 meter). The transmission rate is up to 12 MBit/s.
-
Seite 129: Specifications
Guntermann & Drunck GmbH Operating Instructions LwLVision Specifications Video Resolution (local): max 1920 × 1200 pixels Resolution (remote): max 1600 × 1200 pixels Transmission distance: - Single mode fibre: 10 000 m - Multi mode fibre: 550 m ... - Seite 130 Main Power Supply Redundant Power Supply LwLVision-PC 100 – 240 VAC primary 12 VCD, 1,2 A 50 – 60 Hz, 0,3A LwLVision-Rem 100 – 240 VAC primary 12 VCD, 2,2 A 50 – 60 Hz, 0,5A LwLVision/MC2-PC 100 – 240 VAC primary 12 VCD, 1,9 A 50 –...
- Seite 131 Guntermann & Drunck GmbH Operating Instructions LwLVision Appendix 13.1 HotKey Seizure Table Function Default HotKey Personal HotKey Chapter Manual hold function CTRL + PRINT CTRL + Call-up of the Setup Mode BACKSPACE Page 65...
- Seite 132 Guntermann & Drunck GmbH Operating Instructions LwLVision 13.2 Password For OpenAccess no name and password have to be entered. If you want to configure the system you will have to log in as SUPVERVISOR anmelden! SUPERVISOR L O G I N L W L M 4658 Please enter your login:...
- Seite 133 NOTES...
- Seite 134 NOTES...
- Seite 135 NOTES...
- Seite 136 Das Handbuch wird fortlaufend aktualisiert und im Internet veröffentlicht. The manual is constantly updated and available on our website. http://gdsys.de/A9100003 Guntermann & Drunck GmbH Obere Leimbach 9 57074 Siegen Germany http://www.gdsys.de sales@gdsys.de...