Herunterladen Inhalt Inhalt Diese Seite drucken

BASETech 1539300 Bedienungsanleitung

Raumthermostat
Vorschau ausblenden Andere Handbücher für 1539300:
Inhaltsverzeichnis

Werbung

Verfügbare Sprachen

Verfügbare Sprachen

Bedienungsanleitung
Raumthermostat
Best.-Nr. 1539300
Seite 2 - 32
Operating instructions
Room thermostat
Item No. 1539300
Page 33 - 62
Mode d'emploi
Thermostat d'ambiance
N° de commande 1539300 Page 63 - 93

Werbung

Inhaltsverzeichnis
loading

Inhaltszusammenfassung für BASETech 1539300

  • Seite 1 Bedienungsanleitung Raumthermostat Best.-Nr. 1539300 Seite 2 - 32 Operating instructions Room thermostat Item No. 1539300 Page 33 - 62 Mode d’emploi Thermostat d’ambiance N° de commande 1539300 Page 63 - 93...
  • Seite 2: Inhaltsverzeichnis

    Inhaltsverzeichnis Seite Einführung ....................3 Symbol-Erklärung ..................4 Bestimmungsgemäße Verwendung ............4 Lieferumfang ....................5 Funktionen ....................6 Sicherheitshinweise ...................6 a) Allgemein ....................7 b) Batterien/Akkus ..................8 Montage .....................9 Bedienelemente ..................13 Bedienung ....................14 a) Zeiteinstellung ..................14 b) Funktionseinstellung .................15 c) Vordefinierte Temperatureinstellung ..........17 d) Programmfunktionen ................18 e) Programmübersicht ................20 Manuelle Einstellungen ..............21 g) Batterie .....................22 10. App-Bedienung ..................23...
  • Seite 3: Einführung

    Seite 11. Wartung und Pflege .................30 12. Entsorgung ....................31 Allgemein ..................31 b) Entsorgung von gebrauchten Batterien / Akkus .......31 13. Technische Daten ..................32 14. Konformitätserklärung (DOC) ..............33 1. Einführung Sehr geehrte Kundin, sehr geehrter Kunde, wir bedanken uns für den Kauf dieses Produkts. Dieses Produkt entspricht den gesetzlichen, nationalen und europäischen An- forderungen.
  • Seite 4: Symbol-Erklärung

    2. Symbol-Erklärung Das Symbol mit dem Blitz im Dreieck wird verwendet, wenn Gefahr für Ihre Gesundheit besteht, z.B. durch einen elektrischen Schlag. Das Symbol mit dem Ausrufezeichen im Dreieck weist auf wichtige Hinweise in dieser Bedienungsanleitung hin, die unbedingt zu be- achten sind. Das Pfeil-Symbol ist zu finden, wenn Ihnen besondere Tipps und Hinweise zur Bedienung gegeben werden sollen. 3. Bestimmungsgemäße Verwendung Mit dem Raumthermostat können Sie die Temperatur Ihrer Wohnräume ganz nach Ihren Bedürfnissen einstellen und regeln. Die Bedienung erfolgt über ein Bedienpanel oder alternativ über die App „Stat Blue“ (für IOS und Android er- hältlich).
  • Seite 5: Lieferumfang

    - Staub und brennbare Gase, Dämpfe und Lösungsmittel - Gewitter bzw. Gewitterbedingungen, wie starke elektrostatische Felder Eine andere Verwendung als zuvor beschrieben, führt zur Beschädigung dieses Produktes, außerdem ist dies mit Gefahren wie z.B. Kurzschluss, Brand, elek- trischer Schlag etc. verbunden. Das gesamte Produkt darf nicht geändert bzw. umgebaut werden! Lesen Sie die Bedienungsanleitung sorgfältig durch, und be- wahren Sie diese für späteres Nachschlagen auf. Reichen Sie das Produkt nur zusammen mit der Bedienungsanleitung an dritte Personen weiter.
  • Seite 6: Funktionen

    5. Funktionen • Bluetooth ® • Direkte Ansteuerung der Heizung bzw. Kühlung • Bis zu 24 einstellbare Programme pro Tag • Urlaubsmodus • Fünf vordefinierte Temperatureinstellungen - Comfort - Semi-Comfort - Economy - Anti-Frozen - Off 6. Sicherheitshinweise Lesen Sie sich die Bedienungsanleitung aufmerksam durch und beachten Sie insbesondere die Sicherheitshinweise. Falls Sie die Sicherheitshinweise und die Angaben zur sachgemä- ßen Handhabung in dieser Bedienungsanleitung nicht befol- gen, übernehmen wir für dadurch resultierende Personen-/ Sachschäden keine Haftung.
  • Seite 7: Allgemein

    a) Allgemein • Das Produkt ist kein Spielzeug. Halten Sie es von Kindern und Haustieren fern. • Lassen Sie das Verpackungsmaterial nicht achtlos liegen. Dieses könnte für Kinder zu einem gefährlichen Spielzeug werden. • Schützen Sie das Produkt vor extremen Temperaturen, direktem Sonnenlicht, starken Erschütterungen, hoher Feuchtigkeit, Näs- se, brennbaren Gasen, Dämpfen und Lösungsmitteln. • Setzen Sie das Produkt keiner mechanischen Beanspruchung aus. • Wenn kein sicherer Betrieb mehr möglich ist, nehmen Sie das Produkt außer Betrieb und schützen Sie es vor unbeabsichtigter Verwendung. • Der sichere Betrieb ist nicht mehr gewährleistet, wenn das Produkt: - sichtbare Schäden aufweist, - nicht mehr ordnungsgemäß...
  • Seite 8: B) Batterien/Akkus

    • Wenden Sie sich an eine Fachkraft, wenn Sie Zweifel über die Arbeitsweise, die Sicherheit oder den Anschluss des Produktes haben. • Lassen Sie Wartungs-, Anpassungs- und Reparaturarbeiten ausschließlich von einem Fachmann bzw. einer Fachwerkstatt durchführen. b) Batterien/Akkus • Batterien/Akkus gehören nicht in Kinderhände. •...
  • Seite 9: Montage

    • Wechseln Sie immer den ganzen Satz Batterien/Akkus aus, ver- wenden Sie nur Batterien/Akkus des gleichen Typs/Herstellers und des gleichen Ladezustands (keine vollen mit halbvollen oder leeren Batterien/Akkus mischen). • Mischen Sie niemals Batterien mit Akkus. Verwenden Sie entweder Batterien oder Akkus. •...
  • Seite 10 Schalten Sie die Leitungen spannungsfrei, und sichern Sie diese gegen Wiedereinschalten. Prüfen Sie die Litzen auf Spannungsfreiheit. • Entfernen Sie die Klemmleiste auf der Rückseite des Relais- teils und die Abdeckung der Schraubkontakte. Führen Sie die Kabel (von der Rückseite aus) durch die dahinterliegen- de Öffnung des Relaisteils.
  • Seite 11 • Drücken Sie die Dübel ein, bis diese vollständig in der Wand verschwinden. • Führen Sie das Kabel durch das Re- laiteil und schrauben Sie dieses an die Wand. Ziehen Sie die Schrauben aus- reichend an. Der Pfeil „UP“ muss dabei zur Decke zeigen. • Sorgen Sie für Zugentlastung der Kabel im Gerät.
  • Seite 12 Ist Temperatur Ausgang NO Ausgang NC Heizung > Soll Temperatur OPEN - Öffnen CLOSE - Schließen < Soll Temperatur CLOSE - OPEN - Öffnen Schließen Kühlung > Soll Temperatur CLOSE - OPEN - Öffnen Schließen < Soll Temperatur OPEN - Öffnen CLOSE - Schließen Vergewissern Sie sich über den korrekten Anschluss und die Be- legung der einzelnen Litzen vor der Verdrahtung. Ziehen Sie ggf. einen Fachmann hinzu.
  • Seite 13: Bedienelemente

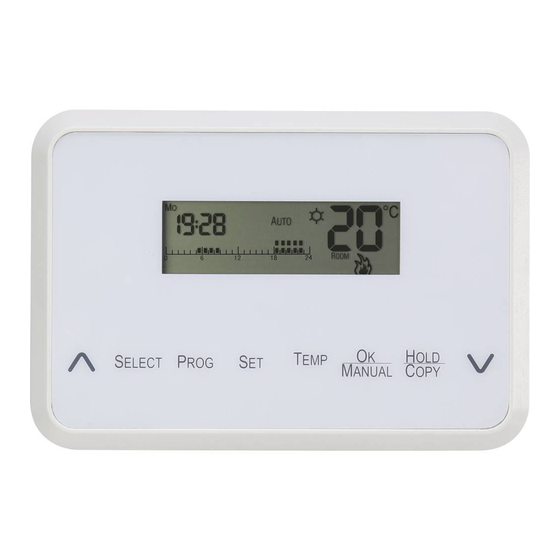
    • Setzen Sie die Schaltlogik in das an der Wand befestigte Relaisteil ein. Achten Sie darauf, dass die Beschriftungen und das Display lesbar sind und nicht verkehrt herum eingesetzt wird. Ansonsten sind die Teile nicht richtig kontaktiert. Die Schaltsignale werden über drei Kontakte von der Logik auf das Relaisteil übertragen. 8. Bedienelemente Uhrzeit 12 HOLD-Symbol Wochentag 13 Symbol für einen manuellen Eingriff Tagesprogramm 14 AUTO-Einstellung Temperatureinstellung...
  • Seite 14: Bedienung

    9. Bedienung Drücken und halten Sie die „SET“-Taste für 3 Sekunden, um in das Menü „Uhr- zeit- und Funktionseinstellung“ zu gelangen. Drücken Sie die „SELECT“-Taste, um zwischen „tI“ für die Uhrzeiteinstellung und „St“ für die Funktionseinstellung auszuwählen. Mit der „SET“-Taste bestätigen Sie Ihre Auswahl. a) Zeiteinstellung Um die Zeiteinstellung vornehmen zu können, drücken und halten Sie die „SET“- Taste für 3 Sekunden. Wählen Sie „tI“ für die Uhrzeiteinstellung und bestätigen Sie Ihre Auswahl, wie oben beschrieben. Im ersten Schritt wird das aktuelle Jahr in der Reihenfolge 2010 bis 2050 eingestellt. Um die Jahreszahl zu erhöhen, drücken Sie die Taste „ “. Sie können die Jahreszahl verringern, indem Sie die Taste „ “ drücken. Ihre Auswahl bestätigen Sie mit der „SELECT“-Taste. Jahr Als nächstes wird der Monat eingestellt. Nutzen Sie, wie in Schritt 1 be- schrieben, die Taste „ “ und die Taste „ “, um das Menü zu durchlaufen. Monat...
  • Seite 15: Funktionseinstellung

    Anschließend werden der Wochentag, die Stunden und Minutenanzahl ein- gestellt. Diese können Sie äquivalent zu Schritt 1 einstellen und auswählen. Monat Tag • Haben Sie Jahr, Monat, Wochentag und Uhrzeit eingestellt, wird wieder bei der Jahreseinstellung begonnen. Wenn Sie Ihre Auswahl bestätigen wollen, drücken Sie die „OK“-Taste. Sollten Sie Ihre Einstellung verändern wollen, wiederholen Sie Schritt 1 bis 3. b) Funktionseinstellung Um die Funktionseinstellung vornehmen zu können, drücken und halten Sie die „SET“-Taste für 3 Sekunden. Wählen Sie „St“ für die Funktionseinstellung und...
  • Seite 16 Holiday-Modus Mit dieser Funktion wird die gewünschte Temperatur von einem bis 199 Tage lang gleichmäßig gehalten. Mit den Tasten „ “ und „ “ können Sie die Anzahl der Tage erhöhen oder verringern. Drücken Sie die „OK“-Taste, um Ihre Einstel- lung zu bestätigen. Es läuft ein Countdown, der die eingestellte Anzahl der Tage bis auf 0 zurückzählt. Ist das Gerät im Holiday-Modus, wird die eingestellte Temperatur für diesen Modus gehalten. Programmeinstellungen werden erst abgerufen, wenn der Countdown des Holiday-Modus bei 0 ist oder der Holiday-Modus auf 0 zurückgesetzt wird! Heat/Cool Control Das Gerät kann als Zweipunktregler zum Kühlen oder Heizen verwendet werden. Im Modus Heizen schaltet das Gerät aus, sobald die Solltemperatur überschritten ist. Im Modus Kühlen sobald die Solltemperatur unterschritten ist.
  • Seite 17: Vordefinierte Temperatureinstellung

    Um die Einstellung vorzunehmen, gehen Sie in die Funktionseinstellungen, wie im Holiday-Modus beschrieben. Mit den Tasten „ “ und „ “ wählen Sie „Ht“ für die Heizung oder „CL“ für die Kühlung. Bestätigen Sie Ihre Wahl mit „OK“. Um die Verzögerung einzuschalten, drücken und halten Sie die „SET“ Taste für 3 Sekunden. Wechseln Sie mit „Select“ von der Zeiteinstellung „ti“ zur Funk- tionseinstellung „St“ und bestätigen mit „Set“. Wechsel mit „Select“ zwischen Holiday „Ho“ und Heizen / Kühlen „Ht“ und bestätigen Sie mit „Set“. Wechsel mit „Select“ zwischen Heizen „Ht“ und Kühlen „CL“ und bestätigen Sie mit „Set“. Mit „Select“ wechseln Sie zwischen Verzögerung an (d:ON) und Verzögerung aus (d:oF). Speichern und schließen Sie Ihre Einstellungen mit „OK“.
  • Seite 18: D) Programmfunktionen

    Mit den Tasten „ “ und „ “ können Sie die Temperatur je Einstellung in Schritten von 0,5 °C erhöhen bzw. verringern. Drücken Sie die „TEMP“-Taste um Ihre Einstellung zu bestätigen. Jetzt kön- nen Sie die nächste Funktion einstellen. Mit der „OK“-Taste bestätigen Sie Ihre Einstellungen und beenden das Menü. d) Programmfunktionen Um in das Menü für die Programmeinstellungen zu kommen, drücken und hal- ten Sie die „PROG“-Taste.
  • Seite 19 Tägliches Programm Wochentage + Wochenende Wochentage + Samstag + Sonntag 7 Tage Programm Als nächstes wählen Sie den Tag für Ihre Programmeinstellung aus. Drü- cken Sie dazu die „SELECT“-Taste. Wie im Bild dargestellt, können Sie damit beispiels-weise Montag für den ersten Tag Ihres 7-Tage-Programms auswählen. Drücken Sie die „PROG“- Taste, um das Programm für den ge- wählten Tag einzustellen. Jetzt können Sie die Programmparameter für den ausgewählten Tag ein- stellen. Die Programmeinstellung beginnt ab 0:00 jeden Tages. Drücken Sie die „TEMP“-Taste, um eine der folgenden fünf Funktionen einzustellen: - Comfort zwei Punkte werden angezeigt...
  • Seite 20: E) Programmübersicht

    Drücken Sie die Tasten „ “ und „ “, um die einzelnen Stunden auszuwäh- len. Die Einstellung wird solange bei- behalten, bis Sie diese durch Drücken der „TEMP“-Taste ändern. Drücken Sie die „PROG“-Taste, um Ihre Programmeinstellungen zu been- den. Danach können Sie die restlichen Tage, wie in den Schritten 3 bis 5 beschrieben, einstellen. Wenn Sie an zwei Tagen dasselbe Programm haben möchten, können Sie die „COPY“-Funktion nutzen, damit können Programme einfach kopiert werden. Zu Beginn der Pro- grammeinstellung für den Tag, drü- cken Sie die „COPY“-Taste. Auf dem Display wird das „COPY“-Symbol...
  • Seite 21: Manuelle Einstellungen

    Drücken Sie die „PROG“-Taste, um den Tag für die Übersicht einzustellen. Mit der „SELECT“-Taste können Sie zwischen den Tagen auswählen. Mit einem erneuten Drücken der „PROG“-Taste, können Sie die Pro- grammübersicht für den gewählten Tag aufrufen. Über die Tasten „ “ und „ “ können Sie jede einzelne Stunde des Programms kontrollieren. Um aus der Übersicht wieder in das Programmeinstellungs-Menü zu gelan- gen, drücken Sie nochmals die „PROG“-Taste. Anschließend drücken Sie die „OK“-Taste um zur Display-Anzeige zurückzukehren.
  • Seite 22: G) Batterie

    • Zusätzlich können Sie zwischen AUTO/OFF/Anti-Frozen wählen. Drücken und halten Sie dazu für 3 Sekunden die MANUAL-Taste. Drücken Sie die „SELECT“-Taste für folgende Auswahl: Auto - eingestelltes Programm Anti-Frozen O FF - das System wird ausgeschalten ON - das System bleibt weiterhin angeschalten Drücken Sie die „OK“-Taste, um Ihre Einstellung zu bestätigen. g) Batterie Ist die Batterie fast leer, erscheint auf dem Display das Batteriesymbol . In diesem Falle müssen Sie die Batterien des Geräts...
  • Seite 23: App-Bedienung

    10. App-Bedienung a) Verbindung zum Mobiltelefon Installieren Sie die App „Stat Blue“ auf Ihrem Smartphone. Die App ist für iOS- und Android-Betriebssysteme erhältlich. Beachten Sie, dass Ihr Smartphone die Android-Version 4.3 oder höher benötigt, um die App nutzen zu können! Nach dem Starten der App, wird das Raumthermostat automatisch gesucht und mit dem Smartphone verbunden. Die App zeigt nach erfolgreichem Verbinden „Connecting Ok“ an. Ihr Smartphone ist jetzt mit dem Raumthermostat verbunden. Um Ihre Eingaben an das Raumthermostat zu senden, müssen Sie mit „OK“ bestätigen. Den „OK“-Button finden Sie in der App auf der linken Seite unten. Ohne Bestätigung mit „OK“ werden keine Ein- gaben an das Raumthermostat übertragen! War eine Übertragung erfolgreich, wird Ihnen „Send Ok/Confirm“ auf dem Smartphone angezeigt.
  • Seite 24: Temperatureinstellung

    b) Temperatureinstellung Es gibt zwei Möglichkeiten die Tempe- ratur einzustellen: - Sie stellen die Temperatur nach Ih- rem Bedürfnis manuell ein. Ziehen Sie dazu den Einstellungsbalken mit den Fingern auf die gewünschte Position. - Sie stellen die Temperatur über vordefinierte Temperatureinstellun- gen ein. Drücken Sie dazu (mehr- mals) den mittleren Button auf dem Display. Lesen Sie dazu auch das Kapitel „Bedienung - vordefinierte...
  • Seite 25: C) Kontrollstatus Des Raumthermostats

    c) Kontrollstatus des Raumthermostats Es können vier Kontrollzustände ein- gestellt werden: - A UTO: Regelung über das einge- stellte Programm des Nutzers - A NTI-FROZEN: die niedrigste Temperatur zur Frostgrenze wird gehalten - T URBO: Die Heizung wird voll ein- geschalten - O FF: Die Heizung wird komplett abgestellt Um die Einstellung des Kontrollzu- standes vorzunehmen, drücken Sie...
  • Seite 26: D) „Temperatur-Halten" Und „Holiday-Modus

    d) „Temperatur-Halten“ und „Holiday-Modus“ Über die Funktion „Temperatur-Halten“ wird die voreingestellte Temperatur für eine bestimmte Zeit lang gleichmäßig gehalten. Drücken Sie die den Button (HOLD/ VACATION) auf derrechten Seite des Displays. Anschließend können Sie die Zeit einstellen. Ziehen Sie dazu den Balken in der Mitte des Displays auf die gewünschte Position. Stellen Sie die gewünschte Temperatur ein, bevor Sie den „HOLD/VACATION- Button“ drücken. Alle ande-...
  • Seite 27: Erweiterte Einstellungen

    e) Erweiterte Einstellungen Es können erweiterte Einstellungen vorgenommen werden. Um in das Menü zu gelangen, drücken Sie links unten auf dem Display den Zahnrad- Button. Sie können Änderungen in den Pro- grammen und in den voreingestellten Temperatureinstellungen vornehmen. Zudem können Sie sich Ihre Ener- giebilanz und Kontrolldaten anzeigen lassen. Drücken Sie auf den entspre- chenden Balken, um in das entspre- chende Untermenü...
  • Seite 28: Program Control

    Program Control Im Menü Program Control können die Programmeingaben überprüft und verän- dert werden. Drücken Sie auf den entsprechenden Balken, um in Untermenüs zu gelangen. Um das Menü zu verlassen, drücken Sie den Pfeil links oben im Display. Program Review In diesem Menü können Sie sich Ihre eingestellten Programmeinstellungen anzeigen lassen. Wählen Sie den Tag aus, für den Sie die Programmeinga- ben überprüfen wollen. Drücken Sie dazu auf den entspre- chenden Wochentag oben auf dem Display. Unten auf dem Display wird der Programmverlauf über verschiede- ne Farben (der voreingestellten Tem-...
  • Seite 29: Program Setting

    Program Setting In diesem Menü können Sie Änderun- gen an Programmen vornehmen oder neue Programme einstellen. Drücken Sie dazu auf den Balken oben im Display um den Wochentag für Ihr Programm auszuwählen. Es ist auch möglich mehrere Wochentage auszuwählen. Drücken Sie auf einen der Button für die Temperaturvoreinstellungen (Comfortable, Anti-Frozen, etc.). Der ausgewählte Button leuchtet auf.
  • Seite 30: Wartung Und Pflege

    Control Data In diesem Menü können Sie die Hei- zung direkt über „Cooling“ oder „Hea- ting“ ansteuern. Lesen Sie dazu bitte die Bedienungsanleitung des Raum- thermostats! 11. Wartung und Pflege Wird die Displayanzeige heller/geringerer Kontrast, oder die Uhrzeit bleibt ste- hen, wechseln Sie bitte die Batterien. Lösen Sie dazu den vorderen Teil mit Logik und Anzeige durch sanftes Lösen der Clips, im an der Wand befestigten Teil. Die Clips befinden sich mittig an der linken und rechten Seite. Drücken Sie unterhalb der Clips und ziehen Sie am vorderen Teil des Raumthermostats.
  • Seite 31: Entsorgung

    12. Entsorgung a) Allgemein Das Produkt gehört nicht in den Hausmüll. Entsorgen Sie das Produkt am Ende seiner Lebensdauer gemäß den geltenden gesetzlichen Vorschriften; geben Sie es z.B. bei ei- ner entsprechenden Sammelstelle ab. Entnehmen Sie die eingesetzten Batterien bzw. Akkus und entsorgen Sie diese getrennt vom Produkt. b) Entsorgung von gebrauchten Batterien / Akkus Sie als Endverbraucher sind gesetzlich (Batterieverordnung) zur Rückgabe aller gebrauchten Akkus verpflichtet; eine Entsorgung über den Hausmüll ist unter- sagt!
  • Seite 32: Technische Daten

    13. Technische Daten Nennspannung ........230 V/AC, 50 Hz Einstellbare Temperatur ..... +5 °C bis +30 °C Energieversorgung ......2x AA Batterien (nicht enthalten) Ohmsche Belastung ......max. 8 A Betriebsbedingungen Temperatur ........0 °C bis +40 °C Luftfeuchtigkeit ........15% bis 95% relativ, nicht kondensierend Lagerbedingungen Temperatur ........
  • Seite 33: Konformitätserklärung (Doc)

    14. Konformitätserklärung (DOC) Hiermit erklärt Conrad Electronic SE, Klaus-Conrad-Straße 1, D-92240 Hirschau, dass dieses Produkt der Richtlinie 2014/53/EU entspricht. Der vollständige Text der EU-Konformitätserklärung ist unter der folgenden Internetadresse verfügbar: www.conrad.com/downloads Wählen Sie eine Sprache durch Anklicken eines Flaggensymbols aus und geben Sie die Bestellnummer des Produkts in das Such- feld ein; anschließend können Sie die EU-Konformitätserklärung im PDF-Format herunterladen.
  • Seite 34 Table of contents Page Introduction ....................34 Explanation of symbols ................35 Intended use ....................35 Package contents ..................36 Functions ....................36 Safety instructions ...................37 a) General information ................37 b) Batteries/rechargeable batteries ............39 Assembly ....................40 Control elements ..................44 Operation ....................45 a) Setting the time .................45 b) Adjusting the functions ..............46 c) Preconfigured temperature setting ...........48 d) Programme functions ...............49 e) Program overview ................51...
  • Seite 35: Introduction

    Page 11. Maintenance and care ................60 12. Disposal ....................61 a) General information ................61 b) Disposal of used batteries/rechargeable batteries ......61 13. Technical data ..................62 14. Declaration of Conformity (DOC) .............63 1. Introduction Dear Customer, thank you for purchasing this product. This product complies with the statutory national and European specifications. To maintain this status and to ensure safe operation, you as the user must ob- serve these operating instructions! These operating instructions are part of this product. They contain important notes on commissioning and handling. Also consider this if you pass on the product to any third party. Therefore, retain these operating instructions for reference! If there are any technical questions, please contact: International: www.conrad.com/contact United Kingdom: www.conrad-electronic.co.uk/contact...
  • Seite 36: Explanation Of Symbols

    2. Explanation of symbols The lightning symbol inside of a triangle is used when there is a potential risk of personal injury, such as electric shock. An exclamation mark in a triangle indicates important instructions in these operating instructions which absolutely have to be observed. The arrow symbol is used when specific tips and information on the operation are provided. 3. Intended use Adjust and regulate the temperature of your living space according to your needs with this room thermostat. It is operated via a control panel or the „Stat blue“ app (available for iOS and Android devices). Set up programs depending on the time or daytime. Also integrated is a holiday mode which controls the temperature during your absence. It is possible to control heating or cooling systems directly.
  • Seite 37: Package Contents

    Use other than that described above can lead to damage to the product and may involve additional risks such as, for example, short circuits, fire, electrical shocks etc. No part of the product may be modified or reconfigured! Read the operating instructions carefully and keep them for later reference. If you pass the product on to a third party, please hand over these operating instructions as well. The safety instructions should be observed without fail! This product complies with the applicable national and European Regulations. All names of companies and products are the trademarks of the respective own- ers. All rights reserved. 4. Package contents • Room thermostat • 2x screws • 2x dowels • Operating instructions Up-to-date operating instructions Download the latest operating instructions via the link www.conrad.com/downloads or scan the QR code. Follow the instructions on the website.
  • Seite 38: Safety Instructions

    • Holiday mode • Five pre-configured temperature settings - Comfort - Semi-Comfort - Economy - Anti-Frozen - Off 6. Safety instructions Please read the operating instructions carefully and pay par- ticular attention to the safety instructions. We do not assume liability for any injuries/material damages resulting from failure to observe the safety instructions and the information in these operating instructions regarding the proper use of the product.
  • Seite 39 • Protect the product from extreme temperatures, direct sunlight, strong vibrations, high humidity, moisture, combustible gases, vapours and solvents. • Never expose the product to mechanical stress. • If safe operation is no longer possible, take the device out of ser- vice and secure it against unintended use. • Safe operation is no longer possible, if the product: - has visible damage, - no longer functions properly, - has been stored under adverse ambient conditions for an ex- tended period of time or - has been exposed to considerable strain during transport.
  • Seite 40: Batteries/Rechargeable Batteries

    b) Batteries/rechargeable batteries • Batteries/rechargeable batteries must be kept out of the reach of children. • Do not leave batteries/rechargeable batteries lying around; they could be swallowed by children or pets. If swallowed, consult a doctor immediately. Danger to life! • Acid contact due to leaking or damaged single/rechargeable bat- teries can burn your skin, therefore use suitable protective gloves.
  • Seite 41: Assembly

    7. Assembly The room thermostat consists of two parts that are held together by clips. The switching logic with temperature sensor, display and control panel is in the front part. The supply batteries (2x AA 1.5 V, not included) are placed inside this part. Always change both batteries and replace them with two new batteries of same size, brand, type and age.
  • Seite 42 Be careful not to short-circuit the input and output lines. Keep the wires separate. • Use the device as a template and mark the locations for the bore- hole on the wall. To do this use the mounting holes in the rear panel suitable for your mounting position. The holes chosen should be located opposite each other to ensure maxi- mum stability. • Use a 6 mm drill and bore at least 30 mm deep at the marks. Note that, depending on the substrate, other fastening material than the material in the installation kit .enclosed may be required. Use the type of installation depending on the conditions.
  • Seite 43 Use a cable cross-section for the electrical installation that is suitable for up to 8 A (1 - 2.5 mm ). Silicone coated cables are recommended. The use of rigid lines may lead to broken cables. Use flexible lines. Not all (inflexible) lines must have a wire end splice. Check the crimped cable ends. All wires of a strand must be enclosed in the splice in order to ensure the total cable cross- section. The length of the wire end splice contact surface should be...
  • Seite 44 Make sure that the individual wires are connected and allocated correctly before the electrical wiring. If necessary, ask an expert. The device does not need a protective earth connection. If neces- sary, cut it. • Open the screws of the contact strip and insert the wires until the insulation is above the edge of the contact surface in the terminal. Hold in position and tighten the screws. If you cannot push the wire into the terminal strip far enough, check the length of the end splice. After assembling, check and re-tighten all the screws.
  • Seite 45: Control Elements

    8. Control elements Time 12 HOLD icon Day of week 13 Icon for manual step Day programme 14 AUTO setting Temperature setting 15 Battery icon Anti-freeze icon 16 Comfort setting Time setting icon 17 Semi-comfort setting Programme setting icon 18 Economy setting Function setting icon 19 TEMPerature setting Control “Heating“ 20 COPY function 10 Control “Cooling“ 21 Room temperature icon 11 Holiday mode 22 Off...
  • Seite 46: Operation

    9. Operation Press and hold the “SET” button for 3 seconds to enter the “Time and function setting” menu. Press the “SELECT” button to toggle between “tI” for the clock time setting and “St” for the function setting. Press “SET” to confirm your selec- tion. a) Setting the time Press and hold the “SET” button for 3 seconds to set the time. Select “tI” for the clock time setting and confirm your selection as described above. In the first step the current year in the order 2010 to 2050 is set. To add a year, press the “ ” button. To reduce the number of years press the “ “ button. Confirm your setting with the “SELECT” button. Year Next the month is adjusted. Use the “ “ button as described in step 1, and the “ ” button to scroll through the menu. Month Weekday, hours and minutes are now adjusted. You can set and select these as described in step 1.
  • Seite 47: B) Adjusting The Functions

    Month Day • Once the year, month, weekday and clock time are set, the year setting re- starts. If you want to confirm your selection, press the “OK” button. If you want to change your settings, repeat step 1 to 3. b) Adjusting the functions Press and hold the “SET” button for 3 seconds to set the function. Select “St” for the function setting and confirm your selection with the “SET” button. • Press the “SELECT“ button to toggle between holiday mode “Ho“ and the heat/cool mode “Ht“ or “CL“ . Confirm your setting with the “SET” button. Holiday mode Heat/cool mode Holiday mode This function maintains the desired temperature consistent for one to 199 days.
  • Seite 48 When the device is in the holiday mode, the set temperature is maintained while in this mode. Program settings are only obtained when the countdown of the holiday mode is at 0 or the Holiday Mode is reset to 0! Heat/Cool control The device can be used as a two-point controller for cooling or heating systems.
  • Seite 49: C) Preconfigured Temperature Setting

    c) Preconfigured temperature setting By means of this setting you can pre-configure the following four temperature functions: Comfort, Semi-Comfort, Economic and Anti-Frozen. Comfort Semi-Comfort Economic Anti-Frozen Press and hold the “TEMP” button for 3 seconds to enter the menu. Briefly press the “TEMP” button to be able to toggle between the preconfigured settings. With the buttons “ “ and “ “ you can decrease or increase the tempera- ture in steps of 0.5 °C depending on the setting. Press the “TEMP” button to confirm your setting. Now you can set the next function. Confirm with “OK” and exit the menu.
  • Seite 50: Programme Functions

    d) Programme functions Press and hold the “PROG” button to enter the program setting menu. Select first your desired program mode. The following program modes are available: - Daily program: The set program is the same for all 7 days of the week. “7” is displayed in the upper left corner. - Weekdays + weekend: A program for weekdays and a program for the weekend can be config- ured. “5 2” is displayed in the upper left corner. - Weekdays + Saturday + Sunday: The mode has the same function as b., but the configuration for Saturday and Sunday differs. “5 1 1” is displayed in the upper left corner. - 7-day program: All 7 weekdays can be configured differently. “7dY” is displayed in the upper left corner. - Press the “PROG” button to confirm your settings. Daily program weekdays + weekend Weekdays + Saturday + Sunday 7 days program...
  • Seite 51 Next, select the day for your pro- gram settings. To do this, press the “SELECT” button. As shown in the image, this allows you to choose, for example, Monday as the first day of your 7-dayprogram. Press the “PROG” button to configure the program for the selected day. Now you can set the program parameters for the selected day. The program setting starts at 0:00 every day. Press the “TEMP” button to set one of the following five functions: - Comfort two points are shown...
  • Seite 52: Program Overview

    • Repeat steps 1 - 7 to configure the remaining days. • Once everything is configured, press the “OK” button to confirm your selection. e) Program overview With the program overview, you can recall and check programs already config- ured. Press and hold the “PROG” button to enter the program settings menu. Press the “SELECT” button 4 times until “7AY” is shown on the display. Press the “PROG” button to set the day for the overview. Use the “SE- LECT” button to toggle between the days.
  • Seite 53: G) Battery

    • Temperature change: You can decrease or increase the temperature with the buttons “ “ and “ “. Also these changes will be applied during the next hour. The icon for the manual steps appears on the display. • Maintaining the selected temperature: Press and hold the “HOLD” button for 3 seconds. Use the buttons “ “ and “ “ to set the duration during which the temperature should be kept. You can choose a time span of 1 to 99 hours. To confirm your choice, press the “OK” button. The display shows “HOLD”. • You can also make a choice between AUTO/OFF/Anti-Frozen. Press and hold the MANUAL button for 3 seconds. Press the “SELECT” to select the following: Auto - configured program Anti-Frozen OFF - system will turn off ON - system remains on Press the “OK” button to confirm your settings. g) Battery When the battery is almost empty, the bat- tery icon appears on the display . If this is the case, you need to change the device...
  • Seite 54: Using The Mobile App

    10. Using the mobile app a) Connecting your phone to the thermostat Install the “Stat blue“ app on your smartphone. The app is available for iOS and Android devices. If you are using an Android device, check that you are running An- droid 4.3 or later. When you open the app, your phone will automatically search for the thermostat and establish a connection. “Connecting OK“ will be displayed once the connec- tion has been established. After configuring the settings, touch “OK“ in the lower-left corner of the screen to apply the settings and send them to the thermostat. “Send Ok/Confirm“ will be displayed once the settings have been sent successfully. Apple Store Google Play...
  • Seite 55: Setting The Temperature

    b) Setting the temperature You can set the temperature in two ways: - Manually set the temperature ac- cording to your needs. Move the slider to the desired setting. - Set the temperature using a preset mode.. Press the middle button on the display to select a preset mode.
  • Seite 56: C) Changing The Thermostat Mode

    c) Changing the thermostat mode There are four different heating modes: - AUTO: The temperature is set us- ing the preset program. - ANTI-FROZEN: The room is main- tained at a low temperature to pre- vent frost. - TURBO: The heating is on full. - OFF: The heating is switched off. To change to another mode, touch the left-hand button.
  • Seite 57: D) "Temperature Hold" And "Holiday Mode

    d) “Temperature hold” and “Holiday mode” “Temperature hold” maintains the room at a preset temperature for a predefined period of time Touch the “HOLD/VACATION” button on the right-hand side of the display, and then drag the slider to set the time. Set the desired temperature before touching the “HOLD/ VACATION” button. No oth- er preset programs will be used when this mode is en- abled. The temperature can be maintained for a duration of 1 to 90 hours.
  • Seite 58: Advanced Settings

    e) Advanced settings To access the advanced settings, touch the settings icon in the lower-left corner of the display. You can change the program settings and preset temperature. You can also view your energy footprint and control data. Touch the corresponding option to access the settings. Preset temperature settings This menu allows you to manually set the temperature for the follow- ing modes: Comfort, Semi-Comfort, Economic and Anti-Frozen. Keep touching the the left-hand button until the desired mode is displayed.
  • Seite 59: Program Control

    Program control This menu allows you to view and change the program settings. Touch the cor- responding option to access the settings. To exit the menu, touch the arrow at the top of the display. Program review This menu allows you to view your preset program settings. Select the day for which you want to view the program settings. Touch the corresponding day of the week at the top of the display. The program settings are displayed in dif- ferent colours (the preset temperature settings).
  • Seite 60: Program Setting

    Program Setting Use this menu to configure existing programs or add new programs. Touch the day of the week for which you want to configure the program. You can select more than one day. Touch the desired mode (Comfortable, Anti-Frozen etc.). The selected button will be highlighted. To set the time period, drag the slider to the desired position. Repeat this step to configure additional time periods.
  • Seite 61: Maintenance And Care

    Control data This menu allows you to control the heating using “Cooling” or “Heating”. Refer to the operating instructions for more information. 11. Maintenance and care Please change the batteries, should the display contrast become too bright/ dark, or the time stop. To do this, detach the front part with logic and display by carefully opening the clips in the wall-mounted part. You find the clips in the midst at the left and right. Press under the clips and pull on the front part of the room thermostat. Do not use water or strong detergents to clean the device.
  • Seite 62: Disposal

    12. Disposal a) General information The product must not be disposed of in the household waste. Dispose of the product at the end of its serviceable life in accord- ance with the current statutory requirements; e.g., return it to any suitable collection point. Remove any normal or rechargeable batteries inserted and dispose of them sepa- rately from the product. b) Disposal of used batteries/rechargeable batteries As the end user, you are required by law (Battery Ordinance) to return all spent rechargeable batteries; disposal of them in the household waste is prohibited! Contaminated rechargeable batteries are labelled with these sym- bols to indicate that disposal in the domestic waste is forbidden. The symbols of the critical heavy metals are: Cd = Cadmium, Hg = Mer- cury, Pb = Lead. You can return used rechargeable batteries free of charge, to any collection facility in your local authority, to our stores or to any other store where rechargeable batteries are sold.
  • Seite 63: Technical Data

    13. Technical data Rated voltage ........230 V/AC, 50 Hz Adjustable temperature ......+5 °C to +30 °C Power ...........2x AA batteries (not included) Resistive load ........max. 8 A Operating conditions Temperature .........0 °C to +40 °C Humidity ..........15% to 95% relative, non-condensing Storage conditions Temperature .........-15 °C to +65 °C Humidity ..........15% to 95% relative, non-condensing Resolution ..........0.5 °C Dimensions (W x H x D) .......126 x 86 x 31 mm...
  • Seite 64: Declaration Of Conformity (Doc)

    14. Declaration of Conformity (DOC) Conrad Electronic SE, Klaus-Conrad-Straße 1, D-92240 Hirschau, hereby de- clares that this product complies with directive 2014/53/EU. The complete text of the EU declaration of conformity is available under the following web address: www.conrad.com/downloads Choose a language by clicking a flag symbol and enter the order number of the product into the search field; then you may download the EU declaration of conformity in the PDF format.
  • Seite 65 Sommaire Page Introduction ....................64 Explication des symboles ................65 Utilisation Conforme ................65 Étendue de la livraison ................66 Fonctions ....................67 Consignes de sécurité ................67 a) Généralités ..................68 b) Piles/batteries ...................69 Montage ....................70 Éléments de commande ................74 Utilisation ....................75 a) Réglage de l’heure ................75 b) Réglages des fonctions ..............76 c) Réglage prédéfini de la température ..........78 d) Fonctions de programme ..............79 e) Aperçu du programme ..............81...
  • Seite 66: Introduction

    Page 11. Maintenance et entretien .................91 12. Élimination ....................92 a) Généralités ..................92 b) Élimination des piles/piles rechargeables usées ......92 13. Caractéristiques techniques ..............93 14. Déclaration de conformité (DOC) ............94 1. Introduction Chère cliente, cher client, nous vous remercions d’avoir fait l’acquisition de cet appareil. Ce produit est conforme aux exigences des directives nationales et euro- péennes en vigueur.
  • Seite 67: Explication Des Symboles

    2. Explication des symboles Le symbole de l’éclair dans un triangle est utilisé pour signaler un danger pour votre santé, par ex. une électrocution. Le symbole avec le point d’exclamation placé dans un triangle si- gnale des informations importantes du présent mode d’emploi qui doivent impérativement être respectées. Le symbole de la flèche renvoie à des astuces et conseils d’utilisa- tion spécifiques. 3. Utilisation Conforme Le thermostat ambiant permet de régler et d’ajuster la température de vos pièces selon vos besoins. Le réglage du thermostat s‘effectue via un panneau de commande ou via l‘application « Stat Blue » (pour IOS et Android). Vous pouvez régler l’heure et les moments de la journée. Un mode vacances, pour le réglage de la température pendant votre absence est également intégré. Une commande directe du chauffage et du refroidissement est possible.
  • Seite 68: Étendue De La Livraison

    - l’orage ou des conditions orageuses comme des champs électrostatiques intenses Toute utilisation autre que celle décrite précédemment peut provoquer la dété- rioration du produit ; de plus, cela s´accompagne de dangers tels que courts-cir- cuits, incendies, décharges électriques, etc. Aucun composant du produit ne doit être modifié ni transformé ! Lisez attentivement la notice d´utilisation et conser- vez celle-ci pour pouvoir la consulter ultérieurement. Transmettez toujours le produit avec le mode d’emploi si vous le donnez à des tiers. Il est impératif de respecter les consignes de sécurité ! Ce produit répond aux exigences légales, nationales et européennes. Tous les noms d’entreprise et les désignations de produit sont des marques déposées de leurs propriétaires respectifs. Tous droits réservés. 4. Étendue de la livraison • Thermostat d’ambiance • 2 vis •...
  • Seite 69: Fonctions

    5. Fonctions • Bluetooth ® • Commande directe du chauffage et du refroidissement • Jusqu’à 24 programmes réglables par jour • Mode vacances • Cinq réglages de température pré-définis - Confort - Semi-confort - Économie - Anti-givre - Off 6. Consignes de sécurité Lisez attentivement le mode d’emploi et respectez particuliè- rement les consignes de sécurité.
  • Seite 70: Généralités

    a) Généralités • Cet appareil n’est pas un jouet. Gardez-le hors de portée des enfants et des animaux domestiques. • Ne laissez pas traîner le matériel d’emballage sans surveillance. Il pourrait constituer un jouet dangereux pour les enfants. • Protégez le produit contre les températures extrêmes, les rayons directs du soleil, les chocs intenses, une humidité élevée, l’eau, les gaz, vapeurs et solvants inflammables. • Évitez d’exposer le produit à des sollicitations mécaniques. • S’il n’est plus possible d’utiliser le produit sans danger, mettez-le hors service et protégez-le contre toute utilisation non autorisée. •...
  • Seite 71: B) Piles/Batteries

    • Faites appel exclusivement à un professionnel ou à un atelier spécialisé pour effectuer des travaux de maintenance, de réglage ou de réparation. • Le contact avec la tension de secteur est mortel. Mettez hors tension les torons conducteurs et protégez ceux-ci d’une remise sous tension. Protégez-vous et les autres d’un contact à nu de la platine de l’appareil. b) Piles/batteries • Les piles/batteries ne doivent pas être laissées à la portée des enfants. • Ne laissez pas traîner les piles/batteries, les enfants ou les ani- maux domestiques risqueraient de les avaler. En cas d’ingestion, consultez immédiatement un médecin.
  • Seite 72: Montage

    • Remplacez toujours tout le jeu de piles/piles rechargeables, utilisez des piles/piles rechargeables du même type/fabricant et avec le même état de charge (ne mélangez pas des piles/piles rechargeables à moitié pleines ou vides avec des piles/piles re- chargeables entièrement chargées). • Ne combinez jamais piles et accumulateurs. Utilisez soit des piles, soit des piles rechargeables. • Veuillez lire le chapitre « Élimination » pour éliminer les piles nor- males/rechargeables dans le respect de l’environnement. 7. Montage Le thermostat ambiant est constitué de deux parties qui sont tenues ensemble avec des clips. Dans la partie avant se trouve la logique de commutation avec la sonde de température, l’affichage et le panneau de commande. C’est dans cette partie que sont insérées les piles d’alimentation (2x AA, 1,5 V non com- prises dans la livraison). Changez tou- jours les piles et substituez-les avec deux piles de même taille, marque,...
  • Seite 73 Pour cela, déconnectez les conduites du courant et assurez-vous qu’il ne se remette en marche. Vérifiez si l’alimentation électrique a été coupée. • Enlevez la barrette de raccordement de l’arrière du relais et le couvercle des connecteurs embrochables. Conduisez le câble (du côté arrière) à travers l’ouverture du relais. La flèche « UP » indique le plafond. Veillez à ne pas court-circuiter les conduites d’entrée et de sortie.
  • Seite 74 • Enfilez la cheville jusqu’à ce qu’elle disparaisse complètement dans le mur. • Conduisez le câble à travers le support et vissez celui-ci au mur. Serrez suffisamment les vis. La flèche « UP » doit indiquer le pla- fond. • Veillez au soulagement de traction du câble dans l’appareil. Replacez le dispositif de serrage et revissez les deux vis de manière identique. • Coupez en longueur et adaptez les torons et enlevez l’isolation sur les 6 - 7 mm avant. Veillez à ne pas endommager pas les fils.
  • Seite 75 Température réelle Sortie NO Sortie NC Chauffage > T empérature de OPEN - CLOSE - consigne Ouvrir Fermer < T empérature de CLOSE - OPEN - consigne Fermer Ouvrir Refroidissement > T empérature de CLOSE - OPEN - consigne Fermer Ouvrir < T empérature de OPEN - CLOSE - consigne Ouvrir Fermer...
  • Seite 76: Éléments De Commande

    • Insérez la logique de commutation dan s la partie relais fixée au mur. Veillez à ce que les inscriptions et l’écran soient lisibles et ne soient pas mis en place à l’envers. Sinon le contact entre les parties n’est pas correct. Les signaux de commutation sont transmis par trois contacts de la logique sur la partie relais. 8. Éléments de commande 1 Heure 12 Symbole HOLD 2 Jour de la semaine 13 S ymbole pour une intervention manuelle 3 Programme du jour 14 Réglage AUTO 4 Réglage de la température 15 Symbole de pile 5 Symbole de protection contre le givre 16 Réglage confort 6 Symbole de réglage de l’heure 17 Réglage semi-confort 7 Symbole de réglage de programme 18 Réglage économie 8 Symbole de réglage de fonction...
  • Seite 77: Utilisation

    9. Utilisation Appuyez et maintenez la touche « SET » pendant 3 secondes pour arriver au « réglage de l’heure et des fonctions » dans le menu. Appuyez sur la touche « SELECT » pour choisir entre « tI » pour le réglage de l’heure et « St » pour le réglage de fonction. Confirmez votre choix avec la touche « SET ». a) Réglage de l’heure Pour pouvoir procéder au réglage du temps, appuyez et maintenez la touche « SET » pendant 3 secondes. Choisissez « tI » pour le réglage de l’heure et confir- mez votre choix comme décrit plus haut. 1 Dans un premier temps, l’année actuelle est réglée,en partant de 2010 jusqu’à 2050. Pour augmenter le nombre de l’année, appuyez sur la touche « ». Pour pouvez diminuer le nombre de l’année en appuyant sur la touche « ». Confirmez votre choix avec la touche « SELECT ».
  • Seite 78: Réglages Des Fonctions

    3 Ensuite, le jour de la semaine, les heures et les minutes sont réglés. Vous pouvez régler et sélectionner ceux-ci comme dans l’étape 1. Mois Jour • Si vous avez réglé l’année, le mois, le jour de la semaine et l’heure, vous retournez au réglage de l’année. Si vous voulez confirmer votre sélection, appuyez sur la touche « OK ». Si vous voulez modifier vos réglages, recom- mencez les étapes de 1 à 3.
  • Seite 79 Si l’appareil est en mode vacances, la température réglée pour ce mode est maintenu. Les réglages de programmes ne sont appelés que quand le compte à rebours du mode vacances est à 0 ou si le mode vacances est ramené à 0 ! Contrôle chaleur/froid L’appareil peut être utilisé comme régulateur entre deux points pour chauffer ou refroidir. En mode chaleur, l’appareil se désactive dès que la température sou- haitée est atteinte. En mode refroidissement, dès que la température souhaitée est en-dessous du seuil. Pendant le fonctionnement, le type de fonctionnement est caractérisé par une flamme ou un flocon de neige. En outre, un retardement (delay) de 5 minutes peut être réglé. Cela a pour effet une hystérésis de dé- marrage pour protéger les systèmes raccordés d’une activation (NO et d’une désactivation (NC) trop rapide.
  • Seite 80: C) Réglage Prédéfini De La Température

    Pour procéder au réglage, allez aux réglages de fonction, comme décrit en mode vacances. Les touches « » et « » permettent de choisir entre « Ht » pour le chauffage ou « CL » pour le refroidissement. Confirmez votre langue avec « OK ». Pour activer le retardement, appuyez et maintenez la touche « SET » pendant 3 secondes. Changez avec « SELECT » du réglage du temps « ti » au réglage de fonction « St » et confirmez avec « SET ». Changez avec « SELECT » entre le mode vacances « Ho » et le mode chaud/froid « Ht » et confirmez avec « SET ». Changez avec « SELECT » entre le mode vacances « Ho » et le mode chaud/froid « CL » et confirmez avec « SET ». Changez avec « SELECT » entre l’activation du retardement (d:ON) et sa désactivation (d:oF). Sauvegardez et fermes les réglages avec « OK ». c) Réglage prédéfini de la température Ce réglage permet de prédéfinir les quatre fonctions de température suivantes : Confort, Semi-confort, Économie et Anti-givre. Confort Semi-confort Économie...
  • Seite 81: D) Fonctions De Programme

    1 Appuyez et maintenez pendant 3 secondes la touche « TEMP » pour accéder au menu. Appuyez brièvement sur la touche « TEMP » pour pouvoir choisir entre les réglages prédéfinis. 2 Les touches « » et « » permettent d’augmenter ou de réduire de 0,5 °C le nombre de jours. 3 Appuyez sur la touche « TEMP » afin de valider le réglage. Vous pouvez maintenant régler la fonction successive. 4 Vous confirmez vos réglages avec la touche « OK » et terminez le menu. d) Fonctions de programme Pour accéder au menu de réglage des programmes, appuyez et maintenez la touche « PROG ». 1 Tout d’abord, choisissez le mode de programme souhaité. Vous disposez des fonctions suivantes : - Programme quotidien : Le programme réglé est identique pour les 7 jours de la semaine. En haut...
  • Seite 82 Programme quotidien Jours de la semaine + week-end J ours de la semaine + samedi + dimanche Programme 7 jours 2 Ensuite, choisissez le réglage de pro- gramme pour chaque jour. Appuyez pour cela sur la touche « SELECT ». Comme le montre l’illustration, vous pouvez ainsi parexemple choisir lundi pour le premier jour de votreprogramme de 7 jours. Appuyez sur la touche « PROG » pour régler le programme du jour choisi. 3 Vous pouvez maintenant régler les paramètres de programme pour le jour choisi. Le réglage du programme commence à 0:00 chaque jour. 4 Appuyez sur la touche « TEMP » pour régler l’une des cinq fonctions sui- vantes : - Confort deux points s’affichent - Semi-confort...
  • Seite 83: E) Aperçu Du Programme

    5 Appuyez sur les touches « » et « » pour sélectionner les heures. Le ré- glage est maintenu jusqu’à ce que vous changiez avec la touche « TEMP ». 6 Appuyez sur la touche « PROG » pour terminer vos réglages de programme. Ensuite, vous pouvez régler les autres jours comme décrit aux étapes 3 à 5. 7 Si vous souhaitez le même programme pour deux jours, vous pouvez utiliser la fonction COPY, ainsi les programmes peuvent être copiés. Au début des réglages de programme pour le jour, appuyez sur la touche COPY. Le sym- bole COPYs’affiche sur l’écran. Pour confirmes la copie, appuyez sur la touche « OK ».
  • Seite 84: Réglages Manuels

    2 Appuyez sur la touche « PROG » pour régler le programme du jour choisi. La touche « SELECT » permet de choisir entre les jours. 3 En appuyant à nouveau sur la touche « PROG », vous pouvez appeler l’aper- çu du programme pour un jour choisi. Avec les touches « » et « », vous pouvez contrôler chaque heure du programme. 4 Pour retourner dans le menu de réglage des programmes depuis l’aperçu, appuyez à nouveau sur « PROG ». Ensuite, appuyez sur la touche « OK » pour retourner à l’affichage de l’écran. f) Réglages manuels Les réglages manuels aident à travailler et modifier les programmes réglés. • Modification du statut du programme actuel : Appuyez sur la touche « TEMP » pour sélectionner les différentes fonctions de température. Le changement de statut du programme température sera adopté dans l’heure qui suit. Sur l’écran, le symbole de l’intervention ma- nuelle s’affiche.
  • Seite 85: G) Pile

    • Vous pouvez ensuite choisir entre AUTO/OFF/Anti-givre. Appuyez et mainte- nez la touche MANUAL pendant env. 3 secondes. Appuyez sur la touche « SELECT » pour le choix suivant : Programme auto-réglé Anti-givre OFF - le système est déactivé ON - le système reste activé Appuyez sur la touche « OK » afin de valider le réglage. g) Pile Si la pile est presque vide, le symbole de pile s’affiche sur l’écran. Dans ce cas, vous devez changer prochainement les piles. Si l’alimentation en énergie manque pour le thermostat ambiant, ses réglages seront éliminés.
  • Seite 86: Utilisation De L'application Mobile

    10. Utilisation de l’application mobile a) Établir la communication avec un téléphone portable Installez l‘application « Stat Blue » sur votre smartphone. L‘application est com- patible avec les systèmes d’exploitation iOS et Android. Veuillez noter qu’une version d’Android 4.3 ou supérieure est né- cessaire sur votre smartphone pour utiliser l‘application. Après le démarrage de l‘application, la recherche du thermostat d‘ambiance se lance automatiquement et la connexion s’établit avec le smartphone. Une fois la connexion établie, le message « Connecting Ok » s’affiche. Votre smartphone est désormais connecté au thermostat d‘ambiance. Pour envoyer vos données au thermostat, confirmez en appuyant sur « OK ». La touche « OK » est située en bas à gauche dans l‘application. En l‘absence de confirmation avec « OK », aucune des données saisies ne sera transférée au thermostat. Lorsqu’un transfert de données est réussi, le message « Send Ok/Confirm »...
  • Seite 87: Réglage De La Température

    b) Réglage de la température Il existe deux façons de régler la tem- pérature : - Vous pouvez régler la température manuellement en fonction de vos besoins. Ajustez la barre de réglage avec les doigts sur la position sou- haitée. - Vous pouvez fixer la température selon des réglages de température prédéfinis. Appuyez pour cela plu- sieurs fois sur le bouton central de...
  • Seite 88: C) Fonctions De Surveillance Du Thermostat D'ambiance

    c) Fonctions de surveillance du thermostat d’ambiance Le thermostat peut être réglé suivant quatre fonctions de surveillance : - AUTO : Régulation en fonction du programme défini par l’utilisateur - ANTI-FROZEN : Une température minimale est maintenue pour assu- rer une protection antigel - TURBO : Le chauffage s’enclenche à pleine capacité - OFF : Le chauffage s’arrête com- plètement Pour régler les fonctions de surveil- lance, appuyez plusieurs fois sur le bouton gauche de l‘écran.
  • Seite 89: D) « Maintien De Température » Et « Mode Vacances

    d) « Maintien de température » et « Mode vacances » Avec la fonction « Maintien de température », la température préréglée est main- tenue uniformément sur une durée donnée. Appuyez sur le bouton (HOLD/VACA- TION) situé du côté droit de l‘écran. Vous pouvez ensuite définir l’intervalle de temps. Pour cela, ajustez la barre au centre de l‘écran sur la position souhai- tée. Réglez à la température souhaitée avant d’appuyer sur le bouton « HOLD/VA- CATION ». Dans ce mode,...
  • Seite 90: Réglages Avancés

    e) Réglages avancés Il est possible de configurer davan- tage de paramètres. Pour entrer dans le menu, appuyez sur le bouton en forme de roue en bas à gauche de l’écran. Vous pouvez modifier les programmes et les paramètres de température prédéfinis. De plus, vous pouvez y consulter votre bilan énergétique et vos paramètres de contrôle. Appuyez sur l’intitulé souhaité pour passer au sous-menu correspondant.
  • Seite 91 Program Control Le menu Program Control vous permet de vérifier et de modifier les données des programmes. Appuyez sur l’intitulé correspondant pour passer au sous-me- nu. Pour quitter le menu, appuyez sur la flèche en haut à gauche de l‘écran. Program Review Ce menu vous permet de visualiser les paramètres des programmes que vous avez définis. Sélectionnez le jour pour lequel vous souhaitez vérifier les para- mètres du programme. Appuyez pour cela sur le jour de la semaine correspondant en haut de l‘écran. En bas de l‘écran le déroule- ment du programme s‘affiche de diffé- rentes couleurs (en fonction des para- mètres de température prédéfinis).
  • Seite 92 Program Setting Ce menu vous permet de modifier les programmes et d’en créer de nou- veaux. Appuyez pour cela sur la barre en haut de l‘écran pour sélectionner le jour de la semaine de votre programme. Il est également possible de sélectionner plusieurs jours de la semaine à la fois. Appuyez sur l’un des boutons de tem- pérature prédéfinie (Comfortable, An- ti-Frozen, etc.). Le bouton sélectionné s‘allume. Pour définir l’intervalle de temps du programme, mettez la barre (au milieu de l‘écran) sur la position souhaitée. Répétez ensuite cette étape afin d’assigner d‘autres d’inter- valles de temps avec la température prédéfinie correspondante.
  • Seite 93: Maintenance Et Entretien

    Control Data Ce menu vous permet de régler direc- tement le chauffage via les fonctions « Cooling » ou « Heating ». Lisez pour cela le mode d‘emploi du thermostat d‘ambiance. 11. Maintenance et entretien Si l’écran montre un contraste plus clair / plus faible, le moment est arrivé de changer les piles. Pour cela, détachez la partie avant avec la logique et l’affi- chage en détachant doucement le clip du la partie fixée au mur. Les clips se trouvent au centre des parties gauche et droite. Appuyez en-dessous des clips et tirez sur la partie avant du thermostat ambiant. Nettoyez l’appareil sans eau ni détergent agressif.
  • Seite 94: Élimination

    12. Élimination a) Généralités Ne jetez pas le produit avec les ordures ménagères. Éliminer le produit au terme de sa durée de vie conformément aux prescriptions légales en vigueur ; le remettre par ex. à un centre de collecte correspondant. Retirez les piles/piles rechargeables insérées et éliminez-les séparément de l’appareil. b) Élimination des piles/piles rechargeables usées Le consommateur final est légalement tenu (ordonnance relative à l’élimination des piles usagées) de rapporter toutes les piles/batteries usées ; il est interdit de les jeter dans les ordures ménagères! Les accumulateurs contenant des substances nocives sont mar- qués par le symbole ci-contre qui signale l’interdiction de les jeter dans une poubelle ordinaire. Les désignations déterminantes pour les métaux lourds sont : Cd = cadmium, Hg = mercure, Pb = plomb.
  • Seite 95: Caractéristiques Techniques

    13. Caractéristiques techniques Tension nominale ........230 V/CA, 50 Hz Température réglable ......de +5 °C à +30 °C Alimentation en énergie ......piles 2x AA (non contenues) Charge résistive ........8 A max. Conditions de fonctionnement Température .........de 0 °C à +40 °C Humidité ambiante ........ d e 15% à 95% d’humidité relative de l’air, sans condensation Conditions de stockage Température .........de -15 °C à +65 °C Humidité ambiante ........ d e 15% à 95 % d’humidité relative de l’air, sans condensation Résolution ..........0,5 °C Dimensions (L x H x P) ......126 x 86 x 31 mm Poids .............0,165 kg...
  • Seite 96: Déclaration De Conformité (Doc)

    14. Déclaration de conformité (DOC) Par la présente, Conrad Electronic SE, Klaus-Conrad-Straße 1, D-92240 Hirschau, déclare que ce produit est conforme à la directive 2014/53/UE. Le texte complet de la déclaration de conformité UE est disponible à l’adresse internet ci-dessous : www.conrad.com/downloads Sélectionnez une langue en cliquant sur un drapeau et saisissez le numéro de commande du produit dans le champ de recherche ; ensuite vous pouvez télécharger la déclaration de conformité UE en format PDF.
  • Seite 100 Dies ist eine Publikation der Conrad Electronic SE, Klaus-Conrad-Str. 1, D-92240 Hirschau (www.conrad.com). Alle Rechte einschließlich Übersetzung vorbehalten. Reproduktionen jeder Art, z. B. Fotokopie, Mikroverfilmung, oder die Erfassung in elektronischen Datenverarbeitungsanlagen, bedürfen der schriftlichen Genehmigung des Herausgebers. Nachdruck, auch auszugsweise, verboten. Die Publikation entspricht dem technischen Stand bei Drucklegung. Copyright 2017 by Conrad Electronic SE. This is a publication by Conrad Electronic SE, Klaus-Conrad-Str. 1, D-92240 Hirschau (www.conrad.com). All rights including translation reserved. Reproduction by any method, e.g. photocopy, microfilming, or the capture in electronic data processing systems require the prior written approval by the editor. Reprinting, also in part, is prohibited. This publication represent the technical status at the time of printing.

Inhaltsverzeichnis