Herunterladen Inhalt Inhalt Diese Seite drucken
Endress+Hauser RMA42 Handbuch
Vorschau ausblenden Andere Handbücher für RMA42:
Inhaltsverzeichnis

Werbung

Verfügbare Sprachen

Verfügbare Sprachen

KA00286R/09/A3/16.16
71325695
Products
Brief Operating Instructions
RMA42
Process transmitter
These Instructions are Brief Operating Instructions; they are
not a substitute for the Operating Instructions pertaining to
the device.
For detailed information, refer to the Operating Instructions
and other documentation.
Available for all device versions via:
• Internet: www.endress.com/deviceviewer
• Smart phone/Tablet: Endress+Hauser Operations App
Solutions
Services

Werbung

Inhaltsverzeichnis
loading

Inhaltszusammenfassung für Endress+Hauser RMA42

  • Seite 1 These Instructions are Brief Operating Instructions; they are not a substitute for the Operating Instructions pertaining to the device. For detailed information, refer to the Operating Instructions and other documentation. Available for all device versions via: • Internet: www.endress.com/deviceviewer • Smart phone/Tablet: Endress+Hauser Operations App...
  • Seite 2 RMA42 Order code: XXXXX-XXXXXX Ser. no.: XXXXXXXXXXXX Ext. ord. cd.: XXX.XXXX.XX Serial number www.endress.com/deviceviewer Endress+Hauser Operations App A0023555 Endress+Hauser...
  • Seite 3 RMA42 RMA42 Process transmitter Kurzanleitung ............... . . 4 Brief Operating Instructions .
  • Seite 4: Inhaltsverzeichnis

    Inhaltsverzeichnis RMA42 Inhaltsverzeichnis Hinweise zum Dokument ............5 Darstellungskonventionen .
  • Seite 5: Hinweise Zum Dokument

    RMA42 Hinweise zum Dokument Hinweise zum Dokument Darstellungskonventionen 1.1.1 Warnhinweissymbole Symbol Bedeutung GEFAHR! GEFAHR Dieser Hinweis macht auf eine gefährliche Situation aufmerksam, die, wenn sie nicht vermieden wird, zu Tod oder schwerer Körperverletzung führen wird. WARNUNG! Dieser Hinweis macht auf eine gefährliche Situation aufmerksam, die, wenn sie nicht WARNUNG vermieden wird, zu Tod oder schwerer Körperverletzung führen kann.
  • Seite 6: Symbole Für Informationstypen

    Hinweise zum Dokument RMA42 1.1.3 Symbole für Informationstypen Symbol Bedeutung Symbol Bedeutung Erlaubt Zu bevorzugen Abläufe, Prozesse oder Handlungen, Abläufe, Prozesse oder Handlungen, die erlaubt sind. die zu bevorzugen sind. Verboten Tipp Abläufe, Prozesse oder Handlungen, Kennzeichnet zusätzliche die verboten sind.
  • Seite 7: Sicherheitshinweise

    RMA42 Sicherheitshinweise Symbol Bedeutung Gabelschlüssel A0011222 Torx Schraubendreher A0013442 Sicherheitshinweise Anforderungen an das Personal Das Personal muss für seine Tätigkeiten folgende Bedingungen erfüllen: ‣ Ausgebildetes Fachpersonal: Verfügt über Qualifikation, die dieser Funktion und Tätigkeit entspricht. ‣ Vom Anlagenbetreiber autorisiert. ‣...
  • Seite 8: Produktsicherheit

    Umgebungsanforderungen Wenn ein Messumformergehäuse aus Kunststoff bestimmten Dampf-Luft-Gemischen permanent ausgesetzt ist, kann das Gehäuse beschädigt werden. ‣ Bei Unklarheiten Ihre Endress+Hauser Vertriebszentrale kontaktieren. ‣ Beim Einsatz im zulassungsrelevanten Bereich: Angaben auf dem Typenschild beachten. Produktsicherheit Dieses Messgerät ist nach dem Stand der Technik und guter Ingenieurspraxis betriebssicher gebaut und geprüft und hat das Werk in sicherheitstechnisch einwandfreiem Zustand...
  • Seite 9: Lieferumfang

    RMA42 Identifizierung A0011757  1 Typenschild des Prozesstransmitters (beispielhaft) Bestellcode, Serien- und Identnummer des Geräts Spannungsversorgung Leistungsaufnahme Zulassungen (falls vorhanden) Temperaturbereich Firmware Version Lieferumfang Der Lieferumfang des Prozesstransmitters besteht aus: • Prozesstransmitter für Hutschienenmontage • Kurzanleitung und Ex-Dokumentation (optional) in Papierform Beachten Sie im Kap.
  • Seite 10: Montage

    Montage RMA42 Montage Warenannahme, Transport, Lagerung Die zulässigen Umgebungs- und Lagerbedingungen sind einzuhalten. Genaue Spezifikationen hierzu finden Sie im Kapitel "Technische Daten" in der Betriebsanleitung. 4.1.1 Warenannahme Kontrollieren Sie nach der Warenannahme folgende Punkte: • Sind Verpackung oder Inhalt beschädigt? •...
  • Seite 11: Vorgehensweise Zur Montage

    RMA42 Montage 45 (1.77) 118 (4.65) A0011792  2 Abmessungen des Prozesstransmitters in mm (in) Vorgehensweise zur Montage A0011766 Endress+Hauser...
  • Seite 12: Einbaukontrolle

    Verdrahtung RMA42 Den oberen Hutschienen-Clip nach oben und den unteren Clip nach unten bis zum Einrastpunkt schieben. Das Gerät von vorn auf die Hutschiene setzen. Die beiden Hutschienen-Clips wieder zusammen schieben bis diese einrasten. Zur Demontage des Gerätes die Hutschienen-Clips nach oben bzw. unten schieben (siehe 1.) und das Gerät von der Hutschiene abziehen.
  • Seite 13: Übersicht Anschlussmöglichkeiten Am Prozessanzeiger

    RMA42 Verdrahtung HART® PC-Schnittstelle A0011800-DE  3 Anschlussbelegung des Prozesstransmitters (Kanal 2 und Relais optional) Ist bei langen Signalleitungen mit energiereichen Transienten zu rechnen, empfehlen wir die Vorschaltung eines geeigneten Überspannungsschutzes. 5.1.1 Übersicht Anschlussmöglichkeiten am Prozessanzeiger Klemmenbezeichnungen Analogeingänge Kanal 1 und 2 (optional)
  • Seite 14 Verdrahtung RMA42 Anschluss Messumformerspeisung 2-Leiter 4-Leiter 0/4...20 mA A0011925 A0011926 Anschluss Analogeingang RTD/Widerstand 2-Leiter RTD/Widerstand 3-Leiter RTD/Widerstand 4-Leiter A0011917 A0011918 A0011919 Thermoelement U ≤ 1 V U > 1 V A0011920 A0011921 A0011922 Strom A0011923 Endress+Hauser...
  • Seite 15 RMA42 Verdrahtung Anschluss Relais (optional) Relais 1 Relais 2 R12 R11 R13 R22 R21 R23 A0011801 A0011802 Anschluss Analogausgang Analogausgang 1 Analogausgang 2 (optional) O15 O16 O25 O26 A0011803 A0011804 Anschluss Digitalausgang Digitalausgang / Open Collector A0011806 Anschluss Spannungsversorgung 24…230 V AC/DC (-20 % / +10 %) 50/60 Hz...
  • Seite 16: Anschlusskontrolle

    Verdrahtung RMA42 Schnittstellen Schnittstelle zur Konfiguration mit PC-Software A0012418 HART® Anschluss-Buchsen CH1 / A0012403 Die HART®-Anschlussklemmen sind mit dem internen Widerstand der Messumformerspeisung verbunden. Es besteht keine interne Verbindung zum Stromeingang. Wird nicht die Messumformerspeisung des Gerätes verwendet, muss ein externer HART®-Widerstand in der 4…20 mA Stromschleife verwendet werden.
  • Seite 17: Bedienung

    RMA42 Bedienung Stimmt die Versorgungsspannung mit den Angaben auf dem Typenschild 24…230 V AC/DC (-20 % / +10 %) überein? 50/60 Hz Sind alle Klemmen in ihrem richtigen Steckplatz fest eingerastet? Stimmt die Codierung auf den einzelnen Klemmen? Sind die Kabel zugentlastet montiert?
  • Seite 18: Konfiguration Über Schnittstelle & Pc-Konfigurationssoftware

    Anschließend installieren Sie den FieldCare Gerätetreiber gemäß folgender Anleitung: Zuerst den Gerätetreiber "CDI DTMlibrary" in FieldCare installieren. Dieser befindet sich in FieldCare unter "Endress+Hauser Device DTMs → Service / Specific → CDI". Anschließend muss der DTM-Katalog in FieldCare aktualisiert werden. Die neu installierten DTMs dem DTM-Katalog hinzufügen.
  • Seite 19: Anzeige Und Gerätestatusanzeige / Led

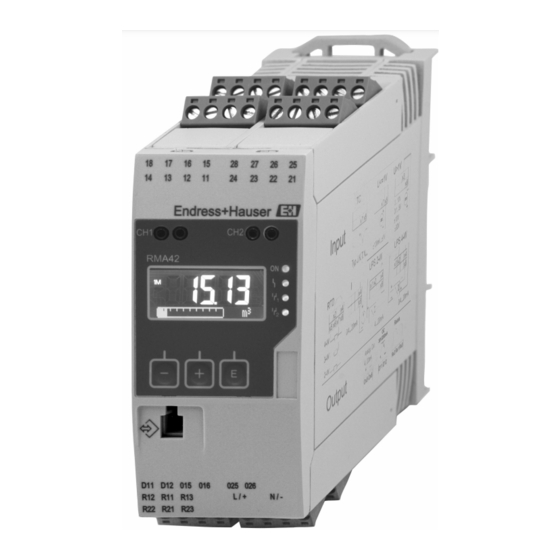
    RMA42 Bedienung Die Treiberinstallation für den Schnittstellenadapter ist damit abgeschlossen. Welcher COM- Port zugewiesen wurde, ist im Windows Gerätemanager ersichtlich. Verbindungsaufbau Für den Verbindungsaufbau mit FieldCare gehen Sie wie folgt vor: Zunächst das Verbindungsmakro bearbeiten. Dazu ein neues Projekt starten und im angezeigten Fenster mit der rechten Maustaste auf das Symbol für "Service (CDI)
  • Seite 20 Bedienung RMA42 A0011767  5 Anzeige- und Bedienelemente des Prozesstransmitters HART® Anschlussbuchsen Display Bedientasten Anschlussbuchse PC-Schnittstelle grüne LED; an = Versorgungsspannung liegt an rote LED; an = Fehler / Alarm gelbe LED; an = Relais 1 angezogen gelbe LED; an = Relais 2 angezogen A0011765 ...
  • Seite 21: Symbole

    RMA42 Bedienung Symbole 6.3.1 Displaysymbole Gerät ist verriegelt / Bediensperre; das Gerätesetup ist für Veränderungen an Parametern gesperrt; die Anzeige kann verändert werden. Kanal eins (Analog in 1) Kanal zwei (Analog in 2) Erster berechneter Wert (Calc value 1) Zweiter berechneter Wert (Calc value 2)
  • Seite 22: Bedienmatrix Auf Einen Blick

    Bedienung RMA42 Rückwärts löschen. Wird dieses Symbol gewählt, wird das Zeichen links von der Cursorposition gelöscht. Alles löschen. Wird dieses Symbol gewählt, wird die gesamte Eingabe gelöscht. Bedienmatrix auf einen Blick Im Folgenden sind alle Menüs einschließlich der Bedienfunktionen aufgelistet.
  • Seite 23 RMA42 Bedienung Menü Setup Beschreibung  CV Bar 0%* Untergrenze Bargraph für berechneten Wert  CV Bar 100%* Obergrenze Bargraph für berechneten Wert  Linearization* Linearisierung für berechneten Wert No lin points Anzahl Stützstellen X-value X-Werte für Stützstellen Y-value Y-Werte für Stützstellen ...
  • Seite 24 Bedienung RMA42 Menü Setup Beschreibung Reset min/max Min/Max-Werte zurücksetzen Calc value 2 Berechneter Wert 2 siehe Calc value 1  Analog out 1 Analogausgang 1 Assignment Zuordnung Analogausgang Signal type Signalart Analogausgang Lower range Bereichsuntergrenze Analogausgang Upper range Bereichsobergrenze Analogausgang ...
  • Seite 25: Gerätekonfiguration

    RMA42 Bedienung Menü Expert Beschreibung  Direct access Direktsprung zu einer Bedienposition  System Systemeinstellungen Access code Sicherung der Bedienung durch Zugriffscode Overfill protect Überfüllsicherung Reset Gerätereset Save user setup Setup-Einstellungen speichern  Input Eingänge Zusätzlich zu den Parametern aus dem Menü Setup sind folgende Parameter verfügbar:...
  • Seite 26 Table of contents RMA42 Table of contents Document information ............27 Document conventions .
  • Seite 27: Document Information

    RMA42 Document information Document information Document conventions 1.1.1 Safety symbols Symbol Meaning DANGER! DANGER This symbol alerts you to a dangerous situation. Failure to avoid this situation will result in serious or fatal injury. WARNING! This symbol alerts you to a dangerous situation. Failure to avoid this situation can result in WARNING serious or fatal injury.
  • Seite 28: Symbols In Graphics

    Document information RMA42 1.1.3 Symbols for certain types of information Symbol Meaning Symbol Meaning Permitted Preferred Procedures, processes or actions that Procedures, processes or actions that are permitted. are preferred. Forbidden Procedures, processes or actions that Indicates additional information. are forbidden.
  • Seite 29: Safety Instructions

    RMA42 Safety instructions Symbol Meaning Open-ended wrench A0011222 Torx screwdriver A0013442 Safety instructions Requirements for personnel The personnel must fulfill the following requirements for its tasks: ‣ Trained, qualified specialists must have a relevant qualification for this specific function and task.
  • Seite 30: Product Safety

    If a plastic transmitter housing is permanently exposed to certain steam and air mixtures, this can damage the housing. ‣ If you are unsure, please contact your Endress+Hauser Sales Center for clarification. ‣ If used in an approval-related area, observe the information on the nameplate.
  • Seite 31: Scope Of Delivery

    The measuring system meets the legal requirements of the applicable EC guidelines. These are listed in the corresponding EC Declaration of Conformity together with the standards applied. Endress+Hauser confirms successful testing of the device by affixing to it the CE mark. 3.3.2 EAC mark The product meets the legal requirements of the EEU guidelines.
  • Seite 32: Installation Conditions

    Installation RMA42 Installation conditions NOTICE The life-time of the display is shortened when operated in the upper temperature range. ‣ To avoid heat accumulation, always make sure the device is sufficiently cooled. ‣ Do not operate the device in the upper temperature range over a longer period of time.
  • Seite 33: Installation Procedure

    RMA42 Installation Installation procedure A0011766 Push the upper top-hat rail clip upwards and the lower clip downwards until the clips engage in position. Position the device on the top-hat rail from the front. Slide the two top-hat rail clips together until they engage in position.
  • Seite 34: Wiring

    Wiring RMA42 Wiring WARNING Danger! Electric voltage! ‣ The entire connection of the device must take place while the device is de-energized. ‣ The ground connection must be made before all other connections. Danger may arise if the protective ground is disconnected.
  • Seite 35 RMA42 Wiring HART® PC interface A0011800-EN  3 Terminal assignment of process transmitter (channel 2 and relay optional) We recommend you connect a suitable surge arrester upstream if high-energy transients can be expected on long signal cables. 5.1.1 Overview of possible connections on the process display unit...
  • Seite 36 Wiring RMA42 Loop power supply connection 2-wire 4-wire 0/4...20 mA A0011925 A0011926 Analog input connection RTD/resistor, 2-wire RTD/resistor, 3-wire RTD/resistor, 4-wire A0011917 A0011918 A0011919 Thermocouple U ≤ 1 V U > 1 V A0011920 A0011921 A0011922 Current A0011923 Endress+Hauser...
  • Seite 37 RMA42 Wiring (Optional) relay connection Relay 1 Relay 2 R12 R11 R13 R22 R21 R23 A0011801 A0011802 Analog output connection Analog output 1 Analog output 2 (optional) O15 O16 O25 O26 A0011803 A0011804 Digital output connection Digital output / open collector...
  • Seite 38: Post-Connection Check

    Wiring RMA42 Interfaces Interface for configuring with PC software A0012418 HART® connection sockets CH1 / A0012403 The HART® terminals are connected to the internal resistor of the loop power supply. There is no internal connection to the current input. If the loop power supply of the device is not used, an external HART®...
  • Seite 39: Operation

    RMA42 Operation Are all terminals firmly engaged in their correct slot? Is the coding on the individual terminals correct? Are the mounted cables strain-relieved? Are the power supply and signal cables correctly connected? See the wiring diagram on the housing.
  • Seite 40 Firstly, install the device driver "CDI DTMlibrary" in FieldCare. It can be found under "Endress+Hauser Device DTMs → Service / Specific → CDI" in FieldCare. Then the DTM catalog must be updated. Add the new installed DTMs to the DTM catalog.
  • Seite 41: Display And Device Status Indicator/Led

    RMA42 Operation Start the macro "Service (CDI) FXA291" by double-clicking it and confirm the subsequent query with "Yes".  A connected device is searched and the suitable DTM is automatically opened. The configuration starts. To then configure the device itself, follow these Operating Instructions for the device. The entire Setup menu, i.e.
  • Seite 42 Operation RMA42 A0011767  5 Display and operating elements of the process transmitter HART® connection sockets Display Operating keys Connection socket for PC interface Green LED; on - supply voltage applied Red LED; on - error/alarm Yellow LED; on - relay 1 energized Yellow LED;...
  • Seite 43: Icons

    RMA42 Operation Icons 6.3.1 Display icons Device is locked/operating lock; the device setup is locked against changes to parameters, the display can be modified. Channel one (Analog in 1) Channel two (Analog in 2) First calculated value (Calc value 1)
  • Seite 44: Quick Guide To The Operating Matrix

    Operation RMA42 Delete back. If this icon is selected, the character to the left of the cursor is deleted. Delete all. If this icon is selected, all the information entered is deleted. Quick guide to the operating matrix The following tables show all menus and the operating functions.
  • Seite 45 RMA42 Operation Setup menu Description  CV Bar 0%* Lower limit for bargraph of calculated value  CV Bar 100%* Upper limit for bargraph of calculated value  Linearization* Linearization of calculated value No lin points Number of linearization points...
  • Seite 46 Operation RMA42 Setup menu Description Reset min/max Reset min/max values Calc value 2 Calculated value 2 See Calc value 1  Analog out 1 Analog output 1 Assignment Assignment for analog output Signal type Signal type of analog output Lower range...
  • Seite 47: Device Configuration

    RMA42 Operation Expert menu Description  Direct access Direct access to an operting function  System System settings Access code Protection of operating menu by means of access code Overfill protect Overfill protection Reset Device reset Save user setup Save settings made in the setup ...
  • Seite 48 Sommaire RMA42 Sommaire Informations relatives au document ..........
  • Seite 49: Informations Relatives Au Document

    RMA42 Informations relatives au document Informations relatives au document Conventions de représentation 1.1.1 Symboles d'avertissement Symbole Signification DANGER ! DANGER Cette remarque attire l' a ttention sur une situation dangereuse qui, lorsqu' e lle n' e st pas évitée, entraîne la mort ou des blessures corporelles graves.
  • Seite 50 Informations relatives au document RMA42 1.1.3 Symboles pour les types d'informations Symbole Signification Symbole Signification Autorisé A privilégier Procédures, processus ou actions Procédures, processus ou actions à autorisés privilégier Interdit Conseil Procédures, processus ou actions Indique des informations interdits complémentaires Renvoi à...
  • Seite 51: Consignes De Sécurité

    RMA42 Consignes de sécurité Symbole Signification Clé à fourche A0011222 Tournevis Torx A0013442 Consignes de sécurité Exigences imposées au personnel Le personnel doit remplir les conditions suivantes dans le cadre de ses activités : ‣ Le personnel qualifié et formé doit disposer d' u ne qualification qui correspond à cette fonction et à...
  • Seite 52: Sécurité Du Produit

    Il satisfait aux exigences générales de sécurité et aux exigences légales. De plus, il est conforme aux directives EU/EEU répertoriées dans la Déclaration de Conformité spécifique à l' a ppareil. Endress+Hauser le confirme en apposant le marquage CE/EAC. Identification Désignation de l'appareil 3.1.1...
  • Seite 53: Contenu De La Livraison

    Le système de mesure satisfait aux exigences légales des directives CE en vigueur. Celles-ci sont listées dans la déclaration de conformité CE correspondante avec les normes appliquées. Par l' a pposition du marquage CE, Endress+Hauser atteste que l' a ppareil a passé les tests avec succès.
  • Seite 54: Conditions De Montage

    Installation RMA42 Conditions de montage AVIS La durée de vie de l'écran est raccourcie en cas d'utilisation dans une plage de température supérieure. ‣ Pour éviter l' a ccumulation de chaleur, assurez-vous que l' a ppareil est toujours suffisamment refroidi.
  • Seite 55: Procédure De Montage

    RMA42 Installation Procédure de montage A0011766 Pousser le clip de rail supérieur profilé vers le haut, et le clip inférieur vers le bas jusqu' à ce qu' i l se bloque en position. Placer l' a ppareil par l' a vant sur le rail profilé.
  • Seite 56: Câblage

    Câblage RMA42 Câblage AVERTISSEMENT Danger ! Tension électrique ! ‣ Le câblage ne doit être réalisé que lorsque l' a ppareil est hors tension. ‣ Le fil de terre doit être raccordé avant tout autre raccordement. Une rupture du fil de terre peut être source de danger.
  • Seite 57 RMA42 Câblage HART® Interface PC A0011800-FR  3 Affectation des bornes du transmetteur de process (voie 2 et relais en option) Nous vous recommandons de raccorder un parafoudre approprié en amont si des transitoires puissants sont susceptibles de se produire sur des câbles de signal longs.
  • Seite 58 Câblage RMA42 Raccordement de l'alimentation par boucle 2 fils 4 fils 0/4...20 mA A0011925 A0011926 Raccordement de l'entrée analogique RTD/résistance, 2 fils RTD/résistance, 3 fils RTD/résistance, 4 fils A0011917 A0011918 A0011919 Thermocouple U ≤ 1 V U > 1 V...
  • Seite 59 RMA42 Câblage Raccordement des relais (en option) Relais 1 Relais 2 R12 R11 R13 R22 R21 R23 A0011801 A0011802 Raccordement de la sortie analogique Sortie analogique 1 Sortie analogique 2 (en option) O15 O16 O25 O26 A0011803 A0011804 Raccordement de la sortie numérique Sortie numérique / collecteur ouvert...
  • Seite 60: Contrôle Du Raccordement

    Câblage RMA42 Interfaces Interface pour la configuration avec le logiciel PC A0012418 Connecteurs HART® CH1 / A0012403 Les bornes HART® sont raccordées à la résistance interne de l' a limentation par boucle. Il n' y a pas de connexion interne à l' e ntrée courant. Si l' a limentation par boucle de l' a ppareil n' e st pas utilisée, une résistance HART®...
  • Seite 61: Fonctionnement

    RMA42 Fonctionnement Toutes les bornes sont-elles correctement insérées dans les bons slots ? Le codage sur chaque borne est-il correct ? Les câbles installés sont-ils libres de toute traction ? La tension d' a limentation et le câble de signal sont-ils correctement Voir le schéma de raccordement sur le...
  • Seite 62 Installer d' a bord le pilote d' a ppareil « CDI DTMlibrary » dans FieldCare. On le trouvera sous « Endress+Hauser Device DTMs → Service / Specific → CDI » dans FieldCare. Il convient ensuite de mettre à jour le catalogue DTM. Ajouter les nouveaux DTM au catalogue DTM.
  • Seite 63: Affichage Et Affichage Du Statut De L'appareil / Led

    RMA42 Fonctionnement Établir la connexion Pour établir la connexion avec FieldCare, procéder comme suit : Tout d' a bord, éditer la macro de connexion. Pour ce faire, démarrer un nouveau projet et dans la fenêtre qui s' a ffiche, cliquer avec le bouton droit de la souris sur l' i cône « Service (CDI) FXA291 »...
  • Seite 64 Fonctionnement RMA42 A0011767  5 Eléments d' a ffichage et de commande du transmetteur de process Douilles de raccordement HART® Représentation Touches de commande Douille de raccordement pour l' i nterface PC LED verte ; marche - tension d' a limentation appliquée LED rouge ;...
  • Seite 65: Symboles

    RMA42 Fonctionnement Symboles 6.3.1 Symboles d'affichage L' a ppareil est verrouillé/verrouillage de fonctionnement ; la configuration de l' a ppareil est bloquée contre les changements de paramètres, l' a ffichage peut être modifié. Voie un (Analogique en 1) Voie deux (Analogique en 2) Première valeur calculée (Valeur de calcul 1)
  • Seite 66: Guide Rapide Pour La Matrice De Programmation

    Fonctionnement RMA42 Effacer vers la gauche. Si ce symbole est sélectionné, le symbole à gauche du curseur est effacé. Tout effacer. Si ce symbole est sélectionné, toute l' e ntrée est effacée. Guide rapide pour la matrice de programmation Les tableaux ci-après montrent tous les menus et les fonctions de programmation.
  • Seite 67 RMA42 Fonctionnement Menu Configuration Description  AI2 gamme supérieure* Limite de gamme de mesure supérieure pour Analogique en 2  Facteur CV* Facteur pour valeur calculée  Unité CV* Unité pour valeur calculée  CV Bar 0%* Limite inférieure pour bargraph de valeur calculée ...
  • Seite 68 Fonctionnement RMA42 Menu Configuration Description Offset Offset pour valeur calculée Pas de points lin Nombre de points de linéarisation Valeur X Valeurs X pour points de linéarisation Valeur Y Valeurs Y pour points de linéarisation Réinitialisation min/max RAZ valeurs min/max Valeur de calcul 2 Valeur calculée 2...
  • Seite 69 RMA42 Fonctionnement Menu Diagnostic Description  Informations sur l' a ppareil Informations sur l' a ppareil  Retour Retour au menu principal Menu Expert Description  Accès direct Accès direct à une fonction d' e xploitation  Système Réglages système Code d' a ccès...
  • Seite 70: Configuration D'appareil

    Fonctionnement RMA42 Configuration d'appareil Vous trouverez des informations détaillées sur la configuration de l' a ppareil dans le manuel de mise en service. Endress+Hauser...
  • Seite 72 www.addresses.endress.com...

Inhaltsverzeichnis