Herunterladen Diese Seite drucken
Numark DJ2GO2 Benutzerhandbuch

Numark DJ2GO2 Benutzerhandbuch

Vorschau ausblenden Andere Handbücher für DJ2GO2:

Werbung

Verfügbare Sprachen
  • DE

Verfügbare Sprachen

  • DEUTSCH, seite 23
Manuale utente - Prodotto 1:
Numark DJ2GO2 Touch - Mini controller DJ per gli spostamenti
- Console DJ USB a 2 deck con interfaccia audio e jog wheel
capacitive, 4 modalità pad; software incluso
Manuale utente - Prodotto 2:
SoundSwitch DMX Micro Interface – Interfaccia Ultra Compatta
USB-DMX con Tre Mesi di Accesso Gratuito al Software
SoundSwitch

Werbung

loading

Inhaltszusammenfassung für Numark DJ2GO2

  • Seite 1 Manuale utente - Prodotto 1: Numark DJ2GO2 Touch - Mini controller DJ per gli spostamenti - Console DJ USB a 2 deck con interfaccia audio e jog wheel capacitive, 4 modalità pad; software incluso Manuale utente - Prodotto 2: SoundSwitch DMX Micro Interface – Interfaccia Ultra Compatta...
  • Seite 2 User Guide English ( 3 – 6) Guía del usuario Español ( 7 – 11 ) Guide d’utilisation Français ( 12 – 16 ) Guida per l’uso Italiano ( 17 – 21 ) Benutzerhandbuch Deutsch ( 22 – 26 ) Appendix English ( 27 )
  • Seite 4 PAD MODE Speaker Headphones Before you can begin using DJ2GO2 with your computer, you must install a DJ software application on your computer. With a DJ software application installed on your computer, connect DJ2GO2 to an available USB port on your computer. (If possible, use a USB port on the rear panel of your computer.) On your computer, open your DJ software application.
  • Seite 5 Mini-USB Port: Plug the included mini-USB cable into this port and into the USB port of your computer to power DJ2GO2. DJ2GO2 is class-compliant, so it is "plug-and-play" – no separate driver installation is necessary. PFL / Cue: Sends pre-fader audio to the Cue channel for monitoring.
  • Seite 6 (Manual) Move the pitch slider so the BPM in the software matches with Deck 1. Press play on the downbeat, then use the wheel to align the beats together. Move the crossfader on DJ2GO2 toward the right to crossfade from Deck 1 to Deck 2.
  • Seite 7 Important Safety Instructions (1) Read and keep these instructions. Heed all warnings and follow all Instructions. (2) Do not use this apparatus near water. (3) Clean only with dry cloth. (4) Do not install near any heat sources such as radiators, heat registers, stoves, or other apparatus (including amplifiers) that produce heat.
  • Seite 8 Antes de comenzar a utilizar el DJ2GO2 con su ordenador, debe instalar una aplicación de software para DJ en su ordenador. Con la aplicación de software para DJ instalada en su ordenador, conecte el DJ2GO2 a un puerto USB disponible en su ordenador. (Si es posible, use un puerto USB del panel trasero de la computadora).
  • Seite 9 Panel superior PAD MODE Puerto mini-USB: Enchufe el cable mini-USB incluido en este puerto y en el puerto USB de su ordenado para suministrar corriente al DJ2GO2. DJ2GO2 cumple con la clase, de modo que es "plug- – and-play" no es necesario instalar ningún controlador por separado.
  • Seite 10 Funcionamiento Controles de modo de pad 1. Cues: Este botón de modo de pad conmuta entre el modo de cue rápido. 2. Auto Loop: Este botón de modo de pad conmuta entre los botones 1-4 para disparar bucles (la cantidad de barras del bucle se define en su software). Pad 1 - Bucle de 1 beat Pad 2 - Bucle de 2 beats Pad 3 - Bucle de 4 beats...
  • Seite 11 (Manual) Mueva el deslizador de tono de forma tal que los BPM del software coincidan con los de la bandeja 1. Pulse play al tempo de la música y utilice la rueda para alinear los beats. Mueva el crossfader del DJ2GO2 para realizar un fundido cruzado desde la bandeja 1 hacia la bandeja 2.
  • Seite 12 Instrucciones importantes de seguridad (1) Lea y conserve estas instrucciones. Preste atención a las advertencias y siga todas las instrucciones. (2) No use este equipo cerca de agua. (3) Límpielo sólo con un paño seco. (4) No instale el equipo cerca de fuentes de calor tales como radiadores, aberturas de entrada de calefacción, calefactores u otros aparatos (incluidos amplificadores) que generen calor.
  • Seite 13 Avant de pouvoir utiliser le DJ2GO2 avec votre ordinateur, vous devez installer le logiciel pour DJ. Une fois le logiciel pour DJ installé sur votre ordinateur, branchez le DJ2GO2 au port USB de votre ordinateur. (Si cela est possible, utilisez un port USB sur le panneau arrière de l’ordinateur.)
  • Seite 14 Port mini-USB : Utilisez le câble mini-USB fourni pour relier ce port au port USB de votre ordinateur afin d’alimenter le DJ2GO2. Le DJ2GO2 est doté d’une connexion USB prête à l’utilisation et ne requiert donc pas l’installation de pilotes.
  • Seite 15 Fonctionnement Commandes du mode Pad 1. Cues : Cette touche permet de basculer les pads en mode points de repère rapides. 2. Auto Loop : Ce bouton permet de basculer les touches 1 à 4 en mode bouclage automatique (la valeur de la mesure de la boucle est définie dans le logiciel). Pad 1 –...
  • Seite 16 1. Appuyez sur la touche de lecture sur le premier battement, puis utilisez la molette pour synchroniser les battements. Déplacez le curseur du DJ2GO2 vers la droite afin de créer un fondu enchaîné du module 1 au module 2.
  • Seite 17 Instructions importantes de sécurité (1) Lire et conserver les instructions qui suivent. Respecter tous les avertissements et suivre toutes les instructions fournies. (2) Ne pas utiliser cet appareil à proximité des sources d’eau. (3) Nettoyer seulement avec un chiffon doux sec. (4) Ne pas installer près des sources de chaleur telles que radiateurs, les registres de chaleur, poêles ou autres appareils (y compris les amplificateurs) qui génèrent de la chaleur.
  • Seite 18 Prima di iniziare a utilizzare il DJ2GO2 con il computer, occorre installare un’applicazione software per DJ sul computer stesso. Con un’applicazione software per DJ installata sul computer, collegare il DJ2GO2 ad una porta USB disponibile sul computer (se possibile, servirsi di una porta USB sul pannello posteriore del computer).
  • Seite 19 PAD MODE Porta mini USB: inserire il cavo mini USB in questa porta e nella porta USB del computer per alimentare il DJ2GO2. Il DJ2GO2 è un dispositivo compatibile, quindi è "plug-and-play": non richiede l’installazione di driver a parte. PFL / Cue: invia audio pre-fader al canale Cue per il monitoraggio.
  • Seite 20 Operazione Comandi modalità pad 1. Cues: questo tasto di modalità pad fa commutare i pad le modalità Hot Cue. 2. Auto Loop: questo tasto di modalità Pad fa commutare i tasti 1-4 per attivare i loop (il valore della barra loop è impostato nel software). Pad 1 - Loop 1 beat Pad 2 - Loop 2 beats Pad 3 - Loop 4 beats...
  • Seite 21 11. (Manual) Spostare il cursore del pitch in modo tale che il BPM nel software corrisponda al Deck 1. Premere play sull’attacco, quindi servirsi della rotella per allineare i beat. 12. Muovere il crossfader sul DJ2GO2 verso destra per sfumare col crossfader dal Deck 1 al Deck 2.
  • Seite 22 Istruzioni importanti di sicurezza (1) Leggere attentamente e conservare le istruzioni. Tenere conto delle avvertenze e seguire attentamente le istruzioni. (2) Non servirsi dell’apparecchio vicino all’acqua. (3) Pulire unicamente con un panno bagnato. (4) Non installare vicino a sorgenti di calore quali radiatori, diffusori di aria calda, fornelli o altri dispositivi (inclusi amplificatori) che producono calore.
  • Seite 23 Bevor Sie Ihr DJ2GO2 mit Ihrem Computer verwenden können, müssen Sie eine DJ-Software- Anwendung auf Ihrem Computer installieren. Verbinden Sie das DJ2GO2 mit einem freien USB-Port Ihres Computers, wenn Sie bereits eine DJ-Software installiert haben. (Wenn möglich, verwenden Sie einen USB-Anschluss an der Rückseite Ihres Computers.)
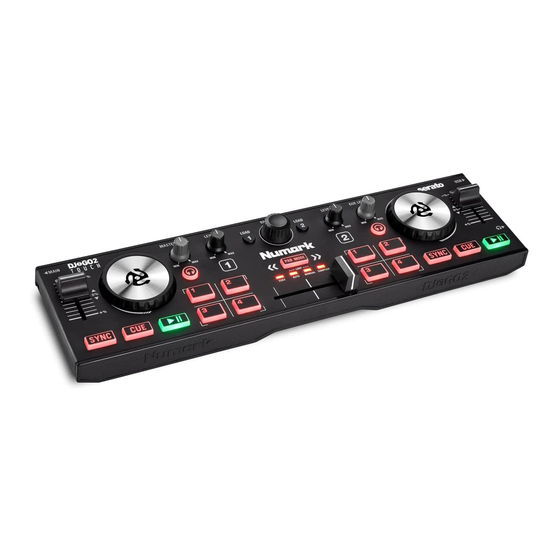
  • Seite 24 PAD MODE Mini-USB-Anschluss: Stecken Sie das mitgelieferte Mini-USB-Kabel in diesen Port und in den USB- Port Ihres Computers, um DJ2GO2 mit Strom zu versorgen. DJ2GO2 ist klassenkonform und kann ohne separate Treiberinstallation als "Plug-and-play" verwendet werden. PFL / Cue: Sendet Pre-Fader-Audio an den Cue-Kanal für das Monitoring.
  • Seite 25 Betrieb Pad-Modus Bedienelemente 1. Cues: Diese Pad Modus-Taste wechselt zwischen Hot Cue-Modi. 2. Auto-Loop: Diese Pad-Modus-Taste wechselt zwischen den Tasten 1-4, um Loops zu triggern (Loop-Bar-Wert wird in Ihrer Software eingestellt). Pad 1 - 1 beat Pad 2 - 2 beats Pad 3 - 4 beats Pad 4 - 8 beats 3.
  • Seite 26 (Manual) Bewegen Sie den Pitch-Regler, so dass die BPM in der Software mit Deck 1 übereinstimmen. Drücken Sie die Wiedergabetaste am Downbeat und verwenden Sie dann das Rad, um die Beats zu synchronisieren. Muovere il crossfader sul DJ2GO2 verso destra per sfumare col crossfader dal Deck 1 al Deck 2.
  • Seite 27 Wichtige Sicherheitsanweisungen (1) Lesen Sie diese Hinweise und heben Sie diese Hinweise auf. Beachten Sie alle Warnhinweise und folgen Sie diese Hinweise. (2) Verwenden Sie das Gerät nicht in der Nähe von Wasser. (3) Verwenden Sie zur Reinigung ein trockenes Tuch. (4) Betrieben Sie das Gerät nicht in der Nähe von Hitzequellen, wie Radiatoren, Wärmegebläsen, Öfen oder anderen, Hitze produzierenden Geräten (wie Verstärkern).
  • Seite 28 Specifications are subject to change without notice. Trademarks & Licenses Numark is a trademark of inMusic Brands, Inc., registered in the U.S. and other countries. Serato and the Serato logo are registered trademarks of Serato Audio Research. Mac and OS X are trademarks of Apple Inc., registered in the U.S. and other countries.
  • Seite 29 Manual Version 1.2...
  • Seite 30 User Guide...
  • Seite 31 WHAT IS SOUNDSWITCH? At its core, SoundSwitch is a DMX lighting control software. SoundSwitch differs from all other DMX lighting control because of its direct connection with leading DJ software and hardware. SoundSwitch not only allows you to create and edit lighting displays but also syncs your lighting creations with DJ software, in time with your DJ performance so that you can focus on DJing.
  • Seite 32 WHAT TO EXPECT What SoundSwitch can do? SoundSwitch allows you to edit presets and create your own custom Autoloop lighting scenes as well as create Scripted Light shows for individual audio tracks. SoundSwitch can also analyze your music library and create basic light shows for you, however, as with any creative pursuit, the more work you put in the better the result.
  • Seite 33 HOW DOES SOUNDSWITCH WORK? SoundSwitch works in two “Modes” Edit Mode and Performance Mode. Using Edit Mode, you can setup fixtures, and edit fixtures and lighting displays then, when it comes time to perform, switch into Performance Mode and SoundSwitch connects with your DJ software and loads and syncs your light shows in real time.
  • Seite 34 CONTENTS DMX Explained - What is DMX - DMX Modes - DMX Addressing 3 - 4 - What Fixtures are Supported Quick Setup Guide - Installing Software - Connecting hardware 8 - 9 - Setting up DMX Fixtures 10 - 12 - Setting up Philips HUE 13 - 14 - Testing...
  • Seite 35 DMX Explained DMX is the most confusing thing about lighting control. We will try and explain it as simply as possible here, however, its best to do some research and try to understand how DMX works. This will help when it comes to troubleshooting errors but here goes: What is DMX? DMX is a protocol for controlling DMX Fixtures.
  • Seite 36 DMX Modes Every DMX Fixture has one or more DMX Modes. For example a simple RGB Wash light, typically has two DMX Modes however some fixtures can have 10 or more DMX modes. Let's use a simple RGB Wash Light as an example. Below are two different modes, each with a different amount of DMX Channels, the more advanced mode, the more channels and features can be controlled.
  • Seite 37 DMX Addressing SoundSwitch allows control of two 512 channel DMX Universes. The DMX Address is where in the DMX Universe the fixture is patched. For example, if you have a RGB LED Wash running in 3 Chn Mode, SoundSwitch needs to know where it is patched. You can set the DMX Address to any number between 1 and 512.
  • Seite 38 DMX Addressing cont.. The main thing to avoid when setting up your fixtures is “Cross Patching”. You must also make sure the settings on the fixture match the settings in the software. Cross Patching is when you have two fixtures with overlapping channels.
  • Seite 39 What Type of Fixtures are Supported? There are loads of different DMX Fixtures and SoundSwitch can control them all, however, some fixtures work differently to others. SoundSwitch works best with RGBWAUV LED fixtures, however, Moving Heads with Color and Gobo wheels work great as do Lasers and Smoke machines however, these fixtures require a few extra steps to setup when compared with simple LED wash lights.
  • Seite 41 Quick Start Guide: Now that you’re up to speed with the concept, lets get started. The following is a step by step guide to getting started with SoundSwitch. We will cover installing and setting up the software, connecting your hardware, setting up and controlling fixtures and finally switch over to Performance Mode and start mixing! Here is an overview of steps covered in the Quick Start Guide: Installing Software...
  • Seite 42 Installing Software Step 1: Download the Latest Version of SoundSwitch To get started, head over to www.soundswitch.com to setup your SoundSwitch account and download the latest version of the software. Step 2: Update your Operating System, close all other applications and reboot.
  • Seite 43 Connecting Hardware: Step 1: Connect your SoundSwitch or Third Party Interface. Connect your DMX interface to a spare USB port or Powered Hub. If SoundSwitch does not recognize your hardware right away, leave the hardware connected and restart SoundSwitch. Step 2: Check the Hardware Settings. Open the Preferences but clicking on the Preferences icon and select the “Hardware Tab”.
  • Seite 44 Connecting Hardware: Step 1 : Connect your fixtures to power and power them on. Step 2 : Connect a DMX cable from the DMX interface to the first fixture and continue to connect the cables from each light to the next. This is called “Daisy Chaining”. Step 3 : Set the fixtures into DMX Mode and Select a DMX Mode and Set the DMX Address.
  • Seite 45 Setting Up DMX Fixture Step 1: Open SoundSwitch and select Edit Mode Step 2 : Create a new Venue tab and name it and press Enter/Return In SoundSwitch, “Venues” are used to setup and organize lighting rigs allowing you to design and create effects specifically for that lighting rig.
  • Seite 46 Setting Up DMX Fixture Step 3: Patching Fixtures This is the most important step to get right. If you do not patch your fixtures correctly, SoundSwitch will not be able to communicate with the fixtures. Start by opening the DMX Map by select the Icon from the tool bar.
  • Seite 47 Setting Up DMX Fixture Step 3: Patching Fixtures Once you have found the fixture, select the mapping which matches the DMX Mode you set on your fixture. Then drag and drop the mapping onto the DMX Universe Map and position the mapping on the same DMX Address you have set on your fixture.
  • Seite 48 Testing Now its time to test to see if everything is setup correctly. To do so, open an Autoloop and see if this plays back correctly. Step 1 : Open an Autoloop To open an Autoloop, select the icon in the bottom right hand corner of the screen to display the Autoloop Banks and open the first Autoloop called “Red”...
  • Seite 49 Setting Up Philips HUE Lighting SoundSwitch 2.3 adds support for Philips Hue lights. This allows basic lighting effects from the Main Track to be displayed on all Philips HUE lights.  To get started, make sure your Philips HUE Bridge is connected to power, and using an ethernet cable connect the bridge to your network router.
  • Seite 50 Setting Up Philips HUE Lighting Select “Enable” & “Add New Bridge” Then when prompted, press the button on the Philips Hue Bridge. SoundSwitch will then discover and connect to all of your Philips HUE lights *SoundSwitch requires an Entertainment Area to be setup in the Philips HUE before connection is possible...
  • Seite 51 Testing Step 3 : Controlling Moving Fixtures If you have moving fixtures in your rig, it’s time to learn how to control the Pan and Tilt. In the Master Track you can see that there are small Cues, these are called Position Cues. You can name and adjust Position Cues and Position Cue Folders using the Positions Menu on the left hand side as shown below.
  • Seite 52 Testing Step 3 : Controlling Moving Fixtures The idea behind Position Cues is that you can name a Position Cue; for example “DJ Booth”, then point the movers toward the appropriate direction, IE the DJ Booth. If you are a mobile DJ and change between venues, you can redirect the Movers as the venue and position of the DJ Booth changes.
  • Seite 53 Testing Step 4 : Controlling Strobe: Now that you have your lights patched and have set your Position Cues we will show you how to Strobe your lights using Hot Keys, On Screen Buttons or a MIDI Controller. To use the On Screen Buttons or to MIDI map a secondary controller, select the MIDI Icon in the top right hand corner of the screen to open the MIDI Menu.
  • Seite 54 Testing Step 5 : Switching to Performance Mode Now that everything is setup and ready to go in Edit Mode its time to connect SoundSwitch to your DJ Software/Hardware. The process is much the same for all supported DJ Software/Hardware below are the steps for each.
  • Seite 55 Testing Step 5 : Switching to Performance Mode Virtual DJ Connect a DJ Controller or Mixer to your computer via USB and open Virtual DJ. Open the Preferences in SoundSwitch and select Virtual DJ, then select ether “Auto Connect” or “On this Computer” In SoundSwitch navigate to the File Menu and Select “Switch Modes”...
  • Seite 56 Testing Step 5 : Switching to Performance Mode Engine Prime Hardware Connect the Prime 4, 2 or GO or X1850 to your computer using an Ethernet Cable If you are using the Media Players, also connect these to the X1850 using Ethernet Cables. Open the Preferences in SoundSwitch and select Engine OS, then select ether of the Player + Mixer options or the All-in-One depending on which hardware you own.
  • Seite 57 Testing Step 5 : Switching to Performance Mode Fader Settings: In SoundSwitch you need to select the Fader Setting that matches how you mix. The Fader Settings are explained below. Switches light shows Switches light shows when the X-Fader when the X-Fader Blends light shows Uses the Upfader Position passes halfway...
  • Seite 58 General FAQ’s What fixtures can be controlled by SoundSwitch? SoundSwitch can control any fixture that uses DMX, while RGB LED fixtures work best, Lasers, Effect Lights and even Smoke Machines can be controlled using SoundSwitch. Can I Connect SoundSwitch to a USB Hub and if so what Hub? Yes, SoundSwitch hardware can be connected to a USB Hub or Adapter.
  • Seite 59 General FAQ’s Can I use SoundSwitch without DJ Software? Yes, SoundSwitch can be run in Standalone Mode allowing you to manually enter and set the tempo and launch lighting scenes in time as a DJ plays on stage. Does SoundSwitch support Smoke/Hazers? Absolutely.
  • Seite 60 General FAQ’s Should I create my Beat-grids before starting SoundSwitch? SoundSwitch relies on accurate beat-grids to sync Autoloops and create light shows using the Automation Feature so its important to have these setup correctly before playing or Auto Scripting these files. Fixtures only Display Color but No Gobo? In order to control Gobos, you need to edit or create some Attribute Cues.
  • Seite 61 General FAQ’s How do I Script tracks on my Prime 4’s Hard-drive The SSD in your Prime 4 behaves like a normal External Hard-drive. To access the drive, you need to set the Prime 4 into Controller/USB Mode. To do so follow the steps below. Step 1 : Connect a USB cable to the USB B port on the PRIME 4 and the other end to your computer.