OHAUS Scout STX Serie Bedienungsanleitung
Vorschau ausblenden
Andere Handbücher für Scout STX Serie:
- Bedienungsanleitung (240 Seiten) ,
- Bedienungsanleitung (233 Seiten) ,
- Bedienungsanleitung (53 Seiten)
Inhaltsverzeichnis
Werbung
Verfügbare Sprachen
Verfügbare Sprachen
Quicklinks
Werbung
Inhaltsverzeichnis
Fehlerbehebung

Verwandte Anleitungen für OHAUS Scout STX Serie


Inhaltszusammenfassung für OHAUS Scout STX Serie
- Seite 1 Scout Series Balances - STX Instruction Manual Balanzas Scout Series - STX Manual de instrucciones Balances Scout Séries - STX Mode d’emploi Scout Waagen - Serien - STX Bedienungsanleitung Bilance Serie Scout - STX Manuale d’Istruzioni...
-
Seite 2: Inhaltsverzeichnis
EN-0 TABLE OF CONTENTS 1. INTRODUCTION ....................1 Description ..............................1 Definition of Signal Warnings and Symbols ....................1 Safety Precautions ............................1 1.4 Features ................................. 2 2. INSTALLATION ....................4 Installing Components ..........................2 2.1.1 Releasing the Transportation Lock ......................2 2.1.2 Installing the Weighing Pan ........................ - Seite 3 5.2.3 Weighing Units ............................29 5.2.4 Data Maintenance ............................30 5.2.5 Communication ............................30 5.2.6 GLP and GMP Data ........................... 35 5.2.7 Factory Reset ............................. 36 5.2.8 Lockout ............................... 36 6. MAINTENANCE ....................39 6.1 Calibration ..............................37 6.2 Cleaning ..............................37 6.3 Troubleshooting ............................
-
Seite 5: Introduction
EN-1 1. INTRODUCTION 1.1 Description The Scout STX balance is a high quality weighing instrument that will provide you with years of service if properly cared for. Models are available with ranges from 120g to 8200g. 1.2 Definition of Signal Warnings and Symbols Safety notes are marked with signal words and warning symbols. -
Seite 6: Features
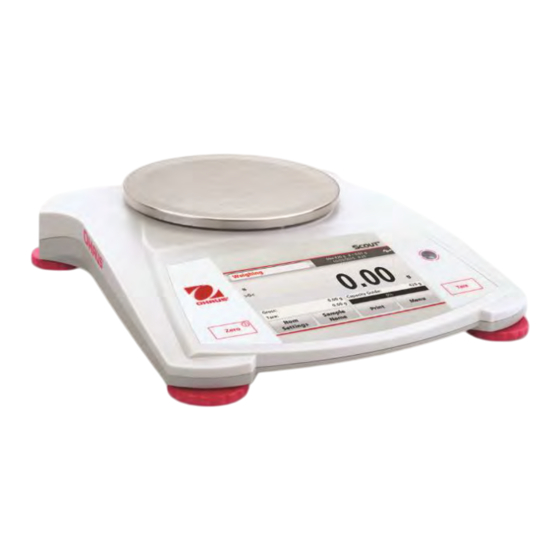
EN-2 1.4 Features Touch Controls: Quick, graphical access to all control functions, applications and features. INSTALLATION 2.1 Installing Components Refer to the illustrations and instructions below to identify and assemble your Scout balance with its components. All components must be assembled before using the balance. 2.1.1 Releasing the Transportation Lock Release the red transportation lock on the Sub-platform... -
Seite 7: Selecting The Location
EN-3 Selecting the Location For best performance, the Scout balance should be used in a clean, stable environment. Do not use the balance in environments with excessive drafts, with rapid temperature changes, near magnetic fields or near equipment that generates magnetic fields, or vibrations. 2.3 Leveling the Balance The Scout has an illuminated level indicator as a reminder that the balance should be leveled for accurate weighing. -
Seite 8: Operation
EN-4 3. OPERATION 3.1 Controls Button Functions Table 3-1. Button Primary Function Tare (Short Press Turns the balance on Enter/clear a tare value. Zero If balance is On, sets Zero Secondary Function (Long Press Turns the balance Off. Notes: Short Press: Press less than 1 second. Long Press: Press and hold for more than 2 seconds. -
Seite 9: Principal Functions And Main Menu
EN-5 Principal Functions and Main Menu Zero Weighing: Press to set the display to zero. Place an item on the pan. Display indicates gross weight. Taring: With no load on the pan, press Tare to set the display to zero. Place an empty container on the pan and press Tare. -
Seite 10: Weighing
EN-6 The Scout Balance incorporates the following Applications. Weighing Parts Percent Dynamic Density Check Counting Weighing (Animal) Determination Weighing Weighing Display Totalization Mole Hold Note: Before using any application, be sure the balance has been leveled and calibrated. 4.1 Weighing Use this application to determine the weight of items in the selected unit of measure. -
Seite 11: Sample Name
If this happens, unplug the USB flash drive and try another USB flash drive. Ohaus takes no responsibility if data on USB flash drive is erased or if the USB flash drive breaks while it is connected to the balance. -
Seite 12: Item Settings
EN-8 The PARTS COUNTING Standard Home screen: Main Display Line Application Reference Fields Icon Application Buttons 4.2.1 Item Settings To view or adjust the current settings, touch the Item Settings button: Touch the Item Settings button. The Settings screen appears. Sample Name: Enter a sample name with the alphanumerical keypad and then press Save to store the name and return... -
Seite 13: Percent Weighing
EN-9 APW: Set a known Average Piece Weight (APW) To adjust the APW value directly, touch the APW button A numeric input window appears. Key in the desired APW Weight, then press Save. The display returns to the application home screen with the new APW value in the reference field. -
Seite 14: Item Settings
EN-10 The PERCENT WEIGHING Home screen: Main Display Line Application Icon Reference Fields Application Buttons 4.3.1 Item Settings To view or adjust the current settings Touch the Item Settings button. The Settings screen appears. Sample Name: Enter a sample name with the alphanumerical keypad and then press Save to store the name. -
Seite 15: Dynamic/Animal Weighing
EN-11 4.4 Dynamic/Animal Weighing Use this application to weigh an unstable load, such as a moving animal. Two different start/reset modes can be selected: Manual (start and stop via key press) and Automatic (start and stop automatically). The DYNAMIC WEIGHING Home screen: Main Display Line Reference Fields Application Icon... -
Seite 16: Item Settings
EN-12 4.4.1 Item Settings To view or adjust the current settings: Touch the Item Settings button. The Settings screen appears. Averaging Time: The Averaging Time can be set from 1 to 99 seconds. The default value is 5 seconds. Automatic Mode: The cycle begins when an object (animal) is placed on the pan, and the held value is automatically reset when the object is removed... -
Seite 17: Density Determination
The Scout can be used to determine an object’s density including solid and liquid. A density determination kit (not included, buy separately) is designed to be used with Ohaus Scout STX. However, you may use whatever lab apparatus that suits the requirements for density measurements. - Seite 18 EN-14 The balance calculates water density based on the water temperature value entered (internal lookup table). Measure the actual water temperature using a precision thermometer. Press Back to return to the Density Determination home screen. To begin the Density Determination process, press Start.
-
Seite 19: Measuring The Density Of A Solid Using An Auxiliary Liquid
EN-15 Once the necessary weights have been determined, the density of the sample is displayed in g/cm (along with the weight in air, weight in water) on the Application screen. Press Start to reset all the weight values and restart the process. The balance can also be used to measure the Density of a Buoyant Material Using Water. - Seite 20 EN-16 Confirm that the default value displayed (sinker volume) is correct. To edit the default values, touch Sinker Volume. A numeric input window is displayed. Key in the desired value, then press Save. The display returns to the previous screen. Edit the Liquid temperature if required.
-
Seite 21: Measuring The Density Of Porous Material Using Oil
EN-17 4.5.4 Measuring the Density of Porous Material Using Oil To enable this feature, enter the Item Settings screen, and select the following: Density Type: Solid Auxiliary Liquid: Water Porous Material: On To adjust the Water Temperature or Oil Density values, touch the Water Temp or Oil Density button. -
Seite 22: Check Weighing
EN-18 Step 2 of 3 – Weigh the Oiled Sample in Air. Follow the screen instructions then press Accept to store the sample weight (oiled). Step 3 of 3 – Weigh the Oiled Sample Submerged in Liquid. Follow the screen instructions then press Accept to store the oiled sample weight (submerged in liquid). -
Seite 23: Item Settings
EN-19 4.6.1 Item Settings To view or adjust the current settings Touch the Item Settings button. The Settings screen appears. Sample Name: Enter a sample name. Weighing Units: Select the displayed unit. Print Settings: To view or adjust the print settings 4.6.2 Limits To view or adjust the current settings... -
Seite 24: Display Hold
EN-20 4.7 Display Hold The Display hold application allows the user to capture and store the highest stable weight in a series of weight measurements. In the upper left portion of the home screen, select Display hold. The DISPLAY HOLD Home screen: Main Display Line Application Icon Reference Fields... -
Seite 25: Totalization
EN-21 1. Select Peak Hold Mode in Item settings (see section 4.7.1). 2. Place item on the pan and press Start. The capture process starts. 3. Continue to weigh items. The highest stable weight will be held. 4. Press Stop to remove the hold and return to normal operation screen. -
Seite 26: Mole Weighing
EN-22 The sample weight is shown on the Main Display Line. 3. Press Accumulate to add the weight of the item to the total. When stable, the new total is shown on the secondary Display Line. 4. Remove the item from the weighing pan, then add the next item and continue as above. -
Seite 27: Enter Molar Mass
EN-23 Weighing Units: Select the displayed unit for gross and tare. Print Settings: To view or adjust the print settings 4.9.2 Enter Molar Mass Press Molar Mass, and use the numeric keypad to enter the required Molar Mass value of the substance, and then press Save. 4.9.3 Calculate Molarity The Molarity is only calculated when the Liquid Volume is set up. -
Seite 28: Connecting The Interface
Interface connection Security Slot AC Adapter Jack * Interface kits may vary according to local regulations The Bluetooth® word mark and logos are registered trademarks owned by Bluetooth SIG, Inc. and any use of such marks by OHAUS is under license. -
Seite 29: Menu Settings
EN-25 5. MENU SETTINGS 5.1 Menu Navigation All menu navigation is performed by touching the display. To enter the Menu, touch Menu from any Application Home screen. The Main menu appears, with buttons for Back and Exit. Continue touching the appropriate list item to navigate to the Menu items or touch a button to change location. -
Seite 30: Main Menu
EN-26 5.2 Main Menu The Scout balance Main menu structure is illustrated below. 5.2.1 Calibration Scout STX balances offer a choice of two calibration methods: Span Calibration and Linearity Calibration. Note: Do not disturb the balance during any calibration. Calibration sub-menu Span Linearity Calibration... -
Seite 31: Balance Setup
EN-27 5.2.2 Balance Setup Enter this sub-menu to customize Balance display functionality. Language User Settings Filter Level Auto Zero Tracking Stability Auto Tare Date & Time Balance Setup sub-menu Factory default settings are shown below in bold. Language Set the language displayed for menus and displayed messages. There are 9 languages available. - Seite 32 EN-28 Level Assist Shows how to level the equipment by adjusting the feet. Filter level Set the amount of signal filtering. = faster stabilization time with less stability. MEDIUM = normal stabilization time with normal stability. HIGH = slower stabilization time with more stability. Auto Zero Tracking Set the automatic zero tracking functionality.
-
Seite 33: Weighing Units
EN-29 5.2.3 Weighing Units Enter this sub-menu to activate the desired units of measure. Note: Due to national laws, the indicator may not include some of the units of measure listed. Units Sub-menu milligram gram kilogram carat ounce ounce troy pound pound ounce pennyweight... -
Seite 34: Data Maintenance
EN-30 5.2.4 Data Maintenance Data Maintenance sub-menu: Export to Import from Balance Info Export to USB* Export data to USB flash drive. Two types of data can be exported: - Application Mode Settings = APW, Ref.Weight etc. - Menu Settings = balance setup functions etc. Note: The function Save to USB needs to be set to ON to enable data transfer to USB. - Seite 35 EN-31 Baud Rate Set the baud rate (bits per second). 1200 = 1200 bps 2400 = 2400 bps 4800 = 4800 bps 9600 = 9600 bps 19200 = 19200 bps 38400 = 38400 bps 57600 = 57600 bps 115200 = 115200 bps Transmission Set the data bits, stop bit, and parity.
- Seite 36 EN-32 = Headers will be printed for every print requirement = Headers will be printed once a day Print Options* Set the printing criteria. Printer = Print data to a printer = Print data to a PC Note: If language selection is set to Chinese, Japanese or Korean, these options shall match the actual peripheral device.
- Seite 37 EN-33 Selection Sample Name Set the status. Set the status. Select All = all options will be turned on OFF = the Sample Name is not Deselect All = all options will be printed. turned off = the Sample Name is printed. Header Result Set the status.
- Seite 38 EN-34 User Name Signature Line Set the status. Set the status. OFF = the User Name is not OFF = the Signature Line is not printed. printed. = the User Name is printed. = the Signature Line is printed. Signature:__________________ User Name: XXXXXXXXXXXX Verified by: _______________...
-
Seite 39: Glp And Gmp Data
EN-35 Alternate Tare Command Set the alternate command character for Tare. Settings of A to Z are available. The default setting is empty, except P&Z. Alternate Zero Command Set the alternate command character for Zero. Settings of A to Z are available. The default setting is empty, except P&T. -
Seite 40: Factory Reset
EN-36 5.2.7 Factory Reset Use this sub-menu to reset the menus to their Factory default settings. Reset All = reset all menus to their factory default setting. Exit = return to main screen without resetting any menus. Note: Calibration data is not affected. 5.2.8 Lockout Use this menu to lock/unlock certain menus to prevent unauthorized changes to menu settings. -
Seite 41: Maintenance
OHAUS service agent. For service assistance or technical support in the United States call toll-free 1-800-672-7722 ext. 7852 between 8:00 AM and 5:00 PM EST. An OHAUS product service specialist will be available to provide assistance. Outside the USA, please visit... -
Seite 42: Technical Data
EN-38 TECHNICAL DATA 7.1 Specifications Ambient conditions Indoor use only Operating temperature: +5 °C to +40 °C Relative humidity: 10% to 80% at 31 °C, decreasing linearly to 50 % at 40 °C, non- condensing Altitude: Up to 2000 m ... - Seite 43 EN-39 TABLE 7-2. SPECIFICATIONS (Continued) Capacity x Readability: Model STX123 STX223 STX222 STX422 STX622 STX1202 Gram (g) 120 x 0.001 220 x 0.001 220 x 0.01 420 x 0.01 620 x 0.01 1200 x 0.01 Milligram (mg) 120000 x 1 220000 x 1 Kilogram (kg) 1.2 x 0.00001...
-
Seite 44: Drawings And Dimensions
202 mm / 8.0 in. 224 mm / 8.8 in. 54 mm / 2.1 in. 8. SOFTWARE UPDATES Ohaus is continuously improving its balance software. To obtain the latest release, please contact your Authorized Ohaus Dealer or Ohaus Corporation. -
Seite 45: Compliance
Standard This product complies with the applicable harmonized standards of EU Directives 2011/65/EU (RoHS), 2014/30/EU (EMC), 2014/35/EU (LVD) and 2014/31/EU (NAWI). The EU Declaration of Conformity is available online at www.ohaus.com/ce. EN 61326-1 CAN/CSA-C22.2 No. 61010-1, UL Std. No. 61010-1... - Seite 46 Ohaus. In lieu of a properly returned warranty registration card, the warranty period shall begin on the date of shipment to...
- Seite 47 ÍNDICE 1. INTRODUCCIÓN ....................1 Descripción ..............................1 Definición de los símbolos y señales de advertencia .................. 3 Precauciones de seguridad .......................... 3 Características ............................. 1 2. INSTALACIÓN ....................4 Instalación de componentes ........................4 2.1.1 Desbloqueo del cierre de seguridad de transporte .................. 4 2.1.2 Instalar la bandeja de pesaje ........................
- Seite 48 5.2.7 Reconfiguración de salida de fábrica por defecto ..................38 5.2.8 Bloqueo ..............................38 6. MANTENIMIENTO ................... 39 Calibrado ..............................39 Limpieza ..............................39 Resolución de problemas ........................... 39 Información sobre el servicio técnico ......................42 7. DATOS TÉCNICOS ..................42 Características técnicas ..........................
-
Seite 49: Introducción
Balanzas Scout Series – STX ES-1 1. INTRODUCCIÓN 1.1 Descripción Las balanzas Scout STX son un instrumento de medición de gran calidad que le proporcionará años de servicio y funcionamiento si lleva a cabo su mantenimiento del modo adecuado. La gama de modelos disponibles van de 120g a 8200g. -
Seite 50: Instalación
ES-2 Balanzas Scout Series – STX Control táctil :Un acceso rápido mediante gráficos a todas las funciones de control, las aplicaciones y las características técnicas del dispositivo. 2. INSTALACIÓN 2.1 Instalación de componentes Consulte las instrucciones y los gráficos que aparecen a continuación para identificar y efectuar el montaje de los componentes de su balanza Scout. -
Seite 51: Conexión A La Corriente Eléctrica
Balanzas Scout Series – STX ES-3 La balanza Scout dispone de un indicador iluminado que sirve para recordar que la balanza debe hallarse equilibrada para un pesaje preciso. Hay una burbuja de equilibrado en una pequeña ventana en la parte frontal de la balanza. Para equilibrar la balanza, ajustar los soportes en cada una de las esquinas hasta que la burbuja quede centrada en el círculo. -
Seite 52: Funcionamiento
ES-4 Balanzas Scout Series – STX 3. FUNCIONAMIENTO 3.1 Controles Botones de funciones Tabla 3-1. Botón Función primaria On - encendido Tara (Pulsación corta Enciende la balanza Introducir / borrar un valor Cero de tara. Si la balanza está encendida, la configura a cero Función secundaria Off - apagado... -
Seite 53: Principales Funcionesy Menú Principal (Mainmenu)
Balanzas Scout Series – STX ES-5 3.3 Principales Funcionesy Menú Principal (MainMenu) Cero Pesaje : Pulsar para configurar el valor que se muestra en pantalla a cero. Colocar un elemento en la bandeja. La pantalla indicará el peso bruto. Tara : Sin que haya ninguna carga en la bandeja, pulsar Tare –... -
Seite 54: Aplicaciones
ES-6 Balanzas Scout Series – STX APLICACIONES La balanza puede ser configurada para funcionar de modo operativo en varios modos de Aplicación . Tocar el botón situado arriba a la izquierda en el área de Aplicaciones (Applicationárea) para seleccionar el modo de la aplicación : The Scout Balance incorporates the following Applications. -
Seite 55: Pesaje
Balanzas Scout Series – STX ES-7 La pantalla principal de WEIGHING / Pesaje : Línea principal de la pantalla Icono de la Campos de referencia Aplicación Botones de la aplicación 4.1.1 Configuración de elementos Para ver o ajustar la configuración actual Tocar el botón ItemSettings –... -
Seite 56: Menu - Menú
USB mientras se halla conectado a la balanza. Para minimizar el riesgo de que surjan problemas, Ohaus sugiere usar un flash drive USB de buena calidad. Para obtener más información sobre este particular, por favor consulte el manual de instrucciones del interfaz Host USB. - Seite 57 Balanzas Scout Series – STX ES-9 4.2.1 Configuración de distintos elementos Para ver o modificar / ajustar la configuración actual, tocar el botón Configuración de elementos : Tocar el botón Configuración de elementos. Aparecerá la pantalla de configuración. SampleName- Nombre de la muestra: Introducir el nombre de la muestra mediante el teclado alfanumérico y luego pulse [Save] –...
- Seite 58 ES-10 Balanzas Scout Series – STX APW – Peso Medio Unitario del Elemento: Configurar un peso medio unitario del elementoconocido (APW) Para ajustar directamente el peso medio del elemento, tocar el botón APW Aparecerá una pantalla que permite introducir un dato numérico.
-
Seite 59: Configuración De Elementos
Balanzas Scout Series – STX ES-11 La pantalla principal delPesaje porcentual (PERCENT WEIGHING) : Línea principal de la pantalla Icono de la Aplicación Campos de referencia Botones de la aplicación 4.3.1 Configuración de elementos Para ver o modificar / ajustar la configuración actual Tocar el botón ItemSettings –... -
Seite 60: Pesaje Dinámico /Animales
ES-12 Balanzas Scout Series – STX 4.4 Pesaje dinámico /Animales Utilizar esta aplicación para pesar cargas inestables, como animales vivos (en movimiento). Pueden seleccionar dos modos de inicio – reconfiguración (start/reset) :Manual(start& stop – iniciar y detener mediante el pulsado de teclas) yAutomatic - Automático (start& stop - iniciar y detener de modo automático). -
Seite 61: Configuración De Elementos
Balanzas Scout Series – STX ES-13 4.4.1 ItemSettings – Configuración de elementos Para ver o modificar / ajustar la configuración actual : Tocar el botón ItemSettings – Configuración de elementos. Aparecerá la pantalla de Configuración (Settingsscreen). Averaging Time – Tiempo medio :El tiempo medio puede configurarse de 1 a 99 segundos. -
Seite 62: Determinación De La Densidad
ES-14 Balanzas Scout Series – STX Prepare la balanza como se muestra en el gráfico Gancho superior – Soporte del vaso situado a la derecha : 1. Apagar la balanza (Power off). 2. Extraer la plataforma de la balanza. 3. Insertar el gancho superior de pesaje en suspensión y el soporte del vaso / recipiente (el vaso no se suministra con el equipo). - Seite 63 Balanzas Scout Series – STX ES-15 Introducir el valor actual de la temperatura del agua, y luego pulsar [Save] - Guardar. La balanza calcula la densidad del agua en función de la temperatura del agua introducido(consultando una tabla de comprobación interna). Mida la temperatura actual del agua con un termómetro de precisión.
-
Seite 64: Medición De La Densidad De Un Sólido Mediante El Uso De Un Líquido Auxiliar
ES-16 Balanzas Scout Series – STX Una vez que se han determinado los pesos necesarios, se mostrará en pantalla la densidad de la muestra en g/cm (junto con el peso en suspensión – en el aire, y el peso en inmersión en el agua) en la pantalla de la aplicación(Applicationscreen). - Seite 65 Balanzas Scout Series – STX ES-17 DensityType – Típo de densidad: Líquido Nota :Cuando se configura la función Tipo de Densidad (DensityType)en el modo Líquido(Liquid), se desactivan las opciones de Tipo de líquido (Liquidtype) y de material poroso (Porous material). Confirmar que el valor por defecto del volumen del peso(sinkervolume) es correcto.
-
Seite 66: Medición De La Densidad De Un Material Poroso Mediante El Uso De Aceite
ES-18 Balanzas Scout Series – STX Una vez que se han determinado los pesos necesarios, se mostrará en pantalla la densidad de la muestra del líquido expresada en g/cm (junto con el peso en suspensión – en el aire, y el peso en inmersión en el agua) en la pantalla de la aplicación(Applicationscreen). - Seite 67 Balanzas Scout Series – STX ES-19 Pulsar [Start]– inicio para iniciar el proceso de determinación de la densidad. Paso 1 de 3 – Pesaje de una muestra libre de aceites en el aire. Siga las instrucciones que aparecen en pantalla y pulsar [Accept] - Aceptar para almacenar del valor del peso de la muestra en seco (en suspensión en el aire).
-
Seite 68: Pesaje De Comprobación
ES-20 Balanzas Scout Series – STX 4.6 Pesaje de comprobación - CheckWeighing Se utiliza el pesaje de comprobación para comprobar el peso de una muestra contra unos límites pre-establecidos. 1. Enla parte superior izquierda de la pantalla principal, seleccionar CheckWeighing – Pesaje de comprobación. -
Seite 69: Limites
Balanzas Scout Series – STX ES-21 4.6.2 Límites Para ver o modificar / ajustar la configuración actual Tocar el botónLimits - límites. Entonces Aparecerá la pantalla de configuración de los límites (limitssettingsscreenappears). Los valores de los límites de comprobación aparecerán en la pantalla de configuración (settingsscreen). -
Seite 70: Fijación De Un Valor En Pantalla
ES-22 Balanzas Scout Series – STX 4.7 DisplayHold – Fijación de un valor en pantalla La aplicación Displayhold– fijación de un valor en pantalla permite al usuario capturar y almacenar el peso estable más elevado de una serie de mediciones de pesaje. En la parte superior izquierda de la pantalla principal, seleccionar Displayhold–... -
Seite 71: Modo Peakhold- Fijación En Pantalla Del Valor Más Elevado
Balanzas Scout Series – STX ES-23 4.7.3 Modo Peakhold– Fijación en pantalla del valor más elevado Este modo le permite al usuario mantener fijado en pantalla el valor de lectura estable más elevado. Siga las instrucciones que aparecen en pantalla para comenzar. 1. - Seite 72 ES-24 Balanzas Scout Series – STX Se mostrará en la línea principal de la pantalla el peso de la muestra. 3. PulsarAccumulate - acumularpara sumar el peso del elemento al total. Cuando es, se muestra el nuevo total en la línea secundaria de la pantalla.
-
Seite 73: Introducir Masa Molar(Molar Mass)
Balanzas Scout Series – STX ES-25 SampleName - Nombre de la muestra :Introducir el nombre de la muestra. WeighingUnits – Unidades de pesaje :Selecciona la unidad de pesaje para el peso bruto y la tara. PrintSettings– Configuración de impresión: Para ver o modificar / ajustar las configuraciones de impresión 4.9.2 Introducir masa molar(Molar Mass) -
Seite 74: Conectando El Interfaz
* Los kits de interfaces disponibles pueden estar sujetos a cambios de acuerdo con las distintas normativas nacionales aplicables La palabra y el logotipo Bluetooth® son marcas registradas propiedad de Bluetooth SIG, Inc., OHAUS hace uso de dichas marcas al amparo de sus licencias de utilización. -
Seite 75: Configuraciones Del Menú
Balanzas Scout Series – STX ES-27 5. CONFIGURACIONES DEL MENÚ (MENU SETTINGS) 5.1 Navegación en el Menú (MenuNavigation) Toda la navegación en el menú se efectúa a través de la pantalla táctil. Para entrar en el menú, toque [Menu]a partir de cualquier pantalla principal de una Aplicación (ApplicationHome screen).Aparecerá... -
Seite 76: Calibrado
ES-28 Balanzas Scout Series – STX Salir del Menú y volver a la Aplicación actual Una vez confirmada la configuración, tocar Back - atrás oExit - Salirpara volver a la Aplicación. 5.2 Menú principal (MainMenu) A continuación de muestra la estructura del menú principal de la balanza Scout. 5.2.1 Calibrado Las Balanzas ScoutSTX permiten escoger entre dos métodos de la calibrado : El Calibrado de Rando (SpanCalibration) y el Calibrado Lineal (LinearityCalibration). -
Seite 77: Configuración De La Balanza
Balanzas Scout Series – STX ES-29 5.2.2 Balance Setup – Configuración de la balanza Entrar en este sub-menú para personalizar las funciones de la pantalla de la Balanza. Language UserSettings FilterLevel Auto Zero Tracking Idioma Configuraciones del Nivel de filtros Ajuste a cero automático usuario Stability... - Seite 78 ES-30 Balanzas Scout Series – STX Auto Off – Apagado automático Permite configurar el tiempo de inactividad tras el cual elequipo se apagará automáticamente. Off - apagado, 1 min., 5 mins., 10 mins. Nota :La función de apagado automático (Auto Off) funciona en bruto únicamente cuando el interruptor de seguridad está...
-
Seite 79: Unidades De Pesaje
Balanzas Scout Series – STX ES-31 5.2.3 Unidades de pesaje Entre en este sub-menú para activar las unidades de pesaje deseadas. Nota :Por causa de las distintas leyes y normativas nacionales de aplicación, es posible que el indicador no incluya algunas de las unidades de medida que aparecen en el siguiente listado. Sub-menú... -
Seite 80: Data Maintenance - Conservación / Almacenamiento De Datos
ES-32 Balanzas Scout Series – STX 5.2.4 Data Maintenance – Conservación / almacenamiento de datos Sub-menú de conservación / almacenamiento de datos : Exportar Importar a InfoBalanza partir de USB Exportar a USB* Exportar datos a un soporte flash drive USB. Pueden exportarse dos tipos de datos : - Configuraciones de los modos de las aplicaciones (Application Mode Settings) = Peso medio de la muestra (APW), peso de referencia (Ref.Weight) etc. - Seite 81 Balanzas Scout Series – STX ES-33 Velocidad de transmisión (BaudRate) Permite configurar la velocidad de transmisión (bits por segundo). 1200 = 1200 bps 2400 = 2400 bps 4800 = 4800 bps 9600 = 9600 bps 19200 = 19200 bps 38400 = 38400 bps 57600 = 57600 bps...
- Seite 82 ES-34 Balanzas Scout Series – STX Configuración de los criterios de impresión. OFF – apagado = Se imprimirán los encabezados en cada impresión ON – encendido = Los encabezados se imprimirán únicamente una vez al dí a Opciones de impresión* Configuración de los criterios de impresión.
- Seite 83 Balanzas Scout Series – STX ES-35 Selección (Selection) Nombre de la muestra (SampleName) Configurar el estatus. Configurar el estatus. Seleccionar todo = Todas las OFF – apagado = No se imprimirá el opciones estarán encendidas nombre de la muestra. Desmarcar todo = Todas las ON –...
- Seite 84 ES-36 Balanzas Scout Series – STX Línea para la firma (Signature Line) Configurar el estatus. Nombre de la balanza (Balance Name): XXXXXXX OFF – apagado = No se imprimirá la línea para la firma. Nombre de usuario (UserName) ON – encendido = Se imprimirá la Configurar el estatus.
- Seite 85 Balanzas Scout Series – STX ES-37 AltCommand (Comando de impresión alternativo) Comando de impresión alternativo (AlternatePrintCommand) Permite configurar el carácter a utilizar como comando alternativo para imprimir. Hay configuraciones disponibles de la A a la Z. No hay configuración por defecto exceptuando P.T o Z. Comando alternativo de ejecución del procedimiento de Tara (Alternate Tare Command) Permite configurar el comando alternativo para ejecutar el...
-
Seite 86: Datos Glp Y Gmp
ES-38 Balanzas Scout Series – STX Nombre de usuario (UserName) Configurar la identificación del usuario. Se hallan disponibles configuraciones alfanuméricas de hasta 25 caracteres. La configuración por defecto esScout. Nombre del proyecto (Project Name) Entrar en este menú para configurar la identificación del Proyecto. Se hallan disponibles configuraciones alfanuméricas de hasta 25 caracteres. -
Seite 87: Mantenimiento
Balanzas Scout Series – STX ES-39 6. Mantenimiento 6.1 Calibrado Es conveniente comprobar el calibrado con cierta periodicidad colocado un peso con un peso preciso establecido sobre la balanza para comprobar el resultado. Si resulta necesario efectuar una calibración ejecute el procedimiento de calibrado interno. Limpieza Riesgos de descarga eléctrica. -
Seite 88: Información Sobre El Servicio Técnico
Si el apartado de resolución de problemas no le resulta útil para resolver un problema, puede ponerse en contacto con su agente autorizado OHAUS. Para servicio o soporte técnico en los Estados Unidos puede llamar al servicio de atención al cliente al número gratuito :1-800-672- 7722 ext. - Seite 89 Balanzas Scout Series – STX ES-41 TABLA 7-1. Características técnicas MODELO STX123 STX223 STX222 STX422 STX622 STX1202 Capacidad (g) 1200 Legibilidad d (g) 0.001 0.001 0.01 0.01 0.01 0.01 Repetibilidad (desviació n 0.002 0.002 0.01 0.01 0.01 0.02 está ndar) (g) Linealidad (g) 0.003 0.003...
- Seite 90 ES-42 Balanzas Scout Series – STX TABLA 7-3. Características técnicas (Continuación) MODELO STX2202 STX421 STX621 STX2201 STX6201 STX8200 Capacidad (g) 2200 2200 6200 8200 Legibilidad d (g) 0.01 Repetibilidad (desviació n 0.02 está ndar) (g) Linealidad (g) 0.03 Masa de Calibrado de Rango 2 kg 200 g 300 g...
-
Seite 91: Gráficos Y Dimensiones
54 mm/2.1in. 8. ACTUALIZACIONES DE PROGRAMAS DE SOFTWARE Ohaus está sumida como empresa en un proceso de mejora continua y continuada de mejora del software de sus balanzas. Para obtener la última versión, por favor, póngase en contacto con su agente autorizado Ohaus o con la empresaOhaus. -
Seite 92: Cumplimiento De La Normativa Vigente
Para las instrucciones sobre la eliminación de residuos aplicable en Europa, por favor, consulte nuestra página web : www.OHAUS.com/weee. Gracias por contribuir a la protección del medio ambiente. -
Seite 93: Garantía Limitada
Bureau Veritus Quality International (BVQI), lo que confirma que el sistema de gestión de calidad de Ohaus es compatible con los requisitos de la norma ISO 9001. El 21 de junio de 2012, Ohaus Corporation, EE.UU., volvió a registrarse en el estándar ISO 9001:2008. - Seite 95 TABLE DES MATIÈRES 1. INTRODUCTION ....................1 Description ..............................1 Définition des signaux d'avertissement et des symboles ................3 Mesures de sécurité ............................. 3 Fonctionnalités ............................. 2 2. INSTALLATION ....................4 Installation des composants ......................... 4 2.1.1 Déverrouillage du verrou de transport ..................... 4 2.1.2 Installation du plateau de pesée ......................
- Seite 96 5.2.5 Communication ............................30 5.2.6 Données GLP et GMP ..........................35 5.2.7 Retour aux paramètres usine ........................36 5.2.8 Verrouillage ..............................36 6. MAINTENANCE ....................39 6.1 Étalonnage ..............................37 6.2 Nettoayge ..............................37 6.3 Dépannage ..............................37 6.4 Information de service ..........................39 7.
-
Seite 97: Introduction
Balances Scout Séries - STX FR-1 1. INTRODUCTION 1.1 Description La balance Scout STX est un instrument de pesée de grande qualité qui vous procurera des années de service si celui-ci est entretenu avec soin. Les modèles disponibles couvrent une plage de 120 g à... -
Seite 98: Fonctionnalités
FR-2 Balances Scout Séries - STX 1.4 Fonctionnalités Commandes tactiles : Accès rapide, graphique à toutes les fonctions de contrôle, utilisations et fonctionnalités. 2. INSTALLATION 2.1 Installation des composants Se reporter aux illustrations et aux instructions ci-dessous pour identifier et assembler la balance Scout et ses composants. -
Seite 99: Mise De Niveau De La Balance
Balances Scout Séries - STX FR-3 2.3 Mise de niveau de la balance La Scout a un indicateur de niveau lumineux rappelant que la balance doit être mise de niveau pour un pesage précis. Il y a un niveau à bulle dans une petite fenêtre ronde à l’avant de la balance. -
Seite 100: Commandes
FR-4 Balances Scout Séries - STX 3. OPÉRATION 3.1 Commandes Fonctions des boutons TABLEAU 3-1 Bouton Activé Tare Fonction primaire Saisir/Effacer une valeur (Appui bref Mettre la balance sous tension de tare. Zéro Si la balance est allumée, définit zéro Désactivé... -
Seite 101: Applications
Balances Scout Séries - STX FR-5 3.2 Principales fonctions et menu principal Zéro pour mettre Pesée : Appuyez sur l'affichage à zéro. Placez un objet sur le plateau. L'affichage indique le poids brut. Mesure de la tare : En l'absence de charge sur le plateau, appuyez sur Tare pour régler l'affichage à... -
Seite 102: Pesée
FR-6 Balances Scout Séries - STX La balance Scout comprend les applications suivantes. Pesée : Comptage Pesée en Pesée Détermination Pesée de de pièces pourcentage dynamique de la masse contrôle (animal) volumique Maintien de Totalisation Mole l'affichage Remarque : Avant d'exploiter une application, vérifiez que la balance soit de niveau et étalonnée. -
Seite 103: Nom De L'échantillon
Dans ce cas, débranchez le lecteur flash USB et essayez un autre lecteur flash USB. Ohaus décline toute responsabilité si les données sur le lecteur flash USB sont effacées ou si le lecteur flash USB est endommagé lorsqu'il est connecté à la balance. - Seite 104 FR-8 Balances Scout Séries - STX Principale ligne d'affichage Icône de Champs de référence l'application Boutons d'application : 4.2.1 Paramètres élément Pour afficher ou modifier les paramètres actuels, appuyez sur le bouton Paramètres élément : Appuyez sur le bouton Paramètres élément. L'écran Paramètres est affiché.
-
Seite 105: Pesée En Pourcentage
Balances Scout Séries - STX FR-9 APW : Définir un poids moyen connu de pièce (APW) Pour ajuster la valeur APW directement, appuyez sur le bouton APW Une fenêtre de saisie numérique est affichée. Saisir le poids de l’APW désiré, puis appuyez sur Sauvegarder. -
Seite 106: Recalculer Le Poids De Référence
FR-10 Balances Scout Séries - STX L'écran d'accueil PESÉE EN POURCENTAGE : Principale ligne d'affichage Icône de l’application ; Champs de de référence Boutons d'application : 4.3.1 Paramètres d’élément Pour afficher ou modifier les paramètres actuels Appuyez sur le bouton Paramètres élément. L'écran Paramètres est affiché. -
Seite 107: Pesée Dynamique /Animal
Balances Scout Séries - STX FR-11 4.4 Pesée dynamique (animal) Utilisez cette application pour peser une charge instable, comme un animal en mouvement. Deux modes de démarrage / réinitialisation différents peuvent être sélectionnés : Manuel (démarrer et arrêter par appui de touche) et automatique (démarrer et arrêter automatiquement). - Seite 108 FR-12 Balances Scout Séries - STX 4.4.1 Paramètres d’élément Pour afficher ou modifier les paramètres actuels : Appuyez sur le bouton Paramètres élément. L'écran Paramètres est affiché. Durée moyenne : La durée moyenne peut être réglée de 1 à 99 secondes. La valeur par défaut est de 5 secondes.
-
Seite 109: Détermination De La Masse Volumique
Un kit de détermination de la masse volumique (non inclus, vendu séparément) est conçu pour être utilisé avec la Ohaus Scout STX. Cependant, il est possible d’utiliser tout appareil de laboratoire qui répond aux exigences de mesure de masse volumique. L’utilisation de la pesée sous crochet est recommandée si le poids des matières solides est supérieur à... - Seite 110 FR-14 Balances Scout Séries - STX l'eau sur la base de la valeur de température de l'eau saisie (de table de correspondance interne). Mesure la température réelle de l'eau en utilisant un thermomètre de précision. Appuyez sur Retour pour revenir à l'écran d'accueil de Détermination de la masse volumique.
-
Seite 111: Calcul De La Masse Volumique D'un Solide À L'aide D'un Liquide Auxiliaire
Balances Scout Séries - STX FR-15 Lorsque les poids nécessaires ont été déterminés, la masse volumique de l'échantillon est affichée en g/cm (avec le poids en milieu aérien, le poids immergé) sur l'écran de l'application. Appuyez sur Démarrer pour réinitialiser toutes les valeurs de pesée et recommencer le processus. - Seite 112 FR-16 Balances Scout Séries - STX Type de masse volumique : liquide Remarque : lorsque le type de masse volumique est sélectionné sur liquide, la sélection du type de liquide et du type de matière poreuse est désactivée. Vérifiez que la valeur par défaut affichée (le volume de la masse) soit correcte.
- Seite 113 Balances Scout Séries - STX FR-17 Lorsque les poids nécessaires ont été déterminés, la masse volumique de l'échantillon liquide est affichée en g/cm (avec le poids en milieu aérien, le poids immergé) sur l'écran de l'application. Appuyezsur Démarrer pour réinitialiser toutes les valeurs de pesée et recommencer le processus.
-
Seite 114: Pesée De Contrôle
FR-18 Balances Scout Séries - STX Étape 1 sur 3 - Pesage de l'échantillon non imprégné d’huile en milieu aérien. Suivez les instructions à l'écran, puis appuyez sur Accepter pour stocker le poids de l’échantillon sec (« en milieu aérien »). Étape 2 sur 3 - Pesage de l'échantillon imprégné... -
Seite 115: Limites
Balances Scout Séries - STX FR-19 L'écran d'accueil de CONTRÔLE DE PESÉE : Principale ligne d'affichage Icône de l’application Champs de référence ; Boutons d'application : 4.6.1 Paramètres d’élément Pour afficher ou modifier les paramètres actuels Appuyez sur le bouton Paramètres élément. L'écran Paramètres est affiché. -
Seite 116: Maintien De L'affichage
FR-20 Balances Scout Séries - STX l‘intérieur de la plage limite. Dans ce cas, les limites dites INFÉRIEURE et SUPÉRIEURE sont toutes les deux des valeurs négatives. (La limite INFÉRIEURE doit être plus grande que la limite SUPÉRIEURE.) Placez l'article à peser sur la balance et appuyez sur TARE. Retirez une partie de l'article jusqu'à... -
Seite 117: Mode Maintien D'affichage
Balances Scout Séries - STX FR-21 4.7.2 Mode maintien d’affichage Ce mode permet à l'utilisateur de maintenir une lecture de poids stable. Suivez les instructions à l'écran pour commencer. 1. Placez un article sur le plateau et appuyez sur Maintien. Le processus de capture commence. -
Seite 118: Pesée Molaire
FR-22 Balances Scout Séries - STX Le poids de l'échantillon est affiché sur la ligne principale d’affichage. 3. Appuyez Cumul pour ajouter le poids de l’article au total. Une fois stabilisé, le nouveau total est indiqué sur la ligne d’affichage secondaire. 4. -
Seite 119: Saisir La Masse Molaire
Balances Scout Séries - STX FR-23 Unités de pesage : Sélectionnez l'unité affichée pour brut et tare. Paramètres d’impression : Pour afficher ou modifier les paramètres d'impression 4.9.2 Saisie masse molaire Appuyez sur Masse molaire, et u pavé tiliser le numérique pour saisir la valeur requise de la masse molaire de la substance, puis appuyez sur Sauvegarder. -
Seite 120: Connection De L'interface
Figure 4-4. Arrière de la balance * Ces kits d'interface varient selon les réglementations locales Les marques verbales et les logos Bluetooth® sont des marques déposées appartenant à Bluetooth SIG, Inc. ; l’exploitation de ces marques par OHAUS est autorisée sous licence. -
Seite 121: Paramètres Menu
Balances Scout Séries - STX FR-25 5. PARAMÈTRES MENU 5.1 Navigation dans le menu Toute la navigation dans le menu est effectuée en touchant l'écran. Pour entrer dans le menu, appuyez Menu à partir de tout écran d’accueil d’application. Le menu principal s’affiche, avec des touches pour Retouret Sortie. -
Seite 122: Menu Principal
FR-26 Balances Scout Séries - STX 5.2 Menu principal La structure du menu principal de la balance Scout est illustrée ci-dessous. 5.2.1 Étalonnage Les balances Scout ST offrent le choix de deux méthodes d’étalonnage : Étalonnage par intervalle de mesure et étalonnage linéaire. Remarque : ne pas toucher la balance lors de l’étalonnage. - Seite 123 Balances Scout Séries - STX FR-27 5.2.2 Configuration de la balance Dans ce sous-menu, on peut personnaliser l’affichage de la balance. Langue Paramètres Niveau filtre Suivi du zéro utilisateur automatique Stabilité Tarage Date et heure automatique Sous-menu de configuration de la balance Les paramètres d'usine par défaut sont indiqués ci-dessous, en caractères gras.
- Seite 124 FR-28 Balances Scout Séries - STX Arrêt automatique Réglez le temps d’inactivité qui entraîne l’arrêt de l’appareil. Arrêt, 1 min, 5 min, 10 min Remarque : L’arrêt automatique ne fonctionne seulement qu’en brut ou lorsque l'interrupteur de sécurité est en position de marche. Aide à...
-
Seite 125: Unités De Pesage
Balances Scout Séries - STX FR-29 5.2.3 Unités de pesage Entrez dans ce sous-menu pour activer les unités de mesure désirées. Remarque : En raison de lois nationales, l'indicateur peut ne pas inclure certaines des unités de mesure énumérée. Sous-menu des unités milligramme gramme kilogramme... -
Seite 126: Maintenance Des Données
FR-30 Balances Scout Séries - STX 5.2.4 Maintenance des données Sous-menu de maintenance des données : Exportation Importation Information vers une clef d’une clef balance Exportation vers une clef USB Exporter des données vers un lecteur flash USB. Deux types de données peuvent être exportés : - Paramètres du mode application = APW, Poids de référence, etc. - Seite 127 Balances Scout Séries - STX FR-31 Débit en bauds Réglez la vitesse de transmission (bits par seconde). 1200 = 1200 bps 2400 = 2400 bps 4800 = 4800 bps 9600 = 9600 bps 19200 = 19200 bps 38400 = 38400 bps 57600 = 57600 bps 115200...
- Seite 128 FR-32 Balances Scout Séries - STX En-tête simple uniquement Définir les critères d'impression. ARRÊT = les en-têtes sont imprimés pour toutes les demandes d'impression MARCHE = les en-têtes sont imprimés une fois par jour Options d'impression* Définir les critères d'impression. Imprimante = imprimer des données sur une imprimante = imprimer des données sur un ordinateur...
- Seite 129 Balances Scout Séries - STX FR-33 Sélection Nom de l’échantillon Définir le statut. Définir le statut. Sélectionnez Tous= toutes les options ARRÊT = le nom de l’échantillon seront activées n'est pas imprimé. Désélectionnez Tous = toutes les MARCHE = le nom de l’échantillon options seront désactivées est imprimé.
- Seite 130 FR-34 Balances Scout Séries - STX Nom d'utilisateur Ligne de signature Définir le statut. Définir le statut. ARRÊT = le nom de ARRÊT = la ligne de l’utilisateur n'est pas imprimé. signature n'est pas imprimée. MARCHE = le nom de MARCHE = la ligne de signature est l’utilisateur est imprimé.
-
Seite 131: Données Glp Et Gmp
Balances Scout Séries - STX FR-35 Autre commande de tare Paramétrez le caractère de l’autre commande pour Tare. Des réglages de A à Z sont disponibles. Le paramétrage par défaut est vide, sauf P et Z. Autre commande de Zéro Paramétrez le caractère de l’autre commande pour Zéro. -
Seite 132: Retour Aux Paramètres Usine
FR-36 Balances Scout Séries - STX Pied de page Active l'impression des en-têtes BPL. Il y a deux en-têtes disponibles. Un paramétrage alphanumérique jusqu'à 25 caractères est disponible pour chacun des paramètres d'en-tête. . 5.2.7 Retour aux paramètres d’usine Utilisez ce sous-menu pour réinitialiser les menus à leurs paramètres d'usine par défaut. Tout réinitialiser = réinitialiser tous les menus à... -
Seite 133: Étalonnage
Occupé (tare, zéro, impression) Attendre jusqu'à la fin 6.4 Service d'information Si la section de dépannage ne permet pas de résoudre ou ne décrit pas le problème, contacter l’agent d’entretien agréé OHAUS. Pour un service d'assistance ou une prise en charge... -
Seite 134: Fiche Technique
États-Unis, composer le numéro gratuit 1-800-672-7722, poste 7852 entre 8h00 et 17h00 (GMT - 5). Un spécialiste du service produit OHAUS est disponible pour apporter son aide. En dehors des États-Unis, bien vouloir se rendre sur notre site web, www.ohaus.com pour rechercher la filiale OHAUS la plus proche. - Seite 135 Balances Scout Séries - STX FR-39 TABLEAU 7-1. SPÉCIFICATIONS MODÈ LE STX123 STX223 STX222 STX422 STX622 STX1202 Capacité (g) 1200 Lisibilité d (g) 0.001 0.001 0.01 0.01 0.01 0.01 Ré pé tabilité (std. dé v.) (g) 0.002 0.002 0.01 0.01 0.01 0.02 Liné...
- Seite 136 FR-40 Balances Scout Séries - STX TABLEAU 7-3. SPÉCIFICATIONS (suite) MODÈ LE STX2202 STX421 STX621 STX2201 STX6201 STX8200 Capacité (g) 2200 2200 6200 8200 Lisibilité d (g) 0.01 Ré pé tabilité (std. dé v.) (g) 0.02 Liné arité (g) 0.03 Masse d'é...
-
Seite 137: Plans Et Dimensions
202 mm / 8,0 pouces 224 mm / 8,8 pouces 54 mm / 2,1 pouces 8. MISES À JOUR DE LOGICIEL Ohaus améliore continuellement le logiciel de la balance. Pour obtenir la dernière version, veuillez contacter votre revendeur Ohaus agréé ou Ohaus Corporation. -
Seite 138: Conformité
Ce produit est conforme aux normes harmonisées applicables des directives européennes 2011/65 / UE (RoHS), 2014/30 / UE (CEM), 2014/35 / UE (LVD) et 2014/31 / UE (IPFNA). La déclaration de conformité de l'UE est disponible en ligne à www.ohaus.com/ce. EN 61326-1 CAN/CSA-C22.2 No. 61010-1 UL Std. - Seite 139 En 1994, Ohaus Corporation, États-Unis, a reçu la certification ISO 9001 du Bureau Veritas Quality International (BVQI), qui confirme que le système de gestion de la qualité de Ohaus est conforme aux spécifications de la norme ISO 9001. Le 21 juin 2012, Ohaus Corporation, USA,...
-
Seite 140: Garantie Limitée
Séries - STX GARANTIE LIMITÉE Les produits Ohaus sont garantis contre des défauts matériels et vices de fabrication à partir de la date de livraison et durant toute la durée de la période de garantie. Pendant la période de garantie, Ohaus va réparer, ou, selon son propre choix, remplacer sans frais tout (tous) composant(s) qui s'avère(ent) défectueux, à... - Seite 141 INHALTSVERZEICHNIS 1. EINFÜHRUNG ....................1 Beschreibung ............................... 1 Definition der Warnhinweise und Symbole ....................3 Vorsichtsmaßnahmen ..........................3 Funktionen ..............................2 2. INSTALLATION ....................4 Installationskomponenten ..........................4 2.1.1 Lösen der Transportsicherung ......................... 4 2.1.2 Installation der Waagschale ........................4 2.1.3 Sicherheitsslot ............................
- Seite 142 5.2.5 Kommunikation ............................31 5.2.6 GLP und GMP Daten ..........................35 5.2.7 Zurücksetzen auf Werkseinstellung ......................36 5.2.8 Sperren ..............................36 6. WARTUNG ...................... 39 6.1 Kalibrierung ..............................37 6.2 Reinigung ..............................37 6.3 Fehlerbehebung ............................37 6.4 Service Informationen ........................... 40 7.
-
Seite 143: Einführung
SCOUT WAAGEN-SERIEN - STX DE-1 1. EINFÜHRUNG 1.1 Beschreibung Der Scout STX Waage ist eine hochwertige Waage, die wenn sie richtig gepflegt wird jahrelang ihre Dienste tut. Modelle sind von 120 g bis 8200 g erhältlich. 1.2 Definition von Warnhinweisen und Symbolen Sicherheitshinweise sind mit Warnhinweisen und Symbolen gekennzeichnet. -
Seite 144: Eigenschaften
DE-2 SCOUT WAAGEN-SERIEN - STX 1.4 Eigenschaften Tippschaltungen: Schneller, grafischer Zugriff auf alle Steuerfunktionen, Anwendungen und Funktionen. 2. INSTALLATION 2.1 Installieren der Komponenten Schauen Sie auf die Abbildungen und Anweisungen unten, um die Komponenten zu identifizieren und zu sehen, wie Sie diese an Ihre Scout Waage montieren. Alle Komponenten müssen vor Verwendung der Waage zusammengebaut werden. -
Seite 145: Nivellierung Der Waage
SCOUT WAAGEN-SERIEN - STX DE-3 2.3 Nivellieren der Waage Die Scout hat eine beleuchtete Nivellierungsanzeige, die daran erinnert, dass die Waage zum genauen Wiegen nivelliert werden muss. Auf der Vorderseite der Waage befindet sich in einem kleinen runden Fenster eine Nivellierungsanzeige. Um die Waage zu nivellieren, stellen Sie die Füße an jeder Ecke so ein, dass die Blase im Kreis zentriert ist. -
Seite 146: Betrieb
DE-4 SCOUT WAAGEN-SERIEN - STX 3. BETRIEB 3.1 Bedienelemente Tastenfunktionen Tabelle 3-1. Taste Tara Primärfunktion Eingeben/deaktivieren Schaltet die Waage ein. (Kurz drücken) eines Tara-Werts. Zero Wenn die Waage eingeschaltet ist, steht sie auf Zero (Null) Sekundärfunktion Schaltet die Waage aus. (Lange drücken) Hinweise: Kurzes Drücken: Drücken für weniger als 1 Sekunde. -
Seite 147: Hauptfunktionen Und Hauptmenü
SCOUT WAAGEN-SERIEN - STX DE-5 Hauptfunktionen und Hauptmenü Drücken Sie auf die Null, um die Anzeige auf Zero zu setzen. Legen Sie einen Wiegen: Gegenstand auf die Schale. Das Display zeigt das Bruttogewicht an. Tarieren: Ohne Last auf der Schale, drücken Sie Tara, um die Anzeige auf Zero (Null) zu setzen. -
Seite 148: Wiegen
DE-6 SCOUT WAAGEN-SERIEN - STX Der Scout Waage enthält die folgenden Anwendungen. Wiegen: Stückzählung Prozentgewichtung Dynamische Dichtebestimmun Kontrollwiege (tierisches) Wiegen Display Summieren Mole Hold Hinweis: Bevor Sie irgendeine Anwendung benutzen, stellen Sie sicher, dass die Waage nivelliert und kalibriert ist. 4.1 Wiegen Verwenden Sie diese Anwendung, um das Gewicht der Gegenstände in der ausgewählten Maßeinheit festzulegen. -
Seite 149: Probename
USB Flash-Laufwerk während es an die Waage angeschlossen ist kaputt geht. Um das Risiko von auftretenden Problemen zu minimieren, rät OHAUS, einen hochwertigen USB-Stick zu verwenden. Für weitere Informationen, schauen Sie bitte in die Bedienungsanleitung des USB Anbieters. -
Seite 150: Artikeleinstellungen
DE-8 SCOUT WAAGEN-SERIEN - STX Der Standard-Startbildschirm für STÜCKZÄHLEN: Hauptanzeigenzeile Anwendungs Referenzfelder symbol Anwendungstasten 4.2.1 Artikeleinstellungen Zum Anzeigen oder Anpassen der aktuellen Einstellungen, tippen Sie auf die Taste Artikeleinstellungen: Tippen Sie auf die Taste Artikeleinstellungen. Der Bildschirm Einstellungen wird angezeigt. Probename: Geben Sie mit der alphanumerischen Tastatur einen Probenamen ein und drücken Sie auf... -
Seite 151: Prozentwägen
SCOUT WAAGEN-SERIEN - STX DE-9 APW: Stellen Sie ein bekanntes Durchschnittliches Stückgewicht (APW) ein Um den APW-Wert direkt einzustellen, berühren Sie die APW-Taste Ein numerisches Eingabefenster erscheint. Geben Sie das gewünschte APW-Gewicht ein und drücken Sie dann auf Speichern. Das Display kehrt mit dem neuen APW-Wert im Referenzfeld zum Startbildschirm der Anwendung zurück. -
Seite 152: Artikeleinstellungen
DE-10 SCOUT WAAGEN-SERIEN - STX Der PROZENTWÄGE Startbildschirm: Hauptanzeigenzeile Anwendungssymbol Referenzfelder Anwendungstasten 4.3.1 Artikeleinstellungen Zum Anzeigen oder Anpassen der aktuellen Einstellungen Tippen Sie auf die Taste Artikeleinstellungen. Der Bildschirm Einstellungen wird angezeigt. Probename: Geben Sie mit der alphanumerischen Tastatur einen Probenamen ein und drücken Sie auf Speichern, um den Namen zu speichern. - Seite 153 SCOUT WAAGEN-SERIEN - STX DE-11 4.4 Dynamische/Tierwägung Verwenden Sie diese Anwendung, um eine instabile Last zu wiegen, wie zum Beispiel ein sich bewegendes Tier. Zwei verschiedene Start/Zurücksetzen-Modi stehen zur Auswahl: Manuell (Start und Stopp über Tastendruck) und Automatisch (automatisch starten und stoppen). Der DYNAMISCHE WIEGEN Startbildschirm: Hauptanzeigezeile Referenzfelder...
- Seite 154 DE-12 SCOUT WAAGEN-SERIEN - STX 4.4.1 Artikeleinstellungen Zum Anzeigen oder Anpassen der aktuellen Einstellungen: Tippen Sie auf die Taste Artikeleinstellungen. Der Bildschirm Einstellungen wird angezeigt. Mittelungszeit: Die Mittelungszeit kann von 1 bis 99 Sekunden eingestellt werden. Der Standardwert ist 5 Sekunden. Automatischer Modus: Der Zyklus beginnt, wenn ein Objekt (Tier) auf die Schale gelegt wird, und der gehaltene Wert...
-
Seite 155: Dichtebestimmung
Objekte zu bestimmen. Ein Dichtebestimmungs-Kit (nicht im Lieferumfang enthalten aber separat erhältlich) ist so konzipiert, dass es mit der OHAUS Scout STX verwendet werden kann. Jedoch können Sie jedes beliebige Laborgerät verwenden, das den Anforderung der Dichtemessungen gerecht wird. Wenn das Feststoffgewicht mehr als 200 g beträgt, wird empfohlen, den Unterflurwiegehaken zu verwenden. - Seite 156 DE-14 SCOUT WAAGEN-SERIEN - STX Ein numerisches Eingabefenster erscheint. Geben Sie die aktuelle Wassertemperatur ein, und drücken Sie dann auf Speichern. Die Waage berechnet die Wasserdichte bezogen auf den eingegebenen Wassertemperaturwert (interne Referenztabellen). Messen Sie die tatsächliche Wassertemperatur mit einem Präzisionsthermometer.
-
Seite 157: Messen Der Dichte Eines Festkörpers Mit Einer Hilfsflüssigkeit
SCOUT WAAGEN-SERIEN - STX DE-15 Sobald die erforderlichen Gewichte bestimmt wurden, wird die Dichte der Probe auf dem Anwendungsbildschirm in g/cm angezeigt (zusammen mit dem Gewicht in Luft und in Wasser). Drücken Sie auf Start, um alle Gewichtswerte zurückzusetzen und den Vorgang neu zu starten. Die Waage kann auch verwendet werden, um die Dichte eines schwimmfähigen Materials unter Verwendung von Wasser zu messen. -
Seite 158: Messen Der Dichte Einer Flüssigkeit Mit Einem Kalibrierten Senkblei (Nicht Mitgeliefert)
DE-16 SCOUT WAAGEN-SERIEN - STX 4.5.3 Messen der Dichte einer Flüssigkeit mit einem kalibrierten Senkblei (nicht mitgeliefert) Aktivieren Sie diese Funktion, geben Sie auf dem Bildschirm Artikeleinstellungen die Dichte ein und wählen Sie das folgende: Dichtetyp: Flüssigkeit Hinweis: wenn der Dichtetyp auf Flüssigkeit gesetzt ist, sind die Auswahlmöglichkeit Flüssigkeitsart und Poröses Material deaktiviert. -
Seite 159: Messen Der Dichte Von Porösem Material Unter Verwendung Von Öl
SCOUT WAAGEN-SERIEN - STX DE-17 Schritt 2 von 2 - Wiegen Sie das Senkblei eingetaucht in Testflüssigkeit. Folgen Sie den Bildschirmanweisungen, und drücken Sie dann auf Akzeptieren, um das Senkbleigewicht (in Flüssigkeit eingetaucht) zu speichern. Sobald die erforderlichen Gewichte bestimmt wurden, wird die Dichte der Flüssigkeitsprobe auf dem Anwendungsbildschirm in g/cm angezeigt (zusammen mit dem Gewicht in der... - Seite 160 DE-18 SCOUT WAAGEN-SERIEN - STX Drücken Sie auf Start, um mit der Dichtebestimmung zu beginnen. Schritt 1 von 3 - Wiegen Sie die nicht- geölte Probe in Luft. Folgen Sie den Bildschirmanweisungen, und drücken Sie dann auf Akzeptieren, um das Gewicht der trockenen Probe (in Luft) zu speichern.
-
Seite 161: Kontrollwiegen
SCOUT WAAGEN-SERIEN - STX DE-19 4.6 Kontrollwiegen Kontrollwiegen wird verwendet, um das Gewicht einer Probe mit Zielgrenzwerten abzugleichen. 1. Im oberen linken Teil des Startbildschirms, wählen Sie Kontrollwiegen. 2. Die Standard- (oder letzte) Kontrollwiegegrenzwerte werden angezeigt. 3. Geben Sie die Objekte auf die Waagschale. 4. -
Seite 162: Display Hold
DE-20 SCOUT WAAGEN-SERIEN - STX Beenden, um zum Startbildschirm der Anwendung zurückzukehren. Positive Kontrolle Positive Kontrolle wird verwendet, um festzustellen, wann dass der Waage hinzugefügte Material innerhalb des Zielbereichs ist. In diesem Fall müssen die ÜBER- und UNTER- Grenzwerte positive Werte sein. (Der ÜBER-Grenzwert muss größer als der UNTER-Grenzwert sein.) Fügen Sie der Waage Material hinzu bis es sich innerhalb des ACCEPT-Bereichs befindet. -
Seite 163: Display Hold Modus
SCOUT WAAGEN-SERIEN - STX DE-21 4.7.1 Artikeleinstellungen Zum Anzeigen oder Anpassen der aktuellen Einstellungen: Tippen Sie auf die Taste Artikeleinstellungen. Der Bildschirm Einstellungen wird angezeigt. Modus: Wählen Sie den Modus, um entweder Peak Hold oder Display Hold (Standard) einzustellen. Probenamen: Geben Sie einen Probenamen ein. -
Seite 164: Mole Wiegen
DE-22 SCOUT WAAGEN-SERIEN - STX 1. Tippen Sie auf den oberen linken Teil des Startbildschirms. Das Anwendungsmenü erscheint. Tippen Sie auf das Symbol Weiter, um auf die nächste Seite zu gelangen und wählen Sie Summieren wenn sie angezeigt wird. 2. Um zu beginnen legen Sie den Artikel i die Waagschale. -
Seite 165: Artikeleinstellungen
SCOUT WAAGEN-SERIEN - STX DE-23 Hauptanzeigezeile Anwendungssymbol Referenzfelder Anwendungstasten 4.9.1 Artikeleinstellungen Zum Anzeigen oder Anpassen der aktuellen Einstellungen: Tippen Sie auf die Taste Artikeleinstellungen. Der Bildschirm Einstellungen wird angezeigt. Flüssigkeitsvolumen: Stellen Sie das Lösungsvolumen der Flüssigkeit ein, falls die Molarität-Info benötigt wird. Probenamen: Geben Sie einen Probenamen ein. -
Seite 166: Zusätzliche Funktionen
DE-24 SCOUT WAAGEN-SERIEN - STX 4.10 Zusätzliche Funktionen 4.10.1 Wiegen unterhalb Die Scout Waage ist mit einem Unterflurwiegehaken für Unterflurwägungen ausgerüstet. Die Unterflurwiegehaken befindet sich wie unten angezeigt an der Rückseite der Batterieabdeckung. Um diese Funktion zu verwenden, entfernen Sie zum Wiegen die rote Schutzabdeckung unterhalb der Öffnung. -
Seite 167: Anschließen Der Schnittstelle
Abbildung 4-3. Rückseite der Waage * Schnittstellen-Kits können nach den örtlichen Bestimmungen variieren Bluetooth® Warenzeichen und Logos sind eingetragene Warenzeichen der Bluetooth SIG, Inc. und die Verwendung dieser Marken durch OHAUS erfolgt unter Lizenz. 5. MENÜEINSTELLUNGEN Menü Navigation Jede Menü-Navigation wird durch Berührung des Displays durchgeführt. Um das Menü... -
Seite 168: Ändern Der Einstellungen
DE-26 SCOUT WAAGEN-SERIEN - STX 5.1.1 Ändern der Einstellungen Um eine Menüeinstellung zu ändern, navigieren Sie zu dieser Einstellung mit den folgenden Schritten: Öffnen Sie das Menü Von jedem Anwendungsbildschirm aus, tippen Sie auf Menü. Die Hauptmenüliste erscheint auf dem Display. Wählen Sie das Untermenü... -
Seite 169: Linearitätskalibrierung
SCOUT WAAGEN-SERIEN - STX DE-27 Vor Beginn der Kalibrierung, stellen Sie sicher, dass das Menü Sicherheitsschalter entsperrt ist. Wenn die Waage eingeschaltet ist und sich keine Last auf der Waagschale befindet, tippen Sie auf Bereichskalibrierung, um das Verfahren einzuleiten. Zusätzliche zu verwendende Kalibrierungswerte werden auf dem Display angezeigt. -
Seite 170: Berührungskalibrierung
DE-28 SCOUT WAAGEN-SERIEN - STX Benutzereinstellungen Berührungskalibri Helligkeit Auto Dimmen Auto-Aus Nivellierungsh erung ilfe Berührungskalibrierung Für die Kalibrierung der Display- Berührungsfunktion folgen Sie den Bildschirmanweisungen. Helligkeit Stellen Sie die Helligkeit des Displays ein. Niedrig = niedrige Bildschirmauflösung Medium = normale Bildschirmauflösung Hoch = hohe Bildschirmauflösung Auto Dimmen... -
Seite 171: Stabilität
SCOUT WAAGEN-SERIEN - STX DE-29 Stabilität Stellen Sie den Betrag ein, um den der Messwert während der Stabilitätssymbol an bleibt variieren darf. 0,5 Abstufung = 0,5 Gradeinteilung 1 Abstufung = 1 Gradeinteilung 2 Abstufungen = 2 Gradeinteilungen 5 Abstufungen = 0,5 Gradeinteilungen Auto Tarieren Stellen Sie den automatischen Tarierstatus ein. -
Seite 172: Benutzerdefinierte Einheit
DE-30 SCOUT WAAGEN-SERIEN - STX 5.2.3.1 Benutzerdefinierte Einheit Verwenden Sie die benutzerdefinierte Einheit, um das Gewicht in einer alternativen Maßeinheit anzuzeigen. Die benutzerdefinierte Einheit wird mit Hilfe eines Umrechnungsfaktors basierend auf der Gramm-Einheit definiert, wobei der Umrechnungsfaktor die Anzahl der benutzerdefinierten Einheiten pro Gramm ist - in wissenschaftlicher Schreibweise ausgedrückt (Faktor x 10^Exponent). -
Seite 173: Kommunikation
SCOUT WAAGEN-SERIEN - STX DE-31 Waage Info Informationen zur Waage: Waage-Typ, Waage-ID, Kapazität, Lesbarkeit und Software-Version. *Nur verfügbar, wenn der USB-Host verbunden und das USB-Flash-Laufwerk installiert ist. 5.2.5 Kommunikation Gehen Sie auf dieses Menü, um die externen Kommunikationsmethoden sowie die Druckparameter zu definieren. - Seite 174 DE-32 SCOUT WAAGEN-SERIEN - STX Handshake Stellen Sie die Steuerflussmethode ein. KEINE = kein Handshake Xon-Xoff = XON/XOFF-Handshake Hinweis: Das gewählte Zeichen kann nur für einen Befehl verwendet werden. Druckeinstellung Untermenü: Druckausgabe Auto-Print Druckinhalt Zuführung Format Alt. Befehl Druckausgabe Nur bei Stabilem Gewicht Stellen Sie die Druckkriterien ein.
- Seite 175 SCOUT WAAGEN-SERIEN - STX DE-33 Belastung = druckt, wenn die angezeigte Last stabil ist. Belastung und Null = druckt, wenn die angezeigte Last - oder der Nullmesswert stabil ist. Wenn INTERVALL gewählt wird, stellen Sie das Zeitintervall mit der Zifferntastatur ein. Einstellungen von 1 bis 3600 Sekunden sind möglich.
-
Seite 176: Zuführung
DE-34 SCOUT WAAGEN-SERIEN - STX = der Waage-ID-Wert wird Informationen gedruckt. Legen Sie den Status fest. AUS = die Referenzinfo wird nicht gedruckt. Waage-ID: XXXXXXX = die Referenzinfo wird gedruckt. Waagen-Name Hinweis: Siehe unten für weitere Klärung Legen Sie den Status fest. AUS = der Name der Waage wird Signaturzeile nicht gedruckt. -
Seite 177: Glp Und Gmp Daten
SCOUT WAAGEN-SERIEN - STX DE-35 4 ZEILEN = bewegt das Papier nach dem Drucken um vier Zeilen nach oben. Format Stellen Sie das Druckformat ein. EINZELNE ZEILE ein einzelner Zeilenausdruck wird erstellt. Ein TAB-Trennzeichen wird zwischen jede Datenausgabe hinzugefügt. MEHRERE ZEILEN ein mehrzeiliger Ausdruck wird erstellt. -
Seite 178: Zurücksetzen Auf Werkseinstellung
DE-36 SCOUT WAAGEN-SERIEN - STX Waagen-Name Stellen Sie die Waagen-Identifikation ein. Alphanumerische Einstellungen von bis zu 25 Zeichen stehen zur Verfügung. Die Standardeinstellung ist leer. Benutzername Stellen Sie die Benutzeridentifikation ein. Alphanumerische Einstellungen von bis zu 25 Zeichen stehen zur Verfügung. -
Seite 179: Instandhaltung
SCOUT WAAGEN-SERIEN - STX DE-37 Klicken Sie auf ein Menü und wählen Sie. AUS = das Untermenü ist nicht gesperrt. = das Untermenü ist gesperrt. 6. INSTANDHALTUNG 6.1 Kalibrierung Überprüfen Sie die Kalibrierung in regelmäßigen Abständen, indem Sie ein genaues Gewicht auf die Waage legen und das Ergebnis ablesen. -
Seite 180: Service Informationen
Wenn der Abschnitt zur Fehlerbehebung Ihr Problem nicht löst oder beschreibt, kontaktieren Sie Ihren autorisierten OHAUS Service-Agent. Für Hilfe oder um den technischen Support in den USA zu erreichen, rufen Sie von 8.00 bis 17.00 Uhr EST. gebührenfrei 1-800-672-7722 ext. - Seite 181 SCOUT WAAGEN-SERIEN - STX DE-39 TABELLE 7-1. TECHNISCHE DATEN MODELL STX123 STX223 STX222 STX422 STX622 STX1202 Kapazitä t (g) 1200 Lesbarkeit d (g) 0.001 0.001 0.01 0.01 0.01 0.01 Wiederholbarkeit (std. Bez.) (g) 0.002 0.002 0.01 0.01 0.01 0.02 Linearitä t (g) 0.003 0.003 0.01...
- Seite 182 DE-40 SCOUT WAAGEN-SERIEN - STX TABELLE 7-3. TECHNISCHE DATEN (Fortsetzung) MODELL STX2202 STX421 STX621 STX2201 STX6201 STX8200 Kapazitä t (g) 2200 2200 6200 8200 Lesbarkeit d (g) 0.01 Wiederholbarkeit (std. bez.) (g) 0.02 Linearitä t (g) 0.03 Bereichskalibrierungsmasse 2 kg 200 g 300 g 2 kg...
-
Seite 183: Zeichnungen Und Abmessungen
202 mm/ 8,0 Zoll 224 mm / 8,8 Zoll 54 mm / 2,1 Zoll 8. SOFTWARE-UPDATES OHAUS wird die Software der Waage kontinuierlich verbessern. Um die neueste Version zu erhalten, kontaktieren Sie bitte Ihren autorisierten OHAUS-Händler oder das OHAUS Unternehmen. -
Seite 184: Compliance
Standard Dieses Produkt entspricht den geltenden harmonisierten Normen der EU-Richtlinien 2011/65/EU (RoHS), 2014/30/EU (EMV), 2014/35/EU (LVD) und 2014/31/EU (NAWI). Die EU-Konformitätserklärung ist im Internet unter www.ohaus.com/ce verfügbar. EN 61326-1 CAN/CSA-C22.2 No. 61010-1 UL Std. No. 61010-1 Wichtiger Hinweis für geeichte Waagen in der EU... - Seite 185 Ohaus Corporation, USA wurde 1994 von BureauVeritas Quality International (BVQI) die ISO 9001 Zertifizierung verliehen. Die Zertifizierung bestätigt, dass das Qualitätsmanagementsystem von Ohaus die Anforderungen für den ISO 9001 Standard erfüllt. Am 21 Juni 2009 wurde Ohaus Corporation, USA für den ISO 9001:2008 Standard erneut zertifiziert.
-
Seite 186: Beschränkte Garantie
Diese Garantie ist ungültig, wenn das Produkt versehentlich oder missbräuchlich beschädigt oder radioaktiven oder zersetzenden Stoffen ausgesetzt wurde, Fremdstoffe ins Innere des Produktes eingedrungen sind, oder wenn der Defekt aus einer nicht von Ohaus durchgeführten Modifikation oder Serviceleistung resultiert. Falls keine ausgefüllte Garantiekarte vorliegt beginnt die Garantiezeit mit dem Datum der Auslieferung an den autorisierten Händler. - Seite 187 INDICE 1. INTRODUZIONE ....................1 Descrizione ..............................3 Definizione di Segnali e Simboli di Avvertimenti ..................3 Precauzioni di Sicurezza ..........................3 1.4 Caratteristiche ..............................4 2. INSTALLAZIONE ....................4 Installazione di Componenti ......................... 4 2.1.1 Liberare il Blocco Trasporto ........................4 2.1.2 Installazione del Piatto di Pesata della Bilancia ..................
- Seite 188 5.2.4 Dati della Manutenzione ..........................31 5.2.5 Comunicazione ............................32 5.2.6 Dati GLP e GMP ............................37 5.2.7 Reimpostazione dalla fabbrica ........................38 5.2.8 Bloccare ..............................38 6. MANUTENZIONE .................... 39 6.1 Calibrazione ..............................39 6.2 Pulizia ................................39 6.3 Risoluzione dei problemi ..........................39 6.4 Informazioni sull'Assistenza ........................
-
Seite 189: Introduzione
BILANCE SERIE SCOUT - STX IT-1 1. INTRODUZIONE 1.1 Descrizione La bilancia Scout STX è uno strumento di pesata ad alta qualità che vi darà anni di assistenza se fosse accuratamente curata. I Modelli sono disponibili con gamme da 120g a 8.200g. 1.2 Definizione dei Segnali di Avvertimento e Simboli Le note di Sicurezza sono segnate con parole di segnali e simboli di avvertimento. -
Seite 190: Caratteristiche
IT-2 BILANCE SERIE SCOUT - STX 1.4 Caratteristiche Comandi sfiorare lo schermo: Veloce, accesso grafico a tutte le funzioni, le applicazioni e le caratteristiche di controllo 2. INSTALLAZIONE 2.1 Installazione dei Componenti Fare riferimento alle illustrazioni e istruzioni qui di seguito per identificare e montare la vostra bilancia Scout con i propri componenti. -
Seite 191: Livellare La Bilancia
BILANCE SERIE SCOUT - STX IT-3 2.3 Livellare la Bilancia La Scout ha un indicatore di livello illuminato come promemoria che la bilancia deve essere livellata per pesature precise. Esiste una bolla di livello in una piccola finestra tonda nella parte anteriore della bilancia. -
Seite 192: Display E Schermata Home Riepilogativi
IT-4 BILANCE SERIE SCOUT - STX 3. OPERAZIONE 3.1 Comandi Pulsante delle Funzioni Tavola 3-1. Pulsante Funzione Primaria Acceso Tara Invia/cancella un valore di (Premuta Breve Accende la bilancia. tara. Zero Se la bilancia è Accesa, imposta Zero. Funzione Secondaria Spento Spegne la bilancia. -
Seite 193: Funzioni E Menù Principali
BILANCE SERIE SCOUT - STX IT-5 3.3 Funzioni e Menù Principali Pesare: Premere Zero per impostare il display su zero. Porre un oggetto sul piatto di pesata della bilancia. Il display indica il peso lordo. Tarare: In assenza di carico sul piatto di pesata della bilancia, premere Tara per impostare il display su zero. -
Seite 194: Pesare
IT-6 BILANCE SERIE SCOUT - STX La Bilancia Scout incorpora le seguenti Applicazioni. Pesare Conteggio Percentuale Pesata Determinazione Controllo Parti Pesata (Animali) della Densità Pesata Dinamica Trattenere Totalizzazione Molare il Display Nota: Prima di utilizzare qualsiasi applicazione, assicurarsi che la bilancia sia stata livellata e calibrata. -
Seite 195: Nome Del Campione
USB. L’Ohaus respinge ogni responsabilità se i dati nel flash drive dell’USB sono cancellati o se il flash drive dell’USB dovesse rompersi mentre viene collegato alla bilancia. - Seite 196 IT-8 BILANCE SERIE SCOUT - STX 4. Porre oggetti sul piatto di pesata della bilancia per visualizzare il numero di pezzi nella Linea del Display Principale Il Standard schermo Home CONTEGGIO DELLE PARTI: Linea Principale di Display Icona Campi di Riferimento dell’Applicazione Pulsanti dell’Applicazione 4.2.1 Impostazioni dell’Oggetto...
- Seite 197 BILANCE SERIE SCOUT - STX IT-9 valore APW: l’APW e i Campioni. APW: Impostare un noto Peso Pezzo Medio (APW) Per regolare il valore APW direttamente, sfiorare lo schermo sul Pulsante APW Appare una finestra d’ingresso numerico. Inviare mezzo tasto il Peso APW desiderato, quindi premere Salvare.
-
Seite 198: Percentuale Pesata
IT-10 BILANCE SERIE SCOUT - STX Lo schermo Home della PERCENTUALE PESATA: Linea Principale di Display Campi di Riferimento Icona del’Applicazione Pulsanti dell’Applicazione 4.3.1 Impostazioni dell’Oggetto Per visualizzare o regolare le attuali impostazioni: Sfiorare lo schermo sul Pulsante Impostazioni dell’Oggetto. Appare lo schermo delle Impostazioni. -
Seite 199: Dinamico/ Pesare Animali
BILANCE SERIE SCOUT - STX IT-11 4.4 Dinamico/ Pesare Animali Utilizzare quest’applicazione per pesare un carico instabile, quale un animale in movimento Possono essere selezionati due modi diversi di inizio/reimpostazione: Manuale (inizio e stop premendo il tasto) e Automatico (inizio e stop automaticamente). Lo schermo Home PESATA DINAMICA Linea Principale di Display Campi di Riferimento... -
Seite 200: Impostazioni Dell'oggetto
IT-12 BILANCE SERIE SCOUT - STX 4.4.1 Impostazioni dell’Oggetto Per visualizzare o regolare le attuali impostazioni: Sfiorare lo schermo sul Pulsante Impostazioni dell’Oggetto. Appare lo schermo. Impostazioni Tempo di Computo della Media: Il Tempo di Computo della Media può essere impostato da 1 a 99 secondi. -
Seite 201: Determinazione Della Densità
Un kit per la determinazione della densità (non compreso, acquistare separatamente) è progettato per essere utilizzato con l’Ohaus Scout STX. Tuttavia, potreste utilizzare qualsiasi apparecchio di laboratorio che risponde ai requisiti per le misurazioni della densità. Si raccomanda di utilizzare il gancio di pesata sotto, se i pesi dei solidi dovessero pesare più... - Seite 202 IT-14 BILANCE SERIE SCOUT - STX Appare una finestra d’ingresso numerica. Inviare l’attuale temperatura dell’acqua, e quindi premere Salvare. La bilancia calcola la densità dell’acqua in base all’inviato valore della temperatura dell’acqua (tabella interna di bloccaggio). Misurare l’attuale temperatura dell’acqua utilizzando un termometro di precisione Premere Indietro per tornare allo schermo home per la Determinazione della Densità...
- Seite 203 BILANCE SERIE SCOUT - STX IT-15 Una volta che i necessari pesi siano stati determinati, la densità del campione è visualizzato in g/cm (insieme al peso in aria e peso in acqua) sullo schermo dell’Applicazione. Premere Iniziare per reimpostare tutti i valori dei pesi e iniziare di nuovo il processo La bilancia può...
-
Seite 204: Misurazione Della Densità Di Un Liquido Utilizzando Un Piombo Calibrato (Non Fornito)
IT-16 BILANCE SERIE SCOUT - STX 4.5.3 Misurazione della Densità di un liquido utilizzando un Piombo Calibrato (non fornito). Attiva questa caratteristica, inviare lo schermo della Densità Impostazioni dell’Oggetto e selezionare i seguenti; Tipo di Densità: Liquido Nota: quando il Tipo di Densità è impostato al Liquido, i selezionati tipi di Liquido e materiali Porosi sono disabilitati. -
Seite 205: Misurazione Della Densità Di Materiale Poroso Utilizzando Olio
BILANCE SERIE SCOUT - STX IT-17 Passo 2 di 2 – Pesare il Piombo Sommerso nel Liquido di Prova. Seguire le istruzioni dello schermo, quindi premere Accettare per memorizzare il peso del piombo (sommerso nel liquido) Una volta che i necessari pesi sono stati determinati, la densità... - Seite 206 IT-18 BILANCE SERIE SCOUT - STX Appaiono delle finestre numeriche d’ingresso Inviare mezzo tasto il desiderato valore, quindi premere Salvare. Per tornare allo schermo home per la Determinazione della Densità, sfiorare sullo schermo Uscire Premere Iniziare per iniziare la Determinazione della Densità. Passo 1 di 3 –...
-
Seite 207: Controllare Pesata
BILANCE SERIE SCOUT - STX IT-19 Una volta che i necessari pesi sono stati determinati, la densità del campione è visualizzata in g/cm (insieme con il peso in aria, non-oliato e oliato, e peso in acqua) sullo schermo dell’Applicazione. Il valore permane sul display finché Iniziare è sfiorato Premere Iniziare per reimpostare tutti i valori del peso e iniziare di nuovo il processo... -
Seite 208: Limiti
IT-20 BILANCE SERIE SCOUT - STX 4.6.2 Limiti Per visualizzare o regolare le attuali impostazioni Sfiorare lo schermo sul Pulsante Limiti. Appare lo schermo Impostazioni Limiti I valori limiti di controllo sono visualizzati nello schermo impostazioni. Per impostare il Valore di Sopra i Limiti sfiorare il Pulsante dello schermo Sopra i Limiti e quindi inviare il desiderato peso limite. -
Seite 209: Trattenere Il Display
BILANCE SERIE SCOUT - STX IT-21 Linea Principale di Display Icona dell’Applicazione Campi di Riferimento Pulsanti dell’ Applicazione 4.7.1 Impostazioni dell’Oggetto Per visualizzare o regolare le attuali impostazioni: Sfiorare lo schermo sul Pulsante Impostazioni dell’Oggetto. Appare lo schermo delle Impostazioni. Modo: Selezionare il modo per Trattenere il Picco o Trattenere il Display (predefinito) Nome del Campione: Inviare un nome del... -
Seite 210: Totalizzazione
IT-22 BILANCE SERIE SCOUT - STX 1. Selezionare Modo di Trattenere il Picco nelle Impostazioni dell’Oggetto (vedi Sezione 4.7.1). 2. Porre un oggetto sul piatto di pesata della bilancia e premere Iniziare. Il processo cattura inizia. 3. Continuare a pesare oggetti. Sarà trattenuto il maggiore peso stabile. -
Seite 211: Impostazioni Dell'oggetto
BILANCE SERIE SCOUT - STX IT-23 Il peso campione è mostrato sulla Linea di Display Principale. 3. Premere Accumulare per aggiungere il peso dell’oggetto al totale. Quando è stabile, il nuovo totale è mostrato sulla Linea di Display secondaria. 4. Rimuovere l’oggetto dal Piatto di Pesata della Bilancia, quindi aggiungere l’oggetto successivo e continuare come sopra. -
Seite 212: Inviare Massa Molare
IT-24 BILANCE SERIE SCOUT - STX campione. Pesare Unità: Selezionare l’unita visualizzata sia per il lordo e sia per la tara. Stampare Impostazioni: Per visualizzare o regolare la Stampa delle Impostazioni 4.9.2 Inviare Massa Molare Premere Massa, Molare e utilizzare la tastiera numerica per inviare il richiesto valore della Massa Molare della sostanza, e quindi premere Salvare... -
Seite 213: Collegare L'interfaccia
Jack CA Bluetooth ®* * I kit d’Interfaccia possono variare secondo i regolamenti locali. La parola “marchio” Bluetooth® così come il logo sono marchi registrati appartenenti alla Bluetooth SIG. Inc., e qualsiasi utilizzo di questi marchi dalla OHAUS è sotto licenza. -
Seite 214: Impostazioni Menù
IT-26 BILANCE SERIE SCOUT - STX IMPOSTAZIONI MENÙ 5.1 Menù della Navigazione Tutta la navigazione del menù è eseguita sfiorando lo schermo sul display. Per inviare il Menù sfiorare lo schermo sul Menù da qualsiasi Schermo Home dell’Applicazione Appare il Menù Principale con i Pulsanti per Indietro e Uscita. Continuare sfiorando lo schermo sull’appropriato oggetto dell’elenco per navigare negli oggetti del Menù... -
Seite 215: Menù Principale
BILANCE SERIE SCOUT - STX IT-27 Uscire dal Menù e Ritornare all’attuale Applicazione Dopo che l’impostazione sia confermata, sfiorare lo schermo sull’Indietro o sull’Uscita per tornare nell’Applicazione. 5.2 Menù Principale La struttura del menù Principale della bilancia Scout è illustrata qui di seguito. 5.2.1 Calibrazione Le bilance Scout STX offrono una scelta di due metodi di calibrazione: Campo della Calibrazione e Calibrazione della Linearità. -
Seite 216: Impostazione Della Bilancia
IT-28 BILANCE SERIE SCOUT - STX Porre il peso di calibrazione specificato sulla bilancia e il processo di calibrazione termina. Il display mostra lo stato, quindi ritorna nell’attuale Applicazione. 5.2.2 Impostazione della Bilancia Inviare questo sottomenu per personalizzare il funzionamento del display della bilancia. Lingua Impostazioni Utente Livello Filtro... - Seite 217 BILANCE SERIE SCOUT - STX IT-29 Auto Spegnimento Impostare l’orario dopo l’inattività per cui l’attrezzatura si spegnerà automaticamente. Spento, 1 minuto, 5 minuti, 10 minuti Nota: Auto Spento funziona solamente al lordo o quando l’Interruttore di Sicurezza sia in posizione accesa. Assistenza al Livellamento Mostra come livellare l’attrezzatura regolando i piedini.
-
Seite 218: Pesare Le Unità
IT-30 BILANCE SERIE SCOUT - STX Orario: Sfiorare lo schermo su 24 ORE per cambiare il formato orario a 12 ORE. Premere Salvare per confermare il nuovo valore. 5.2.3 Pesare le Unità Inviare questo sottomenu per attivare le desiderate unità di misurazione. Nota: Per via di leggi nazionali, l’indicatore potrebbe non includere alcune delle unità... -
Seite 219: Dati Della Manutenzione
BILANCE SERIE SCOUT - STX IT-31 Impostazioni di 0,5, 1, 2, 5, 10, 100 sono disponibili. Nota: L’ è bloccato in posizione Spento quando l’Interruttore di Unità su Ordinazione Sicurezza è impostato nella posizione bloccata. 5.2.4 Dati della Manutenzione Dati sottomenu della Manutenzione: Esportare Importare Informazioni... - Seite 220 IT-32 BILANCE SERIE SCOUT - STX Sottomenu RS-232: Velocità di Trasmissione Trasmissione Handshake Velocità di Trasmissione Impostare la velocità di trasmissione (bits per secondo). 1.200 = 1.200 bps 2.400 = 2.400 bps 4.800 = 4.800 bps 9.600 = 9.600 bps 19.200 = 19.200 bps 38.400...
- Seite 221 BILANCE SERIE SCOUT - STX IT-33 Solamente Valore Numerico Impostare i criteri di stampa SPENTO = tutti i valori dei dati sono stampati; ACCESO = solamente i valori dei dati numerici sono stampati Solamente Intestazione Singola Impostare i criteri di stampa SPENTO = le Intestazioni saranno stampate per ogni requisito di stampa;...
- Seite 222 IT-34 BILANCE SERIE SCOUT - STX Selezione Nome del Campione Impostare lo stato. Impostare lo stato. Selezionare Tutti = tutte le opzioni SPENTO = il Nome del Campione saranno accese non è stampato; Deselezionare Tutti = tutte le opzioni ACCESO = il Nome del Campione saranno spente è...
- Seite 223 BILANCE SERIE SCOUT - STX IT-35 Nome dell’Utente Linea per la Firma Impostare lo stato. Impostare lo stato. SPENTO = il Nome dell’Utente non SPENTO = la Linea della Firma non è stampato; è stampata; ACCESO = il Nome dell’Utente è ACCESO = la Linea della Firma è...
-
Seite 224: Dati Glp E Gmp
IT-36 BILANCE SERIE SCOUT - STX Controllo Tara Alternato Impostare il carattere di controllo alternato per Tara. Impostazioni dalla A alla Z sono disponibili. L’impostazione predefinita è vuota, eccetto che per P e Z. Controllo Zero Alternato Impostare il carattere di controllo alternato per Zero. Impostazioni dalla A alla Z sono disponibili. -
Seite 225: Reimpostazione Dalla Fabbrica
BILANCE SERIE SCOUT - STX IT-37 5.2.7 Reimpostazione dalla fabbrica Utilizzare questo sottomenu per reimpostazione i menù alle impostazioni predefinite dalla fabbrica Reimpostare Tutti = reimpostazione tutti i menù alle loro impostazioni predefinite dalla fabbrica Uscire = tornare sullo schermo principale senza reimpostare alcun menù Nota: I dati di calibrazione non sono affetti. -
Seite 226: Manutenzione
IT-38 BILANCE SERIE SCOUT - STX MANUTENZIONE 6.1 Calibrazione Periodicamente, verificare la calibrazione ponendo un peso preciso sulla bilancia e visualizzare il risultato. Se dovesse essere richiesta una calibrazione, eseguire una calibrazione interna della Bilancia. 6.2 Pulizia AVVERTIMENTO: Pericolo di Scossa Elettrica. Scollegare l’attrezzatura dall’alimentazione elettrica durante la pulizia. -
Seite 227: Informazioni Di Servizio
Stati Uniti telefonare con chiamata a carico del destinatario il numero 1-800-672-7722 est. 7852 tra le 08:00 AM and e le 05:00 PM EST. Un addetto specialista al servizio dei prodotti OHAUS sarà disponibile per darvi assistenza. Al di fuori degli USA, si prega di visitare il nostro sito web www.ohaus.com per localizzare l’Ufficio OHAUS più... - Seite 228 IT-40 BILANCE SERIE SCOUT - STX TABELLA 7-1. SPECIFICHE MODELLO STX123 STX223 STX222 STX422 STX622 STX1202 Capacità (g) 1200 Leggibilità d (g) 0.001 0.001 0.01 0.01 0.01 0.01 Ripetibilità (dev. std.) (g) 0.002 0.002 0.01 0.01 0.01 0.02 Linearità (g) 0.003 0.003 0.01...
- Seite 229 BILANCE SERIE SCOUT - STX IT-41 TABELLA 7-3. SPECIFICHE (Cont.) MODELLO STX2202 STX421 STX621 STX2201 STX6201 STX8200 Capacità (g) 2200 2200 6200 8200 Leggibilità d (g) 0.01 Ripetibilità (dev. Std.) (g) 0.02 Linearità (g) 0.03 Massa Calibrazione di Campo* 2 kg 200 g 300 g 2 kg...
-
Seite 230: Disegni E Dimensioni
103 mm/4.1in. w/o paravento 202 mm/8.0in. 224 mm/8.8in. 54 mm/2.1in. 8. AGGIORNAMENTI SOFTWARE L’Ohaus sta continuamente migliorando la propria bilancia software. Per ottenere l’ultima versione, si prega di mettersi in contatto con il vostro Rivenditore Autorizzato o con l’Ohaus Corporation. -
Seite 231: Conformità
Questo prodotto è conforme alle norme armonizzate applicabili delle direttive comunitarie 2011/65/UE (RoHS) , 2014/30/UE (EMC) , 2014/35/UE (LVD) e 2014/31/UE (NAWI). La dichiarazione di conformità CE è disponibile online all’indirizzo www.ohaus.com/ce. EN 61326-1 CAN/CSA-C22.2 No. 61010-1 UL Norma No. 61010-1... - Seite 232 Questa unità digitale di classe A è conforme alla normativa ICES-003 canadese. Registrazione ISO 9001 Nel 1994, la Ohaus Corporation, Stati Uniti, ha ricevuto il certificato di registrazione ISO 9001 dal Bureau Veritus Quality International (BVQI), a conferma che il sistema di gestione della qualità di Ohaus è...
-
Seite 233: Garanzia Limitata
IT-45 GARANZIA LIMITATA I prodotti Ohaus sono garantiti contro difetti nei materiali e nella lavorazione dalla data di consegna per tutta la durata del periodo di garanzia. Durante il periodo di garanzia Ohaus riparerà o, a sua discrezione, sostituirà gratuitamente qualsiasi componente/i che si dimostri essere difettoso, purché...