SPL Track One Mk3 Bedienungsanleitung
Inhaltsverzeichnis
Verfügbare Sprachen
Verfügbare Sprachen
Quicklinks
Inhaltsverzeichnis

Verwandte Anleitungen für SPL Track One Mk3


Inhaltszusammenfassung für SPL Track One Mk3
- Seite 14 Track One Mk3 – Manual © 2023 SPL electronics GmbH | www.spl.audio...
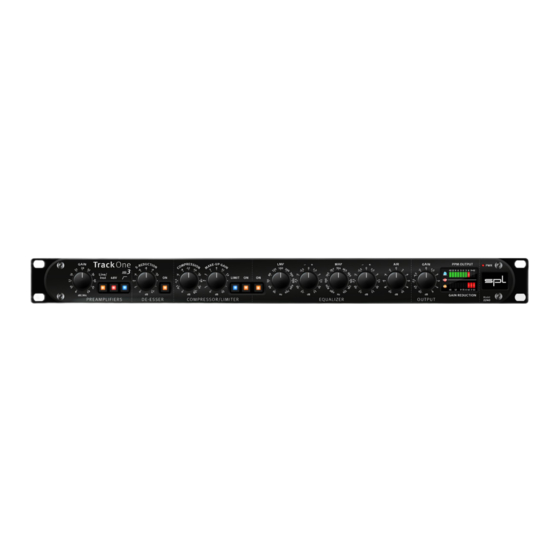
- Seite 15 Track One Mk3 Kanalzug | Channel-Strip Bedienungsanleitung Weitere Informationen: spl.audio...
-
Seite 16: Einschalten
Track One Mk3 – Manual Inbetriebnahme Lesen Sie die Sicherheitshinweise ab Seite 26. Stellen Sie sicher, dass der Spannungswahlschalter des Track One Mk 3 auf die Netzspannung in Ihrer Region eingestellt ist und dass die Sicherung den für die gewählte Netzspannung richtigen Wert hat (siehe Technische Daten auf Seite 24). - Seite 17 Track One Mk3 – Manual Netzschalter Ausgang, XLR Eingang, XLR Compressor-Link-Schalter Netzanschluss Ground-Lift-Schalter Ausgang, TRS Eingang, TS Sicherung Compressor-Link Ein-/Ausgang, TRS Spannungswahlschalter PWR LED...
-
Seite 18: Vorverstärker
Track One Mk3 – Manual Vorverstärker Track One Mk3 ist mit zwei Vorverstärkern ausgestattet: Ein Mikrofon-Vorverstärker mit 48V-Phantomspeisung und einem separaten Instrumenten-Vorverstärker. Beide sind abgestimmt auf eine klangneutrale, offene und transparente Charakteristik. Gain Ausstattung mit Eingangsübertrager müssen den skalierten Werten nochmals ca. +14 dB hinzugerechnet werden. - Seite 19 Track One Mk3 – Manual Die Signal-LED „SIG.“ leuchtet auf, sobald ein Eingangssignal mit einem höherem Pegel als -30 dB anliegt. Der 48V-Schalter aktiviert die für den Einsatz von Kondensatormikrofonen benötigte Phantomspeisung von 48 Volt. Wir empfehlen bei allen anderen Mikrofontypen außer Kondensatormikrofonen die Phantomspeisung...
- Seite 20 Track One Mk3 – Manual Compression Über den Compression-Regler kann ein Threshold zwischen 0 dB und -20 dB eingestellt werden. Je niedriger der Threshold, desto mehr arbeitet der Kompressor. Gain Reduction Die Gain-Reduction-Anzeige informiert über die Bearbeitung, die mit dem Kompressor vorgenommen wird.
- Seite 21 Track One Mk3 – Manual Compressor Link Mit der Compressor-Link-Funktion können die Kompressoren W A R N I N G W I R I N G zweier Track One für den Stereobetrieb verbunden werden. Die XLR Wiring: TO REDUCE RISK OF FIRE...
- Seite 22 Track One Mk3 – Manual Mit dem LMF-Regler wird die Mittenfrequenz des halbparametrischen Bass-/Mittenfilters festgelegt (LMF: Low/Mid Frequencies = tiefe und mittlere Frequenzen). Der einstellbare Frequenzbereich liegt zwischen 30 Hz und 700 Hz, so dass dieses Filter vom untersten Bassbereich bis zum unteren Mittenbereich einen Umfang von etwa 4,5 Oktaven abdeckt.
- Seite 23 Die PPM-Output-Anzeige stellt den Ausgangspegel in Spitzenwerten dar. Diese Anzeige dient auch zur Kontrolle der Vorverstärkeraussteuerung. Die symmetrisch beschalteten XLR und TRS Output-Buchsen liefern das Ausgangssignal. Der Track One Mk3 bietet zwei Serial # Instrument For unbalanced parallel geschaltete Ausgänge.
-
Seite 24: Technische Daten
Track One Mk3 – Manual Technische Daten Analoge Ein- und Ausgänge; XLR (symmetrisch) Maximaler Eingangspegel (Mic, +8 dB – +63 dB) 10,6 dBu (bei +8 dB GAIN) Maximaler Eingangspegel (Line, -12 dB – +22 dB) 33,5 dBu (bei +8 dB GAIN) Maximaler Eingangspegel (Instrument, 0 dB –... - Seite 25 Track One Mk3 – Manual Maße & Gewicht W x H x T (Weite x Höhe x Tiefe) 482 x 44 x 210 mm 19 x 1,73 x 8,27 inch Gewicht des Geräts 3,4 kg 7,49 lbs Versandgewicht (inkl. Verpackung)
-
Seite 26: Sicherheitshinweise
Belüftung kann zu Überhitzung führen und u.U. könnten. Wenn eine Flüssigkeit wie z.B. Wasser in das das Gerät beschädigen oder sogar einen Brand auslösen. Gerät gelangt, schalten Sie das Gerät sofort aus und © 2023 SPL electronics GmbH | spl.audio... -
Seite 27: Reinigung
Bevor Sie das Gerät an andere elektronische Kompo- der SPL electronics GmbH. nenten anschließen, schalten Sie alle Geräte aus. Stellen SPL haftet nicht für Schäden, die auf eine nicht Sie zunächst alle Lautstärkeregler an den Geräten auf ordnungsgemäße Bedienung oder Änderungen am Minimum, bevor Sie die Geräte ein- oder ausschalten. - Seite 28 Track One Mk3 – Manual...