Herunterladen Inhalt Inhalt Diese Seite drucken

Eufab 16257 Bedienungsanleitung

Kfz-dashboard-kamera
Vorschau ausblenden Andere Handbücher für 16257:
Inhaltsverzeichnis

Werbung

Verfügbare Sprachen
  • DE

Verfügbare Sprachen

  • DEUTSCH, seite 1
Art.-Nr.: 16257
Kfz-Dashboard-Kamera
Bedienungsanleitung ........... 2
Art. No. 16257
Vehicle dashboard camera
Operating instructions .......... 9
Réf. 16257
Caméra de tableau de bord
pour voiture
Manuel de l'opérateur .......... 16
© EAL GmbH, 16257, 02. 2022
Art.nr. 16257
Dashboardcamera
Gebruiksaanwijzing .............. 22
Cod. art. 16257
Dashboard Camera
Istruzioni per l'uso ................ 29
1

Werbung

Inhaltsverzeichnis
loading

Inhaltszusammenfassung für Eufab 16257

  • Seite 1 © EAL GmbH, 16257, 02. 2022 Art.-Nr.: 16257 Art.nr. 16257 Kfz-Dashboard-Kamera Dashboardcamera Bedienungsanleitung ... 2 Gebruiksaanwijzing ....22 Art. No. 16257 Cod. art. 16257 Vehicle dashboard camera Dashboard Camera Operating instructions ..9 Istruzioni per l‘uso ....29 Réf. 16257 Caméra de tableau de bord...
  • Seite 2: Inhaltsverzeichnis

    KFZ-DASHBOARD-KAMERA Zum bestimmungsgemäßem Gebrauch gehört auch die Beachtung aller Informationen in dieser Anleitung, INHALT insbesondere die Beachtung der Sicherheitshinweise. 1. BESTIMMUNGSGEMÄSSER GEBRAUCH _____2 Jede andere Verwendung gilt als nicht bestimmungs- 2. LIEFERUMFANG ___________________2 gemäß und kann zu Sach- oder Personenschäden 3.
  • Seite 3: Symbolerklärung

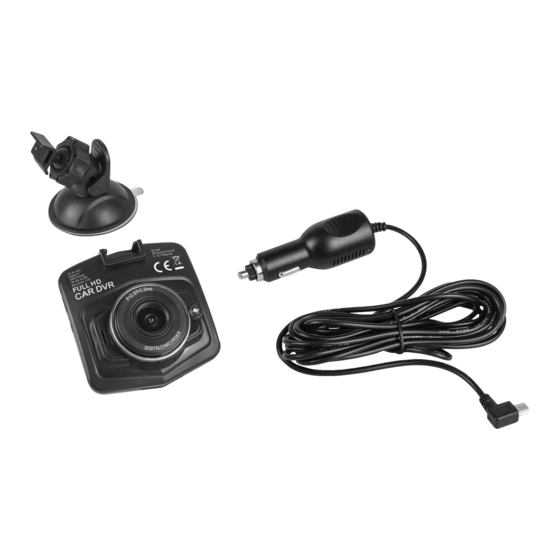
    die in der Anleitung angegeben sind, oder 6. BEDIENUNGSANLEITUNG deren Verwendung durch den Hersteller 6.1 ÜBERSICHT empfohlen wird! 1 EIN/AUS-Schalter • Verlängern Sie das Kabel nicht. Verwen- 2 Steckplatz für Speicherkarte den Sie kein anderes, als das mit gelieferte 3 Menütaste Kabel oder anderes Zubehör.
  • Seite 4: Speicherkarte

    19 USB-Stecker 20 Kfz-Stecker (Position 20 in der Übersicht) des Ladekabels in die 12 V-Kfz-Steckdose Ihres Fahrzeugs. 6.5 FUNKTIONEN EIN/AUS-Schalter (Position 1 in der Übersicht) Langes Drücken: Schaltet die Kamera ein / aus. Beim Einschalten wird direkt die Videoaufzeichnung gestartet. Bild 3: Ladekabel Kurzes Drücken: Schaltet die Power-LED (Position 5 in der Übersicht)
  • Seite 5 Bewegungserkennung: Belichtungsausgleich: Bei eingeschalteter Bewegungserkennung startet die Hier können Sie die Helligkeit der Photos einstellen. Kamera automatisch eine Videoaufzeichnung, wenn +2,0 …+0,0 … -2,0 eine Bewegung erkannt wird. Anti-Shake: ausschalten – einschalten Schalten Sie den Bildstabilisator ein/aus. Video Audio: ausschalten – einschalten Ein-/Ausschalten des Tons Kurzübersicht: ausschalten –...
  • Seite 6: Spracheinstellungen

    Bildschirmschoner: 6.6 ABSPIELEN/ANSEHEN DER AUFZEICHNUNGEN Stellen Sie ein, ob oder wann der Bildschirmschoner Um die aufgezeichneten Videos und Photos anzusehen, wechseln Sie durch Drücken der aktiviert werden soll. Modus-Taste in den Abspielmodus. Mit den Beep: ursor-Tasten wählen Sie das gewünschte Video Tastenton ein-/ ausschalten oder Photo aus.
  • Seite 7: Fehlersuche

    6.8 FEHLERSUCHE Fehler / Mögliche Ursache Abhilfe / Lösung Störung Der Stecker des Monitorkabels wurde Stecken Sie den Stecker des Ladekabels in die nicht in die 12 V Kfz-Steckdose 12 V Kfz-Steckdose eingesteckt. Die Sicherung im Stecker des Ersetzen Sie die Sicherung im Stecker des Monitorkabels hat ausgelöst und muss Keine Ladekabels...
  • Seite 8: Wartung Und Pflege, Aufbewahrung

    7. WARTUNG UND PFLEGE, AUFBEWAHRUNG werden, da sie wichtige Rohstoffe wie Eisen, Zink, Mangan oder Nickel Vor der Reinigung ziehen Sie das Anschlusskabel vom enthalten. Monitor ab. Reinigen Sie das Gehäuse des Monitors mit einem weichen trockenen Tuch. Verwenden Sie Batterien und Akkus, die Schadstoffe keine scharfen oder lösemittelhaltigen Reiniger.
  • Seite 9: Proper Use Of The Product

    VEHICLE DASHBOARD CAMERA The device is not designated for commercial use. Use according to the intended purpose also includes CONTENTS the observance of all information in these opera- 1. PROPER USE OF THE PRODUCT __________9 ting instructions, particularly the observance of the 2.
  • Seite 10: Explanation Of Symbols

    and spare parts that are stated in these 6. OPERATING INSTRUCTIONS instructions or that are recommended by 6.1 OVERVIEW the manufacturer! 1 ON/OFF switch • Do not misuse the cable. Do not use a 2 Slot for memory card cable or accessories other than those 3 Menu button supplied.
  • Seite 11: Memory Card

    6.5 FUNCTIONS 19 USB connector 20 Vehicle connector ON/OFF switch (Position 1 in the overview) Long press: Switches the camera on/off. Video recording is started directly after the camera is switched on. Brief press: Switches the Power-LED (Position 5 in the overview) on/off.
  • Seite 12 Video audio: Anti-Shake: Switches the audio on/off Switch the image stabiliser on/off. Switch off – switch on switch on Switch off – Date stamp: Quick overview: The date is shown on the video. Select the preview time for the pictures that have been taken.
  • Seite 13: Parking Mode Button (Position 12 In The Overview)

    Language settings: 6.6 PLAYING/VIEWING THE RECORDINGS Set the menu language and confirm the selected In order to view the recorded videos and photos, press language using the OK button. the Mode button to switch to Play mode. Use the cursor buttons to select the desired video or photo. TV mode: Press the OK button to view the video or photo.
  • Seite 14: Troubleshooting

    6.8 TROUBLESHOOTING Error/Fault Possible cause Assistance/solution The connector of the monitor cable has Plug the connector of the charging cable into not been inserted into the 12 V vehicle the 12 V vehicle socket. socket. The fuse of the monitor cable connector Plug the connector of the charging cable into has been triggered and must be the 12 V vehicle socket.
  • Seite 15: Maintenance And Care

    7. MAINTENANCE AND CARE Batteries and accumulators that contain pollutants are marked with the symbol of Before cleaning, disconnect the connecting cable from a crossed-out waste bin and the chemical the camera. Clean the housing with a soft, dry cloth. name of the pollutant.
  • Seite 16: Utilisation Conforme

    CAMÉRA DE TABLEAU DE BORD POUR limitées ou ne disposant pas de l‘expérience ou des connaissances nécessaires. Les enfants doivent rester VOITURE à distance de cet appareil. SOMMAIRE L‘appareil n‘est pas destiné à une utilisation 1. UTILISATION CONFORME ____________16 industrielle ou commerciale. 2.
  • Seite 17: Explication Des Symboles

    d‘emballage. Il pourrait devenir un jouet Marquage selon l‘ordonnance allemande sur les piles (BattG §17) : dangereux pour les enfants ! L‘utilisateur final est obligé par la loi de • N‘utilisez cet appareil qu‘aux fins pour remettre l‘article utilisé au revendeur ou à lesquelles il a été...
  • Seite 18: Carte Mémoire

    15 Ventouse ble) contre le pare-brise. Actionnez le levier (position 16 Levier 16 dans la vue d‘ensemble). Desserrez l’ é crou-raccord 17 Écrou-raccord / Articulation à rotule (position 17 dans la vue d‘ensemble) de l’articulation 18 Support de la caméra à...
  • Seite 19 Résolution : FHD – HD - 720P 1280x720 - WVGA Balance des blancs : 848x480 - VGA 640x480 Réglez la balance des blancs pour vos photos afin d’ o b- tenir des couleurs aussi vraies que possibles. Enregistrement en bouche : Automatique –...
  • Seite 20: Lecture/Visionnage Des Enregistrements

    Arrêt automatique : 6.6 LECTURE/VISIONNAGE DES ENREGISTREMENTS Réglez si et quand la caméra en mode veille doit s’ é teindre automatiquement. Pour visionner les vidéos et photos enregistrées, passez en mode lecture en appuyant sur la touche Économiseur d´écran : de mode.
  • Seite 21: Recherche D'erreurs

    6.8 RECHERCHE D‘ERREURS Erreur / défaut Cause possible Remède / Solution Le connecteur du câble de l’ é cran n’a pas Branchez le connecteur du câble de été branché dans la prise 12 V de voiture raccordement dans la prise 12 V du véhicule Le fusible du connecteur du câble de Remplacer le fusible dans le connecteur du l’...
  • Seite 22: Remarques Relatives À La Protection

    8. REMARQUES RELATIVES À LA PROTECTION DASHBOARDCAMERA DE L‘ENVIRONNEMENT INHOUD Ne jetez pas les appareils électriques 1. REGLEMENTAIR GEBRUIK ____________ 22 aux ordures  ! Les appareils électriques 2. LEVERINGSOMVANG _______________ 23 et électroniques usagés doivent être 3. SPECIFICATIES ___________________ 23 collectés séparément et remis aux services de recyclage.
  • Seite 23: Leveringsomvang

    Kinderen moeten uit de buurt van het apparaat • Gebruik voor uw eigen veiligheid uitslui- worden gehouden. tend toebehoren of reserveonderdelen die Het apparaat is niet bedoeld voor bedrijfsmatig gebruik. in de gebruiksaanwijzing staan vermeld Tot het reglementair gebruik behoort ook het in acht of waarvan het gebruik door de fabrikant nemen van alle informatie in deze gebruiksaanwij- wordt aanbevolen!
  • Seite 24: Gebruiksaanwijzing

    6. GEBRUIKSAANWIJZING 19 USB-stekker 20 Autostekker 6.1 OVERZICHT 1 Aan-/uitschakelaar 2 Sleuf voor geheugenkaart 3 Menutoets 4 Lens 5 Power-led 6 Montageschoen Afb. 3: Laadkabel 7 USB-poort 9 Display 6.2 GEHEUGENKAART 10 OK-toets De geheugenkaart plaatsen 11 Cursortoets omlaag Zorg ervoor dat de dashboardcamera is uitgescha- 12 Parkeermodustoets keld.
  • Seite 25: Functies

    6.5 FUNCTIES Motion detection: Bij ingeschakelde bewegingsdetectie start de Aan-/uitschakelaar (positie 1 in het overzicht) camera automatisch een video-opname wanneer Lang drukken: een beweging wordt gedetecteerd. Schakelt de camera aan/uit. uitschakelen – inschakelen Bij het inschakelen wordt direct de video-opname Record audio: gestart.
  • Seite 26: De Opnames Afspelen/Bekijken

    In standby-modus: Formaat: De geheugenkaart wordt geformatteerd, alle Twee keer kort drukken opent het menu voor de gegevens worden gewist. camera-instellingen. Met de cursortoetsen (posities annuleren – bevestigen 11 en 13 in het overzicht) kunt u de verschillende menu-items selecteren. Door op de OK-toets te De standaardinstellingen: drukken, wordt het geselecteerde menu-item De camera wordt weer teruggezet naar de...
  • Seite 27: Problemen Oplossen

    6.8 PROBLEMEN OPLOSSEN Fout/ Mogelijke oorzaak Oplossing storing De stekker van de laadkabel zit niet in Steek de stekker van de laadkabel in het het 12 V-autostopcontact. 12 V-autostopcontact De zekering in de stekker van de Vervang de zekering in de stekker van de laadkabel is gesprongen en moet laadkabel Functioneert...
  • Seite 28: Onderhoud En Verzorging

    7. ONDERHOUD EN VERZORGING belangrijke grondstoffen bevatten zoals ijzer, zink, mangaan of nikkel. Verwijder vóór het reinigen de aansluitkabel van de camera. Reinig de behuizing met een zachte, Batterijen en accu's die verontreinigende droge doek. Gebruik geen agressieve reinigings- of stoffen bevatten, zijn gemarkeerd met oplosmiddelen.
  • Seite 29 DASHBOARD CAMERA Questo dispositivo non è destinato all‘impiego industriale. INDICE Dell’uso appropriato fa parte anche il rispetto di tutte 1. USO CONFORME _________________ 29 le informazioni fornite in queste istruzioni, soprattut- 2. FORNITURA ____________________ 29 to delle avvertenze sulla sicurezza. Ogni altro utilizzo 3.
  • Seite 30: Vista D'insieme

    • Per la propria sicurezza, utilizzare solo gli 6. ISTRUZIONI PER L‘USO accessori e i pezzi di ricambio indicati nelle 6.1 VISTA D‘INSIEME istruzioni o consigliati dal produttore! 1 Interruttore ON/OFF • Non usare prolunghe. Non usare cavi né 2 Slot per scheda di memoria altri accessori diversi da quelli forniti in 3 Tasto Menu dotazione.
  • Seite 31: Scheda Di Memoria

    19 Connettore USB 6.5 FUNZIONI 20 Connettore veicolo Interruttore ON/OFF (vista d‘insieme, posizione 1) Pressione lunga: accende/spegne la videocamera. All‘accensione viene subito avviata la registrazione video. Pressione breve: Figura 3: cavo di ricarica accende/spegne il LED di potenza (vista d‘insieme, posizione 5).
  • Seite 32 Rilevamento movimento: Compensazione esposizione: quando è attivo il rilevamento del movimento, la qui è possibile impostare la luminosità delle foto. videocamera avvia automaticamente la registrazione +2,0 …+0,0 … -2,0 video appena rileva un movimento. Anti-shake: off – accendere attivare/disattivare lo stabilizzatore delle immagini. Video Audio: off –...
  • Seite 33: Impostazioni Della Lingua

    Salvaschermo: 6.6 RIPRODURRE/CONTROLLARE LE REGISTRAZIONI impostare se o quando il salvaschermo deve essere attivato. Per visualizzare i video e le foto registrate, attivare la modalità di riproduzione premendo il pulsante della Bip: modalità. Con i tasti direzionali si seleziona il video o la attivare/disattivare i toni dei tasti foto desiderata.
  • Seite 34: Ricerca Guasti

    6.8 RICERCA GUASTI Guasto/ Possibile causa Rimedio/Soluzione Anomalia Il connettore del cavo del monitor non è Inserire il connettore del cavo di ricarica nella inserito nella presa auto da 12 V. presa auto da 12 V. Si è bruciato il fusibile del connettore del Sostituire il fusibile del connettore del cavo cavo del monitor e si deve sostituire.
  • Seite 35: Manutenzione E Pulizia

    7. MANUTENZIONE E PULIZIA Le batterie e gli accumulatori che contengono sostanze nocive sono Prima della pulizia staccare il cavo di collegamento contrassegnati con il bidone della dalla camera. Pulire l’alloggiamento con un panno spazzatura barrato e con il simbolo morbido asciutto.
  • Seite 36 EAL GmbH Otto-Hausmann-Ring 107 +49 (0)202 42 92 83 0 info@eal-vertrieb.com 42115 Wuppertal +49 (0) 202 42 92 83 – 160 www.eal-vertrieb.com Deutschland...

Inhaltsverzeichnis