Herunterladen Diese Seite drucken
Vorschau ausblenden Andere Handbücher für AMBER 3:

Werbung

Verfügbare Sprachen
  • DE

Verfügbare Sprachen

  • DEUTSCH, seite 1
Bedienungsanleitung - Produkt 1:
EUFAB 11555 Fahrradträger AMBER 3, E-Bike geeignet,
teilweise vormontiert, Diebstahlschutz, für 3 Fahrräder, für
Anhängerkupplung, ca. 102 x 74 x 72 cm
Bedienungsanleitung - Produkt 2:
EUFAB 11242 Fahrradtransportschutz-Set, Rahmenschhutz,
6-teilig

Werbung

loading

Inhaltszusammenfassung für Eufab AMBER 3

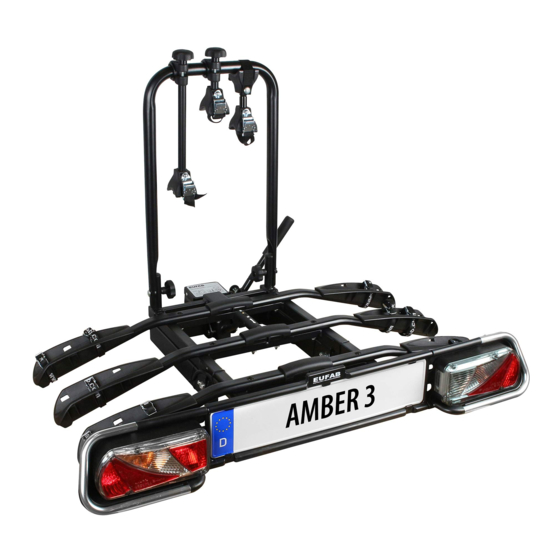
  • Seite 1 Bedienungsanleitung - Produkt 1: EUFAB 11555 Fahrradträger AMBER 3, E-Bike geeignet, teilweise vormontiert, Diebstahlschutz, für 3 Fahrräder, für Anhängerkupplung, ca. 102 x 74 x 72 cm Bedienungsanleitung - Produkt 2: EUFAB 11242 Fahrradtransportschutz-Set, Rahmenschhutz, 6-teilig...
  • Seite 2 Manual de instrucciones ........29 Operating instructions ........7 Réf. 11555 Obj.č. 11555 Nosič jízdních kol AMBER 3 Porte-vélos AMBER 3 na tažné zařízení pour attelage de remorque Návod k obsluze ..........34 Manuel de l‘opérateur ........13 Cod.
  • Seite 3 • Der D-Wert der Kupplung muss mindestens 7,6 kN betragen. Fahrradträger AMBER 3 für Anhängerkupplung • Montieren Sie den Träger nie an einer Kupplung aus Aluminium, anderen Leichtmetallen oder Kunststoff . INHALT • Diese werden z.B. von Westfalia hergestellt für folgende Fahrzeuge: 1.
  • Seite 4 Personen- oder Sachschaden durch beschädigten Fahrradträger Schritt 2 Beschädigungen des Trägers z. B. verbogene Teile, Risse oder Kratzer, Bauteile schließen die sichere Funktion des Trägers aus. • Montieren Sie den Fahrradträger nicht, wenn Beschädigungen vorhanden sind. • Gehen Sie wie im Kapitel Wartung beschrieben vor. Personen- oder Sachschaden durch Verlust des Fahrradträgers während der Fahrt Eine unsaubere oder schadhafte Verbindung zwischen Fahrradträger und...
  • Seite 5 Schritt 4 Schritt 3 Bauteile Bauteile Montage der Rahmenhalter Lösen Sie die Knaufschraube des Rahmenhalters und drehen Sie sie ganz heraus. Öff nen Sie die Schelle des Rahmenhalters und legen die Einlagen, an einer für Ihr Fahrrad geeigneten Stelle, um den U-Bügel herum. Legen Sie die Schelle wieder um die Einlagen herum und drücken sie fest zusammen.
  • Seite 6 Überprüfen Sie ebenso regelmäßig die Funktion der Lichtanlage Ihres Montage des Fahrradträgers auf der Anhängerkupplung Fahrradträgers. Bevor Sie den Fahrradträger auf die Anhängerkupplung setzen, machen Sie sich mit dem Schnellverschluss-System vertraut. Abklappmechanismus Wenn Sie den Abklappmechanismus betätigen wollen, halten Einstellschraube Sicherungsbolzen Sie unbedingt mit einer Hand den U-Bügel fest, damit der Träger nicht schlagartig abklappen kann.
  • Seite 7 Sichern Sie die Räder mit den mitgelieferten kurzen Spannbändern. Ein • Bolzen und Muttern des Fahrradträgers regelmäßig kontrollieren und Spannband für die Befestigung des Hinterrads und zwei für das Vorderrad wenn notwendig nachziehen. (siehe Bild), als Schutz gegen Verdrehen. • Lackschichtbeschädigungen sofort mit Farbe behandeln. •...
  • Seite 8 11. HINWEISE ZUM UMWELTSCHUTZ Bicycle rack AMBER 3 for trailer tow bar Da der Fahrradträger eine Beleuchtungsanlage besitzt, CONTENTS unterliegt er der Elektroaltgeräteverordnung und muss am Ende seiner Nutzungsdauer entsprechend als Elektroaltgerät entsorgt 1. PROPER USE OF THE PRODUCT ________________________7 2.
  • Seite 9 Personal injury or property damage due to loss of the bicycle rack Manufacturer Test symbol Suitable for while driving. F 4192 Audi A4 A loose or faulty connection between the bicycle rack and trailer tow bar can Westfalia lead to the detachment of the bicycle rack. F 3830 Audi A6 •...
  • Seite 10 Step 3 Step 2 Components Components Montage The U-tube is delivered approx. 5 cm wider at the lower end than the receptacles, i.e. the tubes are not parallel when loose. During assembly, the ends of the tubes must be strongly pressed together.
  • Seite 11 Step 4 Mounting the bicycle rack on the trailer tow bar Components Before you put the bicycle rack on the trailer tow bar, familiarise yourself with the quick locking system. Set bolt Safety pin Lever Mounting the frame holder Undo the handle screw of the frame holder and rotate out fully. Open the cuff...
  • Seite 12 Folding mechanism If you wish to operate the folding mechanism, always hold the U-tube with one hand to ensure that the rack is not able to fold out suddenly. (Risk of injury) Now secure the bicycles with the long safety strap. Wrap the safety strap through the bicycle frames and the U-shaped bar and tighten.
  • Seite 13 9. TIPS AND TRICKS 11. NOTES FOR ENVIRONMENTAL PROTECTION 9.1 PIN ASSIGNMENT OF THE 13-PIN CONNECTOR As the bicycle rack has a lighting system, it is subject to the Ordinance on Waste Electrical and Electronic Equipment and must be disposed of as waste electrical and electronic equipment Left indicator Pin 1, L yellow...
  • Seite 14 • Ceux-ci sont par exemple fabriqués par Westfalia pour les véhicules Porte-vélos AMBER 3 pour attelage de remorque suivants : SOMMAIRE Fabricant Symbole de contrôle Adapté pour 1. UTILISATION CONFORME ___________________________13 F 4192 Audi A4 2. CONTENU DE LA LIVRAISON _________________________13...
  • Seite 15 Dommages matériels ou corporels en cas de perte du porte-vélos lors Étape 2 du déplacement. Pièces Un raccordement imprécis ou défectueux entre le porte-vélos et l‘attelage de remorque peut entraîner le desserrage du porte-vélos. • Remplacez l‘attelage de remorque en cas de défaut. •...
  • Seite 16 Étape 4 Étape 3 Pièces Pièces Montage du support de cadre Déserrez les poignées écrous du support de cadre et dévissez-les complètement. Ouvrez le collier du support de cadre et posez les inserts autour de l‘étrier en U à un endroit adapté à votre vélo. Replacez le collier autour des inserts et pressez fermement.
  • Seite 17 Montage du porte-vélos sur l‘attelage de remorque Avant de placer le porte-vélos sur l‘attelage de remorque, familiarisez-vous avec le système de fermeture rapide. Vis de réglage Boulon de sécurité Levier Pour ouvrir le coff re, vous pouvez basculer le porte-vélos, même si les vélos sont montés.
  • Seite 18 9. TRUCS ET ASTUCES Sécurisez maintenant les vélos avec la sangle de sécurité longue. Posez la sangle de sécurité à travers les cadres des vélos et autour de l‘étrier en U et 9.1 AFFECTATION DES CONTACTS DU CONNECTEURS 13 BROCHES serrez-la à...
  • Seite 19 11. CONSIGNES POUR LA PROTECTION DE L‘ENVIRONNEMENT Portabiciclette AMBER 3 per gancio di traino Étant donné que le porte-vélos dispose d’une installation électrique, il est soumis à l’ o rdonnance sur les déchets INDICE d’ é quipements électriques et électroniques et doit être traité...
  • Seite 20 Danni a persone o cose dovuti alla perdita del portabiciclette durante Produttore Simbolo di controllo Adatto per il viaggio F 4192 Audi A4 Un collegamento non corretto o difettoso tra portabiciclette e gancio di traino Westfalia può causare il distacco del portabiciclette. F 3830 Audi A6 •...
  • Seite 21 Passaggio 2 Passaggio 3 Componenti Componenti Montage La staff a a U viene consegnata circa 5 cm più larga all‘estremità inferiore rispetto ai supporti, vale a dire che i tubi non sono paralleli quando sono allentati. Durante il montaggio, le estremità...
  • Seite 22 Passaggio 4 Montaggio del portabici sul gancio di traino Prima di applicare il portabiciclette sul gancio di traino occorre familiarizzarsi Componenti con il sistema di aggancio rapido. Vite di registro Perno di fi ssaggio Leva Montaggio dei bracci di fi ssaggio Svitare la vite zigrinata del braccio di fi...
  • Seite 23 Ora bloccare le biciclette con la cinghia di sicurezza lunga. Far passare la cinghia di sicurezza attraverso il telaio della bicicletta attorno alla staff a a U e tendere la cinghia. Il portabiciclette non si deve utilizzare senza questa cinghia di sicurezza. Per aprire il bagagliaio è...
  • Seite 24 9. CONSIGLI UTILI 11. AVVERTENZE SULLA TUTELA AMBIENTALE 9.1 OCCUPAZIONE CONTATTI DEL CONNETTORE A 13 VIE Dato che il portabiciclette è dotato di un impianto di illuminazione, è soggetto alla normativa sulle apparecchiature Indicatore di direzione sinistro Pin 1, L giallo elettriche usate;...
  • Seite 25 • Monteer de fi etsendrager nooit op een trekhaak van aluminium, andere Fietsendrager AMBER 3 voor trekhaak lichte metalen of kunststof. INHOUD • Ongeschikte kogelstangen van GGG40 worden door Westfalia geproduceerd voor de volgende voertuigen: 1. REGLEMENTAIR GEBRUIK __________________________ 24 2.
  • Seite 26 Persoonlijk letsel of materiële schade door losraken van de Stap 2 fi etsendrager tijdens de rit Onderdelen Een onzuivere of beschadigde verbinding tussen fi etsendrager en trekhaak kan ertoe leiden dat de fi etsendrager loskomt. • Vervang een beschadigde trekhaak. •...
  • Seite 27 Stap 3 De framehouder monteren Onderdelen Draai de knopschroef van de framehouder los en draai deze volledig eruit. Open de klem van de framehouder en plaats de inzetstukken rond de U-beugel op een plaats die geschikt is voor uw fi ets. Plaats de klem weer rond de inzetstukken en druk deze stevig samen.
  • Seite 28 Hangslot Instelbout Borgmoer snelkoppeling Let erop dat de trekhaak onbeschadigd, schoon en vetvrij is. De snelsluiting bestaat uit een onderdeel met hendel. Door de hendel te bedienen, kunt u de snelsluiting openen en sluiten. Met behulp van de borgbout en het hangslot kan de snelsluiting worden vergrendeld en afgesloten.
  • Seite 29 Remlicht Pin 6, 54 rood Linkerachterlicht Pin 7, 58L zwart (inclusief markeringslicht) Veiligheidsriem Achteruitrijlicht Pin 8 grijs Continue stroom (continu plus) Pin 9 niet bezet bruine/blauw Laadleiding Pin 10 niet bezet bruine/rood Laadleiding-/massa Pin 11 niet bezet De demontage de fi etsen gebeurt in omgekeerde volgorde. (voor accu in aanhanger) 7.
  • Seite 30 Portabicicletas AMBER 3 para el enganche de Fabricante Símbolo de inspección A juego para remolque F 4192 Audi A4 Westfalia ÍNDICE F 3830 Audi A6 1. USO CORRECTO ________________________________ 29 F 4112 Audi A8 2. VOLUMEN DE SUMINISTRO ________________________ 29 3.
  • Seite 31 Lesiones o daños materiales por pérdida del portabicicletas durante Paso 2 la circulación Componentes Una conexión mala o dañada entre el portabicicletas y el enganche de remolque puede conllevar que el portabicicletas se suelte. • Cambie un enganche de remolque dañado. •...
  • Seite 32 Montaje del portamatrículas Paso 3 Desenrosque el tornillo con pomo del portamatrículas y sáquelo. Abra la Componentes abrazadera del portamatrículas y ponga los insertos en un lugar apto para las bicicletas, alrededor del estribo en U. Vuelva a poner la abrazadera alrededor de los insertos y apriete.
  • Seite 33 Candado Tornillo de ajuste Tornillo de ajuste Contratuerca para el cierre rápido para el cierre rápido Controle que el enganche de remolque esté en perfecto estado, limpio y sin grasa. El cierre rápido consta de un componente con palanca. Accionando la palanca se puede abrir y cerrar el cierre rápido.
  • Seite 34 Luz de freno Pin 6, 54 rojo Luz trasera izquierda Pin 7, 58L negro (incl. luz de posición) Luz de marcha atrás Correa de seguridad Pin 8 gris Corriente continua (positivo continuo) Pin 9 asignado marrón/azul Línea de carga Pin 10 asignado marrón/rojo Línea de carga/masa Pin 11 asignado...
  • Seite 35 • Tyto jsou např. vyrobeny společností Westfalia pro následující vozidla: Nosič jízdních kol AMBER 3 na tažné zařízení OBSAH Výrobce Kontrolní symbol Vhodné pro 1. POUŽITÍ V SOULADU S URČENÍM ______________________ 34 F 4192 Audi A4 2. ROZSAH DODÁVKY ______________________________ 34...
  • Seite 36 Újma na zdraví osob nebo věcné škody v důsledku ztráty nosiče jízdních kol během jízdy Nečistý nebo poškozený spoj mezi nosičem jízdních kol a tažným zařízením může vést k uvolnění nosiče jízdních kol. • Poškozené tažné zařízení vyměňte. • Tažné zařízení zbavte nečistot, prachu a tuku. Ohrožení...
  • Seite 37 Montáž Vložení registrační značky Montážní spony pro upevnění registrační značky se nachází jako výtlačné U-ramene se dodává na spodním konci asi o 5 cm širší než držáky, části v držáku registrační značky. Odlomte dvě spony. Vsuňte registrační číslo tzn. že trubky nejsou v uvolněném stavu rovnoběžné. Při montáži vozidla do držáku, poté...
  • Seite 38 Visací zámek se musí při použití nosiče jízdního kola vždy používat jako dodatečná ochrana. Vozidlo odstavte na rovné ploše. Vypněte motor a zatáhněte ruční brzdu. Vytáhněte pojistný čep rychlouzávěru a otočte ho o 90°, abyste zabránili opětovnému zasmeknutí. Rychlouzávěr otevřete zvednutím páky. Nosič jízdních kol umístěte shora vodorovně...
  • Seite 39 Konektor Zásuvka Maximální nosnost kolejnic: Maximální nosnost kolejnic: Kolejnice 1: 27,5 kg Kolejnice 2: 27,5 kg Kolejnice 3: 20,0 kg 10. VÝMĚNA ŽÁROVEK Vložte nosič kol tak, aby nebylo překročeno maximální užitečné zatížení. Viz část 3. Specifi kace. Potřebné nářadí: šroubovák velikosti PH1. Odšroubujte křížové šrouby z čočky a vyjměte čočku.
  • Seite 40 • Kula i hak holowniczy muszą być wykute z jednej części. Bagażnik na rowery AMBER 3 na sprzęg przyczepy • Bagażnik na rowery należy montować tylko na sprzęgach przyczep wyko- nach ze stali St52, żeliwa szarego lub z materiału o większej wytrzymałości.
  • Seite 41 Możliwość uszkodzenia przez gorące spaliny Jeżeli wylot rury wydechowej mieści się za blisko bagażnika lub roweru lub strumień spalin trafi a bezpośrednio na bagażnik na rowery, to mogą one ulec uszkodzeniu. • W razie potrzeby zastosować osłonę wylotu rury wydechowej. Możliwość...
  • Seite 42 Krok 4 Krok 3 Części Części Montaż wsporników ramy Poluzować śrubę z pokrętłem wspornika ramy i całkowicie ją wykręcić. Otworzyć opaskę wspornika ramy i przełożyć wkładki wokół pałąka w miejscu właściwym dla posiadanego roweru. Ponownie założyć opaskę wokół wkładki i mocno razem ścisnąć. Zamknąć wspornik ramy śruba z pokrętłem (jeszcze nie dokręcać).
  • Seite 43 Montaż bagażnika na rowery na sprzęgu przyczepy Przed osadzeniem bagażnika na rowery na sprzęgu przyczepy należy zapoznać się z układem szybkozłącza. Śruba regulacyjna Trzpień zabezpieczający / ryglujący szybkozłącza szybkozłącza Żeby otworzyć klapę bagażnika pojazdu, bagażnik na rowery można odchylić, Dźwignia nawet, gdy są...
  • Seite 44 Teraz rowery zabezpieczyć długim pasem zabezpieczającym. Pas Prawe światło pozycyjne Pin 5, 58R brązowy zabezpieczający przełożyć przez ramy rowerów i wokół pałąka, pas (ze światłem obrysowym) zabezpieczający mocno naprężyć. Światło hamulcowe Pin 6, 54 czerwony Bez pasa zabezpieczającego, bagażnika na rowery używać...
  • Seite 45 EAL GmbH +49 (0)202 42 92 83 0 info@eal-vertrieb.com Otto-Hausmann-Ring 107 +49 (0) 202 42 92 83 – 160 www.eal-vertrieb.com 42115 Wuppertal, Deutschland...
  • Seite 46 Art.-Nr.: 11242 Réf. 11242 Fahrradtransportschutz 6-tlg. Protection de vélo pour le transport 6 pcs. Bedienungsanleitung ...... 2 Manuel de l‘opérateur ..... 7 Article number 11242 Cod. art. 11242 Bicycle transportation protection, 6 pieces Protezioni per trasporto biciclette 6 pz. Operating instructions ..... 4 Istruzioni per l‘uso ....
  • Seite 47 Fahrradtransportschutz 6-tlg. INHALT BESTIMMUNGSGEMÄSSER GEBRAUCH __________________________________________________ 2 LIEFERUMFANG ________________________________________________________________ 2 SICHERHEITSHINWEISE ___________________________________________________________ 2 BEDIENUNGSANLEITUNG __________________________________________________________ 3 4.1 ÜBERSICHT __________________________________________________________________ 3 4.2 MONTAGE ___________________________________________________________________ 3 4.2.1 MONTAGE DES FELGENSCHONERS _____________________________________________________ 3 4.2.2 MONTAGE DES GABELSCHONERS _____________________________________________________ 3 4.2.3 MONTAGE DES KETTENSCHONERS _____________________________________________________ 3 4.2.4 MONTAGE DES PEDALSCHONERS _____________________________________________________ 3 4.2.5 MONTAGE DES RAHMENSCHUTZES ____________________________________________________ 4 4.3 ENTFERNEN DES FAHRRADTRANSPORTSCHUTZES ___________________________________________ 4...
  • Seite 48 4. BEDIENUNGSANLEITUNG 4.1 ÜBERSICHT 1 Felgenschoner 2 Gabelschoner 3 Kettenschoner 4 Pedalschoner 5 Rahmenschoner Bild 1: Übersicht 4.2 MONTAGE Bringen Sie die Teile des Transportschutzes, wie auf den folgenden Bildern dargestellt, an Ihrem Fahrrad an. Befestigen Sie die Schutzteile mit den Klettverschlüssen. 4.2.1 MONTAGE DES FELGENSCHONERS Bild 3: Felgenschoner am Bild 2: Felgenschoner...
  • Seite 49 4.2.5 MONTAGE DES RAHMENSCHUTZES Bild 10: Rahmenschoner Bild 11: Rahmenschoner montiert 4.3 ENTFERNEN DES FAHRRADTRANSPORTSCHUTZES Zum Entfernen des Schutzes öffnen Sie die Klettverschlüsse und nehmen die Teile vom Fahrrad ab. Verstauen Sie sie in der Aufbewahrungstasche. Nehmen Sie alle Teile des Transportschutzes ab, bevor Sie Ihr Fahrrad benutzen. 5.
  • Seite 50 1. PROPER USE OF THE PRODUCT The bicycle transportation protection is used to protect the bicycle when transporting on a bicycle rack or in a vehicle. This item is not designed to be used by children or persons with limited mental abilities or without experience and/or lack of required specialist knowledge.
  • Seite 51 4.2.3 MOUNTING THE CHAIN GUARD Figure 6: Chain guard Figure 7: Mounted chain guard 4.2.4 MOUNTING THE PEDAL GUARD Figure 8: Pedal guard Figure 9: Mounted pedal guard 4.2.5 MOUNTING THE FRAME GUARD Figure 10: Frame guard Figure 11: Mounted frame guard 4.3 REMOVING THE BICYCLE TRANSPORTATION PROTECTION To remove the protection, open the hook and loop closures and remove the elements from the bicycle.
  • Seite 52 Protection de vélo pour le transport 6 pcs. SOMMAIRE DOMAINE D‘APPLICATION _________________________________________________________ 7 SCOPE OF SUPPLY ______________________________________________________________ 7 CONSIGNES DE SÉCURITÉ __________________________________________________________ 7 NOTICE D‘UTILISATION ___________________________________________________________ 8 4.1 VUE D‘ENSEMBLE _______________________________________________________________ 8 4.2 MONTAGE ___________________________________________________________________ 8 4.2.1 MONTER LA PROTECTION DE JANTES ___________________________________________________ 8 4.2.2 MONTER LA PROTECTION DE FOURCHE __________________________________________________ 8 4.2.3 MONTER LA PROTECTION DE CHAÎNE ___________________________________________________ 8 4.2.4 MONTER LA PROTECTION DE PÉDALES __________________________________________________ 8...
  • Seite 53 4. NOTICE D‘UTILISATION 1 Protection de jantes 4.1 VUE D‘ENSEMBLE 2 Protection de fourche 3 Protection de chaîne 4 Protection de pédales 5 Protection de cadre Figure 1 : Vue d’ e nsemble 4.2 MONTAGE Placez les pièces de la protection comme décrit sur les illustrations plus bas. Attachez les éléments de protection à l‘aide des bandes velcro.
  • Seite 54 4.2.5 MONTER LA PROTECTION DE CADRE Figure 11 : Monter la Figure 10 : Protection de cadre protection de cadre 4.3 RETIRER LA PROTECTION DE VÉLO Pour enlever la protection, ouvrez la bande velcro et retirez la protection du vélo. Rangez-la dans le sac de rangement. Retirez toutes les pièces de la protection avant d‘utiliser votre vélo.
  • Seite 55 1. USO CONFORME Queste protezioni servono per proteggere le biciclette durante il trasporto sul portabiciclette o all‘interno del veicolo. Questo articolo non è destinato all‘uso da parte di bambini e persone con capacità mentali limitate o che non siano in possesso delle necessarie conoscenze.
  • Seite 56 4.2.3 MONTAGGIO DELLA PROTEZIONE PER LA CATENA Figura 7: Protezione catena applicata Figura 6: Protezione catena 4.2.4 MONTAGGIO DELLA PROTEZIONE PER I PEDALI Figura 9: Protezione pedali applicata Figura 8: Protezione pedali 4.2.5 MONTAGGIO DELLA PROTEZIONE DEL TELAIO Figura 11: Protezione telaio Figura 10: Protezione telaio applicata 4.3 RIMOZIONE DELLE PROTEZIONI PER TRASPORTO BICICLETTE...
  • Seite 57 EAL GmbH Otto-Hausmann-Ring 107 +49 (0)202 42 92 83 0 info@eal-vertrieb.com 42115 Wuppertal +49 (0) 202 42 92 83 – 160 www.eal-vertrieb.com Deutschland © EAL GmbH, 11242, 06.2020...

Diese Anleitung auch für:

11555