Herunterladen Inhalt Inhalt Diese Seite drucken
Beurer BM 45 Gebrauchsanweisung
Vorschau ausblenden Andere Handbücher für BM 45:
Inhaltsverzeichnis

Werbung

Verfügbare Sprachen
  • DE

Verfügbare Sprachen

  • DEUTSCH, seite 1
BEURER GmbH • Söflinger Str. 218 • 89077 Ulm (Germany)
Tel.: +49 (0) 731 / 39 89-144 • Fax: +49 (0) 731 / 39 89-255
www.beurer.com • Mail: kd@beurer.de
BM 45
D Blutdruckmessgerät
Gebrauchsanweisung ......................................2 – 14
G Blood pressure monitor
Instructions for use ........................................15 – 26
F Tensiométre
Mode d'emploi ...............................................27 – 39
E Tensiómetro
Manual de instrucciones ...............................40 – 52
I Misuratore di pressione
Istruzioni per l'uso .........................................53 – 65
T Bilgisayarli tansiyon ölçer
Kullanım kılavuzu ........................................... 66 – 77
r Прибор для измерения кровяного давления в
плечевой артерии
Инструкция по применению .......................78 – 91
Q Ciśnieniomierz
Instrukcja obsługi ........................................92 – 104
Electromagnetic Compatibility Information
....105 – 107

Werbung

Inhaltsverzeichnis
loading

Inhaltszusammenfassung für Beurer BM 45

  • Seite 1 Instrukcja obsługi ........92 – 104 Electromagnetic Compatibility Information ..105 – 107 BEURER GmbH • Söflinger Str. 218 • 89077 Ulm (Germany) Tel.: +49 (0) 731 / 39 89-144 • Fax: +49 (0) 731 / 39 89-255 www.beurer.com • Mail: kd@beurer.de...
  • Seite 2: Wichtige Hinweise

    Mit freundlicher Empfehlung bole verwendet: Ihr Beurer-Team Vorsicht 1. Kennenlernen Überprüfen Sie das Beurer BM 45 Blutdruckmessgerät auf äußere Unversehrtheit der Verpackung und auf die Vollstän- Hinweis digkeit des Inhalts. Vor dem Gebrauch ist sicherzustellen, dass Hinweis auf wichtige Informationen das Gerät und Zubehör keine sichtbaren Schäden aufweisen...
  • Seite 3 • Die von Ihnen selbst ermittelten Messwerte können nur zu Hersteller Ihrer Information dienen – sie ersetzen keine ärztliche Un- tersuchung! Besprechen Sie Ihre Messwerte mit dem Arzt, Storage Zulässige Lagerungstemperatur und begründen Sie daraus auf keinen Fall eigene medizinische 50°C -luftfeuchtigkeit Entscheidungen (z.B.
  • Seite 4 Behandlung sind, z.B. intravaskulärer Zugang bzw. eine – Benutzen Sie das Gerät nicht in der Nähe von starken elektro magnetischen Feldern, halten Sie es fern von Funk- intravaskuläre Therapie oder ein arteriovenöser (A-V-) Neben- anlagen oder Mobiltelefonen. schluss. – Verwenden Sie nur die mitgelieferte oder originale Ersatz- •...
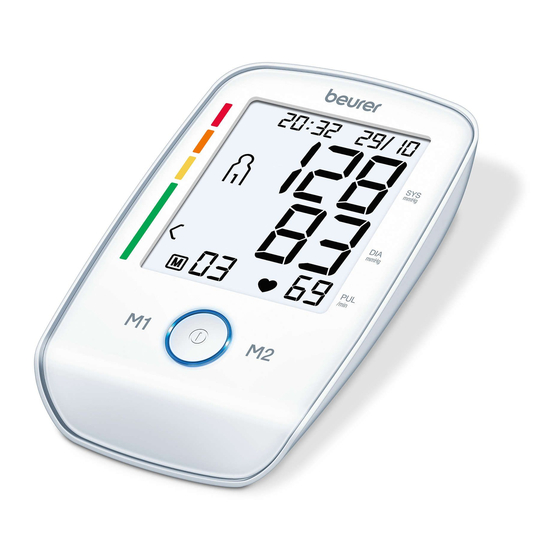
  • Seite 5: Gerätebeschreibung

    • Öffnen Sie nicht das Gerät. Bei nicht beachten erlischt die 4. Anschluss für Netzteil Garantie. 5. Display • Das Gerät darf nicht selbst repariert oder justiert werden. 6. Speichertasten M1/M2 Eine einwandfreie Funktion ist in diesem Fall nicht mehr ge- 7.
  • Seite 6: Messung Vorbereiten

    4. Messung vorbereiten stundenformat, Datum und uhrzeit einstellen In diesem Menü haben Sie die Möglichkeit folgende Batterien einlegen Funktionen nacheinander einzustellen. • Entfernen Sie den Deckel des Batteriefaches auf der Rück- stundenformat ➔ Datum ➔ uhrzeit seite des Gerätes. • Legen Sie vier Batterien vom Sie sollten Datum und Uhrzeit unbedingt einstellen.
  • Seite 7: Blutdruck Messen

    • Schließen Sie danach den Netzstecker des Netzteils an die Im Display blinkt die Tagesanzeige. Steckdose an. • Wählen Sie mit den Speichertasten M1/ • Nach dem Gebrauch des Blutdruckmessgerätes trennen Sie M2 Ihren gewünschten Tag und bestätigen das Netzteil zuerst von der Steckdose und anschließend vom Sie mit der START/STOPP-Taste Blutdruckmessgerät.
  • Seite 8 so stramm angelegt sein, dass noch zwei Finger unter die Richtige Körperhaltung einnehmen Manschette passen. Stecken Sie nun den Manschetten - schlauch in den Anschluss für den Man schetten stecker. • Ruhen Sie sich vor jeder Messung ca. 5 Minuten aus! Wenn Sie die Messung am rechten Oberarm durchführen, Ansonsten kann es zu Abweichungen kommen.
  • Seite 9 Die Manschette wird automatisch aufgepumpt. • Schalten Sie das Blutdruckmessgerät mit der START/ STOPP-Taste aus. Damit wird das Messergebnis im Sie können die Messung jederzeit durch das Drücken ausgewählten Benutzerspeicher abgespeichert. der START/STOPP-Taste abbrechen. Wenn Sie vergessen das Gerät auszuschalten, schaltet Der Manschetten-Luftdruck wird langsam abgelas- sich das Gerät nach ca.
  • Seite 10: Messwerte Abrufen Und Löschen

    Bereich der Blutdruckwerte systole (in mmhg) Diastole (in mmhg) Maßnahme Stufe 3: starke Hypertonie > = 180 > = 110 einen Arzt aufsuchen Stufe 2: mittlere Hypertonie 160 – 179 100 – 109 einen Arzt aufsuchen Stufe 1: leichte Hypertonie 140 –...
  • Seite 11 • Wenn Sie die jeweilige Speichertaste (M1 – Wenn Sie die Messdaten für Benutzerspeicher einse- oder M2) erneut drücken, wird im Display hen möchten, drücken Sie die Speichertaste M1. die letzte Einzelmessung angezeigt (hier im – Wenn Sie die Messdaten für Benutzerspei- Beispiel Messung 03).
  • Seite 12: Gerät Reinigen Und Aufbewahren

    8. Gerät reinigen und aufbewahren 10. Technische Angaben • Reinigen Sie Gerät und Manschette vorsichtig nur mit einem Modell-Nr. BM 45 leicht angefeuchteten Tuch. M1501 • Verwenden Sie keine Reinigungs- oder Lösungsmittel. Messmethode Oszillometrisch, nicht invasive Blut- • Sie dürfen das Gerät auf keinen Fall unter Wasser halten, da druckmessung am Oberarm sonst Flüssigkeit eindringen kann und das Gerät beschädigt.
  • Seite 13 100 – 240 V, 50 – 60 Hz Änderungen der technischen Angaben ohne Benachrichtigung Ausgang 6 V DC, 600 mA, nur in Verbindung mit sind aus Aktualisierungsgründen vorbehalten. Beurer Blutdruckmessgeräten • Dieses Gerät entspricht der europäischen Norm Hersteller Friwo Gerätebau GmbH EN60601-1-2 und unterliegt besonderen Vorsichtsmaß- Schutz Das Gerät ist doppelt schutzisoliert und...
  • Seite 14: Garantie

    Nachweis des Kaufes zu führen. Die Garantie ist innerhalb eines Zeitraumes von 3 Jahren ab Kaufdatum gegenüber der Beurer GmbH, Söflinger Straße 218, 89077 Ulm, Germany geltend zu machen. Der Kunde hat im Garantiefall das Recht zur Reparatur der Ware bei unseren eigenen oder bei von uns autorisierten Werkstätten.
  • Seite 15: Getting To Know Your Instrument

    Your Beurer Team 1. Getting to know your instrument Note Check that the packaging of the Beurer BM 45 blood pressure Note on important information monitor has not been tampered with and make sure that all the required contents are present. Before use, ensure that there...
  • Seite 16 • Do not use the blood pressure monitor on newborns or pati- Permissible transport and storage tem- Storage ents with preeclampsia. We recommend consulting a doctor perature. Permissible transport and storage 50°C before using the blood pressure monitor during pregnancy. humidity.
  • Seite 17 • Do not use the cuff on people who have undergone a mas- • If the instrument is not used for any length of time, we tectomy. recommend removing the batteries. • Do not place the cuff over wounds as this may cause further Advice on batteries injury.
  • Seite 18: Device Description

    Electronic Equipment). In case of queries, please contact the 4. Calculated pulse value municipal authorities responsible for waste disposal in your 5. Pulse symbol area. 6. Release air (arrow) 7. Number of memory 3. Device description space/memory display average value ( ), morning ( ), evening 8.
  • Seite 19 removed from the device, the date and time must be set again. The year flashes on the display. Any saved measurements are retained. • Choose the desired year with the M1/ Used batteries should not be disposed of in normal household M2 memory buttons and confirm with the waste.
  • Seite 20: Measuring Blood Pressure

    When doing so, there must not be any batteries in the battery The cuff should be placed on the compartment. The mains part can be obtained from specialist upper arm so that the lower edge is retailers or from the service address using order number 071.19. 2 to 3 cm above the bend of the elbow •...
  • Seite 21 A larger cuff for upper-arm circumferences of 35 to 44 cm can The cuff automatically inflates. be obtained from specialist retailers or from the service ad- Measuring can be cancelled at any time by pressing dress using order number 163.387. the Start/stop button 5.2 Correct posture The cuff’s air pressure is slowly released.
  • Seite 22: Evaluating Results

    in the bioelectrical system controlling the heart beat. The symp- • Using the Start/stop button , switch off the blood toms (omitted or premature heart beats, slow or excessively fast pressure monitor. The measurement is then stored in heart rate) may be caused, among other things, by heart dis- the selected user memory.
  • Seite 23: Displaying And Deleting Measurements

    It is important to consult your doctor regularly for advice. Your • Press the relevant memory button (M1 or M2). doctor will tell you your individual values for normal blood pres- If you have selected user memory1, the M1 memory sure as well as the value above which your blood pressure is button must be pressed.
  • Seite 24: Cleaning And Storing The Instrument

    If All the values in the current user memory are necessary, reinsert or replace the batteries. deleted. 10. specifications Model no. BM 45 Type M1501 Measurement Oscillometric, non-invasive blood pres- 8. Cleaning and storing the instrument...
  • Seite 25 Measurement range Cuff pressure 0 – 300 mmHg, Classification Internal supply, IPX0, no AP or APG, systolic 60– 250 mmHg, continuous operation, application part diastolic 40 –199 mmHg, type BF (cuff), CLASS II (when using a Pulse 30 –180 beats/minute mains part) Display accuracy Systolic ±...
  • Seite 26: Mains Part

    FW 7575M/EU/6/06 Input 100 – 240 V, 50 – 60 Hz Output 6 V DC, 600 mA, only in connection with beurer blood pressure monitor. Supplier Friwo Gerätebau GmbH Protection This device is double insulated and protected against short circuit and overload by a primary thermal fuse.
  • Seite 27: Premières Expériences

    Avec nos sentiments dévoués Beurer et son équipe Attention 1. Premières expériences Vérifiez que l‘emballage du tensiomètre BM 45 de Beurer est Remarque intact et que tous les éléments sont inclus. Avant l‘utilisation, Ce symbole indique des informations assurez-vous que l‘appareil et les accessoires ne présentent importantes aucun dommage visible et que la totalité...
  • Seite 28 • Évitez de manger, boire, fumer ou d’exercer des activités Élimination conformément à la directive physiques pendant au moins 30 minutes avant la mesure. européenne 2002/96/CE – DEEE relative • Effectuez une nouvelle mesure si vous avez un doute sur les aux déchets d’équipements électriques et valeurs mesurées.
  • Seite 29 • Évitez des mesures trop fréquentes ou une pression continue garantir la précision des valeurs et d’optimiser la durée de du brassard. Elles entraînent une réduction de la circulation vie du produit : sanguine et constituent un risque de blessure. –...
  • Seite 30: Description De L'appareil

    3. Description de l’appareil • N’utilisez pas des types ou des marques de piles différents et n’utilisez pas des piles d’une capacité différente. Utilisez de préférence des piles alcalines. Remarques relatives à la réparation et à la mise au rebut mmHg •...
  • Seite 31: Préparer La Mesure

    Données affichées à l’écran : Si le symbole de changement des piles apparaît en continu, il n’est plus possible d’effectuer de mesure et vous 1. Date / heure devez changer toutes les piles. Dès que les piles sont retirées 2. Pression systolique de l’appareil, l’heure doit être de nouveau réglée.
  • Seite 32 Les heures clignotent à l’écran • Maintenez la touche MARCHE/ARRÊT enfoncée pendant 5 secondes. • À l’aide des touches de mémoire M1/M2, sélectionnez l’heure souhaitée et confirmez • À l’aide des touches de mémoire M1/M2, avec la touche MARCHE/ARRÊT sélectionnez le format d’heure que vous souhaitez et confirmez avec la touche Les minutes clignotent à...
  • Seite 33: Mesure De La Tension Artérielle

    5. Mesure de la tension artérielle Si vous effectuez la mesure sur le bras droit, le tuyau se trouve à l’intérieur de votre coude. Assurez-vous que votre Veuillez amener l’appareil à température ambiante avant la bras n’est pas posé sur le tuyau. mesure.
  • Seite 34 • Installez-vous confortablement avant de prendre votre ten- La manchette se gonfle automatiquement. sion. Faites en sorte que votre dos et vos bras soient bien Vous pouvez interrompre la mesure à tout moment en appuyés sur le dossier et les accoudoirs. Ne croisez pas les appuyant sur la touche START/STOP jambes.
  • Seite 35: Evaluation Des Résultats

    anarchiques ou précoces, pouls lent ou trop rapide) peuvent • Éteignez le tensiomètre en appuyant sur la touche entre autres être dus à des maladies cardiaques, à l’âge, à MARCHE/ARRÊT . Ainsi, le résultat de la mesure est une prédisposition corporelle, à une mauvaise hygiène de vie, enregistré...
  • Seite 36: Récupérer Et Supprimer Les Valeurs De Mesure

    vos valeurs personnelles pour une pression sanguine normale • Appuyez sur la touche mémoire correspondante (M1 et la valeur à laquelle la pression sanguine est considérée ou M2). comme dangereuse. Si vous avez choisi la mémoire utilisateur1, appuyez Le classement qui s’affiche ainsi que l’échelle de l’appareil sur la touche mémoire M1.
  • Seite 37: Nettoyage Et Rangement De L'appareil

    5 secondes. 10. Fiche technique Toutes les valeurs de la mémoire utilisateur actuelle sont supprimées. N° du modèle BM 45 Type M1501 Mode de mesure Mesure de la tension artérielle au bras, oscillométrique et non invasive Plage de mesure Pression du brassard 0 – 300 mmHg, 8.
  • Seite 38 Précision de systolique ± 3 mmHg, Classement Alimentation interne, IPX0, pas d’AP ni l’indicateur diastolique ± 3 mmHg, d’APG, utilisation continue, appareil de Pouls ± 5 % de la valeur affichée type BF (manchette), CLASS II (lors de l’uti- lisation de l’adaptateur secteur) Incertitude de écart type max.
  • Seite 39 Entrée 100 – 240 V, 50 – 60 Hz Sortie 6 V DC, 600 mA, uniquement en associa- tion avec les lecteurs de tension artérielle Beurer. Fabricant Friwo Gerätebau GmbH Protection L’appareil dispose d’une isolation double et d’un protecteur thermique primaire mettant l’appareil hors tension en cas de défaut.
  • Seite 40: Conocer El Aparato

    Su equipo Beurer ¡Atención! 1. Conocer el aparato Compruebe que el embalaje del tensiómetro Beurer BM 45 esté intacto y que su contenido esté completo. Antes de Indicación utilizar el aparato deberá asegurarse de que ni este ni los ac- Indicación de información importante...
  • Seite 41 • Las mediciones realizadas por usted solo tienen carácter Fabricante informativo, en ningún caso pueden reemplazar un examen médico. Hable de los valores que obtenga con su médico. Temperatura de transporte y almacena- Storage Bajo ningún concepto debe tomar usted mismo decisiones miento admisible.
  • Seite 42 tratamiento médico, p. ej. acceso por vía endovascular, ad- – Utilice exclusivamente los brazaletes de repuesto originales ministración de tratamiento por vía endovascular o un shunt adjuntos. De lo contrario los valores medidos serán erróneos. arteriovenoso (A-V-). • No presionar los botones mientras el brazalete no esté colo- •...
  • Seite 43: Descripción Del Aparato

    3. Descripción del aparato • El usuario no debe reparar ni ajustar por sí mismo el aparato. De lo contrario no se podrá garantizar el correcto funciona- miento del aparato. • Las reparaciones deben ser llevadas a cabo exclusivamente por el servicio postventa o bien por sus agentes autorizados. Antes de gestionar cualquier reclamación, controle en primer mmHg lugar las pilas y cámbielas en caso dado.
  • Seite 44: Preparar La Medición

    Indicaciones en la pantalla: • Vuelva a cerrar la tapa del compartimento para pilas con cuidado. 1. Fecha / hora 2. Presión sistólica Cuando el símbolo de cambio de pilas se muestra conti- 3. Presión diastólica nuamente, no se pueden seguir realizando mediciones y se de- 4.
  • Seite 45 • Mantenga pulsada la tecla de inicio/parada El indicador de la hora parpadea en la durante 5 segundos. pantalla. • Seleccione con las teclas de memorizaci- • Seleccione con las teclas de memorización ón M1/M2 el formato de hora deseado y M1/M2 la hora deseada y confirme con la confirme con la tecla de inicio/parada tecla de inicio/parada...
  • Seite 46: Medir La Presión Sanguínea

    ción, el tensiómetro perderá la fecha y la hora. Sin embargo, Conecte el tubo del manguito a la los valores de medición almacenados se conservan. conexión respectiva en el aparato 5. Medir la presión sanguínea Espere a que el aparato esté a temperatura ambiente para realizar la medición.
  • Seite 47 • Repose unos 5 minutos antes de iniciar la medición. De lo El brazalete se infla automáticamente. contrario, pueden producirse desviaciones. El proceso de medición puede interrumpirse en cual- • Usted puede llevar a cabo la medición sentado o tendido. En quier momento pulsando la tecla de INICIO/PARADA todo caso es necesario observar que el brazalete se encuen- tre a la altura del corazón.
  • Seite 48: Evaluar Los Resultados

    razón. Los síntomas (latidos suprimidos o prematuros del corazón, • Encienda el tensiómetro con la tecla de inicio/parada pulso lento o demasiado rápido) pueden deberse, entre otros, a . De esa forma se memorizará el resultado de la cardiopatías, edad, predisposición corporal, consumo excesivo medición en el registro de usuario seleccionado.
  • Seite 49: Consultar Y Borrar Los Valores Medidos

    Es importante que consulte periódicamente a su médico, quien – Si desea consultar los datos medidos del registro de le informará de sus valores personales de presión sanguínea usuario , pulse la tecla de memorización M1. normal, así como del valor a partir del cual puede considerarse –...
  • Seite 50: Limpiar Y Guardar El Aparato

    • Pulse la tecla de memorización correspondiente (M1 o • Si vuelve a pulsar la tecla de memorización correspondiente (M1 o M2) se mostrará en M2). la pantalla la última medición individual (en Si ha seleccionado el registro de usuario1, deberá el ejemplo, la medición 03).
  • Seite 51: Eliminar Fallas

    10. Especificaciones técnicas Alimentación 4 pilas x 1,5 V tipo AA N.º de modelo BM 45 Vida útil de las Para unas 250 mediciones, según el nivel de Tipo M1501 pilas la presión sanguínea y la presión de inflado...
  • Seite 52 Salida 6 V DC, 600 mA, solamente en combinación con los tensiómetros Beurer. • Este aparato cumple con la norma europea EN60601-1-2 y está sujeto a las medidas especiales de precaución relativas Fabricante Friwo Gerätebau GmbH...
  • Seite 53: Note Introduttive

    1. Note introduttive Controllare l‘integrità esterna della confezione e del contenuto Avvertenza del misuratore di pressione Beurer BM 45. Prima dell‘uso Indicazione di importanti informazioni assicurarsi che l‘apparecchio e gli accessori non presentino nessun danno palese e che il materiale di imballaggio sia stato Seguire le istruzioni per l’uso...
  • Seite 54 • Evitare di mangiare, bere, fumare o praticare attività fisica Smaltimento secondo le norme previste almeno nei 30 minuti precedenti alla misurazione. dalla Direttiva CE sui rifiuti di apparecchia- • In caso di valori dubbi, ripetere la misurazione. ture elettriche ed elettroniche 2002/96/ •...
  • Seite 55 bero una riduzione del flusso sanguigno con il conseguente – Non utilizzare l’apparecchio in vicinanza di forti campi rischio di lesioni. elettromagnetici e tenerlo lontano da impianti radiofonici o • Accertarsi che il manicotto non venga applicato su braccia telefoni cellulari. con arterie o vene sottoposte a trattamenti medici, quali –...
  • Seite 56: Descrizione Dell'apparecchio

    è più garantito un funzionamento corretto. • Le riparazioni devono essere eseguite esclusivamente dal /min servizio assistenza di Beurer o da ri-venditori autorizzati. Prima di ogni reclamo verificare in primo luogo lo stato delle batterie e sosti-tuirle, se necessario.
  • Seite 57: Preparazione Della Misurazione

    Indicatori sul display: Quando l’icona di sostituzione delle batterie è fissa, non è più possibile effettuare alcuna misurazione ed è necessario 1. Data / Ora cambiare tutte le batterie. Quando le batterie vengono rimosse 2. Pressione sistolica dall’apparecchio, è necessario reimpostare la data e l’ora. Le 3.
  • Seite 58 • Tenere premuto il pulsante START/STOP Sul display lampeggia il numero dell'ora. per 5 secondi. • Con i pulsanti per la memorizzazione M1/ • Con i pulsanti per la memorizzazione M1/ M2 selezionare il numero dell'ora deside- M2 selezionare il formato dell'ora deside- rato e confermare con il pulsante START/ rato e confermare con il pulsante START/ STOP...
  • Seite 59: Misurazione Della Pressione Sanguigna

    5. Misurazione della pressione sanguigna Inserire quindi il flessibile del bracciale nell’attacco della spina del bracciale. Prima della misurazione portare l’apparecchio a temperatura ambiente. La misurazione può essere eseguita sul braccio destro o sinistro. Se si esegue la misurazione sul braccio destro, il tubo si 5.1 Applicare il bracciale trova all’interno del gomito.
  • Seite 60 • La misurazione può essere eseguita da seduti o sdraiati. Ad Il manicotto si gonfia in automatico. ogni modo controllare che il bracciale si trovi all’altezza del La misurazione può essere interrotta in qualsiasi mo- cuore. L’avambraccio va appoggiato in modo che il bracciale mento premendo il pulsante "START/STOP"...
  • Seite 61: Valutare I Risultati

    battito cardiaco. I sintomi (battiti cardiaci mancanti o prematuri, • Spegnere il misuratore di pressione con il pulsante frequenza lenta o accelerata dei battiti) possono essere causati START/STOP . In questo modo la misurazione viene tra l’altro da malattie cardiache, età, predisposizione genetica, memorizzata nella memoria utente selezionata.
  • Seite 62: Ricerca E Cancellazione Dei Valori Misurati

    È importante consultare regolarmente il proprio medico per • Premere il pulsante per la memorizzazione corrispon- sapere qual è la propria pressione normale e il limite superato il dente (M1 o M2). quale il livello di pressione viene considerato pericoloso. Una volta selezionata la memoria utente1, utilizzare il La classificazione sul display e la scala graduata sul misuratore pulsante per la memorizzazione M1.
  • Seite 63: Pulizia E Custodia Dell'apparecchio

    8. Pulizia e custodia dell’apparecchio • Premendo nuovamente il pulsante per la memorizzazione corrispondente (M1 o • Pulire accuratamente l’apparecchio servendosi esclusiva- M2), il display visualizza l'ultima misura- mente di un panno leggermente inumidito. • La frequenza di pulizia varia in base al livello di sporcizia zione singola (nell'esempio la misurazione dell’apparecchio.
  • Seite 64: Dati Tecnici

    10. Dati tecnici Durata delle batterie Ca. 250 misurazioni, in base alla pressio- ne sanguigna e di pompaggio Codice BM 45 Accessori Istruzioni per l’uso, 4 batterie AA da Tipo M1501 1,5 V, custodia Metodo di Oscillometrico, misurazione non invasiva...
  • Seite 65 FW 7575M/EU/6/06 Ingresso 100 – 240 V, 50 – 60 Hz Uscita 6 V DC, 600 mA, solo in abbinamento con sfigmomanometri Beurer. Produttore Friwo Gerätebau GmbH Protezione L’apparecchio dispone di un doppio iso- lamento di protezione ed è equipaggiato di un fusibile termico sul lato primario che, in caso di guasto, separa l’apparec-...
  • Seite 66: Önemli Bilgiler

    Dostane tavsiyelerimizle Beurer Müessesesi Dikkat 1. Tanıtım Beurer BM 45 tansiyon ölçme cihazının ambalajının dıştan hasar görmemiş ve içeriğin eksiksiz olduğundan emin olun. Önemli bilgilere yönelik notlar Cihazı kullanmadan önce, cihazda ve aksesuarlarında gözle görülür hasarlar olmadığından ve tüm ambalaj malzeme- Kullanım kılavuzunu dikkate alın...
  • Seite 67 hiçbir zaman ölçüm sonuçlarından yola çıkarak kendi tıbbi Üretici kararlarınızı vermeyin (örneğin ilaçlar ve dozları)! • Tansiyon ölçme cihazını yeni doğan bebeklerde ve pree- İzin verilen nakliye ve depolama sıcaklığı. Storage klampsi hastalarında kullanmayın. Tansiyon ölçme cihazını 50°C İzin verilen nakliye ve depolama hava nemi. hamilelikte kullanmadan önce bir doktora danışmanızı...
  • Seite 68 çıkar. çalışması garanti edilemez. • Manşet el bileğine takılı olmadığı sürece, tuşlara basmayınız. • Onarımlar sadece Beurer yetkili servisi veya yetkili satıcılar • Eğer cihaz uzun bir süre kullanmayacaksa, pillerin çıkarılması tarafından yapılmalıdır. Fakat her reklamasyondan önce, yine tavsiye edilir.
  • Seite 69: Cihaz Açıklaması

    • Cihazı lütfen 2002/96/EC – WEEE (Waste Electrical Ekrandaki göstergeler: and Electronic Equipment – Elektrikli ve elektronik 1. Tarih / Saat donanım atıkları) numaralı elektro ve elektronik eski 2. Sistolik tansiyon cihazlar yönetmeliğine uygun şekilde gideriniz. Konuyla ilgili 3. Diyastolik tansiyon sorularınız olması...
  • Seite 70: Ölçüme Hazırlık

    4. Ölçüme hazırlık M1 veya M2 hafıza düğmesini basılı tutarak değerleri hızlı- ca ayarlayabilirsiniz. Pillerin takılması • Cihazın arka tarafındaki pil böl- • BAŞLAT/DURDUR düğmesini 5 saniye mesinin kapağını çıkarın. basılı tutun. • Dört adet tip 1,5 V AA (Alkaline •...
  • Seite 71: Tansiyonun Ölçülmesi

    5. Tansiyonun ölçülmesi Ekranda saat göstergesi yanıp söner. Lütfen cihazı ölçümden önce oda sıcaklığına getiriniz. • Hafıza düğmeleri M1/M2 ile istediğiniz Ölçümü sol veya sağ kolda yapabilirsiniz. saati seçin ve BAŞLAT/DURDUR düğmesi ile onaylayın. 5.1 Manşetin takılması Ekranda dakika göstergesi yanıp söner. Manşeti, açık olan sol üst kola sarınız.
  • Seite 72 Sol ve sağ kol arasındaki tansiyon farklı olabilir, dolayısıyla Tansiyon ölçümünü gerçekleştirme ölçülen tansiyon değerleri de farklı olabilir. Ölçümü her zaman Manşeti yukarıda açıklandığı gibi takın ve ölçümü gerçek- aynı kolda yapın. leştirmek istediğiniz duruşa geçin. İki kol arasındaki değerler çok farklıysa ölçümü hangi kolunuz- •...
  • Seite 73: Sonuçların Değerlendirilmesi

    layı, kalp ritminin anormal olduğu bir hastalıktır. Septomların • Tansiyon ölçme cihazını BAŞLAT/DURDUR düğmesi (gerçekleşmeyen veya erken gerçekleşen kalp atışları, yavaş kapatın. Böylece ölçüm sonucu, seçilmiş olan veya hızlı nabız) sebepleri, başka sebeplerin yanı sıra, kalp has- kullanıcı hafızasına kaydedilmiş olur. talıkları, yaş, bedensel özellikler, aşırı...
  • Seite 74: Ölçüm Değerlerini Çağırma Ve Silme

    Düzenli aralıklarla hekiminize danışmanız önemlidir. Hekiminiz • İlgili hafıza düğmesine (M1 veya M2) basın. sizin için normal tansiyon olarak kabul edilebilecek bireysel Kullanıcı hafızası 1'i seçtiyseniz M1 hafıza düğmesine değeri ve hangi değerden itibaren tansiyonun tehlikeli olarak basın. tanımlanacağını size söyleyecektir. Kullanıcı...
  • Seite 75: Hata Giderilmesi

    • Hafıza düğmelerinin ikisini M1 & M2 5 saniyeliğine veya değiştirin. basılı tutun. O andaki kullanıcı hafızasındaki tüm değerler 10. Teknik bilgiler silinir. Model no. BM 45 M1501 Ölçüm yöntemi Üst koldan, osilometrik, invazif olmayan tansiyon ölçümü 8. Cihazın temizlenmesi ve muhafaza edilmesi Ölçüm aralığı...
  • Seite 76: Kullanım Kılavuzu

    100 – 240 V, 50 – 60 Hz Sınıflandırma Dahili besleme, IPX0, AP veya APG yok, Çıkış 6 V DC, 600 mA, sadece Beurer tansiyon devamlı kullanım, uygulama parçası tip BF ölçme cihazı ile birlikte kullanılır. (manşet), CLASS II (adaptör kullanılırken) Üretici...
  • Seite 77 Koruma Cihazın çift koruyucu izolasyonu vardır ve bir hata durumunda cihazın elektrik şebe- kesine bağlantısını kesen, birincil tarafta mevcut bir ısınmaya karşı güvenlik tertibatı ile donatılmıştır. Adaptörü kullanmadan önce, pillerin pil gözünden çıkarılmış olmasını sağlayınız. Doğru akım bağlantısının kutupları Koruyucu izolasyon / Koruma sınıfı 2 Gövde ve Adaptör gövdesi, elektrik akımı...
  • Seite 78: Важные Указания

    1. Ознакомление ющие символы: Проверьте комплектность поставки прибора для Осторожно! измерения артериального давления Beurer BM 45 и убедитесь в том, что на упаковке нет внешних повреждений. Перед использованием убедитесь в том, Указание что прибор и его принадлежности не имеют видимых...
  • Seite 79 • За 30 минут до измерения следует воздерживаться от Утилизация прибора в соответствии с приема пищи и жидкости, курения или физических на- Директивой ЕС 2002/96/EC об отходах грузок. электрического и электронного оборудова- • При наличии сомнений относительно полученных резуль- ния – WEEE (Waste Electrical and Electronic татов...
  • Seite 80 • Во время измерения кровяного давления не допускается Указания по хранению и уходу прерывание циркуляции крови на длительное время. При • Аппарат состоит из прецизионных и электронных узлов. сбое в работе прибора снимите манжету с руки. Точность результатов измерений и срок службы аппарата •...
  • Seite 81: Описание Устройства

    • Утилизируйте прибор согласно требованиям Указания в отношении батареек Положения об утилизации электрического и • Проглатывание батареек может приводить к опасности электронного оборудования 2002/96/EC – WEEE для жизни. Поэтому храните батарейки и изделия в не- (Waste Electrical and Electronic Equipment). По всем доступном...
  • Seite 82: Подготовка К Измерению

    Индикация на дисплее: ной полярностью в соответствии с маркировкой. Не ис- пользуйте заряжаемые аккумуляторы. 1. Дата / время • Снова тщательно закройте крышку отделения для бата- 2. Систолическое реек. давление 3. Диастолическое При длительном отображении символа замены батареек давление проведение измерений невозможно, следует за- 4.
  • Seite 83 На дисплее замигают часы. • Удерживайте кнопку START/STOP на- жатой в течение 5 секунд. • С помощью кнопок сохранения M1/M2 выберите нужное количество часов и • С помощью кнопок сохранения M1/M2 подтвердите выбор нажатием кнопки выберите желаемый часовой формат START/STOP и...
  • Seite 84: Измерение Кровяного Давления

    измерения артериального давления удаляются. Однако Наденьте теперь соединительную сохраненные результаты измерения остаются в памяти трубку манжеты на штуцер прибора. манжеты. 5. Измерение кровяного давления Пожалуйста, перед измерением храните прибор при ком- Если измерение выполняется на правом плече, шланг натной температуре. должен...
  • Seite 85 5.2 Принять правильное положение Манжета накачивается автоматически. Измерение можно прервать в любое время нажа- тием кнопки START/STOP Давление воздуха в манжете медленно снижается. При распознавании склонности к высокому давлению манжета вновь будет накачана, и давление в ней снова увеличится. Пока распознается пульс, будет •...
  • Seite 86: Оценка Результатов

    Это может служить индикатором аритмии. Аритмия – это за- • Выключите прибор для измерения артериального болевание, при котором сердечный ритм нарушается из-за давления, нажав кнопку START/STOP . Таким пороков в биоэлектрической системе, которая управляет образом в выбранной пользовательской памяти со- сердечными...
  • Seite 87: Просмотр И Удаление Результатов Измерения

    7. Просмотр и удаление результатов результаты измерений можно классифицировать и оце- нить, как указано в нижеследующей таблице. измерения Классификация ВОЗ: Результаты каждого успешного измерения сохраня- Согласно директивам/положениям Всемирной организации ются с указанием даты и времени измерения. Когда здравоохранения (ВОЗ) и новейшими исследованиям ре- количество...
  • Seite 88 • Нажмите соответствующую кнопку сохранения (M1 • При повторном нажатии соответству- или M2). ющей кнопки сохранения (M1 или M2) на дисплее о отобразится результат Если выбрана пользовательская память1, нажми- последнего измерения (в качестве при- те кнопку сохранения M1. мера используется измерение 03). Если...
  • Seite 89: Очистка И Хранение Прибора

    8. Очистка и хранение прибора 10. Технические данные • Осторожно очистите прибор и манжету слегка смочен- Модель № BM 45 ной тряпкой. Тип M1501 • Периодичность очистки зависит от степени загрязнения Метод Осциллометрическое, неинвазивное измере- прибора. Очищайте прибор для измерения артериаль- измерения...
  • Seite 90 ническим системам измерения артериального давления) Электропи- 4 x 1,5 В батарейки типа AA и IEC80601-2-30 (медицинские электрические приборы, тание часть 2 – 30: особые предписания по обеспечению без- Срок службы Для ок. 250 измерений, в зависимости от опасности, включая основные особенности производи- батареек...
  • Seite 91 Фирма-импортер: OOO БОЙРЕР, 109451 г. Москва, ул. Перерва 62, корп. 2, офис 3 Сервисный центр: 109451 г. Москва, ул. Перерва 62, корп. 2, Тел(факс) 495–658 54 90 bts-service@ctdz.ru Дата продажи Подпись продавца Штамп магазина Подпись покупателя...
  • Seite 92: Ważne Wskazówk

    Zespół firmy Beurer Wskazówka 1. Zapoznanie Ważne informacje Ciśnieniomierz Beurer BM 45 należy sprawdzić pod kątem zewnętrznych uszkodzeń opakowania oraz kompletności Należy przestrzegać instrukcji obsługi zawartości. Przed użyciem należy się upewnić, że urządzenie i akcesoria nie wykazują żadnych widocznych uszkodzeń i że wszystkie elementy opakowania zostały usunięte.
  • Seite 93 wać decyzji medycznych na własną rękę (np. dotyczących Dopuszczalna temperatura podczas trans- stosowania leków i ich dawkowania)! Storage portu i przechowywania. Dopuszczalna 50°C • Nie wolno używać ciśnieniomierza do pomiaru ciśnienia wilgotność powietrza podczas transportu i tętniczego u noworodków i kobiet cierpiących na zatrucie -20°C RH ≤85% przechowywania.
  • Seite 94 • Naprawy mogą być przeprowadzane jedynie przez serwis telefonów komórkowych. firmy Beurer lub autoryzowany serwis dystrybutora sprzętu. – Używać jedynie dostarczonej lub orginalnej opaski nad- Przed złożeniem reklamacji sprawdzić najpierw baterie i w garstkowej.
  • Seite 95: Opis Urządzenia

    3. Opis urządzenia Informacje na wyświetlaczu: 1. Data i godzina 2. Ciśnienie skurczowe 3. Ciśnienie rozkurczowe 4. Zmierzone tętno 5. Symbol tętna mmHg 6. Wypuszczanie powietrza (strzałka) mmHg 7. Numer miejsca w pamięci/wskaźnik pamięci wartości śred- /min niej ( ), rano ( ), wieczorem ( 8.
  • Seite 96 daty i godziny. Zapisane • Przytrzymaj przyciśnięty przez 5 sekund wyniki pomiarów nie zostaną przycisk START/STOP utracone. • Za pomocą przycisków pamięci M1/M2 Zużytych baterii nie wolno wybierz żądany format godziny i potwierdź wyrzucać do zwykłego za pomocą przycisku START/STOP pojemnika na śmieci.
  • Seite 97: Pomiar Ciśnienia Krwi

    5. Pomiar ciśnienia krwi Na wyświetlaczu zacznie migać wskazanie Przed rozpoczęciem pomiaru należy doprowadzić urządzenie godziny. do temperatury pokojowej. • Za pomocą przycisków pamięci M1/M2 Dzięki temu będzie można przeprowadzać pomiar na lewym wybierz żądana liczbę godzin i potwierdź lub prawym ramieniu. za pomocą...
  • Seite 98 W przypadku przeprowadzania pomiaru na prawym ramie- • Aby nie zafałszować wyniku pomiaru jest ważne, aby pod- niu, wąż znajduje się po stronie wewnętrznej łokcia. Zwróć czas pomiaru zachowywac się spokojnie i nie mówić. uwagę, aby ramię nie znajdowało się na wężu. Pomiar ciśnienia tętniczego krwi Ciśnienie krwi może się...
  • Seite 99: Ocena Wyników

    Mankiet jest automatycznie napełniany powietrzem. • Wyłącz ciśnieniomierz za pomocą przycisku START/ STOP . Spowoduje to zapisanie wyniku pomiaru w Pomiar można w każdej chwili przerwać naciskając wybranej pamięci. przycisk START/STOP Jeżeli zapomnisz wyłączyć urządzenie, wyłączy się ono Powietrze jest pomału spuszczane z mankietu. W przy- automatycznie po upływie około 3 minut.
  • Seite 100: Odczyt I Usuwanie Wyników Pomiaru

    Podane wartości standardowe służą jedynie jako ogólne wy- diagnoza lub leczenie na podstawie wyników pomiarów może być tyczne, ponieważ indywidualne wartości ciśnienia u różnych niebezpieczne. Koniecznie stosować się do zaleceń lekarza. osób i w różnych grupach wiekowych różnią się od siebie. Kwalifikacja wg WhO: Ważne jest więc regularne korzystanie z konsultacji lekarskich.
  • Seite 101 – Jeśli chcesz wyświetlić dane pomiarów z danej pamięci • Jeśli ponownie naciśniesz odpowiedni użytkownika , naciśnij przycisk pamięci M1. przycisk pamięci (M1 lub M2), na wy- świetlaczu pojawi się ostatni pojedynczy – Jeśli chcesz wyświetlić dane pomiarów pomiar (w przykładzie pomiar 03). z danej pamięci użytkownika , naciśnij przycisk pamięci M2.
  • Seite 102: Usuwanie Błędów

    8. urządzenie czyścić i przechowywać 10. Dane techniczne • Ciśnieniomierz należy czyścić ostrożnie lekko wilgotną ście- Nr modelu BM 45 reczką. M1501 • Częstotliwość czyszczenia należy dostosować do stopnia Metoda pomiaru Oscylometryczny, nieinwazyjny pomiar zabrudzenia urządzenia. Ciśnieniomierz i mankiet należy ciśnienia na ramieniu...
  • Seite 103: Instrukcja Obsługi

    Producent zastrzega sobie prawo do zmiany danych technicz- Wyjście 6 V DC, 600 mA tylko w połączeniu z nych z powodu aktualizacji bez konieczności powiadamiania. ciśnieniomierzami firmy Beurer. • Urządzenie spełnia europejską normę EN60601-1-2 i wyma- Producent Friwo Gerätebau GmbH ga zachowania szczególnych środków ostrożności w zakre-...
  • Seite 104 Obudowa i pokry- Obudowa adaptera chroni przed kontak- wa ochronna tem z częściami, które przewodzą wzgl. mogłyby przewodzić prąd (palce, igły, hak testowy). Użytkownikowi nie wolno jednocześnie dotykać pacjenta i wtyczki wyjściowej adaptera AC.
  • Seite 105: Electromagnetic Compatibility Information

    Electromagnetic Compatibility Information Guidance and manufacture’s declaration – electromagnetic emissions – for all EQuIPMENT and sYsTEMs Guidance and manufacture’s declaration – electromagnetic emission The BM45 blood pressure monitor is intended for use in the electromagnetic environment specified below. The customer of the user of the BM45 blood pressure monitor should assure that it is used in such and environment.
  • Seite 106 Guidance and manufacture’s declaration – electromagnetic immunity – for EQuIPMENT and sYsTEMs that are not LIFE-suPPORTING Guidance and manufacture’s declaration – electromagnetic immunity The BM45 blood pressure monitor is intended for use in the electromagnetic environment specified below. The customer or the user of the BM45 blood pressure monitor should assure that it is used in such an environment.
  • Seite 107 Recommended separation distances between portable and mobile RF communications equipment and the EQuIPMENT or sYsTEM – for EQuIPMENT or sYsTEM that are not LIFE-suPPORTING Recommended separation distances between portable and mobile RF communications equipment and the BM45 blood pressure monitor The BM45 blood pressure monitor is intended for use in an electromagnetic environment in which radiated RF disturbances are controlled.

Inhaltsverzeichnis