Lionelo Liam Bedienungsanleitung
Inhaltsverzeichnis
Verfügbare Sprachen
Verfügbare Sprachen
User manual
Manual de usuario
Instrukcja obsługi
Handleiding
Bedienungsanleitung
Naudojimo instrukcija
Инструкция по эксплуатации
Návod k obsluze
Manuale d'uso
Használati utasítás
Manuel de l'Uti lisateur
Manual uti lizare
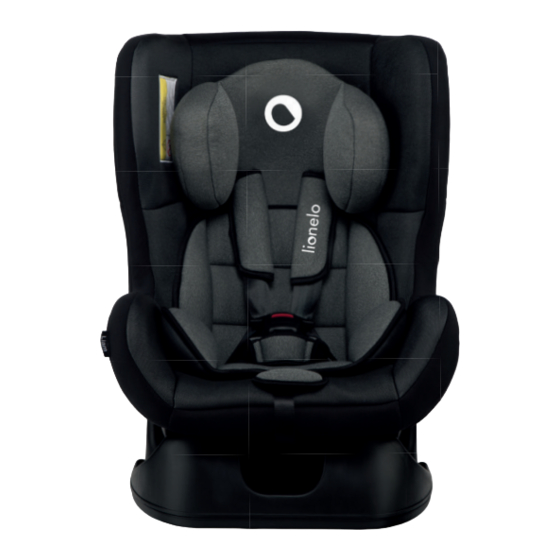
Liam
Baby car seat
Fotelik smochodowy
Kindersitz
Детское автокресло
Seggiolino auto per bambini
Siège-auto bébé
Silla de coche
Autostoeltje
Automobilinė kėdutė
Autós gyermekülés
Autosedačka
Scau auto
www.lionelo.com
‑ 1 ‑
Inhaltsverzeichnis

Verwandte Anleitungen für Lionelo Liam


Inhaltszusammenfassung für Lionelo Liam
- Seite 1 Handleiding Bedienungsanleitung Naudojimo instrukcija Инструкция по эксплуатации Návod k obsluze Manuale d’uso Használati utasítás Manuel de l’Uti lisateur Manual uti lizare Liam Baby car seat Fotelik smochodowy Kindersitz Детское автокресло Seggiolino auto per bambini Siège-auto bébé Silla de coche Autostoeltje Automobilinė...
- Seite 2 ‑ 2 ‑...
- Seite 3 ‑ 3 ‑...
- Seite 4 ‑ 4 ‑...
- Seite 5 ‑ 5 ‑...
- Seite 22 ECE-Regelung Nr. 16 oder anderen vergleichbaren Normen genehmigt sind. Sehr geehrte Kunden! Vor dem Gebrauch des Produktes lesen Sie bitte sorgfältig die vorliegende Bedienungsanleitung. Falls Bemerkungen oder Fragen zum gekauften Produkt, nehmen Sie mit uns Kontakt auf: help@lionelo.com ‑ 22 ‑...
-
Seite 23: Verwendung
Der Kindersitz wird maximal Ihr Kind nur dann schützen, wenn er richti g verwendet wird. Nichtbeachtung der Bedienungsanleitung kann zu einem Unfall führen. Um Ihr Kind richti g zu schützen, muss LO-Liam immer gemäß vorliegender Bedienungsanleitung benutzt und monti ert werden. -
Seite 24: Sicherheitshinweise
GRUPPE 0+ (0 – 13 kg) GRUPPE I (9-18 kg) ACHTUNG – BENUTZEN SIE KEINE NACH VORNE GERICHTETE GERÄTE, WENN DAS GEWICHT DES KINDES 9 KG NICHT ÜBERSCHREITET 3. Sicherheitshinweise • Die harten Teile und Kunststoffteile der Kinderrückhaltevorrichtung müssen so platziert und installiert werden, dass sie unter normalen Betriebsbedingungen des Fahrzeugs nicht vom Schiebesitz oder der Tür des Fahrzeugs eingeklemmt werden können. -
Seite 25: Verwendung Des Sets
wesentlicher Bestandteil des Geräts ist, der dessen Funktion beeinträchtigt. • Bewahren Sie die Bedienungsanleitung des Sitzes auf, wenn Sie das Gerät verwenden. Bewahren Sie es im Auto auf, in dem der Autositz installiert ist. • Verwenden Sie keine anderen tragenden Berührungspunkte als die in der Anleitung beschriebenen und auf der Kinderrückhaltevorrichtung angegebenen. -
Seite 26: Verbindung Der Gurtträger
Taste drücken (Abb. 5a, 5b) und mit zweiter Hand die Schultergurte ziehen. 5.2 Verbindung der Gurtträger 5.2.1 Befestigen Sie die Gurtträger an dem Verbindungsstück gemäß folgenden Abbildungen (Abb. 6a). 5.2.2 Platzieren Sie den Klettergurt im Verbindungsstück der Gurtträger (Abb. 6b). 5.3 Abheften vom Regulationsgurt in Klettergurt 5.3.1 Stecken Sie den Trägergurt in Klettergurt ein (Abb. -
Seite 27: Verwendung Des Kindersitzes Für Die Altersgruppe
5.6.1 Die Höhe der Schultergurte darf nicht zu hoch oder zu niedrig sein (Abb.10) A - zu niedrig B - zu hoch C - korrekt 5.7 Einstellung des Sitzwinkels Der Kindersitz besitzt 3 Möglichkeiten der Einstellung vom Sitzwinkel. 5.7.1 Um den Winkel des Kindersitzes zu ändern, legen Sie die Hand unter Sitz des Kindersitzes, drücken und halten Sie die Blockade. -
Seite 28: Verwendung Des Kindersitzes Für Die Altersgruppe I
6.1.2. Der Kindersitz soll im Auto montiert werden, das mit 3-Punkt- Gurtsystem ausgestattet ist. 6.1.3. Um den Kindersitz zu montieren, die Gurte sollen maximal gezogen werden. 6.1.4. Die Becken- und Schultergurte sollen durch den Kindersitz gezogen werden (Abb. 13). 6.1.5. Prüfen Sie, ob der Verschluss der Sicherheitsgurte richtig geschlossen wird. 6.1.6. -
Seite 29: Pflegeanleitung Des Kindersitzes
7.2.1 Prüfen Sie, in welchen Steckplätzen die Schultergurte eingebaut werden sollen. Das hängt von der Größe des Kindes ab. 7.2.2. Setzen Sie das Kind im Kindersitz. 7.2.3. Sichern Sie das Kind mithilfe des 5-Punkt-Gurtsystems vom Kindersitz. 7.2.4. Vergewissern Sie sich, dass die Gurte nicht verdreht sind. 8. - Seite 103 Podrobné záruční podmínky jsou k dispozici na webových stránkách: A részletes garanciális feltételek elérhetők a weboldalon: Condiții detaliate de garanție sunt disponibile pe site: lionelo.com Thank you for purchasing our product Dziękujemy za zakup urządzenia naszej marki Vielen Dank für den Kauf unserer Markenausrüstung Спасибо...
- Seite 104 ‑ 104 ‑...