Herunterladen Diese Seite drucken
Lionelo Hugo Handbuch
Vorschau ausblenden Andere Handbücher für Hugo:

Werbung

Verfügbare Sprachen

Verfügbare Sprachen

Instrukcja obsługi
User manual
Hugo
fotelik samochodowy
baby car seat
WWW.LIONELO.COM

Werbung

loading

Inhaltszusammenfassung für Lionelo Hugo

  • Seite 1 Instrukcja obsługi User manual Hugo fotelik samochodowy baby car seat WWW.LIONELO.COM...
  • Seite 3 WWW.LIONELO.COM...
  • Seite 4 Informacja Urządzenie przytrzymujące dla dzieci należy do kategorii „uniwersalne”. Uzyskało homologację zgodnie z regulaminem nr 44, seria poprawek 04, do ogólnego zastosowania w pojaz- dach i nadaje się do instalacji na większości miejsc siedzących w samochodzie. Prawidłowa instalacja jest możliwa, jeśli producent pojazdu oświadczył...
  • Seite 5 Wprowadzenie Drogi Kliencie! Dziękujemy za obdarzenie nas zaufaniem i wybranie foteli- ka samochodowego marki Lionelo.Nasze foteliki wykonywa- ne są z największą starannością, by zapewnić Twojemu dziec- ku komfortową podróż, a przede wszystkim, by zadbać o jego bezpieczeństwo. Dzięki wykorzystaniu wysokiej jakości mate- riałów i nowoczesnych rozwiązań...
  • Seite 6: Ważne Informacje

    Ważne informacje Należy przeczytać tę instrukcję obsługi przed użyciem i za- chować. Instrukcja pomoże prawidłowo zamontować fote- lik. Nieprawidłowy montaż może stanowić zagrożenie dla zdrowia dziecka. Producent nie ponosi odpowiedzialności za ewentualne zagrożenia spowodowane niewłaściwym montażem fotelika. Niniejszy fotelik przeznaczony jest dla kategorii (grup) wagowych II-III, co oznacza, że mogą...
  • Seite 7 Nie należy w żaden sposób modyfikować niniejszego produktu. Należy bezwzględnie unikać sytuacji, w których fotelik jest wystawiony na działanie bezpośrednich promieni słonecznych. W przeciwnym razie może się on nagrzać do wysokich temperatur i w konsekwencji doprowadzić do poparzeń dziecka. 10. Nie pozostawiaj dziecka w foteliku bez nadzoru. 11.
  • Seite 8 UWAGA! Nigdy nie używaj fotelika z 2-punktowymi pasami bezpieczeństwa. Schemat fotelika...
  • Seite 9 Zagłówek Oparcie Siedzisko Uchwyt pasów bezpieczeństwa Prowadnica pasów bezpieczeństwa Rączka do regulacji wysokości Zawias oparcia Ramię do mocowania ISOFIX Uchwyt na butelkę Mocowanie oparcia Połóż oparcie poziomo za siedziskiem, następnie nałóż zawias na łącznik w siedzisku (A). Wyprostuj oparcie w taki sposób, by zawias wszedł...
  • Seite 10: Regulacja Zagłówka

    Regulacja zagłówka UWAGA: Nigdy nie używaj fotelika, kiedy nie jest zamon- towany w samochodzie. Dziecko można posadzić w fote- liku dopiero po zakończeniu montażu. Prawidłowo zamontowany zagłówek zapewnia praw- idłowe ułożenie pasa bezpieczeństwa oraz komfort i bezpieczeństwo dziecka. Zagłówek można ustawić w jedenastu pozycjach. Wysokość...
  • Seite 11: Montaż Fotelika

    Montaż fotelika Istnieje możliwość wykorzystania samego siedziska dla starszych dzieci. Aby zdemontować oparcie, połóż opar- cie i pociągnij do góry, aby je odczepić od siedziska (F). Montaż z pasem bezpieczeństwa Zapinanie pasów bezpieczeństwa Umieść fotelik na siedzeniu w samochodzie. • Upewnij się, że oparcie fotelika przylega płasko do oparcia siedzenia (G).
  • Seite 12 Umieszczenie pasa w uchwycie fotelika Od strony zapięcia pasów część biodrową • przeprowadź przez czerwony wskaźnik pod podłokietnikiem (I, L). Część ramienna powinna być przeprowadzona • nad podłokietnikiem. Po drugiej stronie część biodrową również • przeprowadź przez czerwony wskaźnik pod podłokietnikiem (J).
  • Seite 13 Montaż z systemem ISOFIX Wciśnij przycisk na ramieniu mocowania ISOFIX i wysuń je jak najdalej. Wsuń fotelik do mocowania ISOFIX w samocho- dzie, aż usłyszysz kliknięcia po obydwu stronach. Na ramieniu powinien być widoczny zielony przycisk.
  • Seite 14 Upewnij się, że fotelik jest prawidłowo zamo- cowany. Jeśli odstaje od oparcia fotela samo- chodowego albo porusza się, powtórz montaż jeszcze raz. Po zamontowaniu siedzenia, upewnij się jeszcze raz, że fotelik jest prawidłowo zamontowany: Część biodrowa pasa bezpieczeństwa przebiega przez czerwone wskaźniki pod podłokietnikami na siedzisku (M-1).
  • Seite 16: Czyszczenie I Konserwacja

    Czyszczenie i konserwacja Fotelik musi być używany z pokryciem siedzenia. Aby zdjąć pokrycie, rozepnij zamek z tyłu fotelika (O). Pokrycie można zdjąć i prać z delikatnym detergen- tem w cyklu delikatnych tkanin i w temperaturze 30°C. Nie należy wirować oraz suszyć w suszarce bęb- nowej.
  • Seite 17 WWW.LIONELO.COM...
  • Seite 18 Info A holding device intended for children has been cate- gorized as an „all-purpose” device. It has been granted a certificate of approval in accordance with the regulations no. 44, amendments series 04, for general use in vehicles and is fit for assembly on most car seats. The device can be installed properly if the vehicle manu- facturer has specified in the vehicle manual that this vehi- cle is suitable for installation of the holding device for this...
  • Seite 19 Introduction Dear Customer! Thank you for placing your trust in us and purchasing the Lionelo child safety seat. Our child restraint systems are made with the utmost care to ensure comfortable journeys and, above all, maximum safety of your child. Implementation of high quality mate- rials and modern technologies allows us to provide users with a product that is perfectly suited for everyday use.
  • Seite 20 Important Please read this manual before you start using the product and keep it for future reference. The manual will help you se- cure the safety seat properly. An unsuitable assembly may pose a threat to your child. The manufacturer shall not be held responsible for potential danger arising from unsuita- ble assembly.
  • Seite 21 Avoid situations in which the safety seat is exposed to direct sunlight. Otherwise it may reach high temperature and in effect scald the child. 10. Do not leave the child in the safety seat unattended. 11. Make sure the luggage and other items which may injure the body in case of accident have been secured properly.
  • Seite 22 CAUTION! Never use the safety seat with 2-point seatbelts. Safety seat outline...
  • Seite 23 Headrest Backrest Seat Seatbelt handle Seatbelt guide Height adjustment handle Backrest hinge ISOFIX fixing arm Bottle holder How to fix backrest Place the backrest horizontally behind the seat, put the hinge on the seat connector (A). Straighten the backrest so that the hinge is insert- ed in the seat connector (B).
  • Seite 24 How to adjust headrest NOTE: Do not use the safety seat if it has not been se- cured in the car. Place the child in the safety seat once you have finished assembly. Thanks to a properly secured headrest, the seatbelt is properly positioned and your child is provided with comfort and safety.
  • Seite 25 How to assemble safety seat It is possible to use the seat for older children. To disas- semble the backrest, put the backrest down and pull up- wards to detach it from the seat (F). Assembly with seatbelt Fastening seatbelts Place the safety seat on the car seat.
  • Seite 26 Placing seatbelt in the safety seat handle From the seatbelt fastening side - carry the hip • part through the red indicator under the elbow rest (I, L). The arm part must be carried above the elbow • rest. On the other side – carry the hip part through •...
  • Seite 27 Assembly with ISOFIX system Press button on ISOFIX fixing arm and pull it out as far as you can. Slip the safety seat in ISOFIX fixing in the car until you can hear clicks on both sides. There should be a green button on the arm.
  • Seite 28 Make sure the safety seat has been secured properly. If it sticks out or moves, repeat the assembly. Once you have assembled the seat, make sure that the safety seat has been secured properly again: Hip part of the seatbelt must go through red indicators under elbow rests on the seat (M-1).
  • Seite 30: Cleaning And Maintenance

    Cleaning and maintenance Use the safety seat along with the seat cover only. To remove the cover, unzip the back of the safety seat (O). You can remove and wash the cover with a mild detergent in a soft fabric mode and at the tempera- ture of 30°C.
  • Seite 31 WWW.LIONELO.COM...
  • Seite 32 Information Diese Rückhalteeinrichtung für Kinder wurde zur Kategorie „universal“ eingestuft. Das Gerät erhielt eine Homologation gemäß der Regelung Nr. 44, Änderungsserie 04, für die allge- meine Verwendung in Fahrzeugen und passt in die meisten Fahrzeugsitze im Auto. Ein korrekter Einbau der Einrichtung kann erwartet werden, wenn der Fahrzeughersteller im Fahrzeughandbuch erklärt, dass das Fahrzeug für den Einbau einer „Universal“...
  • Seite 33 Einführung Sehr geehrte Kunden! Wir bedanken uns für Ihr Vertrauen und Auswahl der Marke Lionelo. Unsere Kindersitze werden mit höchster Sorgfalt herge- stellt, um Ihrem Kind eine Komfortreise und vor allem die Sicherheit zu gewähren. Dank den hochwertigen Mate- rialien und innovativen technologischen Lösungen geben wir zu Ihren Händen ein Produkt über, das perfekt für den...
  • Seite 34 Wichtige informationen Wir bitten, die Bedienungsanleitung vor dem Gebrauch des Kindersitzes sorgfältig durchzulesen und aufzubewahren. Die Bedienungsanleitung hilft, den Kinderautositz richtig zu montieren. Bei einem unsachgemäßen Gebrauch des Sitzes kann die Gesundheit des Kindes gefährden werden. Der Hersteller übernimmt keine Haftung für die Gefahren, die infolge der unsachgemäßen Verwendung des Kindersitzes entstanden: Der Kinderautositz ist für die Gewichtskategorien...
  • Seite 35 bei einem Unfall starken Belastungen ausgesetzt war. Das vorliegende Produkt soll in keiner Weise modifiziert werden. Es ist wichtig, die Situationen zu vermeiden, in den der Kinderautositz den direkten Sonnenstrahlen ausgesetzt ist. Ansonsten kann er auf hohen Temperaturen erhitzt werden und zu den Verbrennungen des Kindes führen. 10.
  • Seite 36 ACHTUNG! Niemals benutzen Sie den Kinderauto- sitz mit den 2-Punkt-Sicherheitsgurten. Schema des kindersitzes...
  • Seite 37: Befestigung Der Rückenlehne

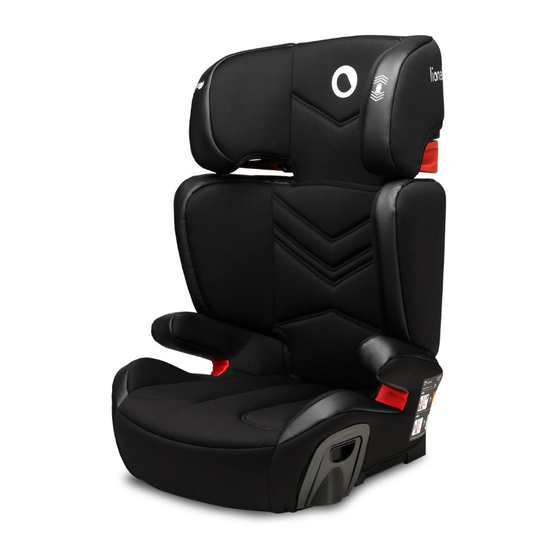
    Kopfstützen Rückenlehne Sitz Halterung der Sicherheitsgurte Führungsschiene der Sicherheitsgurte Handgriff zur Verstellung der Höhe Gelenk der Rückenlehne Arm zur ISOFIX-Befestigung Getränkehalterung Befestigung der rückenlehne Legen Sie die Rückenlehne horizontal unter dem Sitz, dann setzen Sie das Gelenk auf Verbind- ungsstück im Sitz (A) auf. Ziehen Sie die Rückenlehne so aus, dass ein Ge- lenk in Verbindungsstück des Sitzes eingesteckt wird (B).
  • Seite 38: Verstellung Der Kopfstütze

    Verstellung der kopfstütze ACHTUNG: Niemals benutzen Sie den Kinderautositz, wenn er nicht im Auto befestigt wurde. Das Kind darf im Kindersitz nur nach der Beendigung der Montage gesetzt werden. Eine richtige Montage der Kopfstütze gewährt eine richtige Lage des Sicherheitsgurtes, Komfort und Sicherheit des Kindes.
  • Seite 39: Montage Des Kindersitzes

    Montage des kindersitzes Es gibt eine Möglichkeit, nur den Sitz für die älteren Kinder zu benutzen. Um die Rückenlehne zu demontieren, sollen Sie sie ausziehen und dann hochziehen, um sie vom Sitz zu trennen (F). Montage mit Sicherheitsgurt Anschnallen der Sicherheitsgurte Stellen Sie den Kindersitz auf dem Autositz.
  • Seite 40 Platzieren des Sicherheitsgurtes im Gurthalter des Kindersitzes Auf der Seite des Anschnallens der Sicherhe- • itsgurte führen Sie den Beckengurt über die Armlehne (I, L). Der Schultergurt soll über die Armlehne geführt • werden.. Auf der anderen Seite führen Sie auch den •...
  • Seite 41 Montage mit ISOFIX-System Drücken Sie die Taste auf dem Arm der ISOFIX-Bef- estigung und schieben Sie sie möglichst weit. Stecken Sie den Kindersitz in die ISOFIX-Befes- tigung ein, bis Sie einen Klick auf beiden Seiten hören.
  • Seite 42 Vergewissern sie sich, dass der Kindersitz richtig befestigt wurde. Wenn er von der Lehne des Fahrersitzes absteht oder sich bewegt, wiederholen Sie die Montage. Nach dem Einbau des Kindersitzes vergewissern Sie sich nochmal, ob der Sitz richtig befestigt wird: Der Beckengurt des Sicherheitsgurtes verläuft über die roten Zeichen unter den Armlehnen auf dem Sitz (M-1).
  • Seite 44: Wartung Und Reinigung

    Wartung und reinigung Der Kindersitz muss mit dem Bezug benutzt werden. Um den Bezug des Kindersitzes abzunehmen, machen Sie den Reißverschluss hinter dem Sitz auf (O). Der Bezug kann abgenommen und mit einem san- ften Waschmittel unter dem Programm für empfind- liche Textilien, in Temperatur von 30°C gewaschen werden.
  • Seite 45 BrandLine Group Sp. z o. o. ul.Dziadoszańska 10 61-248 Poznań www.lionelo.com WARRANTY CARD KARTA GWARANCYJNA Model: ………………………….. SN: …………………………..May be sold in: BE CZ DK DE EE IE EL ES FR HR IT LV LT HU MT NL AT PL PT RO SI SK FI SE UK...
  • Seite 46 Warranty conditions: 1. The Lionelo brand with its registered office at Dziadoszańska 10, 61-248 Poznań, Poland guarantees that the equipment is operational in accordance with the technical-operating conditions described in the manual. 2. The warranty is granted for a 60 months period from the date of sale. If the Buyer is a company (VAT invoice), the warranty is granted for a 12-month period.
  • Seite 47 13. The Service may refuse to repair products in case of any traces of unauthorised repair. 14. If the fault is not covered by the manufacturer’s warranty, paid repair may be offered by the Service. 15. Neither the Manufacturer nor the Authorised Service is responsible for any damages or losses arising from the inability to use the device that is being repaired.
  • Seite 48 Warunki gwarancji: 1. Marka Lionelo z siedzibą w Poznaniu (61-248) przy ul. Dziadoszańskiej 10 gwarantuje sprawne działanie produktu zgodnie z warunkami techniczno- eksploatacyjnymi opisanymi w instrukcji obsługi. 2. Gwarancja jest udzielana na okres 60 miesięcy, licząc od daty sprzedaży. W przypadku zakupu produktu przez firmę...
  • Seite 49 słonecznych, pranie nieodpowiedniej temperaturze, uszkodzenia mechaniczne, elektryczne, termiczne, ingerencje cieczy lub celowe uszkodzenia i wywołane nimi wady, samowolne przeróbki. 14. Serwis może odmówić wykonania naprawy w przypadku śladów nieautoryzowanej naprawy. 15. W przypadku gdy usterka nie jest objęta gwarancją producenta, serwis może zaproponować...
  • Seite 50 Lionelo Service – Support List of Authorized Service Centers: Lista autoryzowanych centrów serwisowych: lionelo.com/en/service Dziękujemy za zakup urządzenia naszej marki! Croatia Uvoznik: Viva-net d.o.o. A.T. Mimare 8 10090 Zagreb Tel: 01/ 56 01 715, Fax: 01/ 56 01 945 OIB: 73608440692...
  • Seite 51 WWW.LIONELO.COM...
  • Seite 52 WWW.LIONELO.COM...