Herunterladen Inhalt Inhalt Diese Seite drucken

Werbung

Verfügbare Sprachen
  • DE

Verfügbare Sprachen

  • DEUTSCH, seite 25
User manual
Manual de usuario
Instrukcja obsługi
Handleiding
Bedienungsanleitung
Naudojimo instrukcija
Инструкция по эксплуатации
Návod k obsluze
Manuale d'uso
Használati utasítás
Manuel de l'Uti lisateur
Manual uti lizare
Levi Simple
Baby car seat
Fotelik smochodowy
Kindersitz
Детское автокресло
Seggiolino auto per bambini
Siège-auto bébé
Silla de coche
Autostoeltje
Automobilinė kėdutė
Autosedačka
Autós gyermekülés
Scaun auto
www.lionelo.com
‑ 1 ‑

Werbung

Inhaltsverzeichnis
loading

Inhaltszusammenfassung für Lionelo Levi Simple

  • Seite 1 Bedienungsanleitung Naudojimo instrukcija Инструкция по эксплуатации Návod k obsluze Manuale d’uso Használati utasítás Manuel de l’Uti lisateur Manual uti lizare Levi Simple Baby car seat Fotelik smochodowy Kindersitz Детское автокресло Seggiolino auto per bambini Seggiolino auto per bambini Siège-auto bébé...
  • Seite 2 ‑ 2 ‑...
  • Seite 3 ‑ 3 ‑...
  • Seite 4 ‑ 4 ‑...
  • Seite 5 ‑ 5 ‑...
  • Seite 6 ‑ 6 ‑...
  • Seite 7 ‑ 7 ‑...
  • Seite 8 ‑ 8 ‑...
  • Seite 9 Dear customer! Should you have any remarks or questions concerning the product, please do not hesitate to contact us: help@lionelo.com Producer: BrandLine Group Sp. z o. o. ul. A. Kręglewskiego 1, 61-248 Poznań, Poland DESCRIPTION (Fig. 1 and 2) Headrest...
  • Seite 10 In case of any doubts, please consult the product manufacturer or retailer. It is fit for installation only when approved vehicles are equipped with three-point safety belts with a retractor which have been granted a certificate of approval in accordance with the regulations UN/ECG no.
  • Seite 11 • It is not advisable to use the child restraint system without its upholstery. It is forbidden to use other upholstery than recommended by the manufacturer because it is an integral part of the product and affects its functions. • Keep the child safety seat manual when you use the product.
  • Seite 12 The place in which you assemble the child safety seat must be equipped with a 3-point safety belt (group I, II, III). 2.1 Seat liner For protection of your child • The seat liner (K) in your car is intended for babies, improves their comfort and provides additional support.
  • Seite 13 • Put two parts of the belts into the buckle until you can hear a distinctive „click”. See: fig. 15 2.4 How to adjust child safety seat belts. The child safety seat belts can be set at 3 levels. • Check if the height of 5-point safety belts is suitable for your child.
  • Seite 14: How To Assemble The Child Safety Seat In The Car

    (Q). See: fig. 26 • Pull both belts through slits in the child safety seat backrest. • Pull the buckle of the child safety seat belts through the hole in the fabric covering. See: fig. 27 • Pull the metal buckle through both holes in the child safety seat. See: fig.
  • Seite 15 • Make sure the belt is not loose. Keep the child safety seat with your knee, close to the car seat. Tighten the safety belt towards the retractor as much as you can. See: fig. 21 • Unfasten child safety seat belts and then put the child in. Fasten 5-point safety belt, put two parts of the belts into the buckle (I) until you can hear a distinctive „click”.
  • Seite 16 Important! Do not use the child safety seat for other purposes than defined in the manual, for example do not transport heavy items in the child safety seat. Remember! The safety belt must be carried in accordance with the manual. 4.
  • Seite 17 Drogi Kliencie! Jeśli masz jakiekolwiek uwagi lub pytania do zakupionego produktu, skontaktuj się z nami: help@lionelo.com Producent: BrandLine Group Sp. z o. o. ul. A. Kręglewskiego 1, 61-248 Poznań, Polska OPIS (Rys. 1 i 2) Zagłówek Regulator napięcia pasów Otwór regulacji wysokości pasów Dźwignia regulacji wysokości...
  • Seite 18: Ważne Informacje

    do warunków stosujących się do wcześniejszych projektów, które nie są obdarzone tą informacją. W przypadku wątpliwości należy skonsultować się z producentem lub sprzedawcą detalicznym urządzenia. Nadaje się do instalacji jedynie wówczas, gdy homologowane pojazdy wyposażone są w trzypunktowe, wyposażone w zwijacz pasy bezpieczeństwa, które uzyskały homologację...
  • Seite 19 • Chroń fotelik przed działaniem promieni słonecznych. W przeciwnym przypadku fotelik może być zbyt gorący dla skóry Twojego dziecka. • Nigdy nie pozostawiaj dziecka bez opieki w urządzeniu przytrzymującym. • Bagaż i inne przedmioty mogące spowodować obrażenia ciała w przypadku zderzenia powinny być...
  • Seite 20 tego rodzaju lub innego rodzaju fotelika bezpieczeństwa. • W razie wątpliwości, zapytaj producenta fotelika lub sprzedawcę. Nieprawidłowe miejsce instalacji fotelika Miejsce instalacji fotelika powinno posiadać 3-punktowy pas bezpieczeństwa (grupa I, II, III). Należy wyłączyć poduszki powietrzne. Miejsce instalacji fotelika powinno posiadać 3-punktowy pas bezpieczeństwa (grupa I, II, III).
  • Seite 21 pasy bezpieczeństwa i otworzyć klamrę z pasami (I). Patrz: rys. 12 • Następnie umieść pasy fotelika po bokach, posadź dziecko w foteliku. Patrz: rys. 13 • Dopasuj wysokość zagłówka (patrz rozdział 2.2). • Dopasuj wysokość pasów naramiennych (patrz rozdział 2.4). Pociągnij za regulator napięcia pasów (M) tak, żeby ciasno przylegały do ramion dziecka.
  • Seite 22: Montaż Fotelika W Samochodzie

    2.5 Demontaż i instalacja 5-punktowych fotelikowych pasów bezpieczeństwa. Przed montażem fotelika dla II i III grupy należy zdemontować fotelikowe pasy bezpieczeństwa. A. Zdejmowanie 5-punktowych pasów bezpieczeństwa. • Naciśnij przycisk regulacji napięcia pasów (F), poluzuj 5-punktowe pasy bezpieczeństwa i rozepnij pasy. Patrz: rys. 25 •...
  • Seite 23 biodrowy przeprowadź przez czerwoną prowadnicę, pod łokietnikiem (E). • Przeciągnij pas naramienny wraz z pasem biodrowym przez prowadnicę pasów w oparciu (P), (od przodu do tyłu fotelika). Przeciągnij dalej z tyłu za obudową fotelika. • Następnie, przeciągnij pas przez drugą prowadnicę w oparciu, oznaczoną na czerwono (P), (od tyłu do przodu fotelika).
  • Seite 24: Zdejmowanie Pokrycia

    prowadnicę (E). Patrz: rys. 34 • Przeciągnij oba pasy pod drugim podłokietnikiem fotelika (E) i zapnij pas, aż usłyszysz charakterystyczne „kliknięcie”. Patrz: rys. 35 • Upewnij się, że pas nie jest za luźny. Napnij pas bezpieczeństwa w stronę zwijacza. Pas musi być odpowiednio napięty, ale też nie powinien krępować...
  • Seite 25: Hersteller

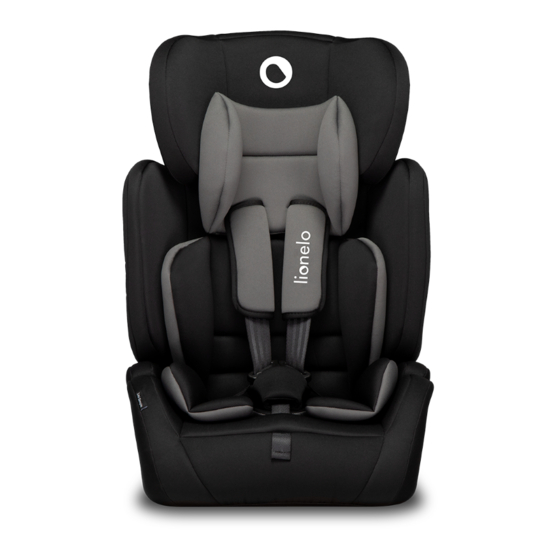
    Zdjęcia mają charakter poglądowy, rzeczywisty wygląd produktów może różnić się od prezentowanego na zdjęciach. Sehr geehrter Kunde! Falls Sie Fragen oder Anmerkungen zu dem gekauften Produkt haben, setzen Sie sich mit uns in Verbindung: help@lionelo.com Hersteller: BrandLine Group Sp. z o. o. ul. A. Kręglewskiego 1, 61-248 Poznań, Polen BESCHREIBUNG (Abb.
  • Seite 26: Anwendung Des Kindersitzes

    1. Information Die Rückhalteeinrichtung für Kinder gehört zu der Kategorie „universal“. Sie hat die Genehmigung gemäß der Regelung Nr. 44, Änderungsserie 4, zur allgemeinen Anwendung in Fahrzeugen erhalten und eignet sich zur Verwendung auf den meisten Sitzplätzen im Fahrzeug. Die richtige Installation ist möglich, wenn der Produzent des Fahrzeugs in der Bedienungsanleitung erklärt hat, dass sich der Fahrzeug zur Installierung der Rückhalteeinrichtung für Kinder in der Kategorie „universal“...
  • Seite 27 der Fahrzeugnutzung nicht durch den Schiebesitz oder die Fahrzeugtür eingeklemmt werden. • Alle Befestigungsbänder, die die Rückhalteeinrichtung am Fahrzeug halten, sollen gespannt sein, die Gurte, die das Kind halten, müssen an seinen Körper angepasst und nicht verdreht sein. • Prüfen Sie, dass die Beckengurte niedrig verlaufen, so dass das Becken festgehalten wird.
  • Seite 28 Achtung! Installieren Sie den Kindersitz nicht auf den Fahrzeugsitzen mit 2-Punkt-Sicherheitsgurten. Installieren Sie den Kindersitz auf den Fahrzeugsitzen mit 3-Punkt- Sicherheitsgurten. Sehen Sie: Abb. 3 Benutzen Sie den Kindersitz folgendermaßen (Sehen Sie: Abb. 4): • Hintere Fahrzeugsitze sind die sichersten Sitze zur Montage des Kindersitzes.
  • Seite 29: Anpassung Der Höhe Der Kopfstütze

    und bildet eine zusätzliche Stütze. Wenn das Kind mehr Platz im Kindersitz bracht, nehmen Sie die Einlage raus. Sehen Sie: Abb. 5 2.2 Anpassung der Höhe der Kopfstütze • Der Kindersitz hat 6 Höhenstufen der Kopfstütze. • Ziehen Sie am Hebel für die Regulierung der Höhe der Kopfstütze (N), um die Höhe der Kopfstütze anzupassen.
  • Seite 30: Ziehen Sie Vorsichtig Mit Der Anderen Hand An Beiden

    • Stecken Sie die beiden Teile der Gurte in die Klammer, bis Sie ein „Klicken“ hören. Sehen Sie: Abb. 15 2.4 Anpassung der Sicherheitsgurte des Kindersitzes. Die Sicherheitsgurte des Kindersitzes haben 3 Höhenstufen. • Prüfen Sie, ob die Höhe der 5-Punkt-Sicherheitsgurte für Ihr Kind richtig ist.
  • Seite 31: Montage Des Kindersitzes Im Auto

    A. Demontage der 5-Punkt-Sicherheitsgurte. • Drücken Sie den Knopf zur Regulierung der Spannung der Gurte (F), lösen Sie die 5-Punkt-Sicherheitsgurte und machen Sie die Gurte auf. Sehen Sie: Abb. 25 • Nehmen Sie die Gurte von dem Verbindungsglied (Q) ab. Sehen Sie: Abb.
  • Seite 32 • Ziehen Sie die Autosicherheitsgurte heraus. Den Schultergurt ziehen Sie durch die Führung zwischen der Kopfstütze und der Rückenlehne des Kindersitzes. Den Beckengurt ziehen Sie durch die rote Führung unter der Armlehne (E). • Ziehen Sie den Schulter- und den Beckengurt durch die Führung der Gurte in der Rückenlehne (P), (von vorne nach hinten).
  • Seite 33: Das Polstermaterial Abnehmen

    (Unterkapitel 2.5, Punkt A). • Stellen Sie den Kindersitz auf den Fahrzeugsitz. Drücken Sie ihn mit dem Knie, um sicher zu sein, dass er eng an der Rückenlehne anliegt. • Setzen Sie das Kind in den Kindersitz, passen Sie die richtige Höhe der Kopfstütze an, dazu ziehen Sie an der Regulierung der Höhe der Kopfstütze (N).
  • Seite 34: Reinigung

    • Nehmen Sie das Polstermaterial von der Kopfstütze, die 5-Punkt- Sicherheitsgurte, die Einlage und das ganze System ab, das die Sicherheitsgurte des Kindersitzes hält. Sehen Sie: Abb. 25 - 28 • Dann, um die Rückenlehne und den Sitz zu trennen: halten Sie den Sitz des Kindersitzes mit einem Bein, und schieben Sie mit der Hand die Rückenlehne nach hinten.
  • Seite 35 Дорогой Клиент! Если у вас есть какие-либо комментарии или вопросы относительно приобретенного продукта, пожалуйста, свяжитесь с нами: help@lionelo.com Производитель: BrandLine Group Sp. из о. о. ул. A. Kręglewskiego 1, 61-248 Познань, Польша OПИСАНИЕ (Рис. 1 и 2) Подголовник Редукционный вкладыш...
  • Seite 36: Важная Информация

    Это детское удерживающее устройство было классифицировано как «универсальное» в более требовательных условиях по сравнению с условиями, применимыми к более ранним конструкциям, которые не сопровождались данной информацией. В случае сомнений проконсультируйтесь с производителем устройства или продавцом. Подходит для установки, только если гомологизированные транспортные...
  • Seite 37 • Не производите никаких модификаций сиденья и не устанавливайте никаких дополнительных компонентов без согласия компетентных органов. Несоблюдение инструкций, предоставленных производителем, может поставить под угрозу пользователя. • Предохраняйте кресло от попадания солнечных лучей. В противном случае кресло может быть слишком горячим для кожи...
  • Seite 38 Используйте автокресло следующим образом (См: рис. 4): • Задние сиденья в автомобиле являются самыми безопасными для установки детского автокресла. • Кресло предназначено для установки исключительно на автомобильных сиденьях, расположенных по направлению движения. Запрещается устанавливать автокресло на боковом сиденье или спинкой к направлению движения. •...
  • Seite 39 отрегулировать высоту подголовника. См. рис. 7 • Выберите правильную высоту подголовника для вашего ребенка, убедитесь, что подголовник не давит на плечи ребенка и что его голова не выше верхней части подголовника. См. рис. 9 Очень важно! Убедитесь, что подголовник находится на соответствующей...
  • Seite 40 выше. Снимите наконечники плечевых ремней, закрепленные на коннекторе ремня безопасности (Q). Протяните оба ремня через отверстия на спинке кресла. Снова протяните за ремни (спереди и сзади кресла), на этот раз через прорези, адаптированные по высоте к размеру ребенка. Вставьте ремни в соответствующее отверстие...
  • Seite 41 в чехле из ткани. См. Рис. 27 • Проденьте металлическую пряжку через оба отверстия в сиденье кресла. См. Рис. 28 B. Установка 5-точечных ремней безопасности. • Проденьте металлическую пряжку через отверстие в тканевом чехле. Затем проденьте пряжку через оба отверстия в сиденье кресла.
  • Seite 42 характерный «щелчок». См. Рис. 20 • Убедитесь, что ремень не ослаблен. Прижмите кресло коленом, ближе к сиденью автомобиля. Натяните ремень безопасности в направлении втягивающего устройства как можно сильнее. См. Рис. 21 • Расстегните ремни безопасности кресла и затем поместите ребенка в...
  • Seite 43 красную направляющую (E). См. Рис. 34 • Потяните за оба ремня под вторым подлокотником кресла (E) и пристегните ремень безопасности, пока не услышите характерный «щелчок». См. Рис. 35 • Убедитесь, что ремень не слишком ослаблен. Натяните ремень безопасности в направлении втягивающего устройства. Ремень должен...
  • Seite 44 Изображения носят иллюстративный характер, фактический внешний вид продуктов может отличаться от представленного на фотографиях. Gentile Cliente! Se avete commenti o domande su un prodotto acquistato, non esitate a contattaci: help@lionelo.com Produttore: BrandLine Group Sp. z o. o. ul. A. Kręglewskiego 1, 61-248 Poznań, Polonia RU | IT ‑...
  • Seite 45 DESCRIZIONE (Fig. 1 e 2) Poggiatesta Inserto di riduzione Foro di regolazione dell’altezza delle Copertura di protezione della fibbia cinture Regolatore di tensione delle cinture Corpo Leva di regolazione dell’altezza del Bracciolo poggiatesta Guida della cintura subaddominale Guida del poggiatesta Pulsante di regolazione della Guida nello schienale del seggiolino tensione delle cinture...
  • Seite 46 ad installare correttamente il seggiolino. Un’installazione impropria può mettere in pericolo la salute del bambino. Il produttore non è responsabile dei possibili rischi causati da un’errata installazione del seggiolino. • I componenti duri e le parti in plastica del sistema di ritenuta per bambini devono essere posizionate e installate in modo tale che in normali condizioni d’uso del veicolo, non possano essere intrappolate dal sedile scorrevole o dalla porta del veicolo.
  • Seite 47 Attenzione! Non installare sui sedili dotati di cinture di sicurezza a due punti Installa sui sedili dotati di cinture di sicurezza a 3 punti. Vedi: fig. 3 Utilizzare il seggiolino nel seguente modo (Vedi: fig. 4): • I sedili posteriori dell’auto sono i sedili più sicuri per l’installazione di un seggiolino per bambini.
  • Seite 48 2.2 Adeguamento dell’altezza del poggiatesta • Il seggiolino possiede 6 livelli di regolazione del poggiatesta. • Titare la leva di regolazione dell’altezza del poggiatesta (N), per regolare l’altezza del poggiatesta. Vedi: fig. 7 • Selezionare la giusta altezza del poggiatesta per il tuo bambino, controllare che il poggiatesta non prema sulle spalle del bambino e la sua testa non sia più...
  • Seite 49 cinture delle spalle, agganciate al connettore delle cinture di sicurezza (Q). Portare entrambe le cinture attraverso le fessure nello schienale del seggiolino. Portare di nuovo le cinture (dalla parte anteriore a quella posteriore del seggiolino per bambini), questa volta attraverso le fessure adattate alla statura del bambino.
  • Seite 50 B. Installazione delle cinture di sicurezza a 5 punti. • Tirare la fibbia metallica attraverso il foro nell’imbottitura di tessuto. Poi trascinare la fibbia attraverso entrambi i fori nel sedile del seggiolino. Vedi: fig. 29 • Inserire le cinture di sicurezza delle spalle del segggiolino (H) nei due fori (B) localizzati nello schienale del seggiolino.
  • Seite 51 • Slacciare le cinture del seggiolino e poi mettere il bambino all’interno del seggiolino. Chiudere con la cintura di sicurezz a 5 punti, inserire le due parti della cintura nella fibbia (I), finché non si sente un caratteristico „click”. Vedi: fig. 22 •...
  • Seite 52 Attenzione! Controllare le cinture di sicurezza. Le cinture di sicurezza devono passare attraverso la guida delle spalle nella parte superiore dello schienale e addominale nella parte inferiore del seggiolino. Importante! Non utilizzare il seggiolino per scopi diversi da quelli indicati nell’...
  • Seite 53 Cher client ! Si vous avez des questions ou remarques relatives au produit acheté, n’hésitez pas à nous contacter à l’adresse : help@lionelo.com Producteur: BrandLine Group Sp. z o. o. ul. A. Kręglewskiego 1, 61-248 Poznań, Pologne Description (fig.
  • Seite 54: Renseignements Importants

    1. Information Le dispositif de retenue pour enfants appartient à la catégorie « universel ». Il a obtenu l’homologation conformément au règlement No. 44, la série d’amendements 04 à l’usage général dans les véhicules et il est adapté à l’installation sur la majorité de sièges assis dans une voiture. L’installation appropriée est possible si le fabricant du véhicule a déclaré...
  • Seite 55 ne puissent être piégés par le siège coulissant ou les portes du voiture dans des conditions normales d’utilisation. • Toutes les sangles fixant le dispositif de retenue au véhicule doivent être bien tendues, les sangles retenant l’enfant doivent être adaptées à...
  • Seite 56 de sécurité à deux points. Installez le siège-auto dans une voiture équipée de ceintures de sécurité à trois points. Voir : Fig. 3 Utilisez le siège-auto bébé de façon suivante (Voir : Fig. 4): • Les sièges arrières de véhicule sont les sièges les plus surs pour y installer le siège-auto bébé.
  • Seite 57: Réglage De La Hauteur De L'appui-Tête

    enfants les plus petits, il améliore leur confort et constitue un appui supplémentaire. Si l’enfant a besoin de plus d’espace dans le siège- auto, ôtez le coussin réducteur. Voir : Fig. 5 2.2 Réglage de la hauteur de l’appui-tête • Le siège-auto bébé...
  • Seite 58 2.4 Réglage du harnais. Le harnais possède 3 niveaux de réglage. • Vérifiez que la hauteur du harnais à 5 points est adéquate pour votre enfant. Ces sangles devraient passer à travers les fentes situées à la hauteur des épaules ou au niveau légèrement plus élevé. Enlevez les embouts des sangles thoraciques accrochés au connecteur des ceintures de sécurité...
  • Seite 59 des sangles (Q). Voir : Fig. 26 • Faites passer les deux sangles à travers les fentes dans le dossier du siège-auto bébé. • Faites passer la boucle du harnais à travers la fente dans la garniture en tissu. Voir : Fig. 27 •...
  • Seite 60 • Puis, faites passer la ceinture à travers le second guide dans le dossier, marqué en rouge (P), (de l’arrière vers l’avant du siège-auto bébé). Voir : Fig. 18 et 19 • Faites passer les deux ceintures sous le second accoudoir (E). •...
  • Seite 61 • Faites passer la sangle abdominale sous l’accoudoir à travers le guide rouge (E). Voir : Fig. 34 • Faites passer les deux sangles sous le second accoudoir du siège-auto bébé (E) et attachez la ceinture jusqu’à ce que vous entendiez un « clic » caractéristique. Voir : Fig.
  • Seite 62 Les photos sont à caractère informatif, l’apparence réelle des produits peut varier de celle présentée sur les photos. ¡Estimado Cliente! Si tienes algún comentario o pregunta sobre algún producto que hayas comprado, por favor contacta con nosotros: help@lionelo.com Fabricante: BrandLine Group Sp. z o.o. A. Kręglewskiego 1, 61-248 Poznań, Polonia FR | ES ‑...
  • Seite 63 DESCRIPCIÓN (Fig. 1 y 2) Reposacabezas Cobertura reductora Orificios de regulación de la altura de Funda para proteger la hebilla las correas Regulador de tensión de los tirantes Cuerpo principal Palanca de regulación de la altura del Reposabrazos reposacabezas Guía para el cinturón abdominal Guía del reposacabezas Botón de ajuste de la tensión de las Guía en el respaldo de la silla infantil...
  • Seite 64 2. Uso de la silla infantil Información importante • Lee estas intrucciones antes de usar el producto y consérvalas. Las instrucciones te ayudarán a instalar la silla infantil correctamente. Una instalación inadecuada puede poner en peligro la salud del niño. El fabricante no se hace responsable de los posibles peligros causados por una instalación incorrecta de la silla infantil.
  • Seite 65 • Conserva las instrucciones de la silla infantil cuando utilices el dispositivo. • No está permitido el uso de otros puntos de contacto diferentes a los descritos en las instrucciones y señalados en el dispositivo de retención infantil. • Si tienes alguna duda sobre la posición de la hebilla de los cinturones de seguridad para adultos en relación con los principales puntos de contacto, ponte en contacto con el fabricante del dispositivo de retención infantil.
  • Seite 66 El lugar de instalación de la silla infantil debe tener un cinturón de seguridad de 3 puntos (grupo I, II, III). Los airbags deben estar desactivados. El lugar de instalación de la silla infantil debe tener un cinturón de seguridad de 3 puntos (grupo I, II, III). 2.1 Cobertura reductora Para la protección del niño •...
  • Seite 67 • A continuación, coloca las correas de la silla infantil a los lados y coloca al niño en el asiento. Ver: fig. 13 • Ajusta la altura del reposacabezas (ver el apartado 2.2). • Ajusta la altura de los tirantes (ver el capítulo •...
  • Seite 68 • Asegúrate de que las correas no estén demasiado apretadas al niño. Ver: fig. 16 ¡Atención! No permitas que el niño esté vestido con una chaqueta. 2.5 Desmontaje e instalación de las correas de seguridad de 5 puntos. Las correas de seguridad deben desmontarse antes de instalar la silla infantil para grupos II y III.
  • Seite 69 3. Instalación de la silla infantil en el coche 3.1 Grupo I (9-18 kg), niño sujeto con correas de seguridad de la silla infantil. • Coloca la silla infantil en el asiento del coche, asegurándote de que quede bien ajustada al respaldo. •...
  • Seite 70 3.2 Grupo II, III (15-36 kg), niño sujeto con el cinturón de seguridad de 3 puntos del coche. • Retira los cinturones de seguridad de 5 puntos antes de la instalación Consulta la fig. 32 para ver las instrucciones paso a paso anteriores (subsdivisión 2.5, subsección A).
  • Seite 71 4. Retirada de la cubierta • Levanta el reposacabezas lo más alto posible. Ver: fig. 8 • Retira la cubierta del reposacabezas, los cinturones de seguridad de 5 puntos, la almohadilla de reducción y todo el sistema de retención de las correas de seguridad. Ver fig. 25 - 28 •...
  • Seite 72 Inleiding Beste Klant! Als u opmerkingen of vragen heeft over uw aankoop product, neem dan contact met ons op: help@lionelo.com Fabrikant: BrandLine Group Sp. z o.o. A. Kręglewskiego 1, 61-248 Poznań, Polen BESCHRIJVING (Afb. 1 en 2) Hoofdsteun Hoes om de gesp te beschermen...
  • Seite 73: Belangrijke Informatie

    voor een kinderbeveiligingssysteem van de categorie “universeel” voor deze leeftijdsgroep. Dit kinderzitje is geclassificeerd als “Universeel” onder meer veeleisender voorwaarden met betrekking tot de voorwaarden van toepassing zijn op eerdere ontwerpen die niet begiftigd met deze informatie. Raadpleeg in geval van twijfel de fabrikant of de verkoper van het product. Alleen geschikt voor montage indien de goedgekeurde voertuigen zijn uitgerust met 3-puntsgordels, voorzien van oprolmechanismen en goedgekeurd volgens VN/ECE-Reglement nr.
  • Seite 74 zonder de toestemming van de bevoegde autoriteiten. Het niet opvolgen van de aanwijzingen van de fabrikant kan gevaar opleveren voor de gebruiker. • Bescherm het autostoeltje tegen zonlicht. Anders kan het autostoeltje te warm zijn voor de huid van uw kind. •...
  • Seite 75 autobanken te worden gemonteerd. Het autostoeltje mag niet worden gemonteerd op achterwaarts of zijdelings gerichte zitplaatsen. • In sommige voertuigen is er niet voldoende plaats om dit of een ander soort veiligheidsstoeltje te monteren. • Vraag bij twijfel de fabrikant of dealer van het autostoeltje. Onjuiste plek voor montage van het autostoeltje Op de plaats van montage van het autostoeltje moet een 3-punts autogordel (groep I, II, III) zijn aangebracht.
  • Seite 76 • Maak de schoudergordels los volgens de instructies (zie afb 2.4). Trek niet aan beschermingskussens die op de veiligheidsgordels zitten. Zie afb. 11 • Druk op de rode knop op het gordelslot (J) om de 5-punts veiligheidsgordels te ontgrendelen en het gordelslot (I) te openen. Zie afb.
  • Seite 77 • Trek met uw andere hand voorzichtig aan beide veiligheidsgordels om ze los te maken. Zie afb. 6. Om de gordels aan te trekken: • Trek aan de gordelspanningsregelaar (M) (afb. 1). • Zorg ervoor dat het harnas niet te strak zit voor het kind. Zie afb. 16 Let op! Vervoer uw kind niet met de jas aan.
  • Seite 78 3. Montage van het stoeltje in de auto 3.1 Groep I (9-18 kg), kind met veiligheidsgordel. • Plaats het autostoeltje op de autostoel en zorg ervoor dat het goed tegen de rugleuning aansluit. • Trek de autogordel uit. Trek de schoudergordel door de geleider tussen de hoofdsteun en de rugleuning.
  • Seite 79: Verwijderen Van De Bekleding

    • Verwijder de 5-punts veiligheidsgordels voor de montage. Zie afb. 32 voor stap-voor-stap instructies hierboven (hoofdstuk 2.5, hoofdstuk A). • Plaats het stoeltje op de autostoel. Duw het met uw knie naar beneden om ervoor te zorgen dat het goed tegen de rugleuning aansluit.
  • Seite 80 reductiekussen en het gehele harnasbeveiligingssysteem. Zie afb. 25 – 28 • Om vervolgens de rugleuning en het zitje van elkaar te scheiden: houd het zitje van de autostoel met één been vast en duw de rugleuning met uw hand naar achteren. De scharnieren zullen ontgrendelen, de bovenen onderkant kunnen worden gescheiden.
  • Seite 81: Gerbiamas Kliente

    Gerbiamas Kliente! Jei turite pastabų ar klausimų apie įsigytą produktą, nedvejodami susisiekite su mumis: help@lionelo.com Gamintojas: BrandLine Group Sp. z o. o. A. Kręglewskiego 1, 61-248 Poznanė, Lenkija APRAŠYMAS (1 ir 2 pav.) Galvos atrama Sumažinimo įdėklas Diržo aukščio reguliavimo anga Sagtį...
  • Seite 82 Jei abejojate, pasitarkite su prietaiso gamintoju arba pardavėju. Gaminys tinka montuoti tik tuo atveju, jei patvirtintos transporto priemonės yra su trijų taškų ištraukiamais saugos diržais, patvirtintais pagal JT / EEK taisyklę Nr. 16 arba kitus lygiaverčius standartus. 2. Kėdutės naudojimas Svarbios informacijos •...
  • Seite 83 apmušalo kitu, nei rekomenduoja gamintojas, nes tai yra neatskiriama surinkimo dalis ir turi įtakos prietaiso veikimui. • Naudodami prietaisą, laikykitės kėdutės naudojimo instrukcijos. • Negalima naudoti jokių kitų laikančiųjų kontaktinių taškų, išskyrus aprašytus vadove ir pažymėtus vaiko apsaugos sistemoje. • Jei kyla abejonių...
  • Seite 84 Kėdutės tvirtinimo vietoje turi būti trijų taškų saugos diržai (I, II, III grupės). 2.1 Sumažinimo įdėklas Jūsų vaiko saugumui • • Sumažinimo įdėklas (K) skirtas mažiausiems vaikams, pagerina jų komfortą ir suteikia papildomą atramą. Jei vaikui reikia daugiau vietos kėdutėje, ištraukite sumažinimo įdėklą. Žr.: 5 pav. 2.2 Galvos atramos aukščio reguliavimas •...
  • Seite 85 • Įkiškite dvi diržų dalis į sagtį, kol išgirsite spragtelėjimą”. Žr. 15 pav. 2.4 Kėdutės saugos diržų reguliavimas. Kėdutės saugos diržai turi 3 reguliavimo lygius. • Patikrinkite, ar Jūsų vaikui tinkamas 5 taškų saugos diržų aukštis. Diržai turi eiti per plyšius pečių aukštyje arba šiek tiek virš jo. Nuimkite petnešėlių...
  • Seite 86 • Saugos diržų sagtį perkiškite per skylę medžiaginiame užvalkale. Žr. 27 pav. • Perkiškite metalinę sagtį per abi kėdutės sėdynės angas. Žr. 28 pav. B. 5 taškų saugos diržų montavimas. • Prakiškite metalinę sagtį per skylę medžiaginiame užvalkale. Tada ištraukite sagtį per abi kėdutės sėdynės angas. Žr. 29 pav. •...
  • Seite 87 5 taškų saugos diržu, įkiškite dvi saugos diržo dalis į sagtį (I), kol išgirsite spragtelėjimą. Žr. 22 pav. • Pasirinkite tinkamą galvos atramos aukštį (2.2), traukite saugos diržus taip, kad jie tvirtai priglustų prie vaiko pečių. Įsitikinkite, kad saugos diržo apsauginė pagalvėlė liečia vaiko petį ir nėra susisukusi su diržais.
  • Seite 88 instrukcijoje, pvz., nesineškite kėdutėje sunkių daiktų. Atminkite! Saugos diržas turi būti pritvirtintas taip, kaip nurodyta instrukcijoje. 4. Užvalkalo nuėmimas • Galvos atramą pakelkite kuo aukščiau. Žr. 8 pav. • Nuimkite galvos atramos, 5 taškų saugos diržų, sumažinimo įdėklo ir visos saugos diržų apsaugos sistemos užvalkalą. Žr. 25 – 28 pav. •...
  • Seite 89 Vážení zákazníci! Máte-li jakékoli připomínky nebo dotazy týkající se zakoupeného výrobku, kontaktujte nás: help@lionelo.com Výrobce: BrandLine Group Sp. z o. o. ul. A. Kręglewskiego 1, 61-248 Poznań, Polsko POPIS (obr. 1 a 2) opěrka hlavy Redukční vložka Otvor pro nastavení výšky pásů...
  • Seite 90: Důležité Informace

    prodejce zařízení. Produkt je vhodný pro instalaci pouze za předpokladu, že jsou homologovaná vozidla vybavena tříbodovými bezpečnostními pásy s navíječem, které získaly homologaci v souladu s předpisem EHK OSN č. 16 nebo jinými ekvivalentními normami. 2. Používání autosedačky Důležité informace •...
  • Seite 91 čalounění autosedačky na jiné, než je doporučeno výrobcem, není povolena, jelikož se jedná o nedílnou součást zařízení ovlivňující její fungování. • Uschovejte si návod k použití autosedačky během používání zařízení. • Nepoužívejte žádné jiné nosné kontaktní body, než jsou body popsané...
  • Seite 92 Místo instalace autosedačky by mělo být vybaveno 3bodovým bezpečnostním pásem (skupina I, II, III). 2.1 Redukční vložka Pro ochranu vašeho dítěte • Redukční vložka (K) ve vašem vozidle je určena nejmenším dětem, zvyšuje jejich pohodlí a poskytuje dodatečnou podporu. Pokud bude dítě potřebovat v autosedačce více místa, vytáhněte redukční...
  • Seite 93 • Vložte dvě části pásů do přezky, dokud neuslyšíte charakteristické „cvaknutí“. Viz obr. 15 2.4 Nastavení bezpečnostních pásů autosedačky. Bezpečnostní pásy autosedačky mají 3 úrovně nastavení. • Zkontrolujte, zda je výška 5bodových bezpečnostních pásů vhodná pro Vaše dítě. Pásy by měly procházet štěrbinami, které se nacházejí ve výšce ramen nebo mírně...
  • Seite 94: Montáž Autosedačky Ve Vozidle

    bezpečnostního pásu (Q). Viz obr. 26 • Protáhněte oba pásy štěrbinami na v opěradle autosedačky. • Protáhněte přezku bezpečnostních pásů otvorem v textilním potahu. Viz obr. 27 • Protáhněte kovovou přezku oběma otvory v sedáku autosedačky. Viz obr. 28 B. Instalace 5bodových bezpečnostních pásů. •...
  • Seite 95 blízko sedadla vozidla. Natáhněte bezpečnostní pás směrem k navíječi, co nejvíce je to možné. Viz obr. 21 • Rozepněte pásy autosedačky a následně uložte dítě do autosedačky. Zapněte 5bodovým bezpečnostním pásem, vložte dvě části pásů do přezky (I), do momentu, kdy uslyšíte charakteristické „cvaknutí“. Viz obr. 22 •...
  • Seite 96: Sejmutí Potahu

    Důležité! Nepoužívejte autosedačku k žádnému jinému účelu, než je uvedeno v příručce, např. nenoste v autosedačce těžké předměty. Pamatujte! Bezpečnostní pás musí být veden podle pokynů 4. Sejmutí potahu • Zvedněte opěrku hlavy co nejvýše. Viz obr. 8 • Sejměte potah z opěrky hlavy, 5bodové bezpečnostní pás, redukční vložku a celý...
  • Seite 97 Kedves Ügyfelünk! Ha bármilyen észrevétele vagy kérdése van a vásárolt termékről, lépjen kapcsolatba velünk: help@lionelo.com Gyártó: BrandLine Group Sp. z o. o. ul. A. Kręglewskiego 1, 61-248 Poznań, Lengyelország LEÍRÁS (1. ÉS 2. ÁBRA) Fejtámla Redukciós betét Az övmagasság állítás nyílása Csatvédő...
  • Seite 98: Fontos Információk

    Kétség esetén forduljon a berendezés gyártójához vagy kiskereskedőjéhez. A termék csak akkor alkalmas, ha a jóváhagyott járműveket az ENSZ-EGB 16. sz. előírása vagy más egyenértékű szabványok szerint jóváhagyott, övvisszahúzóval ellátott hárompontos biztonsági övvel szerelték fel. 2. A gyermekülés használata Fontos Információk •...
  • Seite 99 • A csomagokat és egyéb tárgyakat, amelyek ütközés esetén sérülést okozhatnak, megfelelően rögzíteni kell. • A gyermekbiztonsági rendszer nem használható kárpitozás nélkül. Ne cserélje ki az üléskárpitot a gyártó által ajánlottól eltérőre, mivel az a készülék szerves részét képezi, és befolyásolja annak működését. •...
  • Seite 100 Az ülés nem megfelelő telepítési helye Az ülés telepítési helyének rendelkeznie kell 3-pontos biztonsági övvel (I. II. III. csoport). A légzsákokat ki kell kapcsolni. Az ülés telepítési helyének rendelkeznie kell 3-pontos biztonsági övvel (I. II. III. csoport). 2.1 Redukciós betét A gyermeke védelme érdekében •...
  • Seite 101 • Ezután helyezze a gyermekülés öveit az ülés oldalaira, és ültesse be gyermekét a gyermekülésbe. Lásd: 13. ábra • Állítsa be a fejtámla magasságát (lásd 2.2 szakasz). • Állítsa be a vállövek magasságát (lásd 2.4. szakasz). Húzza meg az övfeszítő beállítót (M) úgy, hogy szorosan illeszkedjen gyermeke vállaihoz.
  • Seite 102: A Gyermekülés Beszerelése Az Autóba

    Figyelem! Ne hordja gyermeket kabátban. 2.5 A gyermekülés 5-pontos biztonsági öveinek leszerelése és telepítése. A II. és III. csoportba tartozóknál, a gyermekülés beszerelése előtt a biztonsági öveket le kell szerelni. A. Az 5-pontos biztonsági övek eltávolítása. • Nyomja meg a biztonsági övfeszítő gombot (F), lazítsa meg az 5-pontos biztonsági öveket, és oldja ki az öveket.
  • Seite 103 vezetőn, a kartámasz alatt (E). • Húzza át a vállövet a derékövvel együtt a háttámlában lévő övvezetőn (P) keresztül (a gyermekülés elejétől hátrafelé). Húzza tovább, hátrébb a gyermekülés mögé. • Ezután húzza át az övet a háttámlán lévő második, piros színnel (P) jelölt vezetőn (az ülés hátuljától az ülés eleje felé).
  • Seite 104 • Húzza a vállövet a kartámasz alá, a piros vezetőn (E) keresztül. Lásd: 34. ábra • Húzza át mindkét övet a gyermekülés másik kartámlája alatt (E), és rögzítse az övet, amíg jellegzetes „kattanást” nem hall. Lásd: 35. ábra • Győződjön meg arról, hogy az öv nem laza-e. Húzza meg a biztonsági övet az övvisszahúzó...
  • Seite 105: Stimate Client

    A fényképek illusztrációk, a termékek megjelenése eltérhet a bemutatott képeken láthatóaktól. Stimate Client! Dacă aveți observații sau întrebări despre produsul achiziționat, vă rugăm să ne contactați: help@lionelo.com Producător: BrandLine Group Sp. z o. o. ul. A. Kręglewskiego 1, 61-248 Poznań, Polska DESCRIERE (FIG.
  • Seite 106 1. Informații Sistemul de susținere a copilului face parte din categoriile „universale”. Este aprobat în conformitate cu Regulamentul nr. 44, seria 04 de modificări, pentru uz general în vehicule și este potrivit pentru instalarea pe majoritatea scaunelor auto. Montarea corectă este posibilă dacă producătorul vehiculului a declarat în manualul vehiculului că...
  • Seite 107 • Toate centurile care fixează dispozitivul de siguranță pe vehicul trebuie să fie strânse, centurile trebuie să se potrivească fizicului copilului, centurile nu trebuie răsucite. • Asigurați-vă că centurile sunt așezate jos, astfel încât pelvisul să fie ținut ferm. • Dacă...
  • Seite 108 Instalați pe scaune cu centuri de siguranță în 3 puncte. Vezi: Fig. 3 Utilizați scaunul auto în felul următor (Vezi: Fig. 4): • Scaunele din spate ale unei mașini sunt cele mai sigure • scaune pentru instalarea unui scaun pentru copii. •...
  • Seite 109 2.2 Adaptarea înălțimii tetierei • Scaunul are 6 niveluri de reglare a tetierei. • Trageți maneta de reglare a înălțimii tetierei (N) la • reglați înălțimea tetierei. Vezi: Fig. 7 • Alegeți înălțimea corectă a tetierei pentru a dvs.copilul dumneavoastră, asigurați-vă...
  • Seite 110 prin fante la sau puțin peste înălțimea umerilor. Scoateți capetele centurei de umăr care sunt agățate de conectorul centurii de siguranță (Q). Trageți ambele curele prin fantele de pe spatele scaunului. Trageți din nou Centurile (din față în spatele scaunului), de această dată prin fantele ajustate la dimensiunea copilului.
  • Seite 111 B. Instalarea centurilor de siguranță în 5 puncte. • Treceți clema metalică prin orificiul de pe husa din material. Apoi trageți catarama prin ambele orificii din perna scaunului. Vezi: Fig. 29 • Introduceți centurile de siguranță pentru umeri (H) în cele două fante (B) de pe spătarul scaunului pentru copii Vezi: Fig.
  • Seite 112 părți ale centurii de siguranță în cataramă (I) până când auziți „clicul” caracteristic. Vezi: Fig. 22 • Selectați înălțimea adecvată a tetierei (2.2), trageți centurile de siguranță astfel încât să se potrivească bine în jurul umerilor copilului. Asigurați-vă că protecția centurii de siguranță atinge umărul copilului dvs.
  • Seite 113 Important! Nu utilizați scaunul în alte scopuri decât cele menționate în manual, de exemplu, nu transportați obiecte grele în scaun. Tine minte! Centura de siguranță trebuie direcționată conform instrucțiunilor 4. Scoaterea husei • Ridicați tetiera cât mai sus posibil. Vezi: Fig. 8 •...
  • Seite 114 ‑ 114 ‑...
  • Seite 115 Podrobné záruční podmínky jsou k dispozici na webových stránkách: A részletes garanciális feltételek elérhetők a weboldalon: Condiții detaliate de garanție sunt disponibile pe site: www.lionelo.com Thank you for purchasing our product Dziękujemy za zakup urządzenia naszej marki Vielen Dank für den Kauf unserer Markenausrüstung Спасибо...
  • Seite 116 ‑ 116 ‑...

Inhaltsverzeichnis