Herunterladen Inhalt Inhalt Diese Seite drucken

Werbung

Verfügbare Sprachen
  • DE

Verfügbare Sprachen

  • DEUTSCH, seite 20
User manual
Manual de usuario
Instrukcja obsługi
Handleiding
Bedienungsanleitung
Naudojimo instrukcija
Инструкция по эксплуатации
Návod k obsluze
Manuale d'uso
Használati utasítás
Manuel de l'Uti lisateur
Manual uti lizare
Levi One
Baby car seat
Fotelik samochodowy
Kindersitz
Детское автокресло
Seggiolino auto
Siège auto bébé
Silla de coche
Autostoeltje
Kūdikio automobilinė kėdutė
Dětská autosedačka
Baba autósülés
Scaun auto pentru bebeluși
www.lionelo.com

Werbung

Inhaltsverzeichnis
loading

Inhaltszusammenfassung für Lionelo Levi One

  • Seite 1 Handleiding Bedienungsanleitung Naudojimo instrukcija Инструкция по эксплуатации Návod k obsluze Manuale d’uso Használati utasítás Manuel de l’Uti lisateur Manual uti lizare Levi One Baby car seat Fotelik samochodowy Kindersitz Детское автокресло Seggiolino auto Siège auto bébé Silla de coche Autostoeltje Kūdikio automobilinė...
  • Seite 2 ‑ 2 ‑...
  • Seite 3 ‑ 3 ‑...
  • Seite 4 ‑ 4 ‑...
  • Seite 5 ‑ 5 ‑...
  • Seite 6 UN Regulation No. 16 or other equivalent standards. Dear customer! Should you have any remarks or questions concerning the product, please do not hesitate to contact us: help@lionelo.com Before you use the child safety seat for the first time, please read this manual carefully. Producer: BrandLine Group Sp.
  • Seite 7 Important Please read this manual before use and keep for future reference. The manual can help you assemble the child safety seat properly. A wrong assembly may pose a threat to the child’s health. The manufacturer is not held responsible for potential hazards arising from wrong assembly of the product.
  • Seite 8: Safety In The Car

    • It is forbidden to use other points of contact than those specified in the manual and marked on the child restraint system. • Should you have any doubts about position of the adult safety belt buckle in relation to main points of contact, consult the manufacturer of the child restraint system.
  • Seite 9 Child safety seat cover Product belt height adjustment Belt tension adjustment button holes Seat liner Car seat guide Belt tension adjustment Child safety seat belt connector M. Headrest height adjustment How to adjust the product Child safety seat belts Height of child safety seat belts The children from group I (9-18 kg) must be secured with safety belts of the child safety seat.
  • Seite 10: How To Assemble

    How to fasten and undo belts Before you fasten the child safety seat belts, make sure the belts are at the proper height (see above: Height of the child safety seat belts). Place the child in the child safety seat. Pull child’s arms through shoulder belts.
  • Seite 11 Child safety seat with Child safety seat with Child safety seat backrest backrest or without it without backrest (base (depending on child’s only) height) Group I The child from this group must be secured with child safety seat belts. Place the child safety seat on the car seat (fig. 6a). Pull the buckle of the car safety seat through the guide (O) to the back of the seat, and then pull forward through the second guide (O) (see: fig.
  • Seite 12 Groups II and III – assembly without child safety seat backrest If the height of the child’s head is above the headrest (at maximum height), it is necessary to disassemble the backrest of the child safety seat. Push the backrest of the child safety seat as presented in the fig. 15a. Detach the backrest of the child safety seat from the base (fig.
  • Seite 13 ONZ nr 16 lub innymi równoważnymi normami. Drogi Kliencie! Jeśli masz jakiekolwiek uwagi lub pytania do zakupionego produktu, skontaktuj się z nami: help@lionelo.com Przed pierwszym użyciem fotelika prosimy o uważne przeczytanie niniejszej instrukcji użytkowania. Producent: BrandLine Group Sp. z o. o.
  • Seite 14: Ważne Informacje

    Ważne informacje Należy przeczytać tę instrukcję obsługi przed użyciem i zachować. Instrukcja pomoże prawidłowo zamontować fotelik. Nieprawidłowy montaż może stanowić zagrożenie dla zdrowia dziecka. Producent nie ponosi odpowiedzialności za ewentualne zagrożenia spowodowane niewłaściwym montażem fotelika. Niniejszy fotelik przeznaczony jest dla grup wagowych I, II i III, co oznacza, że mogą...
  • Seite 15: Bezpieczeństwo W Pojeździe

    • Nie powinno się używać urządzenia przytrzymującego dla dzieci bez tapicerki. Nie wolno zastępować tapicerki siedzenia innym niż zalecone przez producenta, gdyż stanowi ono integralną część urządzenia mająca wpływ na jego funkcjonowanie. • Zachowaj instrukcję obsługi fotelika podczas użytkowania urządzenia. Trzymaj ją...
  • Seite 16 Instalacja w tym miejscu możliwa tylko jeśli siedzenie wyposażone jest w trzypunktowe pasy bezpieczeństwa Opis (rys. 3) Zagłówek Przycisk regulacji napięcia pasów Oparcie Wkładka redukcyjna Prowadnica pasa naramiennego Regulator napięcia pasów M. Regulator wysokości zagłówka Pasy bezpieczeństwa fotelika Poduszki ochronne na pasy Otwory do regulacji wysokości Prowadnica pasa biodrowego pasów fotelika...
  • Seite 17 Uwaga! Upewnij się, że pasy fotelika przylegają ściśle do ciała dziecka i że nie są poskręcane. Upewnij się, że pasy biodrowe przebiegają nisko i chronią miednicę dziecka. Pasy powinny być ciasne względem ciała dziecka, nie powinny jednak być zbyt ciasne i wywoływać dyskomfortu. Zapinanie i rozpinanie pasów Zanim zapniesz dziecko pasami bezpieczeństwa fotelika, upewnij się...
  • Seite 18 Montaż Grupa I Grupa II Grupa III Dziecko zabezpieczone Dziecko zabezpieczone Dziecko zabezpieczone fotelikowymi pasami pasami bezpieczeństwa pasami bezpieczeństwa bezpieczeństwa samochodu samochodu Fotelik z oparciem Fotelik z oparciem lub Fotelik bez oparcia bez (w zależności od (sama podstawa) wzrostu dziecka) Grupa I Dziecko z tej grupy musi być...
  • Seite 19: Konserwacja I Czyszczenie

    Ułóż fotelik na kanapie samochodu. Dosuń go maksymalnie do oparcia kanapy (rys. 14a). Włóż dziecko do fotelika (rys. 14b). Wyciągnij samochodowy pas bezpieczeństwa. Przeprowadź: naramienny pas przez prowadnicę w zagłówku (rys. 14c), pas miednicowy pod podłokietnikiem fotelika (rys. 14d). Upewnij się, że pasy nie są poskręcane (rys. 14e). Zapnij samochodowe pasy bezpieczeństwa (rys.
  • Seite 20 Normen genehmigten Aufroller ausgestattet sind. Sehr geehrter Kunde! Falls Sie Fragen oder Anmerkungen zu dem gekauften Produkt haben, setzen Sie sich mit uns in Verbindung: help@lionelo.com Bevor Sie das Produkt benutzen, lesen Sie bitte genau die vorliegende Bedienungsanleitung.
  • Seite 21 Wichtige Informationen Lesen Sie bitte genau die vorliegende Bedienungsanleitung, bevor Sie das Produkt benutzen, und bewahren Sie sie für das spätere Nachlesen auf. Die Bedienungsanleitung hilft Ihnen, den Kindersitz richtig zu installieren. Eine unrichtige Montage kann die Gesundheit des Kindes gefährden. Der Produzent trägt keine Haftung für die eventuellen Gefahren, die sich aus einer unrichtigen Montage des Kindersitzes ergeben.
  • Seite 22: Sicherheit Im Fahrzeug

    • Das Gepäck und andere Gegenstände, die Körperverletzungen im Falle eines Unfalls verursachen können, sollen entsprechend gesichert werden. • Man soll die Rückhalteeinrichtung nicht ohne Polsterung benutzen. Man darf die Polsterung des Kindersitzes nicht gegen eine andere als die ersetzen, die vom Produzenten empfohlen wird.
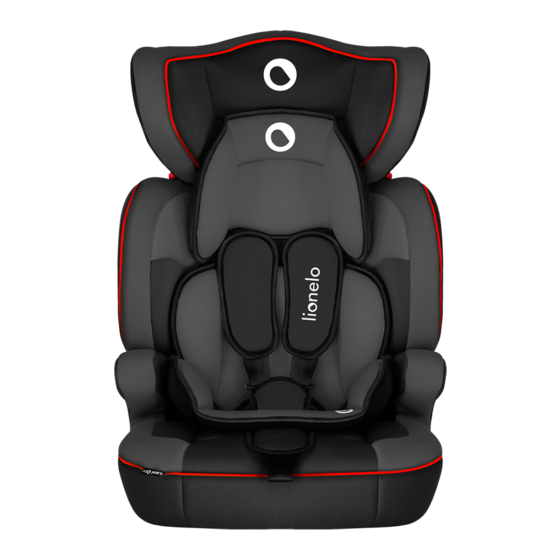
  • Seite 23: Regulierung Des Produkts

    Montage auf diesem Sitz verboten Montage auf diesem Platz möglich, wenn der Airbag deaktiviert ist Montage auf diesem Sitz möglich, wenn der Sitz mit 3-Punkt-Sicherheitsgurten ausgestattet ist Beschreibung (Bild 3) Gurte Kopfstütze Rückenlehne Einlage Führung des Schultergurts Riemen zur Spannung der Gurte Sicherheitsgurte des Regulierung der Höhe der Kindersitzes...
  • Seite 24 Stellen Sie die Gurte auf die gewünschte Höhe ein, indem Sie sie durch eine der drei Öffnungen in der Polsterung und der Rückenlehne ziehen. Schieben Sie die Gurtenden in das Verbindungsstück ein (P). Prüfen Sie, ob die Gurte richtig in das Verbindungsstück hineingeschoben wurden und vergewissern Sie sich, dass sie nicht verdreht sind.
  • Seite 25: Montage

    Die Montage der Gurte soll man in umgekehrter Reihenfolge vornehmen. Bewahren Sie die Gurte des Kindersitzes an einem sicheren Platz auf. Kopfstütze Die Höhe der Kopfstütze soll man an die Größe des Kindes anpassen (sehen Sie: Abb. 11). A – Zu hoch B –...
  • Seite 26 Der Beckengurt muss unter der Armlehne verlaufen (Abb. 6b). Schnallen Sie die Autosicherheitsgurte an (Abb. 6g). Drücken Sie den Kindersitz zu dem Autositz zu. Ziehen Sie an Gurten, um sie zu spannen (Abb. 6h - 6j). Die Autosicherheitsgurte, die den Kindersitz halten, müssen gespannt sein. Setzen Sie das Kind in den Kindersitz (Abb.
  • Seite 27: Wartung Und Reinigung

    Wartung und Reinigung Das Polstermaterial kann in warmem Wasser mit Seife oder einem milden Reingungsmittel gereinigt werden. Lassen Sie es nicht in der Sonne trocknen. Schnalle, Gurte und Plastikteile kann man in warmem Wasser waschen. Benutzen Sie keine starken Reinigungsmittel. Falls das Produkt nicht benutzt wird, soll es an einem dunklen, trockenen Platz fern von der Sonnenstrahlen aufbewahrt werden.
  • Seite 28: Важная Информация

    утвержденным в соответствии с Правилом № 16 ООН или другими эквивалентными стандартами. Дорогой клиент! Если у вас есть какие-либо комментарии или вопросы относительно приобретенного продукта, пожалуйста, свяжитесь с нами: help@lionelo.com Перед первым использованием кресла, пожалуйста, внимательно прочитайте эту инструкцию по эксплуатации. Производитель: BrandLine Group Sp.
  • Seite 29 условиях эксплуатации транспортного средства они не блокировались перемещающимся сиденьем или дверью транспортного средства. • Все ремни, которые крепят поддерживающее устройство к транспортному средству, должны быть натянуты, ремни, которые фиксируют ребенка, должны быть адаптированы к его телу, и не должны быть перекручены. •...
  • Seite 30 Безопасность в транспортном средстве: Чтобы обеспечить максимальную безопасность для себя и пассажиров во время вождения, убедитесь, что: • Складывающиеся подлокотники сложены (вертикальное положение). • Любые предметы, которые могут привести к повреждению автомобиля в случае столкновения, надежно закреплены. • Все пассажиры пристегнуты ремнями безопасности. Автомобильное...
  • Seite 31 M. Регулятор высоты подголовника Направляющая автомобильных Отверстия для регулирования ремней высоты ремней кресла Разъемы ремней безопасности Регулировка изделия Ремни кресла Высота ремней безопасности кресла Дети группы I (9-18 кг) должны быть пристегнуты ремнями безопасности. Для других групп эти ремни должны быть демонтированы. Высота...
  • Seite 32 Пристегивание и расстегивание ремней Прежде чем пристегнуть ребенка ремнями безопасности, убедитесь, что ремни безопасности установлены на правильной высоте (см. Выше: Высота ремней кресла). Поместите ребенка в кресло. Пропустите руки ребенка через плечевые ремни. Соедините плечевые ремни и вставьте их наконечники в пряжку (G).
  • Seite 33 Moнтаж Группа I Группа II Группа III Ребенок защищен Ребенок защищен Ребенок защищен ремнями автомобильными автомобильными безопасности кресла ремнями ремнями безопасности безопасности Кресло со спинкой Кресло со Кресло без спинки спинкой или без (в (лишь основание) зависимости от роста ребенка) Группа...
  • Seite 34: Чистка И Уход

    Снимите ремни безопасности кресла (см. Ремни безопасности кресло – Демонтаж ремней безопасности). Положите автокресло на сиденье автомобиля. Максимально прижмите его к спинке сиденья (рис. 14а). Поместите ребенка в кресло (рис. 14в). Вытащите ремень безопасности автомобиля. Пропустите: плечевой ремень через направляющую в подголовнике (рис. 14с), тазовый...
  • Seite 35 ONU n. 16 o altre norme equivalenti. Gentile Cliente! In caso di un qualsiasi commento o domanda sul prodotto acquistato, non esitate a contattarci: help@lionelo.com Prima di utilizzare il prodotto per la prima volta, leggere attentamente questo manuale di istruzioni.
  • Seite 36 Informazioni importanti Prima dell’uso leggere e conservare il presente manuale.Questo manuale vi aiuterà a installare correttamente il seggiolino. Un’installazione impropria può mettere in pericolo la salute del bambino. Il produttore non è responsabile di eventuali pericoli causati da un’errata installazione del seggiolino. Questo seggiolino è...
  • Seite 37: Sicurezza Nel Veicolo

    raccomandate dal costruttore, in quanto è parte integrante del sistema di ritenuta che ne pregiudica la funzione. • Conservare il manuale d’uso del seggiolino quando si utilizza il dispositivo. Tenerlo nell’auto in cui è installato il seggiolino. • Non utilizzare punti di contatto dei cuscinetti di carico diversi da quelli descritti nelle istruzioni e contrassegnati sul sistema di ritenuta per bambini.
  • Seite 38 Descrizione (fig. 3) Poggiatesta Inserto di riduzione Schienale Regolatore di rensione delle Guida della cintura delle spalle cinture M. Regolatore dell’altezza del Cinture di sicurezza del seggiolino Cuscini protettivi per le cinture poggiatesta Guida della cintura addominale Fori per la regolazione Fibbia dell’altezza delle cinture del Cuscino protettivo delle cinture...
  • Seite 39 Regolazione della tensione delle cinture Per allenatre le cinture del seggiolino: premere il pulsante di regolazione (J) e tirare le cinture delle spalle (fig. 7). Per stringere le cinture del seggiolino: tirare la cintura di regolazione (L). Nota! Accertarsi che le cinture di sicurezza si adattino perfettamente al corpo del bambino e non siano attorcigliate.
  • Seite 40 regolare l’altezza desiderata. Una volta che il processo è completo, assicurarsi che il poggiatesta sia correttamente ancorato nella sua posizione, provare a spostarlo su e giù. Inserto di riduzione Se il bambino ha bisogno di più spazio nel seggiolino, estrarre l’inserto di riduzione. Montaggio Gruppo I Gruppo II...
  • Seite 41: Manutenzione E Pulizia

    Gruppo II – montaggio con schienale del seggiolino Un bambino di questo gruppo non deve essere allacciato con la cintura di sicurezza. Il bambino deve essere protetto con cinture di sicurezza per auto a 3 punti. Smontare le cinture di sicurezza del seggiolino (vedi: Cinture del seggiolino –...
  • Seite 42 ONU no. 16 ou d’autres normes équivalentes. Cher client! Si vous avez des questions ou remarques relatives au produit acheté, n’hésitez pas à nous contacter à l’adresse : help@lionelo.com Avant d’utiliser le siège-auto bébé pour la première fois, lisez attentivement ce mode d’emploi. Producteur: BrandLine Group Sp.
  • Seite 43: Renseignements Importants

    Renseignements importants Lisez ce mode d’emploi avant l’usage et gardez-le. Le mode d’emploi vous aidera à installer le siège correctement. Une installation inappropriée peut présenter un danger pour la santé de l’enfant. Le fabricant ne sera pas tenu pour responsable de tous dangers éventuels causés par un montage inapproprié...
  • Seite 44 elle fait partie intégrante du dispositif qui a une influence sur son fonctionnement. • Conservez le mode d’emploi du siège-auto lors de l’utilisation du dispositif. Tenez-le dans la voiture dans laquelle vous avez installé le siège-auto bébé. • Il est interdit d’utiliser d’autres points porteurs de contact que les points décrits dans le mode d’emploi et indiqués sur le dispositif de retenue pour enfants.
  • Seite 45 Description (Fig. 3) Appui-tête de la courroie Dossier Doublure de siège Guide de sangle thoracique Réglage de la tension de la Harnais de sécurité du siège- courroie M. Réglage de la hauteur de l’appui- auto bébé Coussins protecteurs des sangles tête Guide de sangle abdominale Trous de réglage de la hauteur...
  • Seite 46 Réglage de tension du harnais du siège-auto Pour relâcher le harnais, appuyez sur le bouton de réglage (J) et tirez les sangles d’épaule (Fig. 7). Pour serrer le harnais du siège-auto bébé, tirez la sangle de réglage (L). Attention! Assurez-vous que les courroies du harnais sont bien serrées contre corps de l’enfant et qu’elles ne sont pas vrillées.
  • Seite 47: Installation

    Pour changer la hauteur de l’appui-tête, prenez le levier de réglage (M) et puis réglez la hauteur souhaitée. Après le processus complété, assurez-vous que l’appui-tête s’est accroché correctement en sa position, essayez de le bouger vers le haut et vers le bas. Coussin réducteur Si l’enfant a besoin de plus d’espace dans le siège-auto, ôtez le coussin réducteur.
  • Seite 48 Groupe II - installation avec le dossier de siège L’enfant de ce groupe ne peut pas être attaché à l’aide du harnais de sécurité. L’enfant doit être sécurisé à l’aide des ceintures de sécurité à 3 points du véhicule. Démontez le harnais de sécurité (voir: Le harnais du siège-auto bébé - Démontage du harnais).
  • Seite 49 16 ONU u otras normas equivalentes. ¡Apreciado cliente! Si tienes algún comentario o pregunta sobre algún producto que hayas comprado, por favor contacta con nosotros: help@lionelo.com Antes del uso de este equipo, rogamos la atenta lectura de estas instrucciones. Fabricante: BrandLine Group Sp.
  • Seite 50 Información importante Lea este manual de instrucciones antes de usarlo y guárdalo. Las instrucciones le ayudarán a instalar el asiento correctamente. Un montaje incorrecto puede poner en peligro la salud del niño. El fabricante no se hace responsable de los peligros causados por una instalación incorrecta del asiento.
  • Seite 51: Seguridad En El Coche

    por el fabricante, ya que es parte integrante del dispositivo e influye en su funcionamiento. • Guarda las instrucciones de uso de la silla cuando utilices el dispositivo. Guárdalo en el coche donde está instalada la silla. • No se pueden usar puntos de contacto de soporte de carga que no sean los descritos en el manual y marcados en el dispositivo de retención para niños.
  • Seite 52 Descripción (Fig. 3) Reposacabezas del cinturón Respaldo Cobertura reductora Guía de tirantes Regulador de tensión de los Correas de seguridad de la silla tirantes M. Regulador de altura del infantil Almohadillas antideslizantes en reposacabezas las correas Orificios para regular la altura de Guía para la banda abdominal las correas de seguridad de la Hebilla...
  • Seite 53 ¡Advertencia! Asegúrate de que las correas se ajusten bien alrededor del cuerpo del niño y no estén torcidas. Asegúrate de que los cinturones subabdominales se sitúen de tal forma que la pelvis se sostenga firmemente. Las correas deben estar apretadas contra el cuerpo del niño, pero no demasiado apretadas y no deben causar molestias.
  • Seite 54: Montaje

    Montaje Grupo I Grupo II Grupo III El niño asegurado con Niño asegurado con Niño asegurado con correas de seguridad. cinturones de seguridad cinturones de seguridad del coche del coche Silla con respaldo Silla con o sin respaldo Silla sin respaldo (solo (dependiendo de la la base) altura del niño)
  • Seite 55: Mantenimiento Y Limpieza

    Coloca al niño en la silla (Fig. 14b). Tira del cinturón de seguridad del coche. Pasa: El tirante por guía del reposacabezas (Fig. 14c), La banda abdominal debajo del reposabrazos de la silla (Fig. 14d). Asegúrate de que las correas no estén torcidas (Fig. 14e). Abrocha los cinturones de seguridad del coche (Fig.
  • Seite 56 VN-Reglement nr. 16 of andere gelijkwaardige normen. Beste klant! Als u opmerkingen of vragen heeft over een gekocht product, neem dan contact met ons op: help@lionelo.com Lees deze gebruikershandleiding zorgvuldig door voordat u het stoeltje voor het eerst gebruikt. Fabrikant: BrandLine Group Sp.
  • Seite 57: Belangrijke Informatie

    Belangrijke informatie Lees deze handleiding voor gebruik en bewaar hem. De instructies helpen u bij het correct installeren van het stoeltje. Een verkeerde installatie kan de gezondheid van uw kind in gevaar brengen. De fabrikant is niet verantwoordelijk voor mogelijke risico’s als gevolg van een verkeerde installatie van het stoeltje. Dit stoeltje is bedoeld voor gewichtsgroep I, II i III, wat betekent dat kinderen van 9 tot 36 kg er gebruik van kunnen maken.
  • Seite 58 • Het kinderstoeltje zonder bekleding mag niet worden gebruikt. De bekleding mag niet worden vervangen door een andere dan de door de fabrikant aanbevolen bekleding, aangezien deze een integrerend deel van het apparaat vormt dat de werking ervan beïnvloedt. • Bewaar de gebruikershandleiding van het stoeltje bij gebruik van het apparaat. Bewaar het in de auto waarin het autostoeltje is geïnstalleerd.
  • Seite 59 Installatie is hier alleen mogelijk als het stoeltje is uitgerust met 3-punts veiligheidsgordels en ISOFIX bevestigingen Beschrijving (afb. 3) Hoofdsteun Reductie-inlegstuk Rudleuning Spanningsregelaar M. Hoogteverstelling van de Schoudergordelgeleider Veiligheidsgordels hoofdsteun Gordelbeschermende kussens Openingen voor het verstellen Heup gordelgeleider van de hoogte van de Gordel gesp veiligheidsgordel Gordelbeschermende kussens...
  • Seite 60 Zorg ervoor dat de gordels op de juiste manier in de connector worden geplaatst en niet zijn verdraaid. Aanpassen van de gordelspanning Om de veiligheidsgordels los te maken: druk op de instelknop (J) en trek aan de schouderbanden (Afb. 7). Om de veiligheidsgordels aan te trekken: trek aan de gordelspanner (L).
  • Seite 61 Hoofdsteun De hoogte van de hoofdsteun moet worden aangepast aan de hoogte van het kind (zie afb. 11). A – Te hoog B – Te laag C – OK Om de hoogte van de hoofdsteun te wijzigen, pakt u de verstelhendel (M) vast en stelt u de gewenste hoogte in.
  • Seite 62: Onderhoud En Reiniging

    Plaats het kind in het stoeltje (rys. 6k) en maak de gordels vast 5 – met de 5-punts veiligheidsgordels (afb. 6l). Als u twijfelt over dit punt, neem dan contact op met de fabrikant van het apparaat. Groep II – Montage met rugleuning Een kind uit deze groep kan niet met een autogordel worden vastgemaakt.
  • Seite 63 JT Taisyklę Nr. 16 arba kitus lygiaverčius standartus. Gerbiamas Kliente! Jei turite pastabų ar klausimų apie įsigytą produktą, nedvejodami susisiekite su mumis: help@lionelo.com Prieš pirmą kartą naudodami kėdutę atidžiai perskaitykite šias naudojimo instrukcijas. ‑ 63 ‑...
  • Seite 64 Gamintojas: BrandLine Group Sp. z o. o. A. Kręglewskiego 1, 61-248 Poznanė, Lenkija Svarbios informacijos Prieš naudodami perskaitykite šią naudojimo instrukciją ir išsaugokite ją ateičiai. Instrukcijos padės teisingai sumontuoti automobilinę kėdutę. Netinkamas surinkimas gali kelti pavojų vaiko sveikatai. Gamintojas neatsako už jokius pavojus, kylančius dėl netinkamo kėdutės montavimo.
  • Seite 65 kitu, nei rekomenduoja gamintojas, nes tai yra neatskiriama surinkimo dalis ir turi įtakos prietaiso veikimui. • Naudodami prietaisą, laikykitės kėdutės naudojimo instrukcijos. Laikykite ją automobilyje, kuriame sumontuota kėdutė. • Negalima naudoti jokių kitų laikančiųjų kontaktinių taškų, išskyrus aprašytus vadove ir pažymėtus vaiko apsaugos sistemoje. •...
  • Seite 66 Aprašymas (3 pav.) Galvos atrama mygtukas Atlošas Sumažinimo įdėklas Pečių diržo kreiptuvas Diržo įtempimo reguliatorius M. Galvos atramos aukščio Kėdutės saugos diržai Apsauginės diržų pagalvėlės reguliatorius Juosmens diržo kreiptuvas Saugos diržų aukščio reguliavimo Sagtis angos Diržų apsauginė pagalvėlė Automobilio saugos diržo Kėdutės užvalkalas kreiptuvas Diržo įtempimo reguliavimo...
  • Seite 67 Dėmesio! Įsitikinkite, kad saugos diržai tvirtai priglunda prie vaiko kūno ir nėra susukti. Įsitikinkite, kad juosmens diržai yra žemai ir apsaugo Jūsų kūdikio dubenį. Dirželiai turi būti prigludę prie vaiko kūno, tačiau neturėtų būti per daug įtempti ir nesukelti diskomforto. Saugos diržų...
  • Seite 68 Montavimas Grupė I Grupė II Grupė III Vaikas apsaugotas Vaikas apsaugotas Vaikas apsaugotas kėdutės saugos diržais automobilio saugos automobilio saugos diržais diržais Kėdutė su atlošu Kėdutė su atlošu arba Kėdutė be atlošo (tik be jo (priklausomai nuo sėdynė) vaiko ūgio) I grupė...
  • Seite 69: Valymas Ir Priežiūra

    Įsitikinkite, kad diržai nėra susukti (14e pav.). Prisekite automobilio saugos diržus (14f pav.). II ir III grupės – montavimas be kėdutės atlošo Jei vaiko galvos aukštis viršija galvos atramą (nustatytas maksimaliame aukštyje), kėdutės atlošą reikia nuimti. Pastumkite kėdutės atlošą 15a pav. parodyta kryptimi. Atjunkite kėdutės atlošą...
  • Seite 70 OSN č. 16 nebo jinými ekvivalentními normami. Vážení zákazníci! Máte-li jakékoli připomínky nebo dotazy týkající se zakoupeného výrobku, kontaktujte nás: help@lionelo.com Před prvním použitím autosedačky si prosím pečlivě přečtěte tento návod k použití. Výrobce: BrandLine Group Sp. z o. o.
  • Seite 71: Důležité Informace

    Důležité informace Před použitím si prosím přečtěte tento návod k obsluze a uschovejte jej. Pokyny Vám pomohou správně nainstalovat autosedačku. Nesprávná montáž může představovat riziko pro zdraví dítěte. Výrobce neodpovídá za případná nebezpečí způsobená nesprávnou montáží autosedačky. Tato autosedačka je vhodná pro hmotnostní skupiny I, II a III, což znamená, že ji mohou používat děti s hmotností...
  • Seite 72: Bezpečnost Ve Vozidle

    • Uschovejte si návod k použití autosedačky během používání zařízení. Uchovávejte jej ve vozidle, ve kterém je autosedačka nainstalována. • Nepoužívejte žádné jiné nosné kontaktní body, než jsou body popsané v návodu a označené na dětském zádržném systému. • Máte-li pochybnosti o poloze přezky bezpečnostního pásu pro dospělé vzhledem k hlavním nosním kontaktním bodům, obraťte se na výrobce dětského zádržného zařízení.
  • Seite 73 Popis (obr. 3) Opěrka hlavy Tlačítko pro nastavení napnutí Opěradlo pásů Vedení ramenního pásu Redukční vložka Bezpečnostní pásy autosedačky Nastavení napnutí pásů M. Nastavení výšky opěrky hlavy Ochranné polstrování pásů Vedení bederního pásu Otvory pro nastavení výšky pásů Přezka autosedačky Ochranné...
  • Seite 74 Zapínání a rozepínání pásů Před zapnutím dítěte bezpečnostními pásy autosedačky se ujistěte, že jsou pásy nastaveny na správnou výšku (viz výše: Výška pásů autosedačky). Umístěte dítě v autosedačce. Protáhněte ruce dítěte ramenními pásy. Spojte ramenní pásy a zasuňte jejich konce do přezky (G). Slyšitelné „cvaknutí“ bude znamenat, že jsou bezpečnostní...
  • Seite 75 Autosedačka s Autosedačka s Autosedačka bez opěradlem opěradlem nebo bez opěradla (samotná (v závislosti na výšce základna) dítěte) Skupina I Děti v této skupině musí být připoutány bezpečnostními pásy autosedačky. Umístěte autosedačku na sedadle vozidla (obr. 6a). Protáhněte přezku bezpečnostních pásů vozidla přes vodítko (O) do zadní části sedáku a následně...
  • Seite 76: Údržba A Čištění

    Skupiny II a III - montáž bez opěradla autosedačky Pokud výška hlavy dítěte překročí opěrku hlavy (nastavenou na maximální výšku), opěradlo autosedačky by mělo být odstraněno. Zatlačte opěradlo autosedačky ve směru znázorněném na obr. 15a. Odepněte opěradlo autosedačky od základny (obr. 15b). Umístěte základnu na sedadle automobilu (obr.
  • Seite 77 övvisszahúzóval ellátott hárompontos biztonsági övvel szerelték fel. Kedves Ügyfelünk! Ha bármilyen észrevétele vagy kérdése van a vásárolt termékről, lépjen kapcsolatba velünk: help@lionelo.com Az gyermekülés első használat előtt kérjük, figyelmesen olvassa el az alábbi használati utasítást. Gyártó: BrandLine Group Sp.
  • Seite 78: Fontos Információk

    Fontos Információk Kérjük, használat előtt olvassa el ezt a használati utasítást, és őrizze meg. Az utasítások segítenek a gyermekülés helyes felszerelésében. A helytelen összeszerelés veszélyeztetheti a gyermek egészségét. A gyártó nem vállal felelősséget a gyerekülés nem megfelelő összeszerelése okozta lehetséges veszélyekért.
  • Seite 79: Biztonság A Járműben

    ki az üléskárpitot a gyártó által ajánlottól eltérőre, mivel az a készülék szerves részét képezi, és befolyásolja annak működését. • A készülék használata során őrizze meg az ülés használati útmutatóját. Tartsa azt az autóban, amelyikbe a terméket beszerelték. • Ne használjon a használati utasításban leírtaktól és a gyermekbiztonsági rendszeren megjelöltektől eltérő...
  • Seite 80 Leírás (3. ábra) Fejtámla Redukciós betét Háttámla Övfeszesség szabályozó M. A fejtámla magasságának Vállöv vezető A gyermekülés biztonsági övei beállítója Az övek védőpárnái A gyermekülés övek A deréköv vezetője magasságának beállítására Kapocs szolgáló nyílások Az övek védőpárnája Az autós biztonsági öv vezetője A gyermekülést huzatja A gyermekülés övcsatlakozója Övfeszesség beállító...
  • Seite 81 Figyelem! Ügyeljen arra, hogy a biztonsági övek szorosan illeszkedjenek a gyermek testéhez, és ne csavarodjanak meg. Győződjön meg arról, hogy a derékövek alacsonyan futnak, és védik a gyermek medencéjét. Az öveknek szorosan illeszkedniük kell a gyermek testéhez, de nem lehetnek túl szorosak és nem okozhatnak kényelmetlenséget.
  • Seite 82 Redukciós betét Ha gyermeknek nagyobb helyre van szüksége a gyermekülésben, vegye ki a redukciós betétet. Összeszerelés I. csoport II. csoport III. csoport A gyermek A gyermek az autó A gyermek az autó a gyermekülés biztonsági öveivel van biztonsági öveivel van biztonsági öveivel van biztosítva biztosítva...
  • Seite 83: Karbantartás És Tisztítás

    II. csoport – a gyermekülés beszerelése háttámlával Az ebbe a csoportba tartozó gyermekeket nem lehet a gyermekülés biztonsági öveivel rögzíteni. A gyermeket az autó 3 pontos biztonsági övével kell biztosítani. Szerelje ki a gyermekülés biztonsági öveit (lásd: A gyermekülés övei - Az övek eltávolítása).
  • Seite 84 Regulamentul nr. 16 al ONU sau cu alte standarde echivalente. Stimate Client! Dacă aveți observații sau întrebări cu privire la produsul achiziționat, vă rugăm să ne contactați: help@lionelo.com Înainte de a utiliza scaunul pentru prima dată, vă durgăm să cutiți cu atenție acest manual de utilizare.
  • Seite 85 Informații importante Vă rugăm să citiți acest manual de instrucțiuni înainte de utilizare și să-l păstrați pentru viitor. Instrucțiunile vă vor ajuta să instalați corect scaunul. Instalarea incorectă poate pune în pericol sănătatea copilului. Producătorul nu este responsabil pentru pericolele cauzate de instalarea necorespunzătoare a scaunului.
  • Seite 86 înlocuirea tapițeriei scaunelor decât cea recomandată de producător, deoarece este o parte integrantă a dispozitivului și influențează funcționarea acestuia. • Păstrați instrucțiunile de utilizare a scaunului atunci când utilizați dispozitivul. Păstrați-l în mașina unde este montat produsul. • Nu trebuie folosite puncte de contact portante, altele decât cele descrise în manual și marcate pe scaunul pentru copii.
  • Seite 87 Descriere (fig. 3) Tetieră Buton de reglare a tensionării Spătar centurii Ghidajul centurii de umăr Inserție de reducere Centuri de siguranță Reglator tensionare centură M. Reglator înălțime tetieră Tampoane centuri de siguranță Ghidaj pentru centura de șold Orificii pentru reglarea înălțimii Cataramă...
  • Seite 88 Notă! Asigurați-vă că centurile de siguranță se potrivesc perfect în jurul corpului copilului și că nu sunt răsucite. Asigurați-vă că bretelele sunt reduse și protejați bazinul bebelușului. Curelele trebuie să fie strânse de corpul copilului, dar nu trebuie să fie prea strânse și să nu provoace disconfort. Blocarea și deblocarea centurilor Înainte de a fixa copilul cu centurile de siguranță, asigurați-vă...
  • Seite 89 Montare Grupa I Grupa II Grupa III Copilul este fixat cu Copilul este fixat cu Copilul este fixat cu centurile de siguranță centurile de siguranță centurile de siguranță ale scaunului ale mașinii ale mașinii Scaun auto cu spătar Scaun auto cu spătar Scaun auto fără...
  • Seite 90: Întreținere Și Curățare

    Trageți centura de siguranță a mașinii. Treceți: centura de umăr prin ghidajul din tetieră (fig. 14c), centura pentru poale sub cotiera scaunului (fig. 14d). Asigurați-vă că centurile nu sunt răsucite (fig. 14e). Fixați centurile de siguranță ale mașinii (fig. 14f). Grupele II i III –...
  • Seite 91 Podrobné záruční podmínky jsou k dispozici na webových stránkách: A részletes garanciális feltételek elérhetők a weboldalon: Condiții detaliate de garanție sunt disponibile pe site: www.lionelo.com Thank you for purchasing our product Dziękujemy za zakup urządzenia naszej marki Vielen Dank für den Kauf unserer Markenausrüstung Спасибо...
  • Seite 92 www.lionelo.com...

Inhaltsverzeichnis