Herunterladen Inhalt Inhalt Diese Seite drucken
Gaggenau RT 222 Gebrauchsanleitung

Gaggenau RT 222 Gebrauchsanleitung

Einbaugeraet
Vorschau ausblenden Andere Handbücher für RT 222:
Inhaltsverzeichnis

Werbung

Verfügbare Sprachen
  • DE

Verfügbare Sprachen

  • DEUTSCH, seite 3
Gaggenau
de Gebrauchsanleitung
en Instruction for Use
fr
Mode d'emploi
it
Istruzioni per I´uso
nl Gebruiksaanwijzing
RT 222
RT 242
Einbaugerät
Built-in appliance
Appareil encastrable
Apparecchio da incasso
Inbouwapparaat
All manuals and user guides at all-guides.com

Werbung

Inhaltsverzeichnis
loading

Inhaltszusammenfassung für Gaggenau RT 222

  • Seite 1 All manuals and user guides at all-guides.com Gaggenau de Gebrauchsanleitung en Instruction for Use Mode d’emploi Istruzioni per I´uso nl Gebruiksaanwijzing RT 222 RT 242 Einbaugerät Built-in appliance Appareil encastrable Apparecchio da incasso Inbouwapparaat...
  • Seite 2 All manuals and user guides at all-guides.com de Inhaltsverzeichnis en Table of Contents Table des matières Indice Inhoud...
  • Seite 3: Inhaltsverzeichnis

    All manuals and user guides at all-guides.com de Inhaltsverzeichnis d e G e b r a u c h s a n l e i t u n g Sicherheits- und Warnhinweise Das Gefrierfach Bevor Sie das Gerät in Betrieb nehmen Technische Sicherheit Max.
  • Seite 4: Sicherheits- Und Warnhinweise

    All manuals and user guides at all-guides.com Wenn die Netzanschlussleitung dieses Sicherheits- und Warnhinweise Gerätes beschädigt wird, muss sie durch den Hersteller, Kundendienst oder eine ähnlich qualifizierte Person ersetzt werden. Bevor Sie das Gerät in Betrieb Unsachgemäße Installationen und nehmen Reparaturen können den Benutzer erheblich gefährden.
  • Seite 5: Kinder Im Haushalt

    All manuals and user guides at all-guides.com Zum Abtauen und Reinigen Netzstecker Kinder im Haushalt ▯ ziehen oder Sicherung ausschalten. Verpackung und deren Teile nicht ▯ Am Netzstecker ziehen, nicht am Kindern überlassen. Anschlusskabel. Erstickungsgefahr durch Faltkartons und Hochprozentigen Alkohol nur dicht ▯...
  • Seite 6: Hinweise Zur Entsorgung

    All manuals and user guides at all-guides.com Hinweise zur Entsorgung Lieferumfang Prüfen Sie nach dem Auspacken alle Teile auf * Verpackung entsorgen eventuelle Transportschäden. Die Verpackung schützt Ihr Gerät vor Wenden Sie sich bei Beanstandungen an den Transportschäden. Alle eingesetzten Materialien sind Händler, bei dem Sie das Gerät erworben haben oder umweltverträglich und wieder verwertbar.
  • Seite 7: Raumtemperatur, Belüftung Und Nischentiefe

    All manuals and user guides at all-guides.com Raumtemperatur, Belüftung und Aufstellort Nischentiefe Zum Aufstellen eignet sich ein trockener, belüftbarer Raum. Der Aufstellplatz sollte nicht direkter Sonnenbestrahlung ausgesetzt und nicht in der Nähe Raumtemperatur einer Wärmequelle wie Herd, Heizkörper etc. sein. Das Gerät ist für eine bestimmte Klimaklasse Wenn das Aufstellen neben einer Wärmequelle ausgelegt.
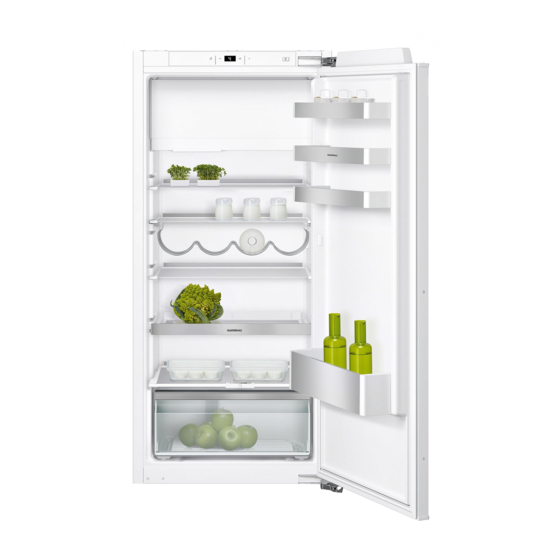
  • Seite 8: Gerät Kennenlernen

    All manuals and user guides at all-guides.com Gerät kennenlernen Diese Gebrauchsanleitung gilt für mehrere Modelle. Die Ausstattung der Modelle kann variieren. Abweichungen bei den Abbildungen sind möglich. Gefrierfach Kühlraum Frischkühlraum Bedienelemente Beleuchtung Kühlraum Glasablage Ausziehbare Glasablage Trennplatte mit Feuchtigkeitsregler Gemüsebehälter Frischkühlbehälter Türablage Ablage für große Flaschen...
  • Seite 9: Bedienelemente

    All manuals and user guides at all-guides.com Bedienelemente Ein/Aus-Taste ÿ Dient zum Ein- und Ausschalten des gesamten Gerätes. Schnell-Taste h Dient zum Ein- und Ausschalten des Schnell-Gefrierens (siehe Kapitel Schnell-Gefrieren). Temperatur-Einstelltasten +/- Mit diesen Tasten wird die Temperatur eingestellt. Temperaturanzeige Die Zahlen entsprechen den eingestellten Kühlraum-Temperaturen in °C.
  • Seite 10: Gerät Einschalten

    All manuals and user guides at all-guides.com Gerät einschalten Temperatur einstellen Das Gerät mit der Ein/Aus-Taste ÿ einschalten. Gefrierfach Die Temperaturanzeige zeigt die eingestellte Die Temperatur im Kühlraum beeinflusst die Temperatur an. Temperatur im Gefrierfach. Ändern Sie die Temperatur Das Gerät beginnt zu kühlen. Die Beleuchtung ist bei im Kühlraum um die Temperatur im Gefrierfach zu geöffneter Tür eingeschaltet.
  • Seite 11: Schnell-Gefrieren

    All manuals and user guides at all-guides.com Schnell-Gefrieren Der Kühlraum Lebensmittel sollen möglichst schnell bis zum Kern Der Kühlraum ist der ideale Aufbewahrungsort für durchgefroren werden, damit Vitamine, Nährwerte, fertige Speisen, Backwaren, Konserven, Aussehen und Geschmack erhalten bleiben. Kondensmilch und Hartkäse. Damit es beim Einlegen frischer Lebensmittel nicht Beim Einlagern beachten zum unerwünschten Temperaturanstieg kommt, ist...
  • Seite 12: Der Frischkühlraum

    All manuals and user guides at all-guides.com Frischkühlbehälter Der Frischkühlraum Das Lagerklima im Frischkühlbehälter bietet ideale Bedingungen zum Aufbewahren von Fisch, Fleisch, Die Temperatur im Frischkühlraum wird nahe 0 °C gehalten. Die niedrige Temperatur und die optimale Wurst, Käse und Milch. Luftfeuchte sichern ideale Lagerbedingungen für frische Lebensmittel.
  • Seite 13: Das Gefrierfach

    All manuals and user guides at all-guides.com Das Gefrierfach Max. Gefriervermögen Angaben über das max. Gefriervermögen in Dient zum: 24 Stunden finden Sie auf dem Typenschild (siehe ▯ Lagern von Tiefkühlkost, Bild im Kapitel Kundendienst) ▯ Herstellen von Eiswürfeln, Voraussetzungen für ▯...
  • Seite 14: Frische Lebensmittel Einfrieren

    All manuals and user guides at all-guides.com Haltbarkeit des Gefriergutes Frische Lebensmittel einfrieren Die Haltbarkeit ist abhängig von der Art der Lebensmittel. Verwenden Sie zum Einfrieren nur frische und einwandfreie Lebensmittel. Bei einer Temperatur von -18 °C: Um Nährwert, Aroma und Farbe möglichst gut zu ▯...
  • Seite 15: Ausstattung

    All manuals and user guides at all-guides.com Wein- und Champagner-Rack Ausstattung Im Wein- und Champagner-Rack können Sie Flaschen sicher ablegen. Benötigen Sie den Platz für andere (nicht bei allen Modellen) Lebensmittel, können Sie die Metallbügel nach oben klappen. Glasablagen Sie können die Ablagen des Innenraums nach Bedarf variieren: Ablage anheben, nach vorne ziehen, absenken und seitlich hinausschwenken.
  • Seite 16: Eisschale

    All manuals and user guides at all-guides.com Eisschale Abtauen Eisschale ¾ mit Trinkwasser füllen und in den Gefrierraum stellen. Kühlraum Festgefrorene Eisschale nur mit stumpfem Das Abtauen wird automatisch ausgeführt. Gegenstand lösen (Löffelstiel). Das Tauwasser läuft über das Ablaufloch in eine Zum Lösen der Eiswürfel Eisschale kurz unter Verdunstungsschale an der Rückseite des Gerätes.
  • Seite 17: Gerät Reinigen

    All manuals and user guides at all-guides.com Ausstattung Gerät reinigen Zum Reinigen lassen sich alle variablen Teile des Gerätes herausnehmen. Achtung ▯ Keine sand-, chlorid- oder säurehaltigen Putz- und Glasablagen herausnehmen Lösungsmittel verwenden. Dazu Ablage herausziehen, vorne anheben und ▯ Keine scheuernden oder kratzenden Schwämme herausnehmen.
  • Seite 18 All manuals and user guides at all-guides.com Ablagen in der Tür herausnehmen Behälter herausnehmen Ablagen nach oben anheben und herausnehmen. Behälter hinten anheben und von den Auszugsschienen heben. Zum Einsetzen Behälter auf die eingeschobenen Auszugsschienen setzen und einrasten. Flaschenhalter herausnehmen Flaschenhalter zusammendrücken und herausnehmen.
  • Seite 19: Beleuchtung (Led)

    All manuals and user guides at all-guides.com Abdeckung Gemüsebehälter herausnehmen Auszugsschienen einbauen Abdeckung anheben, nach vorne ziehen und seitlich Auszugsschiene im ausgefahrenen Zustand auf herausschwenken. vorderen Bolzen setzen. Auszugsschiene zum Einrasten leicht nach vorne Abdeckung Gemüsebehälter und Trennplatte ziehen. einsetzen Auszugsschiene am hinteren Bolzen einsetzen.
  • Seite 20: Energie Sparen

    All manuals and user guides at all-guides.com Energie sparen Betriebsgeräusche ▯ Gerät in einem trockenen, belüftbaren Raum Ganz normale Geräusche aufstellen. Das Gerät soll nicht direkt in der Sonne oder in der Nähe einer Wärmequelle stehen (z. B. Heizkörper, Herd). Brummen Verwenden Sie ggf.
  • Seite 21: Kleine Störungen Selbst Beheben

    All manuals and user guides at all-guides.com Kleine Störungen selbst beheben Bevor Sie den Kundendienst rufen: Überprüfen Sie, ob Sie die Störung aufgrund der folgenden Hinweise selbst beheben können. Sie müssen die Kosten für Beratung durch den Kundendienst selbst übernehmen – auch während der Garantiezeit! Störung Mögliche Ursache...
  • Seite 22: Geräte-Selbsttest

    All manuals and user guides at all-guides.com Geräte-Selbsttest Kundendienst Ihr Gerät verfügt über ein automatisches Einen Kundendienst in Ihrer Nähe finden Sie im Selbsttestprogramm, das Ihnen Fehlerquellen anzeigt, Telefonbuch oder im Kundendienst-Verzeichnis. die nur von Ihrem Kundendienst behoben werden Geben Sie bitte dem Kundendienst die können.
  • Seite 23 All manuals and user guides at all-guides.com en Table of Contents e n I n s t r u c t i o n f o r U s e Safety and warning information The freezer compartment Before you switch ON the appliance Technical safety Max.
  • Seite 24: Safety And Warning Information

    All manuals and user guides at all-guides.com Repairs may be performed by the Safety and warning information manufacturer, customer service or a similarly qualified person only. Before you switch ON the appliance Only original parts supplied by the manufacturer may be used. The manufacturer Please read the operating and installation guarantees that only these parts satisfy the instructions carefully! They contain important...
  • Seite 25: Children In The Household

    All manuals and user guides at all-guides.com Avoiding placing children and Children in the household ▯ vulnerable people at risk: Keep children away from packaging and ▯ At risk are children, people who have its parts. limited physical, mental or sensory Danger of suffocation from folding abilities, as well as people who have cartons and plastic film!
  • Seite 26: Information Concerning Disposal

    All manuals and user guides at all-guides.com Information concerning disposal Scope of delivery After unpacking all parts, check for any damage in * Disposal of packaging transit. The packaging protects your appliance from damage If you have any complaints, please contact the dealer during transit.
  • Seite 27: Room Temperature, Ventilation And Cavity Depth

    All manuals and user guides at all-guides.com Room temperature, ventilation Installation location and cavity depth Install the appliance in a dry, well ventilated room. The installation location should neither be exposed to direct sunlight nor near a heat source, e. g. Ambient temperature a cooker, radiator, etc.
  • Seite 28: Getting To Know Your Appliance

    All manuals and user guides at all-guides.com Getting to know your appliance These operating instructions refer to several models. The features of the models may vary. The diagrams may differ. Freezer section Refrigerator compartment Cool-fresh compartment Controls Light, refrigerator compartment Glass shelf Extendable glass shelf Partition with humidity controller...
  • Seite 29: Controls

    All manuals and user guides at all-guides.com Controls On/Off button ÿ Serves to switch the whole appliance on and off. “Fast” button h Switches fast freezing on and off (see chapter “Fast freezing”). Temperature setting buttons +/- The temperature is set with these buttons. Temperature display The numbers correspond to the set refrigerator compartment temperatures in °C.
  • Seite 30: Switching The Appliance On

    All manuals and user guides at all-guides.com Switching the appliance on Setting the temperature Switch on the appliance with the On/Off button ÿ . Freezer compartment The temperature display indicates the set The temperature in the refrigerator compartment will temperature. affect the temperature in the freezer compartment.
  • Seite 31: Alarm Function

    All manuals and user guides at all-guides.com Alarm function Usable capacity Information on the usable capacity can be found Door alarm inside your appliance on the rating plate (see diagram at chapter “Customer service”). The door alarm (continuous sound) switches on if the appliance door is open for longer than two minutes.
  • Seite 32: The "Cool-Fresh" Compartment

    All manuals and user guides at all-guides.com Notes The “cool-fresh” compartment ▯ Fruit sensitive to cold (e.g. pineapple, banana, papaya and citrus fruit) and vegetables sensitive The temperature in the fridge is about 0 °C. The low to cold (e.g. aubergines, cucumbers, zucchini, temperature and the optimum moisture provide ideal peppers, tomatoes and potatoes) should be storage conditions for fresh food.
  • Seite 33: The Freezer Compartment

    All manuals and user guides at all-guides.com The freezer compartment Max. freezing capacity Information about the max. freezing capacity within Is used to: 24 hours can be found on the rating plate (see ▯ store deepfrozen food, diagram at chapter “Customer service”). ▯...
  • Seite 34: Freezing Fresh Food

    All manuals and user guides at all-guides.com Shelf life of frozen food Freezing fresh food Storage duration depends on the type of food. Freeze fresh and undamaged food only. At a temperature of -18 °C: To retain the best possible nutritional value, flavour ▯...
  • Seite 35: Interior Fittings

    All manuals and user guides at all-guides.com Wine and champagne rack Interior fittings You can store bottles securely in the wine and champagne rack. If you require space for other food, (not all models) you can fold the metal clips upwards. Glass shelves You can reposition the inner shelves as required: lift shelf, pull forwards, lower and swivel out to the side.
  • Seite 36: Ice Cube Tray

    All manuals and user guides at all-guides.com Ice cube tray Defrosting Fill the ice cube tray ¾ full of drinking water and place in the freezer compartment. Refrigerator compartment If the ice tray is stuck to the freezer compartment, Defrosting is actuated automatically. loosen with a blunt implement only (spoon-handle).
  • Seite 37: Cleaning The Appliance

    All manuals and user guides at all-guides.com Interior fittings Cleaning the appliance All variable parts of the appliance can be taken out for cleaning. Caution ▯ Do not use abrasive, chloride or acidic cleaning Take out glass shelves agents or solvents. To do this, pull out shelf, lift at the front and take out.
  • Seite 38 All manuals and user guides at all-guides.com Take out shelves in the door Removing the container Lift shelves upwards and take out. Raise container at the rear and lift off the extension rails. To insert the container, place on the retracted extension rails and engage.
  • Seite 39: Light (Led)

    All manuals and user guides at all-guides.com Taking out the vegetable container cover Installing telescopic rails Lift cover, pull forwards and swivel out to the side. Place the extended telescopic rail on the front pin. Inserting vegetable container cover and partition Pull the telescopic rail forwards slightly until it engages.
  • Seite 40: Tips For Saving Energy

    All manuals and user guides at all-guides.com Tips for saving energy Operating noises ▯ Install the appliance in a dry, well ventilated room! Quite normal noises The appliance should not be installed in direct sunlight or near a heat source (e.g. radiator, cooker).
  • Seite 41: Eliminating Minor Faults Yourself

    All manuals and user guides at all-guides.com Eliminating minor faults yourself Before you call customer service: Please check whether you can eliminate the fault yourself based on the following information. Customer service will charge you for advice – even if the appliance is still under guarantee! Fault Possible cause Remedial action...
  • Seite 42: Appliance Self-Test

    All manuals and user guides at all-guides.com Appliance self-test Customer service Your appliance features an automatic self-test Your local customer service can be found program which shows you sources of faults which in the telephone directory or in the customer-service may be repaired by customer service only.
  • Seite 43 All manuals and user guides at all-guides.com Table des matières f r M o d e d ’ e m p l o i Consignes de sécurité et avertissements Le compartiment congélateur Avant de mettre l'appareil en service Sécurité technique Capacité...
  • Seite 44: Consignes De Sécurité Et Avertissements

    All manuals and user guides at all-guides.com Si le cordon d’alimentation électrique de cet Consignes de sécurité appareil a été endommagé, il faut confier son et avertissements remplacement au fabricant, au service après- vente ou à une personne détenant des qualifications similaires.
  • Seite 45: Les Enfants Et L'appareil

    All manuals and user guides at all-guides.com Pour dégivrer et nettoyer l’appareil, Les enfants et l’appareil ▯ débranchez la fiche mâle de la prise de Ne confiez jamais l’emballage et ses ▯ courant ou retirez le fusible / désarmez le pièces constitutives aux enfants.
  • Seite 46: Conseil Pour La Mise Au Rebut

    All manuals and user guides at all-guides.com Conseil pour la mise au rebut Étendue des fournitures Après avoir déballé, vérifiez toutes les pièces pour * Mise au rebut de l'emballage détecter d’éventuels dégâts dus au transport. L’emballage protège votre appareil contre les En cas de réclamation, veuillez vous adresser au dommages susceptibles de survenir en cours de revendeur auprès duquel vous avez acquis l’appareil...
  • Seite 47: Température Ambiante, Aération Et Profondeur De Niche

    All manuals and user guides at all-guides.com Aération Température ambiante, aération L’air entrant en contact avec la paroi arrière et profondeur de niche de l’appareil se réchauffe. L’air chaud doit pouvoir s’échapper sans obstacle. S’il ne le peut pas, le groupe frigorifique doit fonctionner plus longtemps, Température ambiante ce qui augmente la consommation de courant.
  • Seite 48: Lieu D'installation

    All manuals and user guides at all-guides.com Lieu d'installation Branchement de l’appareil Un local sec et aérable convient pour installer Après l’installation de l’appareil en position verticale, l'appareil. Evitez de placer l'appareil à un endroit attendez au moins une heure avant de le mettre directement exposé...
  • Seite 49: Présentation De L'appareil

    All manuals and user guides at all-guides.com Présentation de l’appareil La présente notice d’utilisation vaut pour plusieurs modèles. L’équipement des modèles peut varier. Selon le modèle, l’appareil peut différer du contenu des illustrations. Compartiment congélateur Compartiment réfrigérateur Compartiment fraîcheur Éléments de commande Éclairage du compartiment réfrigérateur Clayette en verre Clayette extractible en verre...
  • Seite 50: Éléments De Commande

    All manuals and user guides at all-guides.com Éléments de commande Touche Marche / Arrêt ÿ Sert à allumer et éteindre l’ensemble de l’appareil. Touche « rapide » h Elle sert à activer et désactiver le mode congélation rapide ; voir le chapitre « Congélation rapide ».
  • Seite 51: Enclenchement De L'appareil

    All manuals and user guides at all-guides.com Enclenchement de l’appareil Réglage de la température Allumez l’appareil par la touche Marche / Arrêt ÿ . Compartiment congélateur L’affichage de température indique la température La température régnant dans le compartiment réglée. réfrigérateur influence celle du compartiment L’appareil commence à...
  • Seite 52: Congélation Rapide

    All manuals and user guides at all-guides.com Congélation rapide Le compartiment réfrigérateur Il faudrait congeler les produits alimentaires à cœur Le compartiment réfrigérateur est l’endroit idéal le plus rapidement possible afin de préserver leurs où ranger les plats finis de préparer, les pâtisseries, vitamines, leur valeur nutritive, leur aspect et leur conserves, le lait condensé...
  • Seite 53: Le Compartiment Fraîcheur

    All manuals and user guides at all-guides.com Remarques Le compartiment fraîcheur ▯ Il est recommandé de ranger les fruits (par exemple ananas, bananes, papayes, agrumes) L’appareil maintient la température régnant dans et légumes (par exemple les aubergines, le compartiment fraîcheur proche de 0 °C. La basse concombres, courgettes, poivrons, tomates et température et l’humidité...
  • Seite 54: Le Compartiment Congélateur

    All manuals and user guides at all-guides.com Le compartiment congélateur Capacité de congélation maximale Sur la plaquette signalétique, vous trouverez Affectation : des indications concernant la capacité de congélation ▯ Pour stocker des produits surgelés. maximale en 24 heures (voir la Fig. dans le chapitre ▯...
  • Seite 55: Congélation De Produits Frais

    All manuals and user guides at all-guides.com Emballer les surgelés Congélation de produits frais L’air ne doit pas pénétrer dans l’emballage pour Pour congeler les aliments, n’utilisez que des aliments que les aliments ne perdent pas leur goût frais et d’un aspect impeccable. ni ne sèchent pas.
  • Seite 56: Décongélation Des Produits

    All manuals and user guides at all-guides.com Décongélation des produits Equipement Selon la nature et l’utilisation des produits surgelés, (selon le modèle) vous pouvez choisir entre plusieurs possibilités : ▯ à la température ambiante, Clayettes en verre ▯ dans le réfrigérateur, Dans le volume intérieur, vous pouvez faire varier ▯...
  • Seite 57: Clayette À Bouteilles De Vin Et Champagne

    All manuals and user guides at all-guides.com Clayette à bouteilles de vin et Bac à glaçons champagne Remplissez le bac à glaçons aux ¾ d’eau potable puis rangez-le dans le compartiment congélateur. Sur la clayette à vins et champagnes, vous pouvez ranger les bouteilles de manière sûre.
  • Seite 58: Arrêt Et Remisage De L'appareil

    All manuals and user guides at all-guides.com Arrêt et remisage de l'appareil Si vous dégivrez l'appareil Coupure de l’appareil Compartiment réfrigérateur Appuyez sur la touche Marche / Arrêt ÿ. La décongélation a lieu automatiquement. L’affichage de température s’éteint. Le groupe L’eau de condensation sort par l’orifice d’écoulement frigorifique s’éteint.
  • Seite 59: Nettoyage De L'appareil

    All manuals and user guides at all-guides.com Equipement Nettoyage de l’appareil Pour nettoyer, il est possible de retirer toutes les pièces variables de l’appareil. Attention ▯ N’utilisez aucun produit de nettoyage ni aucun Retirer les clayettes en verre solvant contenant du sable, du chlorure ou Pour ce faire, tirez la clayette, soulevez-la à...
  • Seite 60 All manuals and user guides at all-guides.com Sortir les supports en contre-porte Retirer le bac Soulevez les supports et retirez-les. Soulevez l'arrière du récipient et détachez-le des glissières. Pour la mise en place, posez le récipient sur les glissières escamotées et faites-le encranter. Extraire le porte-bouteilles Comprimez le porte-bouteille et retirez-le.
  • Seite 61 All manuals and user guides at all-guides.com Retirer le couvercle du bac à légumes Incorporer les rails de sortie Soulevez le couvercle, tirez-le en avant et faites-le Sur le goujon avant, posez le rail de sortie basculer latéralement pour l’extraire. déployé.
  • Seite 62: Éclairage (Led)

    All manuals and user guides at all-guides.com Éclairage (LED) Bruits de fonctionnement Votre appareil est équipé d’un éclairage par LED Bruits parfaitement normaux ne demandant pas d’entretien. Les réparations de cet éclairage sont exclusivement Bourdonnement sourd réservées au service après-vente ou à...
  • Seite 63: Remédier Soi Même Aux Petites Pannes

    All manuals and user guides at all-guides.com Remédier soi même aux petites pannes Avant d'appeler le service après-vente (SAV) : Vérifiez svp si vous ne pouvez pas remédier vous-même au dérangement à l'aide des instructions qui suivent. Vous éviterez des dépenses inutiles car le déplacement du technicien du SAV vous sera facturé même pendant la période de garantie.
  • Seite 64 All manuals and user guides at all-guides.com Dérangement Cause possible Remède La température régnant dans La température standard est réglée Il est possible de hausser ou réduire de 3 niveaux le compartiment fraîcheur est trop haute ou trop basse (par exemple la température régnant dans le compartiment trop basse ou trop élevée.
  • Seite 65: Autodiagnostic De L'appareil

    All manuals and user guides at all-guides.com Autodiagnostic de l’appareil Service après-vente Votre appareil est équipé d’un programme Pour connaître le service après-vente situé le plus automatique d’autodiagnostic qui vous affiche les près de chez vous, consultez l’annuaire téléphonique sources de défauts ; seul le service après-vente est en ou le répertoire des services après-vente (SAV).
  • Seite 66 All manuals and user guides at all-guides.com Indice i t I s t r u z i o n i p e r I ´ u s o Avvertenze di sicurezza e potenziale pericolo Il congelatore Prima di mettere in funzione l'apparecchio Elementi tecnici di sicurezza Max.
  • Seite 67: Avvertenze Di Sicurezza E Potenziale Pericolo

    All manuals and user guides at all-guides.com Installazioni o riparazioni eseguite da Avvertenze di sicurezza personale non autorizzato, possono e potenziale pericolo potenzialmente creare pericolo per l’utente e danni all’apparecchio. Le riparazioni vanno eseguite dal servizio assistenza clienti Prima di mettere in funzione autorizzato l'apparecchio Le riparazioni vanno eseguite dal servizio...
  • Seite 68: Bambini In Casa

    All manuals and user guides at all-guides.com Per lo sbrinamento e la pulizia estrarre la Bambini in casa ▯ spina d’alimentazione o disinserire Non abbandonare parti dell'imballaggio ▯ l’interruttore di sicurezza. Evitare di che possano essere fonte di gioco per esercitare trazioni sul cordone elettrico, i bambini.
  • Seite 69: Avvertenze Per Lo Smaltimento

    All manuals and user guides at all-guides.com Avvertenze per lo smaltimento Dotazione Dopo il disimballo controllare l’apparecchio per * Smaltimento dell'imballaggio accertare eventuali danni di trasporto. L'imballaggio ha protetto l'apparecchio da eventuali In caso di contestazioni rivolgersi al Vs. fornitore, danni da trasporto.
  • Seite 70: Temperatura Ambiente, Ventilazione E Profondità Della Nicchia

    All manuals and user guides at all-guides.com Ventilazione Temperatura ambiente, ventilazione L’aria sulla parete posteriore e profondità della nicchia dell’apparecchio si riscalda. L’aria riscaldata deve poter defluire liberamente. Altrimenti il refrigeratore deve lavorare di più. Questo aumenta il consumo Temperatura ambiente di energia elettrica.
  • Seite 71: Luogo D'installazione

    All manuals and user guides at all-guides.com Luogo d'installazione Collegare l’apparecchio Per l'installazione è idoneo un ambiente asciutto Dopo avere posizionato l’apparecchio, attendere circa ventilato. Il luogo d'installazione non deve essere 1 ore prima di metterlo in funzione, questo assicura esposto all'irradiazione solare diretta e non essere che l’olio lubrificante si raccolga nella parte bassa del vicino ad una fonte di calore, come stufa, calorifero...
  • Seite 72: Conoscere L'apparecchio

    All manuals and user guides at all-guides.com Conoscere l’apparecchio Questo libretto d’istruzioni per l’uso è valido per diversi modelli. La dotazione dei modelli può variare. Nelle illustrazioni sono possibili differenze. Congelatore Frigorifero Vano a 0 °C Elementi di comando Illuminazione del frigorifero Ripiano in vetro Ripiano estraibile in vetro Ripiano di separazione con regolatore umidità...
  • Seite 73: Elementi Di Comando

    All manuals and user guides at all-guides.com Elementi di comando Pulsante Acceso/Spento ÿ Serve per accendere e spegnere l’intero apparecchio. Pulsante «rapido» h Dispositivo per attivare o disattivare il congelamento rapido, vedi il capitolo «Congelamento rapido». Pulsanti regolazione temperatura +/- Con questi pulsanti si regola la temperatura.
  • Seite 74: Accendere L'apparecchio

    All manuals and user guides at all-guides.com Accendere l’apparecchio Regolare la temperatura Accendere l’apparecchio con il pulsante Acceso/ Congelatore Spento ÿ. La temperatura nel frigorifero influenza la temperatura Il display della temperatura indica la temperatura nel congelatore. Cambiare la temperatura nel regolata.
  • Seite 75: Funzione Di Allarme

    All manuals and user guides at all-guides.com Funzione di allarme Capacità utile totale Trovate i dati circa la capienza utile dell’apparecchio Allarme porta sulla targhetta porta-dati (vedi figura nel capitolo «Servizio Assistenza Clienti»). L'allarme porta (suono continuo) si attiva se la porta dell’apparecchio rimane aperta per oltre due minuti.
  • Seite 76: Il Vano A 0 °C

    All manuals and user guides at all-guides.com Cassetto freschezza Il vano a 0 °C Il clima di conservazione nel cassetto freschezza offre condizioni ideali per conservare pesce, carne, salumi, La temperatura del vano a 0 °C si mantiene vicino a 0 °C.
  • Seite 77: Il Congelatore

    All manuals and user guides at all-guides.com Il congelatore Max. capacità di congelamento Indicazioni sulla max. possibilità di congelamento Serve per: in 24 ore sono riportate sulla targhetta ▯ Conservare alimenti surgelati, d’identificazione (vedi figura nel capitolo «Servizio ▯ Produrre cubetti di ghiaccio, Assistenza Clienti»).
  • Seite 78: Congelamento Di Alimenti Freschi

    All manuals and user guides at all-guides.com Imballaggio idoneo: Congelamento di alimenti freschi pellicola di plastica, pellicola tubolare di polietilene, fogli di alluminio, contenitori per surgelati. Per il congelamento utilizzare solo alimenti freschi Questi prodotti sono in vendita nel commercio ed integri.
  • Seite 79: Decongelare Surgelati

    All manuals and user guides at all-guides.com Ripiano estraibile in vetro Decongelare surgelati Il ripiano estraibile in vetro può essere rimosso per vedere meglio gli alimenti. A seconda del genere e dell’uso, utilizzare una delle seguenti possibilità: ▯ a temperatura ambiente ▯...
  • Seite 80: Fermabottiglie

    All manuals and user guides at all-guides.com Fermabottiglie Spegnere e mettere fuori servizio Il fermabottiglie impedisce la caduta delle bottiglie l'apparecchio durante l’apertura o la chiusura della porta. Spegnere l’apparecchio Premere il pulsante Acceso/Spento ÿ. Il display della temperatura si spegne e il refrigeratore si ferma.
  • Seite 81: Scongelamento

    All manuals and user guides at all-guides.com Scongelamento Pulizia dell’apparecchio Attenzione Frigorifero ▯ Non utilizzare prodotti per pulizia e solventi Lo sbrinamento è automatico. chemici contenenti sabbia, cloro o acidi. L’acqua di sbrinamento scorre attraverso il foro ▯ Non usare spugne abrasive o spugne che di drenaggio in una vaschetta di evaporazione, graffiano.
  • Seite 82: Dotazione

    All manuals and user guides at all-guides.com Dotazione Rimozione dei balconcini dalla porta Sollevare ed estrarre i balconcini. Per la pulizia tutte le parti mobili dell’apparecchio possono essere estratte. Estrarre i ripiani di vetro A tal fine tirare il ripiano verso l’esterno, sollevarlo avanti e poi estrarlo.
  • Seite 83 All manuals and user guides at all-guides.com Estrarre i cassetti Estrazione del coperchio del cassetto per verdure Sollevare il contenitore dietro e staccarlo dalle guide Sollevare il coperchio, tirarlo in avanti e ruotarlo di estrazione. lateralmente. Per inserire il contenitore poggiarlo sulle guide di Inserimento del coperchio del cassetto per verdure estrazione chiuse ed innestarlo in posizione.
  • Seite 84: Illuminazione (Led)

    All manuals and user guides at all-guides.com Smontare le guide estraibili Illuminazione (LED) Estrarre la guida ad estrazione. L’apparecchio è dotato di un’illuminazione a LED Spingere di dispositivo di blocco nel senso esente da manutenzione. indicato dalla freccia. Sganciare dal perno posto posteriormente la Riparazioni a questa illuminazione deve essere guida scorrevole ed estrarla.
  • Seite 85: Rumori Di Funzionamento

    All manuals and user guides at all-guides.com Evitare i rumori Rumori di funzionamento L’apparecchio non è livellato Rumori normali Livellare l’apparecchio con una livella a bolla d’aria. Se necessario, mettere sotto uno spessore. Ronzio I contenitori o i ripiani traballano o non sono Motori in funzione (ad es.
  • Seite 86: Autotest Dell'apparecchio

    All manuals and user guides at all-guides.com L'illuminazione non funziona. L'illuminazione con il LED è guasta. Vedi capitolo «Illuminazione (LED)». La porta è rimasta troppo tempo L'illuminazione si riaccende chiudendo e riaprendo aperta. la porta. L'illuminazione si spegne dopo ca. 10 min.. La temperatura nel vano a La regolazione standard è...
  • Seite 87: Ordine Di Riparazione E Consulenza In Caso Di Guasti

    All manuals and user guides at all-guides.com Segnalando la sigla del prodotto e il numero di fabbricazione contribuite ad evitare interventi a vuoto. Questo comporta un concreto risparmio dei costi di trasferta. Ordine di riparazione e consulenza in caso di guasti Trovate i dati di contatto di tutti i paesi nell’accluso elenco dei centri di assistenza clienti.
  • Seite 88 All manuals and user guides at all-guides.com Inhoud n l G e b r u i k s a a n w i j z i n g Veiligheidsbepalingen en waarschuwingen Het vriesvak Voordat u het apparaat in gebruik neemt Technische veiligheid Maximale invriescapaciteit Bij het gebruik...
  • Seite 89: Veiligheidsbepalingen En Waarschuwingen

    All manuals and user guides at all-guides.com Als de aansluitkabel van het apparaat Veiligheidsbepalingen beschadigd raakt, moet deze worden en waarschuwingen vervangen door de fabrikant, de klantenservice of een andere gekwalificeerde persoon. Onvakkundige Voordat u het apparaat in gebruik installatie en reparaties kunnen groot gevaar neemt opleveren voor de bezitter.
  • Seite 90: Kinderen In Het Huishouden

    All manuals and user guides at all-guides.com Dranken met een hoog Kinderen in het huishouden ▯ alcoholpercentage altijd goed afgesloten Verpakkingsmateriaal en onderdelen ▯ en staand bewaren. ervan zijn geen speelgoed voor kinderen. Geen olie of vet gebruiken op kunststof ▯...
  • Seite 91: Aanwijzingen Over De Afvoer

    All manuals and user guides at all-guides.com Aanwijzingen over de afvoer Omvang van de levering Controleer na het uitpakken alle onderdelen op * Afvoeren van de verpakking van eventuele transportschade. uw nieuwe apparaat Voor klachten kunt u terecht bij de winkel waar u het apparaat hebt aangeschaft of bij onze klantenservice.
  • Seite 92: Omgevingstemperatuur, Ventilatie En Nisdiepte

    All manuals and user guides at all-guides.com Beluchting Omgevingstemperatuur, ventilatie De lucht aan de achterzijde van het apparaat wordt en nisdiepte warm. De verwarmde lucht moet ongehinderd afgevoerd kunnen worden. Anders moet de koelmachine meer presteren. Waardoor het Omgevingstemperatuur energieverbruik toeneemt. De Het apparaat is voor een bepaalde klimaatklasse be en ontluchtingsopeningen mogen dan ook nooit geconstrueerd.
  • Seite 93: De Juiste Plaats

    All manuals and user guides at all-guides.com De juiste plaats Apparaat aansluiten Geschikt voor het opstellen zijn droge, ventileerbare Na het plaatsen van het apparaat moet u minimaal vertrekken. Het apparaat liefst niet in de zon of naast 1 uur wachten voordat u het apparaat in gebruik een fornuis, verwarmingsradiator of een andere neemt.
  • Seite 94: Kennismaking Met Het Apparaat

    All manuals and user guides at all-guides.com Kennismaking met het apparaat Deze gebruiksaanwijzing is op meer dan één type van toepassing. De uitrusting van de modellen kan variëren. Kleine afwijkingen in de afbeeldingen zijn mogelijk. Het vriesvak Koelruimte Verskoelruimte Bedieningselementen Verlichting koelruimte Glasplaat Uittrekbaar glasplateau...
  • Seite 95: Bedieningselementen

    All manuals and user guides at all-guides.com Bedieningselementen Toets Aan/Uit ÿ Om het hele apparaat in en uit te schakelen. Toets Snel h Dient voor het in- en uitschakelen van het snelvriezen, zie het hoofdstuk Snelvriezen. Insteltoetsen voor de temperatuur +/- Met deze toetsen wordt de temperatuur ingesteld.
  • Seite 96: Apparaat Inschakelen

    All manuals and user guides at all-guides.com Apparaat inschakelen Instellen van de temperatuur Het apparaat met de toets Aan/Uit ÿ inschakelen. Het vriesvak De temperatuurindicatie toont de ingestelde De temperatuur in de koelruimte beïnvloedt de temperatuur. temperatuur in het vriesvak. Verander de temperatuur Het apparaat begint te koelen.
  • Seite 97: Alarm Function

    All manuals and user guides at all-guides.com Alarm function Netto-inhoud De gegevens bij de nuttige inhoud vindt u op het Deuralarm typeplaatje in uw apparaat (zie de afb. in het hoofdstuk „Servicedienst”). Het deuralarm (aanhoudend geluidssignaal) wordt ingeschakeld als de deur van het apparaat langer dan twee minuten openstaat.
  • Seite 98: De Verskoelruimte

    All manuals and user guides at all-guides.com Aanwijzingen De verskoelruimte ▯ Koudegevoelig fruit (bijv. ananas, bananen, papaja en citrusvruchten) en groente (bijv. De temperatuur in de verskoelruimte wordt rond aubergines, komkommers, courgettes, paprika, de 0 °C gehouden. De lage temperatuur en de tomaten en aardappels) dienen voor een optimaal optimale luchtvochtigheid maken ideale behoud van kwaliteit en aroma buiten de koelkast...
  • Seite 99: Het Vriesvak

    All manuals and user guides at all-guides.com Het vriesvak Maximale invriescapaciteit Gegevens over de maximale invriescapaciteit binnen Dient voor: 24 uur vindt u op het typeplaatje (zie de afb. in het ▯ bewaren van diepvriesproducten, hoofdstuk „Servicedienst”). ▯ maken van ijsblokjes, Voorwaarden voor max.
  • Seite 100: Verse Levensmiddelen Invriezen

    All manuals and user guides at all-guides.com Houdbaarheid van Verse levensmiddelen invriezen de diepvrieswaren Gebruik uitsluitend verse levensmiddelen. De houdbaarheid is afhankelijk van het soort levensmiddelen. Om de voedingswaarde, het aroma en de kleur zo goed mogelijk te behouden, dient groente Op een temperatuur van -18 °C: geblancheerd te worden voordat het wordt ingevroren.
  • Seite 101: Uitvoering

    All manuals and user guides at all-guides.com Wijn- en champagnerek Uitvoering In het wijn- en champagnerek kunt u flessen veilig bewaren. Als u plaats voor andere levensmiddelen (niet bij alle modellen) nodig hebt, kunt u de metalen beugel omhoog klappen. Glasplateaus U kunt de legplateaus en voorraadvakken in de binnenruimte naar wens verplaatsen: Legplateau...
  • Seite 102: Ijsbakje

    All manuals and user guides at all-guides.com IJsbakje Ontdooien IJsbakje voor ¾ met drinkwater vullen en in de diepvriesruimte zetten. Koelruimte Het vastgevroren ijsbakje alleen met een bot voorwerp Het apparaat wordt automatisch ontdooid. losmaken (steel van een lepel). Het dooiwater loopt via het afvoergaatje naar een Om de ijsblokjes los te maken: het ijsbakje iets verdampingsschaal aan de achterkant van verbuigen of kort onder stromend water houden.
  • Seite 103: Schoonmaken Van Het Apparaat

    All manuals and user guides at all-guides.com Uitvoering Schoonmaken van het apparaat Voor het reinigen kunnen alle variabele onderdelen van het apparaat worden verwijderd. Attentie ▯ Gebruik geen schoonmaak of oplosmiddelen die Glasplateaus eruit halen zand, chloride of zuren bevatten. Daartoe het plateau uittrekken, vooraan optillen ▯...
  • Seite 104 All manuals and user guides at all-guides.com Legplateaus uit de deur nemen Reservoir verwijderen Legplateaus optillen en verwijderen. De lade achteraan optillen en van de rails tillen. De lade aanbrengen door deze op de ingeschoven rails te plaatsen en vast te laten klikken. Fleshouder verwijderen Fleshouder samendrukken en verwijderen.
  • Seite 105: Verlichting (Led)

    All manuals and user guides at all-guides.com Afdekking van de groentelade verwijderen Uittrekbare rails monteren Afdekking optillen, naar voren trekken en zijwaarts Uittrekbare rails in uitgetrokken toestand op naar buiten draaien. de voorste pen zetten. Uittrekbare rails om vast te klikken iets naar voren Afdekking van de groentelade en scheidingsplaat trekken.
  • Seite 106: Energie Besparen

    All manuals and user guides at all-guides.com Energie besparen Bedrijfsgeluiden ▯ Het apparaat in een droge, goed te ventileren Heel normale geluiden ruimte plaatsen! Het apparaat niet direct in de zon of in de buurt van een warmtebron plaatsen zoals een verwarmingsradiator of een fornuis.
  • Seite 107: Kleine Storingen Zelf Verhelpen

    All manuals and user guides at all-guides.com Kleine storingen zelf verhelpen Voordat u de hulp van de Servicedienst inroept: Controleer eerst of u aan de hand van de volgende punten de storing kunt verhelpen. Als u om een monteur vraagt, en het blijkt dat hij alleen maar een advies (bijv. over de bediening of het onderhoud van het apparaat) hoeft te geven om de storing te verhelpen, dan moet u, ook in de garantietijd, de volledige kosten van dat bezoek betalen! Storing...
  • Seite 108 All manuals and user guides at all-guides.com Storing Eventuele oorzaak Oplossing In de verskoelruimte is te De standaardinstelling is te hoog of te De temperatuur in de verskoelruimte kan 3 standen koud of te warm. laag ingesteld (bijv. bij vorst in de warmer of kouder ingesteld worden.
  • Seite 109: Zelftest Apparaat

    All manuals and user guides at all-guides.com Zelftest apparaat Servicedienst Het apparaat beschikt over een automatisch Adres en telefoonnummer van de Servicedienst in uw zelftestprogramma dat de oorzaken van storingen omgeving kunt u vinden in het telefoonboek of aangeeft die alleen door de Servicedienst verholpen in de meegeleverde brochure met service-adressen.
  • Seite 110 All manuals and user guides at all-guides.com Gaggenau Hausgeräte GmbH Carl-Wery-Sraße 34 D-81739 München www.gaggenau.com...

Diese Anleitung auch für:

Rt 242

Inhaltsverzeichnis