Herunterladen Inhalt Inhalt Diese Seite drucken
SPORTSTECH RSX400 Benutzerhandbuch
Vorschau ausblenden Andere Handbücher für RSX400:
Inhaltsverzeichnis

Werbung

Verfügbare Sprachen
  • DE

Verfügbare Sprachen

  • DEUTSCH, seite 1
RSX400
Rowing Machine
DE
EN
ES
FR
IT
NL

Werbung

Inhaltsverzeichnis
loading

Inhaltszusammenfassung für SPORTSTECH RSX400

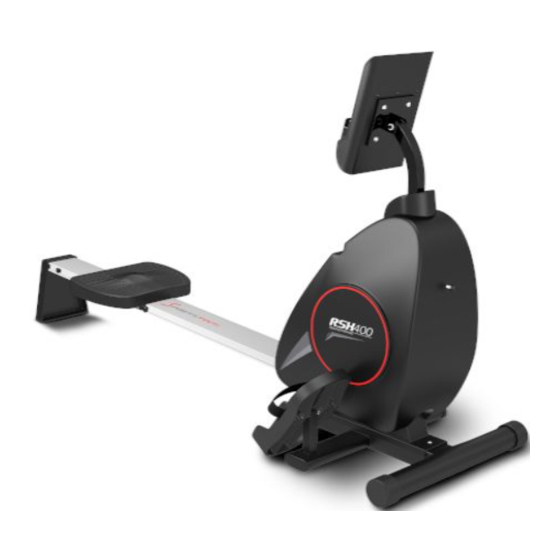
  • Seite 1 RSX400 Rowing Machine...
  • Seite 3: Stellen Sie Sicher, Dass Alle Personen, Die Das Gerät Ver

    Liebe Kund*innen wir freuen uns, dass Sie sich für ein Gerät aus der SPORTSTECH Produktpalette entschieden haben. SPORTSTECH Sportgeräte bieten Ihnen hohe Qualität und neue Technologie. Um die Leistungsfähigkeit des Gerätes voll nutzen zu können und viele Jahre Freude an Ihrem Gerät zu haben, lesen Sie bitte vor der Inbetriebnahme und dem Beginn des Trainings dieses Benutzerhandbuch sorgfältig durch und verwenden Sie das Gerät den Anweisungen entsprechend.
  • Seite 4: Video Tutorials

    Link zu den Videos: https://service.innovamaxx.de/rsx400_video Uns gibt es auch auf Social Media! Hol dir die neuesten Produktinfos, Trainingsinhalte uvm. auf unserer: Instagram-Seite Facebook-Seite https://www.instagram.com/sportstech.official/ https://www.facebook.com/sportstech.de 1. EXPLOSIONSZEICHNUNG/ERSATZTEILLISTE Unter folgendem Link Unter folgendem Link finden Sie die Explosionszeichnung finden Sie die Explosionszeichnung...
  • Seite 5: Inhaltsverzeichnis

    INHALT 1. EXPLOSIONSZEICHNUNG/ERSATZTEILLISTE .............. 4 2. LIEFERUMFANG ...................... 5 3. TECHNISCHE DATEN....................5 4. SICHERHEITSHINWEISE ..................6 5. DIES KÖNNTE SIE AUCH INTERESSIEREN ..............7 6. MONTAGE ......................8 7. LAGERUNG ......................14 8. EINSTELLUNGEN / BATTERIE ..................17 9. KONSOLEN-BEDIENUNGSANLEITUNG ............... 19 10.
  • Seite 6: Sicherheitshinweise

    4. SICHERHEITSHINWEISE Lesen Sie alle Anweisungen und Sicherheitshinweise, bevor Sie dieses Trainingsgerät verwenden. Befolgen Sie sie sorgfältig! Wenden Sie auch den gesunden Menschenverstand an, um Risiken zu vermeiden! Allgemeine persönliche Anforderungen • Nur körperlich und geistig fitte Personen dürfen das Trainingsgerät benutzen. Personen mit Einschränkungen dürfen das Gerät nur unter geeigneter Aufsicht und Hilfestellung benutzen.
  • Seite 7: Dies Könnte Sie Auch Interessieren

    Der ideale Schutz. Für Ihr Hometraining. Damit Ihr Fußboden zu Hause von Ihren Fitnessgeräten nicht beschädigt wird, gibt es von Sportstech eine Bodenschutzmat- te. Natürlich ist diese in verschiedenen Größen erhältlich und kann auch für Yoga oder andere Übungen genutzt werden. Sie schützt Ihren Boden vor Abdrücken, Schmutz oder Kratzern.
  • Seite 8: Montage

    6. MONTAGE Schritt 1 D Ø13x126 2 Stk. C M8x15 4 Stk. B ID8.2 4 Stk. S6 2 Stk.
  • Seite 9 Schritt 2 A M8x38 2 Stk. S6 1 Stk. Stellen Sie den Hauptrahmen senkrecht auf dem geformten Schaum- stoff auf, um Kratzer an der Plastikabdeckung zu verhindern, während Sie den vorderen Stabilisator am Hauptrahmen montieren.
  • Seite 10 Schritt 3 F M8x30 2 Stk. E 23x23x19 2 Stk. G Ø13x66 1 Stk. S6 2 Stk.
  • Seite 11 Schritt 4 P M8 1 Stk. B ID8.2 1 Stk. O M8x125 1 Stk. 1 Stk. 1 Stk. N 1 Stk.
  • Seite 12 Schritt 5 N 1 Stk. S6 2 Stk. Anschlusskabel...
  • Seite 13 Schritt 6...
  • Seite 14: Lagerung

    7. LAGERUNG WIE SIE DAS RUDERGERÄT ZUSAMMENLEGEN Lagern Sie Ihr Gerät In einem trockenen Bereich, ausserhalb der Reichweite von Kindern, und der wenig benutzt wird. Vergewissern Sie sich, dass das Gerät sicher steht und nicht auf kleine Tiere oder Kinder fallen kann. KLAPPBARE LAUFSCHIENE...
  • Seite 16 LAUFSCHIENE AUFKLAPPEN...
  • Seite 17: Einstellungen / Batterie

    8. EINSTELLUNGEN / BATTERIE SPANNKNOPF-EINSTELLUNG Sie können die Spannung für verschiedene Widerstandsstufen wie unten einstellen: Sie sollten zu Beginn Ihres Trainingsprogramms die Widerstandsebene und Ge- schwindigkeit wählen, die Ihren Bedürfnissen entsprechen. Denken Sie daran, langsam und einfach zu beginnen, und arbeiten Sie sich dann bis zu dem gewünschten Fitness- Level hoch.
  • Seite 18 2. Die Batterie muss korrekt positioniert sein, und bitte stellen Sie sicher, dass die Batteriefeder Kontakt mit der Batterie hat. 3. Wenn die Anzeige unleserlich ist oder Segmente nur teilweise erscheinen, nehmen Sie den Akku bitte heraus und warten Sie 15 Sekunden, bevor Sie ihn erneut einsetzen. HINWEISE ZUR HANDHABUNG VON BATTERIEN 1.
  • Seite 19: Konsolen-Bedienungsanleitung

    9. KONSOLEN-BEDIENUNGSANLEITUNG SCAN • Die Reihenfolge der Anzeige: TIME > CAL > RPM > COUNT > DIST > PULSE. • Im SCAN-Modus, MODE-Taste drücken, um andere Funktionen zu wählen. • Automatisch durch jeden Modus scannen mit einer Sequenz von jeweils 6 Sekunden. TIME Zeit •...
  • Seite 20: Funktionen Der Tasten

    RPM Ruderzüge pro Minute Zeigt die aktuelle Rudergeschwindigkeit in Ruderzügen pro Minute an. Dieser Wert wird permanent aktualisiert. COUNT Die Ruderschlagzahl wird fortlaufend ab Trainingsbeginn dargestellt. DIST (DISTANCE) Distanz • Wenn kein Sollwert eingestellt wird, wird die Distanz aufwärts gezählt. •...
  • Seite 21: Lcd-Anzeige

    11. LCD-ANZEIGE Einschalten Eingeschaltet: In der LCD-Anzeige werden alle Segmente angezeigt wie in Abbildung A dargestellt. Abbildung A Ausschalten Wenn für 4 Minuten lang kein Signal an die Konsole übertragen worden ist, wird diese in den Ruhe- modus gehen. Bedienung •...
  • Seite 22: Fehlerbehebung

    12. FEHLERBEHEBUNG • Wenn auf dem Display Abbildung D zu sehen ist, bedeutet dies, dass die Batterien gewechselt werden müssen. • Wenn kein Signal vorhanden ist, während Sie die Pedale treten, überprüfen Sie bitte, ob das Kabel korrekt verbunden ist. •...
  • Seite 23: Anwendungssoftware (App)

    Kinomap Hinweise zur Nutzung der App: Die dargestellten Apps gehören nicht zu SPORTSTECH. Wir schliessen ausdrücklich jegliche Haftung für Software von Drittanbietern aus und sind nicht verantwortlich für deren Inhalte, Codes oder für jegliche Verluste oder Schäden aus deren Nutzung. Wenn Sie Drittanbieter-Ressourcen nutzen, unterliegen Sie deren Bedingungen und Lizenzen und werden nicht mehr durch unsere Datenschutzerklärung oder Sicherheitsmassnahmen geschützt.
  • Seite 24: Dehnungsübungen

    16. DEHNUNGSÜBUNGEN Vor jedem Training sollten Sie Ihre Muskeln mindestens 5-10 Minuten lang dehnen, um sie ausreichend aufzuwärmen. Wiederholen Sie die nachfolgenden Dehnungsübungen daher fünf Mal. Das Dehnen vor dem Training trägt zur Verbesserung der Flexibilität bei und verringert das Verletzungsrisiko. MIT DEM KOPF ROLLEN Drehen Sie den Kopf nach rechts für eine Sekunde, fühlen Sie die Streckung auf der linken Seite des Nackens, dann drehen Sie den Kopf zurück für eine Sekunde, recken Sie Ihr Kinn nach oben und lassen...
  • Seite 25: Trainingshinweise

    17. TRAININGSHINWEISE Rudern ist eine sehr effektive Trainingsform und bietet mehrere Vorteile: 1. Es verbessert die allgemeine Fitness durch Stärkung von Herz und Kreislauf. 2. Es stärkt und, wenn gewünscht, formt alle wichtigen Muskelgruppen: Rücken, Taille, Arme, Schultern, Hüfte und Beine. 3.
  • Seite 26 RUDER-STILE Normaler Ruderstil 1. Nehmen Sie Platz und befestigen Sie Ihre Füsse mit den Riemen an den Pedalen. Nehmen Sie die Griffstange. 2. Nehmen Sie die Startposition ein und lehnen Sie sich mit gestreckten Armen und gebeugten Knien nach vorne (Abb. 1). 3.
  • Seite 27: Entsorgung

    2 oder 4 im Sinne von Anlage 1 ElektroG erworben haben, können Sie von uns bei der Auslieferung des bestellten Neugeräts die unentgeltliche Abholung eines vergleichbaren Elektroaltgeräts fordern. Bitte wenden Sie sich hierfür an unsere Mitarbeiter. Sie erreichen uns per E-Mail unter takeaway@sportstech.de. Weitergehende Informationen zur Abholung eines Elektroaltgeräts finden Sie unter www.sportstech.
  • Seite 28 Altbatterien, die wir als Neubatterie führen oder geführt haben, können Sie auch bei uns im Versandlager oder in unseren Shops zurückgeben: • Sportstech Brands Holding GmbH; Kanalstr 117; 12357 Berlin • 10627 Berlin; Bismarckstraße 73 • 40477 Düsseldorf; Nordstraße 27 • 80797 München;...
  • Seite 29: Konformität

    Sie die Verpackung gemäß den aktuellen Bestimmungen. Informationen erhalten Sie bei den Rückgabe- und Sammelsystemen Ihrer Gemeinde. 19. KONFORMITÄT Hiermit erklärt Sportstech Brands Holding, dass der Funkanlagentyp der Richtlinie 2014/53/EU entspricht. Der vollständige Text der EU-Konformitätserklärung ist unter der folgenden Internetadresse verfügbar: https://service.innovamaxx.de/rsx400_conformity...
  • Seite 31 Dear customer, We are pleased you chose a device from the SPORTSTECH product range. With sports equipment from SPORTSTECH you get the highest quality and latest technology. In order to fully use the potential of your device and be able to enjoy it for many years, please read this manual carefully before starting up and beginning of training, and use the device according to the instruc- tions.
  • Seite 32: Exploded Drawing/Spare Parts List

    We are also on social media! Get the latest product information, training content and much more on our: Instagram-page Facebook-page https://www.instagram.com/sportstech.official/ https://www.facebook.com/sportstech.de 1. EXPLODED DRAWING/SPARE PARTS LIST At the following link you will At the following link you will...
  • Seite 33: Scope Of Delivery

    INDEX 1. EXPLODED DRAWING/SPARE PARTS LIST ..............32 2. SCOPE OF DELIVERY ....................33 3. TECHNICAL DATA ....................33 4. SAFETY ADVICES ....................34 5. YOU MAY ALSO BE INTERESTED IN THESE ACCESSORIES .......... 35 6. ASSEMBLY ......................36 7. STORAGE WAY ....................... 42 8.
  • Seite 34: Safety Advices

    4. SAFETY ADVICES Read all instructions and safety advices before using this training device. Follow them carefully! Also apply common sense for preventing any risks! General personal requirements • Only persons who are physically and mentally fit may use the training device. Handicapped persons may only use the device with suitable supervision and assistance.
  • Seite 35: You May Also Be Interested In These Accessories

    SPORTSTECH floor protection mat 120 The ideal protection. For your home workout. Sportstech has a floor protection mat to prevent your fitness equipment from damaging your floor at home. Of course it is available in different sizes and can also be used for yoga or other exercises.
  • Seite 36 6. ASSEMBLY Step 1 D Ø13x126 2 PCS C M8x15 4 PCS B ID8.2 4 PCS S6 2 PCS...
  • Seite 37 Step 2 A M8x38 2 PCS S6 1 PCS Upright the main frame onto the style foam to prevent from scratch on the plastic cover while mounting the front stabiliser to the main frame.
  • Seite 38 Step 3 F M8x30 2 PCS E 23x23x19 2 PCS G Ø13x66 1 PCS S6 2 PCS...
  • Seite 39 Step 4 P M8 1 Pcs. B ID8.2 1 Pcs. O M8x125 1 Pcs. 1 Pcs. 1 Pcs. N 1 Stk.
  • Seite 40 Step 5 N 1 PCS S6 2 PCS Connecting wire...
  • Seite 41 Step 6...
  • Seite 42 7. STORAGE WAY HOW TO FOLD THE ROWING MACHINE Store your machine in a dry area away from children and high traffic areas as shown in the illustrati- on. Be sure it is secure and cannot fall onto small animals or children. HOW TO FOLD...
  • Seite 44 UNFOLD...
  • Seite 45 8. SETTINGS / BATTERY TENSION KNOB ADJUSTMENT You could adjust the tension for varied resistance as below: You should begin your “Exercise Period” at the resistance level and speed to suit your needs. Remember to start out slow and easy, and work your way up to the fitness level you desire.
  • Seite 46 2. Battery must be correctly positioned and make sure the battery spring is properly in contact with battery. 3. If the display is illegible or only partial segment appeares, please take out the battery and wait for 15 seconds, then reinstall it. ADVICE FOR HANDLING BATTERIES 1.
  • Seite 47: Display Functions

    9. DISPLAY FUNCTIONS SCAN • The sequence of display: TIME > CAL > RPM > COUNT > DIST > PULSE. • In SCAN mode, press MODE key to choose other functions. • Automatically scan through each mode in sequence every 6 seconds. TIME •...
  • Seite 48: Button Function

    RPM Rowings per minute Displays the current rowing speed in rowings per minute. This value becomes permanent updated. COUNT The number of rowing strokes is displayed continously from the start of training. DIST Distance • W/O setting the target value, distance will count up. •...
  • Seite 49: Lcd-Display

    11. LCD-DISPLAY Power on LCD will display all segments as Image A Power off Without any signal been transmitted into the monitor for 4 minutes, and the monitor enter to SLEEP. Operation • When monitor power on (or press MODE, RESET key and hold for 3 seconds), LCD will display all segments for one second and enter to SCAN mode as Drawing B.
  • Seite 50: How To Replace The Batteries

    12. TROUBLE SHOOTING • When the display show Drawing D, it means the batteries need to be changed. • If there is no signal when you pedal, please check if the cable is well connected. • Battery low display: Image D 13.
  • Seite 51: Application Software (App)

    Notes on using the App: The apps presented do not belong to SPORTSTECH. We expressly disclaim all liability of any kind whatsoever for third-party software and are not responsible for their content, code or for any loss or damage arising from the use of them.
  • Seite 52: Stretch Exercise

    16. STRETCH EXERCISE Before each workout you should stretch your muscles for at least 5-10 minutes to warm them up sufficiently. Repeat the following stretching exercises five times. Stretching before training helps improve flexibility and reduces the risk of injury. HEAD ROLLS Rotate your head to the right for one count, feeling the stretch up the left side of your neck, then rotate your head back for one count, stretching your chin to the ceiling and letting your mouth open.
  • Seite 53: Training Instructions

    17. TRAINING INSTRUCTIONS Rowing is a very effective form of exercise and provides several benefits: 1. It improves the general fitness by strengthening the heart and circulation. 2. It strengthens and, if desired, also tones all major muscle groups: Back, waist, arms, shoulders, hips and legs. 3.
  • Seite 54 ROWING STYLES Basic Rowing style 1. Take seat and fasten your feet to the pedals, using the straps. Take the handle bar. 2. Take the start position, leaning forward with your arms straight and knees bent (Fig 1). 3. Push yourself backwards, straightening your back and legs at the same time (Fig 2). 4.
  • Seite 55 19. CONFORMITY Sportstech Brands Holding hereby declares that the radio system type is compliant with EU Directive 2014/53 / EU. The full text of the EU declaration of conformity is available at the following internet address: https://service.innovamaxx.de/rsx400_conformity...
  • Seite 57 Querido cliente, Nos complace que haya elegido un dispositivo de la línea de productos SPORTSTECH. Las máquinas de deporte de Sportstech ofrecen una gran calidad y una tecnología innovadora. Con el fin de usar todo el potencial de su dispositivo y para que pueda disfrutarlo durante muchos años, por favor lea este manual cuidadosamente antes de comenzar a ejercitarse, y use el dispositivo...
  • Seite 58: Dibujo De Explosión/Lista De Repuestos

    ¡También estamos en redes sociales! Obtenga la última información sobre nuestros productos, entrenamientos y mucho más aquí: Instagram Facebook https://www.instagram.com/sportstech.official/ https://www.facebook.com/sportstech.de 1. DIBUJO DE EXPLOSIÓN/LISTA DE REPUESTOS En el siguiente enlace En el siguiente enlace encontrarás el dibujo de explosión encontrarás el dibujo de explosión...
  • Seite 59: 0°C~+40°C (32°F~104°F) -10°C~+60°C (14°F~140°F)

    CONTENIDOS 1. DIBUJO DE EXPLOSIÓN/LISTA DE REPUESTOS ............58 2. CONTENIDO ......................59 3. DATOS TÉCNICOS ....................59 4. INFORMACIÓN DE SEGURIDAD IMPORTANTE ............. 60 5. PUEDE QUE TAMBIÉN LE INTERESE ................61 6. MONTAJE ......................62 7. ALMACENAMIENTO ....................68 8.
  • Seite 60: Información De Seguridad Importante

    4. INFORMACIÓN DE SEGURIDAD IMPORTANTE Al usar la caminadora siempre se deben seguir las precauciones básicas, incluyendo las siguientes instrucciones de seguridad importantes. Lea todas las instrucciones antes de usar este producto. Requisitos generales personales • El equipo deben utilizarlo únicamente personas física y mentalmente aptas. Las personas que tengan limitaciones solo deben usar el dispositivo bajo supervisión y con la ayuda adecuada.
  • Seite 61: Puede Que También Le Interese

    Puede comprar este producto en el tamaño deseado a través del siguiente código QR o enlace: https://www.sportstech.de/bodenschutzmatte SPORTSTECH WBT100 Botella de agua Muchas personas no consiguen beber suficiente agua a lo largo del día. Sin embargo, esto es esencial para nuestro cuerpo: en el trabajo, durante un entrenamiento o en nuestro tiempo libre.
  • Seite 62: Montaje

    6. MONTAJE Paso 1 D Ø13x126 2 pzas. C M8x15 4 pzas. B ID8.2 4 pzas. S6 2 pzas.
  • Seite 63 Paso 2 A M8x38 2 pzas. S6 1 pza. Ubique la estructura principal sobre la espuma para evitar rayones en la cubierta plástica mientras ensambla el estabilizador frontal en la estructura principal.
  • Seite 64 Paso 3 F M8x30 2 pzas. E 23x23x19 2 pzas. G Ø13x66 1 pza. S6 2 pzas.
  • Seite 65 Paso 4 P M8 1 pza. B ID8.2 1 pza. O M8x125 1 pza. 1 pza. 1 pza. N 1 pza.
  • Seite 66 Paso 5 N 1 pza. S6 2 pzas. Cable conector...
  • Seite 67 Paso 6...
  • Seite 68: Almacenamiento

    7. ALMACENAMIENTO CÓMO PLEGAR LA MÁQUINA DE REMO Guarde su máquina en un lugar seco lejos de los niños y de zonas de circulación como se muestra en la ilustración. Asegúrese de que la máquina esté asegurada y que no se caiga hacia adelante sobre animales pequeños o niños.
  • Seite 70 CÓMO DESPLEGAR...
  • Seite 71: Ajustes / Batería

    8. AJUSTES / BATERÍA AJUSTE DE LA PERILLA DE TENSIÓN Puede ajustar los niveles de tensión para variar la resistencia como se muestra a continuación: Debe comenzar su "periodo de ejercicio" en el nivel de resistencia y velocidad que se ajuste a sus necesidades.
  • Seite 72 2. La batería debe ubicarse correctamente y asegúrese de que el resorte entre en contacto con la batería. 3. Si la pantalla es ilegible o sólo aparecen segmentos parciales, por favor retire la batería durante 15 segundos y luego insértela de nuevo. CONSEJO PARA EL MANEJO DE BATERÍAS 1.
  • Seite 73: Funciones De Pantalla

    9. FUNCIONES DE PANTALLA SCAN • Secuencia de la pantalla: TIME > CAL > RPM > COUNT > DIST > PULSE. • En el modo SCAN, presione la tecla MODE para elegir otras funciones. • Escanee automáticamente mediante cada modo en secuencia cada 6 segundos. TIME •...
  • Seite 74: Funciones De Las Teclas

    RPM Movimientos de remo por minuto Muestra la velocidad actual de remo en movimiento de remo por minuto. Este valor se actualiza permanentemente COUNT El número de movimientos de remo se muestra continuamente desde el comienzo del ejercicio. DIST Distancia •...
  • Seite 75: Pantalla Lcd

    11. PANTALLA LCD Encendido La pantalla LCD mostrará todos los segmentos Ilustracíon A Apagado Si la pantalla no recibe ninguna señal después de 4 minutos esta se SUSPENDERÁ. Funcionamiento • Al encender la pantalla (o al presionar la tecla MODE, RESET y sostener durante 3 segundos), esta mostrará...
  • Seite 76: Solución De Problemas

    12. SOLUCIÓN DE PROBLEMAS • Cuando la pantalla muestre le Dibujo D, esto significa que las baterías deben cambiarse. • Si no hay ninguna señal al pedalear, por favor revise que el cable esté bien conectado. • Pantalla con batería baja: Ilustracíon D 13.
  • Seite 77: Software (Aplicación)

    Consejos para el uso de las aplicaciones: Las aplicaciones mostradas no son propiedad de SPORTSTECH. No nos hacemos responsables por el software de terceros ni de su contenido, códigos o de cualquier pérdida o daño derivado de su uso. Si utiliza recursos de terceros, estará...
  • Seite 78: Ajercicios De Estiramiento

    16. AJERCICIOS DE ESTIRAMIENTO Antes de cada entrenamiento debes estirar tus músculos durante al menos 5-10 minutos para calentarlos lo suficiente. Repita los siguientes ejercicios de estiramiento cinco veces. El estiramiento antes del entrenamiento ayuda a mejorar la flexibilidad y reduce el riesgo de lesiones. GIROS CON LA CABEZA Gire su cabeza hacia la derecha por un segundo, sienta como se estira el lado izquierdo de su cuello, luego gire su cabeza hacia tras por un segundo, estirando su barbilla hacia el techo y dejando su boca...
  • Seite 79: Consejos De Entrenamiento

    17. CONSEJOS DE ENTRENAMIENTO El remo es una forma de ejercicio muy eficaz y ofrece varias ventajas: 1. Mejora el estado físico general al fortalecer el corazón y la circulación. 2. Fortalece y, si lo desea, da forma a todos los grupos musculares importantes: espalda, cintura, brazos, hombros, caderas y piernas.
  • Seite 80 FORMA DE REMAR Remo normal 1. Tome asiento y fije los pies a los pedales con las correas. Agarre el asa. 2. Colóquese en posición inicial e inclínese hacia delante con los brazos extendidos y las rodillas dobladas (fig. 1). 3.
  • Seite 81: Desecho

    19. CONFORMIDAD Sportstech Brands Holding declara que el sistema de radio tipo cumple con la directiva 2014/53/EU. El texto completo de la Declaración UE de Conformidad está disponible en el siguiente enlace: https://service.innovamaxx.de/rsx400_conformity...
  • Seite 83 FRANÇAIS Chère clientèle, Nous sommes ravis que vous ayez choisi un appareil de la gamme de produits SPORTSTECH. Les équipements sportifs SPORTSTECH vous offrent une qualité élevée et une technologie innovante. Afin d'utiliser pleinement le potentiel de votre appareil et de pouvoir l'apprécier pendant de nombreuses années, lisez attentivement ce manuel avant l'utilisation et le début de votre entraînement et utilisez...
  • Seite 84: Dessin Éclaté/Liste Des Pièces De Rechange

    Vous pouvez aussi nous trouver sur les réseaux sociaux! Retrouve les dernières informations sur les produits, le contenu des entraînements et bien plus encore sur notre: La page Instagram La page Facebook https://www.instagram.com/sportstech.official/ https://www.facebook.com/sportstech.de 1. DESSIN ÉCLATÉ/LISTE DES PIÈCES DE RECHANGE A l‘adresse suivante A l‘adresse suivante vous trouverez le dessin éclaté...
  • Seite 85: Contenu De La Livraison

    CONTENU 1. DESSIN ÉCLATÉ/LISTE DES PIÈCES DE RECHANGE ............ 84 2. CONTENU DE LA LIVRAISON ..................85 3. DONNÉES TECHNIQUES ................... 85 4. CONSIGNES DE SÉCURITÉ ..................86 5. CECI POURRAIT ÉGALEMENT VOUS INTÉRESSER ............87 6. ENSEMBLE ......................88 7.
  • Seite 86: Consignes De Sécurité

    4. CONSIGNES DE SÉCURITÉ Lisez toutes les instructions et les conseils de sécurité avant d'utiliser ce dispositif d'entraînement. Suivez-les bien!Faites également preuve de bon sens pour prévenir tout risque! Exigences personnelles générales • Seules les personnes physiquement et mentalement aptes peuvent utiliser le dispositif d'entraînement.
  • Seite 87: Ceci Pourrait Également Vous Intéresser

    La protection idéale. Pour votre entraînement à domicile. Afin que votre sol ne soit pas endommagé par votre équipement de fitness, il existe un tapis de protection Sportstech. Il est dispo- nible en différentes tailles et peut également être utilisé pour le yoga ou d‘autres exercices.
  • Seite 88: Ensemble

    6. ENSEMBLE Étape 1 D Ø13x126 2 pcs C M8x15 4 pcs B ID8.2 4 pcs S6 2 pcs...
  • Seite 89 Étape 2 A M8x38 2 pcs S6 1 pce Posez le cadre principal sur la mousse pour empêcher de rayer le couvercle en plastique pendant le montage du stabilisateur avant sur le cadre principal.
  • Seite 90 Étape 3 F M8x30 2 pcs E 23x23x19 2 pcs G Ø13x66 1 pce S6 2 pcs...
  • Seite 91 Étape 4 P M8 1 pce. B ID8.2 1 pce. O M8x125 1 pce. 1 pce. 1 pce. N 1 pce.
  • Seite 92 Étape 5 N 1 pce S6 2 pcs Câble de connexion...
  • Seite 93 Étape 6...
  • Seite 94: Stockage De L'appareil

    7. STOCKAGE DE L'APPAREIL COMMENT PLIER LE RAMEUR Rangez votre machine dans un endroit sec, loin des enfants et des zones à fort trafic, comme le montre l'illustration. Assurez-vous qu'il est sécurisé et ne peut pas tomber sur de petits animaux ou des enfants.
  • Seite 96 ETAPE D'OUVERTURE...
  • Seite 97: Réglages / Batterie

    8. RÉGLAGES / BATTERIE RÉGLAGE DU BOUTON DE TENSION Vous pouvez ajuster la tension pour une résistance variée comme suit: Vous devriez commencer votre "Période d'exercice" au niveau de résistance et à la vitesse qui correspondent à vos besoins. Rappelez-vous que le démarrage des exercices doit se faire facilement et lentement et de travailler doucement jusqu'à...
  • Seite 98 2. La batterie doit être correctement positionnée et assurez-vous que le ressort de la batterie est bien en contact avec la batterie. 3. Si l'affichage est illisible ou seul un segment partiel apparaît. Retirez la batterie et attendez 15 secondes, puis remettez la. CONSEILS POUR LA MANIPULATION DES BATTERIES 1.
  • Seite 99: Fonctions De L'ecran

    9. FONCTIONS DE L'ECRAN SCAN • L'ordre d'affichage : TIME > CAL > RPM > COUNT > DIST > PULSE • En mode SCAN, appuyez sur la touche MODE pour choisir d'autres fonctions. • Numérisez automatiquement chaque mode dans l'ordre toutes les 6 secondes. TIME •...
  • Seite 100: Fonctions Des Boutons

    RPM Mouvements par minute Affiche la vitesse actuelle du rameur en mouvements par minute. Cette valeur est mise à jour en permanence. COUNT Le nombre de mouvements est affiché en continu dès le début de l'entraînement DIST Distance • Si aucune valeur cible n'est définie, le comptage de la distance commencera. •...
  • Seite 101: Ecran Lcd

    11. ECRAN LCD Allumer L'écran LCD affichera tous les segments comme Illustration A Éteindre Si aucun signal n'est transmis au moniteur pendant 4 minutes, le moniteur passera au mode SLEEP. Opération • Lorsque le moniteur est allumé (ou appuyez sur MODE, touche RESET pendant 3 secondes), l'écran LCD affiche tous les segments pendant une seconde et passe en mode SCAN comme sur le dessin B.
  • Seite 102: Diagnostic Des Anomalies

    12. DIAGNOSTIC DES ANOMALIES • Lorsque l'écran affiche le dessin D, cela signifie que les piles doivent être changées. • S'il n'y a pas de signal lorsque vous pédalez, veuillez vérifier si le câble est bien connecté. • L'écran affiche batterie faible Illustration D 13.
  • Seite 103: Logiciel D'application (App)

    Kinomap Informations sur l’utilisation de l’application : Les applications présentées ne sont pas la propriété de SPORTSTECH. Nous excluons expressément toute responsabilité pour les logiciels provenant de tiers. Nous ne sommes en aucun cas responsables de leur contenu, de leur code source, ou de toute perte ou dommage résultant de leur utilisation. Si vous utilisez des ressources provenant de tiers, vous serez soumis à...
  • Seite 104: Excercice D'étirement

    16. EXCERCICE D'ÉTIREMENT Avant chaque séance d'entraînement, vous devez étirer vos muscles pendant au moins 5 à 10 minutes pour les réchauffer suffisamment. Répétez les exercices d'étirement suivants cinq fois. Les étirements avant l'entraînement permettent d'améliorer la flexibilité et de réduire le risque de blessure. ROULER LA TÊTE Tournez la tête vers la droite une fois, en étirant le côté...
  • Seite 105: Instructions D'exercice

    17. INSTRUCTIONS D'EXERCICE L'aviron constitue un entraînement très efficace et présente plusieurs avantages: 1. Il améliore la condition physique générale en renforçant le cœur et la circulation sanguine. 2. Il renforce et, si on le souhaite, sculpte tous les groupes musculaires importants : dos, taille, bras, épaules, hanches et jambes.
  • Seite 106 COMMENT RAMER Ramer de façon classique 1. Prenez place et attachez vos pieds aux pédales à l'aide des sangles. Prenez la barre de traction. 2. Prenez la position de départ et penchez-vous vers l'avant, les bras tendus et les genoux pliés (fig.
  • Seite 107: Mise Au Rebut

    19. CONFORMITÉ Sportstech Brands Holding déclare par la présente que l‘installation radio de type est conforme à la directive 2014/53/CE. Le texte intégral de la déclaration UE de conformité est disponible à l‘adresse Internet suivante: https://service.innovamaxx.de/rsx400_conformity...
  • Seite 109 MANUALE D’USO ITALIANO Cari client* Siamo lieti che abbiate scelto un dispositivo della gamma SPORTSTECH. L'attrezzatura sportiva SPORTSTECH ti offre alta qualità e tecnologia innovativa. Per sfruttare a pieno il potenziale del dispositivo e poterlo utilizzare per molti anni, raccomandiamo di leggere attentamente questo manuale prima di iniziare l’allenamento e di utilizzare il dispositivo...
  • Seite 110: Disegno Esploso/Lista Dei Pezzi Di Ricambio

    Ci siamo anche sui social! Scopri le ultime novità sui prodotti, contenuti per l'allenamento e molto altro ancora sul nostro: Pagina Instagram Pagina Facebook https://www.instagram.com/sportstech.official/ https://www.facebook.com/sportstech.de 1. DISEGNO ESPLOSO/LISTA DEI PEZZI DI RICAMBIO Al seguente link Al seguente link troverete il disegno esploso...
  • Seite 111: Contenuto Di Spedizione

    INDICE 1. DISEGNO ESPLOSO/LISTA DEI PEZZI DI RICAMBIO ............. 110 2. CONTENUTO DI SPEDIZIONE ..................111 3. DATI TECNICI ......................111 4. ISTRUZIONI DI SICUREZZA ..................112 5. ANCHE QUESTO PUÒ ESSERE DI VOSTRO INTERESSE ..........113 6. MONTAGGIO ......................114 7.
  • Seite 112: Istruzioni Di Sicurezza

    4. ISTRUZIONI DI SICUREZZA Leggere tutte le istruzioni e le avvertenze di sicurezza prima di usare questo attrezzo. Seguirli con attenzione! Inoltre, e raccomandato di usare il buon senso per evitare i rischi di infortuni! Requisiti personali generali • Solo persone fisicamente e mentalmente idonee possono utilizzare l’attrezzo di allenamento. Le persone con disabilità...
  • Seite 113 5. ANCHE QUESTO PUÒ ESSERE DI VOSTRO INTERESSE SPORTSTECH materassino protettivo 120 La protezione ideale. Per il vostro allenamento a casa Per fare in modo che il vostro pavimento non venga danneggiato dagli attrezzi fitness che utilizzate per allenarvi abbiamo creato per voi un materassino protettivo per il pavimento.Disponibile...
  • Seite 114 6. MONTAGGIO Passo 1 D Ø13x126 2 pz C M8x15 4 pz B ID8.2 4 pz S6 2 pz...
  • Seite 115 Passo 2 A M8x38 2 pz S6 1 pz Metti in verticale la struttura principale sulla protezione di schiuma per evitare graffi sulla copertura di plastica durante il montaggio dello stabi- lizzatore frontale alla struttura principale.
  • Seite 116 Passo 3 F M8x30 2 pz E 23x23x19 2 pz G Ø13x66 1 pz S6 2 pz...
  • Seite 117 Passo 4 P M8 1 pz B ID8.2 1 pz. O M8x125 1 pz 1 pz 1 pz N 1 Stk.
  • Seite 118 Passo 5 N 1 pz S6 2 pz Cavo di connessione...
  • Seite 119 Passo 6...
  • Seite 120 7. RIPORRE L’ATTREZZATURA COME PIEGARE IL VOGATORE Riponi il tuo attrezzo in una zona asciutta qualsiasi, lontana da bambini e da zone trafficate come mostrato in figura. Sii sicuro che sia fissato e che non possa cadere su piccoli animali o bambini. PASSO DI PIEGATURA...
  • Seite 122 PASSO DI APERTURA...
  • Seite 123 8. IMPOSTAZIONI / BATTERIA REGOLAZIONE DELLA MANOPOLA DELLA TENSIONE Potresti regolare la tensione per resistenze variabili come segue: Dovresti iniziare il tuo “Periodo di Allenamento” al livello di resistenza e velocità adeguato alle tue necessità. Ricorda di iniziare in modo lento e semplice e lavora col tuo ritmo fino al livello desiderato.
  • Seite 124 2. La batteria deve essere posizionata correttamente e controlla che la molla sia opportunamente a contatto con la batteria. 3. Se lo schermo è illeggibile o compare solo un segmento parziale. Per favore rimuovi la batteria ed attendi 15 secondi, quindi inseriscila nuovamente. CONSIGLIO PER MANEGGIARE BATTERIE 1.
  • Seite 125: Funzioni Display

    9. FUNZIONI DISPLAY SCAN • La sequenza del display: TIME > CAL > RPM > COUNT > DIST > PULSE. • In modalità SCAN, premere il pulsante MODE per scegliere altre funzioni. • Scansione automatica in ogni modalità in sequenza ogni 6 secondi. TIME •...
  • Seite 126 RPM Remate per minuto Mostra l'attuale velocità di remata in remate per minuto. Questo valore viene aggiornato permanentemente. COUNT Il numero di remate viene mostrato continuamente dall'inizio dell'allenamento. DIST Distanza • Senza impsotare il valore obiettivo, comincerà il conteggio della distanza. •...
  • Seite 127: Display Lcd

    11. DISPLAY LCD Accensione Il display LCD mostrerà tutti i segmenti Illustrazione A Spegnimento Senza nessun segnale trasmesso al monitor per 4 minuti, il monitor entrerà in modalità SLEEP. Operazioni • Quando si accende il monitor (o si tengono premuti i pulsanti MODE, RESET per 3 secondi), il display LCD mosterà...
  • Seite 128: Risoluzione Dei Problemi

    12. RISOLUZIONE DEI PROBLEMI • Quando il display mostra il Disegno D, vuol dire che le battertie devono essere sostituite. • Se non c'è nessun segnale quando pedali, per favore controlla se il cavo è ben connesso • display batterie in esaurimento: Illustrazione D 13.
  • Seite 129: Software Di Utilizzo (App)

    Kinomap Note sull'uso dell'app: Le applicazioni mostrate non appartengono a SPORTSTECH. Decliniamo espressamente ogni res- ponsabilità per i software di terzi e non siamo responsabili del loro contenuto, dei codici o di qualsiasi perdita o danno derivante dal loro uso. Se utilizzi risorse di terzi, sei soggetto ai loro termini e licenze e non sei più...
  • Seite 130: Esercizi Di Stretching

    16. ESERCIZI DI STRETCHING Prima di ogni allenamento si dovrebbe allungare i muscoli per almeno 5-10 minuti per riscaldarli a sufficienza. Ripetere i seguenti esercizi di stretching per cinque volte. Lo stretching prima dell'allenamento aiuta a migliorare la flessibilità e riduce il rischio di lesioni. RULLI PER LA TESTA Ruotare la testa a destra, fino a sentir allungare il lato sinistro del collo, poi ruotare la testa indietro, allungando il mento verso il soffitto e aprendo la bocca.
  • Seite 131: Istruzioni Di Allenamento

    17. ISTRUZIONI DI ALLENAMENTO Il canottaggio è una forma di esercizio molto efficace e offre diversi benefici: 1. Migliora la forma fisica generale rafforzando il cuore e la circolazione. 2. Rafforza e, se lo si desidera, modella tutti i principali gruppi muscolari: Schiena, vita, braccia, spalle, fianchi e gambe.
  • Seite 132 STILE DI CANOTTAGGIO Stile di voga normale 1. Prendete posto e fissate i vostri piedi ai pedali con le cinghie. Prendi il manubrio. 2. Assumere la posizione di partenza e piegarsi in avanti con le braccia distese e le ginocchia piegate (Fig.
  • Seite 133: Smaltimento

    19. CONFORMITÀ Sportstech Brands Holding dichiara che il tipo di sistema radio è conforme alla direttiva 2014/53/UE. Il testo completo della dichiarazione di conformità UE è disponibile al seguente indirizzo internet: https://service.innovamaxx.de/rsx400_conformity...
  • Seite 135 GEBRUIKSAANWIJZING NEDERLANDS Beste klant, We zijn blij dat je een apparaat uit het SPORTSTECH-assortiment hebt gekozen. De sportuitrusting van SPORTSTECH brengt hoogwaardige apparaten met nieuwe technologieën. Lees vóór gebruik deze gebruikershandleiding aandachtig door en gebruik het apparaat zoals aange- geven. Zo zul je ten volle van de prestaties van het apparaat kunnen profiteren en er vele jaren geniet van hebben.
  • Seite 136: Explosietekening/Onderdelenlijst

    We zijn ook actief op social media! Raadpleeg voor de meest recente productinformatie, trainingen en nog veel meer, onze website: Instagram-pagina Facebook-pagina https://www.instagram.com/sportstech.official/ https://www.facebook.com/sportstech.de 1. EXPLOSIETEKENING/ONDERDELENLIJST Onder de volgende link Onder de volgende link vind je de explosietekening vind je de explosietekening...
  • Seite 137: 0°C~+40°C (32°F~104°F) -10°C~+60°C (14°F~140°F)

    INHOUD 1. EXPLOSIETEKENING/ONDERDELENLIJST ..............136 2. IN DE VERPAKKING ....................137 3. TECHNISCHE GEGEVENS..................137 4. VEILIGHEIDSINSTRUCTIES ..................138 5. DIT KAN OOK INTERESSANT VOOR JE ZIJN ............... 139 6. MONTAGE ......................140 7. OPSLAG ......................... 146 8. INSTELLINGEN / BATTERIJ ..................149 9.
  • Seite 138: Veiligheidsinstructies

    4. VEILIGHEIDSINSTRUCTIES Lees alle instructies en veiligheidsinstructies voordat je dit trainingsapparaat gebruikt. Volg ze nauwgezet! Gebruik ook je gezond verstand om risico's te vermijden! Algemene persoonlijke vereisten • Alleen lichamelijk en geestelijk fitte personen mogen het trainingsapparaat gebruiken. Personen met beperkingen mogen het apparaat alleen onder geschikt toezicht en met aangepaste hulp gebruiken.
  • Seite 139: Dit Kan Ook Interessant Voor Je Zijn

    5. DIT KAN OOK INTERESSANT VOOR JE ZIJN SPORTSTECH vloerbeschermingsmat 120 De ideale bescherming voor je training thuis. Sportstech biedt een vloerbeschermingsmat om ervoor te zor- gen dat je vloer thuis niet wordt beschadigd door je fitnessappa- ratuur. De mat is natuurlijk in verschillende maten verkrijgbaar en kan ook worden gebruikt voor yoga of andere oefeningen.
  • Seite 140: Montage

    6. MONTAGE Stap 1 D Ø13x126 2 st. C M8x15 4 st. B ID8.2 4 st. S6 2 st.
  • Seite 141 Stap 2 A M8x38 2 st. S6 1 st. Plaats het hoofdframe verticaal op het voorgevormde schuim om kras- sen op de plastic kap te voorkomen terwijl je de voorste stabilisator op het hoofdframe monteert.
  • Seite 142 Stap 3 F M8x30 2 st. E 23x23x19 2 st. G Ø13x66 1 st. S6 2 st.
  • Seite 143 Stap 4 P M8 1 st. B ID8.2 1 st. O M8x125 1 st. 1 st. 1 st. N 1 st.
  • Seite 144 Stap 5 N 1 st. S6 2 st. Verbindingskabel...
  • Seite 145 Stap 6...
  • Seite 146: Opslag

    7. OPSLAG HET ROEIAPPARAAT OPKLAPPEN Bewaar je apparaat op een droge plaats die zelden gebruikt wordt en buiten het bereik van kinderen. Zorg ervoor dat het apparaat veilig staat en niet op huisdieren of kinderen kan vallen. OPKLAPBARE RAIL...
  • Seite 148 RAIL OPKLAPPEN...
  • Seite 149: Instellingen / Batterij

    8. INSTELLINGEN / BATTERIJ INSTELLING VAN DE SPANNINGSKNOP Je kunt de spanning voor verschillende weerstandsniveaus instellen zoals hieronder aangegeven: ZWAK STERK Aan het begin van je trainingsprogramma moet je het weerstandsniveau en de snelheid kiezen die bij je behoeften passen. Vergeet niet om langzaam en gemakkelijk te beginnen en vervolgens naar het gewenste fitnessniveau te werken.
  • Seite 150 2. De batterij moet correct worden geplaatst en zorg ervoor dat de batterijveer contact maakt met de batterij. 3. Als het display onleesbaar is of als segmenten slechts gedeeltelijk verschijnen, verwijder je de batterij en wacht je 15 seconden voordat je ze opnieuw plaatst. INSTRUCTIES VOOR HET HANTEREN VAN BATTERIJEN 1.
  • Seite 151: Handleiding Voor De Console

    9. HANDLEIDING VOOR DE CONSOLE SCAN • De volgorde van het display: TIME > CAL > RPM > COUNT > DIST > PULSE. • Druk in de SCAN-modus op de MODE-knop om andere functies te selecteren. • Scan automatisch door elke modus met een sequentie van 6 seconden. TIME: tijd •...
  • Seite 152: Functies Van De Knoppen

    RPM: roeislagen per minuut Toont de huidige roeisnelheid in roeislagen per minuut. Deze waarde wordt altijd bijgewerkt. COUNT Het aantal roeislagen wordt altijd weergegeven vanaf het begin van de training. DIST (DISTANCE): afstand • Als er geen waarde is ingesteld, wordt de afstand opgeteld. •...
  • Seite 153: Lcd-Display

    11. LCD-DISPLAY Inschakelen Ingeschakeld: Op het LCD-scherm worden alle segmenten, zoals weergegeven in afbeelding A. Afbeelding A Uitschakelen Als er gedurende 4 minuten geen signaal naar de console wordt doorgegeven, gaat deze in de slaap- stand. Werking • Wanneer de console is ingeschakeld (of je drukt op MODE en houd vervolgens de RESET-knop drie seconden ingedrukt), toont het LCD-scherm gedurende een seconde alle segmenten, en schakelt vervolgens over naar de SCAN-modus, zoals weergegeven in afbeelding B.
  • Seite 154: Problemen Oplossen

    12. PROBLEMEN OPLOSSEN • Als het display afbeelding D weergeeft, betekent dit dat de batterijen moeten worden vervangen. • Controleer of de kabel goed is aangesloten als er geen signaal is tijdens het trappen. • Batterij-indicator: Afbeelding D 13. OPMERKINGEN 1.
  • Seite 155: Applicatiesoftware (App)

    Opmerkingen over het gebruik van de app: De apps die worden getoond zijn geen eigendom van SPORTSTECH. We verwerpen uitdrukkelijk alle aansprakeli- jkheid voor software van derden en zijn niet verantwoordelijk voor hun inhoud, codes of voor verlies of schade die uit het gebruik ervan voortvloeit.
  • Seite 156: Stretchoefeningen

    16. STRETCHOEFENINGEN Voor elke training moet u uw spieren minstens 5-10 minuten strekken om ze voldoende op te warmen. Herhaal de volgende stretchoefeningen vijf keer. Rekken voor de training helpt de flexibiliteit te verbeteren en vermindert het risico op letsel. MET JE HOOFD ROLLEN Draai je hoofd een seconde naar rechts, voel de stretch aan de linkerkant van je nek, draai dan je hoofd een seconde terug, strek je kin omhoog en laat je mond open.
  • Seite 157: Oefeninstructies

    17. OEFENINSTRUCTIES Roeien is een zeer effectieve vorm van lichaamsbeweging en biedt verschillende voordelen: 1. Het verbetert de algemene conditie en versterkt het hart en de bloedsomloop. 2. Het versterkt en vormt desgewenst alle belangrijke spiergroepen: rug, taille, armen, schouders, heupen en benen.
  • Seite 158 ROEISTIJLEN Normale roeistijl 1. Neem plaats en maak je voeten met de riemen aan de pedalen vast. Neem de greepstang. 2. Neem de startpositie aan en leun voorover met gestrekte armen en gebogen knieën (afb. 1). 3. Duw jezelf naar achteren en strek tegelijk je rug en benen (afb. 2). 4.
  • Seite 159: Verwijdering

    Informatie kan worden verkregen uit de retournerings- en ophaalsystemen van je gemeente. 19. CONFORMITEIT Hierbij verklaart Sportstech Brands Holding dat het type radioapparatuur voldoet aan de richtlijn 2014/53/EU. De volledige tekst van de EU-conformiteitsverklaring is beschikbaar op het volgende internetadres: https://service.innovamaxx.de/rsx400_conformity...
  • Seite 160 Verkauf durch / Distributed by / Distribuido por / Distribué / Distribuito da / Verkoop via Sportstech Brands Holding GmbH Potsdamer Platz 11 10785 Berlin +49 30 220 663 569 http://www.sportstech.de...

Inhaltsverzeichnis