R&G LP0288 Montageanleitung
Inhaltsverzeichnis
Quicklinks
Page 1 of 19
LP0288
FITTING INSTRUCTIONS FOR LP0288
LICENCE PLATE BRACKET
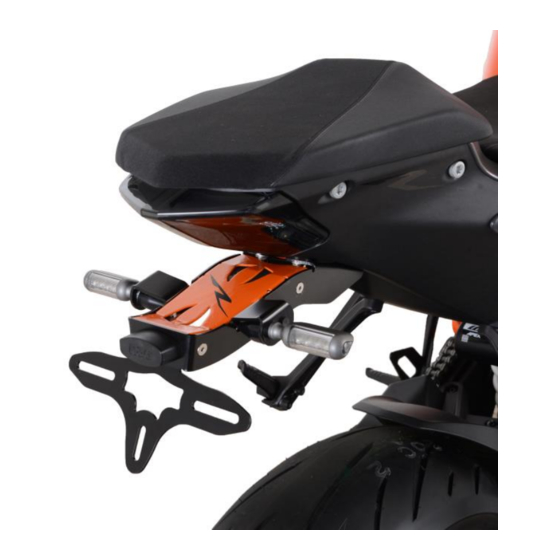
KTM 1290 SUPER DUKE R 2020-
T
.
HIS KIT CONTAINS THE ITEMS PICTURED AND LABELLED OVER PAGE
S
.
OME PARTS MAY BE SHOWN FOR CLARITY OF INSTRUCTIONS ONLY
D
.
O NOT PROCEED UNTIL YOU ARE SURE ALL PARTS ARE PRESENT
P
.
LEASE READ ALL INSTRUCTIONS BEFORE PROCEEDING
IF IN ANY DOUBT WHEN FITTING OUR PRODUCTS, CONSULT ONE OF OUR DEALERS
OR HAVE FITTED BY A QUALIFIED TECHNICIAN.
P
LEASE NOTE THAT THE WAY THE KIT IS PACKED DOES NOT NECESSARILY REPRESENT THE WAY OF
.
MOUNTING TO THE BIKE
I
,
N THE EVENT OF RUBBER WASHERS BEING USED TO HOLD COMPONENTS ONTO BOLTS
.
THESE RUBBER WASHERS CAN BE THROWN AWAY
DIGITAL COPIES OF THESE INSTRUCTIONS ARE AVAILABLE FROM:
WWW.RG-RACING.COM
R&G Racing
Unit 1, Shelley's Lane, East Worldham, Alton, Hampshire, GU34 3AQ
Tel: +44 (0)1420 89007 Fax: +44 (0)1420 87301
www.rg-racing.com
Email:
info@rg-racing.com
Inhaltsverzeichnis

Verwandte Anleitungen für R&G LP0288


Inhaltszusammenfassung für R&G LP0288
- Seite 1 Page 1 of 19 LP0288 FITTING INSTRUCTIONS FOR LP0288 LICENCE PLATE BRACKET KTM 1290 SUPER DUKE R 2020- HIS KIT CONTAINS THE ITEMS PICTURED AND LABELLED OVER PAGE OME PARTS MAY BE SHOWN FOR CLARITY OF INSTRUCTIONS ONLY O NOT PROCEED UNTIL YOU ARE SURE ALL PARTS ARE PRESENT...
- Seite 2 Page 2 of 19 LP0288 TOOLS REQUIRED GENERAL TORQUE SETTINGS • T30 TORX TOOL M4 BOLT = 8Nm • 6, 8, 12 & 13mm A/F SPANNERS M5 BOLT = M6 BOLT = • 3 & 4mm A/F ALLEN TOOL M8 BOLT = 20Nm •...
- Seite 3 Page 3 of 19 LP0288 MAIN ASSEMBLY EXPLODED VIEW R&G Racing Unit 1, Shelley’s Lane, East Worldham, Alton, Hampshire, GU34 3AQ Tel: +44 (0)1420 89007 Fax: +44 (0)1420 87301 www.rg-racing.com Email: info@rg-racing.com...
-
Seite 4: Additional Components
Page 4 of 19 LP0288 MOUNTING EXPLODED VIEW ADDITIONAL COMPONENTS R&G Racing Unit 1, Shelley’s Lane, East Worldham, Alton, Hampshire, GU34 3AQ Tel: +44 (0)1420 89007 Fax: +44 (0)1420 87301 www.rg-racing.com Email: info@rg-racing.com... - Seite 5 Page 5 of 19 LP0288 FITTING PICTURES Picture 1 Picture 2 Picture 3 Picture 4 Picture 5 Picture 6 R&G Racing Unit 1, Shelley’s Lane, East Worldham, Alton, Hampshire, GU34 3AQ Tel: +44 (0)1420 89007 Fax: +44 (0)1420 87301 www.rg-racing.com Email: info@rg-racing.com...
- Seite 6 Page 6 of 19 LP0288 Picture 7 Picture 8 Picture 9 Picture 10 Picture 11 Picture 12 R&G Racing Unit 1, Shelley’s Lane, East Worldham, Alton, Hampshire, GU34 3AQ Tel: +44 (0)1420 89007 Fax: +44 (0)1420 87301 www.rg-racing.com Email: info@rg-racing.com...
-
Seite 7: Fitting Instructions
Page 7 of 19 LP0288 Picture 13 Picture 14 Picture 15 Picture 16 FITTING INSTRUCTIONS • Begin by removing the passenger seat using the key, as shown in picture 1. • Using a T30 Torx tool, remove the bolt shown in picture 2, then remove the wiring cover plate. - Seite 8 Page 8 of 19 LP0288 • Secure the R&G tail light (item 3) to the assembly using a 6mm spanner, then neatly wrap the wires with a length of heatshrink (item 13), as shown in picture 10. • If fitting R&G mini indicators (R&G mini indicator product code RG371 for LED type, or RG372 for Aero Style LED type), secure to the R&G tail bracket using a 13mm spanner, then use the...
- Seite 9 Page 9 of 19 LP0288 NOTICE DE MONTAGE POUR LP0288 SUPPORT DE PLAQUE KTM 1290 SUPER DUKE R 2020- E KIT CONTIENT LES ARTICLES ILLUSTRES ET ETIQUETES SUR LA PAGE ERTAINES PARTIES PEUVENT ETRE PRESENTES UNIQUEMENT POUR LA CLARTE DES INSTRUCTIONS...
- Seite 10 Page 10 of 19 LP0288 OUTILS REQUIS VALEURS DE SERRAGE RECOMMANDÉES • CLÉ TORX T30 M4 BOULON = 8Nm • CLÉS À MOLETTE 6, 8, 12 & 13mm M5 BOULON = M6 BOULON = • CLÉ ALLEN 3 & 4mm M8 BOULON = 20Nm •...
- Seite 11 Page 11 of 19 LP0288 SCHÉMA D’ASSEMBLAGE PRINCIPAL R&G Racing Unit 1, Shelley’s Lane, East Worldham, Alton, Hampshire, GU34 3AQ Tel: +44 (0)1420 89007 Fax: +44 (0)1420 87301 www.rg-racing.com Email: info@rg-racing.com...
-
Seite 12: Schéma De Montage
Page 12 of 19 LP0288 SCHÉMA DE MONTAGE COMPOSANTS ADDITIONNELS R&G Racing Unit 1, Shelley’s Lane, East Worldham, Alton, Hampshire, GU34 3AQ Tel: +44 (0)1420 89007 Fax: +44 (0)1420 87301 www.rg-racing.com Email: info@rg-racing.com... -
Seite 13: Notice De Montage
Page 13 of 19 LP0288 NOTICE DE MONTAGE • Commencez par retirer le siège passager à l'aide de la clé, comme illustré sur la photo 1 • À l'aide d’une clé Torx T30, retirez le boulon illustré sur la photo 2, puis retirez la plaque de couverture du câblage. - Seite 14 Page 14 of 19 LP0288 la photo 13. Passez les boulons à travers les trous de montage, puis faites glisser une rondelle supplémentaire sur les extrémités exposées de sorte qu'elles reposent dans les trous de montage. Enfin, enroulez un écrou M6 Nyloc (article 9) sur chaque boulon, puis serrez à fond à l'aide d'un outil Allen de 4 mm, tout en maintenant les écrous avec une douille de 10 mm, comme indiqué...
- Seite 15 Page 15 of 19 LP0288 MONTAGEANLEITUNG FÜR LP0288 KENNZEICHENHALTER KTM 1290 SUPER DUKE R 2020- EILE SIND UNTEN ABGEBILDET UND GEKENNZEICHNET IE ABGEBILDETEN EILE DIENEN LEDIGLICH ZUR RKLÄRUNG Ü BERPRÜFEN IE ZUERST DASS ALLE EILE VORHANDEN SIND ESEN IE DIE...
- Seite 16 Page 16 of 19 LP0288 SIE BENÖTIGEN FOLGENDES WERKZEUG: ALLGEM. ANZUGSDREHMOMENT: • T30 TORX-SCHLÜSSEL M4 SCHRAUBE = 8Nm • 6, 8, 12 & 13mm SCHRAUBENSCHLÜSSEL M5 SCHRAUBE = M6 SCHRAUBE = • 3 & 4mm A/F INBUSSCHLÜSSEL M8 SCHRAUBE = 20Nm •...
-
Seite 17: Hauptzusammenbau - Explosionszeichnung
Page 17 of 19 LP0288 HAUPTZUSAMMENBAU - EXPLOSIONSZEICHNUNG R&G Racing Unit 1, Shelley’s Lane, East Worldham, Alton, Hampshire, GU34 3AQ Tel: +44 (0)1420 89007 Fax: +44 (0)1420 87301 www.rg-racing.com Email: info@rg-racing.com... -
Seite 18: Montage - Explosionszeichnung
Page 18 of 19 LP0288 MONTAGE - EXPLOSIONSZEICHNUNG ZUSATZKOMPONENTE MONTAGEANLEITUNG • Fangen Sie an, indem Sie den Beifahrersitz mit dem Schlüssel entriegeln und entfernen wie in Abbildung 1 abgebildet. • Benutzen Sie einen T30 Torx-Schlüssel, um die Schraube zu entfernen, die in Abbildung 2 abgebildet ist, dann entfernen Sie die Abdeckplatte für die Kabel. - Seite 19 Page 19 of 19 LP0288 • Stützen Sie den Kennzeichenhalter während Sie die übrigen 3 x T30 Schrauben entfernen, dann ziehen Sie den Kennzeichenhalter weg vom Motorrad. • Entfernen Sie die zwei T30 Schrauben, die den Kennzeichenhalter zusammenklemmen wie in Abbildung 4 abgebildet, dann teilen wie in Abbildung 5 abgebildet.