Herunterladen Inhalt Inhalt Diese Seite drucken
Klarstein Steakreaktor Core Handbuch

Klarstein Steakreaktor Core Handbuch

Hochtemperaturgrill

Werbung

Verfügbare Sprachen
  • DE

Verfügbare Sprachen

  • DEUTSCH, seite 1
Steakreaktor Core
Hochtemperaturgrill
High-Temperature Grill
Parrilla de alta temperatura
Gril haute température
Griglia ad alta temperatura
10035085

Werbung

Inhaltsverzeichnis
loading

Inhaltszusammenfassung für Klarstein Steakreaktor Core

  • Seite 1 Steakreaktor Core Hochtemperaturgrill High-Temperature Grill Parrilla de alta temperatura Gril haute température Griglia ad alta temperatura 10035085...
  • Seite 3: Inhaltsverzeichnis

    Sehr geehrter Kunde, wir gratulieren Ihnen zum Erwerb Ihres Gerätes. Lesen Sie die folgenden Hinweise sorgfältig durch und befolgen Sie diese, um möglichen Schäden vorzubeugen. Für Schäden, die durch Missachtung der Hinweise und unsachgemäßen Gebrauch entstehen, übernehmen wir keine Haftung. Scannen Sie den folgenden QR-Code, um Zugriff auf die aktuellste Bedienungsanleitung und weitere Informationen rund um das Produkt zu erhalten.
  • Seite 4: Sicherheitshinweise

    SICHERHEITSHINWEISE Diese Bedienungsanleitung enthält wichtige Hinweise zum sicheren Gebrauch des Grills sowie Hinweise und Informationen zur täglichen Verwendung und zur Entsorgung. Lesen Sie die Bedienungsanleitung vor Inbetriebnahme des Gerätes. Machen Sie sich vor der Benutzung des Grills intensiv mit dieser Bedienungsanleitung vertraut und benutzen Sie ihn nur in den beschriebenen Einsatzbereichen und für die beschriebenen Zwecke.
  • Seite 5 • Zugängliche Teile können sehr heiß sein. Halten Sie Kinder vom Grill fern. • Der Grill darf während des Betriebes nicht bewegt werden. • Es dürfen keine Veränderungen am Grill vorgenommen werden! • Betreiben Sie den Grill nicht, wenn er sichtbare Schäden aufweist. •...
  • Seite 6 Besondere Sicherheitshinweise (Verbrennungs- und Brandgefahr!) • Sollte es während des Betriebes zu einem unerwarteten Stromausfall kommen, entnehmen Sie das Grillgut. Bedingt dadurch, dass die Lüfter (4) nicht arbeiten, kann sich das Grillgehäuse stark aufheizen. Es besteht Verbrennungsgefahr! • Dieses Gerät muss während des Betriebs von brennbaren Materialien ferngehalten werden.
  • Seite 7: Lieferumfang

    Vor der ersten Nutzung • Stellen Sie Ihren Steakreaktor an einem gut belüfteten Ort auf und schalten Sie ihn für ca. 10 Minuten ein. Während dieser Zeit kann es zu einer Geruchsentwicklung kommen, hervorgerufen durch spezielle Pflegeöle. • Nach dieser ersten Inbetriebnahme und anschließender Grundreinigung ist Ihr Steakreaktor einsatzbereit.
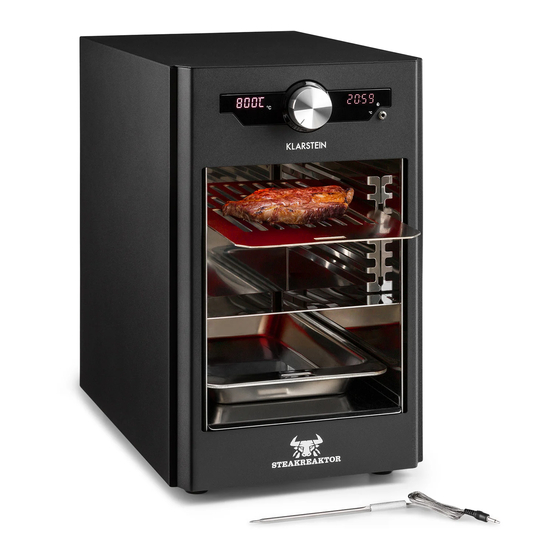
  • Seite 8: Geräteübersicht

    GERÄTEÜBERSICHT Display (Temperatur) Netzkabel Einstellregler Griff Display (Zeit) 10 Fettauffangschale Lüfter (auf der Geräterückseite) 11 Grillrost Kabelaufwicklung (auf der Geräterückseite) 12 Garraum Heizelement 13 Grillrosthalter Hauptschalter (auf der Geräterückseite) 14 Reflexionsblech...
  • Seite 9: Vor Der Inbetriebnahme

    VOR DER INBETRIEBNAHME Grill aufstellen 1. Platzieren Sie den Grill auf einem ebenen, hitzebeständigen Untergrund, idealerweise an der Vorderkante der Arbeitsplatte bzw. der Stellfläche. 2. Halten Sie rund um den Grill einen Mindestabstand von 15 cm (nach oben 50 cm) zu Wänden und Gegenständen. 3.
  • Seite 10 a) Entnehmen: 1. Nutzen Sie zum Entnehmen des Grillrostes (1 1) den beiliegenden Griff (9). Führen Sie diesen von oben in die vorgesehene Griffaufnahme ein. 2. Ziehen Sie den Grillrost (1 1) nun vorsichtig nach vorne aus dem Grillrosthalter (13) heraus.
  • Seite 11: Inbetriebnahme Und Bedienung

    INBETRIEBNAHME UND BEDIENUNG GEFAHR Explosions-, Brand- und Verletzungsgefahr! Machen Sie sich vor jeder Inbetriebnahme mit allen Sicherheitshinweisen vertraut, die im Kapitel „Sicherheitshinweise“ aufgeführt sind. Vorbereitung WARNUNG Verbrennungsgefahr! Der Grill und die Oberflächen des Grills werden während des Betriebes sehr heiß. •...
  • Seite 12 Nun haben Sie folgende zwei Möglichkeiten: A) Grillen mit voreingestellten Temperatur- und Zeitwerten 1. Drücken Sie den Einstellregler (2), um den Grillvorgang mit den voreingestellten Werten zu starten. Es ertönt ein Signalton. 2. Der Grill heizt nun auf und im Display (1, 3) werden Temperatur und Restlaufzeit angezeigt.
  • Seite 13: Zubereitungstipps

    Grillen Hinweis: Mariniertes oder stark fetthaltiges Fleisch sollte nicht in den oberen Einschubebenen gegrillt werden. Es kann zu starker Rauchentwicklung kommen. HINWEIS: Die Heizung kann jederzeit durch längeres Drücken des Einstellreglers (2) ausgeschaltet werden. WARNUNG Verbrennungsgefahr! Der Griff (9) darf während des Betriebes niemals im Grillrost (1 1) verbleiben.
  • Seite 14 • Rindersteaks sollten grundsätzlich (sofern es die Stärke des Fleisches zulässt) auf einer der oberen Einschubebenen und mit maximaler Temperatur gegrillt werden. So erzielt man in kürzester Zeit die sogenannte „Maillard-Reaktion“. Dabei reagieren die im Fleisch enthaltenen Aminosäuren mit Kohlenhydraten und Eiweißbestandteilen.
  • Seite 15 • Gleichzeitig erscheint im Display (3) die Anzeige „OFF“, die darauf hinweist, dass der Heizvorgang ausgeschaltet ist. • Die Lüfter (4) stoppen, wenn die Temperatur ca. 100 °C unterschreitet. Nach einiger Zeit erlöschen die Displays (1, 3) und der Grill befindet sich im Standby- Modus.
  • Seite 16: Reinigung Und Wartung

    REINIGUNG UND WARTUNG Wartung • Befreien Sie die Lüftergitter auf der Rückseite des Grills in regelmäßigen Abständen von Staub, z. B. mit einem Pinsel oder Staubsauger. Ansonsten beinhaltet der Grill keine zu wartenden Teile. Reinigung GEFAHR Verbrennungsgefahr! Der Grill wird während des Betriebes sehr heiß. Lassen Sie den Grill vor der Reinigung vollständig abkühlen.
  • Seite 17: Fehlersuche Und Fehlerbehebung

    • Benutzen Sie zur Lösung von Verkrustungen einen handelsüblichen Topfschwamm. Verwenden Sie keine Schwämme mit Metall- oder Nylonborsten. • Zur Reinigung des Innenbereiches, insbesondere bei eingebrannten Verkrustungen, empfiehlt sich auch ein handelsüblicher Backofenreiniger. Lagerung bei Nichtbenutzung • Reinigen Sie den Grill, wie im vorhergehenden Abschnitt „Reinigung“ beschrieben. •...
  • Seite 18: Hinweise Zur Entsorgung

    Problem Mögliche Ursache Lösungsansatz Der Grill hat zu wenig Temperatur ist zu niedrig Wählen Sie eine höhere Leistung. gewählt. Temperatur. Die gewählte Platzieren Sie den Grillrost Einschubebene für den (1 1) in einer höher Grillrost (1 1) ist zu niedrig. liegenden Einschubebene.
  • Seite 19 Dear Customer, Congratulations on purchasing this device. Please read the following instructions carefully and follow them to prevent possible damages. We assume no liability for damage caused by disregard of the instructions and improper use. Scan the QR code to get access to the latest user manual and more product information.
  • Seite 20: Safety Instructions

    SAFETY INSTRUCTIONS This instruction manual contains important information on the safe use of the grill as well as tips and information on daily use and disposal. Read the instruction manual before using the appliance. Familiarise yourself intensively with this instruction manual before using the grill and use it only in the described areas of application and for the purposes described.
  • Seite 21 • No changes may be made to the grill! • Do not operate the grill if it shows visible damage. • If you discover any damage, never attempt to repair the grill yourself, but contact the manufacturer or costumer service to avoid any hazards. •...
  • Seite 22: Scope Of Delivery

    • Fats and oils can ignite if not used as intended. Never extinguish with water. The result could be an explosive deflagration, which can cause life-threatening burns. To extinguish a grease fire, first pull the mains plug. Then extinguish with a suitable extinguishing agent, e.g.
  • Seite 23: Device Overview

    DEVICE OVERVIEW Display (temperature) Power cord Adjustment controller Handle Display (time) 10 Grease drip tray Fan (on the back of the appliance) 11 Grill rack Cable rewind (on the back of the appliance) 12 Grilling chamber Heating element 13 Grill rack holder Main switch (on the back of the appliance) 14 Reflector plate...
  • Seite 24: Before Commissioning

    BEFORE COMMISSIONING Set up the grill 1. Place the grill on a flat, heat-resistant surface, ideally at the front edge of the worktop or the base. 2. Keep a minimum distance of 15 cm around the grill (50 cm at the top) from walls and objects.
  • Seite 25 a) Remove: 1. Use the handle provided (9) to remove the grill rack (1 1). Insert it from above into the handle holder provided. 2. Now carefully pull the grill rack (1 1) forward out of the grill rack holder (13). 3.
  • Seite 26: Commissioning And Operation

    COMMISSIONING AND OPERATION DANGER Familiarize yourself with all safety instructions listed in the chapter “Safety instructions” before each commissioning. Preparation WARNING Risk of burns! The grill and the surfaces of the grill become very hot during operation. • Wear heat-resistant gloves during barbecuing in accordance with the PPE regulation (category II regarding heat protection, DIN-EN 407).
  • Seite 27 Now you have the following two options: A) Grilling with preset temperature and time values 1. Press the controller (2) to start the grilling process with the preset values. A signal tone sounds. 2. The grill now heats up and the display (1, 3) shows the temperature and remaining time.
  • Seite 28 Grilling Note: Marinated or high fat meat should not be grilled in the upper shelves. Strong smoke may be produced. NOTE: The heating can be switched off at any time by pressing and holding the controller (2). WARNING Risk of burns! The handle (9) must never remain in the grill rack (1 1) during operation.
  • Seite 29 Preparation tips: • Steak meat should be removed from the refrigerator before preparation and should have reached room temperature. • Beef steaks should always (if the thickness of the meat allows it) be grilled on one of the upper shelves and at maximum temperature. In this way the so-called “Maillard reaction“...
  • Seite 30 • At the same time the display (3) shows “OFF”, indicating that the heating process is switched off. • The fans (4) stop when the temperature falls below approx. 100 °C. After some time the displays (1, 3) go out and the grill is in standby mode. This is indicated by an illuminated dot in the left display (1).
  • Seite 31: Cleaning And Maintenance

    CLEANING AND MAINTENANCE Maintenance • Remove dust from the fan grilles on the back of the grill at regular intervals, for example with a brush or vacuum cleaner. Otherwise, the grill does not contain any parts that require maintenance. Cleaning DANGER Risk of burns! The grill becomes very hot during operation.
  • Seite 32: Troubleshooting

    Storage when not in use • Clean the grill as described in the previous section “Cleaning”. • Wind the power cord (8) onto the cable rewind (5) at the back of the grill. • Only store the grill in a dry and clean place, away from direct sunlight and out of the reach of children.
  • Seite 33: Hints On Disposal

    HINTS ON DISPOSAL According to the European waste regulation 2012/19/EU this symbol on the product or on its packaging indicates that this product may not be treated as household waste. Instead it should be taken to the appropriate collection point for the recycling of electrical and electronic equipment.
  • Seite 35: Fiche Technique

    Chère cliente, cher client, Toutes nos félicitations pour l’acquisition de ce nouvel appareil. Veuillez lire attentivement et respecter les instructions de ce mode d’emploi afin d’éviter d’éventuels dommages. Nous ne saurions être tenus pour responsables des dommages dus au non-respect des consignes et à...
  • Seite 36: Consignes De Sécurité

    CONSIGNES DE SÉCURITÉ Ce mode d‘emploi contient des informations importantes sur l‘utilisation sûre du barbecue ainsi que des informations et des remarques sur l‘utilisation au quotidien et le recyclage. Lisez le mode d‘emploi avant de mettre l‘appareil en service. Avant d‘utiliser le barbecue, familiarisez-vous beaucoup avec ce mode d‘emploi et utilisez-le dans les domaines d‘application et aux fins décrites uniquement.
  • Seite 37 • Les parties accessibles peuvent être très chaudes. Éloignez les enfants du barbecue. • Le barbecue ne doit pas être déplacé pendant le fonctionnement. • Aucune modification ne peut être apportée au barbecue ! • N‘utilisez pas le barbecue s‘il présente des dommages visibles. •...
  • Seite 38 Consignes de sécurité particulières (risques de brûlure et d‘incendie !) • En cas de panne de courant inattendue pendant le fonctionnement, retirez les aliments à griller. Comme les ventilateurs (4) ne fonctionnent pas, le boîtier du barbecue peut chauffer considérablement. Il y a un risque de brûlures ! •...
  • Seite 39: Contenu De L'emballage

    Avant la première utilisation • Placez votre Steakreaktor dans un endroit bien ventilé et allumez-le pendant environ 10 minutes. A ce moment, il peut y avoir une odeur causée par des huiles spéciales de protection. • Après ce démarrage initial et le nettoyage de base ultérieur, votre Steakreaktor est prêt à...
  • Seite 40: Aperçu De L'appareil

    APERÇU DE L‘APPAREIL Ecran (Température) Câble secteur Commande de réglage Poignée Ecran (durée) 10 Bac récupérateur de graisse Ventilateur (au dos de l‘appareil) 11 Grille de cuisson Enroulement du câble (au dos de l‘appareil) 12 Espace de cuisson Elément chauffant 13 Support de grille de cuisson Interrupteur principal (au dos de l‘appareil)
  • Seite 41: Avant La Mise En Marche

    AVANT LA MISE EN MARCHE Installer le barbecue 1. Placez le barbecue sur une surface plane et résistante à la chaleur, idéalement sur le bord avant du plan de travail ou de l‘étagère. 2. Gardez une distance minimale de 15 cm (vers le haut 50 cm) des murs et des objets autour du barbecue.
  • Seite 42 a) Retrait: 1. Utilisez la poignée fournie (9) pour retirer la grille de cuisson (1 1). Insérez-la par le haut dans le support de poignée fourni. 2. Tirez maintenant avec précaution la grille (1 1) vers l‘avant hors de son support (13). 3.
  • Seite 43: Mise En Marche Et Utilisation

    MISE EN MARCHE ET UTILISATION DANGER Risque d‘explosion, d‘incendie et de blessure ! Avant la première mise en service, familiarisez-vous avec toutes les consignes de sécurité répertoriées dans le chapitre „Consignes de sécurité“. Préparation MIS EN GARDE Risque de brûlures ! Le barbecue et ses surfaces deviennent très chaudes pendant le fonctionnement.
  • Seite 44 Vous avez maintenant les deux possibilités suivantes : A) Cuire des grillades avec des valeurs de température et de temps prédéfinies 1. Appuyez sur la commande (2) pour démarrer le processus de cuisson avec les valeurs prédéfinies. Un signal sonore retentit. 2.
  • Seite 45 Pour faire des grillades Remarque : La viande marinée ou riche en matières grasses ne doit pas être grillée sur les niveaux supérieurs. Cela peut provoquer beaucoup de fumée. REMARQUE : Vous pouvez à tout moment arrêter le chauffage en maintenant le bouton de commande (2).
  • Seite 46 • Les steaks de bœuf doivent toujours être grillés (si la force de la viande le permet) sur l‘un des niveaux supérieurs et à température maximale. De cette façon, ladite „réaction de Maillard“ peut être réalisée dans les plus brefs délais. Les acides aminés contenus dans la viande réagissent avec les glucides et les composants protéiques.
  • Seite 47 • En même temps, l‘écran (3) indique „OFF“, ce qui indique que le processus de chauffage est arrêté. • Les ventilateurs (4) s‘arrêtent lorsque la température descend en dessous d‘environ 100 °C. Après un certain temps, les écrans (1, 3) s‘éteignent et le barbecue est en mode veille.
  • Seite 48: Nettoyage Et Maintenance

    NETTOYAGE ET MAINTENANCE Maintenance • Nettoyez périodiquement les grilles de ventilation à l‘arrière du barbecue pour éliminer la poussière, par ex. avec une brosse ou un aspirateur. A part cela, le barbecue ne contient aucune pièce réparable par l‘utilisateur. Nettoyage DANGER Risque de brûlure ! Le barbecue devient très chaud pendant le fonctionnement.
  • Seite 49: Identification Et Résolution Des Problèmes

    • Les nettoyants pour four du commerce sont également recommandés pour nettoyer l‘intérieur, surtout en cas de croûtes brûlées. Stockage en cas de non-utilisation • Nettoyez le barbecue comme décrit dans la section précédente „Nettoyage“. • Enroulez le cordon d‘alimentation (8) sur l‘enrouleur de cordon (5) à l‘arrière du barbecue.
  • Seite 50: Informations Sur Le Recyclage

    Problème Cause possible Solution Le barbecue a trop peu de La température choisie est Choisissez une puissance. trop basse. température plus élevée. Le niveau sélectionné pour Placez la grille de cuisson la grille de cuisson (1 1) est (1 1) plus haut. trop bas.
  • Seite 51 Estimado cliente: le felicitamos por la compra de este producto. Por favor, lea las siguientes instrucciones con atención y sígalas para evitar posibles daños. No aceptamos ninguna responsabilidad por los daños causados por el incumplimiento de las instrucciones y un uso indebido.
  • Seite 52: Instrucciones De Seguridad

    INSTRUCCIONES DE SEGURIDAD Este manual de instrucciones contiene información importante sobre el uso seguro de la parrilla, así como consejos e información sobre el uso diario y la eliminación de residuos. Lea el manual de instrucciones antes de utilizar el aparato. Familiarícese con estas instrucciones de uso antes de utilizar la parrilla y utilícelas sólo como se describe y para los propósitos descritos.
  • Seite 53 • Las partes accesibles pueden calentarse mucho. Mantenga a los niños alejados de la parrilla. • La parrilla no debe moverse durante la operación. • ¡No se pueden hacer cambios en la parrilla! • No opere la parrilla si muestra daños visibles. •...
  • Seite 54 Instrucciones especiales de seguridad (¡peligro de quemaduras y fuego!) • Si se produce un fallo inesperado en la alimentación durante el funcionamiento, retire la comida que se va a asar. Al no funcionar los ventiladores (4), la carcasa de la parrilla se puede calentar considerablemente. ¡Hay peligro de quemaduras! •...
  • Seite 55: Contenido De La Entrega

    Antes del primer uso • Ponga su parrilla de carne en un lugar bien ventilado y enciéndalo durante unos 10 minutos. Durante este tiempo, se puede desarrollar un olor, causado por los aceites especiales de mantenimiento. • Después de esta puesta en marcha inicial y la subsiguiente limpieza básica, su parrilla de filetes está...
  • Seite 56: Descripción Del Aparato

    DESCRIPCIÓN DEL APARATO Pantalla (temperatura) Cable delimentación Controladores de ajuste Mango Pantalla (tiempo) 10 Bandeja de goteo de grasa Ventiladores (parte posterior del dispositivo) 11 Parrilla Rebobinado del cable (en la parte posterior 12 Cámara de cocción del dispositivo) Elemento calefactor 13 Soporte para parrilla Interruptor principal (parte posterior del...
  • Seite 57: Antes De La Puesta En Marcha

    ANTES DE LA PUESTA EN MARCHA Preparar la parrilla 1. Coloque la parrilla sobre una superficie plana y resistente al calor, idealmente en el borde frontal de la encimera o en la base. 2. Mantenga una distancia mínima de 15 cm alrededor de la parrilla (50 cm hacia arriba) de las paredes y objetos.
  • Seite 58 a) Retirar: 1. Usar el mango adjunto (9) para quitar la parrilla (1 1). Introdúzcalo desde arriba en el soporte de la manija que se proporciona. 2. Ahora tire con cuidado de la rejilla (1 1) hacia adelante del soporte (13). 3.
  • Seite 59: Puesta En Marcha Y Funcionamiento

    PUESTA EN MARCHA Y FUNCIONAMIENTO PELIGRO ¡Peligro de explosión, fuego y lesiones! Familiarícese con todas las instrucciones de seguridad enumeradas en el capítulo „Instrucciones de seguridad“ antes de cada puesta en marcha. Preparación ADVERTENCIA ¡Peligro de quemaduras! La parrilla y las superficies de la misma se calientan mucho durante el funcionamiento.
  • Seite 60 Ahora tiene las siguientes dos opciones: A) Asar a la parrilla con valores de temperatura y tiempo preestablecidos 1. Presione el control de ajuste (2) para iniciar el proceso de asado con los valores preestablecidos. Suena una señal acústica. 2. La parrilla se calienta ahora y la pantalla (1, 3) muestra la temperatura y el tiempo restante.
  • Seite 61 Barbacoa Nota: La carne marinada o con mucha grasa no debe ser asada en los estantes superiores. Se puede producir un humo fuerte. NOTA: El calentamiento se puede apagar en cualquier momento manteniendo pulsado el control de ajuste (2). ADVERTENCIA ¡Peligro de quemaduras! El mango (9) nunca debe permanecer en la rejilla de la parrilla (1 1) durante el funcionamiento.
  • Seite 62 • Los filetes de carne se deben poner (si el grosor de la carne lo permite) en uno de los estantes superiores y asarlos a la temperatura máxima. De esta manera, la llamada „reacción de Maillard“ se logra en el menor tiempo posible. Los aminoácidos contenidos en la carne reaccionan con los carbohidratos y los componentes proteínicos.
  • Seite 63 • Al mismo tiempo, la pantalla (3) muestra „OFF“, lo que indica que el proceso de calentamiento está apagado. • Los ventiladores (4) se detienen cuando la temperatura desciende por debajo de aprox. 100 °C. Después de un tiempo las pantallas (1, 3) se apagan y la parrilla está...
  • Seite 64: Limpieza Y Mantenimiento

    LIMPIEZA Y MANTENIMIENTO Mantenimiento • Eliminar el polvo de las rejillas del ventilador en la parte posterior de la parrilla a intervalos regulares, por ejemplo con un cepillo o una aspiradora. Por lo demás, la parrilla no contiene ninguna pieza que requiera mantenimiento. Limpieza PELIGRO ¡Peligro de quemaduras! La parrilla se calienta mucho durante la...
  • Seite 65: Solución De Problemas Y Corrección De Errores

    cerdas de metal o de nylon. • También se recomienda utilizar un limpiador de hornos de venta al público para limpiar el interior, especialmente en el caso de incrustaciones quemadas. Almacenamiento cuando no se utiliza • Limpie la parrilla como se describe en la sección anterior „Limpieza“. •...
  • Seite 66: Instrucciones Para La Eliminación

    Problema Posible causa Solución La parrilla tiene muy poca La temperatura Seleccione una potencia seleccionada es temperatura más alta. demasiado baja El nivel seleccionado para Coloque la rejilla(1 1) en la rejilla de la parrilla (1 1) un nivel más alto de la es demasiado bajo.
  • Seite 67: Ca. 26 X 42 X 48 Cm

    Gentile cliente, La ringraziamo per aver acquistato il dispositivo. La preghiamo di leggere attentamente le seguenti istruzioni per l’uso e di seguirle per evitare possibili danni tecnici. Non ci assumiamo alcuna responsabilità per danni scaturiti da una mancata osservazione delle avvertenze di sicurezza e da un uso improprio del dispositivo.
  • Seite 68: Avvertenze Di Sicurezza

    AVVERTENZE DI SICUREZZA Il manuale di istruzioni contiene tutte le avvertenze importanti per un utilizzo sicuro della griglia nonché avvertenze e informazioni per l’uso giornaliero e lo smaltimento. Prima di mettere in funzione il dispositivo leggere molto attentamente tutte le avvertenze e utilizzarlo solo secondo gli scopi previsti e nei campi d’impiego descritti.
  • Seite 69 • Le parti accessibili possono diventare bollenti. Tenere lontano i bambini. • Non spostare la griglia durante l’utilizzo. • Non è possibile eseguire modifiche alla griglia! • Non usare la griglia se è danneggiata. • Se si dovessero notare dei danni, non riparare la griglia autonomamente, ma rivolgersi al produttore o al servizio d’assistenza per evitare pericoli.
  • Seite 70 Avvertenze di sicurezza particolari (pericolo di ustioni e incendio!) • Se durante il funzionamento dovesse verificarsi un’interruzione di corrente, rimuovere gli alimenti. Dato che le 4 ventole non possono funzionare, la scocca della griglia può diventare bollente e causare ustioni! •...
  • Seite 71: Volume Di Consegna

    Prima del primo utilizzo • Collocare lo Steakreaktor in un luogo ben aerato e tenerlo acceso per circa 10 minuti. Durante questo lasso di tempo si possono formare degli odori causati da speciali oli trattanti. • Dopo la prima messa in funzione e successiva pulizia totale, lo Steakreaktor è pronto per essere usato.
  • Seite 72: Descrizione Del Prodotto

    DESCRIZIONE DEL PRODOTTO Display (temperatura) Cavo d’alimentazione Manopola di regolazione Impugnatura Display (ora) 10 Vaschetta raccogligrasso Ventola (sul retro del dispositivo) 11 Graticola Avvolgicavo (sul retro del dispositivo) 12 Vano cottura Elemento calefactor 13 Supporto per graticola Interruttore (sul retro del dispositivo) 14 Teglia...
  • Seite 73: Prima Della Messa In Funzione

    PRIMA DELLA MESSA IN FUNZIONE Collocare la griglia 1. Collocare la griglia su una superficie piana e resistente al calore. L’ideale sarebbe sul bordo anteriore del piano di lavoro o della superficie. 2. Il dispositivo deve essere a una distanza minima di 15 cm (sulla parte superiore deve essere di 50 cm) dalle pareti e dagli oggetti.
  • Seite 74 a) Disinserimento: 1. Per togliere la graticola (1 1) utilizzare l’impugnatura (9) inclusa, inserendola dall’alto nel supporto per impugnatura. 2. Ora estrarre gentilmente la graticola (1 1) in avanti tirando dal supporto per graticola (13). 3. La graticola (1 1) è bollente. Sistemarla su una superficie termoresistente. b) Inserimento: 1.
  • Seite 75: Messa In Funzione E Utilizzo

    MESSA IN FUNZIONE E UTILIZZO PERICOLO Pericolo di esplosione, ustioni e lesioni! Prima della messa in funzione leggere attentamente tutte le avvertenze di sicurezza elencate nel capitolo “Avvertenze di sicurezza”. Preparazione AVVERTENZA Pericolo di ustioni! La griglia e le sue superfici diventano bollenti durante il funzionamento.
  • Seite 76 Ora si hanno due possibilità a disposizione: A) Grigliare con temperatura e valori predefiniti 1. Premere la manopola di regolazione (2) per azionare la griglia con i valori predefiniti. Viene emesso un segnale acustico. 2. Ora la griglia riscalda e sui display (1, 3) vengono visualizzati temperatura e tempo restante.
  • Seite 77 Grigliare Nota: La carne marinata o molto grassa non va grigliata sul ripiano superiore, dato che potrebbe formarsi molto fumo. NOTA: Si può spegnere il riscaldamento in qualsiasi momento premendo a lungo la manopola di regolazione (2). AVVERTENZA ¡Pericolo di ustioni! L‘impugnatura (9) non deve mai rimanere sulla griglia (1 1) durante il funzionamento.
  • Seite 78 • Le bistecche di manzo vanno grigliate in linea di massima (laddove lo spessore della carne lo consente) su uno dei ripiani alti e con la temperatura al massimo. In questo modo si raggiunge in breve tempo la cosiddetta “reazione di Maillard”. Gli aminoacidi contenuti nella carne reagiscono con i carboidrati e le proteine.
  • Seite 79 • Sul display (3) appare contemporaneamente “OFF” a indicare che il processo di riscaldamento è spento. • Le ventole (4) si fermano quando la temperatura scende sotto i 100 °C. Dopo un po’ si spengono i display (1, 3) e la griglia si trova in modalità standby. Sul display (1) a sinistra appare un punto brillante.
  • Seite 80: Pulizia E Manutenzione

    PULIZIA E MANUTENZIONE Manutenzione • Ripulire le griglie di ventilazione sul retro del dispositivo a intervalli regolari da polvere, p. es. con un pennello o l’aspirapolvere. Per il resto la griglia non contiene pezzi che richiedono manutenzione. Pulizia PERICOLO Pericolo di incendio! La griglia diventa bollente durante il funzionamento.
  • Seite 81: Ricerca E Correzione Degli Errori

    consiglia l’uso di un comune detergente per il forno. Come conservare la griglia quando non la si utilizza più • Pulire la griglia come indicato nel paragrafo precedente “Pulizia e manutenzione”. • Avvolgere il cavo d’alimentazione (8) nell’avvolgicavo (5) sul retro della griglia. •...
  • Seite 82: Smaltimento

    SMALTIMENTO Se sul prodotto è presente la figura a sinistra (il bidone dei rifiuti con le ruote), si applica la direttiva europea 2012/19/ UE. Questi prodotti non possono essere smaltiti con i rifiuti normali. Informarsi sulle disposizioni vigenti per la raccolta di dispositivi elettrici ed elettronici.

Diese Anleitung auch für:

10035085

Inhaltsverzeichnis