Herunterladen Inhalt Inhalt Diese Seite drucken
Klarstein Sauenland Mini Bedienungsanleitung

Klarstein Sauenland Mini Bedienungsanleitung

Spanferkelgrill

Werbung

Verfügbare Sprachen
  • DE

Verfügbare Sprachen

  • DEUTSCH, seite 1
Sauenland Mini
Spanferkelgrill
Suckling Pig BBQ Grill
Parrilla para lechón
Barbecue de cochon de lait
Griglia per maialino
10035371

Werbung

Inhaltsverzeichnis
loading

Inhaltszusammenfassung für Klarstein Sauenland Mini

  • Seite 1 Sauenland Mini Spanferkelgrill Suckling Pig BBQ Grill Parrilla para lechón Barbecue de cochon de lait Griglia per maialino 10035371...
  • Seite 3: Inhaltsverzeichnis

    Sehr geehrter Kunde, wir gratulieren Ihnen zum Erwerb Ihres Gerätes. Lesen Sie die folgenden Hinweise sorgfältig durch und befolgen Sie diese, um möglichen Schäden vorzubeugen. Für Schäden, die durch Missachtung der Hinweise und unsachgemäßen Gebrauch entstehen, übernehmen wir keine Haftung. Scannen Sie den folgenden QR-Code, um Zugriff auf die aktuellste Bedienungsanleitung und weitere Informationen rund um das Produkt zu erhalten.
  • Seite 4: Sicherheitshinweise

    SICHERHEITSHINWEISE • Dieses Gerät, einschließlich des Motors, ist nur zum Grillen bestimmt. • Verwenden Sie immer nur das mitgelieferte Netzkabel. • Das Netzkabel sollte regelmäßig auf Beschädigungen überprüft werden. Wenn es beschädigt ist, darf das Gerät nicht verwendet werden. • Kinder ab 8 Jahren, psychisch, sensorisch und körperlich eingeschränkte Menschen dürfen das Gerät nur benutzen, wenn sie vorher von einer für sie verantwortlichen Aufsichtsperson ausführlich mit den Funktionen und den Sicherheitsvorkehrungen vertraut gemacht wurden und die damit verbundenen Risiken verstehen.
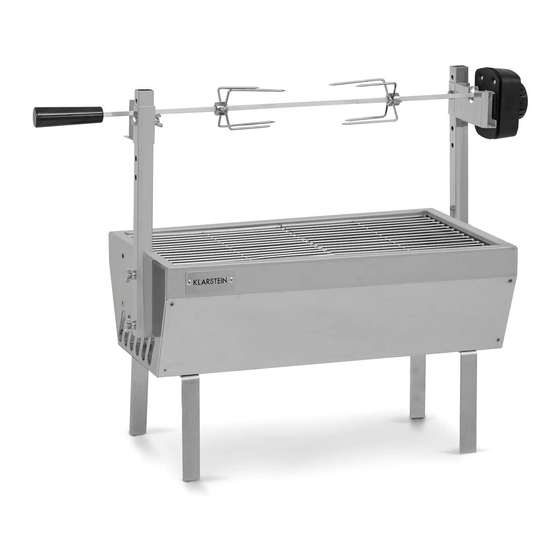
  • Seite 5: Geräteübersicht

    GERÄTEÜBERSICHT Schraube 1/4“ Spießstange 4-zackige Fleischgabel Spießstange Motor Feststellschraube Grillrost Griff Kohlegitter Grillwanne Einstellbare Stange Stangenhalterung Motorhalterung Mutter M8 Sechskantschraube M8*35 Unterlegscheibe M8 Flügelmutter M8 Sechskantschraube M8*14 Füße...
  • Seite 6: Zusammenbau

    ZUSAMMENBAU Montieren Sie die Füße mit M8*14 Schrauben und Muttern an der Grillwanne. Befestigen Sie die einstellbaren Stangen mit Schrauben M8*35. Befestigen Sie dann die Motorhalterung und die Spießhalterung mit Schrauben in der gewünschten Höhe.
  • Seite 7 Setzen Sie den Motor in Motorhalterung ein. Legen Sie das Kohlegitter in den Boden der Grillwanne und setzen Sie dann die Grillroste ein. Stecken Sie die Spießstangen zusammen und schieben Sie die Fleischgabeln, die Feststellschraube und den Griff auf die Stangen. Schieben Sie den Spieß in den Motor und legen Sie ihn auf der Spießhalterung ab.
  • Seite 8: Bedienung

    BEDIENUNG • Entfernen Sie alle Verpackungsmaterialien von der Außen- und Innenseite des Grills. • Überprüfen Sie, ob die Spannung Ihres Geräts mit der Spannung Ihrer Steckdose übereinstimmt. • Wickeln Sie das Netzkabel vor dem Gebrauch vollständig ab. • Wenn Sie ein Verlängerungskabel verwenden, verlegen Sie es so, dass keine Personen darüber stolpern.
  • Seite 9 Dear Customer, Congratulations on purchasing this device. Please read the following instructions carefully and follow them to prevent possible damages. We assume no liability for damage caused by disregard of the instructions and improper use. Scan the QR code to get access to the latest user manual and more product information.
  • Seite 10: Safety Instructions

    SAFETY INSTRUCTIONS • This appliance, including the motor, is intended for grilling only. • Always use only the supplied power cord. • The power cord should be checked regularly for damage. If it is damaged, do not use the appliance. •...
  • Seite 11: Product Overview

    PRODUCT OVERVIEW Screw 1/4". Spike rod 4-pronged meat fork Spike rod Engine Locking screw Barbecue grill Handle Coal Grid Grill tray Adjustable rod Rod support bracket Motor mount Nut M8 Hexagon head screw M8*35 Washer M8 Wing nut M8 Hexagon head screw M8*14 Feet...
  • Seite 12 ASSEMBLY Mount the feet to the grill tray with M8*14 screws and nuts. Fix the adjustable rods with M8*35 screws, then fix the motor mount and the spit mount with screws at the desired height.
  • Seite 13 Place the motor in the motor mount. Place the charcoal grill in the bottom of the grill pan and then insert the grill grids. Put the spike rods together and slide the meat forks, the locking screw and the handle onto the rods.
  • Seite 14: Cleaning And Care

    OPERATION • Remove all packaging materials from the outside and inside of the grill. • Check that the voltage of your appliance matches the voltage of your power outlet. • Fully unwind the power cord before use. • If you are using an extension cord, place it so that no one will trip over it. •...
  • Seite 15: Datos Técnicos

    Estimado cliente, Le felicitamos por la adquisición de este producto. Lea atentamente las siguientes instrucciones y sígalas para evitar posibles daños. No asumimos ninguna responsabilidad por los daños causados por el incumplimiento de las instrucciones y el uso inadecuado. Escanee el siguiente código QR para obtener acceso a la última guía del usuario y más información sobre el producto.
  • Seite 16: Indicaciones De Seguridad

    INDICACIONES DE SEGURIDAD • Este aparato, incluido su motor, está diseñado únicamente para preparar alimentos a la parrilla. • Utilice exclusivamente el cable de alimentación incluido. • El cable debe comprobarse regularmente para detectar posibles daños. No utilice el aparato si el cable está averiado. •...
  • Seite 17: Vista General Del Aparato

    VISTA GENERAL DEL APARATO Tornillo 1/4“ Barra del espetón Tenedor de 4 puntas Barra del espetón Motor Tornillo de sujeción Rejilla de la parrilla Mango Rejilla para el carbón Recipiente de la parrilla Barra regulable Soporte de la barra Soporte del motor Tuerca M8 Tornillo hexagonal M8*35 Arandela M8...
  • Seite 18 MONTAJE Monte las patas con tornillos M8*14 y tuercas al recipiente de la parrilla. Fije las barras ajustables con tornillos M8*35. A continuación, fije el soporte del motor y el soporte del espetón con tornillos hasta la altura deseada.
  • Seite 19 Coloque el motor en su soporte. Coloque la rejilla para el carbón en la base del recipiente de la parrilla y, después, coloque la rejilla de la parrilla. Encaje las barras del espetón entre sí y desplace los tenedores de la carne, el tornillo de sujeción y el mango por las barras.
  • Seite 20: Limpieza Y Cuidado

    MANEJO • Retire todo el material de embalaje del interior y del exterior de la parrilla. • Asegúrese de que la tensión de la toma de corriente coincida con la indicada en la placa técnica del aparato. • Desenrolle el cable completamente antes de utilizar el aparato. •...
  • Seite 21: Fiche Technique

    Chère cliente, cher client, Toutes nos félicitations pour l’acquisition de ce nouvel appareil. Veuillez lire attentivement et respecter les instructions de ce mode d’emploi afin d’éviter d’éventuels dommages. Nous ne saurions être tenus pour responsables des dommages dus au non-respect des consignes et à...
  • Seite 22: Consignes De Sécurité

    CONSIGNES DE SÉCURITÉ • Cet appareil, y compris le moteur, est uniquement destiné aux grillades. • Utilisez toujours uniquement le cordon d‘alimentation fourni. • Le cordon d‘alimentation doit être vérifi é régulièrement pour détecter tout dommage. S‘il est endommagé, l‘appareil ne doit pas être utilisé. •...
  • Seite 23: Aperçu De L'appareil

    APERÇU DE L‘APPAREIL Vis 1/4“ Barre de broche Fourchette à viande 4 pointes Barre de broche Moteur Vis réglable Grille de cuisson Poignée Grille à charbon Lèchefrite Barre réglable Support de tige Support du moteur Écrou M8 Vis hexagonale M8*35 Rondelle M8 Écrou papillon M8 Vis hexagonale M8*14...
  • Seite 24 ASSEMBLAGE Montez les pieds sur la lèchefrite avec des vis et des écrous M8 * 14. Fixez les barres réglables avec des vis M8 * 35. Ensuite, fixez le support du moteur et le support de broche à la hauteur souhaitée avec des vis.
  • Seite 25 Placez le moteur dans son support. Placez la grille à charbon au fond de la lèchefrite puis insérez la grille de cuisson. Assemblez les broches et faites glisser les fourchettes à viande, la vis de verrouillage et la poignée sur les barres. Faites glisser la broche dans le moteur et placez-la sur le support de broche.
  • Seite 26: Nettoyage Et Entretien

    UTILISATION • Retirez tous les matériaux d‘emballage de l‘extérieur et de l‘intérieur du barbecue. • Vérifiez si la tension de votre appareil correspond à la tension de votre prise. • Déroulez complètement le cordon d‘alimentation avant utilisation. • Si vous utilisez une rallonge, acheminez-la de manière à ce que personne ne puisse trébucher dessus.
  • Seite 27: Dati Tecnici

    Gentile cliente, La ringraziamo per aver acquistato il dispositivo. La preghiamo di leggere attentamente le seguenti istruzioni per l’uso e di seguirle per evitare possibili danni. Non ci assumiamo alcuna responsabilità per danni scaturiti da una mancata osservazione delle avvertenze di sicurezza e da un uso improprio del dispositivo.
  • Seite 28: Avvertenze Di Sicurezza

    AVVERTENZE DI SICUREZZA • Questo dispositivo, incluso il motore, deve essere utilizzato solo per grigliare. • Utilizzare sempre il cavo di alimentazione incluso in consegna e nessun altro. • Il cavo deve essere controllato regolarmente per eventuali danni. Non utilizzare il dispositivo se il cavo è...
  • Seite 29: Descrizione Del Dispositivo

    DESCRIZIONE DEL DISPOSITIVO Vite ¼” Asta dello spiedo Forca a 4 rebbi Asta dello spiedo Motore Vite di regolazione Griglia di cottura Impugnatura Griglia per carbonella Corpo principale della griglia Asta regolabile Staffa di supporto dell‘asta Supporto del motore Dado M8 Vite esagonale M8x35 Rondella M8 Vite ad alette M8...
  • Seite 30 ASSEMBLAGGIO Montare i piedi d’appoggio sul corpo principale della griglia con le viti M8x14 e i dadi. Fissare le aste regolabili con le viti M8x35. Fissare poi il supporto del motore e il supporto dello spiedo all’altezza desiderata con le viti.
  • Seite 31 Posizionare il motore sul supporto. Poggiare la griglia per la carbonella nel corpo della griglia e posizionare poi le griglie di cottura. Unire le aste dello spiedo e posizionare sulle aste la forca per la carne, la vite di regolazione e l’impugnatura. Far passare lo spiedo nel motore e poggiarlo sull’apposito supporto.
  • Seite 32: Smaltimento

    UTILIZZO • Rimuovere tutto il materiale d’imballaggio all’esterno e all’interno della griglia. • Controllare che la tensione del dispositivo corrisponda a quella della presa elettrica. • Srotolare completamente il cavo. • Se si usa una prolunga, posizionarla in modo da non rischiare di inciamparvi. •...

Diese Anleitung auch für:

10035371

Inhaltsverzeichnis