Inhaltsverzeichnis
Werbung
Verfügbare Sprachen
Verfügbare Sprachen
LED-SOLARSTRAHLER /
LED SOLAR SPOTLIGHT /
PROJECTEUR SOLAIRE LED
LED-SOLARSTRAHLER
Montage‑, Bedienungs‑ und
Sicherheitshinweise
LED SOLAR SPOTLIGHT
Assembly, operating and safety
instructions
PROJECTEUR SOLAIRE LED
Instructions de montage, d'utilisation et
consignes de sécurité
LED-
SOLARSCHIJNWERPER
Montage‑, bedienings‑ en
veiligheidsinstructies
IAN 304540
REFLEKTOR SOLARNY LED
Wskazówki montażu, obsługi i
bezpieczeństwa
LED SOLÁRNÍ REFLEKTOR
Pokyny k montáži, obsluze a
bezpečnostní pokyny
LED SOLÁRNY REFLEKTOR
Pokyny pre montáž, obsluhu a
bezpečnostné pokyny
Werbung
Kapitel
Inhaltsverzeichnis

Verwandte Anleitungen für LIVARNOLUX HG04465A


Inhaltszusammenfassung für LIVARNOLUX HG04465A
- Seite 1 LED-SOLARSTRAHLER / LED SOLAR SPOTLIGHT / PROJECTEUR SOLAIRE LED LED-SOLARSTRAHLER REFLEKTOR SOLARNY LED Montage‑, Bedienungs‑ und Wskazówki montażu, obsługi i Sicherheitshinweise bezpieczeństwa LED SOLAR SPOTLIGHT LED SOLÁRNÍ REFLEKTOR Assembly, operating and safety Pokyny k montáži, obsluze a instructions bezpečnostní pokyny PROJECTEUR SOLAIRE LED LED SOLÁRNY REFLEKTOR Instructions de montage, d‘utilisation et Pokyny pre montáž, obsluhu a...
- Seite 2 DE/AT/CH Montage‑, Bedienungs‑ und Sicherheitshinweise Seite GB/IE Assembly, operating and safety instructions Page FR/BE Instructions de montage, d‘utilisation et consignes de sécurité Page NL/BE Montage‑, bedienings‑ en veiligheidsinstructies Pagina Wskazówki montażu, obsługi i bezpieczeństwa Strona Pokyny k montáži, obsluze a bezpečnostní pokyny Strana Pokyny pre montáž, obsluhu a bezpečnostné...
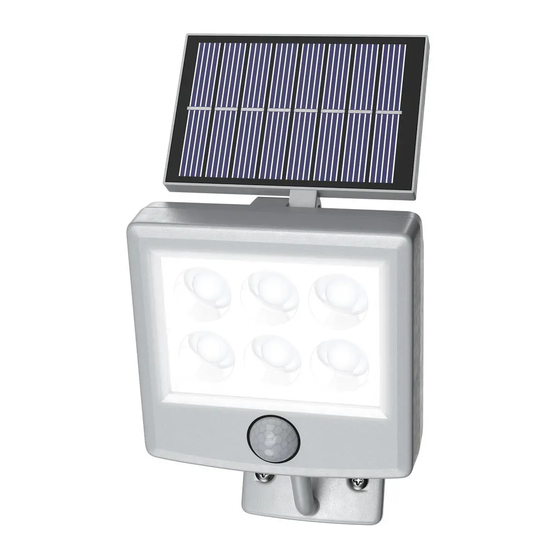
- Seite 3 HG04465A 90° 1.8-2.5m 5.0m 8.0m...
- Seite 4 HG04465B 90° 1.8-2.5m 5.0m 8.0m...
-
Seite 5: Inhaltsverzeichnis
Liste der verwendeten Piktogramme . . . Seite Einleitung . . . . . . . . . . . . . . . . . . . . . . . . . . . . . . . . . . . . Seite Bestimmungsgemäßer Gebrauch . -
Seite 6: Liste Der Verwendeten Piktogramme
Liste der verwendeten Piktogramme LED-Lebensdauer Gleichstrom Dieses Produkt ist für Extremtemperaturen bis -21°C geeignet . Reichweite des Bewegungssensors ca . 5 – 8 m Erkennungswinkel des Bewegungssensors: ca . 90º Schutzart: IP44 (spritzwasserfest) Batterien mitgeliefert Beleuchtungsdauer (nach Aktivierung): ca . 30 Sekunden DE/AT/CH... -
Seite 7: Einleitung
LED-SOLARSTRAHLER ˜ Einleitung Wir beglückwünschen Sie zum Kauf Ihres neuen Produkts . Sie haben sich damit für ein hochwertiges Produkt entschieden . Die Bedienungsanleitung ist Teil dieses Produkts . Sie enthält wichtige Hinweise für Sicherheit, Gebrauch und Entsorgung . Machen Sie sich vor der Benutzung des Produkts mit allen Bedien- und Sicherheitshinweisen vertraut . -
Seite 8: Technische Daten
15 Dübel (für die Montagehalterung) (nur HG04465B) 16 Schraube (für die Montagehalterung) (nur HG04465B) 17 Verbindungskabel (nur HG04465B) 18 Stecker (nur HG04465B) 19 Buchse (nur HG04465B) ˜ Technische Daten Modell-Nr .: HG04465A oder HG04465B LEDs: 6 x 0,5 W (LEDs sind nicht austauschbar) Betriebsspannung: 3,6 V Wiederaufladbare Batterien: 3 x Ni-MH AAA 600 mAh 1,2 V... -
Seite 9: Lieferumfang
˜ Lieferumfang Überprüfen Sie sofort nach dem Auspacken, ob alle Teile vollständig sind und das Produkt in ordnungsgemäßem Zustand ist . 1 solarbetriebener LED-Strahler, Modell HG04465A oder HG04465B 1 Montagehalterung (für Solar-Paneel) (nur HG04465B) 1 Solar-Paneel (nur HG04465B) 2 Dübel (Montageplatte) 2 Schrauben (Montageplatte) 2 Dübel (Montagehalterung) (nur HG04465B) -
Seite 10: Sicherheitshinweise Für Batterien / Akkus
Lassen Sie Kinder niemals mit dem Verpackungsmaterial unbeaufsichtigt . Das Verpackungsmaterial stellt eine Erstickungsgefahr dar . Kinder unterschätzen die damit verbundenen Gefahren häufig . Halten Sie Kinder aus dem Arbeitsbereich fern . Es sind viele Schrauben und andere Kleinteile im Lieferumfang enthalten . Diese können verschluckt oder eingeatmet und so zu einer Lebensgefahr werden . -
Seite 11: Risiko Des Auslaufens Von Batterien / Akkus
EXPLOSIONSGEFAHR! Laden Sie nicht aufladbare Batterien niemals wieder auf . Schließen Sie Batterien / Akkus nicht kurz und / oder öffnen Sie diese nicht . Überhitzung, Brandgefahr oder Platzen können die Folge sein . Werfen Sie Batterien / Akkus niemals in Feuer oder Wasser . ... -
Seite 12: Risiko Der Beschädigung Des Produkts
Risiko der Beschädigung des Produkts Verwenden Sie ausschließlich den angegebenen Batterietyp / Akkutyp! Setzen Sie Batterien / Akkus gemäß der Polaritätskennzeichnung (+) und (–) an Batterie / Akku und des Produkts ein . Reinigen Sie Kontakte an Batterie / Akku und im Batteriefach vor ... -
Seite 13: Batterien Einsetzen/Ersetzen
3 , indem Sie die Befestigungsschrauben 13 gegen den Uhrzeigersinn drehen, um die vordere Abdeckung 10 zu entfernen (Abb . C: HG04465A oder Abb . E: HG04465B) . Nehmen Sie die alten, wiederaufladbaren Batterien 11 heraus . Legen Sie die neuen, wiederaufladbaren Batterien 11 ein . -
Seite 14: Montage
Reichweite von ca . 5 bis 8 m, mit einem Abdeckungs-Winkel von etwa 90° (abhängig von der Montagehöhe – eine Höhe von 1,8 bis 2,5 m ist ideal) (Abb . D: HG04465A oder Abb . F: HG04465B) . Achten Sie darauf, dass der Sensor 4 bei Nacht nicht von ... - Seite 15 Paneels 1 den Strahler 3 erreichen kann . Der maximale Abstand zwischen Solar-Paneel 1 und Strahler 3 beträgt ca . 2,5 m (nur HG04465B) . Für HG04465A: Klappen Sie das Solar-Paneel 1 vorsichtig nach oben . Entfernen Sie die Montageplatte 6 vom Strahler 3 , indem Sie ...
- Seite 16 Positionieren Sie nun den Strahler 3 in Richtung der Montageplatte 6 . Setzen Sie das Kugelgelenk der Montageplatte 6 korrekt in der Öffnung 9 des Strahlers 3 ein . Schließen Sie anschließend die Kugelgelenk-Abdeckung 7 , indem Sie die Schrauben im Uhrzeigersinn drehen (Abb . B) . Stellen Sie den ON-/OFF-Schalter 2 am Strahler 3 in die ...
- Seite 17 Verwenden Sie nun die Schlitze in der Montagehalterung 14 , die für die Schrauben 16 vorgesehen sind, um die Bohrlöcher zu markieren (Ø 8 mm, ca . 40 mm tief) . Achten Sie darauf, dass Sie den Strahler 3 über das ...
-
Seite 18: Vorwiegende Richtung
Vorwiegende Richtung: Optimal ist eine Ausrichtung nach Süden . Eine Ausrichtung mit leichten Abweichungen nach Westen ist gegenüber einer Ausrichtung mit leichter Abweichung nach Osten vorzuziehen . Horizontale Ausrichtung: Die horizontale Ausrichtung des Solar-Paneels 1 hängt von der geografischen Breite des Montagestandortes ab . In Mitteleuropa ist ein Winkel von 30°... -
Seite 19: Wartung Und Reinigung
˜ Wartung und Reinigung WARNUNG! LEBENSGEFAHR DURCH STROMSCHLAG! Verwenden Sie keine Lösungsmittel, Benzin usw . Anderenfalls wird das Leuchtmittel beschädigt . Stellen Sie den ON-/OFF-Schalter 2 des Strahlers 3 in die Position „OFF“ . Entfernen Sie die wiederaufladbaren Batterien 11 . ... -
Seite 20: Entsorgung
˜ Entsorgung Die Verpackung besteht aus umweltfreundlichen Materialien, die Sie über die örtlichen Recyclingstellen entsorgen können . Beachten Sie die Kennzeichnung der Verpackungsmaterialien bei der Abfalltrennung, diese sind gekennzeichnet mit Abkürzungen (a) und Nummern (b) mit folgender Bedeutung: 1–7: Kunststoffe / 20–22: Papier und Pappe / 80–98: Verbundstoffe . -
Seite 21: Garantie
Umweltschäden durch falsche Entsorgung der Batterien / Akkus! Batterien / Akkus dürfen nicht über den Hausmüll entsorgt werden . Sie können giftige Schwermetalle enthalten und unterliegen der Sondermüllbehandlung . Die chemischen Symbole der Schwermetalle sind wie folgt: Cd = Cadmium, Hg = Quecksilber, Pb = Blei . Geben Sie deshalb verbrauchte Batterien / Akkus bei einer kommunalen Sammelstelle ab . - Seite 22 Die Garantieleistung gilt für Material- oder Fabrikationsfehler . Diese Garantie erstreckt sich nicht auf Produktteile, die normaler Abnutzung ausgesetzt sind (z . B . Batterien) und daher als Verschleißteile angesehen werden können oder Beschädigungen an zerbrechlichen Teilen, z . B . Schalter, Akkus oder die aus Glas gefertigt sind . 22 DE/AT/CH...
- Seite 23 List of pictograms used . . . . . . . . . . . . . . . . . . . . Page 24 Introduction .
-
Seite 24: List Of Pictograms Used
List of pictograms used LED lifespan Direct current This product is suitable for extreme temperature up to -21°C . Motion detector range approx . 5 - 8 m Detection angle of motion sensor: approx . 90º Protection type: IP44 (splash-proof) Batteries included Illumination time (after activation): approx . -
Seite 25: Introduction
LED SOLAR SPOTLIGHT ˜ Introduction We congratulate you on the purchase of your new product . You have chosen a high quality product . The instructions for use are part of the product . They contain important information concerning safety, use and disposal . -
Seite 26: Technical Data
16 Screw (for mounting bracket) (HG04465B only) 17 Connection cable (HG04465B only) 18 Plug (HG04465B only) 19 Socket (HG04465B only) ˜ Technical data Model no .: HG04465A or HG04465B LEDs: 6 x 0 .5 W (LEDs not replaceable) Operating voltage: 3 .6 V Rechargeable batteries: 3 x Ni-MH AAA, 600 mAh,1 .2 V... -
Seite 27: Scope Of Delivery
Check immediately after unpacking that the parts are complete and that the product is in proper condition . 1 LED solar powered spotlight, model HG04465A or HG04465B 1 Mounting bracket (for solar panel) (HG04465B only) 1 Solar panel (HG04465B only) -
Seite 28: Safety Instructions For Batteries / Rechargeable Batteries
Never leave children unsupervised with the packaging material . The packaging material represents a danger of suffocation . Children frequently underestimate the dangers . Keep children out of the area you are working in . A large number of screws and other small parts are included with the delivery . - Seite 29 DANGER OF EXPLOSION! Never recharge non- rechargeable batteries . Do not short-circuit batteries / rechargeable batteries and / or open them . Overheating, fire or bursting can be the result . Never throw batteries / rechargeable batteries into fire or water . Do not exert mechanical loads to batteries / rechargeable ...
-
Seite 30: Before Use
Risk of damage of the product Only use the specified type of battery / rechargeable battery! Insert batteries / rechargeable batteries according to polarity marks (+) and (–) on the battery / rechargeable battery and the product . Clean the contacts on the battery / rechargeable battery and in ... -
Seite 31: Inserting / Replacing Batteries
11 from overcharging . Replace the rechargeable batteries 11 if light output does not improve after charging (Fig . C: HG04465A or Fig . E: HG04465B) . ˜ Inserting / replacing batteries Note: The rechargeable batteries 11 are pre-installed . Only use batteries as stated in the “Technical data”... -
Seite 32: Installation
. 5 to 8 m, with a coverage angle of about 90° (depending on the mounting height – a height from 1 .8 to 2 .5 m is ideal) (Fig . D: HG04465A or Fig . F: HG04465B) . - Seite 33 reach the spotlight 3 . Max . distance between the solar panel 1 and the spotlight 3 is approx . 2 .5 m (HG04465B only) . For HG04465A: Carefully fold the solar panel 1 upwards . Remove the mounting plate 6 from the spotlight 3 by loosening ...
- Seite 34 Now place the spotlight 3 towards the mounting plate 6 . Ensure that the ball joint of the mounting plate 6 is correctly inserted into the slot 9 of the spotlight 3 . Then, close the ball joint cover 7 by tightening the screws clockwise (Fig .
- Seite 35 Now use the slots in the mounting bracket 14 intended for the screws 16 to mark the drill holes (Ø 8 mm, depth approx . 40 mm) . Ensure that you can connect the spotlight 3 using the connection ...
-
Seite 36: Start-Up
Cardinal direction: Orientation towards the south is optimum . Orienta tions with slight deviations towards the west are preferable to those with slight deviations towards the east . Horizontal orientation: The horizontal orientation of the solar panel 1 depends on the geographic latitude of the mounting loca tion . -
Seite 37: Maintenance And Cleaning
˜ Maintenance and cleaning WARNING! DANGER TO LIFE BY ELECTRIC SHOCK! Do not use solvents, petrol, etc . Otherwise the light will be damaged . Set the ON/OFF switch 2 on the spotlight 3 to the “OFF“ position . Remove the rechargeable batteries 11 . -
Seite 38: Disposal
˜ Disposal The packaging is made entirely of recyclable materials, which you may dispose of at local recycling facilities . Observe the marking of the packaging materials for waste separation, which are marked with abbreviations (a) and numbers (b) with following meaning: 1–7: plastics / 20–22: paper and fibreboard / 80–98: composite materials . -
Seite 39: Warranty
Environmental damage through incorrect disposal of the batteries / rechargeable batteries! Batteries / rechargeable batteries may not be disposed of with the usual domestic waste . They may contain toxic heavy metals and are subject to hazardous waste treatment rules and regulations . The chemical symbols for heavy metals are as follows: Cd = cadmium, Hg = mercury, Pb = lead . - Seite 40 The warranty applies to defects in material or manufacture . This warranty does not cover product parts subject to normal wear, thus possibly considered consumables (e . g . batteries) or for damage to fragile parts, e . g . switches, rechargeable batteries or glass parts . GB/IE...
- Seite 41 Liste des pictogrammes utilisés . . . . . . . . . . Page 42 Introduction . . . . . . . . . . . . . . . . . . . . . . . . . . . . . . . . . Page 43 Utilisation conforme aux prescriptions .
-
Seite 42: Liste Des Pictogrammes Utilisés
Liste des pictogrammes utilisés Durée de vie des LED Courant continu Ce produit est conçu pour des températures extrêmes allant jusqu’à -21 °C . Portée du capteur de mouvement : env . 5 à 8 m Angle de détection du capteur de mouvement : env . 90º Indice de protection : IP44 (étanche aux projections d'eau) Piles fournies... -
Seite 43: Introduction
PROJECTEUR SOLAIRE LED ˜ Introduction Nous vous félicitons pour l’achat de votre nouveau produit . Vous avez opté pour un produit de grande qualité . Le mode d‘emploi fait partie intégrante de ce produit . Il contient des indications importantes pour la sécurité, l’utilisation et la mise au rebut . -
Seite 44: Caractéristiques Techniques
16 Vis (pour le support de montage) (seulement pour HG04465B) 17 Câble de raccordement (seulement pour HG04465B) 18 Fiche (seulement pour HG04465B) 19 Prise (seulement pour HG04465B) ˜ Caractéristiques techniques Modèle n° : HG04465A ou HG04465B LED : 6 diodes de 0,5 W (LED non remplaçables) Tension de fonctionnement : 3,6 V Piles rechargeables : 3 p . -
Seite 45: Contenu De La Livraison
˜ Contenu de la livraison Après le déballage, contrôlez l’exhaustivité des pièces livrées et vérifiez l’état parfait du produit . 1 projecteur alimenté par un panneau solaire, modèle HG04465A ou HG04465B 1 support de montage (pour panneau solaire) (seulement pour... -
Seite 46: Consignes De Sécurité Relatives Aux Piles / Aux Piles Rechargeables
Ne laissez jamais des enfants sans surveillance avec des matériaux d’emballage . Les matériaux d’emballage représentent un risque d’asphyxie . Les enfants sous-estiment fréquemment les dangers en résultant . Maintenez les enfants hors de portée de la zone de travail . ... - Seite 47 RISQUE D‘EXPLOSION ! Ne rechargez jamais des piles non rechargeables . Ne courtcircuitez pas les piles / piles rechargeables et / ou ne les ouvrez pas ! Autrement, vous risquez de provoquer une surchauffe, un incendie ou une explosion . Ne jetez jamais des piles / piles rechargeables au feu ou dans ...
-
Seite 48: Risque D'endommagement Du Produit
Risque d‘endommagement du produit Exclusivement utiliser le type de pile / pile rechargeable spécifié . Insérez les piles / piles rechargeables conformément à l‘indication de polarité (+) et (–) indiquée sur la pile / pile rechargeable et sur le produit . Nettoyez les contacts de la pile / pile rechargeable et du ... -
Seite 49: Insertion/Remplacement Des Piles
Remarque : le contrôleur de charge intégré dans le produit empêche la surcharge des piles rechargeables 11 . Remplacez les piles rechargeables 11 lorsque la puissance lumineuse ne s’améliore pas après la recharge (ill . C : HG04465A ou ill . E : HG04465B) . ˜ Insertion/remplacement des piles Remarque : les piles rechargeables 11 sont déjà... -
Seite 50: Montage
8 m, avec un angle de couverture d’environ 90° (en fonction de la hauteur de montage – une hauteur de 1,8 à 2,5 m est idéale) (ill . D : HG04465A ou ill . F : HG04465B) . Assurez-vous que le capteur 4 ne soit pas éclairé par l’éclairage ... - Seite 51 1 puisse atteindre le projecteur 3 . La distance maximale entre le panneau solaire 1 et le projecteur 3 s’élève à env . 2,5 m (seulement pour HG04465B) . Pour HG04465A : dépliez soigneusement le panneau solaire 1 vers le haut . ...
- Seite 52 Positionnez maintenant le projecteur 3 en direction de la plaque de montage 6 . Placez l’articulation de la plaque de montage 6 correctement dans l’ouverture 9 du projecteur 3 . Refermez ensuite le couvre-articulation 7 en tournant les vis dans le sens des aiguilles d’une montre (ill . B) .
- Seite 53 Utilisez les fentes du support de montage 14 prévues pour les vis 16 pour marquer les trous à percer (Ø 8 mm, env . 40 mm de profondeur) . Assurez-vous que vous pouvez raccorder le projecteur 3 au panneau solaire 1 via le câble de raccordement 17 . Percez maintenant les trous de fixation .
-
Seite 54: Alignement Horizontal
Direction préférable : Une orientation vers le sud est optimale . Une orientation avec de légères déviations vers l’ouest est préférable à une orientation avec une légère déviation vers l’est . Alignement horizontal : L’alignement horizontal du panneau solaire 1 dépend de la largeur géographique de l’emplacement du montage . -
Seite 55: Maintenance Et Nettoyage
˜ Maintenance et nettoyage AVERTISSEMENT ! DANGER MORTEL DÛ À UNE DÉCHARGE ÉLECTRIQUE ! N’utilisez pas de solvants, d’essence etc . sinon l’éclairage sera endommagé . Placez l’interrupteur ON/OFF 2 du projecteur 3 sur la position OFF . Enlevez les piles rechargeables 11 . ... -
Seite 56: Mise Au Rebut
˜ Mise au rebut L’emballage se compose de matières recyclables pouvant être mises au rebut dans les déchetteries locales . Veuillez respecter l‘identification des matériaux d‘emballage pour le tri sélectif, ils sont identifiés avec des abbréviations (a) et des chiffres (b) ayant la signification suivante : 1–7 : plastiques / 20–22 : papiers et cartons / 80–98 : matériaux composite . -
Seite 57: Garantie
Pollution de l’environnement par la mise au rebut incorrecte des piles / piles rechargeables ! Les piles / piles rechargeables ne doivent pas être mises au rebut avec les ordures ménagères . Elles peuvent contenir des métaux lourds toxiques et doivent être considérées comme des déchets spéciaux . Les symboles chimiques des métaux lourds sont les suivants : Cd = cadmium, Hg = mercure, Pb = plomb . - Seite 58 La garantie couvre les vices matériels et de fabrication . Cette garantie ne s’étend ni aux pièces du produit soumises à une usure normale (p . ex . des piles) et qui, par conséquent, peuvent être considérées comme des pièces d’usure, ni aux dommages sur des composants fragiles, comme des interrupteurs, des batteries ou des éléments fabriqués en verre .
- Seite 59 Overzicht gebruikte pictogrammen . . . Pagina 60 Inleiding . . . . . . . . . . . . . . . . . . . . . . . . . . . . . . . . . . . Pagina 61 Beoogd gebruik .
-
Seite 60: Overzicht Gebruikte Pictogrammen
Overzicht gebruikte pictogrammen LED-levensduur Gelijkstroom Dit product is geschikt voor gebruik bij extreme temperaturen tot -21 °C . Bereik bewegingssensor ca . 5 – 8 m Detectiehoek van de bewegingssensor: ca . 90º Beschermingswijze: IP44 (bestand tegen spatwater) Batterijen meegeleverd Verlichtingsduur (na activering): ca 30 seconden 60 NL/BE... -
Seite 61: Inleiding
LED-SOLARSCHIJNWERPER ˜ Inleiding Hartelijk gefeliciteerd met de aankoop van uw nieuwe product . U heeft voor een hoogwaardig product gekozen . De gebruiksaanwijzing is een deel van het product . Deze bevat belangrijke aanwijzingen voor veiligheid, gebruik en verwijdering . Maakt U zich voor de ingebruikname van het product met alle bedienings- en veiligheidsvoorschriften vertrouwd . -
Seite 62: Technische Gegevens
16 Schroeven (voor de montagehouder) (alleen voor HG04465B) 17 Verbindingskabel (alleen voor HG04465B) 18 Stekker (alleen voor HG04465B) 19 Contrastekker (alleen voor HG04465B) ˜ Technische gegevens Modelnr .: HG04465A of HG04465B LED’s: 6 x 0,5 W (LED's kunnen niet vervangen worden) Bedrijfsspanning: 3,6 V... -
Seite 63: Leveringsomvang
˜ Leveringsomvang Controleer na het uitpakken direct of alle onderdelen volledig zijn en dat het product afgeleverd is zoals behoort . 1 Op zonne-energie werkende LED-straler, model HG04465A of HG04465B 1 Montagehouder (voor zonnepaneel) (alleen bij de HG04465B) 1 Zonnepaneel (alleen bij de HG04465B) -
Seite 64: Veiligheidsinstructies Voor Batterijen / Accu's
Laat kinderen nooit zonder toezicht achter met het verpakkingsmateriaal . Het verpakkingsmateriaal vormt een risico voor verstikkingsgevaar . Kinderen onderschatten vaak de daarmee verbonden gevaren . Houd kinderen uit de buurt waar u de lamp installeert . De levering bevat veel schroeven en andere kleine onderdelen . - Seite 65 EXPLOSIEGEVAAR! Laad niet oplaadbare batterijen nooit op . Sluit de batterijen / accu‘s niet kort en / of open deze niet . Daardoor kan de batterij oververhit raken, in brand vliegen of exploderen . Gooi batterijen / accu‘s nooit in het vuur of water . ...
-
Seite 66: Voor Gebruik
Risico op beschadiging van het product Gebruik uitsluitend het aangegeven type batterij / accu! Plaats de batterijen / accu‘s volgens de weergegeven polariteit (+) en (–) op batterij / accu en op product . type batterij / accu! Reinig de contacten van de batterij / accu en die in het ... -
Seite 67: Batterijen Plaatsen/Vervangen
11 overladen worden . Vervang de herlaadbare batterijen 11 als de lichtsterkte na het opladen niet toeneemt (Afb . C: HG04465A of Afb . E: HG04465B) . ˜ Batterijen plaatsen/vervangen Tip: In het product zijn al herlaadbare batterijen 11 geplaatst . -
Seite 68: Installatie
5 tot 8 m waarbij de detectiehoek ongeveer 90° bedraagt (afhankelijk van de hoogte waarop het product is aangebracht - een hoogte van 1,8 tot 2,5 m is ideaal) (Afb . D: HG04465A of Afb . F: HG04465B) . Let erop dat de sensor 4 's nachts niet door straatverlichting ... - Seite 69 3 . De maximale afstand tussen zonnepaneel 1 en straler 3 bedraagt ca . 2,5 m (alleen bij de HG04465B) . Voor de HG04465A: Klap het zonnepaneel 1 voorzichtig naar boven . ...
- Seite 70 Plaats nu de straler 3 op de montageplaat 6 . Plaats het kogelgewricht van de montageplaat 6 op correcte wijze in de opening 9 van de straler 3 . Sluit dan de afdekking van het kogelgewricht 7 door de schroeven met wijzers van de klok mee vast te draaien (Afb . B) .
- Seite 71 Gebruik de openingen in de montagehouder 14 die voor de schroeven 16 bestemd zijn, om aan te geven waar de boorgaten moeten komen (Ø 8 mm, ca . 40 mm diep) . Zorg ervoor dat u de straler 3 met behulp van de ...
-
Seite 72: Ingebruikname
Oriëntatie: het zonnepaneel kan het best op het zuiden gericht worden . Oriëntatie op het zuiden met een lichte afwijking naar het westen is te verkiezen boven een lichte afwijking naar het oosten . Horizontaal richten: De horizontale oriëntatie van het zonnepaneel 1 hangt af van de geografische breedte van de plek waar het paneel is geinstalleerd . -
Seite 73: Onderhoud En Schoonmaken
˜ Onderhoud en schoonmaken WAARSCHUWING! LEVENSGEVAAR DOOR ELEKTRISCHE SCHOKKEN! Gebruik geen oplosmiddelen, benzine, etc . om te voorkomen dat de lamp wordt beschadigd . Zet de ON-/OFF-schakelaar 2 van de straler 3 in stand „OFF“ . Verwijder de herlaadbare batterijen 11 . ... -
Seite 74: Afvoer
˜ Afvoer De verpakking bestaat uit milieuvriendelijke grondstoffen die u via de plaatselijke recyclingcontainers kunt afvoeren . Neem de aanduiding van de verpakkingsmaterialen voor de afvalscheiding in acht . Deze zijn gemarkeerd met de afkortingen (a) en een cijfers (b) met de volgende betekenis: 1–7: kunststoffen / 20–22: papier en vezelplaten / 80–98: composietmaterialen . -
Seite 75: Garantie
Milieuschade door foutieve verwijdering van de batterijen / accu‘s! Batterijen / accu‘s mogen niet via het huisvuil worden weggegooid . Ze kunnen giftige zware metalen bevatten en vallen onder het chemisch afval . De chemische symbolen van de zware metalen zijn: Cd = cadmium, Hg = kwik, Pb = lood . - Seite 76 De garantie geldt voor materiaal- en productiefouten . Deze garantie is niet van toepassing op productonderdelen, die onderhevig zijn aan normale slijtage en hierdoor als aan slijtage onderhevige onderdelen gelden (bijv . batterijen) of voor beschadigingen aan breekbare onderdelen, zoals bijv . schakelaars, accu’s of dergelijke onderdelen, die gemaakt zijn van glas .
- Seite 77 Lista używanych piktogramów . . . . . . . . . Strona 78 Wstęp . . . . . . . . . . . . . . . . . . . . . . . . . . . . . . . . . . . . . . . Strona 79 Przeznaczenie .
-
Seite 78: Lista Używanych Piktogramów
Lista używanych piktogramów Żywotność diod LED Prąd stały Ten produkt nadaje się do stosowania w ekstremalnych temperaturach do -21 °C . Zasięg czujnika ruchu ok . 5 – 8 m Kąt detekcji czujnika ruchu: ok . 90º Typ ochrony: IP44 (ochrona przed strugami wody) Dołączona bateria Czas świecenia (po aktywacji): ok . -
Seite 79: Wstęp
REFLEKTOR SOLARNY LED ˜ Wstęp Gratulujemy Państwu zakupu nowego produktu . Tym samym zdecydowali się Państwo na zakup produktu wysokiej jakości . Instrukcja obsługi jest częścią tego produktu . Zawiera ona ważne wskazówki dotyczące bezpieczeństwa, użytkowania i utylizacji . Przed pierwszym użyciem produktu należy zapoznać się ze wszystkimi wskazówkami dotyczącymi obsługi i bezpieczeństwa . -
Seite 80: Dane Techniczne
16 Wkręt (uchwytu montażowego) (do modelu HG04465B) 17 Przewód połączeniowy (do modelu HG04465B) 18 Wtyczka (do modelu HG04465B) 19 Gniazdo (do modelu HG04465B) ˜ Dane techniczne Nr modelu: HG04465A lub HG04465B Diody LED: 6 x 0,5 W (diody LED są niewymienne) Napięcie: 3,6 V Akumulatorki: 3 x Ni-MH AAA;... -
Seite 81: Elementy Wyposażenia
˜ Elementy wyposażenia Zaraz po rozpakowaniu należy sprawdzić, czy są wszystkie części i czy produkt jest w dobrym stanie . 1 Reflektor solarny LED, model HG04465A lub HG04465B 1 Uchwyt montażowy (panelu solarnego) (model HG04465B) 1 Panel solarny (model HG04465B) 2 Dybel (płyty montażowej) -
Seite 82: Wskazówki Bezpieczeństwa Dla Baterii / Akumulatorów
Nie zostawiać dzieci bez nadzoru w pobliżu materiałów pakunkowych . Materiały pakunkowe grożą zadławieniem . Dzieci często nie są w stanie ocenić związanych z tym niebezpieczeństw . Dzieci należy trzymać z dala od miejsca pracy . W zestawie znajduje się... -
Seite 83: Akumulatorów
NIEBEZPIECZEŃSTWO WYBUCHU! Baterii jednorazowego użytku nie wolno ładować ponownie . Baterii / akumulatorów nie należy zwierać i / lub otwierać . Może to doprowadzić do przegrzania, pożaru lub wybuchu . Nigdy nie należy wrzucać baterii / akumulatorów do ognia lub wody . Nigdy nie należy narażać... -
Seite 84: Przygotowanie Produktu Do Użycia
Ryzyko uszkodzenia produktu Używać wyłącznie zalecanego rodzaju baterii / akumulatora! Włożyć baterie / akumulatory zgodnie z oznaczeniem biegunów (+) i (–) na baterii / akumulatorze I produkcie . Jeśli to konieczne, oczyścić styki baterii / akumulatora i w komorze baterii przed włożeniem baterii! Zużyte baterie / akumulatory wyjąć... -
Seite 85: Wkładanie Lub Wymiana Baterii
Uwaga: Wbudowany sterownik ładowania produktu chroni akumulatorki 11 przed przeładowaniem . Akumulatorki 11 należy wymienić, jeśli po naładowaniu jasność świecenia nie polepszy się (rys . C: HG04465A lub rys . E: HG04465B) . ˜ Wkładanie lub wymiana baterii Uwaga: Akumulatorki 11 są już włożone do urządzenia . Używać... -
Seite 86: Montaż
4 ma maksymalny zasięg w zakresie ok . 5 do 8 m przy kącie pokrycia 90° (w zależności od wysokości montażu – idealna wysokość wynosi od 1,8 do 2,5 m) (rys . D: HG04465A lub rys . F: HG04465B) . Upewnić się, że czujnik 4 nie jest w nocy oświetlany przez ... - Seite 87 1 z reflektorem 3 . Maksymalna odległość między panelem solarnym 1 i reflektorem 3 wynosi ok . 2,5 m (dotyczy modelu HG04465B) . Model HG04465A: Panel solarny 1 odchylić ostrożnie w górę . Płytę montażową 6 odkręcić od reflektora 3 luzując śruby ...
- Seite 88 Teraz reflektor 3 nałożyć na przegub kulowy płyty montażowej 6 . Upewnić się, że przegub kulowy płyty montażowej 6 jest dokładnie wsunięty w gniazdo 9 reflektora 3 . Następnie zamontować pokrywę przegubu kulowego 7 dokręcając śruby w kierunku zgodnym z ruchem wskazówek zegara (rys . B) . Przełącznik ON/OFF 2 reflektora 3 ustawić...
- Seite 89 Otworów w płycie montażowej 14 przewidzianych pod wkręty 16 użyć do zaznaczenia miejsc wiercenia (Ø 8 mm, głębokość ok . 40 mm) . Upewnić się, że reflektor 3 będzie można połączyć kablem połączeniowym 17 z panelem solarnym 1 . Teraz należy wywiercić...
-
Seite 90: Uruchomienie
Kierunek przeważający: Skierowanie na południe jest wariantem optymalnym . Skierowanie z niewielkim odchyleniem na zachód jest lepsze w porównanie z odchyleniem na wschód . Położenie w poziomie: Pozioma orientacja panelu solarnego 1 zależy od szerokości geograficznej miejsca montażu . W Europie Środkowej idealny kąt mieści się... -
Seite 91: Konserwacja I Czyszczenie
˜ Konserwacja i czyszczenie OSTRZEŻENIE! NIEBEZPIECZEŃSTWO PORAŻENIA PRĄDEM ELEKTRYCZNYM! Nie używać rozpuszczalników, benzyny itp . W przeciwnym razie lampa zostanie uszkodzona . Przełącznik ON/OFF 2 reflektora 3 ustawić w pozycji „OFF” . Wyjąć akumulatorki 11 . Wtyczkę... -
Seite 92: Utylizacja
˜ Utylizacja Opakowanie wykonane jest z materiałów przyjaznych dla środowiska, które można przekazać do utylizacji w lokalnym punkcie przetwarzania surowców wtórnych . Przy segregowaniu odpadów prosimy zwrócić uwagę na oznakowanie materiałów opakowaniowych, oznaczone są one skrótami (a) i numerami (b) o następującym znaczeniu: 1–7: Tworzywa sztuczne / 20–22: Papier i tektura / 80–98: Materiały kompozytowe . -
Seite 93: Gwarancja
Niewłaściwa utylizacja baterii / akumulatorów stwarza zagrożenie dla środowiska naturalnego! Baterii / akumulatorów nie należy wyrzucać razem z odpadami domowymi . Mogą one zawierać szkodliwe metale ciężkie i należy je traktować jak odpady specjalne . Symbole chemiczne metali ciężkich są następujące: Cd = kadm, Hg = rtęć, Pb = ołów . Dlatego też zużyte baterie / akumulatory należy przekazywać... - Seite 94 Świadczenie gwarancyjne obejmuje wady materiałowe i fabryczne . Gwarancja nie obejmuje części produktu ulegających normalnemu zużyciu, uznawanych za części zużywalne (np . baterie) oraz uszkodzeń części łamliwych, np . przełączników, akumulatorów lub wykonanych ze szkła . 94 PL...
- Seite 95 Seznam použitých piktogramů . . . . . . . . Strana 96 Úvod . . . . . . . . . . . . . . . . . . . . . . . . . . . . . . . . . . . . . . . Strana 97 Použití...
-
Seite 96: Seznam Použitých Piktogramů
Seznam použitých piktogramů Životnost LED Stejnosměrný proud Tento výrobek je vhodný pro extrémní teploty až -21 °C . Dosah snímače pohybu cca 5 – 8 m Detekční úhel snímače pohybu: cca 90º Systém ochrany: IP44 (odolný proti stříkající vodě) Baterie jsou součástí dodávky Trvání... -
Seite 97: Úvod
LED SOLÁRNÍ REFLEKTOR ˜ Úvod Blahopřejeme Vám ke koupi nového výrobku . Rozhodli jste se pro kvalitní produkt . Návod k obsluze je součástí tohoto výrobku . Obsahuje důležité pokyny pro bezpečnost, použití a likvidaci . Před použitím výrobku se seznamte se všemi pokyny k obsluze a bezpečnostními pokyny . -
Seite 98: Technická Data
16 Šroub (pro montážní držák) (jen HG04465B) 17 Spojovací kabel (jen HG04465B) 18 Konektor (jen HG04465B) 19 Zdířka (jen HG04465B) ˜ Technická data Model č .: HG04465A nebo HG04465B LED: 6 × 0,5 W (LED diody nejsou vyměnitelné) Provozní napětí: 3,6 V Dobíjecí... -
Seite 99: Rozsah Dodávky
˜ Rozsah dodávky Ihned po vybalení, zkontrolujte, zda jsou všechny díly kompletní a výrobek je v řádném stavu . 1 solární LED reflektor, model HG04465A nebo HG04465B 1 montážní držák (pro solární panel) (pouze HG04465B) 1 solární panel (pouze HG04465B) 2 hmoždinky (montážní... -
Seite 100: Bezpečnostní Pokyny Pro Baterie A Akumulátory
Nenechte děti nikdy hrát si bez dozoru s balicími materiály . Obalový materiál představuje nebezpečí udušení . Děti často podceňují s tím spojená nebezpečí . Držte děti daleko od pracovního prostoru . V objemu dodávky je mnoho šroubů a jiných malých dílů . Ty mohou být spolknuty nebo vdechnuty a tím se stát nebezpečím ohrožení... - Seite 101 NEBEZPEČÍ VÝBUCHU! Nenabíjecí baterie nikdy znovu nenabíjejte . Baterie nebo akumulátory nezkratujte ani je neotevírejte . Hrozí přehřátí, nebezpečí požáru nebo jejich prasknutí . Nikdy neházejte baterie nebo akumulátory do ohně ani do vody . Nevystavujte baterie nebo akumulátory mechanickému zatížení . ...
-
Seite 102: Před Použitím
Nebezpečí poškození výrobku Používejte jen udaný typ baterie nebo akumulátoru! Nasazujte baterie nebo akumulátory podle označení polarity (+) a (–) na bateriích nebo akumulátorech a na výrobku . Vyčistěte před vložením kontakty baterie nebo akumulátoru a kontakty v přihrádce na baterie! Vybité... -
Seite 103: Vložte/Vyměňte Baterie
Pokyn: Integrovaný regulátor nabíjení výrobku zabraňuje přebíjení dobíjecích baterií 11 . Vyměňte dobíjecí baterie 11 , když se světelný výkon po nabíjení nezlepšil (Obr . C: HG04465A nebo Obr . E: HG04465B) . ˜ Vložte/vyměňte baterie Pokyn: Dobíjecí baterie 11 jsou již vloženy . Používejte pouze baterie, které... -
Seite 104: Montáž
Senzor 4 má maximální dosah pokrytí cca 5 až 8 m, úhlem pokrytí asi 90° (závislé na výšce montáže – výška 1,8 až 2,5 m je ideální) (Obr . D: HG04465A nebo Obr . F: HG04465B) . Dbejte na to, aby senzor 4 nebyl v noci osvětlen pouličním ... - Seite 105 3 . Maximální vzdálenost mezi solárním panelem 1 a reflektorem 3 je přibližně 2,5 m (jen HG04465B) . Pro HG04465A: Vyklopte solární panel 1 opatrně nahoru . Odstraňte montážní desku 6 z reflektoru 3 tak, že uvolníte ...
- Seite 106 Nyní umístěte reflektor 3 směrem k montážní desce 6 . Vložte kulový kloub montážní desky 6 správně do otvoru 9 reflektoru 3 . Potom zavřete kryt kulového kloubu 7 tak, že otáčíte šrouby ve směru hodinových ručiček (Obr . B) . Dejte vypínač...
- Seite 107 Nyní použijte otvory v montážní konzole 14 , které jsou určeny pro šrouby 16 , aby označily otvory (Ø 8 mm, cca 40 mm hluboké) . Dbejte na to, abyste reflektor 3 dokázali připojit pomocí propojovacího kabelu 17 se solárním panelem 1 . Nyní...
-
Seite 108: Uvedení Do Provozu
Převažující směr: Optimální je nasměrování na jih . Nasměrováním s mírnými odchylkami na západ je třeba dát přednost před nasměrováním s mírnou odchylkou na východ . Vodorovné nasměrování: Vodorovné nasměrování solárního panelu 1 závisí na zeměpisné šířce místa montáže . Ve střední Evropě je ideální úhel 30° až 40° . Výrobek je nyní... -
Seite 109: Údržba A Čištění
˜ Údržba a čištění VAROVÁNÍ! OHROŽŽENÍ ŽŽIVOTA ELEKTRICKÝM PROUDEM! Nepoužívejte žádná rozpouštědla, benzín atd . Jinak se svítidlo poškodí . Dejte vypínač ON/OFF 2 reflektoru 3 do polohy „OFF“ . Vyjměte dobíjecí baterie 11 . Povolte spojení mezi konektorem 18 a zdířkou 19 (jen ... -
Seite 110: Zlikvidování
˜ Zlikvidování Obal se skládá z ekologických materiálů, které můžete zlikvidovat prostřednictvím místních sběren recyklovatelných materiálů . Při třídění odpadu se řiďte podle označení obalových materiálů zkratkami (a) a čísly (b), s následujícím významem: 1–7: umělé hmoty / 20–22: papír a lepenka / 80–98: složené... -
Seite 111: Záruka
Ekologické škody v důsledku chybné likvidace baterií / akumulátorů! Baterie / akumulátory se nesmí zlikvidovat v domácím odpadu . Mohou obsahovat jedovaté těžké kovy a musí se zpracovávat jako zvláštní odpad . Chemické symboly těžkých kovů: Cd = kadmium, Hg = rtuť, Pb = olovo . Proto odevzdejte opotřebované baterie / akumulátory u komunální... - Seite 112 Záruka platí na vady materiálu a výrobní vady . Tato záruka se nevztahuje na díly výrobku podléhající opotřebení (např . na baterie), dále na poškození křehkých, choulostivých dílů, např . vypínačů, akumulátorů nebo dílů zhotovených ze skla . 112 CZ...
- Seite 113 Zoznam použitých piktogramov . . . . . . . Strana 114 Úvod . . . . . . . . . . . . . . . . . . . . . . . . . . . . . . . . . . . . . . . Strana 115 Použitie v súlade so zadaným účelom .
-
Seite 114: Zoznam Použitých Piktogramov
Zoznam použitých piktogramov Životnosť LED Jednosmerný prúd Tento produkt je vhodný pre extrémne teploty do -21°C . Dosah pohybového snímača pribl . 5 – 8 m Uhol snímania pohybového snímača: pribl . 90º Systémová ochrana: IP44 (chránené proti striekajúcej vode) Batérie sú súčasťou dodávky Trvanie osvetlenia (po aktivácii): pribl . -
Seite 115: Úvod
LED SOLÁRNY REFLEKTOR ˜ Úvod Blahoželáme Vám ku kúpe Vášho nového výrobku . Rozhodli ste sa pre veľmi kvalitný výrobok . Návod na obsluhu je súčasťou tohto výrobku . Obsahuje dôležité upozornenia týkajúce sa bezpečnosti, používania a likvidácie . Skôr ako začnete výrobok používať, oboznámte sa so všetkými pokynmi k obsluhe a bezpečnosti . -
Seite 116: Technické Údaje
16 Skrutka (pre montážny držiak) (len HG04465B) 17 Spojovací kábel (len HG04465B) 18 Konektor (len HG04465B) 19 Zdierka (len HG04465B) ˜ Technické údaje Č . modelu: HG04465A alebo HG04465B LED: 6 x 0,5 W (LED sa nedajú meniť) Prevádzkové napätie: 3,6 V Nabíjateľné... -
Seite 117: Rozsah Dodávky
˜ Rozsah dodávky Ihneď po rozbalení skontrolujte, či sú všetky diely úplné a či je výrobok v bezchybnom stave . 1 Solárny LED žiarič, model HG04465A alebo HG04465B 1 Montážny držiak (pre solárny panel) (len HG04465B) 1 Solárny panel (len HG04465B) 2 Hmoždinka (montážna doska) -
Seite 118: Bezpečnostné Upozornenia Týkajúce Sa Batérií / Akumulátorových Batérií
Deti nikdy nenechávajte bez dozoru v blízkosti obalových materiálov . Obalový materiál predstavuje nebezpečenstvo udusenia . Deti často podceňujú riziká spojené s obalovými materiálmi . Nedovoľte deťom približovať sa k pracovnej oblasti . V rozsahu dodávky je mnoho skrutiek a ďalších malých častí . Môže dôjsť k ich prehltnutiu alebo vdýchnutiu a stanú... - Seite 119 NEBEZPEČENSTVO EXPLÓZIE! Nenabíjateľné batérie nikdy znova nenabíjajte . Batérie / akumulátorové batérie neskratujte a / alebo neotvárajte . Následkom môže byť prehriatie, požiar alebo explózia . Batérie / akumulátorové batérie nikdy nehádžte do ohňa alebo vody . Nevystavujte batérie / akumulátorové batérie mechanickej ...
-
Seite 120: Príprava Výrobku Na Použitie
Riziko poškodenia produktu Používajte výhradne uvedený typ batérií / akumulátorových batérií! Vložte batérie / akumulátorové batérie podľa označenia polarity (+) a (–) na batérii / akumulátorovej batérii a výrobku . Pred vložením vyčistite kontakty na batérii / akumulátorovej batérii a v priečinku pre batérie! Vybité... -
Seite 121: Vloženie/Výmena Batérií
Upozornenie: Integrovaný regulátor nabíjania produktu zabraňuje prebíjaniu nabíjateľných batérií 11 . Vymeňte nabíjateľné batérie 11 , ak sa svetelný výkon po nabíjaní nezlepší (obr . C: HG04465A alebo obr . E: HG04465B) . ˜ Vloženie/výmena batérií Upozornenie: Nabíjateľné batérie 11 sú už vložené . Používajte iba batérie, ktoré... -
Seite 122: Montáž
4 má maximálny dosah pribl . 5 až 8 m, s uhlom snímania pribl . 90° (v závislosti od výšky montáže – ideálna je výška od 1,8 do 2,5 m) (obr . D: HG04465A alebo obr . F: HG04465B) . Uistite sa, že snímač 4 nie je v noci osvetlený pouličným ... - Seite 123 dosiahol žiarič 3 . Maximálna vzdialenosť medzi solárnym panelom 1 a žiaričom 3 činí pribl . 2,5 m (len HG04465B) . Pre HG04465A: Opatrne sklopte solárny panel 1 smerom nahor . Odstráňte montážnu dosku 6 od žiariča 3 uvoľnením skrutiek ...
- Seite 124 Teraz žiarič 3 umiestnite v smere montážnej dosky 6 . Zasuňte guľový kĺb montážnej dosky 6 správne do otvoru 9 žiariča 3 . Potom zatvorte kryt guľového kĺbu 7 tak, že otočíte skrutky v smere chodu hodinových ručičiek (obr . B) . Vypínač...
- Seite 125 Na označenie vŕtaných otvorov (Ø 8 mm, pribl . 40 mm hĺbka) použite štrbiny v montážnej doske 14 , ktoré sú určené pre skrutky 16 . Dbajte na to, aby sa dal žiarič 3 pomocou spojovacieho kábla 17 spojiť so solárnym panelom 1 . Teraz navŕtajte upevňovacie otvory .
-
Seite 126: Uvedenie Do Prevádzky
Prevládajúci smer: Optimálna je orientácia na juh . Orientácia s miernymi odchýlkami na západ je vhodnejšia ako orientácia s miernou odchýlkou na východ . Horizontálny smer: Horizontálny smer solárneho panelu 1 závisí od zemepisnej šírky miesta montáže . V strednej Európe je ideálny uhol od 30° do 40° . Váš... -
Seite 127: Údržba A Čistenie
˜ Údržba a čistenie VÝSTRAHA! NEBEZPEČENSTVO ZÁSAHU ELEKTRICKÝM PRÚDOM! Nepoužívajte rozpúšťadlá, benzín atď ., pretože v opačnom prípade sa poškodí žiarovka . Vypínač ON/OFF 2 na žiariči 3 uveďte do polohy „OFF“ . Vyberte nabíjateľné batérie 11 . ... -
Seite 128: Likvidácia
˜ Likvidácia Obal pozostáva z ekologických materiálov, ktoré môžete odovzdať na miestnych recyklačných zberných miestach . Všímajte si prosím označenie obalových materiálov pre triedenie odpadu, sú označené skratkami (a) a číslami (b) s nasledujúcim významom: 1–7: Plasty / 20–22: Papier a kartón / 80–98: Spojené... -
Seite 129: Záruka
Nesprávna likvidácia batérií / akumulátorových batérií ničí životné prostredie! Batérie / akumulátorové batérie sa nesmú likvidovať spolu s domovým odpadom . Môžu obsahovať jedovaté ťažké kovy a je potrebné zaobchádzať s nimi ako s nebezpečným odpadom . Chemické značky ťažkých kovov sú nasledovné: Cd = kadmium, Hg = ortuť, Pb = olovo . - Seite 130 Poskytnutie záruky sa vzťahuje na chyby materiálu a výrobné chyby . Táto záruka sa nevzťahuje na časti produktu, ktoré sú vystavené normálnemu opotrebovaniu, a preto ich je možné považovať za opotrebovateľné diely (napr . batérie) alebo na poškodenia na rozbitných dieloch, napr . na spínači, akumulátorových batériach alebo častiach, ktoré...
- Seite 131 OWIM GmbH & Co. KG Stiftsbergstraße 1 DE‑74167 Neckarsulm GERMANY Model No.: HG04465A / HG04465B Version: 09/2018 IAN 304540...