Herunterladen Inhalt Inhalt Diese Seite drucken

Werbung

Verfügbare Sprachen
  • DE

Verfügbare Sprachen

  • DEUTSCH, seite 33
DPC-1
Termostato digital programable con comunicación
E
Instrucciones de Manejo y mantenimiento
GB
Programmable digital thermostat with communication
Operating and Maintenance Instructions
Thermostat digital programmable avec communication
F
Instructions d'Utilisation et de Maintenance
Termóstato digital programável com comunicação
P
Instruções de Utilização e Manutenção
Termostato digitale programmabile con comunicazione
I
Istruzioni per l'uso e la Manutenzione
Programmierbarer Digital-Thermostat mit Kommunikationsmöglichkeit
D
Hinweise zu Bedienung und Wartung
Programmeerbare digitale thermostaat met communicatieverbinding
NL
Bedienings- en onderhoudsinstructies
N
Programmerbar digital termostat med kommunikasjon
Betjenings- og vedlikeholdsinstrukser
ER-0028/1991
CGM-97/013
Clima Roca York S.L. participa en el Programa de Certificación EUROVENT.
Los productos se corresponden con los relacionados en el Directorio EUROVENT de
Productos Certificados, en el programa AC1, AC2, AC3, LCP y FC.
Clima Roca York S.L. is participating in the EUROVENT Certification Programme.
Products are as listed in the EUROVENT Directory of Certified Products, in the program
AC1, AC2, AC3, LCP and FC.
Clima Roca York S.L. participe au Programme de Certification EUROVENT.
Les produits figurent dans l'Annuaire EUROVENT des Produits Certifiés, dans le
programme AC1, AC2, AC3, LCP et FC.
Clima Roca York S.L. participa no Programa de Certificação EUROVENT.
Os produtos correspondem aos referidos no Directório EUROVENT de Produtos
Certificados, no programa AC1, AC2, AC3, LCP e FC.
E U R O V E N T
CERTIFIED PERFORMANCE
Clima Roca York S.L. partecipa al Programma di Certificazione EUROVENT.
I prodotti interessati figurano nella Guida EUROVENT dei Prodotti Certificati, nel
programma AC1, AC2, AC3, LCP e FC.
Clima Roca York, S.L. ist am Zertifikationsprogramm EUROVENT beteiligt.
Die entsprechend gekennzeichneten Produkte sind im EUROVENT-Jahrbuch im Programm
AC1, AC2, AC3, LCP und FC. enthalten.
Clima Roca York, S.L. neemt deel aan het EUROVENT-certificatieprogramma.
De produkten zijn opgenomen in het EUROVENT-jaarboek van de gecertificeerde
produkten, in de programma AC1, AC2, AC3, LCP en FC.
Clima Roca York, S.L. deltar i EUROVENT sertifiseringsprogram.
Produktene er oppført i EUROVENT's katalog over sertifiserte produkt, i kategorie AC1,
AC2, AC3, LCP og FC.
Ref: N-40130 0206M
3 - 8
9 - 14
15 - 20
21 - 26
27 - 32
33 - 38
39 - 44
45 - 50
1

Werbung

Inhaltsverzeichnis
loading

Inhaltszusammenfassung für CLIMA ROCA YORK DPC-1

  • Seite 1 CERTIFIED PERFORMANCE ER-0028/1991 CGM-97/013 Clima Roca York S.L. participa en el Programa de Certificación EUROVENT. Clima Roca York S.L. partecipa al Programma di Certificazione EUROVENT. Los productos se corresponden con los relacionados en el Directorio EUROVENT de I prodotti interessati figurano nella Guida EUROVENT dei Prodotti Certificati, nel Productos Certificados, en el programa AC1, AC2, AC3, LCP y FC.
  • Seite 3: Instrucciones De Manejo

    DPC-1, Termostato ambiente Este termostato ha sido diseñado para pro- porcionar un preciso control de la tempera- tura ambiente y dar información gráfica del AUTO modo en que está...
  • Seite 4 en la pantalla (al mismo tiempo la pala- c) Automático Para el correcto funcionamiento de este bra COOL aparece) (Fig. 3). Pulsar alternativamente la tecla MODE modo, previamente se tiene que hacer hasta que los símbolos de calor y frío la puesta en hora del reloj y seleccionar aparezcan en la pantalla (al mismo el número del día de la semana.
  • Seite 5: Menú De Programación

    Las teclas activas serán: el modo Ajuste, que dura 5 segundos. En El termostato DPC-1 ha sido diseñado para Permitirán seleccionar la opción este modo el ventilador parpadea y se mues- aceptar un sensor remoto que permite con- activa.
  • Seite 6 2- Programación del ventilador programables por el usuario. namiento del control de la temperatura. Al seleccionar la opción TURBO; Control rápido de temperatura Permite configurar el estado del ventilador 0h 2 8 10 12 14 16 18 20 22 24 del menú...
  • Seite 7: Instrucciones De Instala- Ción

    En el micro-interruptor SW1 se configuran Tabla de averias (Led ROJO) - Sobre una pared exterior. los siguientes parámetros: - Contiguo a, o en línea con rejillas de des- - Pin 1: Bloquear teclado. En OFF el tecla- Descripción carga de aire acondicionado, huecos de Código do no está...
  • Seite 8 Conexiones eléctricas estan- Precaución Se debe utilizar cable apantalla- Para fijar el termostato a la pared debe- dar termostato DPC-1 (para ter- do de 10 x 0,22 mm con una lon- mos abrir el panel frontal y dejar al descu- mostato con comunicaciones) gitud máxima de 100 m entre el...
  • Seite 9 - It is advisable to inspect and service your equipment whenever necessary; this avoids damage and ensures long service life of your air conditioner. Ambient thermostat DPC-1 These thermostats are designed to give pre- cise ambient temperature control and graphic information with regard to heat pump operation.
  • Seite 10 EMERG HEAT. Controls the system in emer- ambient temperature appears once For correct operation of this mode, first gency heating mode (operates only if an again. you must set the time on the clock and electric heater, optional accessory, is in- After a few minutes, the heating system select the number of the day of the week.
  • Seite 11: Programming Menu

    6.- Ambient temperature remote sensor To change the temperature degree option scale, press the buttons si- The DPC-1 thermostat is designed to ac- The active buttons are: multaneously. cept a remote sensor for controlling the Allow selecting the active option.
  • Seite 12 2- Fan setting 4- Selection of time schedule profiles S1: Indoor probe. Default value. Allows programming fan status in the dif- There are three pre-defined profiles (P1 S2: Remote probe, RS1. ferent occupation periods ( Day, Night or Un- and P5), and three additional profiles S3: Duct remote probe, DS1.
  • Seite 13: Installation Instructions

    discharge grids, stairwells or doors lead- Micro-switches SW1 allow the configura- Table of lockouts (Red LED) ing outdoors. tion of the following parameters: - Where operation can be affected by Designation Code - Pin 1: Lock keyboard. In OFF the key- steam or water pipes, or hot air chimneys board is not locked.
  • Seite 14: Thermostat Installation

    Standard electric connections, Caution A screened 10 x 0.22 mm² cable, To fasten the thermostat to the wall, open thermostat DPC-1 (for thermostat with a maximum length of 100 m., the front panel and uncover the base of the with communication) should be used between the ther- thermostat.
  • Seite 15: Instructions D'utilisation

    On évitera ainsi des pannes et cela permettra d’assurer une durée de vie plus longue du climatiseur. DPC-1, thermostat d’ambiance Ce thermostat a été conçu pour permettre un contrôle précis de la température am- AUTO...
  • Seite 16 MODE jusqu’à l’apparition du symbole c) Automatique Pour un bon fonctionnement de ce du mode froid s’affiche sur l’écran Appuyer alternativement sur le bouton mode, il faut préalablement effectuer la (le mot COOL apparaît en même temps) jusqu’à l’apparition sur l’écran mise à...
  • Seite 17: Menu De Programmation

    Elles permettront de modi- ainsi que le mode auto ou fixe. Une première Le thermostat DPC-1 a été conçu pour ac- fier la sélection. pression sur la touche ne modifie pas l’état cepter un capteur à distance qui permet de Cette touche permettra de sélection-...
  • Seite 18 2.- Programmation du ventilateur 4. Sélection de profils horaires - P1, Programmation des calibrages des lectures de température. Le maximum Elle permet de fixer l’état du ventilateur dans Il existe trois profils prédéfinis (de P1 à P3), permis est ± 3°C. les différents états d’occupation (Jour, Nuit et trois profils supplémentaires, de à...
  • Seite 19: Éléments De Base

    Les paramètres suivants sont configurés Tableau des pannes (LED rouge) - Sur un mur extérieur. dans le micro-interrupteur SW 1: - Contigu ou en ligne avec des grilles de - Pin 1: blocage du clavier. En OFF, le cla- Description soufflage de climatisation, des cages Code vier n’est pas bloqué, en ON, le clavier...
  • Seite 20 Connexions électriques stan- Précaution: Il faut utiliser le fil blindé de 10 x Pour fixer le thermostat au mur, il faut ouvrir dard du thermostat DPC-1 (pour 0,22 mm², d’une longueur maxi- le panneau frontal et laisser la base du ther- thermostat avec communications) male de 100 mètres entre le ther-...
  • Seite 21: Instruções De Utilização

    - É aconselhável inspeccionar e preparar o seu equipamento quando não o neces- sitar; desta maneira, evitará avarias e assegurará uma longa duração do seu condicionador de ar. DPC-1. Termóstato ambiente Este termóstato foi concebido para propor- cionar um controlo preciso da temperatura AUTO AUTO PROG °C...
  • Seite 22 a) Arrefecimento apareçam no ecrã (ao mesmo tem- Para o correcto funcionamento deste Há que premir alternativamente o bo- po, também aparecerá a palavra AUTO). modo, tem de ser acertado previamente tão até que o símbolo do frio Seleccionar uma temperatura de refe- o relógio e seleccionado o número do dia MODE apareça no ecrã...
  • Seite 23 Os botões activos serão os seguintes: fixo. Ao premir o botão pela primeira vez, o O termóstato DPC-1 foi concebido para Permite seleccionar a opção activa. estado actual não é modificado, mas sim aceitar um sensor remoto que permita con- se mostra o mesmo.
  • Seite 24 2 - Programação do ventilador 4 - Selecção de perfis horários - P2, Programação da origem da leitura Permite configurar o estado do ventilador Existem três perfis pré-definidos (de P1 a de temperatura. nos diferentes estados de ocupação (Dia, P3), e três perfis adicionais de S1: Sonda interior.
  • Seite 25: Instruções De Instalação

    Mediante os micro-interruptores SW1, con- Tabela de avarias (Led vermelho) - Em cima de uma parede exterior. figuram-se os seguintes parâmetros: - Contíguo a, ou alinhado com, grelhas de - Pin 1: Bloquear o teclado. Na posição Descripción insuflação de ar condicionado, vão de Código OFF, o teclado não se encontra bloquea- escada ou portas que comuniquem com...
  • Seite 26 Ligações eléctricas standard Precaução Deve-se utilizar cabo blindado de Para fixar o termóstato na parede, há que do termóstato DPC-1 (para 10 x 0,22 mm² com um compri- abrir o painel frontal e deixar à vista a base termóstato com comunicaões) mento máximo de 100 m entre o...
  • Seite 27: Istruzioni Per L'uso

    - È consigliabile ispezionare e mettere a punto l’apparecchio quando questo non sia ancora necessario. Si eviteranno così guasti e si assicurerà una lunga vita utile al climatizzatore. Termostato ambiente DPC-1 AUTO Questo termostato è stato progettato per AUTO PROG °C...
  • Seite 28 OFF Spegne il sistema di climatizzazione c) Automatico Per il buon funzionamento di questo modo MODE (non quello di ventilazione). Premere una o più volte il tasto è prima necessario regolare l’orologio finché sul display appaiano i simboli di ri- sull’ora esatta e selezionare il numero a)Raffrescamento scaldamento...
  • Seite 29: Menu Di Programmazione

    (optional) ne attiva. cità impostata e il modo di funzionamento Il termostato DPC-1 è stato progettato per Permettono di modificare la accettare un sensore remoto, che permette del ventilatore (automatico o continuo). Pre- selezione.
  • Seite 30 2 - Programmazione del ventilatore 4 - Selezione di profili orari S1: Sonda interna. Valore di default. Permette di configurare il ventilatore secon- Ci sono tre prifili predefiniti (da P1 a P3), e S2: Sonda remota, RS1. do l’occupazione (giorno, notte o disabita- tre profili addizionali da S3: Sonda remota nei canali, DS1.
  • Seite 31: Istruzioni Per L'installazione

    Con i microinterruttori SW1 si configurano i razione del sistema, ma solo il giorno e l’ora. possa alterare il corretto rivelamento della seguenti parametri: temperatura ambiente. Tabella delle averie (led ROSSO) DIP switch 1: bloccaggio tastiera. Su OFF - Su una parete esterna. la tastiera è...
  • Seite 32 Connessioni elettriche stan- Attenzione! Per le connessioni tra il termo- Per il fissaggio del termostato a parete si dard del termostato DPC-1 (ter- stato e il modulo di controllo si deve aprire il pannello frontale e lasciare mostato con comunicazione)
  • Seite 33: Hinweise Zur Bedienung

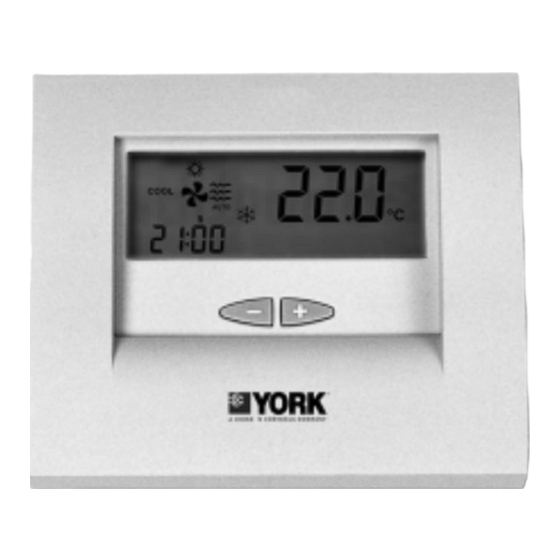
    - Inspektions- und Überholarbeiten sollten vorzugsweise dann vorgenommen wer- den, wenn das Gerät nicht genutzt wird. Auf diese Weise werden Störungen ver- mieden und das Gerät hat eine längere Lebensdauer. DPC-1, Raumthermostat AUTO AUTO PROG °C Dieser Thermostat wurde für eine genaue...
  • Seite 34 MODE OFF Schaltet die Klimatisierung (nicht die c) Automatikbetrieb Taste so lange drücken, bis auf MODE Belüftung) aus. Taste so lange drücken, bis auf dem Display (zusammen mit dem Wort dem Display (zusammen mit dem Wort AUTO PROG) die Symbole a)Kühlen AUTO) die Symbole erschei-...
  • Seite 35: Programm-Menü

    6.- Option zweite Raumtemperatur 0h 2 8 10 12 14 16 18 20 22 24 dargestellt. Bei einer weiteren Betätigung Der Thermostat DPC-1 ist für den Anschluss der Taste kommen die verschiedenen eines Fernsensors zur Kontrolle der Tem- gerätespezifischen Geschwindigkeitsstufen peratur eines zweiten Raums vorgesehen.
  • Seite 36: Menü Zur Programmierung Der Überwachung

    gang des Thermostats auf Betriebs- Belegungszustand, dessen Sollwert mitge- Bei Anzeige des Benutzerprofils weise Normal. schleppt wurde. scheint anstelle der Uhrzeit der Text Sollten innerhalb des Programm-Menüs und zeigt an, dass die dieser Bezeichnung (bzw. der entsprechenden Unterprogram- entsprechende Taste zur Programmierung me) 30 Sekunden lang keine weiteren Ta- des Profils bereitsteht.
  • Seite 37: Hinweise Zum Einbau

    zeit. Hinweise zum Einbau Es sind die folgenden Codenummern vor- Der Einbau sollte von einem qualifizierten gesehen: Installateur vorgenommen werden. - 0-90: Gerätefehler. - 91: Ursprung der gewählten Temperatur Anbringung ist nicht korrekt. Zur Gewährleistung eines korrekten Be- - 92: Der interne Temperatursensor ist triebs muss der Thermostat an der Innen- nicht geeicht.
  • Seite 38: Befestigung Des Thermostats

    Verwendung finden. Der Abstand zwischen Elektrische Standardan- Thermostat und Sensor darf nicht größer als 100 m sein. Angeschlossen werden schlüs-se Thermostat DPC-1 müssen RS1 und RS2. (für Thermostat mit Kommunikations- möglichkeit) Zum Anschluss des digitalen Fernsensors muss bewehrtes Kabel 3 x 0,5 mm...
  • Seite 39: Bedieningsinstructies

    - Geadviseerd wordt het toestel te contro- leren en af te stellen wanneer u het niet gebruikt. U voorkomt hiermee storingen en verzekert een lange levensduur van uw warmtepomp. DPC-1, ruimtethermostaat Deze thermostaat is ontworpen om een AUTO AUTO °C...
  • Seite 40 OFF Schakelt het airconditioningssysteem c) Automatisch Herhaaldelijk de toets indrukken MODE (niet het ventilatiesysteem) uit. De toets herhaaldelijk indrukken totdat de symbolen voor verwarming MODE totdat het symbool voor verwarming en koeling in het display verschijnen a)Koeling en koeling in het display verschijnt (tegelijkertijd verschijnt het woord AUTO De toets herhaaldelijk indrukken...
  • Seite 41 6.- Optie voor een afstandssensor voor Als de toets voor de eerste keer ingedrukt de ruimtetemperatuur wordt, verandert de huidige toestand niet, De DPC-1 thermostaat is ontworpen voor De volgende toetsen zijn actief: deze wordt uitsluitend weergegeven. Door gebruik met een afstandssensor waarmee...
  • Seite 42 en minuten ingesteld worden. 4- Tijdprofiel kiezen S1: Binnensensor. Standaardwaarde. Er zijn drie vooraf gedefinieerde profielen S2: Afstandssensor, RS1. (P1 tot P3), en drie extra profielen S3: Afstandssensor in de kanalen, DS1. die door de gebruiker geprogram- S4: Sensor economizer. meerd kunnen worden.
  • Seite 43: Installatie-Instructies

    systeem gaat niet verloren bij het verwisse- Met de microschakelaar worden de vol- - Plaatsen waar het directe zonlicht of de len van de batterij, alleen moeten de dag en gende parameters ingesteld: door andere toestellen afgegeven de tijd opnieuw ingesteld worden. - Pin 1: Toetsenbord blokkeren.
  • Seite 44 De thermostaat bevestigen Standaard elektrische aanslui- Waarschuwing: Er dient een kabel met mantel- Om de thermostaat tegen de wand te beves- ting van de thermostaat DPC- bescherming van 10 x 0,22 mm tigen moet het frontpaneel geopend worden (voor thermostaat met communica- met een maximale lengte van en de montageplaat van de thermostaat vrij 100 m tussen de thermostaat en...
  • Seite 45 5.- Avlesning av utendørs temperatur bruker det, slik vil man forhindre skader og sikre at luftkondisjoneringsapparatet vil vare lenge. DPC-1, Romtermostat Denne termostaten er beregnet for å skaffe en presis kontroll av romtemperaturen og gi grafisk informasjon om hvilken modus den AUTO virker på.
  • Seite 46 men (samtidig vil ordet COOL vises). c) Automatisk For en korrekt drift på denne modusen, MODE (Fig. 3.) Trykk vekselvis på knappen helt må man først stille klokken og velge uke- dag. Deretter velger man ønsket drifts- til symbolene for varme og kulde vises på...
  • Seite 47 6.- Opsjon fjernsensor for romtempera- De aktive tastene vil være: 2.- Vifte Termostaten DPC-1 er designet for å kunne Tillater valg av aktiv opsjon. Når man trykker på tasten , kommer innlemme en fjernsensor som gjør det mu- Tillater endring av valgt op- man inn på...
  • Seite 48 2- Programmering av viften 4- Valg av driftstimeplan - P3, Programmering av temperatur- Tillater å programmere viften på de ulike Det finnes tre forhåndsdefinerte profiler (P1 kontrollens funksjonsmåte. funksjonsstadiene (Dag, Natt eller Still- til P3), og tre tilleggsprofiler TURBO; Hurtigkontroll av temperaturen stand).
  • Seite 49 På mikrobryter SW1 programmeres føl- Tabell over skader (RØD Iysdiode) utladningsrister fra klimaanlegg, trappe- gende parametre: fordypninger eller ytterdører. Kode Beskrivelse - På steder hvor termostatens funksjon - Pin 1: Blokkering av tastaturet. På OFF er kan påvirkes av gass- eller vannrør- tastaturet ikke blokkert, på...
  • Seite 50 Festing av termostaten Standard elektriske koblinger Man må bruke skjermet ledning Når vi skal feste termostaten på veggen, termostat DPC-1 (for termostat på 10 x 0,22 mm med en maksi- må vi først åpne frontpanelet slik at med kommunikasjoner) mal lengde på 100 m mellom ter- termostatens basisplate kommer til syne.
  • Seite 52 DECLARACION CE DE CONFORMIDAD SOBRE MAQUINAS FABRICANTE: CLIMA ROCA YORK, S.L. DIRECCIÓN: Paseo Espronceda, 278, 08204 SABADELL Certificamos que el equipo descrito, es conforme a las exigencias básicas de las directivas Europeas que le son aplicables, incluidas las modificaciones de las mismas y las correspondientes transposiciones a la ley nacional.

Inhaltsverzeichnis