Seite 1
PIASTRA DI COTTURA (FRY - TOP) COOKING PLATE (FRY - TOP) 08WFT1GV-08WFT2GV BRATPLATTEN (FRY - TOP) 08WFT3GV-08WFT4GV 08WFT6GV-08WFT7GV PLAQUE DE CUISSON (FRY - TOP) PLANCHA DE COCCIÓN (FRY - TOP) MANUALE D’USO E INSTALLAZIONE USE AND INSTALLATION MANUAL BEDIEN- UND INSTALLATIONSHANDBUCH MANUEL D’UTILISATION ET D’INSTALLATION...
INFORMAZIONI GENERALI RACCOMANDAZIONI PER IL LETTORE Per rintracciare facilmente gli argomenti specifici di parte: contiene tutte le informazioni ne- cessarie ai destinatari omogenei, cioè tutti gli interesse, consultare l’indice analitico posto all’ini- operatori esperti e autorizzati a movimentare, zio del manuale. trasportare, installare, mantenere, riparare e Questo manuale è...
è prodotta in più versioni (vedi figura). L'apparecchiatura è dotata di una linea bifronte per permetterne l'installazione al centro del locale. 08WFT1GV Liscia (ferro) 08WFT2GV Rigata (ferro) 08WFT3GV 1/2 Rigata (ferro) 08WFT4GV Liscia (cromo) 08WFT6GV 1/2 Rigata (cromo) 08WFT7GV Liscia (compound) IDM-39611000100.tif...
Organi principali A)Piastra di cottura: realizzata in diverse forme e materiali per far fronte alle diverse esigenze. B)Scarico fumi (tipo A): per evacuare i fumi generati dal bruciatore. C)Tappo di scarico: per scaricare i residui di cottura e convogliarli nella bacinella di raccolta. D)Manopola comando bruciatore: per regolare l'ali- mentazione del gas al bruciatore.
SEGNALI DI SICUREZZA E INFORMAZIONE L'illustrazione indica la posizione dei segnali applicati. A)Targa identificazione costruttore e apparec- chiatura. B)Pericolo di scottatura: fare attenzione alle super- fici calde. C)Pericolo generico: durante il lavaggio dell'appa- recchiatura non dirigere getti d'acqua in pressione sulle parti interne.
SICUREZZA NORME PER LA SICUREZZA Il costruttore, in fase di progettazione e costruzione, Tutti gli interventi di manutenzione che richiedono ha posto particolare attenzione agli aspetti che pos- una precisa competenza tecnica o particolari capa- sono provocare rischi alla sicurezza e alla salute cità...
USO E FUNZIONAMENTO RACCOMANDAZIONI PER L’USO Importante L'incidenza degli infortuni derivanti cipali. Attuare solo gli usi previsti dal co- dall'uso di apparecchiature dipende da struttore manomettere nessun molti fattori che non sempre si riescono a dispositivo per ottenere prestazioni diverse prevenire e controllare.
Seite 10
ACCENSIONE E SPEGNIMENTO BRUCIATORE Per l'accensione e lo spegnimento procedere nel modo indicato per entrambi i bruciatori. Accensione Alla prima accensione lavare la piastra per togliere il grasso protettivo ed ogni eventuale impurità, quindi accendere l'apparecchiatura ed effettuare un preri- scaldamento di circa 2 ore alla temperatura di 195 °C.
RIPRISTINO APPARECCHIATURA In caso di intervento del termostato di sicurezza è necessario ripristinare le condizioni iniziali di funzio- namento dell'apparecchiatura nel modo indicato. È possibile effettuare questa operazione solo per le apparecchiature con piastra cromata o in com- pound. 1 - Aprire il portello (A). 2 - Premere il pulsante (B) del termostato di sicu- rezza intervenuto per riattivare l'alimentazione del gas.
MANUTENZIONI RACCOMANDAZIONI PER LA MANUTENZIONE Mantenere l'apparecchiatura in condizioni di massi- Ad ogni fine esercizio e ogni volta che se ne ri- ma efficienza effettuando le operazioni di manuten- scontra la necessità, pulire: zione programmata previste dal costruttore. Una – La piastra (vedi pag. 11). –...
PULIZIA PIASTRA 4 - Versare acqua a 60°C sulla piastra e lasciare in Cautela - Avvertenza ammollo per alcuni minuti. Effettuare la pulizia della piastra in modo ap- 5 - Rimuovere il tappo (B) per scaricare l'acqua dalla propriato utilizzando l'attrezzatura disponibi- piastra.
GUASTI RICERCA GUASTI L'apparecchiatura, prima della messa in servizio, è per tutti gli altri è richiesta una precisa competenza stata preventivamente collaudata. Le informazioni di tecnica o particolari capacità e quindi devono essere seguito riportate hanno lo scopo di aiutare l'identifica- eseguiti esclusivamente da personale qualificato con zione e correzione di eventuali anomalie e disfunzioni esperienza riconosciuta e acquisita nel settore speci-...
IMBALLO E DISIMBALLO L'imballo è realizzato, limitando gli ingombri, anche in funzione del tipo di trasporto adottato. Per facilitare il trasporto, la spedizione può essere eseguita con alcuni componenti smontati ed oppor- tunamente protetti e imballati. Sull'imballo sono riportate tutte le informazioni ne- cessarie ad effettuare il carico e lo scarico.
INSTALLAZIONE APPARECCHIATURA Tutte le fasi di installazione devono essere conside- rate sin dalla realizzazione del progetto generale. Prima di iniziare tali fasi, oltre alla definizione della zona di installazione, chi è autorizzato ad eseguire queste operazioni dovrà, se necessario, attuare un "piano di sicurezza"...
LIVELLAMENTO Agire sui piedi di appoggio (A) per livellare l'appa- recchiatura. IDM-39610800800.tif MONTAGGIO APPARECCHIATURE IN BATTERIA Per montare le apparecchia- ture in batteria (fianco a fian- co) procedere nel modo indicato. 1 - Sfilare le manopole (A). 2 - Svitare le viti (B) e smontare i cruscotti (C).
ALLACCIAMENTO GAS Importante Chi è autorizzato ad effettuare tale operazio- ne deve possedere capacità ed esperienza acquisita e riconosciuta nel settore specifico, dovrà eseguire l'allacciamento a regola d'arte e tenere conto di tutti i requisiti normativi e le- gislativi. Ad allacciamento completato, prima di rendere operativa l'attrezzatura, si dovrà...
Seite 19
7 - Rimontare il coperchio (H), la scatola elettrica Importante (F) e il cruscotto (D) ad operazione ultimata. In fase di allacciamento fare attenzione al collegamento dei cavi di neutro e di terra; se non è effettuato correttamente il brucia- tore non si accende.
REGOLAZIONI RACCOMANDAZIONI PER LE REGOLAZIONI Importante Prima di effettuare qualsiasi tipo di regola- chiudere il rubinetto alimentazione gas ed zione, attivare tutti i dispositivi di sicurezza impedire l'accesso a tutti i dispositivi che previsti e valutare se sia necessario infor- potrebbero, se attivati, provocare condizio- mare adeguatamente il personale che ope- ni di pericolo inatteso causando danni alla...
SOSTITUZIONE PARTI RACCOMANDAZIONI PER LA SOSTITUZIONE PARTI Prima di effettuare qualsiasi intervento di sosti- Qualora sia necessario sostituire dei componen- tuzione, attivare tutti i dispositivi di sicurezza ti usurati, utilizzare esclusivamente dei ricambi previsti e valutare se sia necessario informare originali.
Seite 22
DISMISSIONE APPARECCHIATURA Importante Tale operazione deve essere eseguita da degradabili, oli lubrificanti e componenti operatori esperti, nel rispetto delle leggi vi- non ferrosi (gomma, PVC, resine, ecc.). Ef- genti in materia di sicurezza sul lavoro. Non fettuare il loro smaltimento nel rispetto del- disperdere nell'ambiente prodotti non bio- le leggi vigenti in materia.
Seite 23
CONTENTS ref. chapters page 1 GENERAL INFORMATION ..........2 2 TECHNICAL INFORMATION..........3 3 SAFETY INFORMATION ............ 6 PART 4 INSTRUCTIONS FOR USE ..........7 5 SERVICING INFORMATION ..........10 6 TROUBLESHOOTING INFORMATION ......12 7 HANDLING AND INSTALLATION INFORMATION ..12 8 ADJUSTMENT INFORMATION ........
GENERAL INFORMATION INFORMATION FOR THE READER To find the specific topics of interest to you quickly, 2nd part: contains all the information neces- refer to the index at the start of the manual. sary for special categories of reader, i.e. all This manual is subdivided into two parts.
The appliance is produced in several versions to The appliance has two working sides, allowing meet varying user requirements (see diagram). 08WFT1GV Smooth (iron) 08WFT2GV Ribbed (iron) 08WFT3GV 1/2 Ribbed (iron) 08WFT4GV Smooth (chromium) 08WFT6GV 1/2 Ribbed (chromium) 08WFT7GV Smooth (compound) IDM-39611000100.tif...
Main Parts A)Cooking plate: produced in a variety of shapes and materials to meet the different requirements B)Fume exhaust vent (type A): for removal of the fumes generated by the burner C)Drain plug: for draining cooking residues into the drip tray D)Burner control knob: controls the supply of gas to the burner E)Piezoelectric ignition: lights the burner.
SAFETY AND INFORMATION SIGNS The illustration shows the position of the signs pro- vided. A)Nameplate with manufacturer and appliance data. B)Burn hazard: watch out for hot surfaces. C)General hazard: read the manual carefully before carrying out any procedure. D)General hazard: when washing the appliance do not point pressurised water jets at internal parts.
SAFETY INFORMATION SAFETY REGULATIONS During design and construction, the constructor has All servicing operations requiring specific technical paid special attention to factors which may cause knowledge or skills must only be carried out by risks to the health and safety of the people interact- qualified staff with recognised experience in the ing with the appliance.
INSTRUCTIONS FOR USE RECOMMENDATIONS FOR USE Important The rate of accidents deriving from the use and the main functions. Use only as intend- of appliances depends on many factors ed by the constructor and never tamper which cannot always be foreseen and con- with any device to obtain performance lev- trolled.
Seite 30
SWITCHING THE BURNER ON AND OFF The lighting and turning off procedure is as de- scribed below for both burners. Lighting The first time the griddle is switched on, wash the plate to remove the protective grease and any dirt, then switch on the appliance and preheat it for about 2 hours at the temperature of 195°C.
Seite 31
RESETTING THE APPLIANCE If the safety thermostat is tripped, the appliance has to be restored to the initial working conditions as follows. This operation is only possible on appliances with chromium-plated or compound plate. 1 - Open the door (A). 2 - Press the button (B) of the safety thermostat tripped to restore the gas supply.
SERVICING INFORMATION RECOMMENDATIONS FOR SERVICING Keep the appliance at peak efficiency by carrying At the end of each session of use and whenever out the scheduled servicing procedures recom- necessary, clean: mended by the constructor. Proper servicing will al- – The plate (see page 11) low the best performance, a longer working life and –...
CLEANING THE PLATE 4 - Pour water at 60° C onto the plate and leave it Caution - warning to soak for a few minutes. Clean the plate appropriately, using the op- 5 - Remove the plug (B) to drain the water from the tional equipment available.
TROUBLESHOOTING INFORMATION TROUBLESHOOTING The appliance has been tested before being put problems himself, but for others specific technical into service.The information provided below is in- knowledge or skill is required, and so they must tended to assist in the identification and correction only be carried out by qualified staff with recognised of any anomalies and malfunctions which might oc- experience acquired in the specific sector of opera-...
PACKAGING AND UNPACKING The packaging is designed to reduce space and as appropriate to the type of transport used. To simplify transport, some components may be re- moved and suitably protected and packed for trans- port. The packaging carries all information necessary for loading and unloading.
INSTALLATION OF THE APPLIANCE All installation stages must be considered right from production of the general layout. Before starting these stages, as well as deciding the place of instal- lation, if necessary, the person authorised to carry out these operations must organise a "safety plan" to protect the people directly involved, and he must also ensure strict compliance with all legal requirements, especially those relating to mobile work-sites.
LEVELLING Adjust the floor-mounted feet (A) to level the appli- ance. IDM-39610800800.tif ASSEMBLY APPLIANCES IN BANKS To assemble appliances in banks (side by side) proceed as described below. 1 - Pull off the knob (A). 2 - Undo the screws (B) and remove the control panels (C).
GAS CONNECTION Important Those authorised to carry out this opera- tion must have experience acquired and certified in the specific sector, must make the connection to the proper standards, and must comply with all the relevant regu- lations and legislation. Once the connec- tion has been made, before the appliance is put into operation a general check must be made to ensure there are no gas leaks.
Seite 39
7 - Replace the lid (H), the electrical equipment Important box (F) and the control panel (D) on completion When connecting, take care over the con- of the operation. nection of the neutral and earth wires; if they are not connected correctly, the burn- er does not light.
ADJUSTMENT INFORMATION RECOMMENDATIONS FOR ADJUSTMENTS Important Before making any type of adjustment, acti- turn off the gas supply tap and prevent ac- vate all the safety devices provided and de- cess to all devices which might cause un- cide whether staff at work and those in the expected health and safety hazards if vicinity should be informed.
INFORMATION ABOUT REPLACING PARTS RECOMMENDATIONS FOR REPLACING PARTS Before carrying out any replacement procedure, ac- clines all responsibly for injury or damage to com- tivate all the safety devices provided and decide ponents due to the use of non original parts, or whether staff at work and those in the vicinity extraordinary work on the appliance which may should be informed.
Seite 42
DECOMMISSIONING THE APPLIANCE Important This operation must be carried out by terials, lubricating oils and non-metallic skilled operatives in compliance with the le- components (rubber, PVC, resins, etc.) in gal requirements with regard to safety at the environment. Dispose of them in accor- work.
Seite 43
INHALTSVERZEICHNIS Ref. Kapitel Seite 1 ALLGEMEINES ..............2 2 TECHNISCHE INFORMATIONEN........3 3 INFORMATIONEN ZUR SICHERHEIT ....... 6 1. TEIL 4 INFORMATIONEN ZUM GEBRAUCH ........ 7 5 INFORMATIONEN ZUR WARTUNG ........ 10 6 INFORMATIONEN ZU FEHLFUNKTIONEN..... 12 7 INFORMATIONEN ZUR HANDHABUNG UND ZUR INSTALLATION ............
ALLGEMEINES INFORMATIONEN FÜR DEN LESER Konsultieren Sie das Sachregister, das am Anfang des 2. Teil: Diese Informationen wenden sich an eine Handbuchs zu finden ist, um leichter unter bestimmten bestimmte Zielgruppe. Sie sind für erfahrene Bedie- Themen von besonderem Interesse nachschlagen zu ner bestimmt, die für Handhabung, Transport, In- können.
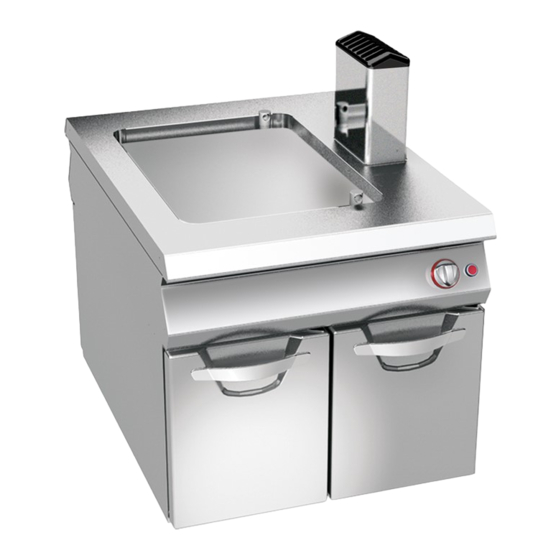
Platte projektiert und konstruiert. Das Gerät wird bedarfsabhängig in verschiedenen Das Gerät hat zwei Arbeitsfronten und kann daher Versionen hergestellt (siehe Abbildung). 08WFT1GV Glatte (Eisen) 08WFT2GV Gerillte (Eisen) 08WFT3GV 1/2 Gerillte (Eisen) 08WFT4GV Glatte (Chrom) 08WFT6GV 1/2 Gerillte (Chrom) 08WFT7GV Glatte (Verbundstoff) IDM-39611000100.tif...
Hauptorgane A)Bratplatte: Ausgeführt in unterschiedlichen For- men und Materialien, um den verschiedenen An- forderungen entgegenzukommen B)Rauchabzug (Typ A): zum Abführen der vom Brenner erzeugten Rauchgase C)Ablassverschluss: zum Ablassen der Bratrück- stände in den Auffangbehälter D)Bedienknebel Brenner: um die Gaszufuhr zu den Brennern einzustellen E)Piezozünder: zum Zünden des Brenners F) Auffangbehälter: zum Auffangen der Bratrück-...
SICHERHEITSHINWEISE UND INFORMATIONEN Die Abbildung zeigt die Anordnung der aufgekleb- ten Sicherheitshinweise. A)Typenschild mit Angabe des Herstellers und der Gerätekenndaten. B)Verbrennungsgefahr: Vorsicht vor heißen Flä- chen. C)Allgemeine Gefahr: Vor Ausführung irgendei- nes Eingriffs zuerst das Handbuch aufmerksam lesen. D)Allgemeine Gefahr: Beim Waschen des Geräts den Wasserstrahl nicht direkt auf die inneren Tei- le richten.
INFORMATIONEN ZUR SICHERHEIT SICHERHEITSVORSCHRIFTEN Der Hersteller hat bei Entwicklung und Fertigung Sämtliche Wartungsarbeiten, die präzise Fach- dieses Produkts besondere Sorgfalt auf Aspekte kenntnisse oder besondere Fähigkeiten erfordern, verwendet, die eine Gefahr für die Sicherheit und dürfen ausschließlich von qualifiziertem Personal die Gesundheit der Personen, die dieses Gerät mit nachweislicher Erfahrung in diesem speziellen handhaben, hervorrufen können.
INFORMATIONEN ZUM GEBRAUCH EMPFEHLUNGEN FÜR DEN GEBRAUCH Wichtig Das Auftreten von Unfällen bei der Verwen- Sie sich auf die vom Hersteller vorgesehenen dung von Geräten hängt von vielen Faktoren Verwendungszwecke, ohne Änderungen an ab, die nicht immer zu vermeiden und zu steu- den Vorrichtungen vorzunehmen, um nicht ern sind.
EIN- UND AUSSCHALTEN DES BRENNERS Verfahren Sie zum Zünden und Abschalten der bei- den Brenner folgendermaßen: Zündung Zur ersten Inbetriebnahme die Platte waschen, um die Schutzölschicht und eventuelle Verunreinigun- gen zu entfernen. Dann das Gerät einschalten und rund 2 Stunden bei einer Temperatur von 195 °C vorheizen.
RÜCKSETZEN DES GERÄTS Wenn der Sicherheitsthermostat anspricht, muss das Gerät in der angegebenen Weise wieder in den normalen Betriebszustand versetzt werden. Dieser Vorgang kann nur bei Geräten mit ver- chromter Platte oder Platte aus Verbundstoff aus- geführt werden. 1 - Öffnen Sie die Klappe (A). 2 - Den Taster (B) des ausgelösten Sicherheits- thermostaten drücken, um die Gaszufuhr wie- der freizugeben.
INFORMATIONEN ZUR WARTUNG EMPFEHLUNGEN FÜR DIE WARTUNG Sorgen Sie dafür, dass das Gerät im Zustand maxima- Folgende Elemente sind nach jedem Einsatz und ler Leistungsfähigkeit bleibt, indem Sie die vom Herstel- bei Bedarf zu reinigen: ler vorgesehenen planmäßigen Wartungsarbeiten – die Platte (siehe S. 11) ausführen.
REINIGUNG DER PLATTE 4 - Wasser mit einer Temperatur von 60°C auf die Vorsicht - Achtung Platte gießen und einige Minuten einwirken las- Die Reinigung der Platte mit dem auf Anfrage sen. 5 - Den Verschluss (B) entfernen, um das Wasser erhältlichen Werkzeug fachgerecht reinigen.
INFORMATIONEN ZU FEHLFUNKTIONEN FEHLERSUCHE Vor der Inbetriebnahme wurde das Gerät einem me können vom Benutzer selbst behoben werden; vorläufigen Testlauf unterzogen. Die im Folgenden alle anderen erfordern präzise Fachkenntnisse aufgeführten Informationen sollen Ihnen dabei hel- oder besondere Fähigkeiten und dürfen daher aus- fen, eventuelle Anomalien oder Funktionsstörun- schließlich von qualifiziertem Personal mit nach- gen, die während des Betriebs auftreten können,...
VERPACKUNG UND AUSPACKEN Die Verpackung wird möglichst platzsparend und unter Berücksichtigung des eingesetzten Trans- portmittels realisiert. Zur Vereinfachung des Transports können einige Komponenten für die Spedition ausgebaut und mit ei- ner geeigneten Schutzverpackung versehen werden. Auf der Verpackung sind sämtliche erforderlichen An- gaben zur Be- und Entladung angegeben.
INSTALLATION DES GERÄTS Es müssen sämtliche Phasen der Installation, schon von der Umsetzung des allgemeinen Projekts an, be- rücksichtigt werden. Die für diese Operationen autori- sierte Person wird vor Einleitung dieser Phasen den Installationsstandort bestimmen und bei Bedarf einen "Sicherheitsplan" aufstellen, um die Unversehrtheit der direkt am Vorgang beteiligten Personen zu gewährlei- sten und die gesetzlichen Bestimmungen zu befolgen.
NIVELLIEREN Regulieren Sie die Füße (A), um das Gerät wasser- waagengerecht aufzustellen. IDM-39610800800.tif MONTAGE BEI REIHENAUFSTELLUNG Verfahren Sie folgenderma- ßen, um Geräte (nebenein- ander) einer Reihe aufzustellen. 1 - Den Schalter (A) abzie- hen. 2 - Die Schrauben (B) aus- schrauben und die Blen- den (C) ausbauen.
GASANSCHLUSS Wichtig Diese Arbeit darf nur von zugelassenen und erfahrenen Fachleuten ausgeführt werden. Der Anschluss muss fachgerecht und vor- schriftsmäßig ausgeführt werden und allen einschlägigen gesetzlichen Bestimmungen entsprechen. Nach Ausführung des An- schlusses muss vor der Inbetriebnahme des Geräts durch eine allgemeine Kontrolle si- chergestellt werden, dass nirgends Gas aus- tritt.
7 - Anschließend den Deckel (H), die Anschluss- Wichtig dose (F) und die Bedienblende (D) wieder mon- Bei der Ausführung des Anschlusses auf tieren. den Anschluss des Neutral- und des Schutzleiters achten. Wenn diese An- schlüsse nicht richtig ausgeführt werden, kann der Brenner nicht gezündet werden.
INFORMATIONEN ZU DEN EINSTELLUNGEN EMPFEHLUNGEN FÜR DIE EINSTELLUNGEN Wichtig Vor jeder Regulierung an den Einstellungen den Gashahn ab und verhindern Sie den müssen sämtliche vorgesehenen Sicher- Zugang zu allen Vorrichtungen, die bei ih- heitsvorrichtungen aktiviert werden. Über- rer Aktivierung eine unvorgesehene Gefahr legen Sie, ob es notwendig ist, das hervorrufen und Schäden für die Sicherheit arbeitende Personal und die in der Nähe be-...
INFORMATIONEN ZUM AUSTAUSCH HINWEISE ZUM AUSTAUSCH VON TEILEN Vor jedem Eingriff zur Ersetzung eines Teils müs- Komponenten, die Verschleißerscheinungen zei- sen sämtliche vorgesehenen Sicherheitsvorrichtun- gen; verwenden Sie dabei ausschließlich Origi- gen aktiviert werden. Überlegen Sie, ob es nalersatzteile.Es wird jede Haftung für Personen- notwendig ist, das arbeitende Personal und die in oder Komponentenschäden abgelehnt, die entste- der Nähe befindlichen Personen auf angemessene...
ENTSORGUNG DES GERÄTS Wichtig Die Entsorgung ist erfahrenen Bedienern bzw. alle Produkte, die nicht biologisch ab- vorbehalten und muss in Übereinstimmung gebaut werden, dürfen nicht in die Umwelt mit den geltenden arbeitsrechtlichen Be- eingeleitet werden. Die Entsorgung muss stimmungen zur Sicherheit am Arbeitsplatz unter Beachtung der einschlägigen gelten- erfolgen.
INFORMATIONS GENERALES INFORMATIONS POUR LE LECTEUR Pour retrouver facilement les sujets qui vous inté- 2e partie: elle contient toutes les informa- ressent, consulter l’index analytique au début du tions nécessaires aux destinataires homogè- manuel. nes, c’est-à-dire tous les opérateurs experts Ce manuel est divisé...
(voir figure). L'appareil peut être utilisé sur deux façades ce qui permet de pouvoir l’installer au centre de la pièce. Lisse (fer) Rayée (fer) Rayée (fer) 08WFT1GV 08WFT2GV 08WFT3GV 1/2 Lisse (chrome) Rayée ( chrome...
Organes principaux A)Plaque de cuisson: réalisée en différentes for- mes et différents matériaux pour faire face à tou- tes les exigences B)Evacuation des fumées (Type A): pour évacuer les fumées générées par le brûleur C)Bouchon de vidange: pour évacuer les résidus de cuisson et les porter dans le bac de récolte D)Manette de commande du brûleur: pour régler l’alimentation du gaz au brûleur...
SIGNAUX DE SÉCURITÉ ET INFORMATION L’illustration indique la position des signaux appli- qués. A)Plaque d'identification du fabricant et de l'ap- pareil. B)Risque de brûlure: attention aux surfaces chaudes. C)Danger générique: avant tout type d’intervention, lire attentivement ce manuel. D)Risque générique: pendant le lavage de l’appareil ne pas diriger de jets d’eau sous pression sur les piè- ces intérieures.
SECURITE NORMES DE SÉCURITÉ Le fabricant, lors de la conception et de la fabrica- Tous les entretiens qui demandent une compéten- tion, a fait très attention aux aspects qui peuvent ce technique précise ou des capacités particulières provoquer des risques à la sécurité et à la santé des ne peuvent être exécutés que par du personnel personnes qui interagissent avec l’appareil.
UTILISATION ET FONCTIONNEMENT RECOMMANDATIONS POUR L’UTILISATION Important L’incidence des accidents dérivant de l’uti- les. Utiliser seulement comme prévu par le lisation d’appareils dépend de beaucoup de fabricant et ne modifier aucun dispositif facteurs que l’on ne peut pas toujours pré- pour obtenir des performances différentes venir et contrôler.
Seite 70
ALLUMAGE ET EXTINCTION DU BRULEUR Pour l’allumage et l’extinction des brûleurs, procé- der comme suit pour les deux brûleurs. Allumage Au premier allumage, laver la plaque pour enlever la graisse de protection et toute impureté éventuel- le, puis allumer l'appareil et préchauffer pendant environ 2 heures à...
RÉTABLISSEMENT DES FONCTIONS DE L’APPAREIL Dans le cas d'intervention du thermostat de sécuri- té, il faut rétablir les conditions initiales de fonction- nement de l’appareil dans le mode indiqué. On ne peut effectuer cette opération que pour les ap- pareils à plaque chromée ou en matériau composite. 1 - Ouvrir la porte (A).
ENTRETIEN RECOMMANDATIONS POUR L’ENTRETIEN Maintenir l’appareil en parfait état de fonctionne- Après chaque utilisation et lorsque cela s’avère ment en effectuant les opérations d’entretien pro- nécessaire, nettoyer: grammé prévues par le fabricant. Un bon entretien – La plaque (voir p. 11) permettra d’obtenir les meilleures performances, –...
Seite 73
NETTOYAGE DE LA PLAQUE 3 - Fermer le trou de vidange avec le bouchon (B). Attention 4 - Verser de l'eau à 60° C sur la plaque et la lais- Nettoyer la plaque de façon appropriée en uti- ser pendant quelques minutes. lisant les outils fournis sur demande.
PANNES DÉPANNAGE Avant sa mise en service, l’appareil a été essayé. pour tous les autres il faut une compétence techni- Les informations reportées ci-après ont pour but que précise ou des capacités particulières; ils doi- d’aider à l'identification et à la correction d’éven- vent donc être exécutés exclusivement par du tuels pannes et dysfonctionnements qui pourraient personnel qualifié...
EMBALLAGE ET DÉBALLAGE L’emballage est réalisé, en limitant les encombre- ments, même en fonction du type de transport adopté. Pour faciliter le transport, l’expédition peut être faite avec certains composants démontés et opportuné- ment protégés et emballés. Sur l’emballage sont reportées toutes les informa- tions nécessaires au chargement et au décharge- ment .
MISE EN PLACE DE L’APPAREIL Toutes les phases de mise en place doivent être prises en considération, dès la réalisation du projet général. Avant de commencer ces phases, outre la définition de la zone de mise en place, celui qui est autorisé...
MISE À NIVEAU Agir sur les pieds d’appui (A) pour mettre de niveau l’appareil. IDM-39610800800.tif MONTAGE DES APPAREILS EN BATTERIE Pour monter les appareils en batterie (les uns à côté des autres), procéder comme suit. 1 - Enlever la manette (A). 2 - Dévisser les vis (B) et démonter les tableaux de commandes (C).
RACCORDEMENT DU GAZ Important La personne autorisée à effectuer cette opéra- tion devra avoir les capacités et l’expérience acquise et reconnue dans le secteur spécifi- que, elle devra effectuer le raccordement dans les règles de l’art et tenir compte de toutes les exigences imposées par les normes et les lois.
Seite 79
7 - Remonter le couvercle (H), le boîtier électrique Important (F) et le tableau de commandes (D) lorsque Au moment du branchement, faire attention l’opération est terminée. à la connexion des câbles de neutre et de terre; si elle n’est pas effectuée correcte- ment, le brûleur ne s’allume pas.
Seite 80
REGLAGES RECOMMANDATIONS POUR LES RÉGLAGES Important Avant d’effectuer tout type de réglage, acti- empêcher l’accès à tous les dispositifs qui ver tous les dispositifs de sécurité prévus pourraient, s’ils sont activés, provoquer et évaluer s’il faut informer le personnel qui des conditions de danger inattendu en cau- travaille et celui à...
REMPLACEMENT DE PIECES RECOMMANDATIONS POUR LE REMPLACEMENT DES PIÈCES Avant d’effectuer tout remplacement, activer tous usés, utiliser exclusivement des pièces de rechan- les dispositifs de sécurité prévus et évaluer s’il faut ge d’origine.Le fabricant décline toute responsabili- informer les opérateurs travaillant sur l'appareil et té...
ELIMINATION DE L’APPAREIL Important Cette opération doit être effectuée par des produits non biodégradables, huiles lubri- opérateurs experts, dans le respect des lois fiantes et composants non ferreux (caout- en vigueur sur la sécurité du lieu de travail. chouc, PVC, résines, etc.). Les éliminer en Ne pas disperser dans l’atmosphère des respectant les lois en vigueur.
Seite 83
ÍNDICE ref. capítulos pág 1 INFORMACIONES DE CARÁCTER GENERAL ....2 2 INFORMACIONES DE CARÁCTER TÉCNICO ....3 3 INFORMACIONES SOBRE SEGURIDAD ......6 PARTE 4 INFORMACIONES SOBRE EL USO ........7 5 INFORMACIONES SOBRE MANTENIMIENTO ....10 6 INFORMACIONES SOBRE AVERÍAS......12 7 INFORMACIONES SOBRE DESPLAZAMIENTO E INSTALACIÓN ...............
INFORMACIONES DE CARÁCTER GENERAL INFORMACIONES PREVIAS Para ubicar fácilmente los temas específicos de inte- 2a parte: contiene todas las informaciones ne- rés, consúltese el índice analítico que se encuentra al cesarias para destinatarios homogéneos, esto inicio del manual. es, todos los operadores expertos y autoriza- Este manual comprende dos partes.
El aparato está equipado con una línea de dos frentes para permitir su instalación en el centro del local. 08WFT1GV Lisa (hierro) 08WFT2GV Ranurada (hierro) 08WFT3GV 1/2 Ranurada (hierro) 08WFT4GV Lisa (cromo) 08WFT6GV 1/2 Ranurada (cromo) 08WFT7GV Lisa (compuesto) IDM-39611000100.tif...
Órganos principales A)Plancha de cocción: realizada en diferentes for- mas y materiales para satisfacer cada requeri- miento específico B)Salida de humos (Tipo A): para evacuar los humos generados por el quemador C)Tapón de descarga: para descargar los residuos de cocción y conducirlos a la respectiva cubeta de recogida D)Mando del quemador: para regular la alimentación de gas al quemador...
SEÑALIZACIONES DE SEGURIDAD E INFORMACIÓN La ilustración indica la posición de las señalizacio- nes fijadas en el equipo. A)Placa de identificación fabricante y aparato. B)Peligro de quemaduras: prestar atención a las su- perficies calientes. C)Peligro genérico: antes de efectuar cualquier tipo de intervención léase atentamente el manual.
INFORMACIONES SOBRE SEGURIDAD NORMAS DE SEGURIDAD Durante las fases de diseño y producción el fabri- Todas las intervenciones de mantenimiento que re- cante ha prestado especial atención a los factores quieren de una competencia técnica precisa o de que pueden provocar riesgos en cuanto a seguri- una capacidad especial, deben ser efectuadas ex- dad y salud de las personas que interactúan con el clusivamente por personal calificado y con expe-...
INFORMACIONES SOBRE EL USO RECOMENDACIONES DE USO Importante El porcentaje de accidentes derivados del Se deben ejecutar sólo operaciones pro- uso de equipos depende de muchos facto- pias de los usos previstos por el fabricante. res que no siempre se logran prevenir y No alterar los equipos con el fin de obtener controlar.
Seite 90
ENCENDIDO Y APAGADO DEL QUEMADOR Para el encendido y el apagado, efectuar en ambos quemadores las siguientes operaciones. Encendido Al efectuar el primer encendido lavar la plancha a fin de eliminar la grasa protectora y toda otra even- tual impureza. A continuación encender el aparato y efectuar un precalentamiento de aproximada- mente 2 horas a temperatura de 195 °C.
REACTIVACIÓN APARATO En caso de intervención del termostato de seguridad será necesario restablecer las condiciones iniciales de funcionamiento del aparato, procediendo para ello de la manera que a continuación se indica. Esta operación sólo puede ser efectuada en apara- tos con plancha cromada o de material compuesto. 1 - Abra la portezuela (A).
INFORMACIONES SOBRE MANTENIMIENTO RECOMENDACIONES PARA EFECTUAR EL MANTENIMIENTO Mantener el equipo en condiciones de máximo ren- Siempre al final del servicio y cada vez que sea dimiento, efectuando las operaciones de manteni- necesario, limpiar: miento programado previstas por el fabricante. Un –...
LIMPIEZA PLANCHA que surta efecto. Precaución - advertencia 3 - Cierre el orificio de descarga mediante el tapón (B). Lleve a cabo una adecuada limpieza de la 4 - Vierta agua a 60°C en la plancha y déjela en re- plancha, utilizando para ello el material dis- mojo durante algunos minutos.
INFORMACIONES SOBRE AVERÍAS BÚSQUEDA DE AVERÍAS Antes de la puesta en servicio, el equipo ha sido some- pero otros requieren una competencia técnica precisa tido a prueba de funcionamiento. Las siguientes infor- o determinadas capacidades, razón por la cual deben maciones tienen por objeto facilitar la identificación y ser resueltos exclusivamente por personal calificado corrección de eventuales anomalías y disfunciones...
EMBALAJE Y DESEMBALAJE El embalaje se realiza, limitando sus dimensiones, según el tipo de transporte adoptado. A fin de facilitar el transporte, la expedición puede ser efectuada con algunos de sus componentes desmon- tados y adecuadamente protegidos y embalados. Sobre el embalaje están reproducidas todas las in- formaciones necesarias para efectuar la carga y descarga del equipo.
INSTALACIÓN DEL EQUIPO Durante la realización del proyecto general, deben ser consideradas todas las fases de la instalación. Antes de comenzar dichas fases, además de esta- blecer la zona de instalación, la persona autorizada a efectuar estas operaciones deberá, si fuera nece- sario, aplicar un "plan de seguridad"...
Seite 97
NIVELACIÓN Operar con las patas de apoyo (A) para nivelar el equipo. IDM-39610800800.tif MONTAJE DE EQUIPOS EN BATERÍA Para montar los equipos en batería (uno al lado del otro) aplicar las siguientes ins- trucciones. 1 - Retire el mando (A). 2 - Desenroscar los tornillos (B) y desmontar los pa- neles de mando (C).
ENLACE GAS Importante El personal autorizado para ejecutar esta opera- ción debe poseer capacidad y haber adquirido experiencia efectiva en el sector específico; la conexión deberá ejecutarse respetando riguro- samente todos los requisitos establecidos por las normativas vigentes. Una vez efectuada la conexión, antes de poner en funcionamiento el aparato se deberá...
Seite 99
7 - Una vez concluida la operación, reinstalar la Importante tapa (H), la caja eléctrica (F) y el panel de man- Durante las operaciones de enlace se debe- dos (D). rá prestar especial atención a la conexión de los cables de neutro y de tierra ya que, en caso de no ser correctamente efectuada, el quemador no se encenderá.
INFORMACIONES SOBRE REGULACIONES RECOMENDACIONES PARA EFECTUAR LAS REGULACIONES Importante Antes de efectuar cualquier tipo de regula- de alimentación del gas e impedir el acceso ción, activar todos los dispositivos de se- a todos los dispositivos que, en caso de ser guridad previstos y evaluar la conveniencia activados, podrían provocar situaciones de de informar oportunamente tanto al perso-...
INFORMACIONES SOBRE SUSTITUCIONES RECOMENDACIONES PARA EFECTUAR LA SUSTITUCIÓN DE LAS PIEZAS Antes de efectuar cualquiera operación de sustitu- se deberán utilizar exclusivamente piezas de re- ción, activar todos los dispositivos de seguridad cambio originales. Se declina toda responsabilidad previstos y evaluar la conveniencia de informar por daños a personas o a componentes del equipo adecuadamente tanto al personal operativo como derivados del empleo de piezas de recambio no ori-...
Seite 102
DESGUACE DEL EQUIPO Importante Esta operación debe ser efectuada por ope- componentes no ferrosos (goma, PVC, re- radores expertos, los que deberán proce- sinas, etc.). Estos productos deben ser eli- der respetando las normas vigentes en minados de conformidad con lo dispuesto materia de seguridad del trabajo.
Seite 103
Bruleur - Quemadores Model - Modelle Stromanschluss Modèle - Modelo Branchement électrique 7 Kw GZ350 Conexión eléctrica (Min. 4,3 Kw) G25.1 08WFT1GV 08WFT2GV 08WFT3GV 0,6W/230V1~N N. 2 14 1,48 m /h 1,72 m /h 2,06 m /h 1,10 Kg/h 1,09 Kg/h 08WFT4GV...
Seite 105
Tabella iniettori bruciatore - Burner injector table - Tabelle der Brennerdüsen Tableau des injecteurs des brûleurs - Tabla inyectores quemador ø (4) ø (5) ø (6) ø (8) p (3) mbar p (7) mbar pen mbar Qn max kW Qn min kW G30/G31 AT II2H3B/P G30/G31...
Seite 106
Tabella iniettori bruciatore - Burner injector table - Tabelle der Brennerdüsen Tableau des injecteurs des brûleurs - Tabla inyectores quemador ø (4) ø (5) ø (6) ø (8) p (3) mbar p (7) mbar pen mbar Qn max kW Qn min kW G30/G31 LV II2HB/P3 G30/G31...
Seite 107
Tabella caratteristiche gas - Table of gas characteristics - Tabelle der Gas-Eigenschaften Tableau des caractéristiques du gaz - Tabla características gas Potere calorifero inferiore (Hi) Famiglia Tipo di gas Indice Wobbe (MJ/m Net calorific value (Hi) Group Gas type Wobbe index (MJ/m Unterer Heizwert (Hi) Familie Gastypen...