EFA 802 Betriebsanleitung
Druckluftmesser
Vorschau ausblenden
Andere Handbücher für 802:
- Originalbetriebsanleitung (19 Seiten) ,
- Originalbetriebsanleitung (28 Seiten)
Inhaltsverzeichnis
Verfügbare Sprachen
Verfügbare Sprachen
Quicklinks
Betriebsanleitung/ Operating instructions
Wartungsanleitung/ Maintenance instructions
Ersatzteilliste/ Sparepart list
EFA 802
Druckluftmesser
Powerknife
Diese Anleitung unbedingt dem Bedienpersonal aushändigen!
Please forward these operating instructions to your operating
Schmid & Wezel
D 75433 Maulbronn
Wichtige Informationen:
Important Informations:
personell!
Ausführung/ Execution
06.2005
Kapitel
Inhaltsverzeichnis

Verwandte Anleitungen für EFA 802


Inhaltszusammenfassung für EFA 802
- Seite 1 Betriebsanleitung/ Operating instructions Wartungsanleitung/ Maintenance instructions Ersatzteilliste/ Sparepart list EFA 802 Druckluftmesser Powerknife Wichtige Informationen: Diese Anleitung unbedingt dem Bedienpersonal aushändigen! Important Informations: Please forward these operating instructions to your operating personell! Schmid & Wezel Ausführung/ Execution 06.2005 D 75433 Maulbronn...
-
Seite 2: Inhaltsverzeichnis
2.2 Verhalten am Arbeitsplatz ......................3 3. Inbetriebnahme und Betriebssicherheit................3 3.1 Erstinbetriebnahme ........................3 3.2 Messereinbau vor dem ersten Betrieb ...................4 3.3 Einschalten Gerät EFA 802 ......................5 4. Montage ..........................6 4.1 Messerwechsel bei Verschleiß ......................6 5. Instandhaltung ........................7 6. Reinigung und Wartung......................7 6.1 Tägliche Reinigung und Desinfektion ....................7... -
Seite 3: Verwendung, Lieferumfang, Zubehör
Nur so können Fehlbedienungen vermieden und Ge- 1.4 Zubehör fahrensituationen richtig eingeschätzt werden. Wartungseinheit Greifen Sie niemals in den Bereich des laufenden Messers, Sie könn- EFA – Spezialöl ten sich sonst Körperteile abtren- Schutzhandschuh „klein“ nen! Schutzhandschuh „mittel“ Schutzhandschuh „groß“... -
Seite 4: Verhalten Am Arbeitsplatz
(siehe Kapitel 3.2 "Messereinbau vor dem ersten Betrieb" (S. 4) ). Beachten Sie die Technischen 8. Verwenden Sie nur Original EFA-Messer. Befol- Daten gen Sie die unter Messerwechsel aufgeführten Vorschriften (siehe Kapitel 4.1 "Messerwechsel Wesentliche Informationen, z. -
Seite 5: Messereinbau Vor Dem Ersten Betrieb
3.2 Messereinbau vor dem ersten Betrieb Abbildung 6: Die Führung bis zum Anschlag in das Kopf- stück einführen, die Befestigungsschraube (Pos. 38) muss an der hinteren Position stehen. Abbildung 2: Befestigungsschraube (Pos 38) der Messer- sicherung lösen und das vordere Schild vst. (Pos. 5) nach vorne abziehen und entfernen. -
Seite 6: Einschalten Gerät Efa 802
Behälter mit Kühler und Trockner automatische Wartungseinheit Entleerung Abbildung 8: Empfohlene Anordnung der Druckluftleitung und Arbeitsplätze 3.3 Einschalten Gerät EFA 802 gedrückt werden. Erst nach vorherigem Lesen dieser Bedienungsanleitung und nach korrektem Anschluss darf das Mes- ser eingeschaltet werden! Bevor das Messer richtig festsitzt Abbildung 3: Gerät im eingeschaltetem Zustand... -
Seite 7: Montage
4. Montage Vor allen Montagearbeiten das Ge- rät vom Luftdrucknetz trennen! 4.1 Messerwechsel bei Verschleiß Der Messerwechsel darf nur von Abbildung 11: Schild vst (Pos. 5) nach vorne abziehen autorisiertem Fachpersonal durch- und entfernen. geführt werden. Ziehen Sie Schutzhandschuhe an, wenn Sie das Messer wechseln. -
Seite 8: Instandhaltung
6.1 Tägliche Reinigung und Desinfektion Lassen Sie keine Werkzeugschlüs- sel stecken. Überprüfen Sie vor 1. Bringen Sie das DL-Messer zu Ihrer dem Einschalten, dass das Messer Werkzeugstelle (Werkstatt). gespannt ist und die Schlüssel ent- 2. Bauen Sie zur Reinigung das Messer aus (siehe fernt sind. -
Seite 9: Wartung
6.2 Wartung 8. Rücknahme von Altgeräten Geben Sie Altgeräte zum Entsorgen an das Stamm- Wartungsarbeiten dürfen nur von haus zurück. autorisiertem Fachpersonal durch- geführt werden. Das Messer muss nicht geschmiert werden. 6.3 DL-Messer aufbewahren / lagern Lagern Sie das DL-Messer immer in trockenen Räu- men. -
Seite 10: Anhang
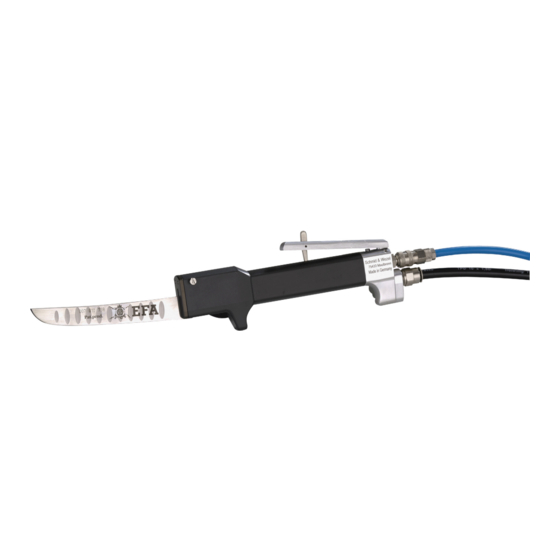
A. Anhang A.1 Maschinen-Komponenten 1 Lufteinlass 2 Luftauslass 3 Ventilhebel 4 Einschaltsicherung 5 Griffbereich 6 Messeraufnahme 7 Messerspannen A.2 Technische Daten EFA 802 Schnitte/min 11.500 Luftverbrauch 120 L/min Betriebsdruck 6,0 bar Länge 210 mm Gewicht 0,53 kg Hand-Arm-Vibration (EN 28662) -
Seite 11: Liste Der Ersatz- Und Verschleißteile
A.3 Liste der Ersatz- und Verschleißteile EFA 802 Bild- Stück Benennung Best.-Nr. DL-Messer 100 280 010 Steuerkolben 003 009 382 Druckfeder 001 362 623 Druckfeder 001 362 623 Kolbenstangenlager 001 786 319 Schild vst. 007 010 856 Ventilbolzen 003 009 378... -
Seite 12: Sonderzubehör
Dichtkegel 003 010 855 Zylinderstift 001 306 439 Zylinderschraube 001 326 042 Zubehör 007 899 382 im Lieferumfang enthalten Drehmomentschlüssel EFA 802 001 788 300 Ohne Einsatz SW 3 001 363 813 Bild für Drehmomentschlüssel Schlaucheinheit vst. 007 010 085 Sonderzubehör... -
Seite 13: Ersatzteiliste Efa 802
A.4 Ersatzteiliste EFA 802 Anzugsmoment beachten • Pos 25,33 2,0 Nm • Pos 17,24 8,3 Nm • Pos 201 2,0 Nm • Pos 38 3,0 Nm Mit Loctite gesichert • Pos 28 Loctite 22 Schmid & Wezel Seite/ Page Ausführung/ Execution... -
Seite 14: Ersatzteilliste Efa 802
A.5 Ersatzteilliste EFA 802 Schmid & Wezel Seite/ Page Ausführung/ Execution D 75433 Maulbronn 13/ 14 08.2005... -
Seite 15: Konformitätserklärung
ˆ ‡ ‡ ™ ‘ ™ „ &( Hubsägen und Messer a) EFA SL50WB,SL50/18,63,66,68,SL24WB, SL 80 E b) EFA 57, 800, 801 Antrieb a) Elektroantrieb b) Pneumatikantrieb Angewandte Vorschriften/Richtlinien: 98/37/EG, 73/23/EWG, 89/336/EWG Angewandte A- Normen: DIN EN 1050 Angewandte B- Normen:... - Seite 28 A.5 EFA 802 spare parts list Schmid & Wezel Page/ Seite Version/ Ausführung D 75433 Maulbronn 13/ 14 08.2005...
- Seite 29 ˆ ‡ ‡ ™ ‘ ™ „ &( Hubsägen und Messer a) EFA SL50WB,SL50/18,63,66,68,SL24WB, SL 80 E b) EFA 57, 800, 801 Antrieb a) Elektroantrieb b) Pneumatikantrieb Angewandte Vorschriften/Richtlinien: 98/37/EG, 73/23/EWG, 89/336/EWG Angewandte A- Normen: DIN EN 1050 Angewandte B- Normen:...