Herunterladen Inhalt Inhalt Diese Seite drucken
Maico PPB 30 K Montageanleitung

Maico PPB 30 K Montageanleitung

Endmontage-set für pushpull lüftungssysteme
Vorschau ausblenden Andere Handbücher für PPB 30 K:
Inhaltsverzeichnis

Werbung

Verfügbare Sprachen

Verfügbare Sprachen

Montageanleitung Endmontage-Set
DE
für PushPull Lüftungssysteme
Final mounting set instructions
UK
for PushPull ventilation system
Notice de montage Gros œuvre
FR
pour systèmes de ventilation PushPull
www.maico-ventilatoren.com
PPB 30 O
PPB 30 K
PPB 30 RC
+
RLS 45 O
RLS 45 K
!

Werbung

Inhaltsverzeichnis
loading

Inhaltszusammenfassung für Maico PPB 30 K

  • Seite 1 Montageanleitung Endmontage-Set für PushPull Lüftungssysteme Final mounting set instructions for PushPull ventilation system Notice de montage Gros œuvre pour systèmes de ventilation PushPull PPB 30 O PPB 30 K PPB 30 RC RLS 45 O RLS 45 K www.maico-ventilatoren.com...
  • Seite 4: Inhaltsverzeichnis

    Einsetzbar mit Raumluftsteuerung RLS 45 K. 10.1 Service-Mode – Bedienung ....19 Anschluss an USB-Schnittstelle. Download 10.2 Service-Menü RLS 45 O ...... 20 mit QR-Code oder unter www.maico-ventila- 10.3 Service-Menü RLS 45 K ...... 22 toren.com. 10.4 Service-Menü PPB 30 RC ....
  • Seite 5: Lieferumfang

    Gerätetyp passenden Raumluftsteuerung Sie aufgrund Ihrer fachlichen Ausbildung, RLS../DS..: Schulung und Erfahrung PPB 30 O- / PPB 30 K: werden mit einer ● die einschlägigen Normen und Richtlinien RLS 45 O oder RLS 45 K-Steuerung bedient. kennen PPB 30 RC-Geräte können per Funkschalter ●...
  • Seite 6: Sicherheitshinweise Und Warnungen

    DE | 3 Bestimmungsgemäße Verwendung Eine PPB 30-Außenabdeckung mit integrier- Bei Betrieb während der Bauphase Gerätebeschädigung durch Ver- ter Kondensatabfuhr ist für den Einbau mit einer Wandhülse vorgeschrieben. schmutzung des Lüftungsgerätes.  Während der Bauphase ist ein Betrieb des Die Ventilator-/Wärmetauschereinheit ist als Lüftungsgerätes unzulässig.
  • Seite 7 230 V AC: RLS 45 O, RLS 45 K, PP 45 RC sich niemand unterhalb des Gerätes aufhält. und PPB 30 RC 12 V DC: PPB 30 O und PPB 30 K Gefahr beim Transport durch zu schwere oder herabfallende Lasten.
  • Seite 8: Anforderungen Aufstellungsort

    DE | 4 Sicherheitshinweise und Warnungen Gefahr bei Betrieb mit nicht komplett 5 Anforderungen Aufstellungsort montierten Systemkomponenten. Bei nicht geschützten elektrischen Kom- ● Umgebungstemperatur - 15 °C bis + 40 °C. ponenten besteht Stromschlaggefahr. ● Fördermitteltemperatur max. 40 °C.  Lüftungsgeräte und Raumluftsteuerungen ●...
  • Seite 9: Anschlussmöglichkeiten

    K9-K11: Volumenstormausgleich ABL-Betrieb über ALDs K12-K18: Zuluftfunktion für PPB 30 K-Abluftbetrieb. Hinweis: Volumenstromausgleich nur für 1 PPB 30 K-Gerät möglich. Bei der Verwendung von PP 45 EO können max. 8 Funksensoren und max. 4 Funkgeräte (PPB 30 RC oder PP 45 RC) als Master eingelernt werden.
  • Seite 10: Kombinationen Mit Rls 45 O

    DE | 7 Anschlussmöglichkeiten 7.2 Kombinationen mit RLS 45 O Lüftungs- PP 45 O/K PPB 30 O Sensoren Sensor gerät, extern intern Sensor (PP45 HY, PP45 HYI CO2, VOC) und LT Kombi- Lüfter- Lüfter- RS 485 nation schnittstelle schnittstelle Fan 1 / Fan 1 / Fan 2 Fan 2...
  • Seite 11: Anwendungsbeispiel

    8 Anwendungsbeispiel | DE 8 Anwendungsbeispiel Lüftungslösung für eine 3-Zimmer Etagen- wohnung mit Lüftungsgeräten PPB 30 K (Bad) und PP 45 (Wohnräume) Das PPB 30 im Badezimmer be- und ent- Möglich ist auch ein reiner Abluftbetrieb, bei lüftet gleichzeitig den Raum im balancierten dem beide Ventilatoren die Feuchtigkeit hin- Betrieb.
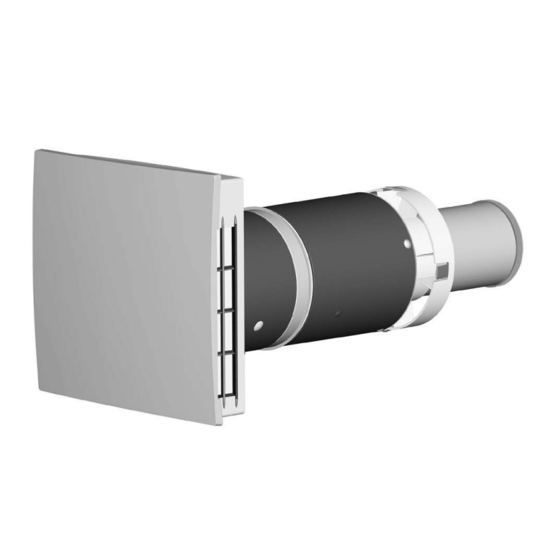
  • Seite 12: Montage

    ● Der Abluftbetrieb an einem PPB30 O in Ver- Bei Verwendung mehrerer PPB 30 K an bindung mit RLS 45 O kann mit Tastendruck einer RLS 45 K sind die PPB 30 K Geräte "Lüftungsstufe" > 2 Sekunden aktiviert werden. über den auf der Platine befindlichen DIP-...
  • Seite 13: Geräteaufbau Und Positionierung

    9 Montage | DE Abluftbetrieb nur bei Einstellung Gerätetyp 1 bis 2 % zur Außenwand hin aufweist. Die PPB 30 und Geräteanzahl 1 Gerät (Einstel- Hülse muss zur Wand mit Silikon abge- lung im Servicemenü) möglich. dichtet sein. 2. Die Außenabdeckung ist bereits montiert. ●...
  • Seite 14: Dichtungsbänder Aufkleben

    Beschädigung des Mauerwerks durch Kondenswasser bei fehlerhaftem Anbrin- gen der Dichtungsbänder [3.1] und [7]. Dichtungsbänder korrekt einkleben. Bei PPB 30 K-Geräten und Anschluss 9.5 Geräteeinschub PPB 30 O/K/RC mit eines optionalen Tasters oder Schalters Verlängerungsrohr einbauen wird der zweite Eingang mit zugehöriger Tülle verwendet ...
  • Seite 15: Elektrischer Anschluss - 230 V

    Aufnahmen eingesetzt sind. 8. Geräteanschluss gemäß Anschlussplan im Anhang vornehmen  Gerätevariante beachten. 9. PPB 30 K/RC: Falls gewünscht, einen Taster 14. Frontabdeckung einhängen und nach zum Starten der Funktion ABL-Betrieb oder unten schwenken, bis die Frontabdeckung Intensivlüftung anschließen ...
  • Seite 16: Raumluftsteuerungen Anschließen

    DE | 9 Montage GEFAHR WARNUNG Gefahr durch Stromschlag. Gefahr durch Stromschlag bei Einbau der Vor Elektroinstallationen alle Versorgungs- Lüftungsgeräte innerhalb der Schutzzone. stromkreise abschalten, Netzsicherung Einbau der Geräte in die vorgegebenen Schutz- zonen nur gemäß IP-Schutzart zulässig. PP 45 ausschalten, gegen Wiedereinschalten si- chern und ein Warnschild sichtbar anbringen.
  • Seite 17: Anschlüsse

    9 Montage | DE Raumluftsteuerung RLS 45 K wird für die Funkgesteuerte Systeme mit RLS 45 K- Ansteuerung von PPB 30 O- oder PPB 30 K- Steuerung und Funkmodul PP 45 EO Geräten eingesetzt. Bei dieser Gerätekombination lassen sich Funk- 1. Rahmen der Raumluftsteuerung abneh- geräte mit kabelgebundenen Geräten koppeln.
  • Seite 18: Feuchtesensor Pp 45 Hyi In Rls 45 O Oder Rls 45 K Einbauen

    DE | 9 Montage Rein funk Kombisystem EnOcean-Actor PP 45 Act gesteuertes Mit dem PP 45 Act können funkgesteuerte System PP 45 RC/PPB 30 RC-Geräte mit kabelge- bundenen Abluftgeräten (ECA, ER) kombi- DS 45 RC RLS 45 K PP 45 EO niert werden.
  • Seite 19: Inbetriebnahme

    Parameterwert ein. Zusatzinformatio- werden. nen erhalten Sie in der Inbetriebnah- meanleitung im Internet (Download Parameterwert speichern unter www.maico-ventilatoren.com). Zum Spei- Der Parameter- Hier können Sie auch die Inbetrieb- chern die wert ist jetzt nahmesoftware für die RLS 45 K- Taste für...
  • Seite 20: Service-Menü Rls 45 O

    DE | 10 Inbetriebnahme 10.2 Service-Menü RLS 45 O Fett = Werkseinstellung LEDs Parameter Einstellwert / Einstellung / Lüftungsstufe Beschreibung Gerätetyp PP 45 an RLS PPB 30 O (Fan1/Fan2) Hier wird die Typenfamilie ausgewählt, die an der Lüfterschnittstelle Fan1/Fan2 angeschlossen wird. Achtung: Es sind nur sortenreine Ge- rätekombinationen PP 45 oder PPB 30 an der Lüfterschnittstelle zulässig! Anzahl Geräte-...
  • Seite 21 10 Inbetriebnahme | DE LEDs Parameter Einstellwert / Einstellung / Lüftungsstufe Beschreibung Kein Sensor Sensoren 1 Sensor intern 1 Sensor intern + 1 Sensor extern 1 Sensor intern + 2 Sensoren extern 1 Sensor intern + 3 Sensoren extern 0 Sensor intern + 1 Sensor extern 0 Sensor intern + 2 Sensoren extern 0 Sensor intern + 3 Sensoren extern Wählen Sie aus, wie viele interne und...
  • Seite 22: Service-Menü Rls 45 K

    Ungerade Anzahl 5 Geräte PP 45 Hier wird die Anzahl der an der Lüfter- schnittstelle (Fan1/Fan2) angeschlos- senen Geräte ausgewählt. Achtung: Freischaltung/Anzahl der PPB 30 K-Geräte wird in anderen Untermenü (Parameter PPB 30 K) berücksichtigt. Lüftungsstufe „0“ möglich Lüftungsstufen Lüftungsstufe „0“ gesperrt Bei Einstellung Lüftungsstufe "0"...
  • Seite 23 10 Inbetriebnahme | DE LEDs Parameter Einstellwert / Einstellung / Lüftungsstufe Beschreibung Betrieb ohne weitere(s) LT´s/RLS Leistungsteile (LT´s) oder Betrieb mit 1 LT oder RLS Raumluft- Betrieb mit 2 LT´s oder RLS steuerungen Betrieb mit 3 LT´s oder RLS (RLS) Slave Nr.
  • Seite 24 ModBus aktiv 9600 Baud ModBus aktiv 19200 Baud Mit diesem Einsteller wird der ModBus akiviert und die Baudrate gesetzt. Achtung: Bei aktiver Modbus-Schnitt- stelle ist der Anschluss von PPB 30 K oder von externen Sensoren/LTs/RLS nicht möglich. ModBus- Adresse 10...
  • Seite 25: Service-Menü Ppb 30 Rc

    10 Inbetriebnahme | DE 10.4 Service-Menü PPB 30 RC Fett = Werkseinstellung PPB 30 RC LEDs Parameter Einstellwert Einstellung / Beschreibung Die orange Betriebs- Betriebsmodi 1 Automatik-Betrieb (rote LED 1x) arten-LED blinkt System-Betrieb (rote LED 2x) zyklisch je 1x Hier können zwei Betriebsmodi gewählt werden: Automatik-Betrieb: Gerät arbeitet meist autonom nach internem Sensor.
  • Seite 26 DE | 10 Inbetriebnahme PPB 30 RC LEDs Parameter Einstellwert Einstellung / Beschreibung Die blaue Betriebs- Dauer 5 Minuten (rote LED 1x) 10 Minuten (rote LED 2x) arten-LED blinkt Stoßlüftung/ zyklisch je 1x Lüftungsstufe 30 Minuten (rote LED 3x) Hier wird die Dauer der manuellen Entfeuchtungsfunktion (Stufe 5) und die Dauer der Lüftungsstufe beim Übersteuern des bedarfsgeführten Be-...
  • Seite 27: Ersatzteile

    E059.1523.9000 E-Mail: ersatzteilservice@maico.de 6 Außenabdeckung E059.1523.9100 7 Ventilatoranschluss- 0101.1424.0000 platine PPB 30 O 8 Ventilatoranschluss- 0101.1425.0000 platine PPB 30 K 9 Funkplatine 0101.1427.0000 PPB 30 RC 10 Abdeckung Elektronik E059.1524.9000 Funkplatine PPB 30 RC 11 Abdeckung Elektronik 0059.1524.0001 PPB 30 O/K 12 Profildichtung 0059.1176.0000...
  • Seite 28 Wiring diagrams...........80 of accessory components  Accessory component supplement. Acknowledgements: © Maico Elektroapparate-Fabrik GmbH. Transla- tion of the original German instructions. We cannot be held responsible for mistakes or printing errors and retain the right to make technical modifications without giving prior notice. The brands, brand names and protected trade marks that are referred to in this document refer to their owners or their products.
  • Seite 29: Scope Of Delivery

    RLS 45 O controller, take the electrical connections in accord- ance with the wiring diagram provided and ● a combination of PPB 30 K with exhaust air units (e.g. ER.../ECA...), ● enables you to recognise and avoid risks and hazards associated with electricity.
  • Seite 30: Safety Instructions And Warnings

    UK | 3 Intended use The fan/heat exchanger unit is designed as a in exhaust fumes being transferred to other duct mounting and can be removed for repair residential units. Risk of death, for example and cleaning purposes. from carbon monoxide. ...
  • Seite 31 230 V AC: RLS 45 O, RLS 45 K, PP 45 RC and PPB 30 RC Risk during transport from heavy or 12 V DC: PPB 30 O and PPB 30 K falling loads.  Observe applicable safety and accident Risks from parts which may affect the prevention requirements.
  • Seite 32: Requirements Of The Installation Site

    UK | 4 Safety instructions and warnings Risk of death from carbon monoxide ● Do not drill core drill hole for unit assembly when operating with air-ventilated and do not drill fixing points on external and internal covers in load-bearing components, fireplaces. Ensure sufficient supply air intake such as in the lintel or ring beam.
  • Seite 33: Connection Options

    K12-K18: Supply air function for PPB 30 K exhaust air mode. Note: Volumetric flow compensation only possible for 1 PPB 30 K unit. * If using PP 45 EO, a max. of 8 radio sensors and a max. of 4 radio units...
  • Seite 34: Combinations With Rls 45 O

    UK | 7 Connection options 7.2 Combinations with RLS 45 O Ventilation PP 45 O/K PPB 30 O (PP45 HY, Internal unit, CO2, VOC) sensor sensor external PP45 HYI sensors and LT Combina- Interface Interface RS 485 tion no. Fan 1/Fan 2 Fan 1/Fan 2 Additional functions K25: Exhaust air mode possible with 1x PPB 30 O + RLS 45 O.
  • Seite 35: Application Example

    8 Application example | UK 8 Application example Ventilation solution for a 3-room flat with PPB 30 K (bathroom) and PP 45 (living spaces) ventilation units The PPB 30 in the bathroom aerates and Pure exhaust air mode is also possible and ventilates the room at the same time in bal- here the two fans pump out humidity (no heat anced mode.
  • Seite 36: Mounting

    RLS 45 K control. If using seve- mode is only possible with a PPB 30 unit ral PPB 30 K on an RLS 45 K, the PPB 30 K type setting and when 1 unit is used (setting units should be addressed using the DIP in service menu).
  • Seite 37: Unit Structure And Positioning

    9 Mounting | UK ● The measurements will be incorrect if the in- 2. The external cover is already mounted. stallation location of the control and external 3. The control cables of ventilation units, sensors is inappropriate. Avoid disturbing sensors and accessory components must influences and direct sunlight.
  • Seite 38: Gluing On Sealing Bands

    NOTICE Damage to brickwork caused by conden- sate if the sealing bands [3.1] and [7] are If using PPB 30 K units and connecting fitted incorrectly. Glue in sealing bands an optional button or switch, the second correctly.
  • Seite 39: Electrical Connection

    8. Make the device connection according to the connection diagram in the appendix  Observe the unit variant. 9. PPB 30 K/RC: If desired, connect a button to start the exhaust air mode or intensive 14. Attach front cover and swivel down until ventilation function ...
  • Seite 40: Connecting Room Air Controls

    UK | 9 Mounting WARNING 9.7 Connecting room air controls Danger of burns/fire due to overload RLS 45 O and RLS 45 K controls caused by incorrect connection or con- with 230 V. Note safety requirements necting too many units to an RLS 45 O/K. in Chapter 9.6.
  • Seite 41: Mounting Radio Switch (Enocean)

    9 Mounting | UK If a PPB 30 K unit is running in exhaust Connecting RLS 45 O air mode, the PP 45/PPB 30 O units RLS 45 O room air control is used to activate handle the volumetric flow compensa- PPB 30 O units.
  • Seite 42: Installing Pp 45 Hyi Humidity Sensor In Rls 45 O Or Rls 45 K

    UK | 9 Mounting PushPull combination system with PP 45 EO 9.9 Installing PP 45 HYI humidity sensor PP 45 EO extension module can only RLS 45 O or RLS 45 K be combined with PP 45 RC/PPB 30 1. Install room air control as described in RC units.
  • Seite 43: Commissioning

    Addi- tional information can be found in the Saving parameter value online commissioning instructions To save, The parameter (download from www.maico-ventila- press the value is now toren.com). button for adopted. Here you can also download the com- 2 seconds.
  • Seite 44: Service Menu For Rls 45 O

    UK | 10 Commissioning 10.2 Service menu for RLS 45 O bold = factory setting LEDs Parameter Set value / Setting / ventilation level description Device type PP 45 on RLS PPB 30 O (Fan1/Fan2) The type family, which is connected to the Fan1/Fan2 fan interface, is selected here.
  • Seite 45 10 Commissioning | UK LEDs Parameter Set value / Setting / ventilation level description Sensors No sensor 1 internal sensor 1 internal sensor + 1 external sensor 1 internal sensor + 2 external sensors 1 internal sensor + 3 external sensors 0 internal sensors + 1 external sensor 0 internal sensors + 2 external sen- sors...
  • Seite 46: Service Menu For Rls 45 K

    Odd number, 5 devices PP 45 The number of units connected to the fan interface (Fan1/Fan2) is selected here. Notice: Release/number of PPB 30 K units is taken into account in another sub-menu (PPB 30 K parameters). Ventilation levels Ventilation level "0" possible Ventilation level "0"...
  • Seite 47 10 Commissioning | UK LEDs Parameter Set value / Setting / ventilation level description Operation without further LT/RLS Power units (LT) or Operation with 1 LT or RLS room air Operation with 2 LT or RLS controls Operation with 3 LT or RLS (RLS) Slave no.
  • Seite 48 ModBus active 9600 baud ModBus active 19200 baud This adjuster activates ModBus and sets the baud rate. Notice: When the Modbus interface is active, PPB 30 K or external sensors/ LTs/RLS cannot be connected. ModBus Address 10 address Address 11...
  • Seite 49: Service Menu For Ppb 30 Rc

    10 Commissioning | UK 10.4 Service menu for PPB 30 RC bold = factory setting PPB 30 RC LEDs Parameter Setting value Setting/Description The orange operating Operating Automatic operation (red LED 1x) mode LED flashes modes System operation (red LED 2x) once per cycle Two operating modes can be selected here: Automatic operation: Unit usually works...
  • Seite 50 UK | 10 Commissioning PPB 30 RC LEDs Parameter Setting value Setting/Description The blue operating Duration of 5 minutes (red LED 1x) 10 minutes (red LED 2x) mode LED flashes intermittent once per cycle ventilation/ 30 minutes (red LED 3x) ventilation Parameters for the duration of the ma- level...
  • Seite 51: Spare Parts

    E059.1523.9000 Fax +49 7720 694 175 E-mail: ersatzteilservice@maico.de 6 External cover E059.1523.9100 7 PPB 30 O fan 0101.1424.0000 connection board 8 PPB 30 K fan 0101.1425.0000 connection board 9 PPB 30 RC 0101.1427.0000 radio board 10 Cover for electronic E059.1524.9000...
  • Seite 52 Consignes de montage .......61 Informations sur les réglages du système et Construction de l'appareil et des appareils (Mode Service). Télécharge- positionnement ........62 ment avec code QR ou sous www.maico- Raccourcissement du tube de ventilatoren.com. prolongation ........62 Collage des rubans isolants ....63 Installation du module d'insertion avec le tube de prolongation ....63...
  • Seite 53: Volume De Fourniture

    : ● vous connaissez les normes et directives en vigueur Les appareils PPB 30 O/PPB 30 K sont pilo- tés par une commande RLS 45 O ou ● vous pouvez exécuter de manière compé- RLS 45 K.
  • Seite 54: Consignes De Sécurité Et Avertissements

    FR | 3 Utilisation conforme Ne jamais utiliser l'appareil de ventila- limitation dans le temps, coupure de sécurité, ModBus, configuration avec PC. Extensible tion dans les situations suivantes : par module radio PP 45 EO pour intégrer des En cas d'utilisation pendant la phase détecteurs radio.
  • Seite 55 4 Consignes de sécurité et avertissements | FR Danger pour la santé par produits  Pour le démontage / montage du mo- chimiques ou gaz/vapeurs agressifs. dule d'insertion, le maintenir d'une main par Les produits chimiques ou gaz/vapeurs dessous. agressifs risquent de nuire à la santé, notam- ment s'ils sont diffusés dans les pièces par Risque de blessure lors des travaux l'appareil de ventilation.
  • Seite 56 Les appareils de ventilation ne peuvent et PPB 30 RC être installés dans des pièces, des habi- 12 V DC: PPB 30 O et PPB 30 K tations ou des unités d'utilisation de taille comparable où sont installés des foyers Dangers en cas de montage ulté-...
  • Seite 57: Exigences Sur Le Lieu D'installation

    4 Consignes de sécurité et avertissements | FR Manipuler les matériaux d'embal- 6 Caractéristiques techniques lage avec prudence.  Respecter les consignes de sécurité et de prévention des Diamètre extérieur DN 160 accidents en vigueur.  Conserver le matériel Épaisseur murale 320 - 790 mm d'emballage hors de portée des enfants Gaine murale...
  • Seite 58: Possibilités De Raccordement

    K12-K18 : Fonction Air entrant pour mode Air sortant PPB 30 K. Remarque : Compensation du débit d'air seulement pour 1 appareil PPB 30 K. * En cas d'utilisation de PP 45 EO, on peut initialiser au maximum 8 détecteurs radio...
  • Seite 59: Combinaisons Avec Rls 45 O

    7 Possibilités de raccordement | FR 7.2 Combinaisons avec RLS 45 O Appareil de PP 45 O/K PPB 30 O Détecteurs Détecteur ventilation, externes interne détecteur (PP45 HY, PP45 HYI CO2, COV) et LT N° de Interface du Interface du combi- ventilateur ventilateur...
  • Seite 60: Exemple D'application

    8 Exemple d'application Solution de ventilation dans un apparte- ment 3 pièces avec appareils de ventilation PPB 30 K (salle de bains) et PP 45 (pièces d'habitation) Il est également possible de réaliser un mode Le PPB 30 dans la salle de bains ventile et Air sortant exclusif par lequel les deux venti- aère simultanément la pièce en cas de fonc-...
  • Seite 61: Montage

    9 Montage | FR ● Les appareils PPB 30 K sont raccordés au 9 Montage bus RS-485 de la commande RLS 45 K. En cas d'utilisation de plusieurs appareils 9.1 Consignes de montage PPB 30 K avec une RLS 45 K, les PPB 30 K doivent être adressés via l'in-...
  • Seite 62: Construction De L'appareil Et Positionnement

    FR | 9 Montage ● Le mode Air sortant activé manuellement 3 Séparation du fluide extérieure ou la ventilation intensive est possible sur le 4 Bague de centrage PPB 30 RC à l’aide de la commande 5 Tube de prolongation : standard 200 mm, DS 45 RC ou du bouton à...
  • Seite 63: Collage Des Rubans Isolants

    9 Montage | FR 5. Enlever le cache de protection avant du l'extérieur du tube de prolongation [5] de boîtier du capot intérieur. Pour ce faire, manière à ce qu'ils adhèrent parfaitement pousser légèrement vers le haut les deux sur le côté frontal. leviers à...
  • Seite 64 8. Effectuer le raccordement de l’appareil con- formément au schéma de raccordement en Pour les appareils PPB 30 K et en cas de annexe  Considérer la variante d’appareil. raccordement d'un bouton ou d'un inter- rupteur optionnel, la deuxième entrée avec 9.
  • Seite 65: Branchement Électrique - 230 V

    à une RLS 45 O/K. Connecter les appareils la fente prévue dans le boîtier. Pour les conformément au schéma de connexions. appareils PPB 30 K/RC, veiller à ce que le Respecter le nombre d'appareils de ventila- détecteur d'humidité soit dégagé.
  • Seite 66: Raccordement Des Commandes D'air Ambiant

    FR | 9 Montage En cas de câblage de plusieurs ap- Systèmes à commande radio avec com- pareils de ventilation, toujours utiliser mande RLS 45 K et module radio PP 45 EO une boîte d'encastrement profonde ou Pour cette combinaison d’appareils, on peut double (boîte d'encastrement à...
  • Seite 67: Montage De L'interrupteur Radio (Enocean)

    2. Raccorder le PPB 30 O aux bornes de max. 6 raccordement RLS-45 Fan1 et Fan2. PP 45 RC PP 45 RC Raccorder les appareils PPB 30 K au bus PP 45 K PPB 30 RC PP 45 RC RS-485.
  • Seite 68: Installation Du Détecteur D'humidité Pp 45 Hyi Dans Rls 45 O Ou Rls 45 K

    Fonctionnement impossible en cas de mon- mise en service sur internet (télé- tage erroné d'un détecteur d'humidité. chargement sous www.maico-ventila- Ne pas déformer les broches. Introduire le toren.com). détecteur dans la douille jusqu'en butée. Vous pouvez aussi télécharger la no- tice d'installation pour la commande 2.
  • Seite 69: Mode Service - Commande

    10 Mise en service | FR 10.1 Mode Service – Commande Démarrage du mode Service Modification de paramètres Appuyer La LED de mode Dès qu'un Les LED de pendant de fonctionne- sous-menu niveau de venti- 5 secondes ment clignote. donné est lation clignotent sur les deux Vous vous atteint, les après modifica-...
  • Seite 70: Menu De Service Rls 45 O

    FR | 10 Mise en service 10.2 Menu de service RLS 45 O Gras = par défaut Paramètre Valeur de réglage/ Réglage / Description Niveau de ventil. Type d'appareil PP 45 sur RLS PPB 30 O (Fan1/Fan2) La gamme de type qui est raccordée à l'interface de ventilateur Fan1/Fan2 est sélectionnée ici. Seules les Attention : combinaisons d'appareils ne comprenant...
  • Seite 71 10 Mise en service | FR Paramètre Valeur de réglage/ Réglage / Description Niveau de ventil. Détecteurs Aucun détecteur 1 détecteur interne 1 détecteur interne + 1 détecteur externe 1 détecteur interne + 2 détecteurs externes 1 détecteur interne + 3 détecteurs externes 0 détecteur interne + 1 détecteur externe 0 détecteur interne + 2 détecteurs externes 0 détecteur interne + 3 détecteurs externes Sélectionnez combien de détecteurs in-...
  • Seite 72: Menu De Service Rls 45 K

    Le nombre d'appareils raccordés à l'interface de ventilateur (Fan1/Fan2) est sélectionné ici. Attention : activation/nombre d'appareils PPB 30 K est pris en compte dans un autre sous-menu (paramètre PPB 30 K). Niveaux de Niveau de ventilation « 0 » possible ventilation Niveau de ventilation «...
  • Seite 73 10 Mise en service | FR Paramètre Valeur de réglage/ Réglage / Niveau de venti- description lation Fonctionnement sans autre(s) Éléments de puissance LT/RLS (LT) ou Fonctionnement avec 1 LT ou RLS commandes Fonctionnement avec 2 LT ou RLS d'air ambiant Fonctionnement avec 3 LT ou RLS (RLS) Esclave N°...
  • Seite 74 Ce module de réglage permet d'activer le ModBus et de régler le taux de transfert. Attention : Si l'interface Modbus est active, il est impossible de raccorder PPB 30 K ou des détecteurs externes / LT / RLS. Adresse 10...
  • Seite 75: Menu De Service Ppb 30 Rc

    10 Mise en service | FR 10.4 Menu de service PPB 30 RC Gras = par défaut LED PPB 30 RC Paramètre Valeur de Réglage / Description réglage La LED orange de Modes de Mode automatique (LED rouge 1x) mode de fonctionne- fonctionne- Mode système (LED rouge 2x) ment clignote 1x ment Deux modes de fonctionnement peuvent de façon cyclique être sélectionnés ici :...
  • Seite 76 FR | 10 Mise en service LED PPB 30 RC Paramètre Valeur de Réglage / Description réglage La LED bleue de Durée 5 minutes (LED rouge 1x) mode de fonctionne- ventilation 10 minutes (LED rouge 2x) ment clignote 1x par à-coups/ 30 minutes (LED rouge 3x) de façon cyclique niveau de La durée de la fonction déshumidifica-...
  • Seite 77: Pièces De Rechange

    6 Protection externe E059.1523.9100 7 Platine de raccordement 0101.1424.0000 du ventilateur PPB 30 O 8 Platine de raccordement 0101.1425.0000 du ventilateur PPB 30 K 9 Platine radio 0101.1427.0000 PPB 30 RC 10 Cache électronique E059.1524.9000 platine radio PPB 30 RC 11 Cache électronique...
  • Seite 78: Anhang Einbaumaße

    DE | UK | FR | ANHANG / APPENDIX / ANNEXE DE: ANHANG UK: APPENDIX FR: ANNEXE Einbaumaße / Installation dimensi- ons / Cotes de montage PPB 30 O/K/RC PPB 30 O/K/RC + PP 45 VS...
  • Seite 79 ANHANG / APPENDIX / ANNEXE | DE | UK | FR Weitere Abmessungen / Other dimensions / Autres dimensions Komponente Abmessungen (BxHxT) Component Dimensions (WxHxD) Composant Dimensions (lxhxp) RLS 45 O / RLS 45 K 80 x 80 x 49 mm Raumluftsteuerung Room air control Commande air ambiant DS45 RC 80 x 80 x 15 mm...
  • Seite 80: Anschluss-/Verdrahtungspläne

    DE | UK | FR | ANHANG / APPENDIX / ANNEXE Anschlussplan RLS 45 K / PPB 30 K / PP 45 K Wiring diagram RLS 45 K / PPB 30 K / PP 45 K Schéma des connexions RLS 45 K / PPB 30 K / PP 45 K...
  • Seite 81 Verteiler UP-L zur Lüfterein- UP-L distributor to castré UP-L jusqu'à l'appareil heit PPB 30 K = 25 m. PPB 30 K ventilation de ventilation PPB 30 K=25 m. unit = 25 m. Steuerleitung Fan 1, empfoh- Fan 1 control cable.
  • Seite 82 DE | UK | FR | ANHANG / APPENDIX / ANNEXE Anschlussplan RLS 45 O / PPB 30 O Wiring diagram RLS 45 O / PPB 30 O Schéma des connexions RLS 45 O / PPB 30 O...
  • Seite 83 ANHANG / APPENDIX / ANNEXE | DE | UK | FR RLS 45 O Raumluftsteuerung PushPull 45 Object Commande d'air ambiant PushPull 45 Objekt room air control PushPull 45 Objet PPB 30 O Lüftereinheit PushPull PushPull Balanced 30 Appareil de ventilation Balance 30 Objekt Object ventilation unit PushPull Balanced 30 Objet X 1.1 RLS - Klemme...
  • Seite 84 DE | UK | FR | ANHANG / APPENDIX / ANNEXE Anschlussplan RLS 45 K – Systembus Wiring diagram for RLS 45 K – system bus Schéma des connexions RLS 45 K – Bus système...
  • Seite 85 RLS maître. C âble de com- (ST) Y 2x2x0.8mm. Max. J-Y(ST)Y 2x2x0,8 mm. mande recommandé J-Y (ST) cable length to the PPB 30 K Y 2x2x0,8mm. Longueur Max. Leitungslänge zu den ventilation units = 25 m f rom max. du câble au l'appareils PPB 30 K 25 Meter star point.
  • Seite 86 DE | UK | FR | ANHANG / APPENDIX / ANNEXE Anschlussplan RLS 45 O – Systembus Wiring diagram for RLS 45 O system bus Schéma des connexions RLS 45 O – Bus système...
  • Seite 87 ANHANG / APPENDIX / ANNEXE | DE | UK | FR RLS 45 K Raumluftsteuerung PushPull 45 Comfort Commande d'air ambiant room air control PushPull 45 Confort PP 45 Komfort PP 45 LT Leitungsteil PP45 PP 45 power unit Élément de puissance PP 45 PP 45 HY Feuchtesensor PP45 zur PP 45 humidity sensor for Détecteur d'humidité...
  • Seite 88 DE | UK | FR | ANHANG / APPENDIX / ANNEXE Anschlussplan PPB 30 K – Geräteanschluss Wiring diagram for PPB 30 K – device connection Schéma des connexions PPB 30 K – raccordement de ventilateur PPB 30 K W-PPB VAP-K VAP-K PPB 30 K - Geräte-Adressierung...
  • Seite 89 ANHANG / APPENDIX / ANNEXE | DE | UK | FR Anschlussplan PPB 30 O – Geräteanschluss Wiring diagram for PPB 30 O – device connection Schéma des connexions PPB 30 O – raccordement de ventilateur PPB 30 O W-PPB-O VAP-O PPB 30 O Lüftereinheit PushPull Balanced 30 Appareil de ventilation PPB 30 Objekt...
  • Seite 90 DE | UK | FR | ANHANG / APPENDIX / ANNEXE Anschlussplan PPB 30 RC – Geräteanschluss Wiring diagram for PPB 30 RC – device connection Schéma des connexions PPB 30 RC – raccordement de ventilateur PPB 30 RC PPB 30 PLC PPB 30 RC Lüftereinheit PushPull PushPull Balanced 30 RC Appareil de ventilation Balanced 30 RC...
  • Seite 92 MAICO Elektroapparate-Fabrik GmbH Steinbeisstr. 20 78056 Villingen-Schwenningen ● ● ● Germany Service +49 7720 6940 technik@maico.de ● ●...

Diese Anleitung auch für:

Rls 45 oRls 45 kPpb 30 rcPpb 30 o

Inhaltsverzeichnis