Herunterladen Inhalt Inhalt Diese Seite drucken
Vorschau ausblenden Andere Handbücher für Piezosurgery touch:
Inhaltsverzeichnis

Werbung

Verfügbare Sprachen
  • DE

Verfügbare Sprachen

  • DEUTSCH, seite 74
Û
Use and maintenance manual
Û
Manuale d'uso e manutenzione
Û
Gebrauchs- und Wartungshandbuch
Û
Mode d'emploi et maintenance
Û
Manual de uso y mantenimiento
Û
Bruks-och underhållsanvisning
0476
EN
IT
DE
FR
ES
SV

Werbung

Inhaltsverzeichnis
loading

Inhaltszusammenfassung für mectron Piezosurgery touch

  • Seite 1 Û Use and maintenance manual Û Manuale d’uso e manutenzione Û Gebrauchs- und Wartungshandbuch Û Mode d’emploi et maintenance Û Manual de uso y mantenimiento Û Bruks-och underhållsanvisning 0476...
  • Seite 2 Û Fold out this page Û Aprire la pagina Û Seite aufklappen Û Ouvrir la page Û Abrir la página Û Vik ut denna sida...
  • Seite 4 irrigation function light implant auto cortical cancellous special perio endo pump/clean...
  • Seite 5 Û Use and maintenance manual...
  • Seite 6: Inhaltsverzeichnis

    Û TABLE OF CONTENTS 01 Û INTRODUCTION ........
  • Seite 7 . . . 09.4 Sending the device to an Authorized Mectron Service Service 10 Û WARRANTY ......... .
  • Seite 8: Introduction

    (refers to possible damage to property) in your possession, contact your Retailer The purpose of this manual is to make or the After-Sales Service of Mectron for the operator knowledgeable of the safety clarifications and support. 01.1 Û INTENDED USE OF THE PIEZOSURGERY®...
  • Seite 9: Description Of The Device

    The manufacturer Mectron shall be under no authorized by Mectron; liability, expressed or implied, with respect to 6 Improper use, mistreatments, and/or...
  • Seite 10: Safety Precautions

    Contact an Authorized Mectron remove them. Service Center if the abnormalities concern The patient must be instructed to breathe the device.
  • Seite 11 01 Û INTRODUCTION units near the PIEZOSURGERY® touch WARNING: Only use original Mectron device may interfere with its correct inserts, accessories, and spare parts. operation. WARNING: Contraindications. Do not WARNING: Contraindications. use the PIEZOSURGERY® touch on patients Interference with other equipment.
  • Seite 12: Symbols

    01.5 Û SYMBOLS Serial number Lot number Product code CAUTION: read the instructions for use Operating instructions 70 °C Temperature limitation - transport and storage conditions -10 °C 90 % Humidity limitation - transport and storage conditions 10 % 1060 hPa Atmospheric pressure limitation - transport and storage conditions 500 hPa It indicates compliance with the CE 93/42 CEE EN 60601-1 and EN 60601-1-2.
  • Seite 13: Identification Data

    An exact description of the model and of the serial number of the device will enable our After- Sales Service to provide fast and efficient support. Always refer these data whenever you contact an Authorized Mectron Service Center. 02.1 Û IDENTIFICATION PLATE OF THE DEVICE Every device has an identification plate that...
  • Seite 14: Delivery

    Authorized The package of the device is sensitive to Mectron Service Center and so that you can strong collisions, because it contains electronic place it back inside during prolonged periods components.
  • Seite 15: Installation

    04 Û INSTALLATION 04 Û INSTALLATION 04.1 Û FIRST INSTALLATION The device must be installed in a comfortable In the case that your device requires an place suitable for its use. activation key, the procedures to follow may The PIEZOSURGERY® touch can be purchased vary from country to country.
  • Seite 16: Connection Of The Accessories

    04.3 Û CONNECTION OF THE ACCESSORIES Insert the irrigation bag support rod in the dedicated hole; Insert the handpiece fixed support in the housing; PLEASE NOTE The handpiece support can be placed in 4 different locations: lateral right, front right, front left, lateral left; Take a peristaltic pump tube in silicon and insert it on the connector of the handpiece cord;...
  • Seite 17 04 Û INSTALLATION - position the tube in the pump; - close the pump cover completely; WARNING: When the lid of the peristaltic pump is open, the foot pedal of the PIEZOSURGERY® touch must not be operated. The parts in movement may cause harm to the operator.
  • Seite 18: Use

    Insert the power supply cable in its connection located at the back of the device. Connect it to the power outlet; Equipotential plug: The device is equipped with an additional equipotential plug located on the rear of the console. This plug is in accordance with DIN 42801. Insert the connector of the equipotential cord (optional) to the plug on the rear of the device’s console.
  • Seite 19: Description Of The Keyboard

    05 Û USE 05.2 Û DESCRIPTION OF THE KEYBOARD Touch keyboard The user can configure the device by simply touching on the touch keyboard. Depending on the selected setting, the electronic feedback system automatically adjusts the correct operating frequency. FUNCTIONS (ref.
  • Seite 20 IRRIGATION (ref. inside cover) The capacity of the peristaltic pump can be adjusted by selecting the numbers on the touch keyboard in the “irrigation” column. 7 capacity levels are foreseen: 0 = operation of the pump is closed: no irrigation outflows from the insert From 1 to 6= the pump flow goes from 8 ml/min to approximately 75 ml/min.
  • Seite 21 05 Û USE LIGHT (ref. inside cover) Depending on the type of handpiece and operation that needs to be performed, it is possible to choose 3 options from the “light” list: • By choosing the AUTO option, the LED light on the front terminal of the handpiece is switched on by pressing the foot pedal, and automatically switches off 3 seconds after...
  • Seite 22: Safety Precautions Before And During Use

    WARNING: To ensure that the not perform the treatment. Contact an Authorized Mectron Service Center if the handpiece cools down, always activate it abnormalities concern the device. with the irrigation circuit correctly installed and filled. To fill the irrigation circuit, CAUTION: CLEAN function.
  • Seite 23: Instructions For Use

    The patient must be instructed to breathe Exclusively use the Mectron torque wrench through his nose during the treatment, to fasten the insert to the handpiece. or a dental dam must be used to prevent...
  • Seite 24 To fill the irrigation circuit, use the PUMP function by selecting PUMP/CLEAN on the touch keyboard: all the other selection options present on the display are disabled, and the PUMP/CLEAN writing flashes; While the PUMP/CLEAN wording is flashing, press the foot pedal once and release it; the PUMP/CLEAN stops flashing and the irrigation circuit starts to fill up;...
  • Seite 25 05 Û USE Tighten the insert by using the Mectron torque wrench; To correctly use the Mectron torque wrench, operate as follows: Put the insert inside the wrench as shown; CORRECT NOT CORRECT Firmly hold the central body of the handpiece;...
  • Seite 26: Important Information On The Inserts

    Mectron insert to replace it. you’ve purchased. - Use original Mectron inserts only. Use - Before using the PIEZOSURGERY® of non-original inserts, in addition to touch, make sure you have prepared the voiding the warranty, damages the operatory site by having first moved...
  • Seite 27: Maintenance

    Mectron spare part. 4 Prior to using the device again, clean and sterilize the handpiece, the inserts, the 07 Û DISPOSAL MODES AND PRECAUTIONS PIEZOSURGERY®...
  • Seite 28: Technical Data

    08 Û TECHNICAL DATA Device compliant to Dir. 93/42/CEE: Class II a Classification as per EN 60601-1: Applied part type B (handpiece, insert) IP 20 (device) IP X8 (foot pedal) 60sec. ON - 30sec. OFF with irrigation Device for intermittent operation: 30sec.
  • Seite 29: Guidance And Manufacturer's Declaration - Electromagnetic Emissions

    08 Û TECHNICAL DATA 08.1 Û ELECTROMAGNETIC COMPATIBILITY EN 60601-1-2 WARNING: Interference with WARNING: Interference from other other equipment. Though compliant equipment. An electrical scalpel or with the standard IEC 60601-1-2, the other electro-surgical units near the PIEZOSURGERY® touch may nonetheless PIEZOSURGERY®...
  • Seite 30: Guidance And Manufacturer's Declaration - Electromagnetic Immunity

    Guidance and manufacturer’s declaration - Electromagnetic immunity The PIEZOSURGERY® touch is intended for use in the electromagnetic environment specified below. The customer or user of the PIEZOSURGERY® touch should ensure that it is used in such an environment. Immunity Test level Compliance Electromagnetic IEC 60601...
  • Seite 31 08 Û TECHNICAL DATA Guidance and manufacturer’s declaration - Electromagnetic immunity The PIEZOSURGERY® touch is intended for use in the electromagnetic environment specified below. The customer or user of the PIEZOSURGERY® touch should ensure that it is used in such an environment.
  • Seite 32 Recommended separation distances between portable and mobile RF communications equipment and the PIEZOSURGERY® touch The PIEZOSURGERY® touch is intended for use in an electromagnetic environment in which radiated RF disturbances are controlled. The customer or user of the PIEZOSURGERY® touch can help prevent electromagnetic interference by maintaining a minimum distance between portable and mobile FR communications equipment (transmitters) and the PIEZOSURGERY®...
  • Seite 33: Troubleshooting

    Contact an Authorized Mectron Service Center Insert not tightened correctly on Unscrew the insert and correctly handpiece screw it on again with the Mectron torque wrench (see paragraph 05.4) Insert broken, worn-out or deformed Replace the insert Handpiece cord contacts wet...
  • Seite 34: Quick Solution To Problems

    The insert is not correctly Unscrew and correctly screw the tightened on the handpiece insert again with the Mectron A slight whistling torque wrench sound coming from the (see paragraph 05.4) PIEZOSURGERY® touch handpiece is heard...
  • Seite 35 (See paragraph 04.3) liquid outflows from the handpiece The insert is not correctly Unscrew and correctly screw the tightened on the handpiece insert again with the Mectron Insufficient torque wrench performance Insert broken, worn-out, or Replace the insert with a new...
  • Seite 36: Replacement Of The Fuses

    09.3 Û REPLACEMENT OF THE FUSES WARNING: Switch the device off. Always turn the device off with the main switch and disconnect it from the electrical power socket before performing the following intervention. Apply leverage with a flat screwdriver, inserting its tip in the seat of the fuse- holder drawer located under the power supply socket;...
  • Seite 37: Sending The Device To An Authorized Mectron Service Service

    • Product name • Serial number and/or lot number Clean and sterilize all the parts that need to be sent to an Authorized Mectron Service • Reason for goods returned / description of Center, following the instructions provided the malfunction in the Cleaning and Sterilization Manual •...
  • Seite 38: Warranty

    Italian version will have pertinence. Texts, images, and graphics of this manual are property of Mectron S.p.A., Carasco, Italy. All rights reserved. The contents cannot be copied, distributed, changed, or made available to third parties without the written approval of...
  • Seite 39 Û Manuale d‘uso e manutenzione...
  • Seite 40 Û SOMMARIO 01 Û INTRODUZIONE ..........38 01.1 Destinazione d’uso del PIEZOSURGERY®...
  • Seite 41 09.3 Sostituzione dei fusibili ........66 09.4 Invio ad un Centro Assistenza Autorizzato Mectron ....67 10 Û...
  • Seite 42: Introduzione

    La Mectron è impegnata nel continuo PERICOLO aggiornamento dei propri prodotti (riferito sempre a danni a persone) con possibili modifiche a componenti dell’apparecchio.
  • Seite 43: Descrizione Dell'apparecchio

    2 Le condizioni ambientali di conservazione paziente 9 Uso di inserti non originali Mectron e ed immagazzinamento del dispositivo non sono conformi alle prescrizioni utilizzati secondo i settaggi progettati indicate nel capitolo 08 - DATI TECNICI e testati sugli inserti originali Mectron.
  • Seite 44: Prescrizioni Di Sicurezza

    Rivolgersi ad durante l’utilizzo. Gli inserti rotti o usurati un Centro Assistenza Autorizzato Mectron non devono mai essere utilizzati. se le anomalie riguardano l’apparecchio. In caso di rottura verificare che non rimangano frammenti nella parte trattata ATTENZIONE: L’impianto elettrico dei...
  • Seite 45 Interferenza con altre attrezzature. Anche PERICOLO: Utilizzare esclusivamente se conforme allo standard IEC 60601-1-2, il inserti, accessori e ricambi originali PIEZOSURGERY® touch può interferire con Mectron. altri dispositivi nelle vicinanze. PERICOLO: Controindicazioni. Non Il PIEZOSURGERY® touch non deve essere utilizzare il PIEZOSURGERY® touch su usato in prossimità...
  • Seite 46: Simboli

    01.5 Û SIMBOLI Numero di serie Numero di lotto Codice prodotto Attenzione leggere le istruzioni per l’uso Istruzioni per il funzionamento 70 °C Limiti di temperatura per trasporto e conservazione -10 °C 90 % Limiti di umidità per trasporto e conservazione 10 % 1060 hPa Limiti per pressione atmosferica per trasporto e conservazione...
  • Seite 47: Dati Di Identificazione

    Una esatta descrizione del modello e del numero di serie dell’apparecchio faciliterà risposte rapide ed efficaci da parte del nostro Servizio Post-Vendita. Riferire sempre questi dati ogni volta che si contatta un Centro Assistenza Autorizzato Mectron. 02.1 Û TARGA IDENTIFICAZIONE APPARECCHIO Ogni apparecchio è...
  • Seite 48: Consegna

    (manipolo, inserti, chiavi) da Non sovrapporre più cartoni per non utilizzare in caso di fermo per guasto o di schiacciare gli imballi sottostanti. inconvenienti. Tutto il materiale spedito dalla Mectron è stato controllato all’atto della spedizione. L’apparecchio viene consegnato opportunamente protetto ed imballato.
  • Seite 49: Installazione

    04 Û INSTALLAZIONE 04 Û INSTALLAZIONE 04.1 Û PRIMA INSTALLAZIONE L’apparecchio deve essere installato in luogo Nel caso in cui il vostro apparecchio necessiti idoneo e comodo per il suo utilizzo. di chiave di attivazione le procedure da seguire Il PIEZOSURGERY® touch può essere acquistato possono variare da Paese a Paese.
  • Seite 50: Collegamento Degli Accessori

    04.3 Û COLLEGAMENTO DEGLI ACCESSORI Inserire l’asta supporto sacca nel foro predisposto; Inserire il supporto fisso manipolo negli alloggiamento predisposti. NOTA BENE Il supporto manipolo può essere posizionato in 4 differenti postazioni: laterale destro, frontale destro, frontale sinistro, laterale sinistro; Prendere un tubo pompa peristaltica in silicone e inserirlo sul connettore del cordone del manipolo;...
  • Seite 51 04 Û INSTALLAZIONE - posizionare il tubo nella rotante; - chiudere completamente lo sportello; PERICOLO: Quando lo sportello della pompa peristaltica è aperta non si deve azionare il pedale del PIEZOSURGERY® touch. Le parti in movimento possono causare danni all’operatore. Collegare l’estremità...
  • Seite 52: Uso

    Inserire il cavo di alimentazione nella sua connessione situata sul retro dell’apparecchio. Collegarlo alla presa a muro; Spina equipotenziale: il dispositivo è dotato di una spina equipotenziale supplementare sul retro dell’apparecchio. La spina è conforme alla DIN 42801. Inserire il connettore del cavo equipotenziale (non fornito) sulla spina posta sul retro del dispositivo.
  • Seite 53: Descrizione Della Tastiera

    05 Û USO 05.2 Û DESCRIZIONE DELLA TASTIERA Tastiera touch L’utente può configurare la macchina semplicemente toccando la tastiera touch. A seconda del settaggio impostato il sistema elettronico di feedback regola automaticamente la frequenza di lavoro corretta. FUNZIONI (rif. interno copertina) A seconda del tipo di chirurgia è...
  • Seite 54 IRRIGAZIONE (rif. interno copertina) La portata della pompa peristaltica è regolabile selezionando i numeri sulla tastiera touch, nella colonna “irrigation”. Sono previsti 7 livelli di portata: 0 = il funzionamento della pompa è chiuso: dall’inserto non esce nessuna irrigazione. Da 1 a 6= la portata della pompa va da 8 ml/min a circa 75 ml/min.
  • Seite 55 05 Û USO LUCE (rif. interno copertina) A seconda del tipo di manipolo e del tipo di operazione che si deve eseguire è possibile segliere 3 opzioni dall’elenco “light”: • Selezionando l’opzione AUTO la luce a LED sul terminale anteriore del manipolo viene accesa con la pressione del pedale e si spegne automaticamente dopo 3 secondi dal rilascio del pedale.
  • Seite 56: Prescrizioni Di Sicurezza Prima E Durante L'uso

    Rivolgersi ad correttamente installato e riempito. Per un Centro Assistenza Autorizzato Mectron riempire il circuito di irrigazione utilizzare se le anomalie riguardano l’apparecchio. sempre la funzione PUMP ATTENZIONE: Funzione CLEAN.
  • Seite 57: Istruzioni D'uso

    È necessario istruire il paziente a respirare Utilizzare esclusivamente la chiave attraverso il naso durante il trattamento, dinamometrica Mectron per fissare o utilizzare una diga dentale, in modo da l’inserto al manipolo. evitare ingestioni di frammenti di inserti rotti.
  • Seite 58 Per caricare il circuito di irrigazione utilizzare la funzione PUMP selezionando PUMP/CLEAN sulla tastiera touch: tutte le altre selezioni presenti vengono disattivate e la scritta PUMP/CLEAN lampeggia; Mentre la scritta PUMP/CLEAN lampeggia, premere il pedale una volta e rilasciarlo, PUMP/CLEAN smette di lampeggiare e il riempimento del circuito di irrigazione ha inizio;...
  • Seite 59 05 Û USO Serrare l’inserto mediante la chiave dinamometrica Mectron; Per il corretto utilizzo della chiave dinamometrica Mectron operare come segue: Inserire l’inserto all’interno della chiave, CORRETTO come illustrato; NON CORRETTO Trattenere con forza il corpo centrale del manipolo; ATTENZIONE: Non si deve impugnare il manipolo sulla parte terminale e/o sul cordone ma solo sul corpo centrale.
  • Seite 60: Informazioni Importanti Sugli Inserti

    - Prima di utilizzare il PIEZOSURGERY® - Utilizzare solo inserti originali Mectron. touch assicurarsi di aver preparato il sito L’utilizzo di inserti non originali, oltre operatorio avendo preventivamente ad annullare la garanzia, danneggia la allontanato i tessuti molli, per evitare di filettatura del manipolo PIEZOSURGERY®...
  • Seite 61: Manutenzione

    - Chiave serraggio inserti, quando usurata gli fornisce nuova apparecchiatura; presso o rotta. Mectron sono a disposizione istruzioni per il corretto smaltimento. I materiali usa e getta ed i materiali che comportano rischio biologico devono essere smaltiti secondo le norme vigenti locali concernenti i rifiuti ospedalieri.
  • Seite 62: Dati Tecnici

    08 Û DATI TECNICI Apparecchio conforme alla Dir. 93/42/CEE: Classe IIa Classificazione ai sensi della EN 60601-1: Parti applicate Tipo B (manipolo, inserto) IP 20 (apparecchio) IP X8 (pedale) Apparecchio per funzionamento 60sec. ON - 30sec. OFF con irrigazione intermittente: 30sec.
  • Seite 63: Compatibilità Elettromagnetica

    08 Û DATI TECNICI 08.1 Û COMPATIBILITÀ ELETTROMAGNETICA EN 60601-1-2 PERICOLO: Controindicazioni. PERICOLO: Controindicazioni. Interferenza con altre attrezzature Interferenza da altre attrezzature Anche se conforme allo standard IEC Un elettrobisturi o altre unità 60601-1-2, il PIEZOSURGERY® touch può elettrochirurgiche disposte vicino interferire con altri dispositivi nelle all’apparecchio PIEZOSURGERY®...
  • Seite 64 Guida e dichiarazione del costruttore - Immunità elettromagnetica Il PIEZOSURGERY® touch è previsto per funzionare nell’ambiente elettromagnetico sotto specificato. Il cliente o l’utilizzatore del PIEZOSURGERY® touch dovrebbe assicurarsi che esso venga usato in tale ambiente. Prova Livello di prova Livello Ambiente IEC 60601 di immunità...
  • Seite 65 08 Û DATI TECNICI Guida e dichiarazione del costruttore - Immunità elettromagnetica Il PIEZOSURGERY® touch è previsto per funzionare nell’ambiente elettromagnetico sotto specificato. Il cliente o l’utilizzatore del PIEZOSURGERY® touch dovrebbe assicurarsi che esso venga usato in tale ambiente. Prova Livello di prova Livello Ambiente elettromagnetico...
  • Seite 66 Distanze di separazione raccomandate tra apparecchi di radiocomunicazione portatili e mobili e il PIEZOSURGERY® touch Il PIEZOSURGERY® touch è previsto per funzionare in un ambiente elettromagnetico in cui sono sotto controllo i disturbi irradiati RF. Il cliente o l’operatore del PIEZOSURGERY® touch possono contribuire a prevenire interferenze elettromagnetiche assicurando una distanza minima fra gli apparecchi di comunicazione mobili e portatili a RF (trasmettitori) e il PIEZOSURGERY®...
  • Seite 67: Risoluzione Dei Problemi

    Centro Assistenza Autorizzato Mectron Procedura di accensione non Verificare che il pedale non sia corretta: l’apparecchio è stato acceso premuto. Se il problema persiste col pedale premuto disconnettere il pedale ed eventualmente contattare un Centro Assistenza Autorizzato Mectron...
  • Seite 68: Risoluzione Rapida Dei Problemi

    Il display non segnala errori. Il pedale non funziona Contattare un Centro Assistenza Autorizzato Mectron Vedi paragrafo 09.1 per la causa Vedi paragrafo 09.1 per l’azione L’apparecchio è acceso possibile a seconda del simbolo da intraprendere a seconda del ma non lavora.
  • Seite 69 Durante il funzionamento non esce liquido Il manipolo è ostruito Contattare un Centro Assistenza dall’inserto Autorizzato Mectron Il livello di irrigazione sullo Regolare il livello di irrigazione schermo è regolato sullo “0” La sacca del liquido è vuota Sostituire la sacca con una piena La presa d’aria del deflussore...
  • Seite 70: Sostituzione Dei Fusibili

    09.3 Û SOSTITUZIONE DEI FUSIBILI PERICOLO: Spegnere l’apparecchio. Spegnere sempre l’apparecchio mediante l’interruttore principale e scollegarlo dalla presa di alimentazione elettrica prima di effettuare il seguente intervento. Fare leva con un cacciavite piano, inserendone la punta nella sede del cassetto porta fusibili situato sotto la presa alimentazione;...
  • Seite 71: Invio Ad Un Centro Assistenza Autorizzato Mectron

    Mectron, il personale tecnico qualificato darà Nel caso in cui il cliente non ottemperi la valutazione del caso. La riparazione verrà a quanto richiesto Mectron si riserva di fatta solo previa accettazione da parte del addebitargli le spese di pulizia e sterilizzazione cliente finale.
  • Seite 72: Garanzia

    Testi, immagini e grafica del presente manuale sono di proprietà di Mectron S.p.A., Carasco, Italia. Tutti i diritti sono riservati. Senza l‘approvazione scritta di Mectron S.p.A. i contenuti non possono essere copiati, distribuiti, cambiati o resi disposnibili a...
  • Seite 73 Û Gebrauchs-und Wartungshandbuch...
  • Seite 74 Û ZUSAMMENFASSUNG 01 Û EINFÜHRUNG .........
  • Seite 75 ..09.4 Versand an ein autorisiertes Servicezentrum von Mectron 10 Û GARANTIE ......... . .
  • Seite 76: Einführung

    "Sicherheitshinweise". Die Sicherheitshinweise ist auf der letzten Seite dieses Handbuchs sind je nach Schweregrad folgendermaßen abgedruckt. klassifiziert: Die Firma Mectron ist zur ständigen GEFAHR: Aktualisierung der Produkte und eventuellen (Immer in Bezug auf Personenschäden) Veränderungen der Gerätekomponenten verpflichtet. Falls Unstimmigkeiten zwischen...
  • Seite 77: Beschreibung Des Geräts

    Anpassung, Aktualisierungen und stillschweigend, und kann für unmittelbare Reparaturen des Geräts werden nicht durch oder mittelbare Schäden an Personen und/ das von Mectron autorisierte Personal oder Gegenständen nicht haftbar gemacht durchgeführt; 6 Eine falsche Verwendung, Missbrauch und/ werden, die aufgrund von falscher Verfahren im Zusammenhang mit der Benutzung des oder unsachgemäßen Gebrauch;...
  • Seite 78: Sicherheitsvorschriften

    Behandlung nicht durch. Wenden Sie keine Fragmente im Behandlungsfeld sich an ein autorisiertes Servicezentrum zurückbleiben, zeitgleich verwenden Sie die von Mectron, wenn Störungen auftreten. Absaugung um diese zu entfernen. Der Patient muss, falls nötig, angewiesen ACHTUNG: Die elektrische Anlage der werden, während der Behandlung durch...
  • Seite 79 Nähe des PIEZOSURGERY® touch GEFAHR: Verwenden Sie nur Original- befinden, können die Funktionsweise des Instrumente, -Zubehör und -Ersatzteile von Gerätes beeinträchtigen. Mectron. GEFAHR: Gegenanzeigen. Störungen GEFAHR: Gegenanzeigen. Verwenden mit anderen Geräten. Auch wenn er dem Sie den PIEZOSURGERY® touch nicht...
  • Seite 80: Symbole

    01.5 Û SYMBOLE Seriennummer Chargennummer Produktcode Achtung - Lesen Sie die Gebrauchsanweisung Betriebsanweisungen 70 °C Limits Temperatur während Transport und Lagerung -10 °C 90 % Limits Luftfeuchtigkeit während Transport und Lagerung 10 % 1060 hPa Limits Luftdruck während Transport und Lagerung 500 hPa Konformität mit der EU-Richtlinie 93/42 CEE EN 60601-1 und EN 60601-1-2.
  • Seite 81: Identifikationsdaten

    02 Û IDENTIFIKATIONSDATEN Eine genaue Beschreibung des Modells und der Seriennummer des Geräts erleichtert eine schnelle und effektive Antwort von unserem After-Sales-Service. Geben Sie diese Daten immer an, wenn Sie eines der autorisierten Servicezentren von Mectron kontaktieren. 02.1 Û TYPENSCHILD DES GERÄTS Jedes Gerät ist mit einem Typenschild...
  • Seite 82: Lieferung

    Bewahren Sie die Verpackung für ein erworbene Gerät ausgestattet ist. eventuelles Versenden an ein autorisiertes Die Verpackungseinheit darf keinen starken Servicezentrum von Mectron auf sowie zur Erschütterungen ausgesetzt werden, da sie Verstauung des Geräts bei längerer Inaktivität. elektronische Bauteile enthält. Daher müssen...
  • Seite 83: Installation

    04 Û INSTALLATION 04 Û INSTALLATION 04.1 Û ERSTE INSTALLATION Das Gerät muss an einem für seine Falls Ihr Gerät einen Aktivierungscode Verwendung geeigneten und zweckmäßigen erfordert, beachten Sie bitte, dass der Ort installiert werden. Aktivierungsprozess von Land zu Land Der PIEZOSURGERY®...
  • Seite 84: Anschluss Des Zubehörs

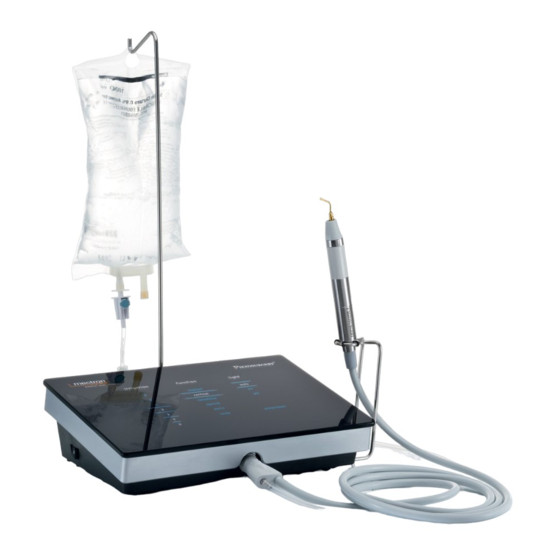
    04.3 Û ANSCHLUSS DES ZUBEHÖRS Führen Sie den Flaschenhalterung in das hierfür vorgesehene Loch; Stecken Sie die feste Handstückhalterung in das hierfür vorgesehene Gehäuse. HINWEIS Die Handstückhalterung kann an 4 verschiedenen Stellen angebracht werden: an der rechten Seite, vorne rechts, vorne links, an der linken Seite;...
  • Seite 85 04 Û INSTALLATION - Der Schlauch wird drehend positioniert; - Schließen Sie die Pumpenöffnung; GEFAHR: Wenn die Peristaltikpumpe geöffnet ist, darf der Fußanlasser des PIEZOSURGERY® touch nicht verwendet werden. Bewegliche Teile können zu Verletzungen des Bedieners führen. Verbinden Sie das Ende des Silikonschlauchs mit dem Infusionsbesteck;...
  • Seite 86: Verwendung

    Stecken Sie das Netzkabel in die Buchse auf der Rückseite des Geräts. Stecken Sie es in die Steckdose; Erdungskabel: das Gerät ist auf der Rückseite mit einer zusätzlichen Erdungssteckdose ausgerüstet. Diese Steckdose entspricht der DIN 42801. Der Stecker des (optionalen) Erdungskabels wird in die Steckdose auf der Geräterückseite eingeführt.
  • Seite 87: Beschreibung Des Bedienfelds

    05 Û VERWENDUNG 05.2 Û BESCHREIBUNG DES BEDIENFELDS Touchpad Der Bediener kann das Gerät einfach durch Berühren des Bedienfelds konfigurieren. Je nach Einstellung des elektronischen Feedbacksystems wird die richtige Arbeitsfrequenz automatisch reguliert. FUNKTIONEN auf der Umschlagseite) Je nach der Art der chirurgischen Anwendung können Sie eine von 6 Optionen aus der Liste "Function"...
  • Seite 88 SPÜLUNG auf der Umschlagseite) Die Durchflussmenge der Peristaltikpumpe ist einstellbar, indem Sie die Zahlen auf dem Bedienfeld unter "irrigation" wählen. 7 Stufen der Kapazität sind vorgesehen: 0 = Die Pumpenfunktion ist gesperrt: aus dem Instrument kommt keine Flüssigkeit. Von 1 bis 6= die Durchflussmenge der Pumpe reicht von 8 ml/min bis circa 75ml/min.
  • Seite 89 05 Û VERWENDUNG LICHT auf der Umschlagseite) Je nach Art des Handstücks und Art der Anwendung können 3 Möglichkeiten aus der Liste "light" ausgewählt werden: • Wenn Sie AUTO auswählen, dann geht die LED-Leuchte des Handstücks an, sobald Sie den Fußanlasser betätigen. Sie schaltet sich automatisch 3 Sekunden nach Loslassen des Fußanlassers ab.
  • Seite 90: Sicherheitsvorschriften Vor Und Während Der Anwendung

    Teile und ihr Zubehör (neu oder zurück aus GEFAHR: Vor Beginn der Arbeit stellen einem der autorisierten Servicezentren Sie immer sicher, dass sie genügend von Mectron), werden in einem NICHT Material im Lager zur Verfügung haben STERILEN Zustand geliefert und müssen (Handstücke, Instrumente, Schlüssel), die vor jedem Gebrauch entsprechend der Sie im Falle von Ausfällen oder Problemen...
  • Seite 91: Gebrauchsanweisung

    Handstück das korrekte Instrument die Absaugung um diese zu entfernen. angebracht ist. Der Patient muss, falls nötig, angewiesen Verwenden Sie ausschließlich den Mectron werden, während der Behandlung durch Drehmomentschlüssel zur Fixierung des die Nase zu atmen, oder verwenden Sie Instrumentes auf dem Handstück.
  • Seite 92 Um das Schlauchsystem zu füllen, verwenden Sie die Funktion PUMP über die Auswahl von PUMP/ CLEAN auf dem Bedienfeld: Alle anderen vorhandenen Auswahlmöglichkeiten werden desaktiviert und die Schrift PUMP/CLEAN leuchtet auf; Während die Schrift PUMP/CLEAN blinkt, drücken Sie ein Mal den Fußanlasser und lassen ihn wieder los.
  • Seite 93 05 Û VERWENDUNG Befestigen Sie das Instrument mit dem Mectron Drehmomentschlüssel; Für die ordnungsgemäße Verwendung des Mectron Drehmomentschlüssels gehen Sie wie folgt vor: Führen Sie das Instrument in das Innere des KORREKT Schlüssels ein, wie hier gezeigt; NICHT KORREKT Halten Sie den Körper des Handstücks gut fest;...
  • Seite 94: Wichtige Informationen Zu Den Instrumenten

    Instrument. - Bevor Sie den PIEZOSURGERY® touch - Verwenden Sie nur Original-Instrumente verwenden stellen Sie sicher, dass Sie von Mectron. Die Verwendung von nicht im zu behandelnden Bereich vorsorglich originalen Instrumenten führt neben das Weichgewebe entfernt haben, um dem Verlust der Garantie zu Schäden es nicht zu schädigen.
  • Seite 95: Wartung

    Es liegt in der Verantwortung des Käufers, - Das Infusionsbesteck am Ende jedes das Gerät an den Händler zu übergeben, der Eingriffs ihm ein neues Gerät liefert. Mectron stellt - Peristaltikpumpenschläuche, nach 8 die Anweisungen für die ordnungsgemäße Sterilisationszyklen; Entsorgung zur Verfügung.
  • Seite 96: Technische Daten

    08 Û TECHNISCHE DATEN Geräte in Übereinstimmung mit der Richtlinie 93/42/CEE: Klasse IIa Klassifizierung gemäß EN 60601-1: Typ B (Handstück, Instrument) IP 20 (Gerät) IP X8 (Fußanlasser) 60sek. AN - 30sek. AUS mit Spülung Geräte für den intermittierenden Betrieb: 30sek. AN - 120sek. AUS ohne Spülung (ENDO, PERIO) 100-240 Vac 50/60 Hz Stromversorgung: 120 VA...
  • Seite 97: Anleitung Und Erklärung Des Herstellers - Elektromagnetische Emissionen

    08 Û TECHNISCHE DATEN 08.1 Û ELEKTROMAGNETISCHE VERTRÄGLICHKEIT EN 60601-1-2 GEFAHR: Störungen mit anderen GEFAHR: Störungen von anderen Geräten. Auch wenn er dem Standard Geräten. Eine HF-Einheit oder anderen IEC 60601-1-2 entspricht, kann der elektrochirurgische Geräte, die sich in der PIEZOSURGERY®...
  • Seite 98: Anleitung Und Erklärung Des Herstellers - Elektromagnetische Immunität

    Anleitung und Erklärung des Herstellers - Elektromagnetische Immunität Das PIEZOSURGERY® touch Gerät ist für den Gebrauch in dem im Anhang aufgeführten elektromagnetischen Umfeld ausgelegt. Kunden und Betreiber des PIEZOSURGERY® touch müssen sicherstellen, dass das Gerät in diesem Umfeld eingesetzt wird. Testniveau Elektromagnetische Immunitätstest...
  • Seite 99 08 Û TECHNISCHE DATEN Anleitung und Erklärung des Herstellers - Elektromagnetische Immunität Das PIEZOSURGERY® touch Gerät ist für den Gebrauch in dem im Anhang aufgeführten elektromagnetischen Umfeld ausgelegt. Kunden und Betreiber des PIEZOSURGERY® touch müssen sicherstellen, dass das Gerät in diesem Umfeld eingesetzt wird.
  • Seite 100: Empfohlene Abstände Zwischen Tragbaren/Mobilen Kommunikationsgeräten Und Dem Piezosurgery® Touch

    Empfohlene Abstände zwischen tragbaren/mobilen Kommunikationsgeräten und dem PIEZOSURGERY® touch Das PIEZOSURGERY® touch Gerät kann in elektromagnetischen Umgebungen eingesetzt werden, in denen die RF-Strahlungen unter Kontrolle sind. Der Kunde oder Betreiber des PIEZOSURGERY® touch Geräts kann dazu beitragen elektromagnetischen Interferenzen vorzubeugen indem ein Mindestabstand zwischen tragbaren/mobilen RF-Kommunkationsgeräten (Sendern) und dem PIEZOSURGERY®...
  • Seite 101: Fehlerbehebung

    Gerät angeschlossen Ausfall des Handstücks Ersetzen Sie das Handstück Störung des Abstimmkreises Kontaktieren Sie ein autorisiertes Servicezentrum von Mectron Das Instrument ist nicht richtig Nehmen Sie das Instrument ab festgezogen und ziehen Sie es richtig mit einem Drehmomentschlüssel wieder fest...
  • Seite 102: Schnelle Fehlerbehebung

    Das Display meldet Der Fußanlasser funktioniert Kontaktieren Sie ein keine Fehler. nicht autorisiertes Servicezentrum von Mectron Siehe Abschnitt 09.1 für Siehe Abschnitt 09.1 für die Das Gerät ist eingeschaltet, mögliche Ursachen den Ergreifung von Maßnahmen funktioniert aber nicht.
  • Seite 103 Instrument mit einem neues Das Handstück ist verstopft Kontaktieren Sie ein Während des Betriebs autorisiertes Servicezentrum tritt keine Flüssigkeit aus von Mectron dem Instrument. Der Flüssigkeitspegel ist auf Stellen Sie den Flüssigkeitspegel dem Bildschirm auf "0” gesetzt Der Infusionsbeutel ist leer...
  • Seite 104: Austausch Der Sicherungen

    09.3 Û AUSTAUSCH DER SICHERUNGEN GEFAHR: Schalten Sie das Gerät aus. Schalten Sie das Gerät immer über den Hauptschalter aus und ziehen Sie das Netzkabel aus der Steckdose, bevor Sie folgenden Eingriff durchführen. Heben Sie sie mit einem flachen Schraubenzieher an, indem Sie die Spitze unter die Sicherungsbuchse ansetzen, die sich unterhalb der Steckdose befindet;...
  • Seite 105: Versand An Ein Autorisiertes Servicezentrum Von Mectron

    Änderungen überein. Reparatur wird erst nach Einverständnis Wenn der Kunde die Anforderungen von des Endkunden vorgenommen. Für weitere Mectron nicht erfüllt, behält sich Mectron die Informationen kontaktieren Sie das nächste Berechnung der Kosten für Reinigung und autorisierten Servicezentrum von Mectron Sterilisation vor.
  • Seite 106: Garantie

    Die italienische Version dieses Handbuchs ist das Originaldokument. Von diesem wurden die Übersetzungen erstellt. Im Falle von Abweichungen gilt die italienische Version. Texte, Bilder und Grafiken in diesem Handbuch sind das Eigentum der Mectron S.p.A. in Carasco, Italien. Alle Rechte sind vorbehalten.
  • Seite 107 Û Mode d’emploi et de maintenance...
  • Seite 108 Û SOMMAIRE 01 Û INTRODUCTION ........
  • Seite 109 ..09.4 Envoi auprès d’un Centre de Service Autorisé Mectron 10 Û GARANTIE ......... . .
  • Seite 110: Introduction

    Selon le degré de gravité, les règles de sécurité d’édition indiquée à la dernière page. sont classées avec les indications suivantes: Mectron s’engage dans une mise à jour en DANGER (toujours en référence à des continue de ses produits avec d’éventuelles dommages à...
  • Seite 111: Description De L'appareil

    être tenu responsable pour réparations du dispositif sont effectuées des lésions sur des personnes et/ou des par un personnel non autorisé par Mectron 6 Utilisation impropre, mauvais traitements dommages à des biens directement ou indirectement, survenus à la suite de et/ou interventions incorrectes procédures mal faites liées à...
  • Seite 112: Règles De Sécurité

    En cas de casse, vérifier qu’il ne reste pas pas effectuer le traitement. S’adresser à un de fragments dans la partie traitée et, Centre de Service Autorisé Mectron si les simultanément, aspirer de façon efficace anomalies concernent l’appareil. pour les enlever.
  • Seite 113 DANGER: Utiliser exclusivement des DANGER: Contre indications. Interférence avec d’autres appareils. inserts, accessoires et pièces de rechange originaux Mectron. Bien qu’il soit conforme au standard IEC 60601-1-2, le PIEZOSURGERY® touch peut DANGER: Contre indications. Ne pas interférer avec d’autres dispositifs voisins.
  • Seite 114: Symboles

    01.5 Û SYMBOLES Numéro de série Numéro de lot Numéro de référence du produit Attention lire les instructions pour l’utilisation Instructions d’emploi 70 °C Limites de températures de transport et de conservation -10 °C 90 % Limites d’humidités de transport et de conservation 10 % 1060 hPa Limites des pressions atmosphériques de transport et de conservation...
  • Seite 115: Données D'identification

    Mectron et le logo PIEZOSURGERY® touch (réf. 2). 02.3 Û DONNÉES D’IDENTIFICATION DES INSERTS Sur chaque insert est gravé au laser le nom de l’insert (réf. 3), le logo Mectron (réf. 4) et le numéro de lot auquel l’insert appartient (réf. 5).
  • Seite 116: Réception De L'appareil

    (pièce à main, inserts, pas écraser les emballages. clés) à utiliser en cas de panne ou incident. Tout le matériel envoyé par Mectron a été contrôlé au moment de l’expédition. L’appareil est livré correctement protégé et emballé.
  • Seite 117: Installation

    04 Û INSTALLATION 04 Û INSTALLATION 04.1 Û PREMIÈRE INSTALLATION L’appareil doit être installé dans un lieu Dans le cas où votre appareil a besoin d’une approprié pour son utilisation. clé d’activation, les procédures à suivre Le PIEZOSURGERY® touch peut être acheté peuvent varier d’un pays à...
  • Seite 118: Branchements Des Accessoires

    04.3 Û BRANCHEMENT DES ACCESSOIRES Insérer la tige porte poche de solution dans le logement prévu à cet effet; Insérer le support fixe de la pièce à main dans son logement prévu. Á NOTER Le support de la pièce à main peut être placé...
  • Seite 119 04 Û INSTALLATION - placer le tube dans son placement prévu dans la pompe; - fermer complètement le clapet; DANGER: Quand le clapet de la pompe péristaltique est ouvert, il ne faut pas actionner le pédale du PIEZOSURGERY® touch. Les parties en mouvement peuvent causer des dommages à...
  • Seite 120: Utilisation De L'appareil

    Insérer le câble d’alimentation dans sa prise située à l’arrière de l’appareil. Le brancher à la prise du mur; Prise équipotentielle: le dispositif dispose de une prise équipotentielle supplémentaire à l’arrière de d’appareil. La prise est conforme à DIN 42801. Insérer le connecteur de prise équipotentielle supplémentaire (non fourni) dans le prise correspondante à...
  • Seite 121: Description Du Clavier

    05 Û UTILISATION 05.2 Û DESCRIPTION DU CLAVIER Clavier touch L’utilisateur peut configurer l’appareil simplement en touchant sur le clavier touch. En fonction du réglage choisi, le système électronique de feedback règle automatiquement la fréquence de travail correcte. FONCTIONS (rèf. couverture) En fonction du type de chirurgie il est possible de choisir une des 6 options dans la liste...
  • Seite 122 IRRIGATION (rèf. couverture intérieure) Le débit de la pompe péristaltique est réglable en sélectionnant les numéros sur le clavier touch, dans la colonne “irrigation”. 7 niveaux de débit sont prévus: 0 = le fonctionnement de la pompe est fermé: aucune irrigation ne sort de l’insert. De 1 à...
  • Seite 123 05 Û UTILISATION LUMIERES (rèf. couverture intérieure) En fonction du genre de pièce à main et du type d’opération à effectuer, il est possible de choisir 3 options dans la liste “light”: • En sélectionnant l’option AUTO la lumière à LED sur l’embout de la pièce à...
  • Seite 124: Règles De Sécurité Avant Et Pendant L'utilisation

    S’adresser à un DANGER: Pour assurer le Centre de Service Autorisé Mectron si les anomalies concernent l’appareil. refroidissement de la pièce à main, l’activer toujours avec le circuit d’irrigation ATTENTION: Fonction CLEAN. Après correctement installé...
  • Seite 125: Instructions D'utilisation

    Utiliser exclusivement la clé Il est nécessaire d’apprendre au patient à dynamométrique Mectron pour fixer respirer par le nez durant le traitement, l’insert à la pièce à main. ou utiliser une digue dentaire, de façon à...
  • Seite 126 Pour charger le circuit d’irrigation, utiliser la fonction PUMP en sélectionnant PUMP/ CLEAN sur le clavier touch: toutes les autres sélections sont alors désactivées et le voyant PUMP/CLEAN clignote; Pendant que le voyant PUMP/CLEAN clignote, appuyer sur la pédale une fois et relâcher, PUMP/CLEAN arrête de clignoter et le circuit d’irrigation commence à...
  • Seite 127 ATTENTION: Pour un choix correct des paramètres de Fonction en fonction de l’insert à utiliser, consulter le Tableau en annexe du présent manuel “Réglages appropriés pour les inserts sur le PIEZOSURGERY® touch” ou le feuillet illustratif de l’insert Mectron acheté.
  • Seite 128: Informations Importantes Sur Les Inserts

    - Contrôler l’état d’usure de l’insert et PIEZOSURGERY® touch” ou le feuillet son intégrité avant et durant chaque illustratif de l’insert Mectron acheté. utilisation. Si une baisse des prestations - Avant d’utiliser le PIEZOSURGERY® touch se produit, le remplacer.
  • Seite 129: Maintenance

    électrique; quand il est abimé, le changer 4 Avant d’utiliser à nouveau l’appareil, avec un original Mectron. nettoyer et stériliser la pièce à main, les 07 Û MODALITÉ ET PRÉCAUTIONS DE RECYCLAGE Le PIEZOSURGERY® touch doit être recyclé et DANGER: Déchets hospitaliers.
  • Seite 130: Données Techniques

    08 Û DONNÉES TECHNIQUES Appareil conforme à la Dir. 93/42/CEE: Classe IIa Classification aux sens de la EN60601-1: Typo B (pièce à main, insert) IP 20 (appareil) IP X8 (pédale) Appareil pour fonctionnement 60sec. ON - 30sec. OFF avec irrigation intermittent: 30sec.
  • Seite 131: Compatibilité Électromagnétique

    08 Û DONNÉES TECHNIQUES 08.1 Û COMPATIBILITÉ ÉLECTROMAGNÉTIQUE EN 60601-1-2 DANGER: Contre-indications. DANGER: Contre-indications. Interférences avec d’autres appareils. Interférences d’autres appareils. Bien qu’il soit conforme au standard IEC Un bistouri électrique ou tout autre 60601-1-2, le PIEZOSURGERY® touch peut unite électro-chirurgical disposée près de intrférer avec d’autres dispositifs voisins.
  • Seite 132 Guide et déclaration du fabricant - Émissions électromagnétiques Le PIEZOSURGERY® touch est attendu à fonctionner dans l'environnement électromagnétique spécifié ci-dessous. Le client ou l'utilisateur dePIEZOSURGERY® touch doit s'assurer qu'il est utilisé dans un tel environnement. Environnement Preuve Niveau de preuve Niveau de électromagnétique IEC 60601...
  • Seite 133 08 Û DONNÉES TECHNIQUES Guide et déclaration du fabricant - Émissions électromagnétiques Le PIEZOSURGERY® touch est attendu à fonctionner dans l'environnement électromagnétique spécifié ci-dessous. Le client ou l'utilisateur dePIEZOSURGERY® touch doit s'assurer qu'il est utilisé dans un tel environnement. Preuve Niveau de preuve Niveau de Environnement électromagnétique...
  • Seite 134 Distances de séparation recommandées entre les équipements de communication portable et mobile et PIEZOSURGERY® touch Le PIEZOSURGERY® touch est conçu pour fonctionner dans un milieu électromagnétique où les brouillages irradiés RF sont sous contrôle. Le client ou l’opérateur du PIEZOSURGERY® touch peuvent contribuer à...
  • Seite 135: Dépannages Des Problèmes

    électrostatiques avant de rallumer l’appareil excessives ou anomalies internes Si le problème persiste, contacter un Centre de Service Autorisé Mectron Mise en marche de l’appareil non Vérifier que la pédale n’est correcte: l’appareil a été allumé avec pas enfoncée. Si le problème la pédale enfoncée...
  • Seite 136: Dépannage Rapide Des Problèmes

    L’insert n’est pas correctement Dévisser et visser correctement serré sur la pièce à main l’insert avec la clé Durant le fonctionnement dynamométrique Mectron (Voir se produit un léger paragraphe 05.4) sifflement provenant de la pièce à main Le circuit d’irrigation n’a pas été...
  • Seite 137 à main L’insert n’est pas correctement Dévisser et visser correctement serré sur la pièce à main l’insert avec la clé dynamométrique Mectron (Voir Prestations paragraphe 05.4) insuffisantes Insert cassé, usé ou déformé Remplacer l’insert par un...
  • Seite 138: Remplacement Des Fusibles

    09.3 Û REMPLACEMENT DES FUSIBLES DANGER: Eteindre l’appareil. Eteindre toujours l’appareil par l’interrupteur principal et le débrancher de la prise d’alimentation électrique avant d’effectuer l’intervention suivante. Faire levier avec un tournevis plat, en insérant sa pointe dans la boite porte fusibles située sous la prise d’alimentation;...
  • Seite 139: Envoi Auprès D'un Centre De Service Autorisé Mectron

    Centres de Service Autorisés et d’une fiche comprenant: Mectron ou votre Revendeur. Ne pas essayer • Données du propriétaire avec numéro de de réparer ou de modifier l’appareil et ses téléphone accessoires.
  • Seite 140: Garantie

    La version italienne de ce mode d’emploi est le document original ensuite traduit. En cas de différence, c’est la version italienne qui fait foi. Les textes, images et illustrations du présent mode d’emploi sont propriété de Mectron S.p.A., Carasco, Italie. Tous droits réservés.
  • Seite 141 Û Manual de uso y mantenimiento...
  • Seite 142 Û ÍNDICE 01 Û INTRODUCCIÓN ........
  • Seite 143 ..09.4 Envío a un Centro de Asistencia Autorizado Mectron 10 Û GARANTÍA ......... .
  • Seite 144: Introducción

    última página. con las siguientes indicaciones: Mectron se compromete a la continua PELIGRO (referido siempre a daños actualización de sus productos con posibles a personas) modificaciones en componentes del aparato.
  • Seite 145: Descripción Del Aparato

    1 Utilización de forma o durante 8 Uso de insertos no originales Mectron, que procedimientos distintos de los comporta un daño definitivo de la rosca especificados en el destino de uso del...
  • Seite 146: Prescripciones De Seguridad

    En caso de rotura verificar que no queden no realizar el tratamiento. Dirigirse a un fragmentos en la parte tratada y al mismo Centro de Asistencia Autorizado Mectron si tiempo aspirar de forma eficaz para las anomalías afectan al aparato.
  • Seite 147 PELIGRO: Utilizar exclusivamente aparato PIEZOSURGERY® touch pueden insertos, accesorios y recambios originales interferir en el correcto funcionamiento del Mectron. propio aparato. PELIGRO: Contraindicaciones. No PELIGRO: Contraindicaciones. utilizar el PIEZOSURGERY® touch en Interferencia con otros equipos. Si bien...
  • Seite 148: Símbolos

    01.5 Û SÍMBOLOS Número de serie Número de lote Código de producto Atención leer las instrucciones de uso Instrucciones para el funcionamiento 70 °C Limites de temperatura para transporte y conservación -10 °C 90 % Limites de humedad para transporte y conservación 10 % 1060 hPa Limites para presión atmosférica para transporte y conservación...
  • Seite 149: Datos De Identificación

    02.2 Û PLACA DE IDENTIFICACIÓN DE LA PIEZA DE MANO En cada pieza de mano viene marcado con láser el número de serie de la pieza de mano (ref. 1), el logo Mectron y el logo PIEZOSURGERY® touch (ref. 2). 02.3 Û DATOS DE IDENTIFICACIÓN DE LOS INSERTOS En cada inserto viene marcado con láser el...
  • Seite 150: Entrega

    (pieza de mano, insertos, llaves) los embalajes de abajo. para utilizar en caso de parada por avería o Todo el material enviado por Mectron ha sido de problemas. comprobado en el momento del envío. El aparato se entrega protegido y embalado...
  • Seite 151: Instalación

    04 Û INSTALACIÓN 04 Û INSTALACIÓN 04.1 Û PRIMERA INSTALACIÓN El aparato debe instalarse en un lugar idóneo En caso de que su aparato necesite una clave y cómodo para su uso. de activación, los procedimientos que hay que El PIEZOSURGERY® touch puede adquirirse seguir pueden variar según el país.
  • Seite 152: Conexión De Los Accesorios

    04.3 Û CONEXIÓN DE LOS ACCESORIOS Introducir la vara de soporte de la bolsa en el orificio preparado; Introducir el soporte fijo de la pieza de mano en los alojamientos preparados. NOTA El soporte de la pieza de mano se puede colocar en 4 posiciones diferentes: lateral derecha, frontal derecha, frontal izquierda, lateral izquierda;...
  • Seite 153 04 Û INSTALACIÓN - colocar el tubo en el rotor; - cerrar completamente la compuerta; PELIGRO: Cuando la compuerta de la bomba peristáltica está abierta no se debe accionar el pedal del PIEZOSURGERY® touch. Las partes en movimiento pueden causar daños al operador.
  • Seite 154: Uso

    Introducir el cable de alimentación en su conexión situada en la parte trasera del aparato. Conectarlo a la toma de pared; Conector equipotencial: el aparato cuenta con un conector equipotencial suplementario en la parte trasera del aparato. El conector es conforme a la DIN 42801.
  • Seite 155: Descripción Del Teclado

    05 Û USO 05.2 Û DESCRIPCIÓN DEL TECLADO Teclado táctil El usuario puede configurar la máquina simplemente tocando el teclado táctil. Según la configuración ajustada el sistema electrónico de feedback regula automáticamente la frecuencia de trabajo correcta. FUNCIONES (ref. interior portada) En función del tipo de cirugía, se puede elegir una de las 6 opciones de la lista “function”: ENDO: dedicado a la cirugía endodóntica y al...
  • Seite 156 IRRIGACIÓN (ref. interior portada) El caudal de la bomba peristáltica es regulable seleccionando los números en el teclado táctil, en la columna “irrigation”. Hay previstos 7 niveles de caudal: 0 = el funcionamiento de la bomba está cerrado: del inserto no sale ninguna irrigación. Da 1 a 6= el caudal de la bomba va de 8 ml/min a unos 75 ml/min.
  • Seite 157 05 Û USO (ref. interior portada) En función del tipo de pieza de mano y del tipo de operación que se debe efectuar, es posible escoger 3 opciones de la lista “light”: • Seleccionando la opción AUTO la luz de LED del terminal anterior de la pieza de mano se enciende con la presión del pedal y se apaga automáticamente 3 segundos después de...
  • Seite 158: Prescripciones De Seguridad Antes Y Durante El Uso

    Dirigirse a un el circuito de irrigación correctamente Centro de Asistencia Autorizado Mectron si instalado y lleno. Para llenar el circuito de las anomalías afectan al aparato. irrigación utilizar siempre la función PUMP ATENCIÓN: Función CLEAN.
  • Seite 159: Instrucciones De Uso

    Es necesario enseñar al paciente a respirar Utilizar exclusivamente la llave por la nariz durante el tratamiento, o dinamométrica Mectron para fijar el utilizar un dique dental, con el fin de evitar inserto a la pieza de mano. ingestiones de fragmentos de insertos rotos.
  • Seite 160 Para cargar el circuito de irrigación utilizar la función PUMP seleccionando PUMP/ CLEAN en el teclado táctil: todas las demás selecciones presentes se desactivan y parpadean las palabras PUMP/CLEAN; Mientras el mensaje PUMP/CLEAN parpadea, pisar el pedal una vez y soltarlo, PUMP/CLEAN deja de parpadear y el circuito de irrigación comienza a llenarse;...
  • Seite 161 05 Û USO Apretar el inserto mediante la llave dinamométrica Mectron; Para el correcto uso de la llave dinamométrica Mectron operar de la siguiente manera: Introducir el inserto en el interior de la llave, CORRECTO como se ilustra; INCORRECTO Sujetar con fuerza el cuerpo central de la pieza de mano;...
  • Seite 162: Informaciones Importantes Sobre Los Insertos

    Puede ocurrir que, durante el corte del - Utilizar solo insertos originales Mectron. hueso, el contacto accidental de algunas El uso de insertos no originales, además partes del inserto con los tejidos blandos de anular la garantía, daña la rosca de la...
  • Seite 163: Mantenimiento

    Es facultad del comprador entregar el intervención; dispositivo para su eliminación al distribuidor - Tubo de la bomba peristáltica, después de que le suministra nuevos equipos; en Mectron 8 ciclos de esterilización; están disponibles instrucciones para la - Llave de ajuste de insertos, cuando esté...
  • Seite 164: Datos Técnicos

    08 Û DATOS TÉCNICOS Aparato conforme a la Dir. 93/42/CEE: Clase IIa Clasificación en virtud de la EN 60601-1: Tipo B (pieza de mano, inserto) IP 20 (aparato) IP X8 (pedal) Aparato para funcionamiento 60sec. ON - 30sec. OFF con irrigación intermitente: 30sec.
  • Seite 165: Compatibilidad Electromagnética

    08 Û DATOS TÉCNICOS 08.1 Û COMPATIBILIDAD ELECTROMAGNÉTICA EN 60601-1-2 pueden influir en el buen funcionamiento PELIGRO: Contraindicaciones. del aparato. Interferencias con otros equipos. Si bien es conforme a la norma PELIGRO: Contraindicaciones. IEC 60601-1-2, el PIEZOSURGERY® touch Interferencias de otros equipos. puede interferir con otros dispositivos Un electrobisturí...
  • Seite 166 Guía y declaración del constructor - Inmunidad electromagnética PIEZOSURGERY® touch ha sido previsto para funcionar en el ambiente electromagnético abajo especificado. El cliente o el usuario del PIEZOSURGERY® touch debe asegurarse que éste se use en dicho ambiente. Prueba de Nivel de prueba Nivel de Ambiente...
  • Seite 167 08 Û DATOS TÉCNICOS Guía y declaración del constructor - Inmunidad electromagnética PIEZOSURGERY® touch ha sido previsto para funcionar en el ambiente electromagnético abajo especificado. El cliente o el usuario de PIEZOSURGERY® touch debe asegurarse que éste se use en dicho ambiente.
  • Seite 168 Distancias de separación recomendadas entre aparatos de radiocomunicación portátiles y móviles y el PIEZOSURGERY® touch PIEZOSURGERY® touch ha sido previsto para funcionar en un ambiente electromagnético en el cual están bajo control las interferencias irradiadas RF. El cliente o el operador del PIEZOSURGERY®...
  • Seite 169: Resolución De Problemas

    Pieza de mano averiada Sustituir la pieza de mano Funcionamiento anómalo del Contactar con un Centro de circuito de sintonía Asistencia Autorizado Mectron Inserto no ajustado correctamente Aflojar el inserto y volver a apretarlo en la pieza de mano correctamente mediante la llave dinamométrica (Véase Apartado 05.4)
  • Seite 170: Resolución Rápida De Problemas

    La pantalla no indica errores. El pedal no funciona Contactar con un Centro de Asistencia Autorizado Mectron Véase el apartado 09.1 para la Véase el apartado 09.1 para El aparato está encendido posible causa según el símbolo la posible solución según el...
  • Seite 171 La pieza de mano está Contactar con un Centro de líquido del inserto obstruida Asistencia Autorizado Mectron El nivel de irrigación en la Regular el nivel de irrigación pantalla está regulado en “0” La bolsa del líquido está vacía...
  • Seite 172: Sustitución De Los Fusibles

    09.3 Û SUSTITUCIÓN DE LOS FUSIBLES PELIGRO: Apagar el aparato. Apagar siempre el aparato mediante el interruptor general y desconectarlo de la toma de alimentación eléctrica antes de efectuar la siguiente intervención. Hacer palanca con un destornillador plano, introduciendo la punta en el asiento de la caja portafusibles situado bajo la toma de alimentación;...
  • Seite 173: Envío A Un Centro De Asistencia Autorizado Mectron

    Centros de Asistencia accesorios y de una ficha que incluya: Autorizados Mectron o con su distribuidor. • Datos del propietario con contacto telefónico No intentar reparar o modificar el aparato y •...
  • Seite 174: Garantía

    La versión italiana de este manual es el documento original a partir del cual se han realizado las traducciones. En caso de cualquier discrepancia, prevalecerá la versión italiana. Los textos, las imágenes y los gráficos de este manual son propiedad de Mectron S.p.A., Carasco, Italia. Todos los derechos reservados.
  • Seite 175 Û Bruks-och underhållsanvisning...
  • Seite 176 Û INNEHÅLLSFÖRTECKNING 01 Û INLEDNING ......... .
  • Seite 177 ..09.4 Sändning till ett av Mectron Auktoriserat Service Center 10 Û GARANTI ..........
  • Seite 178: Inledning

    Beroende på de eventuella skadornas manual är uppdaterade till utgivningsdatumet betydelse, är säkerhetsföreskrifterna som anges på sista sidan. klassificerade med följande uttryck: Mectron utför ständig uppdatering av de egna FARA produkterna, med möjliga modifieringar av (anger alltid personskador) apparatens komponenter.
  • Seite 179: Beskrivning Av Apparaten

    ökad säkerhet, även vid de anatomiskt svåra områdena. 01.3 Û ANSVARSBEGRÄNSNING 5 Procedurerna för montering, utökning, Tillverkaren Mectron avsäger sig allt ansvar, uttryckligt eller underförstått och kan inte justering, uppdatering och reparationer av hållas ansvarig för personskador och/eller apparaten har utförts av personal som inte direkta eller indirekta skador på...
  • Seite 180: Säkerhetsföreskrifter

    Om felfunktion skulle uppdagas, utför dessa. inte behandlingen. Vänd dig till ett av Patienten måste instrueras att andas Mectron Auktoriserat Service Center om genom näsan under behandlingen eller felfunktionen beror på apparaten. använd en dental damm, för att undvika att VARNING: Den elektriska anläggningen...
  • Seite 181 01 Û INLEDNING FARA: Kontroindikationer. Använd inte FARA: Kontroindikationer. Interferens med andra utrustningar. Även om i PIEZOSURGERY® touch på patienter som är överensstämmelse med IEC 60601-1-2, bärare av hjärtstimulatorer (Pace-maker) eller andra inoperarade elektroniska kan PIEZOSURGERY® touch störa andra anordningar. Denna föreskrift gäller även närliggande utrustningar.
  • Seite 182: Symboler

    01.5 Û SYMBOLER Serienummer Partinummer Produktkod Varning läs bruksanvisningen Anvisningar för drift 70 °C Temperaturgränser för transport och förvaring -10 °C 90 % Fuktighetsgränser för transport och förvaring 10 % 1060 hPa Gränser för atmosfäriskt tryck för transport och förvaring 500 hPa Anger överensstämmelse med direktiv CE 93/42 CEE EN 60601-1 och EN 60601- 1-2 inkluderade.
  • Seite 183: Identifieringsuppgifter

    En exakt beskrivning av apparaten och dess partinummer underlättar snabba och effektiva svar från din After-Sales Service. Återge alltid dessa uppgifter varje gång du kontaktar ett av Mectron Auktoriserat Service Center. 02.1 Û APPARATENS TYPSKYLT Varje apparat är försedd med en typskylt som återger de tekniska egenskaperna och...
  • Seite 184: Leverans

    Placera inte kartongerna ovanpå varandra tillhanda (handstycke, spetsar, nycklar) för för att undvika att krossa de nedre användning i händelse av stopp orsakat av förpackningarna. fel eller problem. Allt material som sänts från Mectron har kontrollerats vid sändningen. Apparaten levereras tillräckligt skyddad och förpackad.
  • Seite 185: Installation

    04 Û INSTALLATION 04 Û INSTALLATION 04.1 Û FÖRSTA INSTALLATIONEN Apparaten ska installeras på en plats som är Om din apparat skulle kräva aktiveringskod, lämplig och bekväm för dess användning. kan procedurerna skifta från land till land. PIEZOSURGERY® touch kan inköpas klar för Vänd dig alltid till din återförsäljare för de användning eller kan kräva inläggning av en relativa detaljerna.
  • Seite 186: Anslutning Av Tillbehören

    04.3 Û ANSLUTNING AV TILLBEHÖREN För in droppstativet i det förutsedda hålet; För in handstyckets fasta hållare i de förutsedda sätena; OBSERVERA Handstyckets hållare kan placeras på 4 olika ställen: på höger sida, framtill till höger, framtill till vänster och på vänster sida;...
  • Seite 187 04 Û INSTALLATION - Placera slangen i pumhjulet; - Stäng luckan helt; FARA: När den peristaltiska pumpens lucka är öppen får PIEZOSURGERY® touch. Delarna i rörelse kan orsaka skada för operatören. Anslut silikonslangens slutändar till droppslangen; Anslut droppslangen till vätskepåsen som används för behandlingen (Påsen medföljer ej).
  • Seite 188: Användning

    För in nätsladden i dess uttag på apparatens baksida. Anslut den till vägguttaget; Potentialutjämningskontakt: Apparaten är utrustad med en extra pontentialutjämningskontakt, som är placerad på konsolens baksida. Denna kontakt överensstämmer med DIN 42801. För in potentialutjämningskabelns (tillval) kontakt på baksidan av apparatens konsol. Syftet med ytterligare Potentialutjämning är att minska potentialskillnader, som kan uppstå...
  • Seite 189: Beskrivning Av Tangentbordet

    05 Û ANVÄNDNING 05.2 Û BESKRIVNING AV TANGENTBORDET Touch tangentbord Användaren kan konfigurera apparaten helt enkelt genom att vidröra touch tangentbordet. Beroende på den utförda inställningen reglerar det elektroniska feedback systemet automatiskt den korrekta arbetsfrekvensen. FUNKTIONER (ref. försättsbladets insida) Beroende på det kirurgiska ingreppet är det möjligt att välja en av de 6 valmöjligheterna i listan “function”: ENDO: tillägnat endodontisk kirurgi och...
  • Seite 190 IRRIGATION (ref. försättsbladets insida) Den peristaltiska pumpens flöde kan justeras genom att välja numrena på touch tangentbordet , i kolumnen “irrigation”. 7 flödesnivåer är förutsedda: 0 = pumpens funktion är avstängd: ingen irrigation kommer ut ur spetsen. Från 1 till 6= pumpens flöde går från 8 ml/min till ungefär 75 ml/min.
  • Seite 191 05 Û ANVÄNDNING BELYSNING (ref. försättsbladets insida) Beroende på typen av handstycke och typen av operation som ska utföras är det möjligt att utföra 3 val från listan“light”: • Genom att välja AUTO tänds LED ljuset på handstyckets främre del när pedalen trycks ner och släcks sedan efter 3 sekunder efter att pedalen släppts.
  • Seite 192: Säkerhetsföreskrifter Före Och Under Användning

    Om felfunktion skulle uppdagas, utför avkylning, aktivera det alltid med inte behandlingen. Vänd dig till ett av irrigationskretsen korrekt installerad och Mectron Auktoriserat Service Center om fylld. Använd alltid PUMP funktionen för felfunktionen beror på apparaten. att fylla irrigationskretsen VARNING: CLEAN funktion. Efter FARA: Behandlingar som kräver...
  • Seite 193: Bruksanvisning

    05 Û ANVÄNDNING Deformerade eller på annat sätt VARNING: För en korrekt användning av skadade spetsar går lätt sönder under apparaten är det nödvändigt att trycka ner användningen. Söndriga eller slitna spetsar pedalen och starta den utan att spetsen är får aldrig användas.
  • Seite 194 För att fylla irrigationskretsen, använd PUMP funktionen genom att välja PUMP/ CLEAN på touch tangentbordet: alla andra föreliggande val avaktiveras och texten PUMP/CLEAN blinkar; Medan texten PUMP/CLEAN blinkar, tryck ner pedalen en gång och släpp sedan upp den, PUMP/CLEAN upphör att blinka och den bevattning kretsen börjar fyllas;...
  • Seite 195 Spetsen är nu fastspänd på optimalt sätt; Välj på tangentbordet typ av nödvändig funktion, irrigation och om så önskas, ljus. VARNING: Konsultera den till denna Manual bifogade tabellen “Korrekta inställningar för PIEZOSURGERY® touch spetsarna” eller informationsbladet för den inköpta Mectron spetsen, för korrekt inställning.
  • Seite 196: Viktig Information Angående Spetsarna

    Om en reducerad prestanda inställningar för spetsarna på skulle uppvisas, byt ut spetsen. PIEZOSURGERY® touch” eller den inköpta - Använd endast originala Mectron Mectron spetsens informationsblad. spetsar. Användning av spetsar som - Före anvädningen av PIEZOSURGERY®touch inte är originalkomponenter, skadar kontrollera att området som ska opereras...
  • Seite 197: Underhåll

    Mectron. 4 Innan apparaten sedan används på nytt, rengör och sterilisera handstycket, 07 Û TILLVÄGAGÅNGSSÄTT OCH FÖRESKRIFTER FÖR NEDSMÄLTNINGEN...
  • Seite 198: Tekniska Data

    08 Û TEKNISKA DATA Utrustning i överensstämmelse med Dir. 93/42/CEE: Klass IIa Klassificering enligt EN 60601-1: Typ B (handstycke, spetsen) IP 20 (apparat) IP X8 (pedal) 60sec. ON - 30sec. OFF med irrigation Apparat för intermittent drift : 30sec. ON - 120sec. OFF utan irrigation (ENDO, PERIO) 100-240 Vac 50/60 Hz Matningsspänning: 120 VA...
  • Seite 199: Elektromagnetisk Överensstämmelse

    08 Û TEKNISKA DATA 08.1 Û ELEKTROMAGNETISK ÖVERENSSTÄMMELSE EN 60601-1-2 FARA: Interferens med andra FARA: Interferens från andra utrustningar. Även om i överensstämmelse utrustningar. En elektronisk skalpell med IEC 60601-1-2, kan PIEZOSURGERY® eller andra elektroniska kirurgisa touch störa andra närliggande instrument som placeras i närheten utrustningar.
  • Seite 200 Vägledning och tillverkarens försäkran - Elektromagnetisk immunitet PIEZOSURGERY® touch är avsedd för användning i sådan elektromagnetisk miljö som specificerats nedan. Köparen eller användaren av PIEZOSURGERY® touch ska säkerställa att den används i en dylik miljö. IEC 60601 Överensstämmelse Elektromagnetisk miljö Immunitetstest Test nivå...
  • Seite 201 08 Û TEKNISKA DATA Vägledning och tillverkarens försäkran - Elektromagnetisk immunitet PIEZOSURGERY® touch är avsedd för användning i sådan elektromagnetisk miljö som specificerats nedan. Köparen eller användaren av PIEZOSURGERY® touch ska säkerställa att den används i en dylik miljö. IEC 60601 Överensstämmelse Elektromagnetisk miljö...
  • Seite 202 Rekommenderade separationsavstånd mellan bärbar och mobil RF-kommunikationsutrustning och PIEZOSURGERY® touch PIEZOSURGERY® touch är avsedd att användas i elektromagnetisk miljö där utstrålade RF-störningar är under kontroll. Köparen eller användaren kan hjälpa till att förebygga elektromagnetiska interferenser genom att bibehålla det minsta avstånd mellan bärbar och mobil RF-kommunikationsutrustning (sändare) och PIEZOSURGERY®...
  • Seite 203: Felsökning

    Anslut handstycket är inte anslutet till apparaten Handstycket har gått sönder Byt ut handstycket Fel på trimningskretsen Kontakta ett av Mectron Auktoriserat Service Center Spetsen är inte korrekt fastspänd på Skruva av spetsen och skruva handstycket fast den på nytt, korrekt med momentnyckeln (Se Paragraf 05.4)
  • Seite 204: Möjlig Orsak

    Apparaten är påslagen uttag men fungerar inte. Displayen anger inga fel. Pedalen fungerar inte Kontakta ett av Mectron Auktoriserat Service Center Se paragraf 09.1 för möjlig Se paragraf 09.1 för möjlig Apparaten är påslagen men fungerar inte.
  • Seite 205 Om problemet kvarstår, byt ut spetsen med en ny Vätskan kommer inte ut ur spetsen under Handstycket är igentäppt Kontakta ett av Mectron funktionen. Auktoriserat Service Center Irrigationsnivån på skärmen är Justera irrigationsnivån inställd på “0” Vätskepåsen är tom Byt ut påsen med en full...
  • Seite 206: Byte Av Säkringar

    09.3 Û BYTE AV SÄKRINGARNA FARA: Stäng av apparaten. Stäng alltid av apparaten med huvudströmbrytaren och koppla loss den från elnätet innan följande ingrepp utförs. Bänd upp med en platt skruvmejsel, genom att föra in dess spets i säkringslådans utrymme vilken är placerad under nätuttaget;...
  • Seite 207: Sändning Till Ett Av Mectron Auktoriserat Service Center

    9 Û FELSÖKNING 09.4 Û SÄNDNING TILL ETT AV MECTRON AUKTORISERAT SERVICE CENTER Om det skulle vara nödvändigt att erhålla Apparaten ska återlämnas korrekt förpackad teknisk assistans på apparaten, kontakta ett tillsammans med samtliga tillbehör och ett av Mectron Auktoriserat Service Center eller formulär som innehåller:...
  • Seite 208: Garanti

    Den italienska versionen av denna manual, utgör originalet från vilket översättningarna härrör. I händelse av avvikelser, gäller den italienska versionen. Text, bilder och lay-out i denna manual tillhör Mectron S.p.A., Carasco, Italien. Alla rättigheter är reserverade. Innehållet får inte kopieras, spridas, modifieras eller tillhandahållas tredje part, utan skriftligt tillstånd från Mectron S.p.A.
  • Seite 209: Bibliography

    Û 11 BIBLIOGRAPHY 11 Û BIBLIOGRAPHY - BIBLIOGRAFIA BIBLIOGRAPHIE - BIBLIOGRAPHIE - BIBLIOGRAFI BIBLIOGRAFÍA Û SINUS LIFT TECHNIQUE Û RIDGE EXPANSION Sentineri R., Dagnino G. Vercellotti T. Sinus Augmentation by crestal approach with Piezoelectric Surgery in Implantology: A Case the Sinus Physiolift device Report - A New Piezoelectric Ridge Expansion Technique.
  • Seite 210 Bengazi F., Lang N.P., Canciani E., Viganò P., Urbizo Velez J., Patel A, Schofield J. Botticelli D. Using Piezosurgery to harvest a block bone Osseointegration of implants with from the symphyseal region: a clinical case dendrimers surface characteristics installed presentation. ®...
  • Seite 211 Û 11 BIBLIOGRAPHY Û TECHNIQUE ADAVANTAGES Sortino F, Pedullà E, Masoli V. The piezoelectric and rotatory osteotomy Vercellotti T. technique in impacted third molar surgery: La Chirurgia Ossea Piezoelettrica. comparison of postoperative recovery. Il Dentista Moderno. 2003; 5:21-55 J Oral Maxillofac Surg. 2008 Dec;66(12):2444-8 Boioli LT, Vercellotti T, Tecucianu JF.
  • Seite 212 Stübinger S, Landes C, Seitz O, Zeilhofer HF, Sader R. maxillofacial surgery. Ultraschallbasiertes Knochenschneiden in der Br J Oral Maxillofac Surg. 2004 Apr;42(5):451-3. Oralchirurgie: eine Übersicht anhand von 60 Beziat JL, Vercellotti T, Gleizal A. Patientenfällen. ® Qu’est-ce que la PIEZOSURGERY ? Intérêt en Ultraschall Med.
  • Seite 213 Mectron S.p.A. Via Loreto 15/A 16042 Carasco (Ge) Italy Tel. +39 0185 35361 Fax +39 0185 351374 www.mectron.com e-mail: mectron@mectron.com Reseller - Rivenditore - Wiederverkäufer - Revendeur - Revendedor...

Inhaltsverzeichnis