Herunterladen Inhalt Inhalt Diese Seite drucken
ABB CoriolisMaster FCB100 Anweisung
Vorschau ausblenden Andere Handbücher für CoriolisMaster FCB100:

Werbung

Verfügbare Sprachen

Verfügbare Sprachen

ABB MEASUREMENT & ANALYTICS | INSTRUCTION
CoriolisMaster FCB100, FCH100, FCB400, FCH400
Coriolis mass flowmeter
DE
Deutsch
Anweisung
Plombieren von Geräten für den
eichpflichtigen Verkehr
Measurement made easy
Instruction
EN
Sealing of devices for for legal metrology
English

Werbung

Kapitel

Inhaltsverzeichnis
loading

Inhaltszusammenfassung für ABB CoriolisMaster FCB100

  • Seite 1 — ABB MEASUREMENT & ANALYTICS | INSTRUCTION CoriolisMaster FCB100, FCH100, FCB400, FCH400 Coriolis mass flowmeter Measurement made easy Anweisung Instruction Plombieren von Geräten für den Sealing of devices for for legal metrology Deutsch English eichpflichtigen Verkehr...
  • Seite 3 CORIOLISMASTER FCX100, FCX400 PLOMBIEREN VON GERÄTEN | IN/FCX100/FCX400/MID/OIML-XA REV. A DE – 1 Produkt-Kurzbeschreibung Materialsatz zur Plombierung von eichpflichtigen Geräten. Weitere Informationen Zusätzliche Dokumentation zum CoriolisMaster FCX100, FCX400 steht kostenlos unter www.abb.com/flow zum Download zur Verfügung. Anweisung - DE IN/FCX100/FCX400/MID/OIML-XA Rev. A Ausgabedatum: 08.2017...
  • Seite 4: Inhaltsverzeichnis

    2 – DE CORIOLISMASTER FCX100, FCX400 PLOMBIEREN VON GERÄTEN | IN/FCX100/FCX400/MID/OIML-XA REV. A Inhalt Zweck der Anleitung ............3     Warum Verplomben? ..........3     Aktivieren des Hardware-Schreibschutzes ....3     Zweikammer-Gehäuse ......... 4       2.1.1 Einkammer-Gehäuse ..........
  • Seite 5: Zweck Der Anleitung

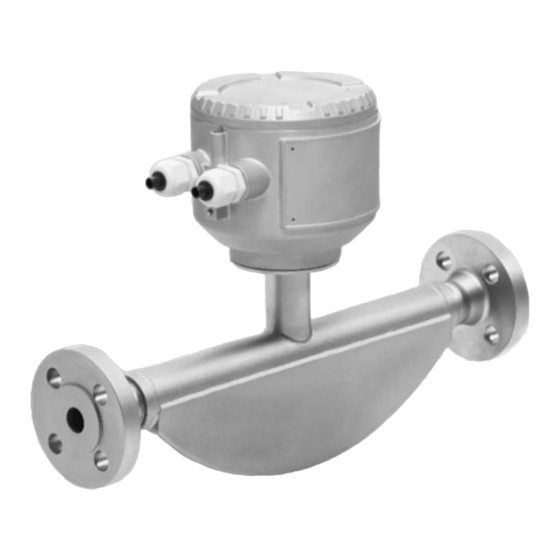
    CORIOLISMASTER FCX100, FCX400 PLOMBIEREN VON GERÄTEN | IN/FCX100/FCX400/MID/OIML-XA REV. A DE – 3 Aktivieren des Hardware- Zweck der Anleitung Schreibschutzes Diese Anleitung beschreibt die Plombierung eines Gerätes. WARNUNG CoriolisMaster FCB400, FCH400 Seite Verletzungsgefahr durch spannungsführende Teile. Messwertaufnehmer in kompakter Bauform mit Unsachgemäße Arbeiten am Gerät können zu einem Zweikammer-Gehäuse Stromschlag führen.
  • Seite 6: Zweikammer-Gehäuse

    4 – DE CORIOLISMASTER FCX100, FCX400 PLOMBIEREN VON GERÄTEN | IN/FCX100/FCX400/MID/OIML-XA REV. A Zweikammer-Gehäuse 2.1.1 Einkammer-Gehäuse G11779 Abb. 1: Position des DIP-Schalters Abb. 2: Position des DIP-Schalters 1 DIP-Schalter, NAMUR 2 DIP-Schalter, Schreibschutz 1 DIP-Schalter, Schreibschutz Hinter dem vorderen Gehäusedeckel befinden sich DIP- Über den DIP-Schalter werden bestimmte...
  • Seite 7: Montage

    Vor dem Plombieren des Gerätes müssen alle Einstellungen abgeschlossen und der Schreibschutzschalter auf „Schreibschutz aktiv“ geschaltet sein (siehe Kapitel „Aktivieren des Hardware-Schreibschutzes“ auf Seite 3 ). Lieferumfang Abb. 4 1. Zwei der vier Schrauben am Fuß herausschrauben und durch die Kopflochschrauben ersetzen.
  • Seite 8 6 – DE CORIOLISMASTER FCX100, FCX400 PLOMBIEREN VON GERÄTEN | IN/FCX100/FCX400/MID/OIML-XA REV. A Plombendraht verlegen G12352 Abb. 5 G12354 1. Sperrzylinder auf die Haltestange am hinteren Abb. 6 Gehäusedeckel aufstecken. 6. Den Plombendraht bis zur hinteren 2. Den Plombendraht so durch die Öffnungen an der...
  • Seite 9: Fcb400, Fch400 In Kompakter Bauform Mit Einkammer-Gehäuse

    Schreibschutzschalter auf „Schreibschutz aktiv“ geschaltet sein (siehe Kapitel „Aktivieren des Hardware-Schreibschutzes“ auf Seite 3 ). Lieferumfang G12357 Abb. 9 1. Den Plombendraht so durch die Ösen im Gehäuse G12355 und Deckel auf der linken Seite stecken, dass beide Abb.
  • Seite 10 8 – DE CORIOLISMASTER FCX100, FCX400 PLOMBIEREN VON GERÄTEN | IN/FCX100/FCX400/MID/OIML-XA REV. A G12354 Abb. 11 4. Den Plombendraht bis zur hinteren Kopflochschraube weiter verdrillen. Ein Drahtende durch das Loch in der Schraube führen, das andere Ende an der Schraube vorbeiführen. Den Plombendraht...
  • Seite 11: Messwertaufnehmer Fcb100, Fch100 Und Fcb400, Fch400 In Getrennter Bauform

    Vor dem Plombieren des Gerätes müssen alle Einstellungen abgeschlossen und der Schreibschutzschalter auf „Schreibschutz aktiv“ geschaltet sein (siehe Kapitel „Aktivieren des Hardware-Schreibschutzes“ auf Seite 3 ). Lieferumfang G12352 Abb. 14 1. Sperrzylinder auf die Haltestange Gehäusedeckel aufstecken. 2. Den Plombendraht so durch die Öffnungen an der...
  • Seite 12: Messwertaufnehmer Fcb100, Fch100, Fcb400, Fch400 In Kompakter Und Getrennter Bauform Mit Turmverlängerung

    „Schreibschutz aktiv“ geschaltet sein (siehe Kapitel „FCB400, FCH400 in kompakter Bauform mit Zweikammer- Gehäuse“ auf Seite 5 ). Lieferumfang G12364 Abb. 16: Beispiel FCX100 und FCX400 Messwertaufnehmer in getrennter Bauform 1. Zwei der vier Schrauben am Fuß herausschrauben und durch die Kopflochschrauben ersetzen.
  • Seite 13: Messumformer Fct400 Mit Zweikammer-Gehäuse

    Schreibschutzschalter auf „Schreibschutz aktiv“ geschaltet sein (siehe Kapitel „Aktivieren des Hardware-Schreibschutzes“ auf Seite 3 ). Lieferumfang G12365 Abb. 17: Beispiel FCX100 und FCX400 Messwertaufnehmer in getrennter Bauform 3. Den Plombendraht bis zur hinteren Kopflochschraube weiter verdrillen. Ein Drahtende durch das Loch in der Schraube führen, das andere Ende...
  • Seite 14 Schlaufen der Verdrillung sollen kleiner als 1 cm sein. 5. Den Sperrzylinder am vorderen Deckel, wie in Schritt 3. beschrieben, sichern. G12361 Abb. 19 1. Zwei der vier Schrauben am Fuß herausschrauben und durch die Kopflochschrauben ersetzen. 2. Die beiden Fixierungsschrauben am vorderen und am hinteren Deckel des Zweikammer-Gehäuses...
  • Seite 15: 3.6 Messumformer Fct400 Mit Einkammer-Gehäuse

    Lieferumfang Benennung Menge Plombe Plombendraht G12362 Abb. 22 8. Den Plombendraht bis zur linke Öse im unteren Deckel weiter verdrillen. Ein Drahtende durch die Ösen in Deckel und Gehäuse führen das andere Ende außen an den Ösen vorbeiführen. Den Plombendraht direkt hinter der linken Öse...
  • Seite 17 FCX100, FCX400 is available for download, free of charge, at www.abb.com/flow. Instruction - EN IN/FCX100/FCX400/MID/OIML-XA Rev. A Issue date: 10.2017 Original instruction Manufacturer ABB Automation Products GmbH Measurement & Analytics Dransfelder Str. 2 37079 Göttingen Germany Tel: +49 551 905-0 Fax:...
  • Seite 18 2 – EN CORIOLISMASTER FCX100, FCX400 SEALING OF DEVICES | IN/FCX100/FCX400/MID/OIML-XA REV. A Contents Purpose of the instructions .......... 3     Why seal? ..............3     Activating the hardware write protection ....3     Dual- compartment housing ....... 4  ...
  • Seite 19: Purpose Of The Instructions

    CORIOLISMASTER FCX100, FCX400 SEALING OF DEVICES | IN/FCX100/FCX400/MID/OIML-XA REV. A EN – 3 Activating the hardware write Purpose of the instructions protection These instructions describe the process of sealing a device. WARNING CoriolisMaster FCB400, FCH400 Page Risk of injury due to live parts. Sensor in integral mount design with dual- Improper work on the device can result in electric shock.
  • Seite 20: Dual- Compartment Housing

    4 – EN CORIOLISMASTER FCX100, FCX400 SEALING OF DEVICES | IN/FCX100/FCX400/MID/OIML-XA REV. A Dual- compartment housing 2.1.1 Single-compartment housing G11779 Fig. 1: Position of the DIP switches Fig. 2: Position of DIP switch 1 DIP switch, NAMUR 2 DIP switch, write protection 1 DIP switch, write protection DIP switches are located behind the front housing cover.
  • Seite 21: Mounting

    CORIOLISMASTER FCX100, FCX400 SEALING OF DEVICES | IN/FCX100/FCX400/MID/OIML-XA REV. A EN – 5 Mounting Preparation FCB400, FCH400 in integral mount design with dual-compartment housing. NOTICE Before the device is sealed, any settings must be completed and the write protection switch must be set to “write protection active”...
  • Seite 22 6 – EN CORIOLISMASTER FCX100, FCX400 SEALING OF DEVICES | IN/FCX100/FCX400/MID/OIML-XA REV. A Lay seal wire G12352 Fig. 5 G12354 Insert locking cylinder on the holding rod on the Fig. 6 rear housing cover. Continue to twist the seal wire up to the rear head Insert the seal wire through the openings on the...
  • Seite 23: Fcb400, Fch400 In Integral Mount Design With Single-Compartment Housing

    CORIOLISMASTER FCX100, FCX400 SEALING OF DEVICES | IN/FCX100/FCX400/MID/OIML-XA REV. A EN – 7 FCB400, FCH400 in integral mount design with Lay seal wire single-compartment housing. NOTICE Before the device is sealed, any settings must be completed and the write protection switch must be set to “write protection active”...
  • Seite 24 8 – EN CORIOLISMASTER FCX100, FCX400 SEALING OF DEVICES | IN/FCX100/FCX400/MID/OIML-XA REV. A G12354 Fig. 11 Continue to twist the seal wire up to the rear head hole screw . Guide one end of the wire through the hole in the screw, guide the other end near the screw. Tightly twist the seal wire right behind the head hole screw...
  • Seite 25: Fcb100, Fch100, Fcb400 And Fch400 Sensors In Remote Mount Design

    CORIOLISMASTER FCX100, FCX400 SEALING OF DEVICES | IN/FCX100/FCX400/MID/OIML-XA REV. A EN – 9 FCB100, FCH100, FCB400 and FCH400 sensors in Lay seal wire remote mount design NOTICE Before the device is sealed, any settings must be completed and the write protection switch must be set to “write protection active”...
  • Seite 26: Fcb100, Fch100, Fcb400 And Fch400 Sensors In Integral And Remote Mount Design With Tower Extension

    10 – EN CORIOLISMASTER FCX100, FCX400 SEALING OF DEVICES | IN/FCX100/FCX400/MID/OIML-XA REV. A Preparation 3.4 FCB100, FCH100, FCB400 and FCH400 sensors in integral and remote mount design with tower extension NOTICE Before the device is sealed, any settings must be completed and the write protection switch must be set to “write protection active”...
  • Seite 27: Fct400 Sensor With Dual-Compartment Housing

    CORIOLISMASTER FCX100, FCX400 SEALING OF DEVICES | IN/FCX100/FCX400/MID/OIML-XA REV. A EN – 11 Lay seal wire FCT400 sensor with dual-compartment housing NOTICE Before the device is sealed, any settings must be completed and the write protection switch must be set to “write protection active”...
  • Seite 28 12 – EN CORIOLISMASTER FCX100, FCX400 SEALING OF DEVICES | IN/FCX100/FCX400/MID/OIML-XA REV. A Preparation Tightly twist the seal wire right behind the locking cylinder to secure the locking cylinder NOTICE You should still be able to slightly move the locking cylinder after it is secured with the seal wire.
  • Seite 29: Fct400 Transmitter With Single-Compartment Housing

    CORIOLISMASTER FCX100, FCX400 SEALING OF DEVICES | IN/FCX100/FCX400/MID/OIML-XA REV. A EN – 13 Continue to twist the seal wire up to the front head 3.6 FCT400 transmitter with single-compartment hole screw . Secure the front head hole screw housing described previously. NOTICE Before the device is sealed, any settings must be completed and the write protection switch must be set to...
  • Seite 32 We reserve the right to make technical changes or modify the contents of this document without prior notice. With regard to purchase orders, the agreed particulars shall prevail. ABB does not accept any responsibility whatsoever for potential errors or possible lack of information in this document.

Inhaltsverzeichnis