Medela Lactina Gebrauchsanweisung
Vorschau ausblenden
Andere Handbücher für Lactina:
- Gebrauchsanweisung (148 Seiten) ,
- Gebrauchsanweisung (172 Seiten) ,
- Gebrauchsanweisung (214 Seiten)
Inhaltsverzeichnis
Werbung
Verfügbare Sprachen
Verfügbare Sprachen
Quicklinks
Lactina
Instructions for use
EN
Gebrauchsanweisung
DE
Mode d'emploi
FR
Istruzioni per l'uso
IT
Gebruiksaanwijzing
NL
BPA
free
BPA
BPA
Bisphenol-A
Bisphenol-A
free
™
BPA
free
BPA
Bisphenol-A
free
All parts
that touch
USA
breastmilk are
USA
ROW
All parts
that touch
breastmilk a
All parts
that touch
breastmilk a
All parts
that touch
Werbung
Inhaltsverzeichnis

Verwandte Anleitungen für Medela Lactina


Inhaltszusammenfassung für Medela Lactina
- Seite 1 Lactina ™ Instructions for use Gebrauchsanweisung Mode d‘emploi Istruzioni per l‘uso Gebruiksaanwijzing All parts that touch breastmilk are All parts free free that touch breastmilk a All parts that touch breastmilk a Bisphenol-A Bisphenol-A Bisphenol-A free free All parts that touch...
- Seite 2 Parts List XIV Teileliste XIV Liste des pièces XIV Elenco componenti XIV Onderdelenlijst XIV...
- Seite 3 Instructions for use Gebrauchsanweisung Mode d’emploi Istruzioni per l’uso Gebruiksaanwijzing...
-
Seite 4: Indications For Use
Lactina Breastpump Mother’s milk is the best nutrition for babies. Lactina gives you and your baby optimal support during the breastfeeding period. The attractive breastpump for hospitals and home rental is especially suitable for long-term and frequent pumping and encourages milk production in the long term, too. - Seite 5 EMC information provided in these instructions for use. • There are no user-serviceable parts inside the Lactina. Do not attempt to repair the Lactina Breastpump yourself. SAVE THIS INSTRUCTION MANUAL...
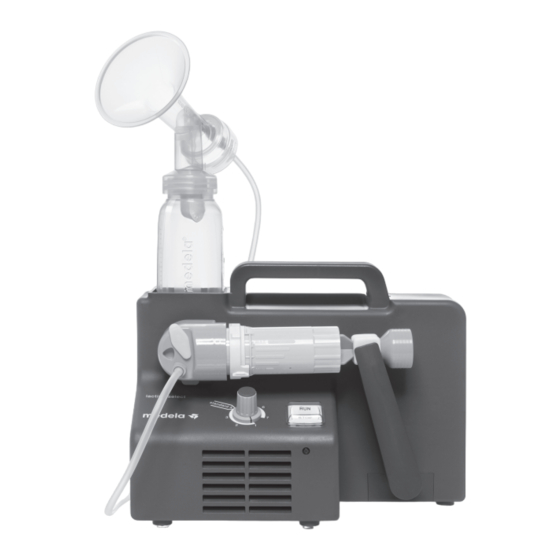
- Seite 6 Assembly Instructions Screw bottle into breastshield. a b c Insert adapter end of tubing into opening in breastshield. a b c Slip rubber seal onto piston until it snaps into place - the larger side faces the handle. To ensure proper seal, hold rubber seal firmly and twist piston.
- Seite 7 Screw piston/cylinder assembly tightly into cylinder holder. Insert plug at the back side of the cylinder holder into the hole on the front side of the Lactina. Rotate until tab of cylinder holder is securely placed in slit of Lactina.
-
Seite 8: Electrical Operation
Assembly Instructions Push piston into rubber clamp of Lactina pumping arm until it snaps in. Push adapter end of tubing into opening on cylinder holder. If single pumping, insert port cap into the unused opening of cylinder holder. If double pumping, insert port cap into the hole in the middle of cylinder holder. - Seite 9 Pumping Be comfortably seated and relax. Use a footrest, when pumping or when feeding your baby. Elevating your feet puts you into proper sitting position to avoid stress on the lower back and perineum. Center your breastshield over your nipple. •...
- Seite 10 Pumping Lactina Select only The Lactina Select features an additional knob to adjust the pumping speed. Choose a fast pumping rhythm to start your milk flowing (setting 7 corresponds to highest speed level). Once your milk starts to flow or you sense milk ejection you may adjust the rhythm by decreasing speed slightly (e.g.
-
Seite 11: Manual Pumping
Manual Pumping VIlI Follow steps 1–7 (excluding step 4) on page 3/4/5 Screw cylinder into breastshield. a b c d Set the vacuum regulator to minimum and start pumping. Adjust the vacuum to your Maximum Comfort Vacuum™. This is the highest vacuum you can use and still feel comfortable (different for every mother). - Seite 12 Cleaning and Hygiene Cleaning at Follow these cleaning instructions unless you are told otherwise by home your healthcare professional. Prior to first use and once daily • Disassemble, wash and rinse all parts of your pump kit that come in contact with the breast and milk (a+b+c+d+m+n+o). •...
- Seite 13 Cleaning Disassemble and thoroughly wash all parts in warm, soapy water. Rinse in clear water. Disinfecting Disinfect all parts by washing in a thermic washing machine (at approx. 93° C). Sterilizing Prior sterilizing visually check parts if clean and intact. Sterilize all parts by autoclaving at 134°...
- Seite 14 Cleaning and Hygiene Breastpump Unplug breastpump prior to cleaning care At home Daily or when spills occur In hospitals Immediately when spills occur In between each mother and/or on a regular basis, e.g. daily • Use a damp (not wet) cloth to wipe over the breastpump. Optionally, soapy water or a non-abrasive detergent may be used.
- Seite 15 • the piston/cylinder is correctly attached onto cylinder holder or breastshield. • the cylinder holder including piston/cylinder is assembled pro- perly onto the Lactina. • If single pumping, make sure the port cap is inserted into the unused opening of cylinder holder.
- Seite 16 3-year warranty for the unit from the date of purchase, excluding pump set and accessories. The manufacturer is not liable for any damage or consequential damage caused by incor- rect operation, inappropriate usage or use by unauthorized persons. Routine checks and servicing may only be carried out by Medela authorized personnel. Disposal XIII The unit is made of various metal and plastics.
-
Seite 17: Parts List
Parts List Article numbers Breastshield (24 mm) 810.0131 Valve head 810.0475 Valve membrane 820.7013 Bottle (150 ml) 811.0020 Bottle stand 810.0462 Silicone tubing (105 cm) 800.0828 Cylinder 810.0717 Piston 810.0494 Rubber seal 820.0078 Vacuum regulator ring 810.0066 Cylinder holder 810.0668 Port cap 820.0135 810.0474... -
Seite 18: Indikationen Für Die Anwendung
Lactina Brustpumpe Muttermilch ist die beste Nahrung für Babys. Lactina unterstützt Sie und Ihr Kind opti- mal während der Stillzeit. Die attraktive Brustpumpe für Krankenhaus und Vermietung eignet sich besonders gut für langfristiges und regelmässiges Abpumpen und fördert die Milchproduktion auch längerfristig. - Seite 19 (Elektromagnetische Verträglichkeit) und muss entsprechend den in dieser Gebrauchs- anweisung gegebenen EMV-Informationen installiert und in Betrieb genommen werden. • Die Lactina Brustpumpe enthält keine durch den Benutzer zu wartenden Teile. Versuchen Sie nicht, die Lactina Brustpumpe selbst zu reparieren. BEWAHREN SIE DIESE GEBRAUCHSANWEISUNG SORGFÄLTIG AUF...
- Seite 20 Montage-Anleitung Flasche auf die Brusthaube schrau- ben. a b c Den Schlauchadapter in die Öffnung der Brusthaube einführen. a b c Gummidichtung über den Kolben schieben, bis er einrastet – die grös sere Öffnung voran. Zur Sicherstellung des dichten Sitzes die Gum mi- dichtung festhalten und den Kolben drehen.
- Seite 21 Verschluss-Stopfen auf den Zylinder- halter montieren. Kolben/Zylinder fest in den Zylinder- halter schrauben. Den Stecker auf der Rückseite des Zylinderhalters in die Öffnung auf der Vorderseite der Lactina stecken. Drehen Sie, bis der Dorn des Zylinderhalters fest im Schlitz der Lactina sitzt.
- Seite 22 Montage-Anleitung Den Kolben in die Gummiklemme des Lactina Pumparms drücken, bis er einrastet. Den Schlauchadapter in die Öffnung des Zylinderhalters einführen. Beim einseitigen Abpumpen setzen Sie den Verschluss-Stopfen auf die unbenützte Öffnung des Zylinder- halters auf. Beim doppelseitigen Abpumpen set- zen Sie die Kappe auf die Öffnung in...
- Seite 23 Abpumpen Setzen Sie sich bequem und entspannt hin. Stellen Sie Ihre Füsse beim Abpumpen oder Stillen Ihres Babys auf eine Still-Fussstütze. Hierdurch nehmen Sie die richtige Sitzposition ein um eine Überlastung des unteren Rückens und des Damms zu vermeiden. Zentrieren Sie die Brusthaube über Ihrer Brustwarze. •...
-
Seite 24: Auswahl Der Brushaube
Abpumpen Nur Lactina Select Die Lactina Select hat einen zusätzlichen Knopf zur Einstellung der Pumpgeschwindigkeit. Wählen Sie einen schnellen Pumprhythmus, um den Milchfluss zu starten (Einstellung 7 entspricht der höchsten Geschwindigkeit). Wenn Ihre Milch zu fliessen beginnt und Sie den Milchfluss spüren, können Sie den Rhythmus durch eine leichte Verminderung der Geschwindigkeit anpassen (z.B. -
Seite 25: Manuelles Abpumpen
Manuelles Abpumpen VIlI Befolgen Sie die Schritte 1–7 (mit Ausnahme von Schritt 4) auf Seiten 17/18/19 Den Zylinder in die Brusthaube schrau- ben. a b c d Stellen Sie den Vakuum Einstellring auf das Minimum ein und beginnen Sie mit Abpumpen. - Seite 26 Reinigung und Hygiene Reinigung zu Befolgen Sie diese Reinigungsanweisungen, es sei denn, Ihr medi- Hause zinisches Fachpersonal hat Ihnen etwas anderes empfohlen. Vor dem ersten Gebrauch und einmal täglich • Alle Teile Ihres Pumpsets, die mit der Brust und der Milch in Berührung kommen (a+b+c+d+m+n+o), auseinander nehmen, waschen und spülen.
- Seite 27 Reinigung Alle Teile auseinander nehmen und gründlich mit warmem Seifen wasser reinigen. Mit klarem Wasser spülen. Desinfektion Alle Teile in einer thermischen Waschmaschine (bei ca. 93° C) desinfizieren. Sterilisation Vor dem Sterilisieren ist zu überprüfen, ob alle Teile sauber und intakt sind.
-
Seite 28: Brustpumpe Vor Dem Reinigen Ausstecken
Reinigung und Hygiene Pflege der Brustpumpe vor dem Reinigen ausstecken Brustpumpe Zu Hause täglich oder bei einem Überlauf Im Krankenhaus Sofort, wenn ein Überlauf passiert Bevor sie einer anderen Mutter übergeben wird und/oder regelmässig, z.B. täglich • Pumpe mit einem feuchten (keinesfalls nassen) Tuch abwischen. Wenn gewünscht kann Seifenwasser oder ein nicht-aggressives Reinigungsmittel verwendet werden. -
Seite 29: Störungen Beheben
• dass der Kolben/Zylinder korrekt am Zylinderhalter oder der Brusthaube aufgeschraubt ist. • dass der Zylinderhalter einschliesslich Kolben/Zylinder richtig auf die Lactina montiert ist. • dass beim einseitigen Abpumpen der Verschluss-Stopfen auf die unbenutzte Öffnung des Zylinderhalters aufgesetzt ist. Darauf achten, dass der Schlauch nicht geknickt oder eingeklemmt wird. -
Seite 30: Entsorgung
3 Jahre Garantie auf das Gerät ab Kaufdatum, Pumpset und Zubehör ausgeschlossen. Der Hersteller haftet nicht für irgendwelche Schäden oder Folgeschäden, die durch fehlerhaften Betrieb, unsachgemässen Gebrauch oder Gebrauch durch unbefugte Personen entstanden sind. Routinekontrollen und Servicearbeiten sind nur durch von Medela autorisierte Stellen auszuführen. Entsorgung XIII Das Gerät besteht aus verschiedenen Metallen und Kunststoffen. -
Seite 31: Teileliste
Teileliste Artikelnummern Brusthaube (24 mm) 810.0131 Ventilkopf 810.0475 Ventilmembrane 820.7013 Flasche (150 ml) 811.0020 Standfuss 810.0462 Silikon-Schlauch (105 cm) 800.0828 Zylinder 810.0717 Kolben 810.0494 Gummidichtung 820.0078 Vakuum Einstellring 810.0066 Zylinderhalter 810.0668 Verschluss-Stopfen 820.0135 Schutzhaube 810.0474 Deckel mit Öffnung 810.7062 Deckeleinlage 810.0473 Zubehör (nicht mitgeliefert) •... -
Seite 32: Recommandations Importantes
Lactina Tire-Lait Le lait de la mère est le meilleur aliment pour les bébés. Lactina vous offre, à votre enfant et à vous-même, un soutien optimal au cours de la période de l’allaitement. Ce tire-lait attrayant, destiné aux hôpitaux et à la location à domicile, est spécialement conçu pour un pompage fréquent et de longue durée. -
Seite 33: Instructions D'assemblage
Les appareils de communication portables et mobiles peuvent influencer le fonctionnement du Lactina. • Le Lactina nécessite des précautions spéciales en ce qui concerne la Compatibilité Electro Magnétique, et doit être installé et mise en service conformément aux directives sur la CEM indiquées dans ce mode d’emploi. - Seite 34 Instructions d‘assemblage Visser le biberon sur la téterelle. a b c Insérer un des embouts du tuyau dans la connexion de la téterelle prévue à cet effet. a b c Glisser le joint de caoutchouc sur le piston jusqu’à ce qu’il s’en- clenche (le côté...
- Seite 35 Visser étroitement l’assemblage pis- ton/cylindre sur le support-cylindre. Insérer l’embout au dos du support- cylindre dans l’orifice situé sur la face avant du Lactina. Tourner jusqu’à ce que la languette sur le support-cylindre soit bien placée dans la fente du Lactina.
-
Seite 36: Fonctionnement Sur Secteur
Instructions d‘assemblage Pousser le piston dans l’attache en caoutchouc du bras mécanique du Lactina jusqu’à ce qu’il soit enclenché. Insérer l’embout du tuyau dans l’ori- fice situé sur le support-cylindre. Pour un pompage simple, boucher l’orifice inutilisé du support-cylindre à l’aide de l’obturateur placé sur le support-cylindre. - Seite 37 Expression S’asseoir confortablement et se détendre. Il est recommandé d’utiliser un repose-pieds pendant l’allaitement ou pendant l’expression du lait avec un tire-lait. Surélever les pieds garantit une position assise correcte et évite toute contrainte au bas du dos et au niveau du périnée.
- Seite 38 Expression Lactina Select uniquement Le Lactina Select dispose d’un bouton de réglage supplémentaire pour ajuster la vitesse d’aspiration. Sélectionner une vitesse d’aspiration rapide pour amorcer l’écoulement du lait (le réglage sur 7 correspond au niveau de vitesse le plus élevé). Une fois que le lait commence à...
-
Seite 39: Nettoyage Et Hygiène
Expression manuelle VIlI Suivre les étapes 1 – 7 (à l’exception de l’étape 4) en pages 31/32/33 Visser le cylindre sur la téterelle. a b c d Régler la force d’aspiration au minimum et commencer l’expression. Ajuster la force d’aspiration au niveau de force d’aspiration maximale de confort vous correspond. - Seite 40 Nettoyage et hygiène Nettoyage à Respecter la marche à suivre pour le nettoyage et l’entretien de la maison votre tire-lait, à moins que votre professionnel de santé ne vous conseille de procéder autrement. Avant la première utilisation, et une fois par jour •...
- Seite 41 Nettoyage Démonter et laver entièrement toutes les pièces dans l’eau chaude et savonneuse. Rincer à l’eau claire. Désinfection Désinfecter toutes les pièces en les lavant dans une machine à laver thermique (à env. 93° C). Stériliser Avant de stériliser, examiner la propreté et le bon état de chaque pièce.
- Seite 42 Nettoyage et hygiène Maintenance Débrancher le tire-lait avant de le nettoyer du tire-lait À domicile Chaque jour ou dès que souillé À l’hôpital Immédiatement après souillure Entre chaque mère et/ou régulièrement, par ex. chaque jour • Utiliser un chiffon humide (non mouillé) pour essuyer la coque du tire-lait.
- Seite 43 à la téterelle si le set d’accessoires est utilisé en tire-lait manuel. • Le support-cylindre, y compris le piston/cylindre est assemblé correctement sur le Lactina. • Pour un pompage simple, s’assurer que l’obturateur soit bien inséré dans l’orifice inutilisé du support-cylindre.
- Seite 44 Le fabricant n’est pas responsable des dégâts ou dommages dus à une utilisation incorrecte, une chute, un usage inapproprié ou une utilisation par une personne non autorisée. Les tests de maintenance et le service après-vente doivent uni- quement être effectués par le personnel autorisé de Medela. Recyclage XIII Cet appareil est composé...
-
Seite 45: Liste Des Pièces
Liste des pièces Numéros d’article Téterelle (24 mm) 810.0131 Valve 810.0475 Membrane 820.7013 Biberon (150 ml) 811.0020 Support 810.0462 Tuyau silicone (105 cm) 800.0828 Cylindre 810.0717 Piston 810.0494 Joint en caoutchouc 820.0078 Régulateur de l‘aspiration 810.0066 Porte-cylindre 810.0668 Capuchon 820.0135 Capuchon de protection 810.0474 Bague... -
Seite 46: Importanti Misure Di Sicurezza
Lactina Tiralatte Il latte materno è il nutrimento migliore per i neonati. Lactina assicura alla madre e al bambino un ottimo sostegno nel periodo dell’allattamento. Questo attraente tiralatte per ospedali o per noleggio a casa è particolarmente adatto per un pompaggio prolungato e frequente e incoraggia anche la produzione di latte nel lungo termine. -
Seite 47: Istruzioni Di Montaggio
Lo Lactina richiede precauzioni speciali riguardanti l’EMC, e deve essere installato e messo in servizio in conformità alle informazioni sull’EMC contenute in queste istruzioni per l’uso. • Nel Lactina non vi sono parti riparabili dal cliente. Non tentate di riparare da soli il tiralatte Lactina. CONSERVATE QUESTO MANUALE D’ISTRUZIONI... - Seite 48 Istruzioni di montaggio Avvitate la bottiglia nella coppa per il seno. a b c Inserite l’adattatore all’estremità del tubicino nell’apertura della coppa per il seno. a b c Fate scivolare la guarnizione di gomma sul pistone finché non scatti nella sua posizione – il lato maggiore è di fronte all’impugnatura.
- Seite 49 Avvitare saldamente il gruppo pistone/ cilindro nel porta cilindro. Inserire il connettore della parte poste- riore del porta cilindro all’interno del foro nella parte anteriore del Lactina. Ruotare fino a collocare correttamente la linguetta del porta cilindro nella fes- sura del Lactina.
-
Seite 50: Funzionamento Elettrico
Istruzioni di montaggio Spingere il pistone nel morsetto di gomma del braccio di pompaggio del Lactina, fino a sentire lo scatto di aggancio. Spingere l’adattatore del’estremità del tubo nell’apertura del porta cilindro. In caso di pompaggio singolo, inserire il tappo nell’apertura non utilizzata del porta cilindro. - Seite 51 Pompaggio State comodamente seduta e rilassata. Usate un appoggio per i piedi durante il pompag- gio e l’allattamento del bambino. Tenendo i piedi sollevati, vi mettete nella giusta posizione per evitare sforzi nella zona lombare e perineale. Centrate la coppa del seno sul capezzolo. •...
- Seite 52 Pompaggio Solo Lactina Select Il Lactina Select dispone di un’ulteriore manopola che permette di regolare la velocità di pompaggio. Selezionare un ritmo di pompaggio veloce per favorire la fuoriuscita del latte (la posizione 7 corrisponde alla massima velocità). Una volta che il latte ha iniziato a defluire o quando si sente la fuoriuscita del latte, è...
-
Seite 53: Pulizia E Misure Igieniche
Tiralatte Manuale VIlI Seguire le istruzioni ai punti 1 – 7 (escluso il punto 4) a pagina 45/46/47 Avvitate il cilindro nella coppa per il seno. a b c d Impostate il regolatore del vuoto al mini- mo e iniziate ad aspirare. Regolate il vuoto sul vostro Massimo vuoto con- fortevole. - Seite 54 Pulizia e misure igieniche Pulizia a casa Seguite queste istruzioni di pulizia a meno che il vostro consulente sanitario non vi abbia detto cose diverse. Prima del primo impiego e una volta al giorno • Smontate, lavate e sciacquate tutte le parti del kit dell’ap- parecchio che entrano in contatto con il seno e con il latte (a+b+c+d+m+n+o).
- Seite 55 Pulizia Smontate e lavate accuratamente tutte le parti in acqua calda e saponata. Sciacquate in acqua corrente. Disinfezione Disinfettate tutte le parti lavandole in una lavatrice ad alta tempera- tura (circa 93° C). Sterilizzazione Prima di sterilizzarle, controllate visivamente se le parti sono pulite e intatte.
- Seite 56 Pulizia e misure igieniche Cura del Scollegare il tiralatte dalla corrente prima di pulirlo tiralatte A casa Giornalmente o quando vi sono fuoriuscite di latte In ospedale Immediatamente quando vi sono fuoriuscite di latte Tra una madre e l’altra e/o con frequenza regolare, ad esempio giornalmente •...
-
Seite 57: Risoluzione Dei Problemi
• Il pistone/cilindro è correttamente inserito sul porta cilindro o sulla coppa per il seno. • Il porta cilindro, incluso il pistone/cilindro, è correttamente assemblato sul Lactina. • In caso di pompaggio singolo, accertarsi che il tappo sia cor- rettamente posizionato sull’apertura non utilizzata del porta cilindro. -
Seite 58: Smaltimento
Il produttore non risponde di eventuali danni, diretti o indiretti, causati dalla messa in funzione scorretta, dall’uso improprio o dall’utilizzo da parte di persone non autorizzate. I controlli di routine e la manutenzione devono essere effettuati unicamente da personale autorizzato Medela. Smaltimento XIII L’unità... -
Seite 59: Elenco Componenti
Elenco componenti Numeri articoli Coppa per il seno (24 mm) 810.0131 Testa della valvola 810.0475 Membrana della valvola 820.7013 Poppatoio (150 ml) 811.0020 Supporto 810.0462 Tubo silicone (105 cm) 800.0828 Cilindro 810.0717 Pistone 810.0494 Guarnizione di gomma 820.0078 Anello di regolazione vuoto 810.0066 Porta cilindro 810.0668... -
Seite 60: Belangrijke Veiligheidsaanwijzingen
Lactina Borstkolf Moedermelk is de beste voeding voor een baby. Lactina helpt u en uw baby optimaal gedurende de borstvoedingsperiode. Deze fraaie borstkolf voor ziekenhuizen en voor verhuur aan particulieren is vooral geschikt voor moeders die langdurig en vaak moeten afkolven en stimuleert de melkproductie ook op de langere termijn. - Seite 61 EMC-informatie in deze gebruiksaanwijzing. • De Lactina bevat geen onderdelen die door de gebruiker gerepareerd kunnen worden. Probeer niet de Lactina borstkolf zelf te repareren. BEWAAR DEZE GEBRUIKSAANWIJZING...
- Seite 62 Montage Schroef flesje in borstschild. a b c Steek adaptereinde van slang in opening in borstschild. a b c Schuif rubberafdichting op zuiger tot deze op zijn plaats klikt – de lange kant wijst naar het handvat. Om voor goede afdichting te zorgen de rubberaf- dichting goed vasthouden en de zuiger draaien.
- Seite 63 Schroef de geassembleerde zuiger/ cilinder stevig in de cilinderhouder. Steek plug aan de achterkant van de cilinderhouder in het gat aan de voor- kant van de Lactina. Draai tot uitsteek- sel van cilinderhouder goed in de sleuf van de Lactina zit.
-
Seite 64: Elektrische Werking
Montage Druk zuiger in rubberklem van Lactina pomparm tot hij inklikt. Druk zuiger in rubberklem van Lactina pomparm tot hij inklikt. Bij enkel kolven: afsluitdopje in de ongebruikte opening van de cilinder- houder steken. Bij dubbel kolven: afsluitdopje in het gat in het midden van de cilinderhou- der steken. - Seite 65 Kolven Ga prettig zitten en ontspan u. Gebruik een voetenbankje wanneer u kolft of uw baby voedt. Door uw voeten hoger te plaatsen komt u in de juiste zithouding en voorkomt u spanning in uw rug en perineum. Plaats het borstschild gecentreerd over uw tepel. •...
- Seite 66 Kolven Alleen Lactina Select De Lactina Select heeft een extra knop om de kolfsnelheid in te stellen. Kies een snelle pompfrequentie om het stromen van uw melk te starten (stand 7 correspondeert met de hoogste snelheid). Wanneer uw melk eenmaal stroomt of u het toeschieten van de melk voelt, kunt u de frequentie bijregelen door de snelheid iets te verlagen (b.v.
- Seite 67 Hand kolven VIlI Voer stappen 1 – 7 (behalve stap 4) op pagina 59/60/61 uit. Schroef cilinder in borstschild. a b c d Zet de vacuümregelaar op minimum en begin te kolven. Pas het vacuüm aan Vacuüm voor Maximaal Comfort aan.
- Seite 68 Reinigen en hygiëne Thuis reinigen Voer deze reinigingsinstructies uit tenzij uw medisch adviseur u anders instrueert. Voor het eerste gebruik en eens per dag • Alle onderdelen van uw pompset die met de borst en melk in contact komen (a+b+c+d+m+n+o) uit elkaar halen, wassen en schoonspoelen.
- Seite 69 Reinigen Demonteren en alle onderdelen in warm zeepwater wassen. Afspoelen met schoon water. Desinfecteren Desinfecteer alle onderdelen door ze in een thermische wasma- chine te wassen (bij ca. 93° C). Steriliseren Voor het steriliseren visueel controleren of de onderdelen schoon en heel zijn.
- Seite 70 Reinigen en hygiëne Verzorging van Voor her reinigen de borstkolf uitschakelen de borstkolf Thuis Dagelijks of als er melk uit lekt In ziekenhuizen Onmiddellijk als er melk uit lekt Tussen de moeders en/of regelmatig, b.v. dagelijks • Gebruik een vochtige (niet natte) doek om de borstkolf af te vegen.
- Seite 71 • de rubber afdichtring is correct aan het zuiger bevestigd. • de zuiger/cilinder is correct aan de cilinderhouder of het borst- schild bevestigd. • de cilinderhouder incl. zuiger/cilinder is goed op de Lactina aangebracht. • Bij enkel pompen: let erop dat de poortkap in de ongebruikte opening van cilinderhouder is gestoken.
- Seite 72 Routinecontroles en service mogen alleen gedaan worden door personen die door Medela geautoriseerd zijn. Vernietiging XIII De eenheid bestaat uit metalen en kunststoffen.
-
Seite 73: Onderdelenlijst
Onderdelenlijst Artikelnummers Borstschild (24 mm) 810.0131 Vacuümklep 810.0475 Membraan 820.7013 Melkflesje (150 ml) 811.0020 Standaard 810.0462 Siliconenslang (105 cm) 800.0828 Cilinder 810.0717 Zuiger 810.0494 Rubberen afdichting 820.0078 Vacuüm regulatorring 810.0066 Cylinder houder 810.0668 Afsluitdop 820.0135 Speenkap 810.0474 Ringdeksel 810.7062 Dekselinleg 810.0473 Toebehoren (apart verkrijgbaar) •... -
Seite 74: Emc / Technical Description
IEC 60601-1-2, Table 201 Electromagnetic Emissions The Lactina breastpump is intended for use in the electromagnetic environment specified below. The customer or the user of the Lactina breastpump should assure that it is used in such environment. Emission Tests Compliance... - Seite 75 -100 … -240 mmHg Betrieb 50 / 60 Hz -13.33 … -32 kPa En Service 0.5 A Lactina Electric Plus 50 cpm Utilizzo °C Lactina Select 40 – 60 cpm Gebruik °C 100 – 240 V Transport/Storage T 800 mA...
- Seite 76 INTERNATIONAL SALES GERMANY & AUSTRIA SWITZERLAND Medela AG, Medical Technology Medela Medizintechnik Medela AG, Medical Technology Lättichstrasse 4b GmbH & Co. Handels KG Lättichstrasse 4b 6341 Baar Postfach 1148 6341 Baar Switzerland 85378 Eching Switzerland Phone +41 (0)41 769 51 51...