Herunterladen Inhalt Inhalt Diese Seite drucken
Medela Lactina Gebrauchsanweisung
Vorschau ausblenden Andere Handbücher für Lactina:
Inhaltsverzeichnis

Werbung

Verfügbare Sprachen
  • DE

Verfügbare Sprachen

Lactina
®
EN Instructions for use – hospital use | DE Gebrauchsanweisung – Verwendung im Krankenhaus
FR Mode d'emploi – Usage en milieu hospitalier | IT Istruzioni per l'uso – Uso ospedaliero
NL Gebruiksaanwijzing – voor gebruik in ziekenhuizen
EFFICIENCY

Werbung

Inhaltsverzeichnis
loading

Inhaltszusammenfassung für Medela Lactina

  • Seite 1 Lactina ® EN Instructions for use – hospital use | DE Gebrauchsanweisung – Verwendung im Krankenhaus FR Mode d’emploi – Usage en milieu hospitalier | IT Istruzioni per l’uso – Uso ospedaliero NL Gebruiksaanwijzing – voor gebruik in ziekenhuizen EFFICIENCY...
  • Seite 2 Grazie per aver scelto il tiralatte Lactina. Il latte materno è la scelta naturale per i neonati, ma in alcuni casi non è possibile allattare al seno. Da oltre 50 anni Medela è impegnata ad aiutare madri e neonati che si trovano in queste situazioni.
  • Seite 3 4 – 43 44 – 83 84 – 123 124 – 163 164 – 203...
  • Seite 4: Inhaltsverzeichnis

    Table of Contents 1. Intended use / population / contraindication 2. Meaning of symbols 3. Important safety information 4. Product description 5. Cleaning 6. Preparing for pumping 7. Expression 8. Storing and thawing breast milk 9. Troubleshooting 10. Warranty and maintenance / disposal 11.
  • Seite 5: Intended Use / Population / Contraindication

    Lactina is a flexible breast pump with a proven track record through regular use in hospitals and as a rental pump. It is available as the Lactina Electric Plus and the Lactina Select, both of which operate using the traditional one-phase pumping technology.
  • Seite 6: Meaning Of Symbols

    2. Meaning of symbols The warning symbol identifies all instructions that are important for safety. Failure to observe these instructions can lead to injury or damage to the breast pump. When used in conjunction with the following words, the warning symbol stands for: Warning Can lead to serious injury or death.
  • Seite 7: Symbols On The Device

    Symbols on the device This symbol indicates that the instructions for use should be followed. This symbol indicates the compliance with the essential requirements of the Council Directive 93/42/EEC of 14 June 1993 concerning medical devices. This symbol indicates the manufacturer. This symbol indicates do not dispose the device together with unsorted municipal waste (for EU only).
  • Seite 8: Important Safety Information

    Microwaving can also change the composi- tion of breast milk. I Use only the power cord that comes with the Lactina breast pump. Make sure the voltage of the power cord is compatible with the power source.
  • Seite 9 Virus (HIV): pumping breast milk will not reduce or remove the risk of transmitting the virus to the baby through breast milk. I Inspect all components of the Lactina breast pump as well as all parts of the pump set(s) before each use.
  • Seite 10 Never drop or insert any object into any opening or tubing. l Do not use outdoors. l Supervision is necessary when the Lactina breast pump is used in the vicinity of children. l Portable and mobile radio frequency communications equipment can affect the Lactina breast pump.
  • Seite 11 I Never put the breast pump unit in water or in a steriliser, as this can cause permanent damage to the breast pump. I Do not use the Medela Lactina pump sets with a non-compatible breast pump. I Do not use the pump sets for any other purpose than expressing breast milk.
  • Seite 12: Product Description

    Lactina is a flexible breast pump with a proven track record through regular use in hospitals and as a rental pump. It is available as the Lactina Electric Plus and the Lactina Select, both of which operate using the traditional one-phase pumping technology. Both Lactina models are suitable for single and double pumping.
  • Seite 13 Only Lactina Select The Lactina Select has an additional knob for adjusting the pump speed between 40 and 60 cycles per minute. Select a fast pumping rhythm to stimulate the milk flow. Reduce the speed when the milk begins to flow.
  • Seite 14 4. Product description 4.3 Reusable pump set – Product parts (applied parts)* 1x PersonalFit breast shield 1x PersonalFit connector 1x silicon tubing (105 cm) 2x valve 1x valve head membrane 1x breast milk bottle (150 mL) 1x cylinder holder 1x stand for 1x port cap 150 mL bottle 1x piston...
  • Seite 15 4.4 Disposable pump set – Product parts (applied parts)* 1x breast shield 1x connector 1x port cap 1x piston 1x cylinder holder 1x silicone tubing 1x rubber seal 1x vacuum 1x membrane regulator ring 1x cylinder colostrum disposable disposable disposable container bottle bottle...
  • Seite 16: Cleaning

    I Surface disinfectant agents for medical devices will not cause mechanical damage to the Lactina. I Follow the instructions provided by the supplier of the surface disinfectant agents. I Provide personal protection for operators in accordance with the supplier’s...
  • Seite 17 12. The listed automated reprocessing pro cedures are tested, validated and recommended by Medela. In the case of automated cleaning, an internal validation of the preferred procedure by the hospital is necessary, too. In the...
  • Seite 18 1. Intended Use/Contraindication/Population 5. Cleaning 5.2 Cleaning pump sets – Overview Disposable bottles and disposable pump sets (breast shield, connector, membrane, silicone tubing) Single-use pump set and One-day pump sets single-use bottles Before first use No cleaning needed No cleaning needed I Manual cleaning (§5.4) After every use Dispose of after use (§5.3)
  • Seite 19 If there is milk, condensation or visible residues in the tubing, the tubing must be disposed of and replaced. Medela recommends that the tubing is disposed of and replaced after max. 6 months. If required by national, regional or in-house regulations.
  • Seite 20 1. Intended Use/Contraindication/Population 5. Cleaning 5.3 Disposable single-use Warning pump sets and bottles – Cleaning l The sterile single-use pump set is a single- use product and may not be reused or reprocessed. The sterile pump set and disposable l The one-day pump set is a single-user bottles (sterile and Ready-to-Use) are product.
  • Seite 21 5.4 Disposable one-day pump set – Cleaning Check whether there is milk in the Rinse the breast shield, the connector and tubing. If so, replace the pump set. the membrane with cold, clear drinking- If not, disassemble the pump set quality water (approx.
  • Seite 22 To remove the white membrane from Note the yellow valve head, use two fingers with one gently pushing onto the I Medela does not define a maximum number “knob”. of uses appropriate for a re-usable pump Check all parts for damage.
  • Seite 23 - leaving residue. Medela recommends rances and colouring (5 – 15% anionic that the tubing is disposed of and tenside, nonionic tenside, pH neutral).
  • Seite 24 If there is no milk, condensation or visible residues in the tubing, there is no need for automated cleaning and disinfection or sterilisation of the tubing. Medela recom- mends that the tubing is disposed of and replaced after max. 6 months.
  • Seite 25 Storage 93 °C Put the clean parts in a clean storage bag or a clean environment. It is important that all residual moisture dries. Do not store parts in an airtight container/bag. For cleaning of the tubing see chapter 5.7. Clean and disinfect the remaining parts in a mechanical washer-disinfector.
  • Seite 26: Preparing For Pumping

    Dry your hands with a fresh towel or a single-use paper towel. Note l Use Medela original accessories only. Open the packaging of the l The disposable pump set does not need disposable pump set. Push the cleaning prior to first use.
  • Seite 27 Screw a disposable bottle onto the con- Push the open end of the tubing over the nector. Choose a bottle that suits your protruding part at the back of the connector. needs. Sizes available are 35, 80, 150 and 250 mL. Place the white membrane in a horizontal Push the valve head and mem- position on the valve head.
  • Seite 28 Dry your hands with a fresh towel or a single-use paper towel. Screw a Medela bottle onto the Note connector. Choose a size that suits l Use Medela original accessories only.
  • Seite 29 Insert one end of the tubing into the corresponding opening inside the connector. Slide the piston into Slide the vacuum regulator ring the cylinder. over the cylinder.
  • Seite 30 Fit the port cap to the cylinder holder. Rotate the cylinder holder until the pin sits in the slot on the Lactina. Then push the piston into the rub- ber clamp on the pump arm until it engages.
  • Seite 31 Screw the piston/cylinder firmly Insert the cylinder holder incl. into the cylinder holder. piston/cylinder horizontally into the opening on the front of the Lactina. Plug the power cord into the mains socket.
  • Seite 32: Expression

    7. Expression 7.1 Selecting the breast shield A correctly fitted breast shield avoids compression of any milk ducts during √ pumping to ensure optimal breast emptying and maximum milk output. To verify whether the breast shield has a correct fit: 1.
  • Seite 33: Preparing For Single Pumping

    7.2 Preparing for single pumping Insert the port cap into the unused Wipe the breast with a warm cloth opening of the cylinder holder. (do not use alcohol). Place the breast Prepare one pump set/bottle for shield on the breast so that the nipple expression.
  • Seite 34 Select a fast rhythm to stimulate the milk flow. Reduce the speed when milk comes in. Note l Always disconnect the Lactina from the power source after expression. Info Use the stand or bottle holder to prevent the bottle from tipping over.
  • Seite 35: Preparing For Double Pumping

    Switch off the breast pump Set the vacuum comfort: twist up the with vacuum regulator ring to increase the vacuum until it is slightly uncomfortable. Turn back to reduce the vacuum slightly. 7.4 Preparing for double pumping Prepare two pump sets/bottles for expres- Close the bottle with a lid or lid and sion.
  • Seite 36 7. Expression Info l Manual pumping requires a threaded pump set on the connector (reusable pump set). For this reason, manual pumping is not possible with a disposable pump set. Place one breast shield on the first breast as described in chapter 7.2, steps 2 and 3.
  • Seite 37: Manual Pumping

    7.5 Manual pumping Wipe the other breast with a warm Screw the cylinder onto the breast cloth (do not use alcohol). Place shield connector of the reusable the second breast shield on the pump set. breast so that the nipple is properly centred in the tunnel.
  • Seite 38: Storing And Thawing Breast Milk

    You can freeze expressed breast milk in milk bottles or “Pump & Save”* bags. Do not fill the bottles or bags more than 3/4 full to allow space for possible expansion. I Label the bottles or “Pump & Save” bags with the date of expression and volume of milk expressed. * More information at www.medela.com...
  • Seite 39 I With the Calesca* bottle warmer, it is possible to warm breast milk in a gentle way. Note These storing and thawing breast milk guidelines are a recommendation. National and hospital internal guidelines and standards may deviate. * More information at www.medela.com...
  • Seite 40: Troubleshooting

    The piston/cylinder is correctly screwed onto the cylinder holder or breast shield. l The cylinder holder including the piston/cylinder is correctly fitted to the Lactina. l During pumping on one side, the port cap has been inserted into the unused opening on the cylinder holder.
  • Seite 41: Warranty And Maintenance / Disposal

    Medela authorized personnel. The engineering of the Medela Lactina breast pump has been verified by independent test institutes for compliance with the EN / IEC 60601-1 standard. Copies of such certificates may be obtained on request.
  • Seite 42: Accessories List

    Ready-to-Use One-Day Lactina Pump Set, size L (27 mm) 008.0270 008.0271 Ready-to-Use One-Day Lactina Pump Set, size XL (30 mm) Symphony and Lactina One-Day Pump Set, PersonalFit breast shield size M (24 mm) 008.0179 008.0180 Symphony and Lactina One-Day Pump Set, PersonalFit breast shield size L (27 mm) 008.0181...
  • Seite 43: Other Accessories

    Lactina rubber seal 800.0634 Lactina piston 800.0661 Lactina global cylinder 800.0636 Lactina vacuum regulator ring 800.0662 Lactina global cylinder with vacuum regulator ring 800.0663 Lactina global cylinder holder 800.0664 Lactina port cap 800.0665 Lactina global cylinder holder with port cap 800.0609 Lactina piston/cylinder incl.
  • Seite 44 Inhaltsverzeichnis 1. Verwendungszweck/Zielgruppe/Kontraindikationen 2. Bedeutung der Symbole 3. Wichtige Sicherheitshinweise 4. Produktbeschreibung 5. Reinigen 6. Vorbereitung des Abpumpens 7. Abpumpen 8. Aufbewahren und Auftauen von Muttermilch 9. Problembehebung 10. Garantie und Wartung/Entsorgung 11. Zubehörliste 12. Cleaning – Country-specific regulations 13. EMC / Technical description 14.
  • Seite 45: Verwendungszweck/Zielgruppe/Kontraindikationen

    Lactina Electric Plus und Lactina Select verfügbar. Beide Modellvarianten verwenden die traditionelle Ein-Phasen-Technologie. Beide Lactina Modelle eignen sich für ein- und beidseitiges Abpumpen. Das Zubehörset kann auch als Handmilchpumpe verwendet werden. Je nach Milchpumpenmodell kann ebenfalls die Vakuumstärke und Geschwindigkeit der Pumpe eingestellt werden.
  • Seite 46: Bedeutung Der Symbole

    2. Bedeutung der Symbole Das Warnsymbol kennzeichnet alle für die Sicherheit wichtigen Anweisungen. Nichtbeachtung kann zu Verletzungen oder Schäden an der Milchpumpe führen. In Verbindung mit den folgenden Signalwörtern steht das Warnsymbol für: Achtung Kann zu schweren Verletzungen oder zum Tod führen. Vorsicht Kann zu leichten Verletzungen führen.
  • Seite 47: Symbole Auf Dem Gerät

    Dieses Symbol zeigt an, dass die Verpackung Produkte enthält, die gemäß Verord- nung 1935/2004 dazu bestimmt sind, mit Lebensmitteln in Berührung zu kommen. Dieses Symbol gibt die weltweit eindeutige Identifikationsnummer GTIN (GSI Global Trade Item Number) an. Symbole auf dem Gerät Dieses Symbol weist darauf hin, dass die Gebrauchsanweisung zu beachten ist.
  • Seite 48: Wichtige Sicherheitshinweise

    Verwenden Sie die Milchpumpe Lactina nicht beim Baden oder Duschen. l Greifen Sie niemals nach einem ins Wasser gefallenen elektrischen Gerät. Ziehen Sie sofort den Netzstecker aus der Steckdose. l Trennen Sie die Milchpumpe Lactina nach der Verwendung immer sofort von der Stromver- sorgung. ACHTUNG: Zur Vermeidung von Feuer, Stromschlägen oder schweren Verbrennungen:...
  • Seite 49: Achtung: Zur Vermeidung Von Gesundheitsrisiken Und Verminderung Des Verletzungsrisikos

    Das Abpumpen der Muttermilch reduziert oder vermeidet nicht das Risiko einer Übertragung des Virus an das Baby über die Muttermilch. I Überprüfen Sie vor jedem Gebrauch alle Teile der Milchpumpe Lactina sowie alle Teile des/r Pumpsets. l Verwenden Sie niemals Geräte, Komponenten oder Teile, die beschädigt sind.
  • Seite 50: Vorsichtsmaßnahmen

    Gefährdung darstellen. l Führen Sie keine Änderungen an Teilen der Pumpe oder des Pumpsets durch. l Verwenden Sie die Milchpumpe Lactina nicht, wenn Sie schlafen oder übermäßig müde sind. l Verwenden Sie die Milchpumpe Lactina nicht beim Betrieb von Kraftfahrzeugen.
  • Seite 51 I Legen Sie die Milchpumpe nie in Wasser oder in einen Sterilisator, da dies dauerhafte Schäden an der Milchpumpe verursachen kann. I Verwenden Sie die Medela Lactina Pumpsets nicht mit einer nicht kompatiblen Milchpumpe. I Verwenden Sie die Pumpsets nicht für einen anderen Zweck als das Abpumpen von Milch.
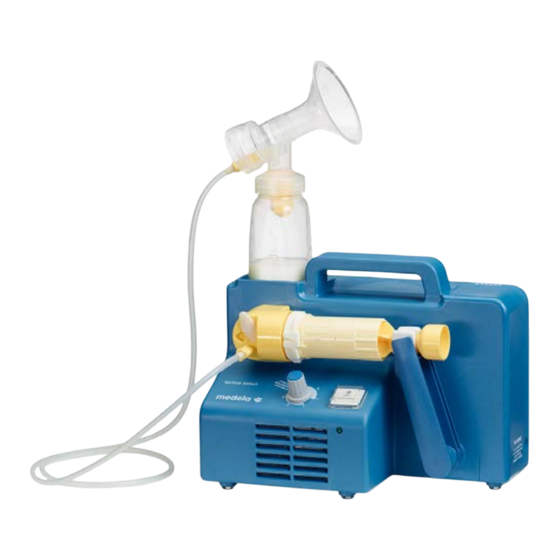
  • Seite 52: Produktbeschreibung

    Je nach Milchpumpenmodell kann ebenfalls die Vakuumstärke und Geschwindigkeit der Pumpe eingestellt werden. Benötigtes Zubehör* Die Milchpumpe Lactina muss mit den Pumpsets und Milchflaschen von Medela verwendet werden. Die Pumpsets und Flaschen gibt es als Mehrweg- und Einweg-Produkte. Mehrweg-Produkte: I Lactina Multibox für den Einsatz im Krankenhaus (50 Mehrweg-Einzelpumpsets) Einweg-Produkte: Einweg-Produkte von Medela sind für den einmaligen oder Eintages-Gebrauch in Kranken-...
  • Seite 53 4.2 Milchpumpe Lactina für den Einsatz im Krankenhaus – Zubehör* Lactina Electric Plus Lactina Select Flaschenhalter Anschluss für Autokabel Netzkabel Nur Lactina Select Die Lactina Select Milchpumpe verfügt über einen zusätzlichen Knopf zur Einstellung der Pumpgeschwindigkeit im Bereich von 40 bis 60 Zyklen pro Minute. Wählen Sie einen schnellen Pumprhythmus, um den Milchfluss zu stimulieren.
  • Seite 54 4. Produktbeschreibung 4.3 Mehrweg-Pumpset – Bestandteile (angewandte Teile)* 1x PersonalFit Brusthaube 1x PersonalFit Verbindungsstück 1x Silikonschlauch (105 cm) 2x Ventil- 1x Ventilkopf membran 1x Muttermilchflasche (150 ml) 1x Zylinderhalter 1x Standfuß für 1x Verschluss- 150-ml-Flasche stopfen 1x Kolben 1x Vakuum-Einstellring 1x Zylinder 1x Gummidichtung 1x Schutzhaube...
  • Seite 55 4.4 Mehrweg-Pumpset – Bestandteile (angewandte Teile)* 1x Brusthaube 1x Verbindungsstück 1x Verschlussstopfen 1x Kolben 1x Zylinderhalter 1x Silikonschlauch 1x Gummidich- 1x Vakuum- 1x Membran tung Einstellring 1x Zylinder Kolostrumbe- Einweg- Einweg- Einweg- hälter Flasche Flasche Flasche 35 ml 80 ml 150 ml 250 ml * Siehe Kapitel 11 für Bestellinformationen...
  • Seite 56: Reinigen

    Richtlinien des Kran- kenhauses enthalten. I Flächendesinfektionsmittel verursachen keine mechanischen Schäden an der Lactina. l Befolgen Sie die Anweisungen des Her- stellers des Flächendesinfektionsmittels. l Sorgen Sie für den Schutz der Betreiber Zur Reinigung der Milchpumpe die gemäß...
  • Seite 57: Reinigung Von Pumpsets

    Bei gegensätzlichen nationalen einem sauberen, feuchten (keines- Reinigungs- und Sterilisationsvorschrif- falls nassen) Tuch abwischen, das ten gelten diese vor den Empfehlungen mit einem Flächendesinfektionsmittel von Medela. für medizinische Geräte befeuch- tet wurde. Medela empfiehlt die Verwendung eines alkoholbasierten Oberflächenreinigers.
  • Seite 58: Reinigung Von Pumpsets - Übersicht

    5. Reinigen 5.2 Reinigung von Pumpsets – Übersicht Einweg-Flaschen und Einweg-Pumpsets (Brusthaube, Verbindungsstück, Membran, Silikonschlauch) Einweg-Pumpset und Eintages-Pumpset Einweg-Flaschen Vor dem ersten Keine Reinigung nötig Keine Reinigung nötig Gebrauch I Manuelle Reinigung (§ 5.4) Nach jeder Nach der Verwendung entsorgen Hinweis: Der Schlauch muss (§...
  • Seite 59 Solange das Pumpset bei der Mutter bleibt. Bei Milch, Kondensation oder sichtbaren Rückständen im Schlauch muss der Schlauch entsorgt und ersetzt werden. Medela empfiehlt, den Schlauch nach max. sechs Monaten zu entsorgen und zu ersetzen. Falls erforderlich gemäß nationalen, regionalen oder internen Richtlinien.
  • Seite 60 5. Reinigen 5.3 Einweg-Pumpsets und Achtung Flaschen – Reinigung l Das sterile Einweg-Pumpset ist ein Produkt Das sterile Pumpset und die Einweg- zur einmaligen Benutzung und darf nicht Flaschen (steril und Ready-to-Use) sind wiederverwendet oder aufbereitet werden. Produkte zur einmaligen Benutzung, l Das Eintages-Pumpset ist nur für die Benut- die nicht wiederverwendet oder aufbe- zung durch eine Person vorgesehen.
  • Seite 61: Einweg-Eintages-Pumpset - Reinigung

    5.4 Einweg-Eintages-Pumpset – Reinigung Überprüfen Sie, ob sich Milch im Die Brusthaube, das Verbindungsstück und Schlauch befindet. Wenn ja, muss das die Membran mit kaltem, klarem Wasser in Pumpset ersetzt werden. Falls nein, Trinkwasserqualität (ca. 20 °C) abspülen, zerlegen Sie das Pumpset in seine um Proteine zu entfernen.
  • Seite 62: Mehrweg-Pumpset - Manuelle Reinigung

    Verwenden Sie zwei Finger zum Entfer- nen der weißen Membran vom gelben Hinweis Ventilkopf und drücken Sie mit einem l Medela setzt keine maximale Anzahl von Finger leicht auf den „Knopf“. Verwendungen für ein Mehrweg-Pumpset Alle Teile auf Beschädigung kontrollieren.
  • Seite 63 Desinfektionsmittel, die keine Zusatz- Verwenden Sie ein handelsübliches stoffe enthalten und ohne Rückstände Reinigungsmittel, vorzugsweise ohne trocknen. Medela empfiehlt, den künstliche Duft- und Farbstoffe (5 – 15 % Schlauch nach max. sechs Monaten anionische Tenside, nichtionische Tensi- zu entsorgen und zu ersetzen.
  • Seite 64: Mehrweg-Pumpset - Automatische Reinigung Und Desinfektion

    Falls sich keine Milch, Kondensation oder sichtbare Rückstände im Schlauch befin- den, muss der Schlauch nicht automatisch gereinigt und desinfiziert oder sterilisiert werden. Medela empfiehlt, den Schlauch nach max. sechs Monaten zu entsorgen und zu ersetzen. Bei Milch, Kondensation oder sichtba- Falls noch nicht geschehen, zerlegen ren Rückständen im Schlauch muss der...
  • Seite 65 Aufbewahrung 93 °C Legen Sie die sauberen Teile in einen sauberen Aufbewahrungsbeutel oder an einen sauberen Ort. Es ist wichtig, dass alle feuchten Stellen trocknen. Bewahren Sie die Teile nicht in einem luftdichten Behälter/Beutel auf. Informationen zur Reinigung des Schlauchs finden Sie in Kapitel 5.7.
  • Seite 66: Vorbereitung Des Abpumpens

    Handtuch oder einem Einweg- Papierhandtuch. Hinweis l Verwenden Sie nur Originalzubehör von Öffnen Sie die Verpackung des Medela. Einweg-Pumpsets. Stecken Sie das l Das Einweg-Pumpset muss vor dem ers- Verbindungsstück auf die Brusthau- ten Gebrauch nicht gereinigt werden. be. Stecken Sie anschließend die l Bei dem wiederverwendbaren Pumpset Membran auf das Verbindungsstück...
  • Seite 67 Schrauben Sie die Einweg-Flasche auf Stülpen Sie das offene Schlauchende über das Verbindungsstück. Wählen Sie eine das hervorstehende Teil am hinteren Ende Flasche, die Ihren Bedürfnissen ent- des Verbindungsstücks. spricht. Die verfügbaren Größen sind: 35, 80, 150 oder 250 ml. Legen Sie die weiße Ventilmembran Stecken Sie den Ventilkopf mit horizontal auf den Ventilkopf.
  • Seite 68 Trocknen Sie Ihre Hände mit einem frischen Handtuch oder einem Einweg- Papierhandtuch. Schrauben Sie eine Flasche von Hinweis Medela auf das Verbindungsstück. l Verwenden Sie nur Originalzubehör von Wählen Sie eine Größe, die Ihren Medela. Bedürfnissen entspricht. l Überprüfen Sie die Teile des Pumpsets vor Gebrauch auf Abnutzung oder Beschädi-...
  • Seite 69 Stecken Sie den Schlauch in die entsprechende Öffnung im Verbindungsstück. Schieben Sie den Kolben in Schieben Sie den Vakuum- den Zylinder. Einstellring über den Zylinder.
  • Seite 70 Netzkabels mit der Stromquelle kompa- tibel ist. Montieren Sie den Verschluss- stopfen auf den Zylinderhalter. Drehen Sie den Zylinderhalter, bis der Dorn fest im Schlitz der Milchpumpe Lactina sitzt. Drücken Sie anschließend den Kolben in die Gummiklemme des Pumparms, bis er einrastet.
  • Seite 71 Schrauben Sie den Kolben/Zy- Stecken Sie den Zylinderhalter linder fest in den Zylinderhalter. inkl. Kolben/Zylinder horizontal in die Öffnung auf der Vorderseite der Lactina Milchpumpe. Stecken Sie das Netzkabel in eine Netzsteckdose ein.
  • Seite 72: Abpumpen

    7. Abpumpen 7.1 Auswahl der Brusthaube Eine korrekt sitzende Brusthaube verhindert das Abdrücken der Milchgänge während des √ Abpumpens und ermöglicht so ein optimales Entleeren der Brust und maximale Effizienz. Um zu überprüfen, ob die Brusthaube richtig sitzt: 1. Zentrieren Sie die Brustwarze im Brusthau- bentunnel.
  • Seite 73: Vorbereitung Für Das Einseitige Abpumpen

    7.2 Vorbereitung für das einseitige Abpumpen Stecken Sie den Verschlussstopfen Waschen Sie die Brust mit warmem auf die unbenutzte Öffnung des Zylin- Wasser ab (keinen Alkohol verwen- derhalters. Bereiten Sie ein Pumpset/ den). Setzen Sie die Brusthaube auf eine Flasche für das Abpumpen die Brust auf, so dass die Brustwarze vor.
  • Seite 74 Stellen Sie die Pumpgeschwindigkeit mit werden kann oder das Abpumpen dem Einstellknopf für die Geschwindig- schmerzhaft ist. keit ein (nur Lactina Select). Wählen Sie einen schnellen Pumprhythmus, um den Milchfluss zu stimulieren. Verringern Sie Hinweis die Geschwindigkeit, wenn Milch einfließt.
  • Seite 75: Vorbereitung Für Das Beidseitige Abpumpen

    Stellen Sie das Komfort-Vakuum ein: Milchpumpe mit ausschalten. Drehen Sie den Vakuum-Einstellring zur Erhöhung des Vakuums auf, bis es leicht unangenehm ist. Reduzieren Sie das Vakuum nun wieder geringfügig, indem Sie leicht zurückdrehen. 7.4 Vorbereitung für das beidseitige Abpumpen Bereiten Sie zwei Pumpsets/Flaschen Verschließen Sie die Flasche mit für das Abpumpen vor.
  • Seite 76 7. Abpumpen Info l Für das manuelle Abpumpen ist ein Pumpset mit einem Gewinde am Verbindungsstück erforderlich (Mehrweg-Pumpset). Deshalb ist manuelles Abpumpen mit einem Einweg-Pumpset nicht möglich. Setzen Sie eine Brusthaube auf die erste Brust auf, wie in Kapitel 7.2, Schritt 2 und 3, beschrieben. Beginnen Sie mit dem Abpumpen von Muttermilch, wie in Kapitel 7.3, Schritte 1 bis 3, beschrieben.
  • Seite 77: Manuelles Abpumpen

    7.5 Manuelles Abpumpen Waschen Sie die andere Brust mit Schrauben Sie den Zylinder auf einem warmen Tuch ab (keinen das Verbindungsstück der Brust- Alkohol verwenden). Setzen Sie haube des Mehrweg-Pumpsets. die zweite Brusthaube auf die Brust auf, sodass die Brustwarze gut zentriert im Tunnel liegt.
  • Seite 78: Aufbewahren Und Auftauen Von Muttermilch

    Füllen Sie Flaschen oder Beutel höchstens zu drei Viertel, um Raum für Ausdehnung zu lassen. l Beschriften Sie Milchflaschen oder „Pump & Save“-Beutel mit dem Datum, an dem Sie die Milch abgepumpt haben. * Weitere Informationen unter www.medela.com...
  • Seite 79 Fett mit der Milch zu vermischen. Schütteln oder rühren Sie die Milch nicht. l Mit dem Flaschenwärmer Calesca* können Sie die Muttermilch schonend erwärmen. Hinweis Diese Regeln für das Aufbewahren und Auftauen von Muttermilch stellen eine Empfehlung dar. Staatliche und krankenhausinterne Richtlinien können davon abweichen. * Weitere Informationen unter www.medela.com...
  • Seite 80: Problembehebung

    Der Kolben/Zylinder ist korrekt am Zylinderhalter oder der Brusthau- be aufgeschraubt. l Der Zylinderhalter einschließlich Kolben/Zylinder muss richtig auf der Milchpumpe Lactina montiert sein. l Beim einseitigen Abpumpen ist der Verschlussstopfen auf die unbe- nutzte Öffnung am Zylinderhalter aufgesetzt.
  • Seite 81: Garantie Und Wartung/Entsorgung

    Gebrauch oder Gebrauch durch unbefugte Personen entstanden sind. Routine- kontrollen und Servicearbeiten sind nur durch von Medela autorisierte Stellen auszuführen. Die Technik der Milchpumpe Lactina von Medela wurde durch unabhängige Prüfstellen im Hinblick auf die Einhaltung der Norm EN/IEC 60601-1 überprüft. Kopien der betreffenden Zertifikate sind auf Anfrage erhältlich.
  • Seite 82: Zubehörliste

    Produkt 800.0388 Lactina Einzelpumpset in PE-Beutel (Lactaset), EN DE FR IT NL Lactina Einzelpumpset in PE-Beutel (Lactaset), EN SV DA FI NO PL 800.0096 * Manche Artikel sind möglicherweise nicht in allen Ländern verfügbar. Weitere Informatio- nen über Produkte von Medela finden Sie unter www.medela.com, über die länderspezifi-...
  • Seite 83: Sonstiges Zubehör

    800.0623 Ventilmembran 800.0624 Ventil, komplett, inklusive Ersatzmembran Muttermilchflasche 150 ml 800.0625 800.0627 Deckel 800.0628 Deckeleinlage 800.0629 Kappe 600.0290 Rollstativ für die Lactina Milchpumpe 810.0291 Rollstativ mit Flaschenhalter für die Lactina Milchpumpe 600.0809 Hartschalenkoffer 928.7001 Lactina Kabelanschluss fürs Auto 600.0387 Test-Vakuummeter...
  • Seite 84 Table des matières 1. Utilisation prévue/Public concerné/Contre-indications 2. Signification des symboles 3. Recommandations importantes en matière de sécurité 4. Description du produit 5. Nettoyage 6. Préparation à la séance d’expression 7. Expression 8. Conserver et décongeler le lait maternel 9. Résolution des problèmes 10.
  • Seite 85: Utilisation Prévue/Public Concerné/Contre-Indications

    Il n’existe aucune contre-indication connue au tire-lait Lactina*. Description du produit Le Lactina est un tire-lait polyvalent ayant déjà fait ses preuves en tant qu’appareil de loca- tion et en tant que tire-lait à usage régulier dans les hôpitaux. Le tire-lait est disponible en version Lactina Electric Plus et en version Lactina Select ;...
  • Seite 86: Signification Des Symboles

    2. Signification des symboles Les symboles d’avertissement renvoient à des instructions importantes en matière de sécurité. Le non-respect de ces instructions peut provoquer des blessures ou endommager le tire-lait. Le symbole d’avertissement peut avoir différentes significations s’il est associé à l’un des termes ci-après : Avertissement Peut engendrer des blessures graves ou la mort.
  • Seite 87: Symboles Présents Sur L'appareil

    Ce symbole indique que l’emballage contient des produits destinés à entrer en contact avec des denrées alimentaires conformément au règlement N° 1935/2004. Ce symbole fait référence aux codes articles internationaux (GTIN) GSI uniques. Symboles présents sur l’appareil Ce symbole indique qu’il faut se référer au mode d’emploi. Ce symbole indique la conformité...
  • Seite 88: Recommandations Importantes En Matière De Sécurité

    Débranchez toujours le tire-lait Lactina dès que vous avez fini de l’utiliser. AVERTISSEMENT : Pour éviter les risques d’incendie, d’électrocution ou de brûlures graves : l Le tire-lait Lactina n’est pas thermorésistant : maintenez-le à distance des radiateurs et flammes nues. l N’exposez pas le bloc-moteur à la lumière directe du soleil.
  • Seite 89 (VIH) : exprimer le lait maternel ne réduit pas et n’élimine pas le risque de transmission du virus au bébé par le lait maternel. I Examinez tous les composants du tire-lait Lactina et toutes les pièces du ou des set(s) pour tire-lait avant chaque utilisation.
  • Seite 90 Ne modifiez pas les pièces du tire-lait ou du set pour tire-lait. l N’utilisez pas le tire-lait Lactina pendant votre sommeil ou en cas de forte somnolence. l N’utilisez pas le tire-lait Lactina en conduisant un véhicule à moteur.
  • Seite 91 I Ne placez jamais le tire-lait dans l’eau ou dans un stérilisateur, car cela l’endommagerait définitivement. I N’utilisez pas les sets pour tire-lait Medela Lactina avec un tire-lait incompatible. I N’utilisez pas les sets pour tire-lait à d’autres fins que l’expression du lait maternel.
  • Seite 92: Description Du Produit

    4.1 Tire-lait et accessoires Lactina pour hôpital Le Lactina est un tire-lait polyvalent ayant déjà fait ses preuves en tant qu’appareil de loca- tion et en tant que tire-lait à usage régulier dans les hôpitaux. Le tire-lait est disponible en version Lactina Electric Plus et en version Lactina Select ;...
  • Seite 93 4.2 Tire-lait Lactina pour hôpital : pièces de l’appareil* Lactina Electric Plus Lactina Select Porte-biberon Fiche de connexion Câble d’alimentation pour câble allume-cigare Lactina Select uniquement Le modèle Lactina Select est muni d’un bouton supplémentaire permettant de régler la vitesse d’aspiration (entre 40 et 60 cycles par minute).
  • Seite 94 4. Description du produit 4.3 Set réutilisable pour tire-lait : pièces détachées (pièces associées)* 1 téterelle PersonalFit 1 connecteur PersonalFit 1 tuyau en silicone (105 cm) 1 support de valve 2 membranes 1 biberon pour lait maternel (150 ml) 1 support de cylindre 1 support pour 1 obturateur...
  • Seite 95 4.4 Set à usage unique pour tire-lait : pièces détachées (pièces associées)* 1 téterelle 1 raccord 1 obturateur 1 piston 1 support de cylindre 1 tuyau en silicone 1 joint en 1 bague de 1 membrane caoutchouc régulation de l’aspiration 1 cylindre contenant biberon à...
  • Seite 96: Nettoyage

    à l’hôpital pour le nettoyage de matériel à patients multiples. I Les produits désinfectants de surface n’endommagent pas la mécanique du tire-lait Lactina. I Respectez les instructions du fournisseur de produits désinfectants de surface. I Assurez la protection individuelle des opérateurs conformément aux recom-...
  • Seite 97 à chaque pays, consultez le chapitre 12. Medela a procédé à des essais avant de valider et de recommander les pro- cédures de retraitement automatisées qui y figurent. En cas de nettoyage auto- matique, l’hôpital doit également valider...
  • Seite 98 5. Nettoyage 5.2 Nettoyage des sets pour tire-lait : présentation Biberons à usage unique et sets à usage unique pour tire-lait (téterelle, raccord, membrane, tubulure en silicone) Set à usage unique pour tire-lait et biberons à Sets pour tire-lait One-Day usage unique Avant une première...
  • Seite 99 Tant que les sets pour tire-lait restent attribués à la mère. En cas de présence de traces de lait, de condensation ou de résidus visibles dans la tubulure, cette dernière doit être mise au rebut ou remplacée. Medela recommande de jeter ou remplacer la tubulure après maximum six mois.
  • Seite 100 5. Nettoyage 5.3 Sets à usage unique pour Avertissement tire-lait et biberons à usage unique - Nettoyage l Le set pour tire-lait à usage unique stérile est un produit à usage unique qui ne doit pas être réutilisé ni retraité. Le set pour tire-lait stérile et les l Le set pour tire-lait One-Day est un produit biberons à...
  • Seite 101 5.4 Set pour tire-lait à usage unique One-Day - Nettoyage Vérifiez si le tuyau contient du lait. Si Rincez la téterelle, le raccord et la c’est le cas, remplacez le set pour membrane à l’eau claire, potable et froide tire-lait. Sinon, démontez le set pour (env.
  • Seite 102 Pour retirer la membrane blanche Remarque de la valve jaune, utilisez deux doigts dont l’un pousse doucement sur I Medela ne définit pas un nombre d’uti- le « bouton ». lisations maximales adapté pour le set Vérifiez qu’aucune pièce n’est réutilisable pour tire-lait ni pour ses pièces...
  • Seite 103 15 % d’agents tensioactifs anioniques, sécher sans laisser aucun résidu. non ioniques, de pH neutre). Rincez les Medela recommande de jeter ou pièces à l’eau claire, potable et froide remplacer la tubulure après maximum (env. 20 °C).
  • Seite 104 à un net- toyage et à une désinfection automatisés, ni à une stérilisation. Medela recommande de jeter ou remplacer la tubulure après maximum six mois. En cas de présence de traces de lait, de Si ce n’est pas encore fait, démontez...
  • Seite 105 Conservation 93 °C Placez toutes les pièces propres dans un sac de rangement propre ou à un endroit propre. Il est important que toute l’humidité résiduelle sèche. Ne stockez pas les pièces dans un conteneur ou un sac hermétique. Pour le nettoyage de la tubulure, consultez le chapitre 5.7.
  • Seite 106: Préparation À La Séance D'expression

    Séchez-vous les mains à l’aide d’une serviette parfaitement propre ou d’un essuie-tout à usage unique. Remarque l N’utilisez que des accessoires Medela Ouvrez l’emballage du set à usage originaux. unique pour tire-lait. Poussez le raccord l Il n’est pas nécessaire de nettoyer le set à...
  • Seite 107 Vissez un biberon à usage unique sur le Enfoncez l’extrémité du tuyau sur la raccord. Choisir un biberon répondant partie saillante derrière le connecteur. aux besoins. Capacités disponibles : 35 ml, 80 ml, 150 ml et 250 ml. Placez la membrane blanche à l’hori- Poussez la valve et la membrane zontale sur la valve.
  • Seite 108 Séchez-vous les mains à l’aide d’une serviette parfaitement propre ou d’un essuie-tout à usage unique. Vissez un biberon Medela sur le Remarque raccord. Choisissez une taille l N’utilisez que des accessoires Medela correspondant à...
  • Seite 109 Introduisez un embout du tuyau dans l’orifice prévu à cet effet sur le connecteur. Glissez le piston dans le cylindre. Glissez le régulateur de l’aspira- tion sur le cylindre.
  • Seite 110 6. Préparation à la séance d’expression Avertissement l pour l’étape 8 (section 6.3) : l Utilisez exclusivement le câble d’alimenta- tion fourni avec le tire-lait Lactina. l Assurez-vous que la tension du cordon d’alimentation est compatible avec celle de l’alimentation électrique.
  • Seite 111 Vissez le piston/cylindre solide- Insérez le support de cylindre ment sur le support de cylindre. vissé au piston/cylindre horizon- talement dans l’orifice situé à l’avant du tire-lait. Branchez le cordon d’alimenta- tion sur la prise électrique.
  • Seite 112: Expression

    7. Expression 7.1 Sélection de la téterelle Une téterelle à la bonne taille évite la com- pression de canaux galactophores pendant √ l’expression ; ainsi le sein est vidé de façon optimale, avec une efficacité maximale. Pour vérifier si la téterelle s’adapte correctement : 1.
  • Seite 113 7.2 Préparation à une séance d’expression simple Placez le bouchon d’orifice sur Essuyez-vous légèrement le sein avec l’ouverture inutilisée du support un linge tiède (n’utilisez pas d’alcool). de cylindre. Préparez un biberon/ Placez la téterelle sur le sein de sorte set pour tire-lait pour l’expression.
  • Seite 114 Choisissez un rythme rapide afin de stimuler l’écoulement de lait. Lorsque celui-ci com- mence à s’écouler, réduisez la vitesse. Remarque l Déconnectez toujours le tire-lait Lactina de la source d’alimentation après l’expression. Info l Ne pliez pas le tuyau pendant l’expression.
  • Seite 115 Réglage du niveau de vide de confort : tour- Désactivez le tire-lait en appuyant sur le bouton nez la bague de régulation d’aspiration vers le haut pour augmenter la force d’aspiration jusqu’à ce qu’elle devienne légèrement incon- fortable. Tournez alors la bague de régulation de l’aspiration dans le sens inverse pour réduire un peu la force.
  • Seite 116 7. Expression Info l Si vous souhaitez effectuer une expression manuelle avec le set d’accessoires, vous devez visser le piston/cylindre sur le pas de vis de la téterelle (set réutilisable pour tire-lait). Pour cette raison, l’expression ma- nuelle est impossible avec un set pour tire-lait à...
  • Seite 117 7.5 Expression manuelle Essuyez-vous l’autre sein avec un Vissez le cylindre sur le connec- linge tiède (n’utilisez pas d’alcool). teur de la téterelle du set pour Placez l’autre téterelle sur le sein tire-lait à usage unique. de manière à centrer correcte- ment le mamelon dans l’embout.
  • Seite 118: Conserver Et Décongeler Le Lait Maternel

    « Pump & Save »*. Remplissez les biberons ou sachets aux 3/4 maximum, de façon à laisser de l’espace pour l’expansion éventuelle du lait. I Inscrivez la date d’expression et le volume de lait exprimé sur les biberons ou sachets « Pump & Save ». * Pour plus d’informations, consultez le site www.medela.com...
  • Seite 119 I Le chauffe-biberon Calesca* permet de réchauffer progressivement le lait maternel. Remarque Ces règles de conservation et de décongélation du lait maternel sont des recommanda- tions. Les règles et normes nationales et internes aux hôpitaux peuvent être différentes. * Pour plus d’informations, consultez le site www.medela.com...
  • Seite 120: Résolution Des Problèmes

    Le support cylindre bien vissé au piston/cylindre doit être correcte- ment positionné sur le tire-lait Lactina. l Durant l’expression simple, l’obturateur doit être inséré dans le second orifice inutilisé situé sur le support de cylindre.
  • Seite 121: Garantie Et Entretien/Mise Au Rebut

    être exécutés que par des sites Medela agréés. La conception du tire-lait Lactina de Medela a été vérifiée par des organismes de contrôle indépendants et répond à la norme EN/CEI 60601-1 Des copies des certificats de confor- mité...
  • Seite 122: Liste Des Accessoires

    008.0270 008.0271 Set One-Day Ready-to-Use pour tire-lait Lactina, taille XL (30 mm) Set One-Day pour tire-lait Symphony et Lactina, téterelle PersonalFit taille M (24 mm) 008.0179 008.0180 Set One-Day pour tire-lait Symphony et Lactina, téterelle PersonalFit taille L (27 mm) 008.0181...
  • Seite 123: Autres Accessoires

    Biberon pour lait maternel, 150 ml 800.0625 800.0627 Couvercle 800.0628 Disque de transport 800.0629 Capuchon de protection 600.0290 Pied à roulettes pour Lactina 810.0291 Pied à roulettes avec porte-biberon pour Lactina 600.0809 Étui rigide 928.7001 Câble allume-cigare pour Lactina 600.0387 Vacuomètre d’essai...
  • Seite 124 Indice 1. Uso previsto/Destinatari/Controindicazioni 2. Significato dei simboli 3. Importanti informazioni di sicurezza 4. Descrizione del prodotto 5. Pulizia 6. Preparazione all’estrazione del latte 7. Estrazione 8. Conservazione e scongelamento di latte materno 9. Risoluzione dei problemi 10. Garanzia e manutenzione / smaltimento 11.
  • Seite 125: Uso Previsto/Destinatari/Controindicazioni

    Sono disponibili i modelli Lactina Electric Plus e Lactina Select, entrambi funzionanti con il sistema di estrazione one-phase. Entrambi i modelli Lactina sono adatti sia per l’estrazione singola, sia doppia. Il set di accessori può essere utilizzato come tiralatte manuale. In base al modello di tiralatte, è possibile anche impostare il livello di vuoto e la velocità...
  • Seite 126: Significato Dei Simboli

    2. Significato dei simboli Il simbolo di avvertenza identifica tutte le istruzioni importanti per la sicurezza. La mancata osservanza di tali istruzioni può comportare lesioni o danni al tiralatte. Abbinato ai seguenti termini, il simbolo di avvertenza assume i significati descritti di seguito. Avvertenza Può...
  • Seite 127 Questo simbolo indica che la confezione contiene prodotti destinati a venire a contatto con alimenti secondo il regolamento 1935/2004. Questo simbolo indica il codice univoco GSI Global Trade Item Number (GTIN). Simboli sul dispositivo Questo simbolo indica di osservare le istruzioni per l’uso. Questo simbolo indica la conformità...
  • Seite 128: Importanti Informazioni Di Sicurezza

    Scollegare sempre il tiralatte Lactina subito dopo l’uso. AVVERTENZA: Per evitare incendi, folgorazioni o ustioni gravi: l Il tiralatte Lactina non è resistente al calore: tenere lontano da radiatori e fiamme libere. l Non esporre l’unità motore alla luce diretta del sole.
  • Seite 129 Controllare tutti i componenti del tiralatte Lactina e del/i set per tiralatte prima di ogni utilizzo. l Non utilizzare mai dispositivi, parti o componenti danneggiati.
  • Seite 130 Non far cadere o inserire oggetti in qualsiasi apertura o tubicino. l Non utilizzare all’aperto. l È necessaria una supervisione se il tiralatte Lactina viene usato in prossimità di bambini. l Gli apparecchi di comunicazione a radiofrequenza, portatili o mobili, possono disturbare il tiralatte Lactina.
  • Seite 131 Non mettere mai il tiralatte in acqua o in uno sterilizzatore poiché il dispositivo subirebbe un danno permanente. l Non utilizzare i set per tiralatte Lactina Medela con un tiralatte non compatibile. l Non utilizzare i set per tiralatte per un uso diverso dall’estrazione di latte materno.
  • Seite 132: Descrizione Del Prodotto

    Accessori necessari* Il tiralatte Lactina deve essere adoperato con i set per tiralatte e le bottiglie per latte Medela. I set per tiralatte e le bottiglie sono disponibili in confezioni sia riutilizzabili che ad utilizzo limitato.
  • Seite 133 4.2 Tiralatte Lactina per uso ospedaliero – Componenti del prodotto* Lactina Electric Plus Lactina Select Porta bottiglia Presa per il cavo di colle- Cavo di alimentazione gamento all’automobile Solo Lactina Select Il modello Lactina Select dispone di una manopola aggiuntiva per regolare la velocità...
  • Seite 134 4. Descrizione del prodotto 4.3 Set per tiralatte riutilizzabile – Componenti del prodotto (parti applicate)* 1 coppa per il seno PersonalFit 1 connettore PersonalFit 1 tubicino in silicone (105 cm) 2 membrane 1 testa della valvola della valvola 1 bottiglia per latte materno (150 ml) 1 porta cilindro 1 supporto per...
  • Seite 135 4.4 Set per tiralatte ad utilizzo limitato – Componenti del prodotto (parti applicate)* 1 coppa per il seno 1 connettore 1 tappo per porta di collegamento 1 pistone 1 porta cilindro 1 tubicino in silicone 1 guarnizione 1 anello di 1 membrana in gomma regolazione...
  • Seite 136: Pulizia

    Gli agenti disinfettanti di superficie per dispositivi medici non provocano danni meccanici al tiralatte Lactina. l Seguire le istruzioni del fornitore di agenti disinfettanti di superficie. l Fornire la protezione individuale agli operatori in conformità...
  • Seite 137 12. Le procedure di rigenerazione au- disinfettare tomatizzata in elenco sono testate, convalidate e raccomandate da Medela. In caso di pulizia automatizzata, è necessaria anche la convalida interna della procedura preferita dall’ospedale. In caso di requisiti di sterilizzazione e...
  • Seite 138: Prima Del Primo Utilizzo

    5. Pulizia 5.2 Pulizia dei set per tiralatte – Panoramica Bottiglie ad utilizzo limitato e set per tiralatte ad utilizzo limitato (coppa per il seno, connettore, membrana, tubicino in silicone) Set per tiralatte e bottiglie Set giornalieri per tiralatte monouso One-Day Prima del primo Pulizia non necessaria...
  • Seite 139 In caso di presenza di latte, condensa o residui visibili nel tubicino, questo deve essere smaltito e sostituito. Medela raccomanda lo smaltimento e la sostituzione del tubicino dopo un massimo di 6 mesi. Se richiesto dalle norme nazionali, regionali o interne alla struttura.
  • Seite 140 5. Pulizia 5.3 Set per tiralatte monouso Avvertenza e bottiglie monouso – Pulizia l Il set per tiralatte monouso sterile è un prodot- to monouso e non deve essere riutilizzato né rigenerato. Il set per tiralatte sterile e le bottiglie ad l Il set per tiralatte giornaliero è...
  • Seite 141 5.4 Set per tiralatte giornaliero ad utilizzo limitato One-Day – Pulizia Verificare se nel tubicino è presente Risciacquare la coppa per il seno, il connet- latte. In questo caso, sostituire il set per tore e la membrana con acqua potabile pulita tiralatte.
  • Seite 142 Note „manopola“. l Medela non indica il numero massimo di Controllare l’eventuale danneggiamento utilizzi per un set per tiralatte riutilizzabile o dei componenti. per i suoi singoli componenti, ad eccezio- Sostituire i componenti danneggiati o ne del tubicino.
  • Seite 143 Medela raccomanda artificiali (5–15% tensioattivi anioni- lo smaltimento e la sostituzione del ci, tensioattivi non ionici, pH neutro).
  • Seite 144 Se non vi sono residui visibili oppure conden- sa o latte nel tubicino, non è necessario effet- tuare la pulizia e la disinfezione automatizzate né sterilizzare il tubicino. Medela raccomanda lo smaltimento e la sostituzione del tubicino dopo un massimo di 6 mesi.
  • Seite 145 Conservazione 93 °C Riporre i componenti puliti in una borsa di conservazione pulita o in un ambien- te pulito. È importante far asciugare tutta l’umidità residua. Non conservare i componenti in contenitori/borse a chiusura ermetica. Per la pulizia del tubicino, vedere il capi- tolo 5.7.
  • Seite 146: Preparazione All'estrazione Del Latte

    Note l Utilizzare esclusivamente accessori origi- Aprire la confezione del set per nali Medela. tiralatte ad utilizzo limitato. Spingere l Il set per tiralatte ad utilizzo limitato non il connettore nella coppa per il seno. necessita di pulizia prima del primo Quindi, spingere la membrana sul utilizzo.
  • Seite 147 Avvitare una bottiglia ad utilizzo limitato Spingere l’estremità aperta del tubicino sul al connettore. Scegliere una bottiglia componente sporgente situato nella parte che si adatti alle esigenze individuali. posteriore del connettore. Le misure disponibili sono 35, 80, 150 e 250 ml. Posizionare la membrana in posizione Inserire la testa della valvola e la orizzontale sulla testa della valvola.
  • Seite 148 Asciugare le mani con un asciugamano pulito o una salvietta di carta usa e getta. Note Avvitare una bottiglia Medela al con- nettore. Scegliere una misura che si l Utilizzare esclusivamente accessori originali adatti alle esigenze individuali.
  • Seite 149 Inserire una estremità del tubi- cino nell’apposita apertura nel connettore. Inserire il pistone nel cilindro. Inserire l’anello di regolazione vuoto sopra il cilindro.
  • Seite 150 Applicare il tappo della porta di collegamento al porta cilindro. Ruotare il porta cilindro finché il perno non si innesta nella scana- latura di Lactina. Quindi spingere il pistone nella staffa in gomma sul braccio dell’unità finché non è saldo in sede.
  • Seite 151 Avvitare saldamente il pistone/ Inserire il porta cilindro, inclusi cilindro nel porta cilindro. pistone/cilindro, orizzontalmente nell’apertura situata nella parte anteriore di Lactina. Collegare il cavo di alimentazione alla presa di corrente.
  • Seite 152: Estrazione

    7. Estrazione 7.1 Scelta della coppa per il seno Una coppa per il seno correttamente dimen- sionata impedisce la compressione dei dotti √ lattiferi durante l’estrazione, assicurando un ottimale svuotamento del seno e il massimo flusso di latte. Per verificare che la coppa per il seno aderi- sca correttamente: 1.
  • Seite 153: Preparazione All'estrazione Singola

    7.2 Preparazione all’estrazione singola Inserire il tappo della porta di collega- Pulire il seno con una salvietta tiepida mento sull’apertura non utilizzata del (non usare alcool). Posizionare la porta cilindro. coppa sul seno in modo tale che il Preparare un set per tiralatte/una capezzolo si trovi correttamente al bottiglia per l’estrazione.
  • Seite 154 Accendere il tiralatte con l’estrazione risulta dolorosa. Regolare la velocità di estrazione con la manopola di regolazione della velocità (soltanto per Lactina Select). Selezionare un ritmo veloce per stimolare il flusso del latte. Ridurre la velocità quando compare il latte Note all’interno.
  • Seite 155: Preparazione All'estrazione Doppia

    Impostare il proprio „vuoto confortevole“: Spegnere il tiralatte con ruotare verso l’alto l’anello di regolazione vuoto per aumentare il vuoto fino a quando diventa leggermente sgradevole. Ruotare in senso inverso per ridurre leggermente il vuoto. 7.4 Preparazione all’estrazione doppia Preparare due set per tiralatte/bottiglie per Chiudere la bottiglia con un coper- l’estrazione.
  • Seite 156 7. Estrazione Informazioni l L’aspirazione manuale richiede un set per tiralatte collegato al connettore (set per tiralatte riutilizzabile). Per tale motivo, l’aspirazione manuale non è possibile con il set per tiralatte ad utilizzo limitato. Posizionare una coppa sul seno come descritto al capitolo 7.2, fasi 2 e 3.
  • Seite 157 7.5 Aspirazione manuale Pulire l’altro seno con una salvietta Avvitare il cilindro sul connettore tiepida (non usare alcool). Posizio- della coppa per il seno posta sul nare la seconda coppa sul seno in set per tiralatte riutilizzabile. modo che il capezzolo sia corret- tamente centrato nel condotto.
  • Seite 158: Conservazione E Scongelamento Di Latte Materno

    „Pump & Save“*. Non riempire le bottiglie o le sacche per più di 3/4, in modo da lasciare spazio per un’eventuale dilatazione del latte. l Etichettare le bottiglie o le sacche „Pump & Save“ con la data di estrazione e il volume di latte estratto. * Ulteriori informazioni sul sito www.medela.com...
  • Seite 159 Con il dispositivo di riscaldamento e scongelamento Calesca*, è possibile scaldare delicatamente il latte materno. Note Le presenti linee guida per la conservazione e lo scongelamento del latte materno sono sem- plicemente consigli. Possono differire dalle linee guida e dagli standard interni dell’ospedale. * Ulteriori informazioni sul sito www.medela.com...
  • Seite 160: Risoluzione Dei Problemi

    Il porta cilindro, pistone/cilindro compresi, deve essere applicato correttamente a Lactina. l Durante l’estrazione da un solo lato, il tappo della porta di collegamen- to deve essere inserito nell’apertura non utilizzata del porta cilindro.
  • Seite 161: Garanzia E Manutenzione / Smaltimento

    Medela. L’ingegnerizzazione del tiralatte Medela Lactina è stata verificata da istituti di ricerca indipendenti per accertarne la conformità alla norma EN / IEC 60601-1. Copie dei suddetti certificati sono disponibili su richiesta.
  • Seite 162: Elenco Accessori

    800.0388 800.0096 Set singolo per tiralatte Lactina in sacchetto di polietilene (Lactaset), EN SV DA FI NO PL * Gli articoli possono non essere disponibili in tutti i Paesi. Per ulteriori informazioni sui prodotti Medela e per trovare i rivenditori più vicini, visitare il sito www.medela.com.
  • Seite 163: Altri Accessori

    Cilindro globale Lactina con anello di regolazione vuoto 800.0663 Porta cilindro globale Lactina 800.0664 Tappo per porta di collegamento Lactina 800.0665 Porta cilindro globale Lactina con tappo per porta di collegamento 800.0609 Pistone/cilindro Lactina incluso il porta cilindro 800.0622 Testa della valvola 800.0623 Membrana della valvola 800.0624...
  • Seite 164 Inhoudsopgave 1. Beoogd gebruik / populatie / contra-indicatie 2. Betekenis van de symbolen 3. Belangrijke veiligheidsinformatie 4. Productomschrijving 5. Reiniging 6. Voorbereidingen voor het afkolven 7. Afkolven 8. Moedermelk bewaren en ontdooien 9. Problemen oplossen 10. Garantie en onderhoud / afvalverwijdering 11.
  • Seite 165: Beoogd Gebruik / Populatie / Contra-Indicatie

    Lactina Electric Plus en de Lactina Select. Deze maken beide gebruik van de traditionele 1-fase-afkolftechnologie. De beide modellen van de Lactina zijn geschikt voor enkel en dubbel afkolven. De acces- soires kunnen ook worden gebruikt als handkolf. Afhankelijk van het model van borstkolf dat je kiest, kun je het vacuümniveau en de afkolfsnelheid individueel instellen.
  • Seite 166: Betekenis Van De Symbolen

    2. Betekenis van de symbolen Het waarschuwingssymbool geeft belangrijke veiligheidsinstructies aan. Als deze instructies niet in acht worden genomen, kan dat letsel of schade aan de borstkolf veroorzaken. Indien het waarschuwingssymbool wordt gebruikt in combinatie met de volgende woorden, staat het voor: Waarschuwing Kan leiden tot ernstig letsel of overlijden.
  • Seite 167: Symbolen Op Het Apparaat

    Dit symbool geeft aan dat de verpakking goedgekeurd is om in contact te komen met levensmiddelen conform EG-verordening 1935/2004. Dit symbool verwijst naar de unieke GSI-identificatie van handelseenheden (GTIN) (barcodes). Symbolen op het apparaat Dit symbool geeft aan dat de gebruiksaanwijzing gevolgd moet worden. Dit symbool geeft de conformiteit aan met de essentiële eisen van Richtlijn 93/42/EEG van de Raad van 14 juni 1993 betreffende medische hulpmiddelen.
  • Seite 168: Belangrijke Veiligheidsinformatie

    Pak een elektrisch apparaat dat in het water is gevallen niet vast. Trek onmiddellijk de stekker uit het stopcontact. l Trek onmiddellijk na gebruik van de Lactina borstkolf de stekker uit het stopcontact. WAARSCHUWING: Om vuur, elektrocutie of ernstige brandwonden te voorkomen: l De Lactina borstkolf is niet hittebestendig: weghouden van radiatoren en open vuur.
  • Seite 169 Reparatiewerkzaamheden mogen alleen door een bevoegde servicedienst worden uitgevoerd. Repareer de onderdelen niet zelf! Aan het apparaat mogen geen wijzigingen worden aangebracht. l Gebruik de Lactina borstkolf alleen voor het doel waarvoor hij bestemd is, zoals beschre- ven in deze gebruiksaanwijzing.
  • Seite 170 Steek nooit een voorwerp in enige opening of slang en laat er geen voorwerp in vallen. l Gebruik de borstkolf niet buitenshuis. l Er is toezicht vereist als de Lactina borstkolf in de buurt van kinderen wordt gebruikt. l De radiofrequenties van mobiele communicatieapparatuur kunnen een negatieve invloed hebben op de Lactina borstkolf.
  • Seite 171 I Dompel de borstkolf nooit onder in water of in een sterilisator omdat dit permanente schade aan de borstkolf kan veroorzaken. I Gebruik de Medela Lactina afkolfsets niet met een niet-compatibele borstkolf. I Gebruik de afkolfsets niet voor andere doeleinden dan het afkolven van moedermelk.
  • Seite 172: Productomschrijving

    4. Productomschrijving 4.1 Lactina borstkolf en accessoires voor gebruik in ziekenhuizen De Lactina is een flexibele borstkolf met een bewezen staat van dienst voor regelmatig gebruik in ziekenhuizen of als verhuurkolf. De kolf is beschikbaar in twee modellen, de Lactina Electric Plus en de Lactina Select. Deze maken beide gebruik van de traditionele 1-fase-afkolftechnologie.
  • Seite 173 Netsnoer Alleen bij de Lactina Select De Lactina Select heeft een extra knop om de afkolfsnelheid te regelen tussen 40 en 60 cycli per minuut. Kies een snel kolfritme om de melkstroom te stimuleren. Verlaag de snelheid als de melk begint te stromen.
  • Seite 174 4. Productomschrijving 4.3 Herbruikbare afkolfset – Productonderdelen (toegepaste onderdelen)* 1x PersonalFit borstschild 1x PersonalFit connector 1x silicone slang (105 cm) 2x membraan 1x vacuümklep van de vacuümklep 1x moedermelkflesje (150 ml) 1x cilinderhouder 1x standaard voor 1x poortafdekking fles van 150 ml 1x zuiger 1x vacuüminstelring 1x cilinder...
  • Seite 175 4.4 Disposable afkolfset – Productonderdelen (toegepaste onderdelen)* 1x borstschild 1x connector 1x poortafdekking 1x zuiger 1x cilinderhouder 1x silicone slang 1x rubberen 1x vacuüminstelring 1x membraan afdichting 1x cilinder colostrum- disposable disposable disposable container flesje flesje flesje 35 ml 80 ml 150 ml 250 ml * Zie hoofdstuk 11 voor bestelinformatie...
  • Seite 176: Reiniging

    We verwijzen naar het zieken- huisbeleid voor het reinigen van gedeelde apparatuur. I Oppervlakteontsmettingsmiddelen ver- oorzaken geen mechanische schade aan de Lactina. I Volg de instructies van de leverancier van de oppervlakteontsmettingsmiddelen. I Verstrek persoonlijke beschermingsmid- delen voor operators conform de instruc-...
  • Seite 177: Afkolfsets Reinigen - Overzicht

    De vermelde automatische procedures desinfecteren om het apparaat opnieuw klaar te ma- ken voor gebruik zijn getest, gevalideerd en aanbevolen door Medela. Bij auto- matische reiniging is ook een interne validatie van de voorkeursprocedure van het ziekenhuis nodig. Indien er nationale...
  • Seite 178 5. Reiniging 5.2 Afkolfsets reinigen – Overzicht Disposable flessen en disposable afkolfsets (borstschild, connector, membraan, silicone slang) Afkolfset voor eenmalig gebruik en flessen voor Afkolfsets voor één dag eenmalig gebruik Vóór het eerste Geen reiniging vereist Geen reiniging vereist gebruik I Handmatige reiniging (§5.4) Na elk gebruik Wegwerpen na gebruik (§5.3)
  • Seite 179 Als er zich melk, condens of zichtbare resten in de slang bevinden, moet de slang weggeworpen en ver- vangen worden. Medela adviseert om de slang na max. zes maanden weg te werpen en te vervangen. Indien vereist door nationale, regionale of interne voorschriften.
  • Seite 180 5. Reiniging 5.3 Disposable afkolfsets en Waarschuwing flessen voor eenmalig gebruik – Reiniging l De steriele afkolfset voor eenmalig gebruik is een product voor eenmalig gebruik en mag niet opnieuw worden gebruikt of opnieuw De steriele afkolfset en disposable worden klaargemaakt voor gebruik. flessen (steriel en Ready-to-Use) zijn l De afkolfset voor één dag is een product voor producten voor eenmalig gebruik die...
  • Seite 181 5.4 Disposable afkolfset voor één dag – Reiniging Controleer of er melk in de slang zit. Spoel het borstschild, de connector en het Vervang de afkolfset als dit het geval membraan met koud, schoon water van is. Als dat niet het geval is, haal je de drinkkwaliteit van circa 20 °C om de eiwitten afkolfset uit elkaar tot losse onderdelen te verwijderen.
  • Seite 182 Bewaar de schone onderdelen in een raat te bepalen. Medela raadt aan om de schone bewaarzak of in een schone silicone slang na max. zes maanden weg te omgeving.
  • Seite 183 (5-15% resten achter te laten. Medela advi- anionisch tenside, niet-ionisch tenside, seert om de slang na max. zes maan- pH-neutraal). Spoel de onderdelen met den weg te werpen en te vervangen.
  • Seite 184 Als er zich geen melk, condens of zichtba- re resten in de slang bevinden, hoeft deze niet automatisch te worden gereinigd en gedesinfecteerd of gesteriliseerd. Medela adviseert om de slang na max. zes maan- den weg te werpen en te vervangen.
  • Seite 185 Bewaren 93 °C Bewaar de schone onderdelen in een schone bewaarzak of in een schone omgeving. Het is belangrijk dat al het achtergebleven vocht opdroogt. Bewaar de onderdelen niet in een luchtdichte verpakking/zak. Zie hoofdstuk 5.7 voor meer informatie over het reinigen van de slang.
  • Seite 186: Voorbereidingen Voor Het Afkolven

    Opmerking l Gebruik alleen originele accessoires van Medela. Open de verpakking van de disposa- l De disposable afkolfset hoeft niet te wor- ble afkolfset. Druk de connector op den gereinigd voor het eerste gebruik.
  • Seite 187 Schroef een disposable fles op de con- Druk het open uiteinde van de slang op nector. Kies een fles die bij je behoeften het uitstekende deel aan de achterkant past. Verkrijgbaar in de maten 35, 80, van de connector. 150 en 250 ml. Plaats het witte membraan horizontaal Duw de combinatie vacuümklep/ op de vacuümklep.
  • Seite 188: Zuiger/Cilinder In Elkaar Zetten

    Droog je handen af met een schone, ongebruikte handdoek of een papieren handdoek voor eenmalig gebruik. Schroef een fles van Medela op de Opmerking connector. Kies een maat die bij je l Gebruik alleen originele accessoires van behoeften past.
  • Seite 189 Steek een uiteinde van de slang in de corresponderende opening van de connector. Schuif de zuiger in de cilinder. Schuif de vacuüminstelring op de cilinder.
  • Seite 190 Plaats de poortafdekking op de cilinderhouder. Draai de pin van de cilinder- houder in de corresponderende opening op de Lactina. Druk de zuiger vervolgens in de rubberen klem op de arm van de afkolfset totdat hij vastklikt.
  • Seite 191 Schroef de zuiger/cilinder vast Steek de cilinderhouder incl. in de cilinderhouder. zuiger/cilinder horizontaal in de opening aan de voorkant van de Lactina. Sluit het netsnoer aan op het stopcontact.
  • Seite 192: Afkolven

    7. Afkolven 7.1 Het borstschild kiezen Een goed passend borstschild voorkomt het samendrukken van melkkanalen tijdens het √ afkolven, zodat de borst zo leeg mogelijk wordt en de hoeveelheid afgekolfde melk maximaal is. Je kunt als volgt controleren of het borst- schild goed past: 1.
  • Seite 193 7.2 Voorbereiding voor enkel afkolven Steek de poortafdekking in de onge- Veeg de borst af met een warme bruikte opening van de cilinderhou- doek (gebruik geen alcohol). Plaats der. Zet één fles en afkolfset klaar om het borstschild op de borst met de af te kolven.
  • Seite 194 Lactina Select). Kies een snel ritme om de melkstroom te stimuleren. Verlaag de snelheid als de melk begint te stromen. Opmerking l Haal de stekker van de Lactina na het afkolven altijd direct uit het stopcontact. Info l Zorg ervoor dat de slang tijdens het afkol- Gebruik de flesstandaard of de fleshou- ven niet knikt.
  • Seite 195: Voorbereiding Voor Dubbel Afkolven

    Schakel de borstkolf uit door de Comfortabel vacuüm instellen: draai de knop in te drukken. vacuüminstelring omhoog om het vacuüm te verhogen totdat het enigszins oncom- fortabel is. Draai terug om het vacuüm iets te verlagen. 7.4 Voorbereiding voor dubbel afkolven Zet twee afkolfsets/flessen klaar om af Sluit de fles af met een deksel of te kolven.
  • Seite 196 7. Afkolven Info l Handmatig afkolven vereist een bedrade afkolfset op de connector (herbruikbare afkolfset) Om die reden is handmatig afkolven niet mogelijk met de disposable afkolfset. Plaats een borstschild op de borst zoals omschreven in hoofdstuk 7.2, stappen 2 en 3. Start met het afkolven van moedermelk zoals beschreven in hoofdstuk 7.3, stappen 1-3.
  • Seite 197 7.5 Handmatig afkolven Veeg de andere borst af met een Schroef de cilinder op de warme doek (gebruik geen alcohol). borstschildconnector van Plaats het tweede borstschild op de herbruikbare afkolfset. de borst zodanig dat de tepel zich centraal in de schacht bevindt. Draai de vacuüminstelring omhoog Positioneer het borstschild zoals om het vacuüm te verhogen totdat het...
  • Seite 198: Moedermelk Bewaren En Ontdooien

    Vul de flesjes of zakken niet meer dan voor 3/4 zodat de melk kan uitzetten. l Label de flesjes of ‚Pump & Save’ zakken met de afkolfdatum en de hoeveelheid afgekolfde melk. * Meer informatie vind je op www.medela.com...
  • Seite 199 Met behulp van de flessenwarmer Calesca* is het mogelijk moedermelk geleidelijk te verwarmen. Opmerking Deze richtlijnen voor bewaren en ontdooien van moedermelk zijn aanbevelingen. Nationale en interne ziekenhuisrichtlijnen en -normen kunnen hiervan afwijken. * Meer informatie vind je op www.medela.com...
  • Seite 200: Problemen Oplossen

    De rubberen afdichting is correct verbonden met de zuiger. l De zuiger/cilinder is correct op de cilinderhouder of op het borst- schild geschroefd. l De cilinderhouder met de zuiger/cilinder is correct op de Lactina geplaatst. l Tijdens enkel afkolven is de poortafdekking in de ongebruikte ope- ning op de cilinderhouder gestoken.
  • Seite 201: Garantie En Onderhoud / Afvalverwijdering

    Routinecontroles en onderhoudsbeurten mogen alleen worden uitgevoerd door daartoe bevoegd personeel van Medela. Onafhankelijke testinstituten hebben vastgesteld dat de constructie van de Medela Lactina borstkolf in overeenstemming is met de norm EN/IEC 60601-1 Een kopie van de desbetref- fende certificaten wordt op verzoek uitgereikt.
  • Seite 202: Lijst Van Accessoires

    008.0270 008.0271 Ready-to-Use Lactina afkolfset voor één dag, maat XL (30 mm) Symphony en Lactina afkolfset voor één dag, PersonalFit borstschild maat M (24 mm) 008.0179 008.0180 Symphony en Lactina afkolfset voor één dag, PersonalFit borstschild maat L (27 mm) 008.0181...
  • Seite 203: Andere Accessoires

    800.0623 Membraan van de vacuümklep Vacuümklep compleet incl. reservemembraan 800.0624 800.0625 Moedermelkflesje 150 ml 800.0627 Deksel Dekselinleg 800.0628 800.0629 Speenkap 600.0290 Verrijdbare standaard voor Lactina 810.0291 Verrijdbare standaard met fleshouder voor Lactina Koffer 600.0809 928.7001 Autokabel voor Lactina 600.0387 Testvacuümmeter...
  • Seite 204: Cleaning - Country-Specific Regulations

    ** Manual cleaning is possible, but automated cleaning is preferred *** Recommended, not mandatory The regulations and guidelines reflect the situation as at December 2014. Medela disclaims all liability for the correctness, completeness and topicality of the information. It is the user‘s own responsibility to...
  • Seite 205 Disinfec- Auto- Manual tion in Sterili- mated Country cleaning washer- sation Remarks cleaning disinfector (§ 5.7) (§ 5.9) (§ 5.8) (§ 5.8) France (CCLIN) √ ( clean √ Manual cleaning with directly sterilisation after use) CCLIN = Centre de Coordination de Lutte contre les Infections Nosocomiales France (CCLIN) Disinfection in washer- √...
  • Seite 206 12. Cleaning – Country-specific regulations Disinfec- Auto- Manual tion in Sterili- mated Country cleaning washer- sation Remarks cleaning disinfector (§ 5.7) (§ 5.9) (§ 5.8) (§ 5.8) The reusable pump set is a The Netherlands √* √* √ single user product Perform a pre-clean on the spot Philippines √**...
  • Seite 207: Emc / Technical Description

    Wireless communications equipment such as wireless home network devices, mobile phones, cordless telephones and their base stations, and walkie-talkies can affect the Lactina electric breast pump and should be kept at a distance of at least 1.0 m from the equipment.
  • Seite 208 Electromagnetic Compatibility (EMC, IEC 60601-1-2:2007, Table 1) Electromagnetic emissions The Lactina electric breast pump is intended for use in the electromagnetic environment specified below. The customer or the user of the Lactina electric breast pump should ensure that it is used in such an environment. Compli- Emission tests Electromagnetic environment –...
  • Seite 209: Electromagnetic Immunity

    Electromagnetic immunity The Lactina electric breast pump is intended for use in the electromagnetic environment specified below. The customer or the user of the Lactina electric breast pump should ensure that it is used in such an environment. IEC 60601...
  • Seite 210 Electromagnetic Compatibility (EMC, IEC 60601-1-2:2007, Table 4) Electromagnetic immunity The Lactina electric breast pump is intended for use in the electromagnetic environment specified below. The customer or the user of the Lactina electric breast pump should ensure that it is used in such an environment. Com-...
  • Seite 211 RF transmitters, an electromagnetic site survey should be considered. If the measured field strength in the location in which the Lactina electric breast pump is used exceeds the ap- plicable RF compliance level above, the Lactina electric breast pump should be observed to verify normal operation.
  • Seite 212 Recommended separation distances between portable and mobile RF communications equipment and the electric breast pump Lactina The electric breast pump Lactina is intended for use in an electromagnetic environment in which radiated RF disturbances are controlled. The customer or the user of the electric breast...
  • Seite 213: Technical Specifications

    (env.) Utilisation vuoto (circa) Funzionamento vacuüm (ca.) Bediening -100 ... -240 mmHg -13.33 ... -32 kPa Lactina Electric Plus 50 cpm Transport / Storage Lactina Select 40 – 60 cpm Transport/Lagerung Transport/stockage Trasporto/conservazione Transport/opslag 100 – 240 V ~...
  • Seite 214 85378 Eching Germany Phone +49 89 31 97 59-0 Italy +49 89 31 97 59 99 Medela Italia Srl a socio unico Via Turrini, 13-15 - Loc. Bargellino info@medela.de www.medela.de 40012 Calderara di Reno (BO) Italy Austria Phone + 39 051 72 76 88 + 39 051 72 76 89 Medela Österreich GmbH...

Inhaltsverzeichnis