Herunterladen Inhalt Inhalt Diese Seite drucken
Medela Lactina Gebrauchsanweisung
Vorschau ausblenden Andere Handbücher für Lactina:
Inhaltsverzeichnis

Werbung

Verfügbare Sprachen
  • DE

Verfügbare Sprachen

Lactina
®
EN Instructions for use – hospital use | DE Gebrauchsanweisung – für die Verwendung
im Krankenhaus | FR Mode d'emploi – Usage en milieu hospitalier | IT Istruzioni per l'uso –
Uso ospedaliero | NL Gebruiksaanwijzing – voor gebruik in ziekenhuizen
EFFICIENCY

Werbung

Inhaltsverzeichnis
loading

Inhaltszusammenfassung für Medela Lactina

  • Seite 1 Lactina ® EN Instructions for use – hospital use | DE Gebrauchsanweisung – für die Verwendung im Krankenhaus | FR Mode d’emploi – Usage en milieu hospitalier | IT Istruzioni per l’uso – Uso ospedaliero | NL Gebruiksaanwijzing – voor gebruik in ziekenhuizen...
  • Seite 2 Für Mütter, die nur das Beste für sich und ihr Baby wollen. Medela vous remercie d’avoir choisi un tire-lait Lactina. Le lait maternel est ce qu’il y a de plus naturel pour les nouveau-nés, mais dans certaines situations, l’allaitement au sein n’est pas possible. Voilà plus de 50 ans que Medela s’est donné...
  • Seite 3 04–35 36–67 68–99 100–131 132–163...
  • Seite 4: Inhaltsverzeichnis

    Table of Contents 1. Intended use / Population – Contraindication 2. Meaning of symbols 3. Important safety information 4. Product description 5. Cleaning 5.1 One-Day and reusable pump set – after every use 5.2 Reusable pump set – before first use, once a day and always before passing onto the next patient 5.3 Reusable pump set –...
  • Seite 5: Intended Use / Population - Contraindication

    Women are often delighted to learn that a breastpump can be used as a supplement to breastfeeding and that some pumps are designed to mimic the suckling of a nursing baby. Contraindications There are no known contraindications for the Lactina breastpump.
  • Seite 6: Meaning Of Symbols

    2. Meaning of symbols The warning symbol identifies all instructions that are important for safety. Failure to observe these instructions can lead to injury or damage to the breastpump. When used in conjunction with the following words, the warning symbol stands for: Warning Can lead to serious injury or death.
  • Seite 7: Symbols On The Device

    This symbol indicates the date of manufacture (four digits for the year and two digits for the month). This symbol indicates that the Lactina is a class II device. This symbol indicates fuse (to identify fuse boxes or their location).
  • Seite 8: Important Safety Information

    Do not expose the motor unit to direct sunlight. There are no user-serviceable parts inside the Lactina. Repairs must be performed only by an authorised service agency. Do not repair yourself! No modifications to the device are permitted.
  • Seite 9 Use the Lactina breastpump only for its intended use as described in this manual. Never operate an electrical device if it has a damaged power cord, if it is not working properly, if it has been dropped or damaged, or dropped into water.
  • Seite 10: Product Description

    600.0930 Only Lactina Select The Lactina Select has an additional knob for adjusting the pump speed between 40 and 60 cycles per minute. Select a fast pumping rhythm to stimulate the milk flow. Reduce the speed when the milk begins to flow.
  • Seite 11 Disposable bottles 150 ml: 200.2956 Disposable bottles 250 ml: 200.4802 Reusable products Lactina pump set in a PE-bag, 50 pcs (EN, DE, FR, IT, NL): 800.0388 Lactina pump set in a PE-bag, 50 pcs (EN, SV, DA, FI, NO, PL): 800.0096 Basic set in a box: 25 pcs: 800.0605...
  • Seite 12 4. Product description Reusable pump set (Applied parts) 800.0388 / 800.0096 1x PersonalFit™ 1x PersonalFit™ Breastshield M (24 mm) Connector (for other breastshield sizes 810.7088 see Chapter 11, page 33) 1x silicon tubing 810.7084 (105 cm) 800.0828 1x valve head 810.0475 2x valve membrane...
  • Seite 13 One-Day Pump Set (Applied parts) 008.0179 / 008.0180 / 008.0181 1x breastshield 1x port cap 1x cylinder 1x piston 820.0135 holder 810.0494 1x connector 810.0668 1x silicone tubing 1x rubber seal 200.2575 1x membrane 1x vacuum 1x cylinder regulator ring 810.0717 200.2775 Disposable...
  • Seite 14: Cleaning

    5. Cleaning 5.1 One-Day and reusable Caution pump set – after every use l Only use drinking-quality water for cleaning. l Take apart and wash all parts that come in contact with the breast and breastmilk immediately after use to avoid dry up of milk residues and to prevent growth of bacteria.
  • Seite 15 Clean all parts with plenty Rinse all parts with cold, of warm water and basic dish- clear water (approx. 20 °C). washer agent (approx. 30 °C). One-Day Pump Set Dry with a clean cloth or Throw away the One-Day leave to dry on a clean cloth. Pump Set after a maximum of 8 pumping sessions within 24 hours.
  • Seite 16: Reusable Pump Set - Before First Use, Once A Day And Always Before Passing Onto The Next Patient

    5. Cleaning 5.2 Reusable pump set – before first Warning use, once a day and always before passing onto the next patient l Use by more than one mother without adequate sterilisation may pose a health risk. l All parts must be cleaned after every use.
  • Seite 17: Reusable Pump Set - Disinfecting And Sterilising

    5.3 Reusable pump set – Disinfecting and Sterilising Clean all parts in a washer disinfector for Check parts if they are clean five minutes (at 93 °C). Check that the and intact. pump set is working. Replace defective parts of the pump set. 5.4 Cleaning 5.5 Disinfecting the breastpump...
  • Seite 18: Preparing For Pumping

    The reusable pump set needs cleaning Open the packaging of the prior to first use. Please see chapter 5.2. Ready-to-Use pump set. l Use Medela original accessories only. Add a disposable bottle as l Check pump set components for wear required (35/80/150/250 ml).
  • Seite 19: Assembling The Reusable Pump Set

    Screw the disposable bottle Push the breastshield onto (35/80/150/250 ml as the connector. required) onto the connector. 6.2 Assembling the reusable pump set Push the breastshield onto Carefully push the membrane the connector. onto the valve head until it engages.
  • Seite 20: Assembling Piston/Cylinder

    Note l Use Medela original accessories only. l Check pump set components for wear or damage before use. Push the valve head and membrane onto the connector.
  • Seite 21 Screw bottle into connector. Insert the tubing into the corresponding opening in the connector. Slide the vacuum regulator ring Slide the piston into the over the cylinder. cylinder.
  • Seite 22 Fit the port cap to the cylinder holder. Rotate the cylinder holder until the pin sits in the slot on the Lactina. Then push the piston into the rubber clamp on the pump arm until it engages.
  • Seite 23 Screw the piston/cylinder Insert the cylinder holder incl. firmly into the cylinder holder. piston/cylinder horizontally into the opening on the front of the Lactina. Insert adapter end of tubing Plug the power cord into the into opening in cylinder holder. mains socket.
  • Seite 24: Expression

    This can lead to blockage of the milk ducts and engorgement. l for step 1 (chapter 7.2): Select a fast pumping rhythm on the Lactina Select to start the milk flow. Reduce the speed when the milk begins Set the vacuum regulator ring to flow.
  • Seite 25 Hold the breastshield onto Place the breastshield on your breast with your thumb the breast so that your nipple is and index finger. Support properly centred in the tunnel. your breast with the palm of your hand. Set vacuum comfort: twist down the Switch on the breastpump with vacuum regulator ring and increase the vacuum until it is slightly uncomfortable.
  • Seite 26: Preparing For Double Pumping

    Note Switch off the breastpump l Always disconnect the Lactina from the with power source after expression. Info 7.3 Preparing for l for chapter 7.3:...
  • Seite 27 Use the stand or bottle holder Close the bottle with a lid or lid to prevent the bottle from and disc (depending on bottle tipping over. type).  Follow the instructions in chapter 8 “Storing and thawing breastmilk”. Set the vacuum regulator ring Place the second breastshield on to minimum.
  • Seite 28: Manual Pumping

    7. Expression 7.4 Manual pumping Info l Manual pumping requires a threaded pump set on the connector (reusable pump set). For this reason, manual pumping is not possible with the One-Day Pump Set. Screw the cylinder onto the breastshield connector of the reusable pump set.
  • Seite 29 Position the breastshield as Set the vacuum regulator ring described in chapter 7.1 step 2 to minimum. and 3.
  • Seite 30: Storing And Thawing Breastmilk

    Avoid shaking or stirring the milk. I With the Calesca* bottle warmer, it is possible to warm breastmilk in a gentle way. Note These storing and thawing breastmilk guidelines are a recommendation. National and hospital internal guidelines and standards may deviate. *More information at www.medela.com...
  • Seite 31: Troubleshooting

    The piston/cylinder is screwed onto the cylinder holder or breast- shield correctly. l The cylinder holder including the piston/cylinder is fitted to the Lactina correctly. l During pumping on one side, the port cap has been inserted into the unused opening on the cylinder holder.
  • Seite 32: International Warranty/Disposal

    The manufacturer is not liable for any damage or consequential damage caused by incorrect operation, inappropriate usage or use by unauthorized persons. Routine checks and servicing may only be carried out by Medela authorized personnel. The engineering of the Medela Lactina Breastpump has been verified by independent test institutes for compliance with the EN / IEC 60601-1 standard.
  • Seite 33: Accessories List

    Set of 40 Disposable Breastmilk Bottles 250ml with Lids, Multibox 4 Sets 800.0388 Lactina Single Pump Set in PE-Bag (Lactaset), EN DE FR IT NL, Multibox 50 pcs. 800.0096 Lactina Single Pump Set in PE-Bag (Lactaset), EN SV DA FI NO PL, Multibox 50 pcs.
  • Seite 34 800.0634 800.0661 Lactina global cylinder, Multipack 25 pcs. 800.0636 Lactina vacuum regulator ring, Multipack 25 pcs. Lactina global cylinder with vacuum regulator ring, Multipack 25 pcs. 800.0662 800.0663 Lactina global cylinder holder, Multipack 25 pcs. 800.0664 Lactina port cap, Multipack 25 pcs.
  • Seite 36 Inhaltsverzeichnis 1. Verwendungszweck/Zielgruppe - Kontraindikationen 2. Bedeutung der Symbole 3. Wichtige Sicherheitshinweise 4. Produktbeschreibung 5. Reinigung 5.1 Eintages-Pumpset und wiederverwendbares Pumpset – nach jedem Gebrauch 5.2 Mehrweg-Pumpsets – vor Erstgebrauch, einmal täglich und immer vor der Übergabe an die nächste Patientin 5.3 Wiederverwendbares Pumpset –...
  • Seite 37: Verwendungszweck/Zielgruppe - Kontraindikationen

    Baby getrennt sind. Da ist es beruhigend zu wissen, dass Milchpumpen als Ergänzung zum Stillen an der Brust eingesetzt werden können und dass es Pumpen gibt, die sogar das natürliche Saugen des Babys imitieren. Kontraindikationen Für die Milchpumpe Lactina gibt es keine bekannten Kontraindikationen.
  • Seite 38: Bedeutung Der Symbole

    2. Bedeutung der Symbole Das Warnsymbol kennzeichnet alle für die Sicherheit wichtigen Anweisungen. Nichtbeachtung kann zu Verletzungen oder Schäden an der Milchpumpe führen. In Verbindung mit den folgenden Signalwörtern steht das Warnsymbol für: Achtung Kann zu schweren Verletzungen oder zum Tod führen. Vorsicht Kann zu leichten Verletzungen führen.
  • Seite 39: Symbole Auf Dem Gerät

    Dieses Symbol verweist auf das Herstellungsdatum (vier Ziffern für das Jahr und zwei Ziffern für den Monat). Dieses Symbol verweist darauf, dass die Milchpumpe Lactina ein Gerät der Klasse II ist. Dieses Symbol stellt eine Sicherung dar (um auf Sicherungskästen bzw.
  • Seite 40: Wichtige Sicherheitshinweise

    Heizkörpern und offenem Feuer fern. Setzen Sie die Motoreinheit nicht direktem Sonnenlicht aus. Lactina enthält keine Teile, die vom Kunden zu warten sind. Reparaturen dürfen nur durch eine autorisierte Servicestelle durchgeführt werden. Bitte führen Sie Reparaturarbeiten nicht selbst durch! Änderungen am Gerät sind nicht erlaubt.
  • Seite 41 Verwendung Benutzen Sie die Milchpumpe Lactina ausschließlich für den in dieser Gebrauchsanweisung beschriebenen Verwendungszweck. Nehmen Sie ein elektrisches Gerät niemals in Betrieb, wenn das Netzkabel beschädigt ist, wenn es nicht korrekt funktioniert oder wenn es heruntergefallen, beschädigt oder ins Wasser gefallen ist.
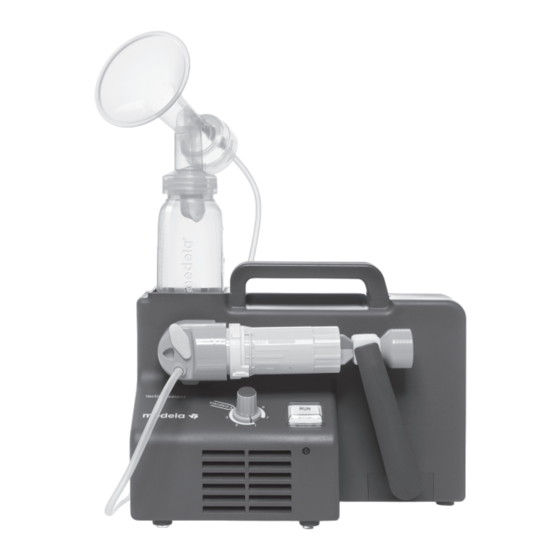
  • Seite 42: Produktbeschreibung

    600.0929 600.0930 Nur Lactina Select Die Milchpumpe Lactina Select verfügt über einen zusätzlichen Knopf zu Einstellung der Pumpgeschwindigkeit im Bereich von 40 bis 60 Zyklen pro Minute. Wählen Sie einen schnellen Pumprhythmus, um den Milchfluss zu stimulieren. Verringern Sie die Geschwindigkeit, wenn Milch zu fließen beginnt.
  • Seite 43 Colostrum Container, 35 ml: 200.2110 Einweg-Flaschen, 80 ml: 200.2957 Einweg-Flaschen, 150 ml: 200.2956 Einweg-Flaschen, 250 ml: 200.4802 Mehrwegprodukte Lactina-Pumpset in PE-Beutel, 50 Stück (EN, DE, FR, IT, NL): 800.0388 Lactina-Pumpset in PE-Beutel, 50 Stück (EN, SV, DA, FI, NO, PL): 800.0096 Basic Kit in einer Schachtel: 25 Stück: 800.0605...
  • Seite 44 4. Produktbeschreibung Wiederverwendbares Pumpset (Angewandte Teile) 800.0388 / 800.0096 1x PersonalFit™ 1x PersonalFit™ Brusthaube M (24 mm) Verbindungsstück (weitere Brusthaubengrößen 810.7088 siehe Kapitel 11, Seite 65) 1x Silikonschlauch 810.7084 (105 cm) 800.0828 1x Ventilkopf 810.0475 2x Ventilmembrane 820.7013 1x Milchflasche, 150 ml, transparent 1x Zylinderhalter 811.0020 810.0668...
  • Seite 45 Eintages-Pumpset (Angewandte Teile) 008.0179 / 008.0180 / 008.0181 1x Verschluss- 1x Brusthaube 1x Zylinder- 1x Kolben stopfen halter 810.0494 820.0135 1x Verbindungsstück 810.0668 1x Silikonschlauch 1x Gummidichtung 200.2575 1x Membran 1x Vakuum-Einstellring 1x Zylinder 200.2775 810.0717 Einweg- Einweg- Einweg- Colostrum Container, Flaschen, Flaschen,...
  • Seite 46: Reinigung

    5. Reinigung 5.1 Eintages-Pumpset und Vorsicht wiederverwendbares Pumpset – nach jedem Gebrauch l Verwenden Sie für die Reinigung nur Wasser in Trinkwasserqualität. l Alle Teile, die mit Brust und Milch in Berührung kommen, sollten sofort nach dem Gebrauch auseinandergenommen und gereinigt werden, um ein Eintrocknen von Milch und ein Bakterienwachstum zu verhindern.
  • Seite 47 Reinigen Sie alle Teile mit viel Spülen Sie alle Teile mit kaltem, warmem Wasser (circa 30 °C), klaren Wasser nach (ca. 20 °C). dem ein handelsübliches Spülmittel zugesetzt ist. Eintages- Pumpset Trocknen Sie die Teile mit Entsorgen Sie das Eintages-Pumpset einem sauberen Tuch ab spätestens nach acht Pumpsitzungen oder lassen Sie sie auf einem innerhalb von 24 Stunden.
  • Seite 48: Mehrweg-Pumpsets - Vor Erstgebrauch, Einmal Täglich Und Immer Vor Der Übergabe An Die Nächste Patientin

    5. Reinigung 5.2 Mehrweg-Pumpsets – vor Erst- Achtung gebrauch, einmal täglich und immer vor der Übergabe an die l Die Benutzung durch mehrere Mütter ohne nächste Patientin vorherige ausreichende Sterilisierung kann ein Gesundheitsrisiko darstellen. l Alle Teile müssen nach jedem Gebrauch gereinigt werden.
  • Seite 49: Wiederverwendbares Pumpset - Desinfektion Und Sterilisierung

    5.3 Wiederverwendbares Pumpset – Desinfektion und Sterilisierung Reinigen Sie alle Teile während fünf Minuten in Überprüfen Sie, ob alle Teile einem Reinigungs- und Desinfektionsautomaten sauber und intakt sind. (bei 93 °C). Vergewissern Sie sich, dass das Pumpset ordnungsgemäß funktioniert. Nicht funktionstüchtige Teile des Pumpsets ersetzen. 5.4 Reinigung der Milchpumpe 5.5 Desinfektion der Milchpumpe disinfect...
  • Seite 50: Vorbereitung Des Abpumpens

    Öffnen Sie die Verpackung des erforderlich. Siehe auch Kapitel 5.2. Ready-to-Use Eintages-Pumpsets. l Verwenden Sie nur Originalzubehör von Verwenden Sie je nach Bedarf Medela. zudem eine Einwegflasche l Überprüfen Sie die Teile des (35/80/150/250 ml). Pumpsets vor Gebrauch auf Abnutzung / Beschädigung.
  • Seite 51: Zusammensetzen Des Mehrweg-Pumpsets

    Schrauben Sie die jeweilige Stecken Sie die Brusthaube Einwegflasche (je nach Bedarf auf das Verbindungsstück. 35/80/150/250 ml) auf das Verbindungsstück. 6.2 Zusammensetzen des Mehrweg-Pumpsets Stecken Sie die Brusthaube Stecken Sie die Membrane auf das Verbindungsstück. sorgfältig auf den Ventilkopf, bis sie einrastet.
  • Seite 52: Zusammensetzen Des Kolbens/Zylinders

    Brust, gereinigte Pumpenteile sowie das gereinigte Pumpset angefasst werden. Hinweis l Verwenden Sie nur Originalzubehör von Stecken Sie den Ventilkopf mit Medela. Membrane auf das Verbindungsstück. l Überprüfen Sie die Teile des Pumpsets vor  Positionieren Sie den Ventilkopf Gebrauch auf Abnutzung / Beschädigung.
  • Seite 53 Schrauben Sie die Flasche Stecken Sie den Schlauch in auf das Verbindungsstück. die entsprechende Anschluss- öffnung im Verbindungsstück. Schieben Sie den Schieben Sie den Kolben Vakuum-Einstellring in den Zylinder. über den Zylinder.
  • Seite 54 Netzkabels mit der Stromquelle kompatibel ist. Montieren Sie den Verschlussstopfen auf den Zylinderhalter. Drehen Sie den Zylinderhalter, bis der Dorn fest im Schlitz der Milchpumpe Lactina sitzt. Drücken Sie anschließend den Kolben in die Gummiklemme des Pumparms, bis er einrastet.
  • Seite 55 Schrauben Sie den Stecken Sie den Zylinderhalter Kolben/Zylinder fest inkl. Kolben/Zylinder horizontal in den Zylinderhalter. in die Öffnung auf der Vorder- seite der Milchpumpe Lactina. Stecken Sie den Schlauchadapter Stecken Sie das Netzkabel in die Öffnung des Zylinderhalters. in eine Netzsteckdose ein.
  • Seite 56: Abpumpen

    Pumpset nicht an der Flasche halten. Dies kann zum Abdrücken der Milchkanäle und zu Milchstau führen. l zu Schritt 1 (Kapitel 7.2): Wählen Sie bei Lactina Select einen Stellen Sie den Vakuum-Einstellring schnellen Pumprhythmus, um den auf Minimum. Milchfluss auszulösen. Verringern Sie Die Lactina Select verfügt über einen...
  • Seite 57 Halten Sie die Brusthaube mit Platzieren Sie die Brusthaube so auf Daumen und Zeigefinger an die der Brust, dass die Brustwarze Brust. Stützen Sie Ihre Brust gut zentriert im Tunnel liegt. mit der Handfläche. Schalten Sie die Milchpumpe Stellen Sie das Komfort-Vakuum ein: ein.
  • Seite 58: Vorbereitung Für Das Beidseitige Abpumpen

    Laktationsberaterin oder Hebamme, wenn Sie keine oder nur wenig Milch abpumpen können oder wenn das Abpumpen schmerzhaft ist. Hinweis Schalten Sie die Milchpumpe l Trennen Sie die Milchpumpe Lactina aus. nach dem Abpumpen immer von der Stromquelle. 7.3 Vorbereitung für das Info beidseitige Abpumpen l zu Kapitel 7.3:...
  • Seite 59 Verwenden Sie den Standfuß Verschließen Sie die Flasche mit oder den Flaschenhalter, um dem Deckel oder mit Deckel und ein Umkippen der Flasche Deckeleinlage (je nach Flaschentyp). zu vermeiden.  Befolgen Sie die Anleitung in Kapitel 8 „Aufbewahren und Auftauen der Muttermilch“. Stellen Sie den Vakuum-Einstellring Setzen Sie die zweite Brusthaube auf Minimum.
  • Seite 60: Manuelles Abpumpen

    7. Abpumpen 7.4 Manuelles Abpumpen Info l Für das manuelle Abpumpen ist ein Pumpset mit einem Gewinde am Verbindungsstück erforderlich (Mehrweg-Pumpset). Darum ist manuelles Abpumpen mit den Eintages- Pumpsets nicht möglich. Schrauben Sie den Zylinder auf das Verbindungsstück der Brusthaube des Mehrweg-Pumpsets.
  • Seite 61 Setzen Sie die Brusthaube wie Stellen Sie den in Kapitel 7.1, Schritt 2 und 3, Vakuum-Einstellring beschrieben auf die Brust auf. auf Minimum.
  • Seite 62: Aufbewahren Und Auftauen Der Muttermilch

    Fett mit der Milch zu vermischen. Schütteln oder rühren Sie die Milch nicht. I Mit dem Flaschenwärmer Calesca* können Sie die Muttermilch schonend erwärmen. Hinweis Diese Regeln für das Aufbewahren und Auftauen von Muttermilch stellen eine Empfehlung dar. Staatliche und krankenhausinterne Richtlinien können davon abweichen. *Weitere Informationen unter www.medela.com...
  • Seite 63: Fehlerbehebung

    Der Zylinderhalter einschließlich Kolben/Zylinder muss richtig auf der Milchpumpe Lactina montiert sein. l Beim einseitigen Abpumpen ist der Verschlussstopfen auf die unbenutzte Öffnung des Zylinderhalters aufgesetzt. l Knicken Sie den Schlauch während des Abpumpens nicht und klemmen Sie ihn nicht ein.
  • Seite 64: Internationale Gewährleistung / Entsorgung

    Routinekontrollen und Servicearbeiten sind nur durch von Medela autorisierte Stellen auszuführen. Die Technik der Milchpumpe Lactina von Medela wurde durch unabhängige Prüfstellen im Hinblick auf die Einhaltung der Norm EN / IEC 60601-1 überprüft. Kopien der betreffenden Zertifikate sind auf Anfrage erhältlich.
  • Seite 65: Zubehörliste

    Set aus 40 Einweg-Muttermilchflaschen, 250 ml, mit Deckeln, Multibox mit 4 Sets 800.0388 Lactina-Einzelpumpset in PE-Beutel (Lactaset), EN DE FR IT NL, Multibox mit 50 Stück. 800.0096 Lactina-Einzelpumpset in PE-Beutel (Lactaset), EN SV DA FI NO PL, Multibox mit 50 Stück. 800.0605 Basispaket ohne Schläuche, Multibox mit 25 Stück 200.0571 Brusthaube „PersonalFit”, Größe S (21 mm), Multipack mit 25 Stück...
  • Seite 66 Brusthaube, Verbindungsstück, Multipack mit 25 Stück 800.0710 800.0659 Silikonschlauch mit Polygon-Adaptern, gerollt, Multipack mit 25 Stück 800.0633 Lactina-Gummidichtung, Multipack mit 25 Stück Kolben für die Milchpumpe Lactina, Multipack mit 25 Stück 800.0634 800.0661 Lactina-Universalzylinder, Multipack mit 25 Stück 800.0636 Vakuum-Einstellring für die Milchpumpe Lactina, Multipack mit 25 Stück Lactina-Universalzylinder mit Vakuum-Einstellring, Multipack mit 25 Stück...
  • Seite 68 Table des matières 1. Utilisation prévue/Public concerné – Contre-indications 2. Signification des symboles 3. Informations de sécurité importantes 4. Description du produit 5. Nettoyage 5.1 Set pour tire-lait réutilisable et One-Day – Après chaque utilisation. 5.2 Set réutilisable pour tire-lait – Avant la première utilisation, une fois par jour et systématiquement avant de le transmettre à...
  • Seite 69: Utilisation Prévue/Public Concerné - Contre-Indications

    éloignées de leur bébé. Elles sont souvent ravies d’apprendre qu’un tire-lait peut servir de complément à l’allaitement maternel et que certains sont même conçus pour imiter la succion d’un bébé au sein. Contre-indications Il n’existe aucune contre-indication connue au tire-lait Lactina.
  • Seite 70: Signification Des Symboles

    2. Signification des symboles Les symboles d’avertissement renvoient à des instructions importantes en matière de sécurité. Le non-respect de ces instructions peut provoquer des blessures ou endommager le tire-lait. Le symbole d’avertissement peut avoir différentes significations s’il est associé à l’un des termes ci-après : Avertissement Peut engendrer des blessures graves ou la mort.
  • Seite 71: Symboles Présents Sur L'appareil

    Ce symbole indique la date de fabrication (quatre chiffres pour l’année et deux chiffres pour le mois). Ce symbole indique que le tire-lait Lactina est un appareil de classe II. Ce symbole fait référence au fusible (pour l’identification des boîtes à fusibles ou de leur emplacement).
  • Seite 72: Informations De Sécurité Importantes

    N’exposez pas le bloc-moteur à la lumière directe du soleil. Le tire-lait Lactina ne contient aucune pièce pouvant être réparée par l’utilisateur. Toute réparation doit exclusivement être réalisée par un service technique agréé. Ne réparez pas l’appareil vous-même ! Aucune modification de l’appareil n’est autorisée.
  • Seite 73 état ou si l’appareil ne fonctionne pas correctement, est endommagé ou est tombé au sol ou dans de l’eau. N’utilisez pas le tire-lait Lactina lors du bain ou de la douche. Ne faites pas fonctionner le tire-lait Lactina pendant votre sommeil ou en cas de grosse somnolence.
  • Seite 74: Description Du Produit

    600.0929 600.0930 Lactina Select uniquement Le modèle Lactina Select est muni d’un bouton supplémentaire permettant de régler la vitesse d’aspiration (entre 40 et 60 cycles par minute). Choisissez un rythme d’aspiration rapide afin de stimuler l’écoulement de lait. Lorsque celui-ci commence à...
  • Seite 75 Biberons jetables 80 ml : 200.2957 Biberons jetables 150 ml : 200.2956 Biberons jetables 250 ml : 200.4802 Produits réutilisables Set pour tire-lait Lactina sous sachet plastique, 50 pièces (EN, DE, FR, IT, NL) : 800.0388 Set pour tire-lait Lactina sous sachet plastique, 50 pièces (EN, SV, DA, FI, NO, PL) : 800.0096...
  • Seite 76 4. Description du produit Set réutilisable pour tire-lait (parties appliquées) 800.0388 / 800.0096 1 téterelle PersonalFit™ 1 connecteur taille M (24 mm) PersonalFit™ (pour d’autres tailles 810.7088 de téterelle, reportez-vous 1 tuyau en silicone au chapitre 11, page 97) (105 cm) 810.7084 800.0828 1 valve 810.0475 membranes 820.7013 1 biberon transparent pour lait maternel, 1 support de 150 ml...
  • Seite 77 Set pour tire-lait One-Day (détail des pièces) 008.0179 / 008.0180 / 008.0181 1 téterelle 1 obturateur 1 support 1 piston 820.0135 de cylindre 810.0494 1 connecteur 810.0668 1 tuyau en silicone 1 joint en caoutchouc 200.2575 1 membrane 1 bague de 1 cylindre régulation de 810.0717 l’aspiration 200.2775 Biberons jetables Biberons jetables Biberons jetables...
  • Seite 78: Nettoyage

    5. Nettoyage 5.1 Set pour tire-lait Mise en garde réutilisable et One-Day – Après chaque utilisation. l N’utilisez que de l’eau potable pour le nettoyage. l Démontez et nettoyez toutes les pièces qui sont entrées en contact avec la poitrine et le lait maternel immédiatement après utilisation afin d’éviter l’assèchement de résidus de lait et la prolifération...
  • Seite 79 Nettoyez abondamment Rincez-les à l’eau claire toutes les pièces à l’eau à environ 20 °C. chaude avec du produit vaisselle (à environ 30 °C). Set One-Day pour tire-lait Séchez les pièces avec un Jetez le set pour tire-lait One-Day chiffon propre ou laissez-les au bout de 24 heures (8 séances sécher sur un chiffon propre.
  • Seite 80: Set Réutilisable Pour Tire-Lait - Avant La Première Utilisation, Une Fois Par Jour Et Systématiquement Avant De Le Transmettre À Une Autre Patiente

    5. Nettoyage 5.2 Set réutilisable pour tire-lait – Avant Avertissement la première utilisation, une fois par jour et systématiquement avant de le transmettre à une autre patiente l L’utilisation du set d’accessoires par plusieurs mères peut entraîner un risque de contamination si celui-ci n’est pas correctement stérilisé.
  • Seite 81: Set Réutilisable Pour Tire-Lait - Désinfection Et Stérilisation

    5.3 Set réutilisable pour tire-lait – Désinfection et stérilisation Nettoyez toutes les pièces dans Assurez-vous que les pièces un appareil de lavage et de désinfection sont intactes et propres. pendant cinq minutes (à 93 °C). Vérifiez l’état des pièces et si le set fonctionne. Remplacez les pièces défectueuses.
  • Seite 82: Préparation À La Séance D'expression

    Ouvrez l’emballage du set nettoyé avant la première utilisation. pour tire-lait Ready-to-Use. Reportez-vous à la section 5.2. Ajoutez un biberon jetable si l N’utilisez que des accessoires Medela besoin (de 35/80/150/250 ml). originaux. l Avant utilisation, vérifiez que les composants du set pour tire-lait ne présentent aucun signe d’usure ou...
  • Seite 83: Assemblage Du Set Réutilisable Pour Tire-Lait

    Vissez le biberon jetable Insérez la téterelle sur (de 35/80/150/250 ml, le connecteur. selon vos besoins) sur le connecteur. 6.2 Assemblage du set réutilisable pour tire-lait Insérez la téterelle sur Poussez doucement le connecteur. la membrane sur la valve jusqu’à ce qu’elle s’y emboîte.
  • Seite 84: Montage Du Piston/Cylindre

    Remarque l N’utilisez que des accessoires Medela originaux. l Avant utilisation, vérifiez que les pièces du set pour tire-lait ne présentent aucun Poussez la valve et la membrane signe d’usure ou d’endommagement.
  • Seite 85 Vissez le biberon sur Introduisez le tuyau dans le connecteur. l’ouverture appropriée du connecteur. Glissez le régulateur de Glissez le piston dans l’aspiration sur le cylindre. le cylindre.
  • Seite 86 Faites pivoter le support de cylindre jusqu’à ce que la languette vienne bien se loger dans la fente du tire-lait Lactina. Poussez ensuite le piston dans le collier en caoutchouc qui se trouve sur le bras du tire-lait...
  • Seite 87 Insérez le support de cylindre équipé solidement sur le support du piston/cylindre horizontalement dans de cylindre. l’orifice situé à l’avant du tire-lait Lactina. Insérez l’embout du tuyau Branchez le câble d’alimentation dans l’un des orifices prévus sur la prise électrique.
  • Seite 88: Expression

    (section 7.2) : Réglez le régulateur de l’aspiration Choisissez un rythme d’aspiration rapide sur au minimum. Le modèle Lactina Select le tire-lait Lactina Select afin de démarrer est muni d’un bouton supplémentaire l’écoulement de lait. Lorsque celui-ci permettant de régler la vitesse commence à...
  • Seite 89 Maintenez la téterelle sur le sein à Placez la téterelle sur le sein de l’aide de votre pouce et de votre telle sorte que le mamelon soit au index. Soutenez votre sein avec la centre de l’embout. paume de la main. Réglage de l’aspiration de confort : Tournez Allumez le tire-lait en appuyant sur la bague de régulation d’aspiration vers le...
  • Seite 90: Préparation De L'expression Double

    Remarque Éteignez le tire-lait en appuyant l Débranchez toujours le tire-lait Lactina de la source d’alimentation après l’expression. Info 7.3 Préparation de l’expression double...
  • Seite 91 Utilisez le support biberon ou Fermez le biberon avec un couvercle, le porte-biberon intégré sur le en ajoutant le disque de fermeture s’il tire-lait pour éviter que le biberon y a lieu (suivant ne se renverse. le type de biberon). ...
  • Seite 92: Expression Manuelle

    7. Expression 7.4 Expression manuelle Info l Si vous souhaitez effectuer une expression manuelle avec le set d’accessoires, vous devez visser le piston/cylindre sur le pas de vis de la téterelle (set réutilisable pour tire-lait). Pour cette raison, l’expression manuelle est impossible avec le set One-Day pour tire-lait.
  • Seite 93 Positionnez la téterelle de la manière Réglez la bague de régulation décrite dans la section 7.1 de l’aspiration au minimum. (étapes 2 et 3).
  • Seite 94: Conservation Et Décongélation Du Lait Maternel

    I Le chauffe-biberon Calesca* permet de faire chauffer doucement le lait maternel. Remarque Ces règles de conservation et de décongélation du lait maternel sont des recommandations. Les règles et normes nationales et internes aux hôpitaux peuvent être différentes. *Pour plus d’informations, consultez le site www.medela.fr.
  • Seite 95: Résolution Des Problèmes

    Le piston/cylindre doit être bien vissé sur le support de cylindre ou la téterelle. l Le support de cylindre équipé du piston/cylindre doit être monté convenablement sur le tire-lait Lactina. l Durant l’expression en simple pompage, le l’obturateur doit être inséré dans l’orifice inutilisé du support de cylindre.
  • Seite 96: Garantie Internationale/Mise Au Rebut

    Les éventuels contrôles de routine, réparations et remplacements de batterie ne doivent être exécutés que par des sites Medela agréés. La conception technique du tire-lait Lactina de Medela a été vérifiée par des organismes de contrôle indépendants et répond à la norme EN/CEI 60601-1.
  • Seite 97: Liste Des Accessoires

    11. Liste des accessoires Réf. article Produit 008.0179 Set One-Day pour tire-lait Symphony et Lactina avec téterelle PersonalFit taille M (24 mm), multibox 72 pièces. 008.0180 Set One-Day pour tire-lait Symphony et Lactina avec téterelle PersonalFit taille L (27 mm), multibox 60 pièces.
  • Seite 98 800.0634 800.0661 Cylindre Lactina, multipack 25 pièces. 800.0636 Bague de régulation d’aspiration Lactina, multipack 25 pièces. Cylindre Lactina avec bague de régulation d’aspiration, multipack 25 pièces. 800.0662 800.0663 Support de cylindre Lactina, multipack 25 pièces. 800.0664 Obturateur Lactina, multipack 25 pièces.
  • Seite 100 Indice 1. Uso previsto/A chi è destinato – Controindicazioni 2. Significato dei simboli 3. Importanti informazioni di sicurezza 4. Descrizione del prodotto 5. Pulizia 5.1 Set per tiralatte One Day e riutilizzabile – dopo ogni utilizzo 5.2 Set per tiralatte riutilizzabile: prima del primo utilizzo, una volta al giorno e sempre prima di passare alla paziente successiva 5.3 Set per tiralatte riutilizzabile –...
  • Seite 101: Uso Previsto/A Chi È Destinato - Controindicazioni

    Le madri sono spesso liete di sapere che il tiralatte può essere usato come integrazione all’allattamento al seno e che alcuni modelli sono studiati per imitare la suzione del bambino. Controindicazioni Non esistono controindicazioni note per il tiralatte Lactina.
  • Seite 102: Significato Dei Simboli

    2. Significato dei simboli Il simbolo di avvertenza identifica tutte le istruzioni importanti per la sicurezza. La mancata osservanza di tali istruzioni può comportare lesioni alle persone o danni al tiralatte. Abbinato ai seguenti termini, il simbolo di avvertenza assume i significati descritti di seguito. Avvertenza Può...
  • Seite 103 Questo simbolo indica la data di produzione (quattro cifre per l’anno e due cifre per il mese). Questo simbolo indica che Lactina è un dispositivo di classe II. Questo simbolo indica il fusibile (per identificare le scatole dei fusibili o la loro ubicazione).
  • Seite 104: Importanti Informazioni Di Sicurezza

    Dispositivo Pericolo di folgorazione! Mantenere asciutto il dispositivo! Non immergere mai in acqua o altri liquidi! Il tiralatte Lactina non è resistente al calore: tenere lontano da radiatori e fiamme libere. Non esporre l’unità motore alla luce diretta del sole.
  • Seite 105 è caduto in acqua. Non utilizzare il tiralatte Lactina durante il bagno o la doccia. Non utilizzare il tiralatte Lactina quando si dorme o si è troppo assonnati. Non guidare durante l’estrazione del latte con l’opzione mani libere.
  • Seite 106: Descrizione Del Prodotto

    600.0930 Solo Lactina Select Il modello Lactina Select dispone di una manopola aggiuntiva per regolare la velocità del tiralatte tra i 40 e i 60 cicli al minuto. Selezionare un ritmo di aspirazione veloce per stimolare il flusso del latte. Ridurre la velocità quando il latte inizia a fluire.
  • Seite 107 Bottiglie monouso 150 ml: 200.2956 Bottiglie monouso 250 ml: 200.4802 Prodotti riutilizzabili Set per tiralatte Lactina in sacchetto di polietilene, 50 pezzi (EN, DE, FR, IT, NL): 800.0388 Set per tiralatte Lactina in sacchetto di polietilene, 50 pezzi (EN, SV, DA, FI, NO, PL): 800.0096 Set di base in una confezione: 25 pezzi: 800.0605...
  • Seite 108 4. Descrizione del prodotto Set per tiralatte riutilizzabile (parti applicate) 800.0388 / 800.0096 1 coppa per il seno PersonalFit™ M (24 mm) (per altre misure di coppe 1 connettore per il seno, consultare PersonalFit™ il capitolo 11, pag. 129) 810.7088 810.7084 1 tubicino in silicone (105 cm)
  • Seite 109 Set giornaliero per tiralatte One Day (parti applicate) 008.0179 / 008.0180 / 008.0181 1 coppa per il seno 1 tappo per 1 porta 1 pistone porta di cilindro 810.0494 1 connettore collegamento 810.0668 820.0135 1 tubicino in silicone 1 guarnizione in gomma 200.2575 1 membrana...
  • Seite 110: Pulizia

    5. Pulizia 5.1 Set per tiralatte One Day Attenzione e riutilizzabile – dopo ogni utilizzo l Per la pulizia, usare esclusivamente acqua potabile. l Separare e lavare tutte le parti che entrano in contatto con il seno o con il latte materno subito dopo l’uso per evitare l’essiccazione dei residui di latte e prevenire la formazione di batteri.
  • Seite 111 Pulire tutti i componenti con Risciacquare tutti i componenti abbondante acqua tiepida con acqua pulita fredda e un comune detergente (20 °C circa). per stoviglie (30 °C circa). Set giornaliero per tiralatte One Day Asciugare con un panno pulito Gettare il set giornaliero o lasciare asciugare su un per tiralatte One Day dopo panno pulito.
  • Seite 112: Set Per Tiralatte Riutilizzabile: Prima Del Primo Utilizzo, Una Volta Al Giorno E Sempre Prima Di Passare Alla Paziente Successiva

    5. Pulizia 5.2 Set per tiralatte riutilizzabile: Avvertenza prima del primo utilizzo, una volta al giorno e sempre prima di l L’uso da parte di più madri senza una passare alla paziente successiva sterilizzazione adeguata può costituire un rischio per la salute. l Tutti i componenti devono essere puliti dopo ogni utilizzo.
  • Seite 113: Set Per Tiralatte Riutilizzabile - Disinfezione E Sterilizzazione

    5.3 Set per tiralatte riutilizzabile – Disinfezione e sterilizzazione Pulire tutti i componenti in una disinfettatrice Verificare che i componenti per cinque minuti (a 93 °C). Verificare il siano puliti e intatti. funzionamento del set per tiralatte. Sostituire i componenti difettosi del set per tiralatte. 5.4 Pulizia del 5.5 Disinfezione del tiralatte...
  • Seite 114: Preparazione All'estrazione Del Latte

    Ready-to-Use. Consultare il paragrafo 5.2. Aggiungere una bottiglia l Utilizzare esclusivamente accessori monouso secondo necessità originali Medela. (35/80/150/250 ml). l Controllare l’eventuale usura o danneggiamento dei componenti del set per tiralatte prima dell’uso. l Tutti i componenti devono essere completamente asciutti prima dell’utilizzo.
  • Seite 115: Montaggio Del Set Per Tiralatte Riutilizzabile

    Avvitare la bottiglia monouso Inserire la coppa per il seno (35/80/150/250 ml secondo nel connettore. necessità) sul connettore. 6.2 Montaggio del set per tiralatte riutilizzabile Inserire la coppa per il seno Spingere con cautela la nel connettore. membrana sulla testa della valvola fino all’inserimento.
  • Seite 116: Montaggio Del Pistone/Cilindro

    Nota Inserire la testa della valvola l Utilizzare esclusivamente accessori e la membrana nel connettore. originali Medela.  Posizionare la testa della l Controllare l’eventuale usura o valvola lateralmente. danneggiamento dei componenti del set per tiralatte prima dell’uso.
  • Seite 117 Avvitare la bottiglia Inserire il tubicino nell’apposita al connettore. apertura del connettore. Inserire l’anello di regolazione Inserire il pistone nel cilindro. vuoto sopra il cilindro.
  • Seite 118 6. Preparazione all’estrazione del latte Avvertenza l Per l’operazione 9 (paragrafo 6.3): l Usare esclusivamente il cavo di alimentazione fornito con Lactina. l Assicurarsi che la tensione del cavo di alimentazione sia compatibile con quella di rete. Applicare il tappo della porta di collegamento al porta cilindro.
  • Seite 119 Avvitare saldamente il pistone/ Inserire il porta cilindro compresi cilindro nel porta cilindro. pistone/cilindro orizzontalmente nell’apertura situata nella parte anteriore di Lactina. Inserire l’adattatore che Collegare il cavo di alimentazione si trova all’estremità del alla presa di corrente. tubicino nell’apertura...
  • Seite 120: Estrazione

    Questo potrebbe comportare il blocco dei dotti lattiferi e l’ingorgo. l Per l’operazione 1 (paragrafo 7.2): selezionare un ritmo di aspirazione rapido su Lactina Select per avviare il flusso Impostare l’anello di regolazione del latte. Ridurre la velocità quando vuoto al minimo.
  • Seite 121 Tenere la coppa sul seno Porre la coppa per il seno sul con il pollice e l’indice. seno in modo che il capezzolo Sostenere il seno con siacorrettamente centrato il palmo della mano. nel condotto. Impostare il proprio „vuoto confortevole“: Accendere il tiralatte con ruotare verso il basso l’anello di regolazione vuoto e aumentare il vuoto fino a quando...
  • Seite 122: Preparazione All'estrazione Doppia

    Consultare il proprio consulente per l’allattamento o l’ostetrica se la quantità di latte estratta è minima o nulla oppure se l’estrazione risulta dolorosa. Nota l Scollegare sempre Lactina Spegnere il tiralatte con dall’alimentazione di rete al termine dell’estrazione. Informazioni 7.3 Preparazione...
  • Seite 123 Usare il supporto o il porta Chiudere la bottiglia con un coperchio bottiglia per evitare ribaltamenti. o con coperchio e ghiera (a seconda del tipo di bottiglia).  Seguire le istruzioni del capitolo 8 „Conservazione e scongelamento del latte materno“. Impostare l’anello di regolazione Posizionare la seconda coppa vuoto al minimo.
  • Seite 124: Aspirazione Manuale

    7. Estrazione 7.4 Aspirazione manuale Informazioni l L’aspirazione manuale richiede un set per tiralatte collegato al connettore (set per tiralatte riutilizzabile). Per tale motivo, l’aspirazione manuale non è possibile con il set giornaliero per tiralatte One Day. Avvitare il cilindro sul connettore della coppa per il seno posta sul set per tiralatte riutilizzabile.
  • Seite 125 Posizionare la coppa per il seno Impostare l’anello di regolazione come descritto al paragrafo 7.1, vuoto al minimo. operazioni 2 e 3.
  • Seite 126: Conservazione E Scongelamento Del Latte Materno

    I Con il dispositivo per il riscaldamento Calesca*, è possibile scaldare delicatamente il latte materno. Nota Le presenti linee guida per la conservazione e lo scongelamento del latte materno sono semplicemente consigli. Possono differire dalle linee guida e dagli standard interni dell’ospedale. *Ulteriori informazioni sul sito www.medela.it...
  • Seite 127: Risoluzione Dei Problemi

    Il porta cilindro, pistone/cilindro compresi, deve essere applicato corret- tamente a Lactina. l Durante l’estrazione da un solo lato, il tappo della porta di collegamento deve essere inserito nell’apertura non utilizzata del porta cilindro.
  • Seite 128: Garanzia Internazionale/Smaltimento

    I controlli di routine e la manutenzione possono essere svolti esclusivamente da personale autorizzato Medela. L’ingegnerizzazione del tiralatte Medela Lactina è stata verificata da istituti di ricerca indipendenti per accertarne la conformità alla norma EN/IEC 60601-1. Copie dei suddetti certificati sono disponibili su richiesta.
  • Seite 129: Elenco Accessori

    Codice articolo Prodotto 008.0179 Set giornaliero per tiralatte One Day Symphony e Lactina con coppa per il seno PersonalFit taglia M (24 mm), confezione multipla da 72 pezzi Set giornaliero per tiralatte One Day Symphony e Lactina con coppa per 008.0180...
  • Seite 130 25 pezzi 800.0663 Porta cilindro globale Lactina, confezione multipla da 25 pezzi 800.0664 Tappo per porta di collegamento Lactina, confezione multipla da 25 pezzi Porta cilindro globale Lactina con tappo per porta di collegamento, confezione 800.0665 multipla da 25 pezzi 800.0609...
  • Seite 132 Inhoudsopgave 1. Beoogd gebruik/populatie – contra-indicatie 2. Betekenis van de symbolen 3. Belangrijke veiligheidsinformatie 4. Productomschrijving 5. Reiniging 5.1 Afkolfset voor één dag en herbruikbare afkolfset – na elk gebruik 5.2 Herbruikbare afkolfset – voor het eerste gebruik, eenmaal per dag en steeds alvorens hem aan een andere gebruiker te geven 5.3 Herbruikbare afkolfset –...
  • Seite 133: Beoogd Gebruik/Populatie - Contra-Indicatie

    Vrouwen zijn vaak blij te horen dat een borstkolf gebruikt kan worden als ondersteuning bij het geven van borstvoeding en dat sommige kolven zo zijn ontworpen dat ze het zuigen van een baby imiteren. Contra-indicaties Er zijn geen contra-indicaties bekend voor de Lactina borstkolf.
  • Seite 134: Betekenis Van De Symbolen

    2. Betekenis van de symbolen Het waarschuwingssymbool geeft belangrijke veiligheidsinstructies aan. Als die instructies niet in acht worden genomen, kan dat letsel of schade aan de borstkolf veroorzaken. Indien het waarschuwingssymbool wordt gebruikt in combinatie met de volgende woorden, staat het voor: Waarschuwing Kan leiden tot ernstig letsel of de dood.
  • Seite 135: Symbolen Op Het Apparaat

    Dit symbool geeft de productiedatum aan (vier cijfers voor het jaar en twee cijfers voor de maand). Dit symbool geeft aan dat de Lactina een klasse II-apparaat is. Dit symbool geeft de zekering aan (om de zekeringdoos of de locatie...
  • Seite 136: Belangrijke Veiligheidsinformatie

    Houd het netsnoer uit de buurt van verwarmde oppervlakken. Pak een elektrisch apparaat dat in het water is gevallen niet vast. Trek onmiddellijk de stekker uit het stopcontact. Laat de Lactina borstkolf nooit onbeheerd achter met de stekker in het stopcontact.
  • Seite 137 Gebruik de Lactina borstkolf niet tijdens baden of douchen. Gebruik de Lactina borstkolf niet tijdens het slapen of als u zeer slaperig bent. Bestuur geen auto tijdens het handsfree afkolven. Er is toezicht vereist als de Lactina borstkolf in de buurt van kinderen wordt gebruikt.
  • Seite 138: Productomschrijving

    600.0930 Alleen bij de Lactina Select De Lactina Select heeft een extra knop om de pompsnelheid te regelen tussen 40 en 60 cycli per minuut. Kies een snel kolfritme om de melkstroom te stimuleren. Verlaag de snelheid als de melk begint te stromen.
  • Seite 139 Disposable flesjes 80 ml: 200.2957 Disposable flesjes 150 ml: 200.2956 Disposable flesjes 250 ml: 200.4802 Herbruikbare producten Lactina afkolfset in een PE-tas, 50 stuks (EN, DE, FR, IT, NL): 800.0388 Lactina afkolfset in een PE-tas, 50 stuks (EN, SV, DA, FI, NO, PL): 800.0096 Basisset in een doos: 25 stuks: 800.0605...
  • Seite 140 4. Productomschrijving Herbruikbare afkolfset (toegepaste onderdelen) 800.0388 / 800.0096 1x PersonalFit™ 1x PersonalFit™ borstschild M (24 mm) connector (voor borstschilden in 810.7088 andere maten, zie hoofdstuk 11, pagina 161) 1x silicone slang 810.7084 (105 cm) 800.0828 1x vacuümklep 810.0475 2x membraan van de vacuümklep 820.7013 1x moedermelkflesje,...
  • Seite 141 Afkolfset voor één dag (toegepaste onderdelen) 008.0179 / 008.0180 / 008.0181 1x borstschild 1x poortafdekking 1x cilinderhouder 1x zuiger 810.0668 820.0135 810.0494 1x connector 1x silicone slang 1x rubber afdichting 1x membraan 200.2575 1x vacuümregelring 1x cilinder 200.2775 810.0717 Disposable Disposable Disposable Colostrum-...
  • Seite 142: Reiniging

    5. Reiniging 5.1 Afkolfset voor één dag Waarschuwing en herbruikbare afkolfset – na elk gebruik l Gebruik voor het reinigen alleen water van drinkkwaliteit. l Haal de borstkolf uit elkaar en maak alle onderdelen die in aanraking komen met de borst en moedermelk onmiddellijk na het gebruik schoon, om te voorkomen dat melkresten opdrogen en om de vorming van bacteriën tegen te gaan.
  • Seite 143 Maak alle delen schoon met Spoel alle onderdelen in koud, veel warm water en een schoon water (ongeveer 20 °C). standaard afwasmiddel (ongeveer 30 °C). Afkolfset voor één dag Droog de onderdelen af met Gooi de afkolfset voor één dag een schone doek of leg weg na max.
  • Seite 144: Herbruikbare Afkolfset - Voor Het Eerste Gebruik, Eenmaal Per Dag En Steeds Alvorens Hem Aan Een Andere Gebruiker Te Geven

    5. Reiniging 5.2 Herbruikbare afkolfset – voor het Waarschuwing eerste gebruik, eenmaal per dag en steeds alvorens hem aan een l Gebruik door meer dan één moeder andere gebruiker te geven zonder adequate sterilisatie kan een gezondheidsrisico met zich meebrengen. l Alle onderdelen moeten na elk gebruik worden gereinigd.
  • Seite 145: Herbruikbare Afkolfset - Desinfecteren En Steriliseren

    5.3 Herbruikbare afkolfset – desinfecteren en steriliseren Maak alle delen schoon in een desinfecterende Controleer of de onderdelen wasmachine gedurende vijf minuten (op 93 °C). schoon en onbeschadigd zijn. Controleer of de afkolfset functioneert. Vervang defecte onderdelen van de afkolfset. 5.4 De borstkolf 5.5 De borstkolf reinigen...
  • Seite 146: Voorbereidingen Voor Het Afkolven

    Zie hoofdstuk 5.2. afkolfset openen. Kies het gewenste l Gebruik alleen originele accessoires disposable flesje (35/80/150/250 ml). van Medela. l Controleer voor gebruik de onderdelen van de afkolfset op slijtage en beschadiging. l Voor het gebruik moeten alle onderdelen helemaal droog zijn.
  • Seite 147: De Herbruikbare Afkolfset In Elkaar Zetten

    Schroef de disposable fles Druk het borstschild (van 35/80/150 of 250 ml) op de connector. op de connector. 6.2 De herbruikbare afkolfset in elkaar zetten Druk het borstschild Druk het membraan op de connector. voorzichtig op de vacuümklep totdat het gekoppeld is.
  • Seite 148: Zuiger/Cilinder In Elkaar Zetten

    Opmerking l Gebruik alleen originele accessoires Duw de combinatie vacuümklep/ van Medela. membraan op de connector. l Controleer voor gebruik de onderdelen van  Positioneer de vacuümklep zijdelings. de afkolfset op slijtage en beschadiging.
  • Seite 149 Schroef de fles op de Steek de slang in de connector. corresponderende opening van de connector. Schuif de vacuüminstelring Schuif de zuiger in de cilinder. op de cilinder.
  • Seite 150 Plaats de poortafdekking op de cilinderhouder. Draai de pin van de cilinderhouder in de corresponderende opening op de Lactina. Druk de zuiger vervolgens in de rubberen klem op de arm van de afkolfset totdat hij vastklikt.
  • Seite 151 Schroef de zuiger/cilinder vast Plaats de cilinderhouder met in de cilinderhouder. de zuiger/cilinder horizontaal in de opening aan de voorkant van de Lactina. Steek het adaptereinde van Sluit het netsnoer aan de slang in de opening van op het stopcontact.
  • Seite 152: Afkolven

    Dit kan leiden tot een blokkade van de melkkanalen en tot stuwing. l Bij stap 1 (hoofdstuk 7.2): Kies op de Lactina Select een snel kolfritme om de melkstroom op gang te brengen. Verlaag de snelheid als Zet de vacuüminstelring de melk begint te stromen.
  • Seite 153 Houd het borstschild met uw Plaats het borstschild op de borst duim en wijsvinger op de borst. zodat de tepel zich centraal in Ondersteun de borst met de schacht bevindt. de palm van uw hand. Vacuüm comfort instellen: draai de Schakel de borstkolf in met vacuüminstelring omlaag en verhoog het vacuüm totdat het enigszins...
  • Seite 154: Voorbereiding Voor Dubbel Afkolven

    Opmerking Schakel de borstkolf uit met l Haal de stekker van de Lactina na het afkolven altijd direct uit het stopcontact. Info 7.3 Voorbereiding voor l Bij hoofdstuk 7.3:...
  • Seite 155 Gebruik de flesstandaard of de Sluit de fles af met een deksel of met fleshouder om te voorkomen dat deksel en dekselinleg (afhankelijk van de fles omvalt. type fles).  Volg de aanwijzingen in hoofdstuk 8 „Moedermelk bewaren en ontdooien“. Zet de vacuüminstelring Plaats het tweede borstschild op op minimaal niveau.
  • Seite 156: Handmatig Afkolven

    7. Afkolven 7.4 Handmatig afkolven Info l Handmatig afkolven vereist een bedrade afkolfset op de connector (herbruikbare afkolfset) Om die reden is handmatig afkolven niet mogelijk met de afkolfset voor één dag. Schroef de cilinder op de borstschildconnector van de herbruikbare afkolfset. Draai de vacuüminstelring omlaag en verhoog het vacuüm totdat het enigszins oncomfortabel is.
  • Seite 157 Positioneer het borstschild zoals Zet de vacuüminstelring vermeld in hoofdstuk 7.1 stappen op minimaal niveau. 2 en 3.
  • Seite 158: Moedermelk Bewaren En Ontdooien

    I Met behulp van de flessenwarmer Calesca* is het mogelijk moedermelk voorzichtig op te warmen. Opmerking Deze richtlijnen voor bewaren en ontdooien zijn aanbevelingen. Nationale en interne ziekenhuisrichtlijnen en -normen kunnen hiervan afwijken. *Meer informatie vindt u op www.medela.nl of op www.medela.be...
  • Seite 159: Problemen Oplossen

    De zuiger/cilinder is correct op de cilinderhouder of op het borstschild geschroefd. l De cilinderhouder met de zuiger/cilinder is correct op de Lactina geplaatst. l Tijdens enkel afkolven is de poortafdekking in de ongebruikte opening op de cilinderhouder gestoken.
  • Seite 160: Internationale Garantie/Afvalverwijdering

    Medela. Onafhankelijke testinstituten hebben vastgesteld dat de constructie van de Medela Lactina borstkolf in overeenstemming is met de norm EN/IEC 60601-1. Een kopie van de desbetreffende certificaten worden op verzoek uitgereikt. Vanwege de toegepaste constructie, verwacht Medela niet dat de elektrische veiligheid op enig moment tijdens de levenscyclus van het product wordt aangetast, mits het apparaat correct en overeenkomstig het beoogde gebruik wordt gebruikt.
  • Seite 161: Lijst Van Accessoires

    Set van 40 disposable moedermelkflesjes 250 ml met deksel, multibox 4 sets 800.0388 Enkele Lactina afkolfset in PE-tas (Lactaset), EN DE FR IT NL, multibox 50 stuks 800.0096 Enkele Lactina afkolfset in PE-tas (Lactaset), EN SV DA FI NO PL, multibox 50 stuks 800.0605 Basisset zonder slang, multibox 25 stuks 200.0571 PersonalFit borstschild maat S (21 mm), multipak 25 stuks 800.0668...
  • Seite 162 Lactina zuiger, multipak 25 stuks 800.0634 800.0661 Lactina universele cilinder, multipak 25 stuks 800.0636 Lactina vacuüminstelring, multipak 25 stuks Lactina universele cilinder met vacuüminstelring, multipak 25 stuks 800.0662 800.0663 Lactina universele cilinderhouder, multipak 25 stuks 800.0664 Lactina poortafdekking, multipak 25 stuks Lactina universele cilinderhouder met poortafdekking, multipak 25 stuks 800.0665...
  • Seite 164: Emc / Technical Description

    Wireless communications equipment such as wireless home network devices, mobile phones, cordless telephones and their base stations, walkie-talkies can affect the electric breastpump Lactina and should be kept at least a distance 1.0 m away from the equipment. Electromagnetic Compatibility (EMC, IEC 60601-1-2:2007, Table 1)
  • Seite 165: Electromagnetic Immunity

    Electromagnetic Compatibility (EMC, IEC 60601-1-2:2007, Table 2) Electromagnetic immunity The electric breastpump Lactina is intended for use in the electromagnetic environment specified below. The customer or the user of the electric breastpump Lactina should assure that it is used in such an environment. Electromagnetic...
  • Seite 166 <5 % U <5 % U the electric breast- (>95 % dip in U (>95 % dip in U pump Lactina is for 5 s for 5 s powered from an uninterruptible power supply or a battery. Power frequency...
  • Seite 167 Electromagnetic Compatibility (EMC, IEC 60601-1-2:2007, Table 4) Electromagnetic immunity The electric breastpump Lactina is intended for use in the electromagnetic environment specified below. The customer or the user of the electric breastpump Lactina should assure that it is used in such an environment. IEC 60601...
  • Seite 168 RF transmitters, an electromagnetic site survey should be considered. If the measured field strength in the location in which the electric breastpump Lactina is used exceeds the appli- cable RF compliance level above, the electric breastpump Lactina should be observed to verify normal operation.
  • Seite 169 Recommended separation distances between portable and mobile RF communications equipment and the electric breastpump Lactina The electric breastpump Lactina is intended for use in an electromagnetic environment in which radiated RF disturbances are controlled. The customer or the user of the electric breastpump...
  • Seite 170: Technical Specifications

    Utilisation vuoto (circa) Funzionamento vacuüm (ca.) Bediening °C –100 ... –240 mmHg –13.33 ... –32 kPa Transport / Storage Lactina Electric Plus 50 cpm Transport/Lagerung Lactina Select 40– 60 cpm Transport/stockage Trasporto/conservazione Transport/opslag 100 – 240 V ~ °C 50 / 60 Hz...
  • Seite 171 Notes...
  • Seite 172 40012 Calderara di Reno (BO) United Kingdom Italy Phone +44 161 776 0400 Phone + 39 051 72 76 88 Australia +44 161 776 0444 Medela Australia Pty Ltd, + 39 051 72 76 89 info@medela.co.uk Medical Technology info@medela.it www.medela.co.uk www.medela.it...

Diese Anleitung auch für:

Lactina selectLactina electric plus

Inhaltsverzeichnis