Herunterladen Inhalt Inhalt Diese Seite drucken
Beurer BM 58 Gebrauchsanweisung
Vorschau ausblenden Andere Handbücher für BM 58:
Inhaltsverzeichnis

Werbung

Verfügbare Sprachen
  • DE

Verfügbare Sprachen

  • DEUTSCH, seite 1
BEURER GmbH • Söflinger Str. 218 • 89077 Ulm (Germany)
Tel.: +49 (0) 731 / 39 89-144 • Fax: +49 (0) 731 / 39 89-255
www.beurer.com • Mail: kd@beurer.de
BM 58
D Blutdruckmessgerät
Gebrauchsanweisung ................................................................... 2 – 16
G Blood pressure monitor
Instructions for use .....................................................................17 – 29
F Tensiométre
Moded'emploi .............................................................................. 30 – 43
E Tensiómetro
Manual de instrucciones.............................................................44 – 58
I Misuratore di pressione
Istruzioni per l'uso .......................................................................59 – 73
T Bilgisayarli tansiyon ölçer
Kullanım kılavuzu ........................................................................ 74 – 87
r Прибор для измерения кровяного давления в плечевой артерии
Инструкция по применению ...................................................88 – 103
Q Ciśnieniomierz
Instrukcja obsługi ....................................................................104 – 117
Electromagnetic Compatibility Information
............................... 118 – 121

Werbung

Inhaltsverzeichnis
loading

Inhaltszusammenfassung für Beurer BM 58

  • Seite 1 Instrukcja obsługi ..............104 – 117 Electromagnetic Compatibility Information ....... 118 – 121 BEURER GmbH • Söflinger Str. 218 • 89077 Ulm (Germany) Tel.: +49 (0) 731 / 39 89-144 • Fax: +49 (0) 731 / 39 89-255 www.beurer.com • Mail: kd@beurer.de...
  • Seite 2: Wichtige Hinweise

    In der Gebrauchsanweisung, auf der Verpackung und auf Hinweise. dem Typschild des Geräts und des Zubehörs werden fol- gende Symbole verwendet: Mit freundlicher Empfehlung Ihr Beurer-Team Vorsicht 1. Kennenlernen Das Oberarm-Blutdruckmessgerät dient zur nichtinvasiven Hinweis Messung und Überwachung arterieller Blutdruckwerte von Hinweis auf wichtige Informationen erwachsenen Menschen.
  • Seite 3 Gleichstrom Hinweise zur Anwendung Entsorgung gemäß Elektro- und Elektro- • Um eine Vergleichbarkeit der Werte zu gewährleisten, nik-Altgeräte EG-Richtlinie 2002/96/EC messen Sie Ihren Blutdruck immer zu gleichen Tageszei- – WEEE (Waste Electrical and Electronic ten. Equipment) • Ruhen Sie sich vor jeder Messung ca. 5 Minuten aus! •...
  • Seite 4 Blutdruck, Diabetes, Durchblutungs- und Rhythmusstö- • Legen Sie die Manschette nicht über Wunden an, da dies rungen sowie bei Schüttelfrost oder Zittern. zu weiteren Verletzungen führen kann. • Das Blutdruckmessgerät darf nicht im Zusammenhang • Sie können das Blutdruckmessgerät mit Batterien oder mit einem Hochfrequenz-Chirurgiegerät verwendet wer- mit einem Netzteil betreiben.
  • Seite 5 • Batterien können bei Verschlucken lebensgefährlich sein. gewährleistet. Bewahren Sie deshalb Batterien und Produkte für Klein- • Reparaturen dürfen nur vom Beurer Kundenservice oder kinder unerreichbar auf. Wurde eine Batterie verschluckt, autorisierten Händlern durchgeführt werden. Prüfen Sie muss sofort medizinische Hilfe in Anspruch genommen jedoch vor jeder Reklamation zuerst die Batterien und werden.
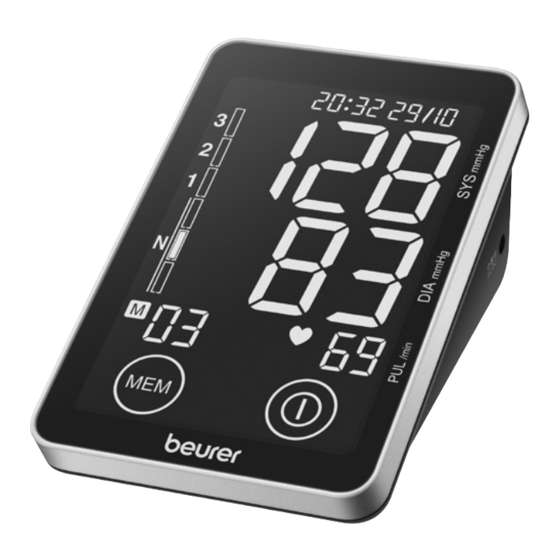
  • Seite 6: Gerätebeschreibung

    3. Gerätebeschreibung Touch Screen-Aktivierungsschalter Das Gerät verfügt über ein Touch Screen Display. Um eine unbeabsichtigte Aktivierung des Bildschirms zu vermeiden, behalten Sie den Touch Screen-Aktivierungsschalter in der Position OFF, wenn das Gerät nicht im Gebrauch ist. Um das Gerät zu bedienen, bringen Sie den Touch Screen Akti- vierungsschalter in die Position ON.
  • Seite 7: Messung Vorbereiten

    Ihre gemessenen Werte auf den PC übertragen. 4. Messung vorbereiten Hierzu benötigen Sie ein USB Kabel (im Lieferumfang ent- halten) sowie die Beurer PC -Software „Health Manager“. Batterie einlegen Die Software können Sie kostenlos im Downloadbereich • Schieben Sie den Man- unter Service auf www.beurer.com herunterladen.
  • Seite 8 terien erneuen. Sobald die Batterien aus dem Gerät entfernt • Stellen Sie danach Monat, Tag, Stunde und Minute ein werden, muss die Uhrzeit neu eingestellt werden. und bestätigen Sie jeweils mit START/STOP Verbrauchte Batterien gehören nicht in den Hausmüll. Entsor- •...
  • Seite 9: Blutdruck Messen

    Uhrzeit. Die gespeicherten Messwerte bleiben jedoch Stecken Sie nun den Manschetten- erhalten. schlauch in den Anschluss für den Manschettenstecker. 5. Blutdruck messen Bitte bringen Sie das Gerät vor der Messung auf Raumtem- peratur. Achtung: Das Gerät darf nur mit der Original-Manschette Manschette anlegen betrieben werden.
  • Seite 10: Ergebnisse Beurteilen

    • Um das Messergebnis nicht zu verfälschen, ist es wichtig, • Die Messergebnisse Systolischer Druck, Diastolischer sich während der Messung ruhig zu verhalten und nicht Druck und Puls werden angezeigt. zu sprechen. • Sie können die Messung jederzeit durch das Drücken der Taste START/STOP abbrechen oder indem Sie den Blutdruckmessung durchführen...
  • Seite 11 steuert, anormal ist. Die Symptome (ausgelassene oder Werte für einen normalen Blutdruck sowie den Wert mit, ab vorzeitige Herzschläge, langsamer oder zu schneller Puls) dem die Höhe des Blutdrucks als gefährlich einzustufen ist. können u.a. von Herzerkrankungen, Alter, körperliche Veran- lagung, Genussmittel im Übermaß, Stress oder Mangel an Die Balkengrafik im Display und die Skala auf dem Gerät Schlaf herrühren.
  • Seite 12: Messwerte Speichern, Abrufen Und Löschen

    Morgen-Messung angezeigt (Morgen: 5.00 Uhr – 9.00 Uhr, Bereich der Systole Diastole Maßnahme Anzeige ). Durch weiteres Drücken der Taste MEM wird Blutdruckwerte (in mmHg) (in mmHg) der Durchschnittswert der letzten 7 Tage der Abend-Mes- regelmäßige sung angezeigt (Abend: 18.00 Uhr – 20.00 Uhr, Anzeige Hoch normal 130 –139 85 –...
  • Seite 13: Fehlermeldung/Fehlerbehebung

    Eine erfolgreiche Datenübertragung wird wie in Abb 1. dar- • ein System- oder Gerätefehler vorliegt ( gestellt. oder erscheint im Display), • die Batterien fast verbraucht sind Bei einer nicht erfolgreichen Datenübertragung wird die Fehlermeldung wie in Abb. 2 angezeigt. Wiederholen Sie in diesen Fällen die Messung.
  • Seite 14: Gerät Reinigen Und Aufbewahren

    -20 °C bis +55 °C, ≤ 95 % relative Luft- 11. Technische Angaben rungsbedingungen feuchte, 800 –1050 hPa Umgebungsdruck Stromversorgung Modell-Nr. BM 58 4 x 1,5 V AA Batterien Batterie-Lebens- Für ca. 500 Messungen, je nach Höhe des Messmethode Oszillometrisch, nicht invasive Blutdruck- dauer Blutdrucks bzw.
  • Seite 15 Bitte beachten Sie dabei, dass tragbare und mobile Ausgang 6 V DC, 600 mA, nur in Verbindung mit HF-Kommunikationseinrichtungen dieses Gerät beein- Beurer Blutdruckmessgeräten flussen können. Genauere Angaben können Sie unter der angegebenen Kundenservice-Adresse anfordern oder am Hersteller Friwo Gerätebau GmbH Ende der Gebrauchsanweisung nachlesen.
  • Seite 16: Garantie

    Nachweis des Kaufes zu führen. Die Garantie ist innerhalb eines Zeitraumes von 3 Jahren ab Kaufdatum gegenüber der Beurer GmbH, Söflinger Straße 218, 89077 Ulm, Germany geltend zu machen. Der Kunde hat im Garantiefall das Recht zur Reparatur der Ware bei unseren eigenen oder bei von uns autorisierten Werkstätten.
  • Seite 17: Getting To Know Your Instrument

    Caution users and observe the information they contain. Best regards, Your Beurer Team Note Note on important information 1. Getting to know your instrument The upper arm blood pressure monitor is used for non-inva- Follow instructions for use sive measurement and monitoring of adults’...
  • Seite 18 • Do not take a measurement within 30 minutes after eat- Manufacturer ing, drinking, smoking or exercising. • Repeat the measurement if you are unsure of the meas- Permissible transport and storage tempe- ured value. Storage rature. Permissible transport and storage •...
  • Seite 19 • During the blood pressure measurement, blood circula- • The device is only intended for the purpose described in tion must not be stopped for an unnecessarily long time. these instructions for use. The manufacturer is not liable If the device malfunctions, remove the cuff from the arm. for damage resulting from improper or careless use.
  • Seite 20: Unit Description

    • Never attempt to repair the instrument or adjust it yourself. 2. Cuff We can no longer guarantee perfect functioning if you do. 3. Cuff connector • Repairs may only be performed by Beurer Customer Ser- 4. Touch screen activation vice or authorized dealers. However, always check the switch batteries and replace them if necessary prior to making 5.
  • Seite 21 The device features a touch screen display. To prevent the screen from being activated accidentally, keep the touch The Beurer blood pressure monitor also allows you to trans- screen activation switch set to OFF when the device is not fer your measured values to the PC.
  • Seite 22: Prepare Measurement

    • Free memory on the primary partition of at least: them via your specialist electrical supplier or local collec ting – x86 – 600 MB point for recyclable waste. – x64 – 1.5 GB Note: Batteries containing pollutant substances • Graphic resolution from: 1024 x 768 pixels are marked as follows: Pb = Battery contains •...
  • Seite 23: Measuring Blood Pressure

    5. Measuring blood pressure Note: In 24h mode, the date is displayed as day/month. In 12h mode, as month/day. Please ensure the device is at room temperature before measuring. Operation with the mains part You can also operate this device with a mains part. Positioning cuff When doing so, there must not be any batteries in the bat- Fit the cuff round your bare left...
  • Seite 24 Insert the cuff tubing into the socket ing on something. Do not cross your legs. Place your feet for the cuff attachment. flat on the ground. • In order not to distort the result, it is important to keep still during the measurement and not talk.
  • Seite 25: Evaluating Results

    • You can cancel the measurement at any time by press- sive use of stimulants, stress or lack of sleep. Arrhythmia can only be ascertained through examination by your doctor. ing the START/STOP button or by pushing the touch Repeat the measurement if the flashing icon is dis- screen activation button to OFF.
  • Seite 26: Saving, Retrieving And Deleting Results

    WHO classification on the unit always indicates the higher measured data, the earliest items of data measured are range (grade hypertension in the example described). lost. • Move the touch screen activation switch to the ON posi- Range of Systolic Diastolic Measure tion.
  • Seite 27: Error Messages/Trouble-Shooting

    8. Transferring measurements • systolic or diastolic pressure was outside the measure- ment range ( or Lo appears on the display) Connect the blood pressure monitor to your PC using the • the cuff is fastened too tightly or loosely ( USB cable.
  • Seite 28: Cleaning And Storing The Instrument

    800 –1050 hPa ambient pres- sure 11. Specifications Power supply 4 x 1,5 V AA batteries Model no. BM 58 Battery life For approx. 500 measurements, Measurement Oscillometric, non-invasive blood pres- depending on the blood pressure level method sure measurement on the upper arm...
  • Seite 29: Mains Part

    Output 6 V DC, 600 mA, only in connection with interfere with this unit. More details can be requested beurer blood pressure monitor from the stated Customer Service address or found at the end of the instructions for use. Supplier Friwo Gerätebau GmbH...
  • Seite 30: Premières Expériences

    Avec nos sentiments dévoués Attention Beurer et son équipe 1. Premières expériences Remarque Le lecteur de tension artérielle au bras sert à la mesure non Ce symbole indique des informations invasive et au contrôle de la tension artérielle chez l’adulte.
  • Seite 31 Appareil de type BF Remarques relatives à l’utilisation • Mesurez toujours votre tension au même moment de la journée afin que les valeurs soient comparables. Courant continu • Avant toute mesure, reposez-vous environ 5 minutes ! Élimination conformément à la directive • Lorsque vous devez effectuer plusieurs mesures sur une européenne 2002/96/CE –...
  • Seite 32 basse, de diabète, de troubles de la circulation et du • Ne placez pas le brassard sur des plaies, son utilisation rythme cardiaque et de frissons de fièvre ou de tremble- peut les aggraver. ments. • Vous pouvez utiliser le tensiomètre avec des piles ou un •...
  • Seite 33 • Les réparations doivent être effectuées uniquement par le conséquent les piles et les produits hors de portée des service après-vente de Beurer ou des revendeurs agréés. jeunes enfants. Au cas où une pile a été avalée, faites Cependant avant de faire une réclamation, contrôlez immédiatement appel à...
  • Seite 34: Description De L'appareil

    3. Description de l’appareil Interrupteur d’activation de l’écran tactile L’appareil dispose d’un affichage à écran tactile. Pour éviter une activation accidentelle de l’écran, gardez l’interrupteur d’activation de l’écran tactile en position OFF quand l’appa- reil n’est pas utilisé. Pour utiliser l’appareil, mettez l’interrup- teur d’activation de l’écran tactile en position ON.
  • Seite 35: Préparation À La Mesure

    • Résolution graphique à partir de : 1024 x 768 pixels Interface PC • Port USB 1.0 ou version supérieure Avec le tensiomètre Beurer, vous pouvez en plus transférer les 4. Préparation à la mesure valeurs mesurées sur votre PC. Pour profiter de cette fonc- tionnalité, vous avez besoin d’un câble USB (compris dans le...
  • Seite 36: Mesure De La Tension Artérielle

    Ne mettez pas les piles usées à la poubelle. La loi vous Remarque : en mode 24h, la date s'affiche sous forme jour/ oblige d’éliminer les piles. mois ; en mode 12h, sous forme mois/jour. Remarque : Vous trouverez les symboles Fonctionnement avec l'adaptateur secteur suivants sur les piles contenant des subs- Vous pouvez aussi utiliser cet appareil en le branchant avec...
  • Seite 37 Mise en place du brassard Attention: L’appareil ne doit être utilisé qu’avec le bras- sard d’origine. Avec manchette pour tours de bras de 22 à Posez le brassard autour du bras 30 cm. Sous le numéro de commande 163.246, un bras- gauche nu.
  • Seite 38: Evaluation Des Résultats

    Mesure de la tension artérielle • Vous pouvez interrompre la mesure à tout moment en appuyant sur la touche START/STOP ou en glissant l’in- • Mettez l’interrupteur d’activation de l’écran tactile en terrupteur d’activation de l’écran tactile en position OFF. position ON.
  • Seite 39 à l’âge, à une prédisposition corporelle, à une mauvaise « hypertension de degré » et diastole « normale »), la classi- hygiène de vie, au stress ou au manque de sommeil. L’aryth- fication WHO de l’appareil vous propose systématiquement mie ne peut être décelée que par une consultation médicale. la zone la plus élevée, soit, dans notre exemple, «...
  • Seite 40: Enregistrement, Appel Et Suppression Des Valeurs Mesurées

    7. Enregistrement, appel et suppression des • Pour éteindre, appuyez de nouveau sur la touche MEM ou la touche START/STOP ou mettez l’interrupteur valeurs mesurées d’activation de l’écran tactile en position OFF. • Les résultats de chaque mesure réussie sont enregistrés •...
  • Seite 41: Message D'erreur / Suppression Des Erreurs

    être plié sous un angle fermé. Le cas échéant, remettez les piles ou remplacez-les. 11. Fiche technique N° du modèle BM 58 Alarme technique – Description Si la tension artérielle (systolique ou diastolique) mesu- Mode de mesure Mesure de la tension artérielle au bras, rée se situe hors de l'intervalle donné...
  • Seite 42 Plage de mesure Pression du brassard 0 – 300 mmHg, Durée de vie des Environ 500 mesures, selon le niveau de systolique 60 – 260 mmHg, piles tension artérielle ainsi que la pression diastolique 40 –199 mmHg, de gonflage Pouls 40 –180 battements/mn Accessoires Brassard, Mode d’emploi, 4 x piles AA Précision de systolique ±...
  • Seite 43 Entrée 100 – 240 V, 50 – 60 Hz sortie de l’adaptateur. Sortie 6 V DC, 600 mA, uniquement en associa- tion avec les lecteurs de tension arté- rielle Beurer Fabricant Friwo Gerätebau GmbH...
  • Seite 44: Conocer El Aparato

    Les saluda cordialmente ¡Atención! Su equipo Beurer 1. Conocer el aparato Indicación El esfigmomanómetro se utiliza para la medición y control Indicación de información importante no invasivos de la presión arterial de adultos.
  • Seite 45 Corriente continua Indicaciones para la aplicación Eliminación de residuos según la Directiva • Para garantizar que los valores sean comparables, europea 2002/96/CE sobre residuos de tómese la tensión siempre a la misma hora del día. aparatos eléctricos y electrónicos (RAEE). •...
  • Seite 46 latorios, alteraciones del ritmo cardiaco, así como escalo- • El tensiómetro puede funcionar con pilas o con una fríos o temblores. fuente de alimentación. Tenga en cuenta que la transmi- • El tensiómetro no debe utilizarse conjuntamente con un sión de datos y su almacenamiento en memoria solo tie- equipo quirúrgico de alta frecuencia.
  • Seite 47 • Las reparaciones deben ser llevadas a cabo exclusiva- inaccesibles para los niños. Si se ha tragado una pila, mente por el servicio postventa de Beurer o bien por sus será necesario consultar inmediatamente a un médico. agentes autorizados. Antes de gestionar cualquier recla- •...
  • Seite 48: Descripción Del Aparato

    3. Descripción del aparato Interruptor de encendido de la pantalla táctil El aparato dispone de pantalla táctil; para evitar que esta se encienda por error, mantenga el interruptor de encendido de la pantalla táctil en la posición OFF mientras no esté usando el aparato.
  • Seite 49: Preparar La Medición

    • Resolución gráfica a partir de: 1024 x 768 píxeles Interfaz de PC • Puerto USB 1.0 o superior El tensiómetro de Beurer además le permite transferir los 4. Preparar la medición valores medidos al PC. Para ello necesita un cable USB (incluido), así como el soft- Colocar las pilas ware “Health Manager”...
  • Seite 50 del aparato, será necesario ajustar nuevamente la hora. Las • La pantalla se apagará si vuelve a pulsar la tecla START/ pilas usadas no deben tirarse junto con la basura domés- STOP tica. Según el ley hay que desechar las pilas. Entréguelas Nota: En el modo de 24 horas, la fecha se indica con día/ en su comercio de electricidad o en un punto limpio local.
  • Seite 51: Medir La Presión Sanguínea

    5. Medir la presión sanguínea Conecte el tubo del manguito a la conexión respectiva en el aparato. Espere a que el aparato esté a temperatura ambiente para realizar la medición. Colocar el brazalete Coloque el brazalete en el brazo Atención: El aparato debe ser utilizado exclusivamente con izquierdo, que deberá...
  • Seite 52 erróneos, mantenga el brazo quieto durante la medición y Si se detecta ahora una tendencia de presión sanguí- procure no hablar. nea demasiado alta, se infla nuevamente aumentándose • Siéntese para tomar la tensión sanguínea de manera la presión del brazalete. Tan pronto como se detecta el cómoda.
  • Seite 53: Evaluar Los Resultados

    6. Evaluar los resultados Clasificación OMS: De acuerdo con las directrices y/o definiciones de la Orga- Trastornos del ritmo cardíaco: nización Mundial de la Salud (OMS) y los últimos hallazgos, Este aparato puede detectar durante la medición eventua- los resultados de las mediciones se pueden clasificar y eva- les trastornos del ritmo cardíaco y en caso dado, advierte al luar según la siguiente tabla.
  • Seite 54: Almacenar, Activar Y Borrar Valores De Medición

    de medición, cada vez que se almacenan nuevos datos Zona de valores Sístole Diástole Medida se pierden los datos más antiguos. de la presión (en mmHg) (en mmHg) • Ponga el interruptor de encendido de la pantalla táctil en sanguínea la posición ON.
  • Seite 55: Transmisión De Los Valores De Medición

    • Si se olvida de apagar el aparato, este se desconectará • no se pudo medir la presión sistólica o diastólica (en la automáticamente pasados 2 minutos. pantalla aparece • la presión sistólica o diastólica queda fuera del rango de 8.
  • Seite 56: Limpiar Y Guardar El Aparato

    +5 °C hasta +40 °C, ≤ 90 % hume- funcionamiento dad relativa (sin condensación) 11. Especificaciones técnicas admisibles N.º de modelo BM 58 Condiciones de desde -20 °C hasta +55 °C, ≤ 95 % Método de Oscilométrico, medición no invasiva de la almacenamiento humedad relativa, presión ambiente...
  • Seite 57 Salida 6 V DC, 600 mA, solamente en combina- documento o leer el final de las instrucciones de uso. ción con los tensiómetros Beurer • Este aparato cumple la directiva europea en lo referente Fabricante Friwo Gerätebau GmbH...
  • Seite 58 Protección El aparato está provisto de un doble ais- lamiento de protección y de un termofusi- ble en su cara principal, que desconecta el aparato de la red en caso de avería. Asegúrese de haber extraído las pilas del compartimento de las pilas antes de utili- zar el adaptador.
  • Seite 59: Note Introduttive

    Attenzione e di osservare le avvertenze ivi riportate. Cordiali saluti Avvertenza Il Suo team Beurer Indicazione di importanti informazioni 1. Note introduttive Seguire le istruzioni per l’uso Lo sfigmomanometro da braccio serve per la misurazione non invasiva e il monitoraggio della pressione sanguigna di persone adulte.
  • Seite 60 • Per effettuare più misurazioni su una stessa persona, Smaltimento secondo le norme previste dalla attendere 5 minuti tra una misurazione e l’altra. Direttiva CE sui rifiuti di apparecchiature elet- • Evitare di mangiare, bere, fumare o praticare attività fisica triche ed elettroniche 2002/96/CE –...
  • Seite 61 • La misurazione delle pressione non deve impedire la cir- • L’apparecchio è concepito solo per l’uso descritto nelle colazione del sangue per un tempo inutilmente troppo presenti istruzioni per l’uso. Il produttore non risponde di lungo. In caso di malfunzionamento dell’apparecchio, danni causati da un uso inappropriato o non conforme.
  • Seite 62 • Le riparazioni devono essere eseguite esclusivamente dal Indicazioni sulle batterie servizio assistenza di Beurer o da ri-venditori autorizzati. • L’inghiottimento delle batterie può essere mortale. Con- Prima di ogni reclamo verificare in primo luogo lo stato servare quindi le batterie e i prodotti fuori della portata dei delle batterie e sosti-tuirle, se necessario.
  • Seite 63: Descrizione Dell'apparecchio

    3. Descrizione dell’apparecchio 1. Tubo flessibile del bracciale 2. Bracciale 3. Spina del bracciale 4. Pulsante di attivazione touch screen 5. Interfaccia USB 6. Supporto manicotto 7. Numeri di sequenza di memoria (lato sinistro) 8. Pulsante di memorizzazione MEM 9. Pulsante START/STOP 10.
  • Seite 64 • Risoluzione grafica a partire da: 1024 x 768 pixel Interfaccia PC • Porta USB 1.0 o superiore Con il misuratore di pressione Beurer è anche possibile tra- sferire i valori misurati sul PC. A tale scopo è necessario disporre di un cavo USB (fornito in dotazione) e del software per PC “Health Manager”...
  • Seite 65: Preparazione Della Misurazione

    4. Preparazione della misurazione Nota: Sulle batterie contenenti sostante nocive sono riportate le sigle seguenti: Pb = la batteria Inserimento delle batterie contiene piombo, Cd = la batteria contiene • Far scivolare verso l’alto cadmio, Hg = la batteria contiene mercurio. il supporto del manicotto posizionato sul retro Impostazione della data e dell’ora esatta...
  • Seite 66: Misurazione Della Pressione Sanguigna

    Funzionamento con l'alimentatore di rete Applicare il bracciale L'apparecchio può essere utilizzato anche con un alimen- Applicare il bracciale al braccio tatore di rete. libero da indumenti. La circola- A tale scopo il vano batterie non deve contenere batterie. zione sanguigna del braccio non L'alimentatore è...
  • Seite 67 Attenzione: l’apparecchio deve essere utilizzato unica- • Per non falsare il risultato della misurazione, è importante mente con il bracciale originale. Il bracciale è adatto per una mantenere un atteggiamento calmo e non parlare durante circonferenza braccio tra 22 e 30 cm. la misurazione.
  • Seite 68 • Vengono visualizzati i valori misurati della pressione sisto- turi, frequenza lenta o accelerata dei battiti) possono essere lica e diastolica e del polso. causati tra l’altro da malattie cardiache, età, predisposizione • È possibile interrompere la misurazione in qualsiasi genetica, ingerimento spropositato di dolciumi, stress o momento premendo il pulsante START/STOP o portando...
  • Seite 69: Salvataggio, Richiamo E Cancellazione Dei Valori Misurati

    7. Salvataggio, richiamo e cancellazione dei La classificazione OMS sul display indica il campo in cui si trova la pressione sanguigna misurata. valori misurati Se i valori di sistole e diastole si trovano in due campi OMS • I valori rilevati da ogni misurazione eseguita con successo diversi (ad es.
  • Seite 70: Trasmissione Dei Valori Misurati

    9. Messaggi di errore / Eliminazione dei • Se si dimentica di spegnere l’apparecchio, dopo circa 2 minuti si attiva lo spegnimento automatico. guasti 8. Trasmissione dei valori misurati In caso di anomalie, il display visualizza il messaggio I messaggi di errore possono essere visualizzati quando Collegare il misuratore di pressione al PC con un cavo USB.
  • Seite 71: Dati Tecnici

    " " o " Lo". In tal 11. Dati tecnici caso si consiglia di consultare un medico o di verificare la Codice BM 58 correttezza del procedimento. Metodo di Oscillometrico, misurazione non inva- I valori limite dell'allarme tecnico sono preimpostati in fab-...
  • Seite 72 Uscita 6 V DC, 600 mA, solo in abbinamento gnetica. Apparecchiature di comunicazione HF mobili con sfigmomanometri Beurer e portatili possono influire sul funzionamento di questo Produttore Friwo Gerätebau GmbH apparecchio. Per informazioni più dettagliate, rivolgersi all’Assistenza clienti oppure consultare la parte finale delle...
  • Seite 73 Protezione L’apparecchio dispone di un doppio isolamento di protezione ed è equi- paggiato di un fusibile termico sul lato primario che, in caso di guasto, separa l’apparecchio dalla rete. Prima di utilizzare l’adattatore, assicu- rarsi che le batterie siano state rimosse dal loro vano.
  • Seite 74: Önemli Bilgiler

    Dikkat Dostane tavsiyelerimizle Beurer Müessesesi 1. Tanıtım Önemli bilgilere yönelik notlar Kolun üst kısmı üzerinden tansiyon ölçme cihazı, yetişkin insanlarda atardamar üzerinden tansiyon değerlerinin dıştan Kullanım kılavuzunu dikkate alın...
  • Seite 75 • Bir kişide birden fazla ölçüm yapmak istiyorsanız, ölçüm- Elektrikli ve elektronik eski cihazlarla ilgili ler arasında 5 dakika bekleyin. AB Yönetmeliği 2002/96/EC - WEEE’ye • Ölçüme en az 30 dakika kala yememeli, içmemeli, sigara (Waste Electrical and Electronic Equip- kullanmamalı...
  • Seite 76 • Kan dolaşımı, tansiyon ölçümü nedeniyle gereğinden uzun ve yanlış kullanımdan ötürü oluşacak hasarlardan üretici kısıtlanmamalıdır. Aletin hatalı çalışması durumunda, man- firma sorumlu değildir. şeti koldan çıkarın. Muhafaza, bakım ve koruma ile ilgili bilgiler • Manşet hortumunun mekanik olarak sıkışmasını, ezilme- sini veya bükülmesini önleyin.
  • Seite 77 • Cihaz, kendiniz tarafından onarılmamalı veya kalibre edil- memeli, yani ayarlanmamalıdır. Aksi halde cihazın kusur- suz çalışması garanti edilemez. • Onarımlar sadece Beurer yetkili servisi veya yetkili satıcılar tarafından yapılmalıdır. Fakat her reklamasyondan önce, yine de ilk olarak pilleri kontrol ediniz ve gerekirse bunları...
  • Seite 78: Cihazın Tarifi

    3. Cihazın tarifi Dokunmatik ekran etkinleştirme şalteri Cihazda dokunmatik ekran mevcuttur. Ekranın kazayla etkinleştirilmesini önlemek için, alet kullanılmadığında dokunmatik ekran etkinleştirme anahtarını OFF konumunda tutun. Aleti çalıştırmak için dokunmatik ekran etkinleştirme anahtarını ON konumuna getirin. Dokunmatik ekrana doku- nulduğunda (START/STOP düğmesi veya MEM düğmesi) sinyal sesi duyulur.
  • Seite 79: Pil Takılması

    • Grafik çözünürlük en az: 1024 x 768 piksel 9. Aritmi tespiti • USB bağlantı noktası 1.0 veya üstü Bilgisayar bağlantı noktası 4. Pil takılması Ayrıca, Beurer tansiyon ölçme aletinizle ölçtüğünüz değerleri Pillerin Yerleştirilmesi bilgisayara aktarabilirsiniz. • Aletin arka tarafındaki Bunun için bir USB kablosu (teslimat kapsamındadır) ve bilekliği kilitlenene kadar...
  • Seite 80 • Daha sonra ayı, günü, saati ve dakikayı ayarlayın ve her Pil Değiştirme Göstergesi sürekli yanıyorsa, herhangi defasında START/STOP ile onaylayın. bir ölçüm daha yapmak olası değildir ve pillerin tamamını • START/STOP düğmesine yeniden basıldığında ekran değiştirmek zorundasınız. kapanır. Kullanılmış ve tamamen boşalmış piller ve aküler, özel olarak Not: 24h modunda tarih, gün/ay ile birlikte gösterilir.
  • Seite 81: Tansiyonun Ölçülmesi

    5. Tansiyonun ölçülmesi Manşetin hortumunu, manşetteki yerine takınız. Lütfen cihazı ölçümden önce oda sıcaklığına getiriniz. Manşetin takılması Manşeti, açık olan sol üst kola sarı- nız. Kolunuzdaki kan dolaşımı, dar Dikkat: Cihaz sadece orijinal manşet ile kullanılmalıdır. Orji- elbise ve benzeri sebeple etkilen- nal manşet 22 ile 30 cm arasındaki bir kol kalınlığı...
  • Seite 82: Sonuçların Değerlendirilmesi

    • Ölçüm sonucunun yanlış olmasını önlemek için, ölçüm • Ölçümü istediğiniz zaman START/STOP düğmesiyle esnasında sakin olunması, hareket edilmemesi ve konu- iptal edebilirsiniz veya dokunmatik ekran etkinleştirme şulmaması önemlidir. anahtarını OFF konumuna getirebilirsiniz. • Ölçme işleminin doğru uygulanması mümkün olmadıysa, Tansiyon ölçme işleminin uygulanması...
  • Seite 83 veya az uyuma olabilir. Aritmi hastalığı ancak doktorunuzun sınıflandırması (kademesi) size daima daha yüksek değerin yapacağı bir kontrol sayesinde tespit edilebilir. bulunduğu aralığı gösterir; burada tarif edilen örnekte örne- Ölçme işleminden sonra ekranda sembolü görüntülenirse, ğin „derece hipertoni“. ölçme işlemini tekrarlayınız. Ölçme işleminden önce 5 dakika Tansiyon Sistolik Diyastolik...
  • Seite 84: Ölçüm Değerlerinin Kaydedilmesi, Çağrılması Ve Silinmesi

    7. Ölçüm değerlerinin kaydedilmesi, • Aleti kapatmayı unutursanız otomatik olarak 2 dakika sonra kendiliğinden kapanır. çağrılması ve silinmesi 8. Ölçüm değerlerinin aktarılması • Her başarılı ölçme işleminin sonuçları, tarih ve saat bilgi- leri ile birlikte belleğe kaydedilir. 30’dan fazla ölçüm verisi Tansiyon ölçme aletinizi USB kablosuyla bilgisayarınıza bağ- mevcut olması...
  • Seite 85: Teknik Bilgiler

    Gerekirse pilleri yeniden yerleştirin veya değiştirin. 11. Teknik bilgiler Teknik Alarm – Tanım Model no. BM 58 Ölçülen tansiyon (sistolik veya diyastolik) Teknik Veriler Ölçüm yöntemi Üst koldan, osilometrik, invazif olmayan bölümünde belirtilen sınırların dışında olursa ekranda tansiyon ölçümü...
  • Seite 86 • Bu cihaz Avrupa Normu EN60601-1-2’ye uygundur ve Ölçüm belirsizliği klinik kontrole göre maks. izin verilen elektromanyetik uyumluluk bakımından özel koruma ted- standart sapma: sistolik 8 mmHg / birlerine tabidir. Lütfen taşınabilir veya mobil HF ileti- diyastolik 8 mmHg şim sistemlerinin bu cihazı etkileyebileceğini dikkate alın. Hafıza 2 x 60 kayıt yeri Ayrıntılı...
  • Seite 87 12. Adaptör Model no. FW 7575M/EU/6/06 Giriş 100 – 240 V, 50 – 60 Hz Çıkış 6 V DC, 600 mA, sadece Beurer tansi- yon ölçme cihazı ile birlikte kullanılır Üretici Friwo Gerätebau GmbH Koruma Cihazın çift koruyucu izolasyonu vardır ve bir hata durumunda cihazın elektrik...
  • Seite 88: Важные Указания

    В инструкции по применению, на упаковке и на типо- следуйте приведенным в ней указаниям. вой табличке прибора и принадлежностей используются следующие символы: С дружескими пожеланиями сотрудники компании Beurer Осторожно! 1. Ознакомление Аппарат для измерения кровяного давления в плечевой Указание артерии служит для неинвазивного измерения и кон- Отмечает...
  • Seite 89 Аппликатор типа BF указания по применению • Для сравнительного анализа данных всегда измеряйте свое артериальное давление только в определенные Постоянный ток часы. Утилизация прибора в соответствии • Не занимайтесь активной деятельностью в течение с Директивой ЕС 2002/96/EC об отхо- 5 минут перед измерением! дах...
  • Seite 90 время беременности рекомендуется проконсультиро- • Убедитесь в том, что к кровеносным сосудам руки, на ваться с врачом. которую накладывается манжета, не подсоединено • Заболевания системы кровообращения могут приве- медицинское оборудование (через внутрисосудистый сти к неправильным результатам измерения или сни- доступ, артериовенозный шунт или при внутрисосуди- жению...
  • Seite 91 указания в отношении батареек • Ремонт разрешается выполнять только сервис- • Проглатывание батареек может приводить к опасно- ной службе фирмы Beurer или авторизирован- сти для жизни. Поэтому храните батарейки и изделия ным сервисным организациям. Но перед любыми в недоступном для детей месте. В случае проглатыва- рекламациями...
  • Seite 92: Описание Прибора

    вопросам по утилизации обращайтесь в соответству- 9. Кнопка START/STOP ющую коммунальную службу. 10. Гнездо для сетевого переходника 11. Дисплей 3. Описание прибора Выключатель сенсорного дисплея На приборе имеется сенсорный дисплей. Чтобы избежать случайного включения сенсорного дисплея, держите его выключатель в позиции OFF, когда Вы не пользуетесь прибором.
  • Seite 93: Подготовка К Измерению

    • Графическое разрешение от: 1024 x 768 пикселей С помощью прибора для измерения артериального давле- • USB-порт 1.0 или больше ния Beurer Вы можете перенести на ПК измеренные значе- 4. Подготовка к измерению ния. Для этого вам потребуется USB-кабель (входит в ком- установка батарейки...
  • Seite 94 • Установите 4 алкалиновых батарейки типа AA 1,5 В. Для настройки даты и времени действуйте следующим Следите за тем, чтобы батарейки были вставлены с образом: соблюдением полярности. Заряжаемые аккумулятор- • Переведите выключатель сенсорного дисплея в пози- ные батареи использовать нельзя. цию...
  • Seite 95: Измерение Кровяного Давления

    используйте его только с указанным здесь блоком Наложить манжету питания. Наденьте манжету на обнажен- • Подключите блок питания к предусмотренному ное левое предплечье. Примите для этого разъему на правой стороне прибора для меры, чтобы слишком тесные измерения артериального давления. Блок питания элементы...
  • Seite 96 Внимание! Эксплуатация прибора допускается только с Выполнить измерение кровяного давления оригинальной манжетой. Данная манжета пригодна для • Переведите выключатель сенсорного дисплея в пози- руки с окружностью от 22 до 30 см. Под номером цию ON. 163.246 можно заказать манжету большего размера •...
  • Seite 97: Оценка Результатов

    • Вы можете прервать измерение в любой момент ется из-за пороков в биоэлектрической системе, кото- нажатием кнопки START/STOP , или передвинув рая управляет сердечными сокращениями. Симптомы выключатель сенсорного дисплея в позицию OFF. (пропущенные или преждевременные сердечные сокра- • Вы можете в любой момент прервать измерение щения, медленный...
  • Seite 98 ниям результаты измерений можно классифицировать и Диапазон систола Диастола Мера оценивать в соответствии со следующей таблицей. значений (в мм рт. (в мм рт. Обратите внимание, что это усредненные значения, слу- артериального ст.) ст.) жащие только для приблизительного ориентирования, давления так как индивидуальные значения артериального давле- Уровень...
  • Seite 99: Сохранение, Вызов И Удаление Результатов Измерения

    7. сохранение, вызов и удаление памяти, после тройного звукового сигнала будут уда- лены. результатов измерения • Для отключения снова нажмите кнопку MEM или • Результаты каждого успешного измерения сохраня- кнопку START/STOP или передвиньте выключатель ются в памяти вместе с датой и временем. При более сенсорного...
  • Seite 100: Очистка И Хранение Прибора

    динительную трубку манжеты. данных — описание Если измеренное значение артериального давления 11. Технические данные (систолического или диастолического) находится за Модель № BM 58 пределами границ, указанных в разделе «Технические Метод Осциллометрическое, неинвазив- данные», на дисплее отобразится сигнал тревоги, измерения ное измерение кровяного давления...
  • Seite 101 Точность ± 3 мм рт. ст. для систолического, Срок службы Для ок. 500 измерений, в зависимо- индикации ± 3 мм рт. ст. для диастолического, батареек сти от высоты кровяного давления пульс ± 5 % от определяемого зна- или давления накачивания чения Принадлежности Манжета, инструкция по применению, Надежность...
  • Seite 102 № модели FW 7575M/EU/6/06 одновременно прикасаться к пациенту Вход 100 – 240 В, 50 – 60 Гц и к выходному штекеру блока питания переменного/постоянного тока. Выход 6 В пост. тока, 600 мА, только в комбинации с приборами для измерения артериального давления Beurer...
  • Seite 103 13. Гарантия Дата продажи Мы предоставляем гарантию на дефекты материалов и изготовления этого прибора на срок 36 месяцев со дня Подпись продавца продажи через розничную сеть. Гарантия не распространяется: Штамп магазина - на случаи ущерба, вызванного неправиль- ным использованием AГ 93 Подпись...
  • Seite 104: Ważne Wskazówki

    Uwaga Z poważaniem, Zespół firmy Beurer Wskazówka 1. Zapoznanie Ważne informacje Naramienny aparat do mierzenia ciśnienia krwi służy do nie- Należy przestrzegać instrukcji obsługi inwazyjnego pomiaru i kontroli tętniczych wartości ciśnienia...
  • Seite 105 • Przed każdym pomiarem odpocznij ok. 5 minut. Utylizacja zgodnie z dyrektywą WE w • Jeśli chcesz wykonać kilka pomiarów u jednej osoby, sprawie zużytego sprzętu elektrycznego i zachowaj 5-minutowe przerwy między pomiarami. elektronicznego 2002/96/WE • Na co najmniej 30 minut przed wykonaniem pomiaru nie Producent należy jeść, pić, palić...
  • Seite 106 • Podczas pompowania urządzenia może dojść do zabu- nie ponosi odpowiedzialności za szkody wynikłe z niewła- rzenia sprawności danej kończyny. ściwego użycia urządzenia. • Nie wolno zakłócać cyrkulacji krwi przez zbyt długi pomiar Wskazówki do przechowywania i pielęgnacji ciśnienia. W przypadku błędnego działania urządzenia należy zdjąć...
  • Seite 107: Opis Urządzenia

    3. Wtyczka opaski • Naprawy mogą być przeprowadzane jedynie przez ser- 4. Włącznik wyświetlacza wis firmy Beurer lub autoryzowany serwis dystrybutora dotykowego sprzętu. Przed złożeniem reklamacji sprawdzić najpierw 5. Złącze USB baterie i w razie potrzeby wymienić je na nowe.
  • Seite 108 Za pomocą uchwytu mankietu znajdującego się na dole Oprogramowanie można pobrać bezpłatnie z sekcji pobiera- obudowy można wygodnie złożyć mankiet. W tym celu nia na karcie Service na stronie www.beurer.com. wysunąć uchwyt mankietu obydwoma kciukami do momentu jego zablokowania (patrz też rozdział: Zakłada-...
  • Seite 109: Przygotowanie Pomiaru

    4. Przygotowanie pomiaru Program Health Manager firmy Beurer — wymagania systemowe Zakładanie baterii 1. Obsługiwane systemy operacyjne: • Przesuń uchwyt mankietu • Windows XP z dodatkiem SP3 znajdujący się z tyłu urzą- • Windows Vista z dodatkiem SP1 lub wyższym dzenia do góry, aby się...
  • Seite 110: Pomiar Ciśnienia Krwi

    ustawianie czasu zegarowego i daty Eksploatacja urządzenia z zasilaczem Koniecznie ustaw datę i godzinę. Tylko w ten sposób można Urządzenie można również używać z zasilaczem. zapisywać pomiary z prawidłową datą i godziną i później W takim wypadku w urządzeniu nie mogą się znajdować sprawdzać...
  • Seite 111 Nałożyć opaskę Po numerem zamówienia 163.246 dostępny jest w handlu detalicznym lub jednym z punktów serwisowych większy Mankiet należy ułożyć na odsło- mankiet dla obwodu ramienia od 30 do 42 cm. niętym lewym przedramieniu. Nie wolno zmniejszać ukrwienia ramie- Przyjęcie prawidłowej pozycji nia przez noszenie za wąskiego ubrania.
  • Seite 112: Ocena Wyników

    • Pomiar ciśnienia krwi uruchamia się przyciskiem START/ działu „Komunikaty o błędach/Usuwanie błędów” w STOP . Po wyświetleniu pełnego ekranu pojawi się instrukcji obsługi i powtórz pomiar. ostatnio używana pamięć użytkownika ( ). W celu • Wynik pomiaru jest zapamiętywany automatycznie. zmiany pamięci użytkownika wciśnij przycisk MEM i •...
  • Seite 113 Jeśli symbol pojawia się częściej, należy zwrócić się do Zakres Ciśnienie Ciśnienie Postępowanie lekarza. Samodzielna diagnoza lub leczenie na podstawie wartości skurczowe rozkurczowe wyników pomiarów może być niebezpieczne. Koniecznie ciśnienia (w mmHg) (w mmHg) stosować się do zaleceń lekarza. krwi Stopień...
  • Seite 114: Zapis Wartości Pomiarowych Do Pamięci, Edycja I Kasowanie

    7. Zapis wartości pomiarowych do pamięci, • Jeżeli zapomnisz wyłączyć urządzenie, wyłączy się ono automatycznie po upływie około 2 minut. edycja i kasowanie • Wyniki każdego, udanego pomiaru z datą i czasem zega- 8. Przenoszenie danych pomiarowych rowym zapisywane są do pamięci. Przy większej ilości wpisów niż...
  • Seite 115: Komunikaty O Błędach/Usuwanie Błędów

    9. Komunikaty o błędach/usuwanie błędów Alarm techniczny — opis W przypadku błędów na wyświetlaczu pojawia się komu- Jeśli zmierzone ciśnienie (skurczowe lub rozkurczowe) prze- nikat kroczy granice określone w sekcji danych technicznych, na Komunikaty o błędzie mogą pojawić się, jeśli wyświetlaczu pojawi się...
  • Seite 116: Dane Techniczne

    11. Dane techniczne Dop. warunki -20 °C do +55 °C, względna wilgotność przechowywania powietrza ≤ 95 %, ciśnienie otoczenia Nr modelu BM 58 800 –1050 hPa Metoda pomiaru Oscylometryczny, nieinwazyjny pomiar Źródło zasilania 4 x baterie AA 1,5 V ciśnienia na ramieniu Trwałość...
  • Seite 117 12. Adapter Nr modelu FW 7575M/EU/6/06 Wejście 100 – 240 V, 50 – 60 Hz Wyjście 6 V DC, 600 mA tylko w połączeniu z ciśnieniomierzami firmy Beurer Producent Friwo Gerätebau GmbH...
  • Seite 118: Electromagnetic Compatibility Information

    Guidance and manufacture’s declaration – electromagnetic emissions The BM 58 is intended for use in the electromagnetic environment specified below. The customer or the user of the BM 58 should assure that it is used in such an environment. Emissions test Compliance Electromagnetic environment –...
  • Seite 119 For all ME EQuIPMENT and ME SYSTEMS Guidance and manufacturer’s declaration – electromagnetic immunity The BM 58 is intended for use in the electromagnetic environment specified below. The customer or the user of the BM 58 should assure that it is used in such an environment.
  • Seite 120 For ME EQuIPMENT and ME SYSTEMS that are not lIFE-SuPPORTING Guidance and manufacturer’s declaration – electromagnetic immunity The BM 58 is intended for use in the electromagnetic environment specified below. The customer or the user of the BM 58 should assure that it is used in such an environment.
  • Seite 121 Recommended separation distances between portable and mobile RF communications equipment and the BM 58 The BM 58 is intended for use in an electromagnetic environment in which radiated RF disturbances are controlled. The customer or the user of the BM 58 can help prevent electromagnetic interference by maintaining a minimum distance between portable and mobile RF communications equipment (transmitters) and the BM 58 as recommended below, according to the maximum output power of the communications equipment.

Inhaltsverzeichnis